We may receive a commission when you use our affiliate links. However, this does not impact our recommendations.
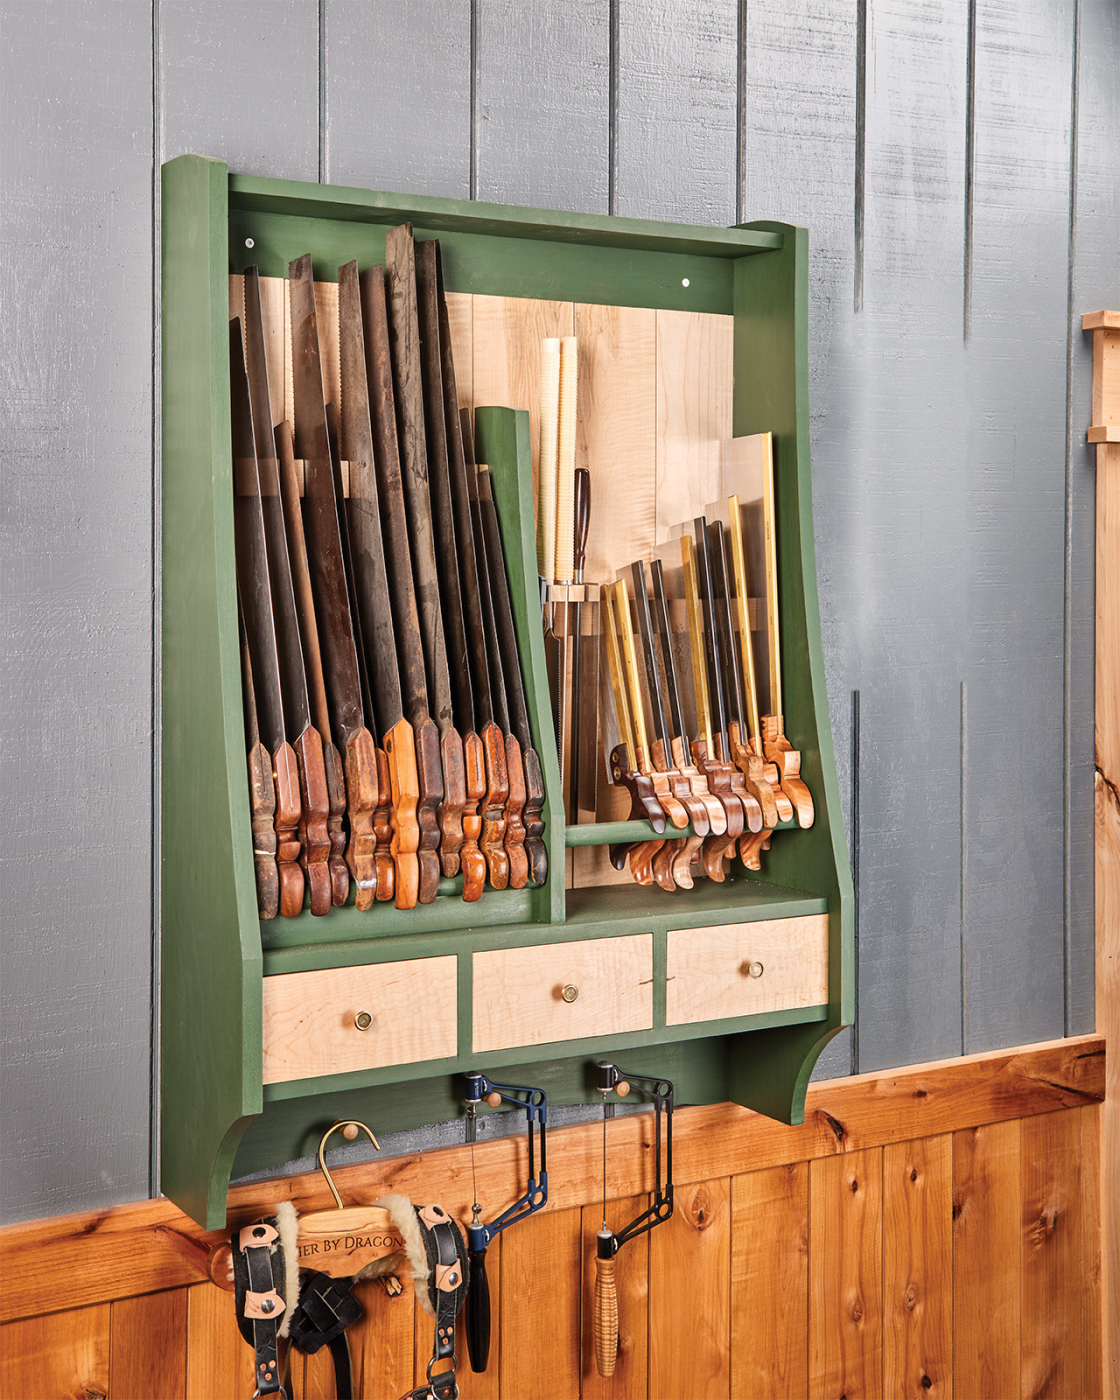 This saw till is a great way to keep your saws organized, protected, and close at hand.
 This saw till is a great way to keep your saws organized, protected, and close at hand.
 Project #2405 • Skill Level: Intermediate • Time: 3 Days • Cost: $150
There is a debate among hand tool woodworkers about saw tills. Officially, there haven’t been any historical accounts of a saw till in an old-time shop. Most of the time, saws would have been hung on a peg on a wall, or in a holder in the back (or lid) of a toolbox. However, I think there’s something beautiful about a well-made hand saw, and I want them out where they can be seen. That, combined with my growing… collection… of hand saws led me to design and build the saw till that you see here.
The design of this till is fairly common. Two sides are connected by some inner framework. I decided to also include a few drawers for saw files, sets, and other random saw-related items. On the ledger board below the drawers, a few pegs offer places to hang items that don’t fit in the till. Coping saws, fret saws, even a bow saw find a home here (and of course, my apron).
Now, I would be remiss if I didn’t mention one facet of this project. Prior to designing and building this till, I was talking about it on our ShopNotes podcast (we do it weekly by the way). A saw maker whom I respect greatly reached out to offer his thoughts on a saw till. In his opinion, the best way to store a saw is hanging by the handle—whether that is from a peg, nail, or some form of holder that is similar to a saw scabbard. The idea being that, in the vertical orientation, the plate is being twisted and torqued.
I agree with Jared’s assessment and input on the saw till. With that said, I could not come up with a design that I liked holding the saws by the handle, letting the saw plate hang down. Maybe I like seeing the saws lined up in an orderly fashion. I know. Throwing logic and professional advise out the window simply for aesthetics. I never have claimed to be a smart man.
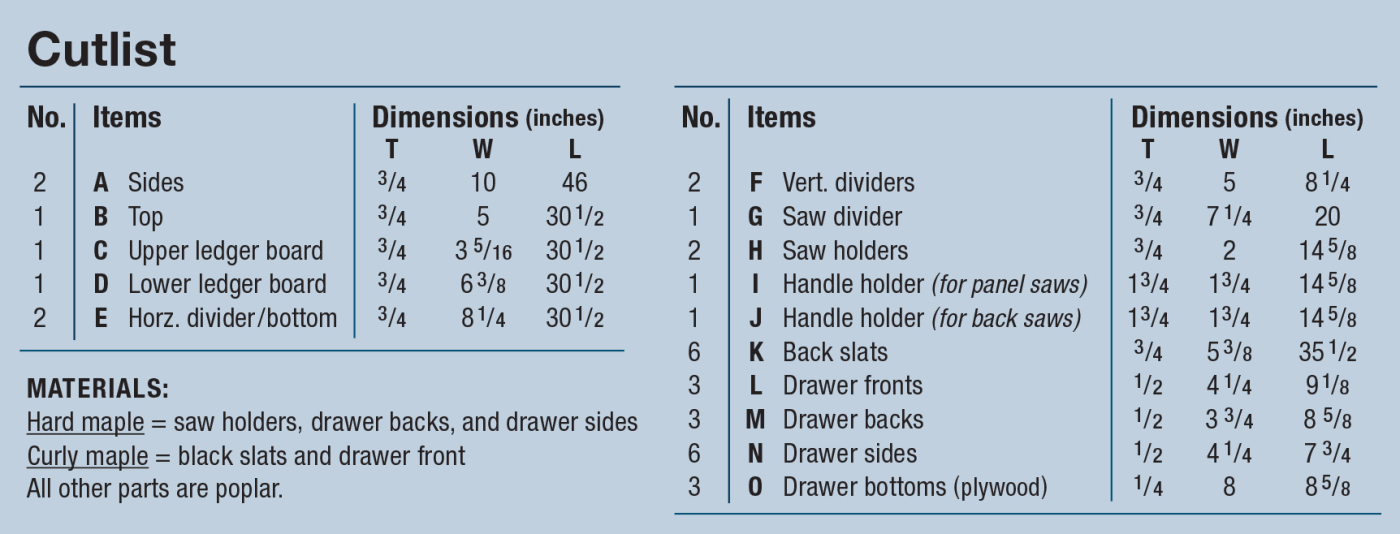
Cutlist and Diagrams
 Start with the Case

 Start with the Case
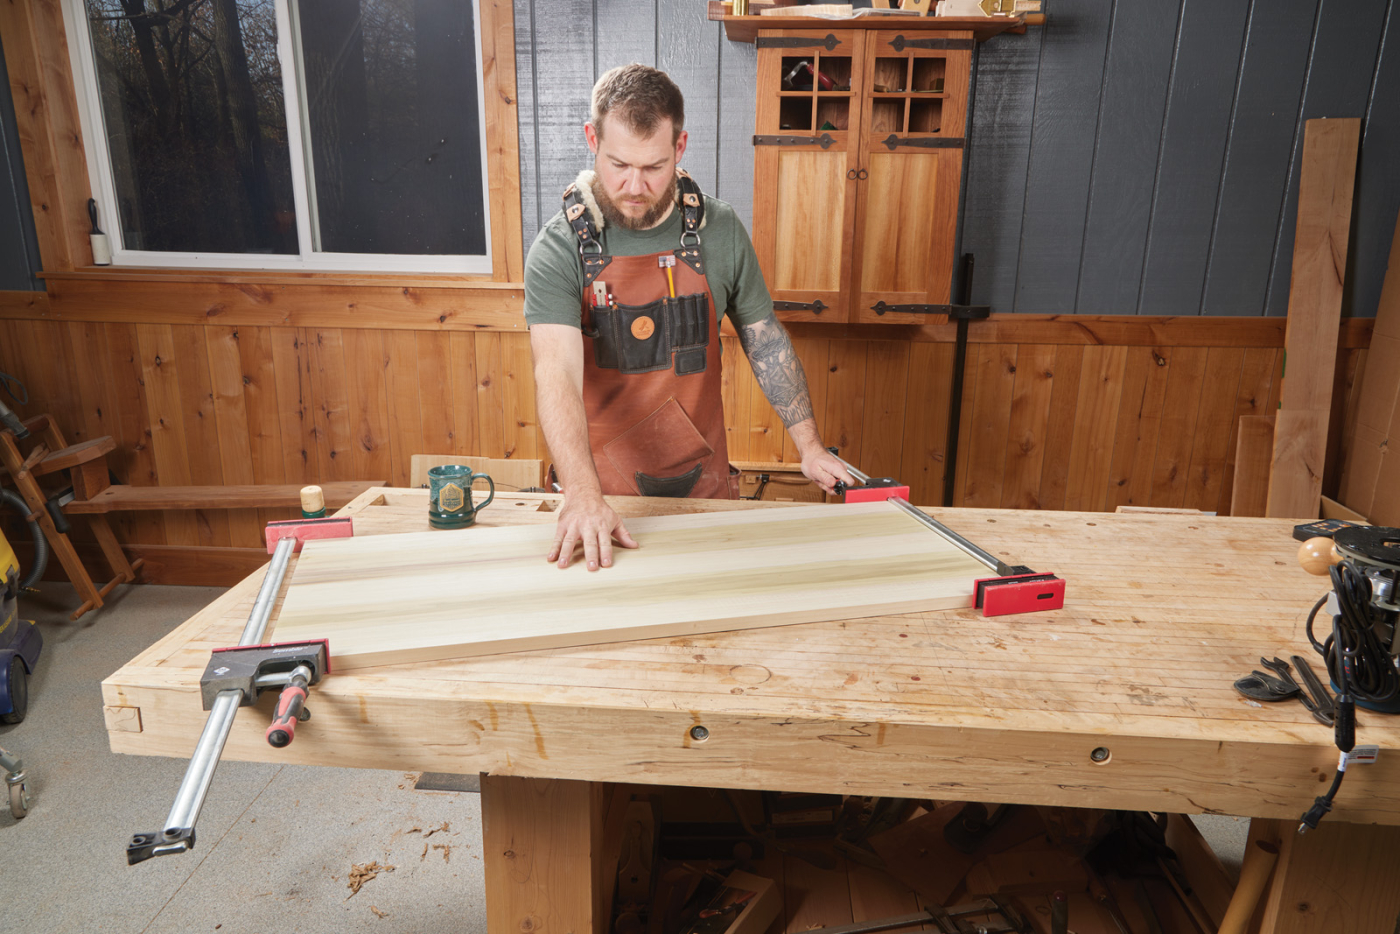
In essence, this saw till is a hanging wall-shelf. A pair of sides are connected by framework that holds the saws. For this till, I wanted to paint it (I’ve been experimenting with linseed paint lately—look for that in an upcoming article). I happened to have some poplar that I knew would paint well, so I grabbed that for the painted portions of the case. I like my shop fixtures to look nice enough to hang in a house, but I would never shame anyone for choosing to make this out of something like pine or plywood. In the shop, function over aesthetics (regardless of my prior comments).
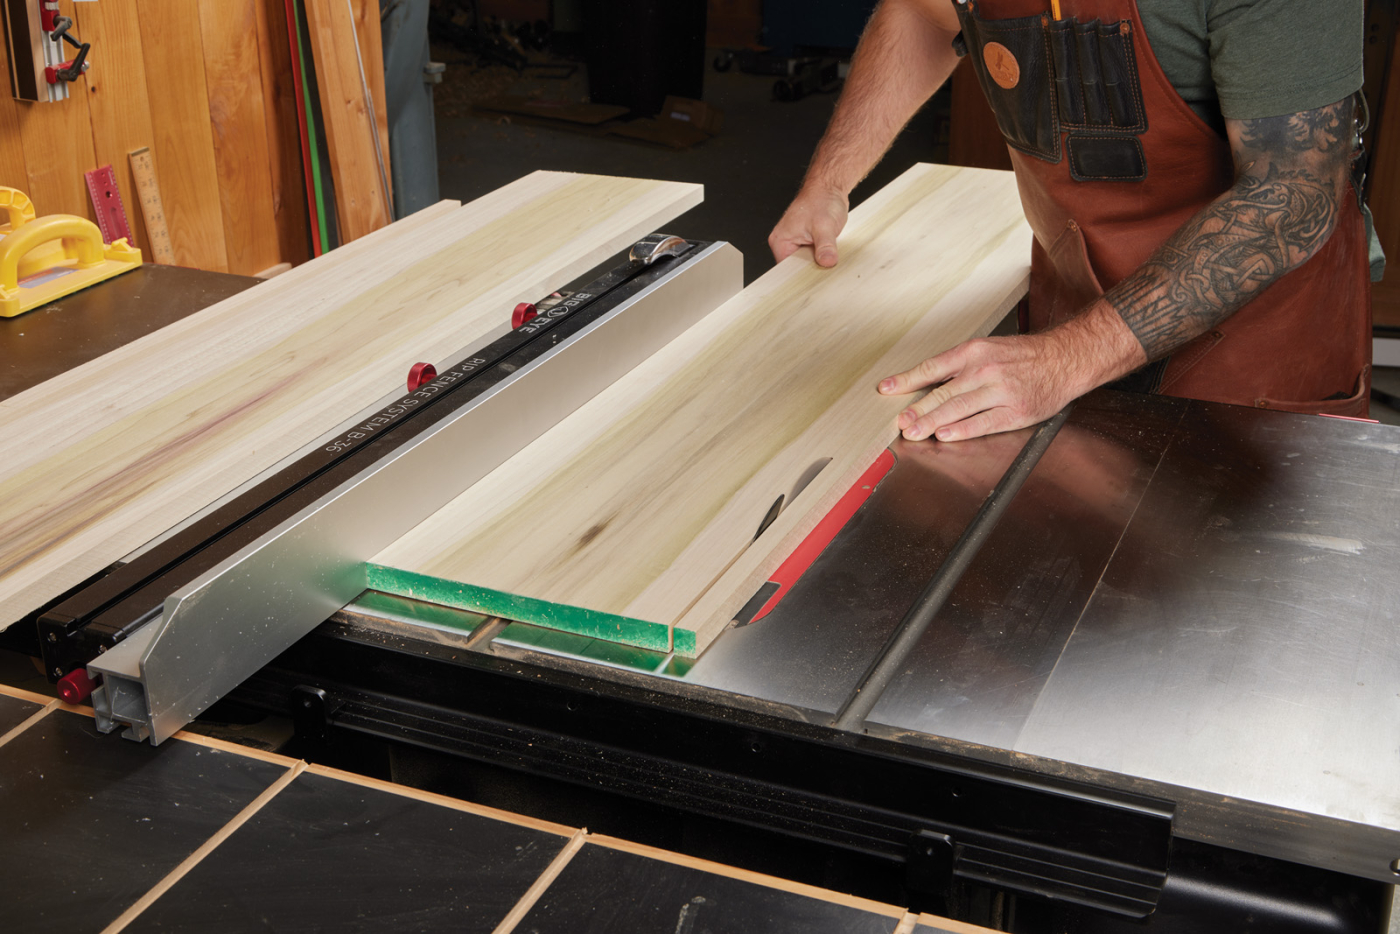

1-2 Start this saw till off by breaking stock down for the sides. Poplar is available in wide boards, but you could glue up stock if you need to.
The sides are made from one wide board, ripped to final width. Even though the top edge of the sides get shaped a bit (and therefore could be left rough), I trimmed down both ends. Starting with workpieces that are square from the get-go just makes everything go a bit smoother in my opinion.

3-4 Clamp the parts together to mark out the dado locations.
The sides are mirror images of each other. For accuracy, I clamp sides like this together and lay out my lines all at once. The inner framework (and top) of the till is attached to the sides with stopped dadoes. After laying out the dado locations (there are three in each side—top, bottom, and divider), it’s time to decide how to cut the dadoes.
The dadoes go through at the back edge, but not at the front. Cutting these dadoes with a router means you can stop them at the correct location and has the benefit of using the part that goes into the dado to set the width—an easy way to get a good fit. The steps I took to cut these dadoes are outlined below in the photos.

5 Double-sided tape applied to the part will hold a pair of fences in place.

6 Sandwich the divider between two fences (which are scrap plywood).

7 A dado clean-out bit (Woodline WL-1007D) follows the plywood fences to rout the stopped dadoes.
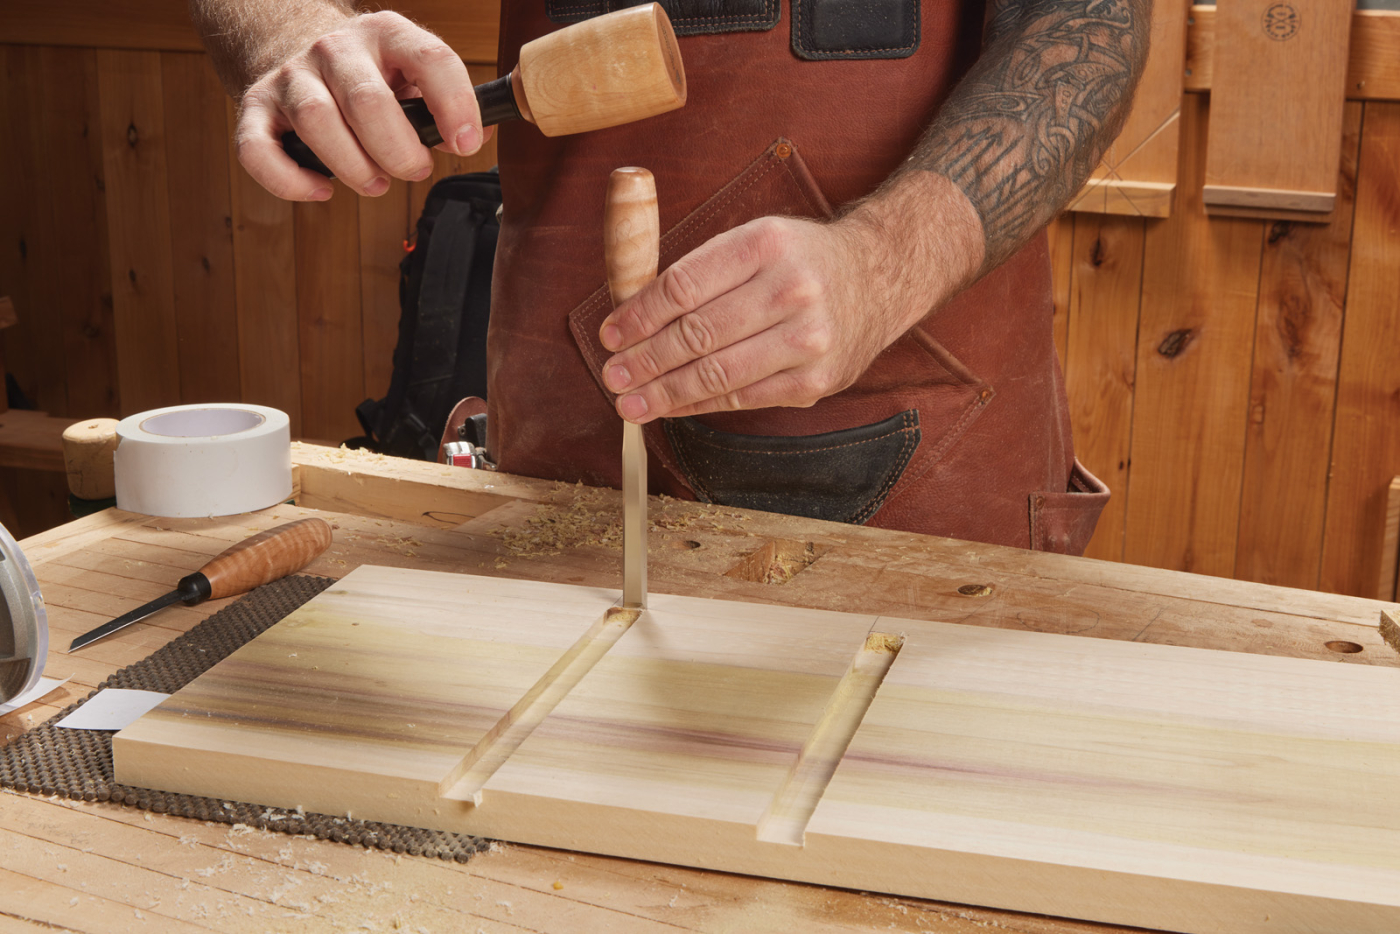

8-9 Chisel the ends square.
Shape the Sides
Now, you can shape the sides of the till. I like the asymmetrical curve that I chose for the sides. It’s actually an intentional curve — the shape is reminiscent of a skew-back saw. I like the poetic-ness of it. I used an asymmetric drawing bow (Photo 10) to come up with the curve, and transfered it to the sides. (I stuck them together with double-sided tape). I also drew a small scoop on the bottom edge. That scoop size isn’t intentional. It happens to be the same radius as a Folgers coffee tin full of rusty nails. (Disclaimer: I don’t know if the radius changes if it’s not full of tetanus).
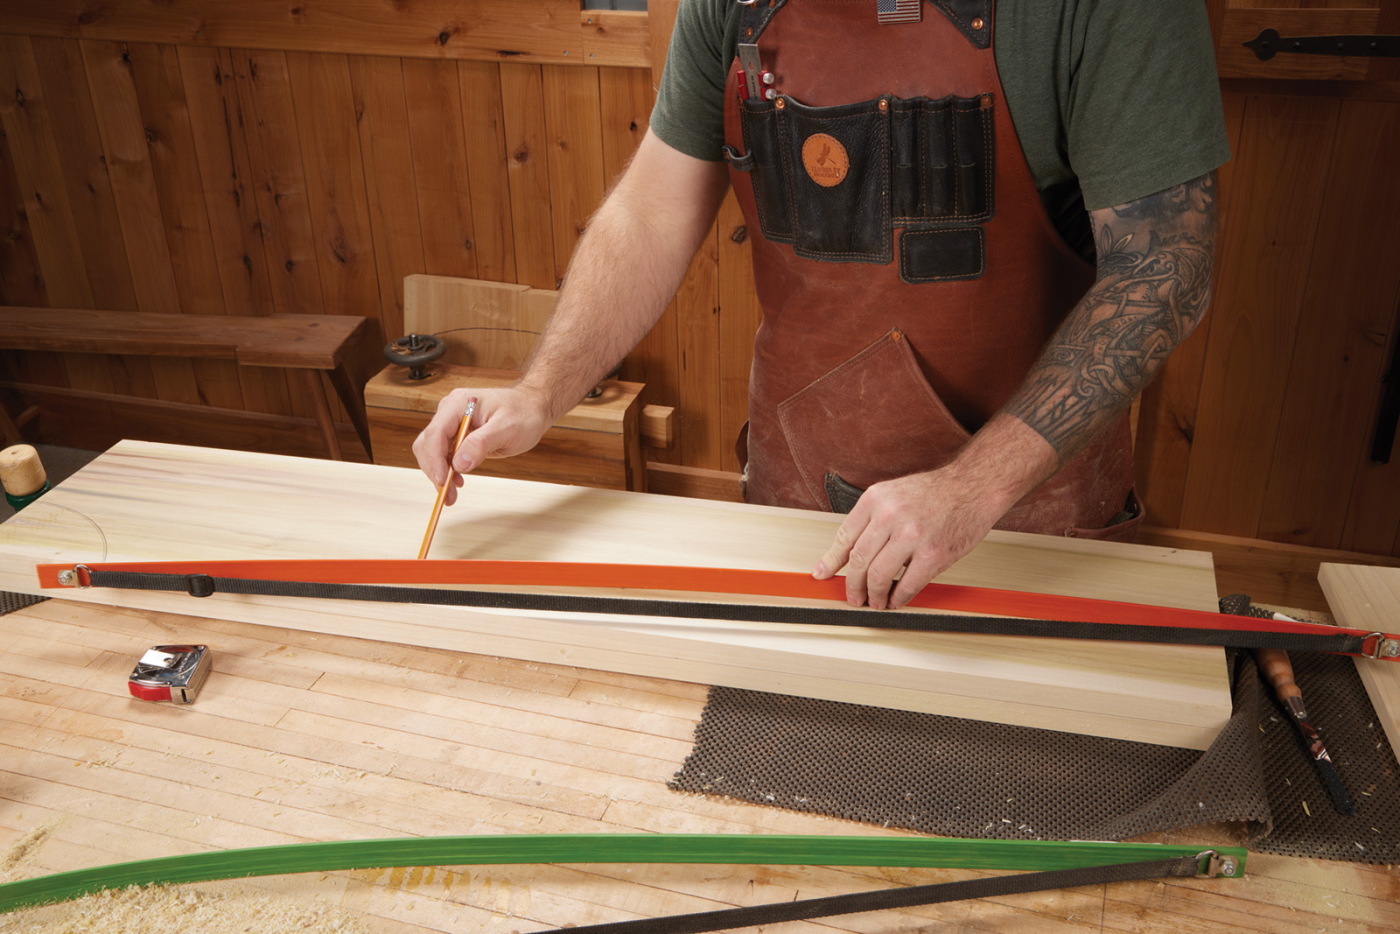

10-11 Lay out lines to shape the sides. The shape doesn’t matter, but just avoid cutting into the stopped dadoes. A drawing bow, such as the one here, helps get smooth curves.
I don’t actually own a bow saw, so cutting this curve is done at the band saw. The shape of the curve isn’t critical, so I trimmed close to the line. Any clean up that needs to happen on this curve can be done with a rasp and sandpaper, or if you own a compass plane, here’s a great place to use that tool before putting it back on the shelf for the next few years.

12 Refine the shape with a compass plane.
The final thing left to do on the sides is to form a rabbet along the back edge. This rabbet will run from the top dado through the bottom edge. The rabbet will capture two parts—the back slats as well as the ledger board. Routing the rabbet is straight forward. I used the same dado clean-out bit as before, but instead of guiding the bearing, I added an edge guide to the router base. You’ll need to make two passes to form the rabbet. Any final cleanup can be done with a router plane.

13 Rout the rabbet using an edge guide.
The Inner-workings
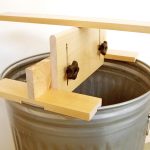
With the sides complete, we can turn our focus to the inner-workings of the saw till. The bottom, a horizontal divider, and two vertical dividers form the majority of this assembly. The assembly will hold the handle rest, as well as a saw divider. Before working on the assembly, I decided to get the handle rest glued up and drying.
As you can see in Photos 14-16 (as well as the drawings at the top of this article), the handle rest is (basically) a rabbeted dowel glued onto a board. Rabbeting a round dowel would be sketchy, so I started with a square blank that I rabbeted with a dado blade (Photo 14). At the router table, I used a roundover bit to form the dowel, leaving the ends square for support. This can be glued up and allowed to cure.

14 Rabbet the square stock at the table saw.

15 Form a dowel with a roundover bit. Test out the set up to make sure you get a completely round dowel, and leave the ends square for support.

16 Glue the holder up.
The horizontal divider as well as the bottom are dadoed. I cut these the same way as before—a pair of fences, sandwiching the workpiece to set the width. Unlike the dadoes in the sides, these are through-dadoes, so I cut them with the workpieces clamped edge-to-edge. Before grabbing the glue bottle, the bottom has a rabbet along the back edge for the ledger board.

17 Spread glue inside the dadoes using a brush.
The vertical dividers are cut to size and glued in place with the divider and bottom (Photo 18). You’ll notice in the photo that the dividers are all the same depth, but the bottom is a little wider. Everything is aligned on the front faces. Because the horizontal divider isn’t full depth, it will allow the back slats to sit behind the divider and be screwed in place.

18 Glue up the divider assembly and allow it to cure.
Saw Divider
With the glue cured, I took a measurement and routed a stopped groove in the top of the assembly. This is for the saw divider—you can see this in place in Photo 19. The saw divider is to break up the cavity of the till into panel saws and back saws. The divider has a similar curve to the sides. At this point, I also decided to curve the top edge of the divider. I liked the look enough that I went back and sanded the same curve into the side panels (you can see that curve in Photo 20).

19 Dry-fit the saw divider and measure the length of the holder.

20 Glue up the till case.
Here’s where real-world building comes in. With the saw divider in place, I was able to play with the position of the handle holder. I used a few of my saws to see where the best position for the holder would be, then routed a groove for it to sit in. Finally, a measurement can be taken for the length of the handle holder and it can be cut to length.
The Big Assembly
Here’s where building something designed from scratch gets really exciting—the first assembly. Here’s where you can really see your design come to life. (It’s also where you realize if you made a design or sizing mistake, but we won’t worry about that).
Nothing crazy is going on with this saw till assembly. The divider assembly you glued up earlier slips in place in the lower stopped dadoes. The top slips into place as well. There are two other pieces to add as well—the first being a top cleat. This cleat seats in the side rabbets, directly below the top and has a rabbet along the bottom edge on the back face. It is screwed into the top from the top face. This cleat will be where we attach the till to the wall.

21 Drive a few screws in each joint.
The second piece to add is a lower ledger board. As you saw in the main photo, the ledger board has a curve cut in it. You could leave it straight—no problem. I liked the little curve to reflect the shapes on the sides. After I had everything glued in place and clamped, I drove a bunch of screws. I’m not too proud of a woodworker to not use screws, at least where they’re appropriate (and where you can fill the screw holes). I tried a new type of screw here (Spax MDF/Hardwood screws). They’re pretty legit—I didn’t pre-drill anything and nothing split. A few screws through each joint is all that’s needed to keep everything tight while the glue cures.
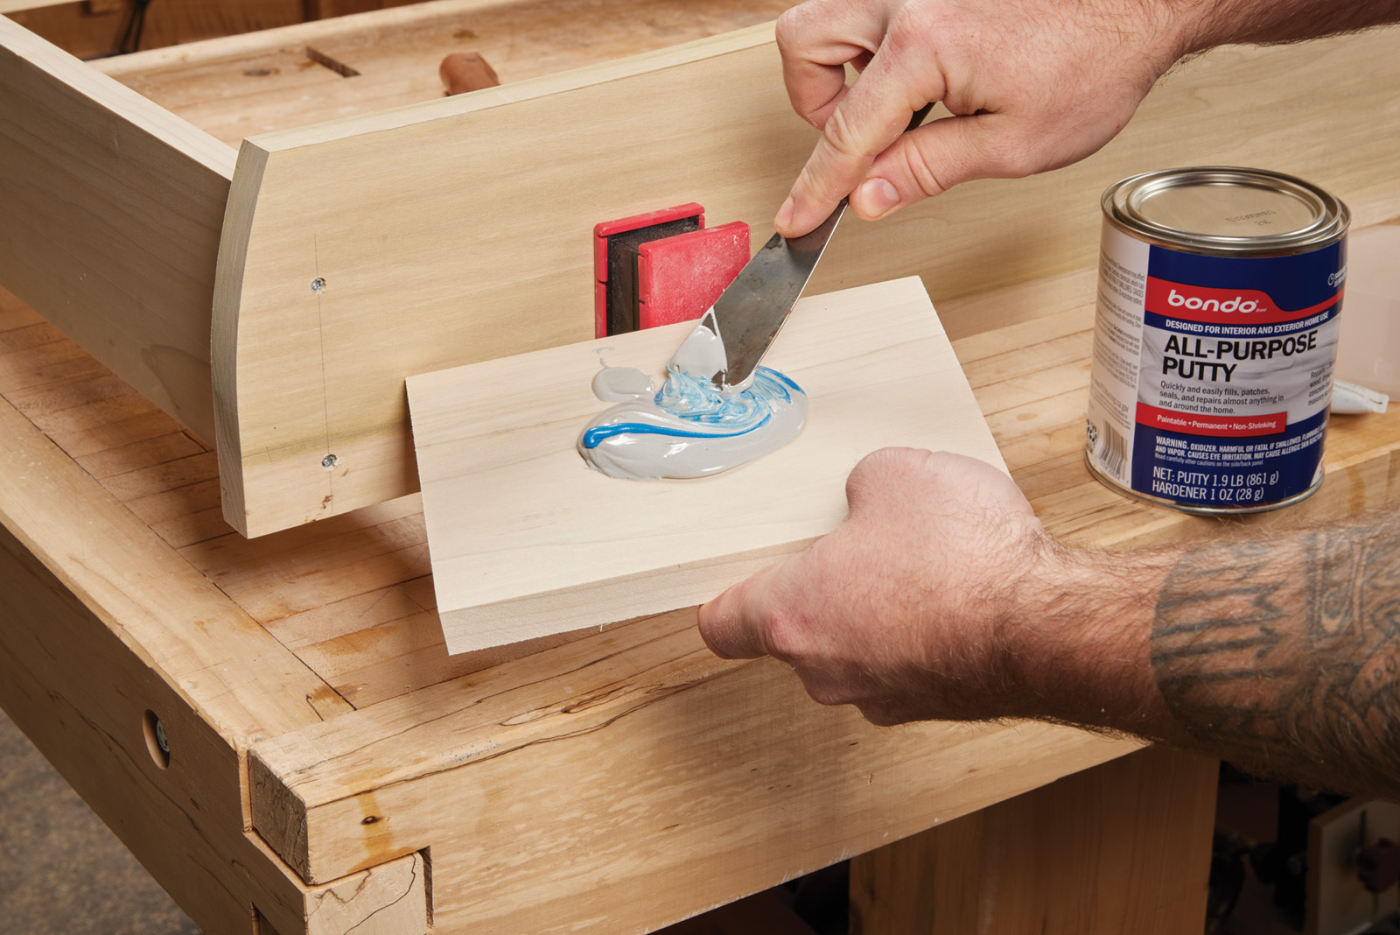

22-23 Mix up the Bondo, a small amount at a time and cover the screw holes. After 15-20 minutes, sand the Bondo flush with the surface.
Covering screw holes can be done many ways. Plugs and filler work, but one of my favorite ways to plug screws is with Bondo. It’s a trick I picked up from my trim carpenters when I built my house. The colored Bondo is easy to see, cures very quickly, sands easily, and it doesn’t shrink as it cures. The blue stuff I used here is sold as “all purpose filler”. The smell and working properties tell me it’s the same as the standard “pink” body Bondo, and I simply paid $5 more for it. (It may actually be different, but I couldn’t tell—see the previous remark about me not being too bright).
Back Saw Holder
Something that I did not realize before building this till is just how different backsaw handles are from panel saws. The handles need to be held several inches higher, due to the length and hang angle of the saw. To deal with this, I chose to use a dowel as my handle holder for the backsaw side of the till. Holding my saws in place, I eyeballed where the dowel should go, and made a template to help position the Forstner bit. The template is aligned with the front edge of the horizontal divider, not the front edge of the side. After clamping it in place, I could drill the hole in both the side and the saw divider. This hole only goes in a bit— don’t poke through the outside. Now, the dowel and saw divider can be glued in place.

24 A template helps position the Forstner bit.

25 Glue the dowel and tip the saw divider (with glue) into its dado.
A Fancy Back
I’m going to be a little pompous now. I really like the look of a fancy wood (in this case, some curly maple) with a painted case. So, curly maple back slats and drawer fronts it is.
The back is a ship-lap back. This allows the back slats to expand and contract as needed. To create the ship-lap, I used a dado blade buried in an auxiliary fence and cut a rabbet on opposite faces on each edge (see Photo 26). Push pads help keep a consistent downward pressure on the workpiece to ensure a full-depth rabbet.


26-27 Rabbet the edges of the back slats, as well as the top, front face of each slat.
The top edge of each back slat has a rabbet along it. This will seat in the rabbet on the top cleat. Cutting this is done with the same setup, but using a miter gauge to guide the workpiece. To make the inside look neat and tidy, I chamfered the edges where the slats meet—simply count the number of swipes along each edge (mine was 6 swipes). Before screwing them in place, I finished them with a thin coat of shellac followed by Danish oil.

28 Chamfer the edges for a clean look.
Attaching them to the back is done with screws. The biggest thing is to only attach one edge, allowing room for movement. As you see in Photo 29, I attached only the right hand corner of each slat. The next slat holds the previous one down. A few washers, in the rabbet, space out the slats creating breathing room.

29 Space out the slats and screw them in place. Using a pair of screws on the same edge of each slat will allow the “wild side” to expand and
contract as needed.
The Drawers
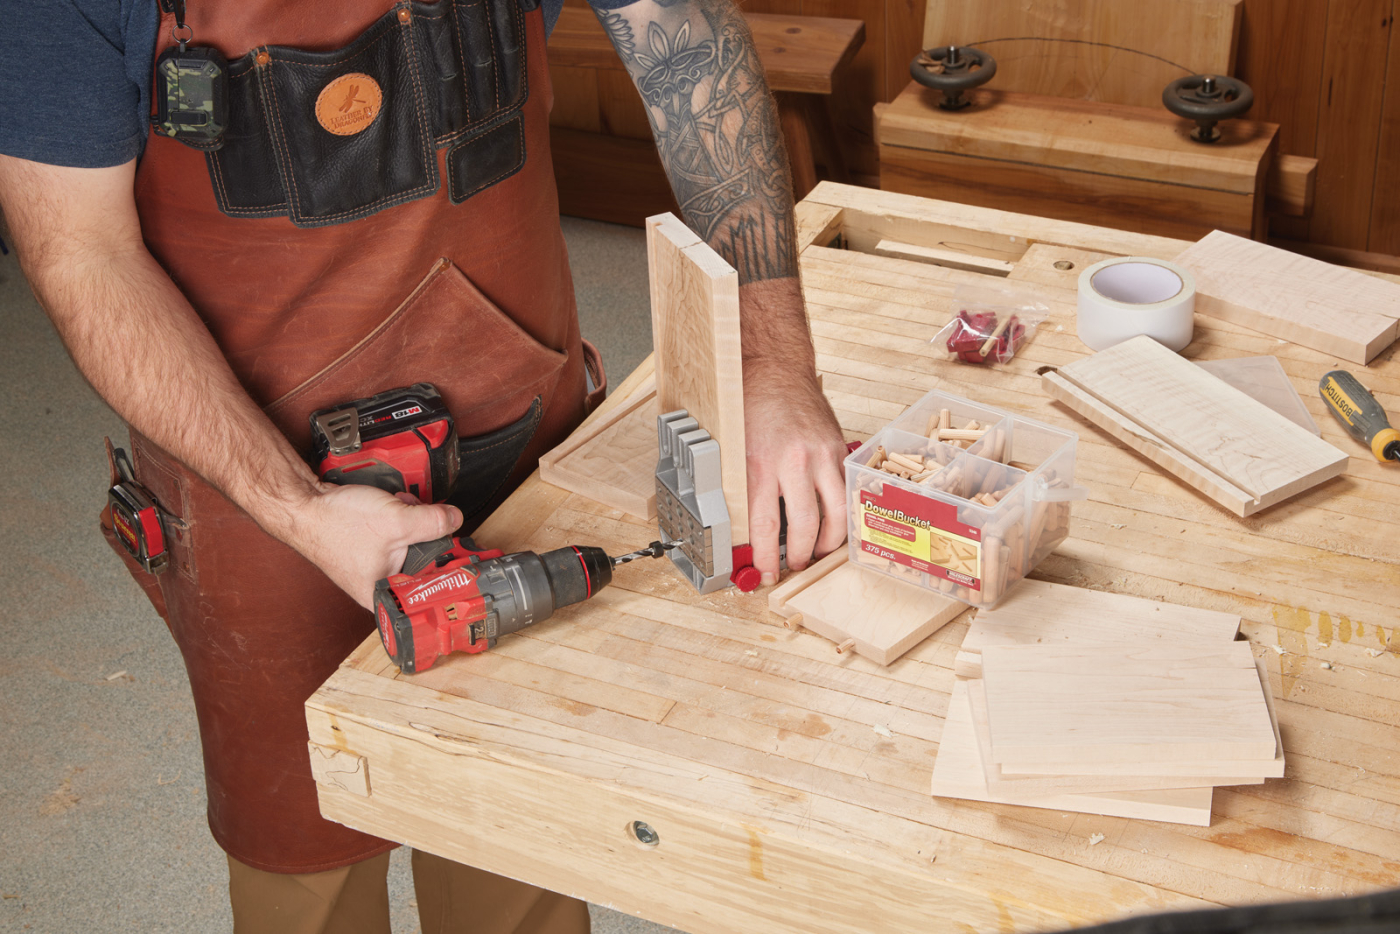
Good-looking drawers don’t need to be complicated. Not every fancy drawer needs to be dovetailed. For these drawers, I used dowels to hold them together. Dowels into the front and sides will be plenty strong for what these drawers will hold. To be honest, I received a Milescraft Joint Master doweling jig for Christmas and wanted to try it out. For what it is, it’s much more versatile than the self-centering style of doweling jig. It gets an A+ from me.

30 Cut a groove in all of the drawer parts for the bottom panel.

31-32 Drill the dowel holes in the edge of the sides, and faces of the fronts.
After gluing up the drawers, I slipped the bottoms in place. You can see in Photo 33 that I left the back shorter than the other parts. This allows the back to slide into the groove and get installed with one screw. Then, it’s easy to replace the bottom at a later point if necessary.

33 Slip in the bottom and install a screw to hold it in place.
Pulls for the drawers were a thorn in my side. Everything at the hardware store was much too large —the drawers needed a bit smaller pull, but I didn’t want to wait on one to get shipped. That’s when I remembered I had a “spare parts tray” that contained a few saw nuts and medallions… so, the pulls for my drawers are saw medallions. Once again—poetic and pompous. You can order your own pulls, or buy saw medallions on eBay.
Saw Holder
The final part to put together is a saw holder. This captures the blade and keeps them from tipping. I simply spaced out marks on a block of hard maple, and made kerfs at the table saw using a thin-kerf blade (see photo 34)A pair of these are needed—one for each side. To install them, I simply screwed them in from the back using a pan-head screw and oversized holes (so the back can continue to move).

34 A thin-kerf blade makes nearly a perfect slot for even the heaviest-set saw plates.
Here’s where you may need to start to customize some of these saw holders. I have several pull-style saws and gent’s saws. To hang these, I cut wider slots in a small shelf and screwed it in place on top of the backsaw blade holder. You can see these in the main photo. The final detail is to decide if you want pegs on the ledger board. I turned 3 shaker style pegs from offcuts of the curly maple. The perfect spot to hang some specialty saws. Hanging the till can be done with cabinet screws through the top cleat.
Here are some supplies and tools we find essential in our everyday work around the shop. We may receive a commission from sales referred by our links; however, we have carefully selected these products for their usefulness and quality.