


We may receive a commission when you use our affiliate links. However, this does not impact our recommendations.
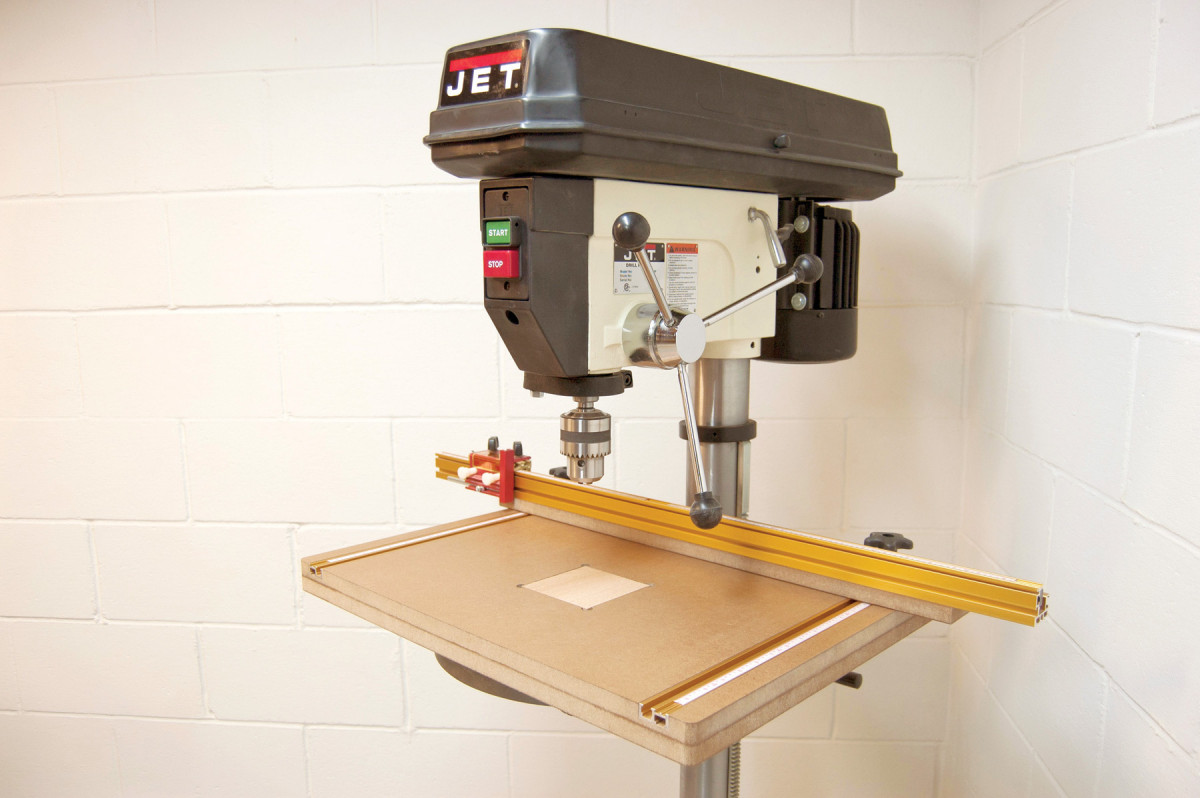
For accurate drilling, build an engineered table.
Did you know that most drill press tables are made for metalworking?
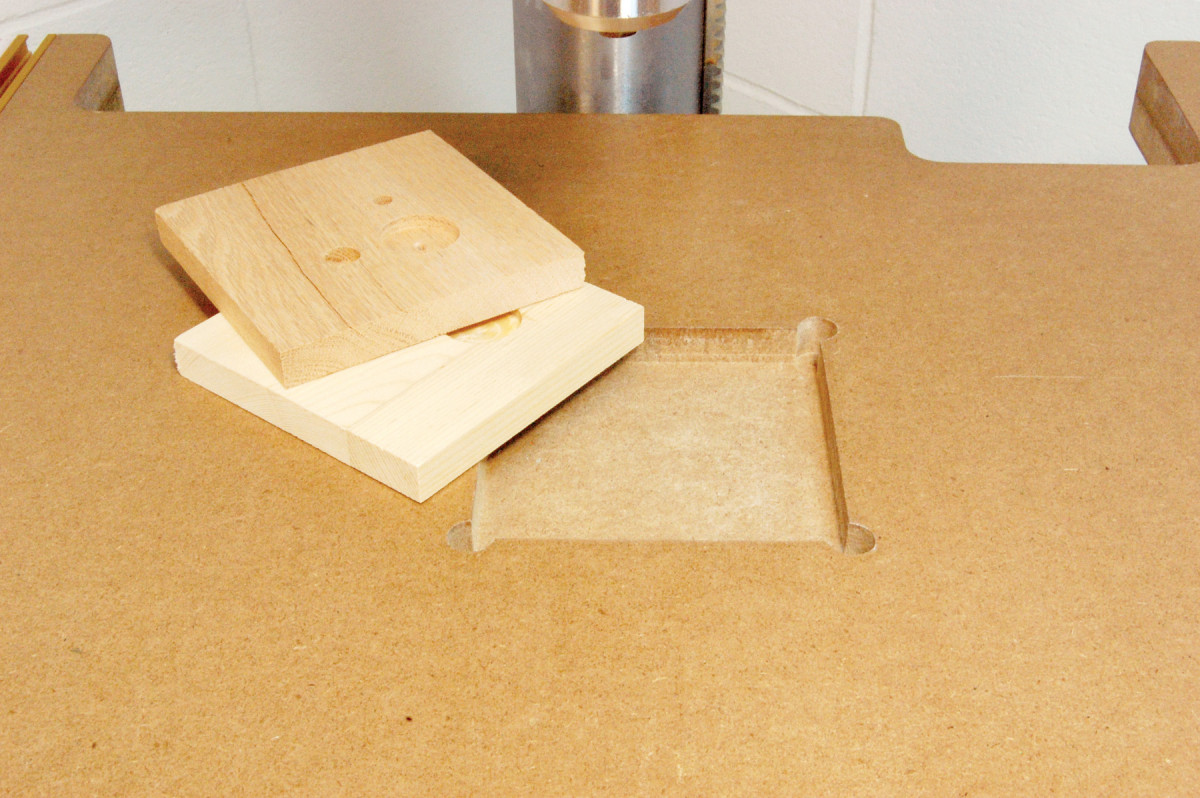
Sacrificial inserts. Make a bunch to prevent blowout when you drill through a workpiece.
Woodworkers need a better table: it should have a broad surface, an easily adjustable fence with a stop, hold-downs, and replaceable inserts.
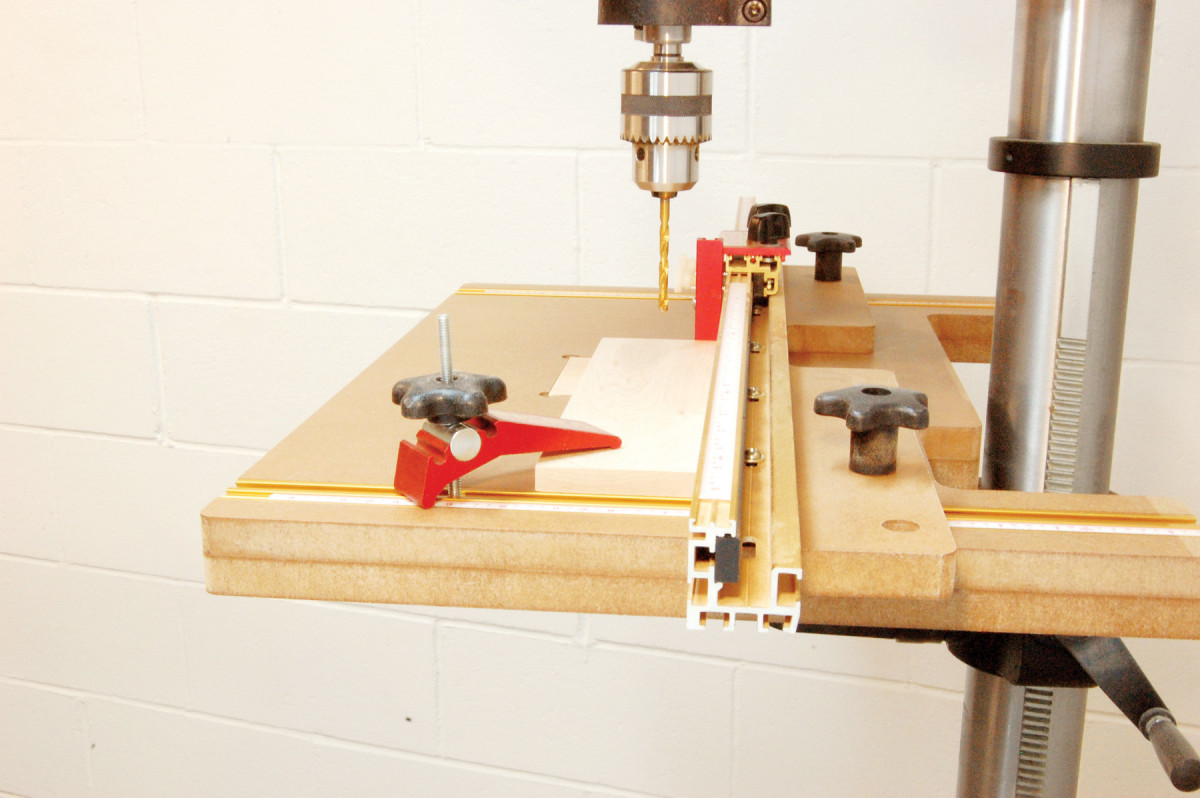
Hold-down clamps. The T-track is mounted so securely that you can use very strong clamps.
I’ve studied many plans for a table with these features, but each one seems to have a shortcoming.
Deep capacity. The table’s design allows you to clamp the fence all the way back.
I’ve taken all of their best qualities and come up with a table that should satisfy all your needs. It uses two types of Incra track—which I like a lot—but other kinds of T-track would work well, too.
Make the table
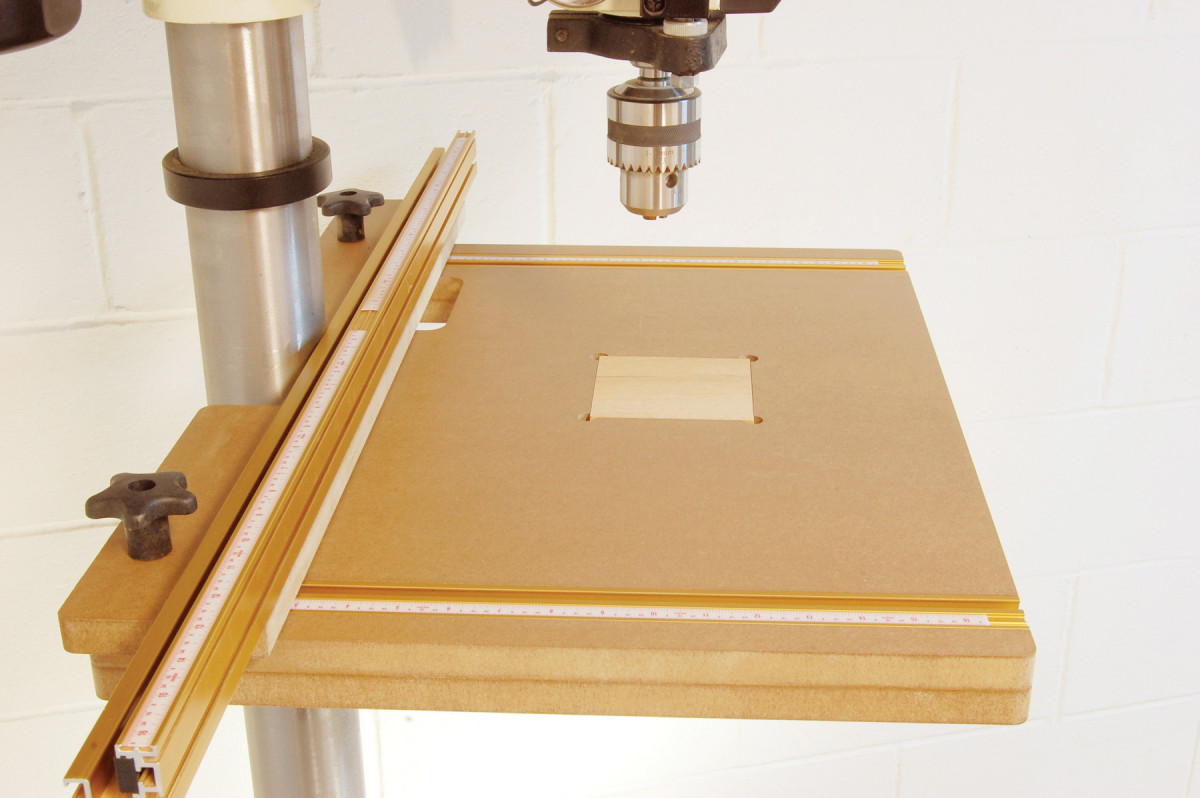
The table is laminated from two layers of 3/4″ MDF. Cut the upper piece (A, in diagram below) to exact size; cut the lower piece (B) about 1/4″ oversize. Make a large notch on the rear of the upper piece (Fig. B). (The deep section allows clearance for turning the table-height adjustment crank.) First, drill holes to make internal corners, then cut the notch with a jigsaw. Cut out the same notch on the lower piece, but make this notch about 1/8″ smaller. Round the outside corners of the top piece using a template and flush-trim bit or a file and sandpaper.
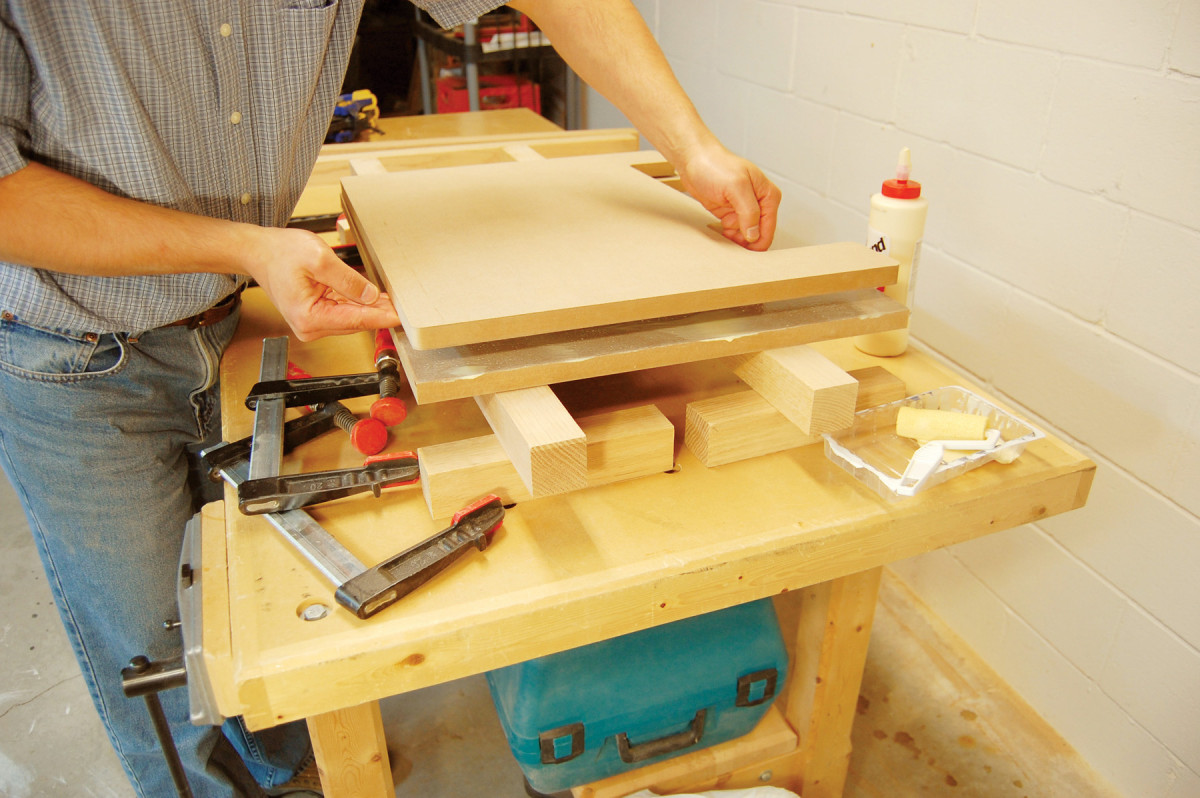
1. Glue two pieces of 3/4″ MDF face-to-face to make the table. Use cauls above and below to distribute clamping pressure.
Glue the upper and lower pieces together (Photo 1). After the glue dries, rout all around the table with a flush trim bit to even up the edges of the two pieces.
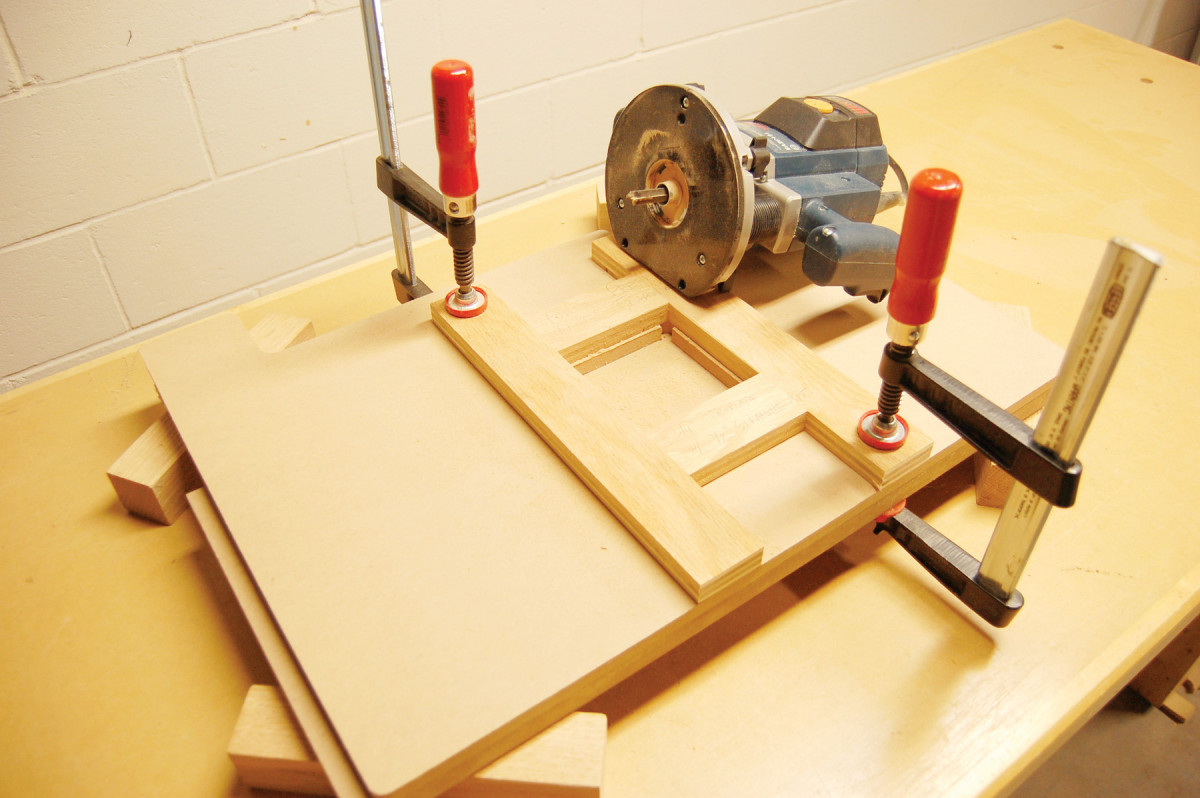
2. Rout a recess into the top of the table for holding the inserts. Make a square template and install a template guide and straight bit in your router.
Build a template for routing the recess for the sacrificial inserts (Fig. C). Glue the template’s pieces around a square piece of plywood, then fasten them together with screws. Install a template guide and straight bit in your router and make a test recess in a scrap piece of MDF. (This is a good time to plan ahead: If your inserts will be made from a supply of 1/2″ or 3/4″ sheetstock, adjust your router’s depth of cut to match this material’s thickness.) The test cut will give you the exact size of the recess. Back on the real table, draw the recess (Fig. B) and drill holes at each corner. (These holes will allow you to easily remove an insert.) Position the template over the holes and rout the recess (Photo 2).

3. Cut grooves to hold the T-track. Drill a few holes through the grooves, then insert 1/4″ cap screws through the holes.
Using a dado set, cut grooves in the table for the T-track (Photo 3). On the bottom of the table, carefully lay out the holes for the screws that will fasten the T-track in place (Fig. F). Use a Forstner bit to drill the large diameter portion of the holes first, then finish drilling the holes using a smaller bit. (The heads of these screws are recessed so the table will have a smooth bottom. This makes it easier to clamp a workpiece to the table.)
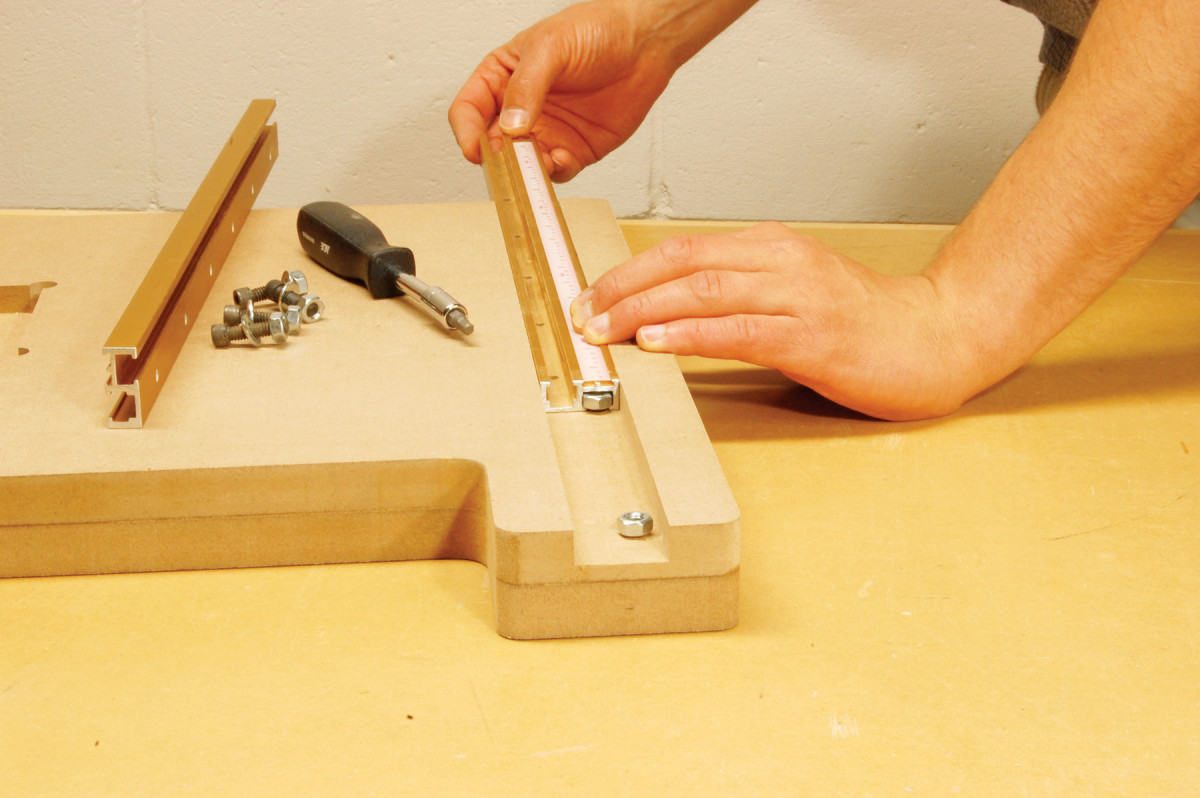
4. Slide the T-track over nuts that are attached to the ends of the cap screws. Tighten the screws from underneath the table. This T-track is never coming loose!
Install the screws and washers through the holes, then loosely attach the nuts. Slide the T-track over the nuts (Photo 4). Once the T-track is positioned, tighten the screws from underneath. This extra-strong fastening system prevents the upward force of the hold-down clamps from yanking the T-track out of the table.
Precision Drill Press Table Cut List
Overall Dimensions: 1-1/2″ Th x 24″ W x 18″ D
|
Part |
Name |
Qty. |
Th x W x L |
|
A |
Upper table |
1 |
3/4″ x 24″ x 18″ |
|
B |
Lower table |
1 |
3/4″ x 24-1/4″ x 18-1/4″ |
|
C |
Fence base |
1 |
3/4″ x 4″ x 26″ |
|
D |
Insert |
1/2″ x 4″ x 4″ |

Fig. A) Exploded View

Fig. B) Plan View of Table

Fig. C) Insert Routing Template

Fig. D) Plan View of Fence

Fig. E) Side View of Fence

Fig. F) T-track Mounting Detail
Fence and inserts
Make the fence by cutting the base (C) to size. Cut a notch in the base so it can clear the drill press column (Fig. D). You could screw a wooden fence to the base; I chose an Incra fence because it has a scale and built-in T-tracks for holding a stop block.
Drill holes for the bolts that will clamp the base to the table’s T-track. Drill holes for the threaded inserts that hold the Incra fence (Fig. E). Install the inserts and the fence.
Make a large supply of inserts to fit the recess in the table. Set aside one insert and draw crosshairs on it indicating where the center of the table will be (Fig. B).
Install the table
Install a small bit in the chuck of your drill press. Position the new table under the chuck, aligning the bit with the crosshairs you drew on the insert. Underneath the cast-iron table of the drill press, trace the outline of the mounting holes with a pencil.
The strongest way to fasten the wood table to the cast-iron table is by using 1/4 – 20 bolts, fender washers and threaded inserts. (MDF doesn’t hold screws very well.) Turn the wooden table over and drill holes in it as far apart as possible for the threaded inserts. Avoid drilling into the sacrifical-insert recess. Install the threaded inserts and mount the table. Add the fence and you’re ready to go!
Shopping List
• 8 socket-head cap screws, 1/4-20 x 1″
• 10 washers, 1/4″
• 8 nuts, 1/4-20
• 2 hex-head bolts, 1/4-20 x 1-1/2″
• 6 threaded inserts, 10-24
• 6 round-head machine screws, 10-24 x 3/4″ and washers
• 2 star knobs with 1/4-20 inserts
• 4 threaded inserts, 1/4-20
• 4 hex-head bolts, 1/4-20 x 1″ and fender washers
SOURCES
Here are some supplies and tools we find essential in our everyday work around the shop. We may receive a commission from sales referred by our links; however, we have carefully selected these products for their usefulness and quality.


Hi Popular,
Terrific instructions on the precision drill press table. However, the “install the table” is hard to follow. The Jet steel table has to intersecting groves designed for flat head bolts, I guess. The top of the bolt, nut and washer needs to be recessed into the table top — you don’t know that. Can you help? Thanks, Fred Healey fdhealey@gmail.com
There is an alternative to the two knob fence that is common on these tables that I think is better. The two tracks restrict movement of the fence to one dimension: forward and back. Since a drill creates a point, an angled fence is just as good as one that is square to the table. The t-track and knob on the left side can do double duty by acting as a pivot point as well as locking the fence to the table. Using a clamp to lock the fence to the edge of the table on the other side allows for rotation of the fence. With this setup only one side needs to be loosened for fine adjustments and you get greater precision since moving the clamp position a distance of x moves the drilled hole less then x/2.