We may receive a commission when you use our affiliate links. However, this does not impact our recommendations.
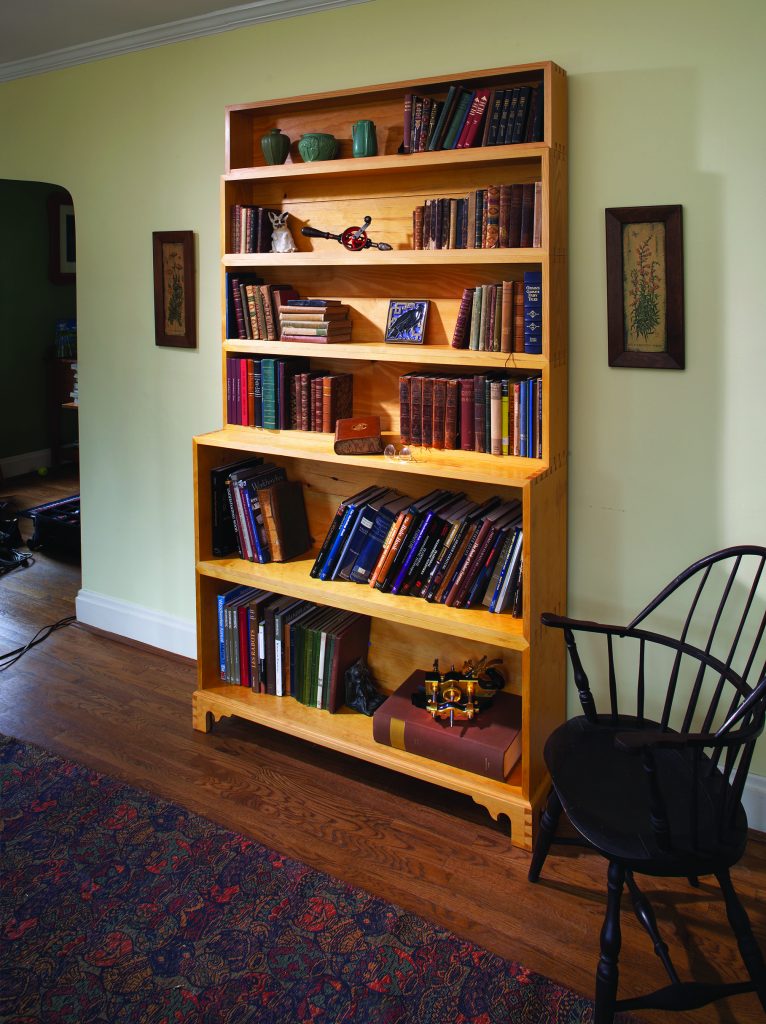
Thomas Jefferson’s book boxes became the foundation of the Library of Congress.
I like to think of Thomas Jefferson’s personal library as America’s first “bookmobile.”
When the British burned down the nation’s capitol in 1814, the inferno took with it many of the books owned by the government of our young nation. Lucky for us, Jefferson had a personal library of about 6,700 books – an astonishing accomplishment for the time.
And after some negotiations, Jefferson agreed to cede his entire library at Monticello to Congress for the sum of $23,950. The question was, how to transport 6,700 books from Virginia north to Washington, D.C., with horse-drawn wagons.
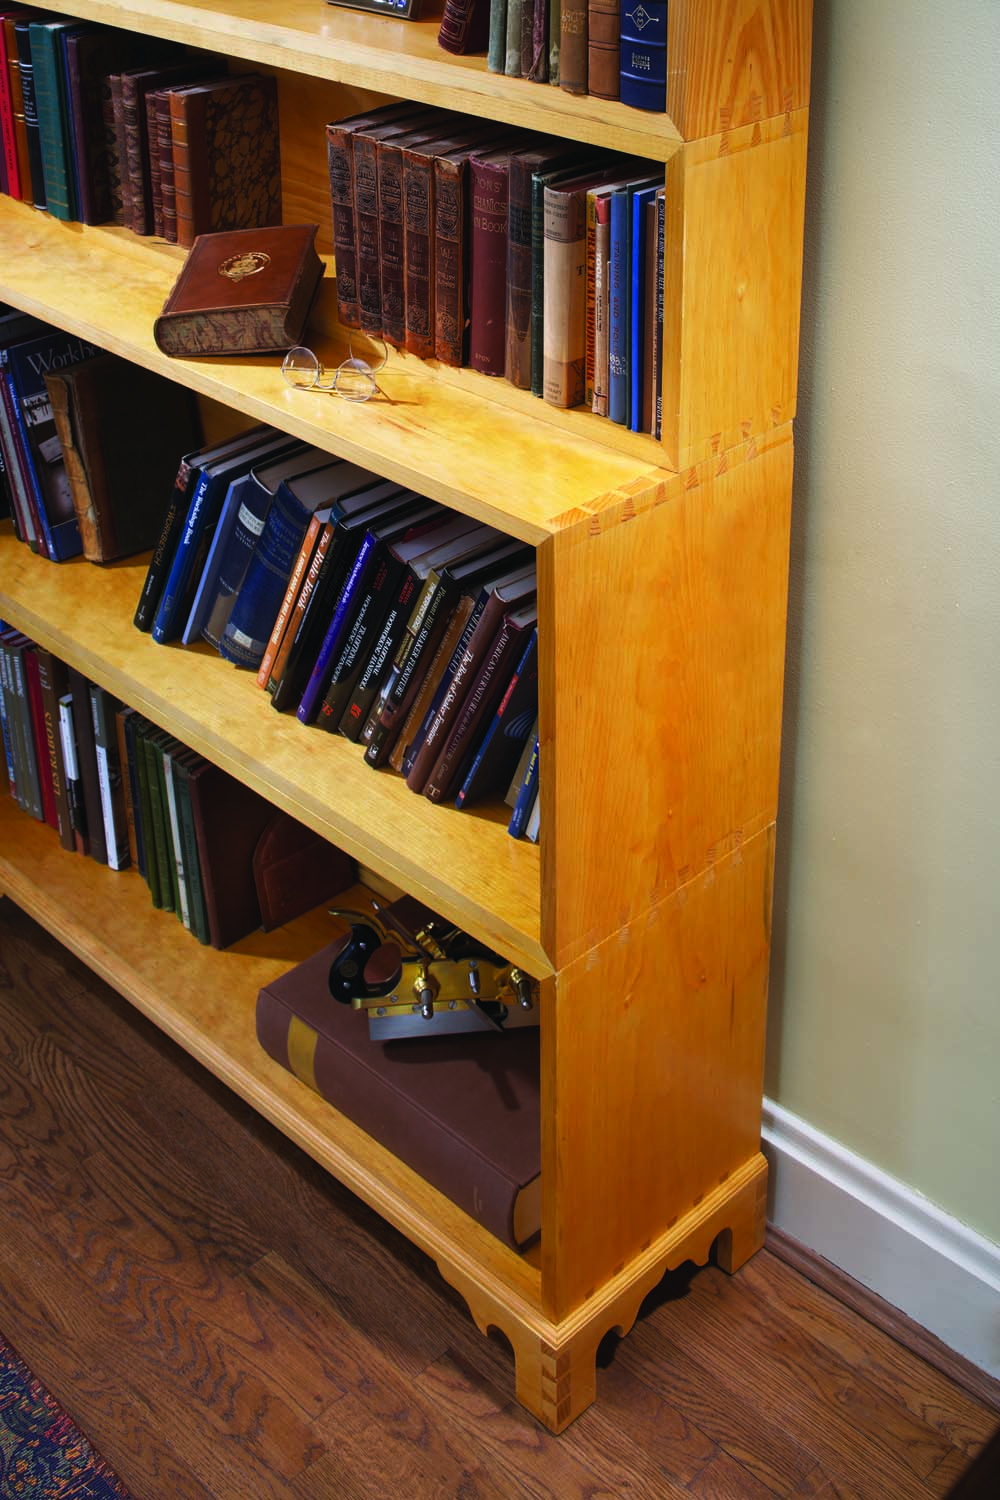
Stacked to move. This modular system of stacking book boxes allowed Thomas Jefferson to easily expand and move his enormous library.
Lucky for us, Jefferson was a clever man. He stored his precious library in pine boxes that were designed specifically to travel. While it isn’t known if Jefferson designed the book boxes (or “book presses” as they are sometimes called), they do bear the mark of his cleverness.
For when the day came to transport this massive chunk of knowledge, the process was straightforward. Scrap paper was stuffed among the books to protect them, then a lid was nailed over the front of each unit and it was loaded onto a wagon and carted to Washington.
Jefferson’s collection of books (which continues to make headlines even today) was the foundation for our Library of Congress. His method for organizing his books (memory, reason and imagination) pushed us into a more modern classification system. Until that time it was common to organize books by height or color.
But What About the Boxes?

The designer? While we might never know if Thomas Jefferson designed these book boxes, he designed many clever devices at Monticello.
While a good deal is known about the books in Jefferson’s collection that he sold to Congress, far less is known about the stackable boxes that he used to store his library at Monticello. By examining the written records, officials at Monticello built six bookcases for the museum in 1959 that are a good guess at what would have housed Jefferson’s library (though he could have had as many as 20 of these units, if you do the math).
Since the day I started woodworking, I have been concerned about amassing information on the craft. For me, the written word enhances my personal experience in the shop, and it is a way to stay in touch with the craft while I am on the road, in bed or sitting on the couch.
As my library got out of hand sometime about 2005, I decided I needed to build something to store all my woodworking books. I also wanted something that would allow them to be easily transported when my wife and I leave our house after the kids are off to college, and we launch the next phase of our lives.
And so I became interested in Jefferson’s book boxes. I read the original letters that describe how the books were transported. I used the standard measurements for books of the day to help fill in the blanks when it came to designing the three different case sizes Jefferson describes in his correspondence.
Oh, and what was the joinery on these boxes? Who knows. Perhaps the boxes were nailed together, as there were as many as 150 individual book boxes to hold the nearly 6,700 books. But I prefer to think that our third president, who was familiar with the principles of joinery, would insist on something more substantial.
And so, despite the fact that no surviving examples of these book boxes exist, I built each of these units using through-dovetails with mitered shoulders at the corners. The backs are shiplapped and nailed on to the carcases. This approach to building a box is typical for the time, and I bet that my modern book boxes would easily survive a wagon journey from Monticello to Washington, D.C.
A Discussion of Sizes
After researching Jefferson’s book boxes and the history of 18th-century publishing, I found that these original book boxes would not be as friendly to the modern library. The largest book box is taller than necessary, and the smaller two boxes are shallower than necessary for some modern titles that are squat. But I decided to build my book boxes to suit old books – you can alter yours as you see fit.
Here are the old dimensions. Jefferson said the bottom cases were 13″ deep, the middle cases were 63⁄4” deep and the top cases 53⁄4” deep. As to the heights, we can turn to the standard sizes of books at the time (according to the American Library Association). The lower cases were designed to hold “quartos” and “folios.” A folio is 15″ high x 12″ deep. A quarto is 12″ high x 91⁄2” deep (the typical size of a modern woodworking book).
The middle cases were designed for “octavos,” which are 9″ high x 6″ deep. The top cases were for “duodecimos,” which are 73⁄8” high x 5″ deep.
So I designed the three different book boxes around these three sizes. As I mentioned above, the lower cases are a little taller than necessary, and the middle cases are a little shallow. But it actually works, and I like the way the boxes step gracefully up my wall.
About the Joinery
I chose to use through-dovetails with mitered shoulders at the corners. This was the same joint the joiners at Monticello used in the 1959 reproductions of the book boxes. I like this joint because it dresses up the front edge of each box with a miter. Also, it is strong and easy to make. Yes, you read that right: easy to make.
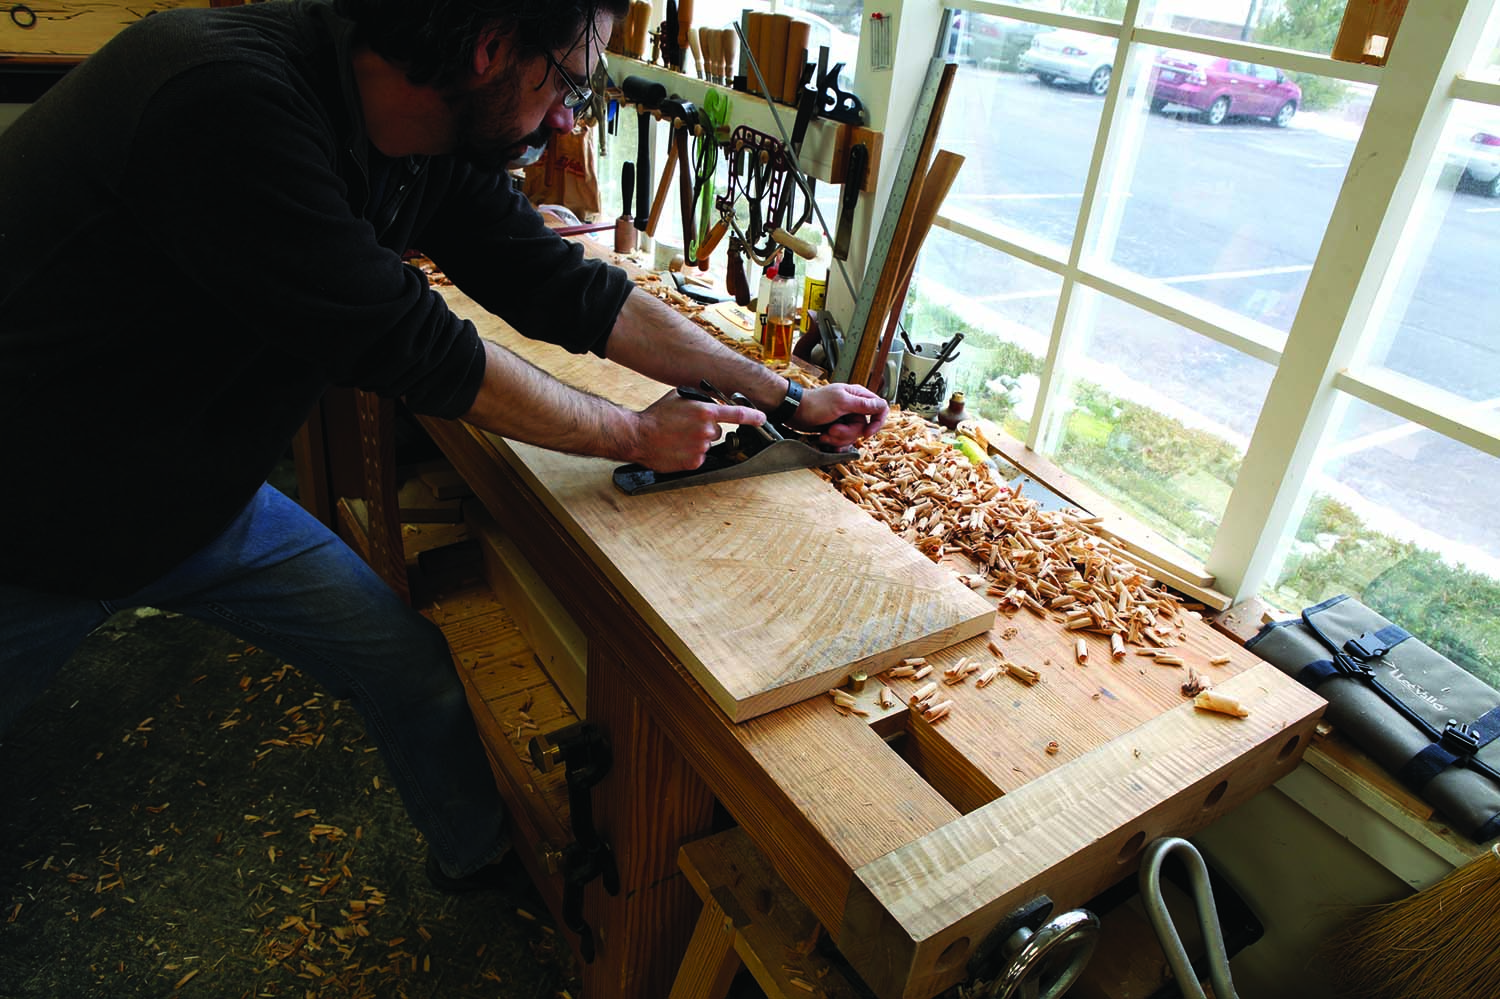
Worth the effort. I dressed the concave face of my wide boards with my jack plane then ran them through my powered planer. By jacking one face before planing the other, I avoided having to rip the boards down and re-glue them.
You might be wondering if you can cut a mitered through-dovetail joint. The answer is: Yes. It is as easy as a regular through-dovetail, once you let go of your fear of miters and cut the joint freehand and use the joint’s natural compression to help you fit it so it’s airtight. Of the 24 mitered dovetails in this project, only one is less than airtight. And it was the first one I cut.
The rest of the joinery for these boxes is cake. The 1⁄2“-thick backs rest in 1⁄2” x 1⁄2” rabbets cut into the end pieces and are nailed to the top and bottom of the boxes, which are 1⁄2” narrower than the end pieces.
The only other thing to build is the plinth that supports the book boxes. Jefferson’s papers don’t mention a plinth, but the joiners at Monticello in 1959 built plinths for their cases, and I think it’s a fine idea.
The profile I chose for the plinth is a typical late 18th-century foot that you can find on furniture made in both the North and South of the United States. Feel free to select another profile for your plinth, especially if your bookcases will reside in a more modern setting. After all, when old furniture started to look unfashionable, the owners would change the plinth and the hardware to update it. So you can alter your plinth to reflect Shaker, Arts & Crafts or even Scandinavian aesthetics. It’s your library.
Building the Shelves
These shelves are 48″ long without any center supports. This sounds like a recipe for sagging. But if you nail in your back pieces (which add strength) and use beefy, 7⁄8“-thick stock, you will find that your book boxes are nigh on indestructible.
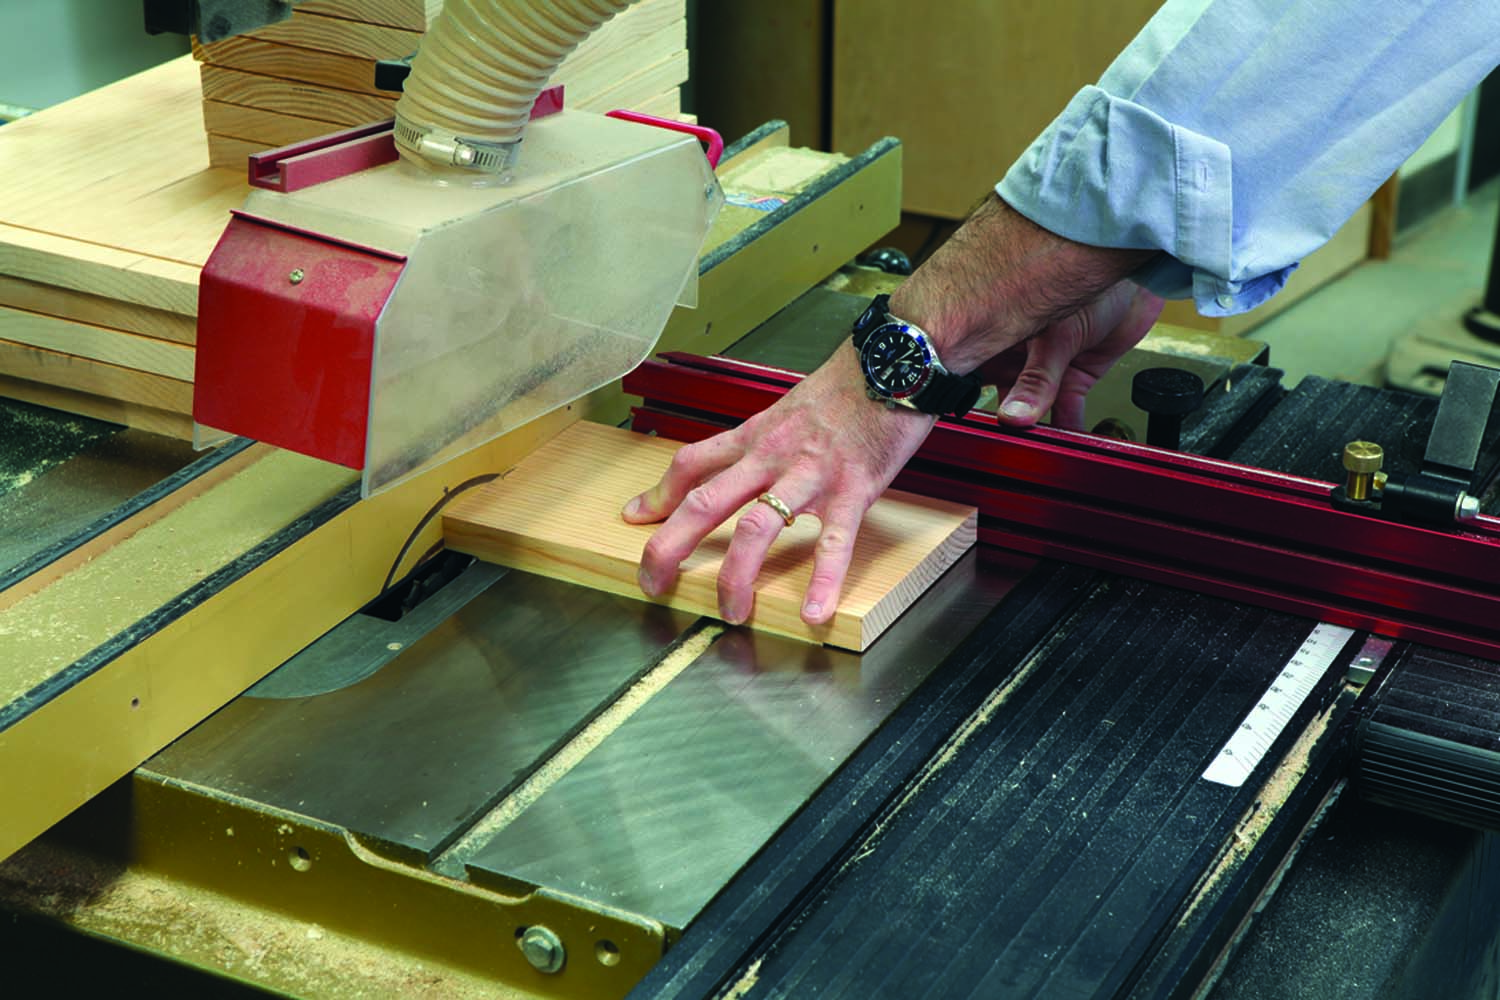
Under pressure. Press the stock down hard to ensure that the cut is consistent across the width of your boards. The dado stack will try to turn your board into a hovercraft. Don’t let it. Press down.
You could get away with 3⁄4” stock throughout without too much of a visual compromise, so don’t think that you have to find 4/4 rough stock to build these shelves.
Begin by dressing all your stock to thickness. I was lucky enough to score some Eastern white pine boards of unreasonable widths. So I had to dress the boards for my bottom cases by hand before I could run them through my powered planer.
After dressing my stock to size, I cut a shallow rabbet on the ends of the tail boards. This rabbet is 1⁄16” deep and the width of the mating pin board. This shallow rabbet makes it quite easy to mate up the two pieces when transferring the marks from my tail board to my pin board.
If I had only a couple boxes to build, I’d make this rabbet with a moving fillister plane. But because I had 28 of these rabbets to cut, I set up a dado stack in my table saw and cut them all using the table saw.
While this might seem like a no-brainer technique, it requires finesse. You need to really press the top of your work hard against the table when making these rabbets. Anything less, and the rotation of the cutterhead will lift the work off the table. No lie.
With all your shallow rabbets cut, you can cut the 1⁄2” x 1⁄2” rabbets in the inside back edge of the end pieces. I again use a dado stack for this.
Now you can begin to lay out your dovetail joints. This is tricky to explain, but once you cut one mitered dovetail joint, you will laugh loud and hard. It’s flipping easy. If you are skeptical, then please give it a try using some scrap first, then you can come crawling … .
Tail Layout
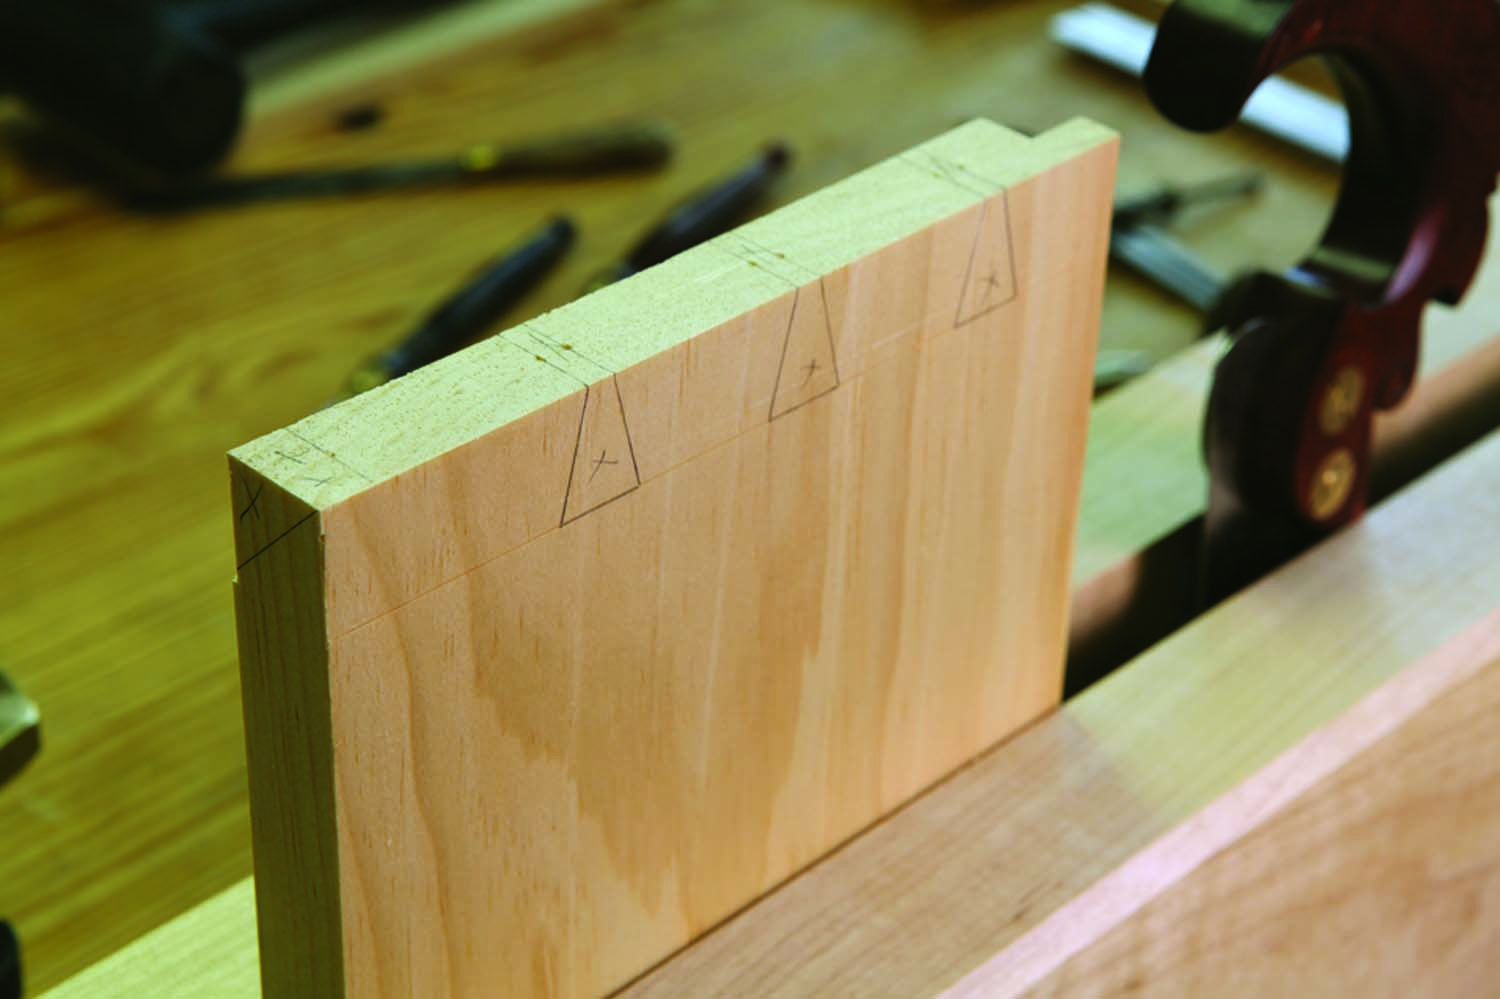
Here’s the deal. You can see almost all the trickiness here. Note how the tail on the left doesn’t go through the face of the board, so it looks like a half-tail. On the right, you can see how the half-tail conceals the rabbet for the back.
When you lay out a traditional through-dovetail joint, you will lay out a number of full tails on the tail board. The pin board has full pins – plus half-pins at the ends. Not so with this project.
Because of the miters, the tail joint at the front of the case has one of its corners that mutates into a miter. It looks like a half-pin in one direction and a full tail from another. I know, I know. It seems confusing. Stick with me.
At the rear of each case, I used a half-tail at the back edge so that I could easily conceal the backboards with simple through-rabbets. The half-tail conceals the 1⁄2” x 1⁄2” rabbet on the inside back edge. As a result, the completed end pieces look a little weird to the traditional eye. But you’ll get over it.
So here’s how you should proceed: Figure out a tail width at the rear of the case that will hide the backboards and remain strong. Lay out that tail.
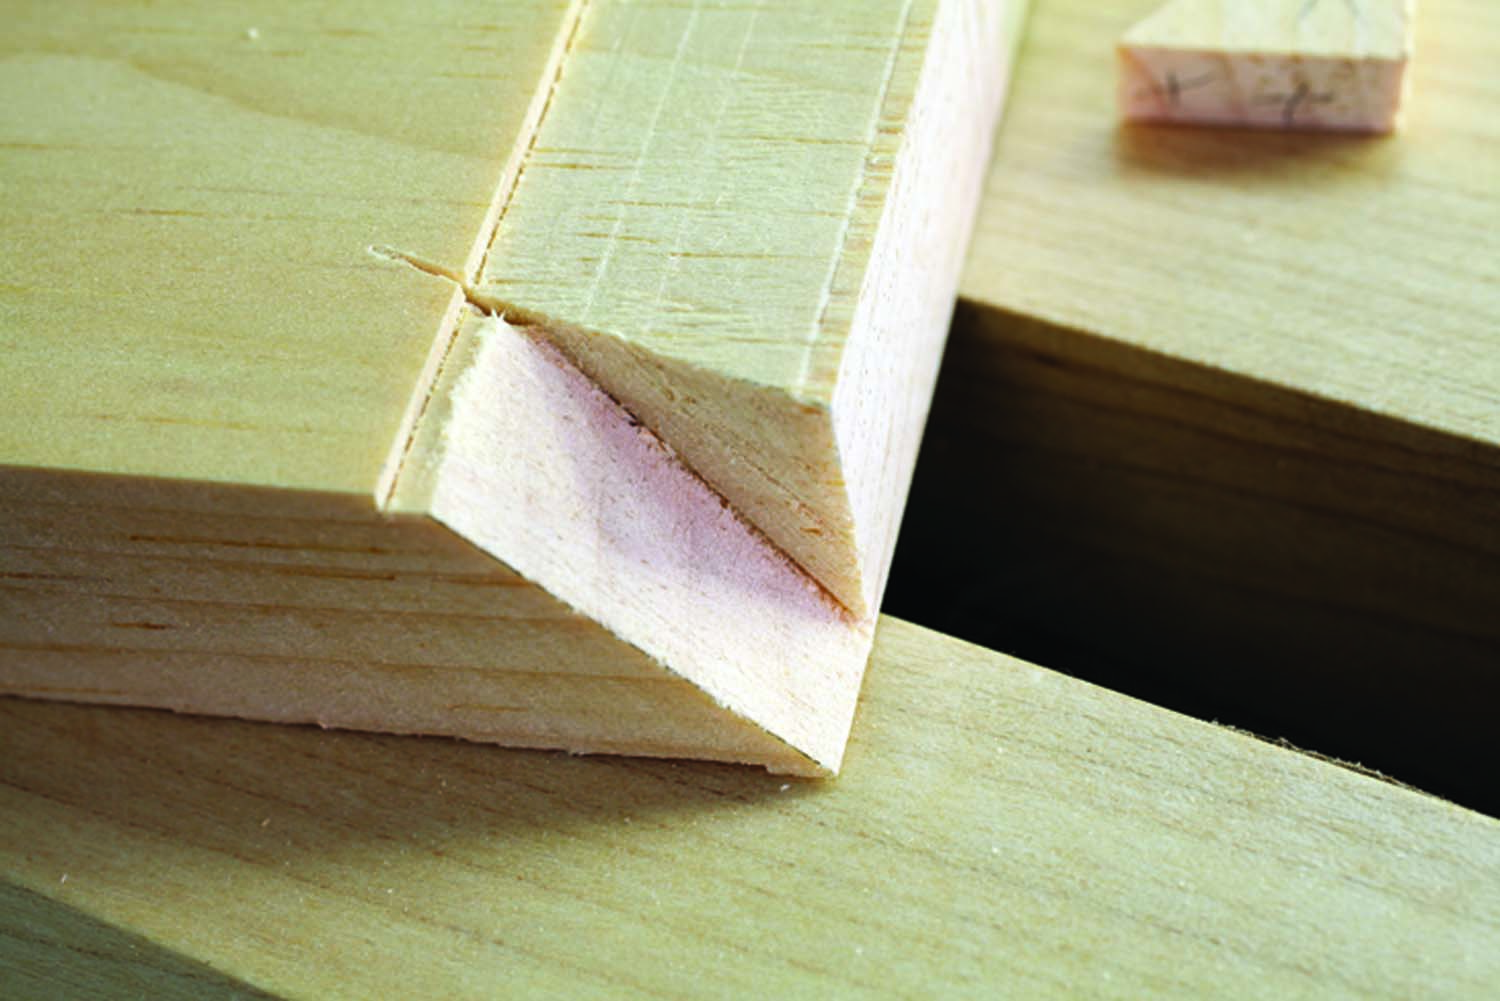
The result. See? Here’s the miter at the front, which intersects the sloping tail. Once you see it, you’ll get it.
At the front of the case, things are a little more complicated. The miter should begin 3⁄8” from the front edge. So mark a line 3⁄8” from the front edge of your tail board. Make this mark on the end grain. But don’t mark it down the face grain of the outside face of your tail board, which would be typical. Instead, make this sloping tail mark on the inside face of the board. It’s weird, I know. But do it.
Lay out the rest of your tail cuts between these two tails, leaving a gap between your tails that is about 1⁄8” wide at the top.
Now make your tail cuts with a dovetail saw. When you are done with one face, it should look like you have a board with two half-tails at either end. Turn the board around so the rabbeted face is facing you. Take your dovetail saw and make the compound cut at the front of the case that defines the face of the miter. This cut is 45° to the front edge. It looks tricky. It ain’t. If you can see the line, you can cut the line.
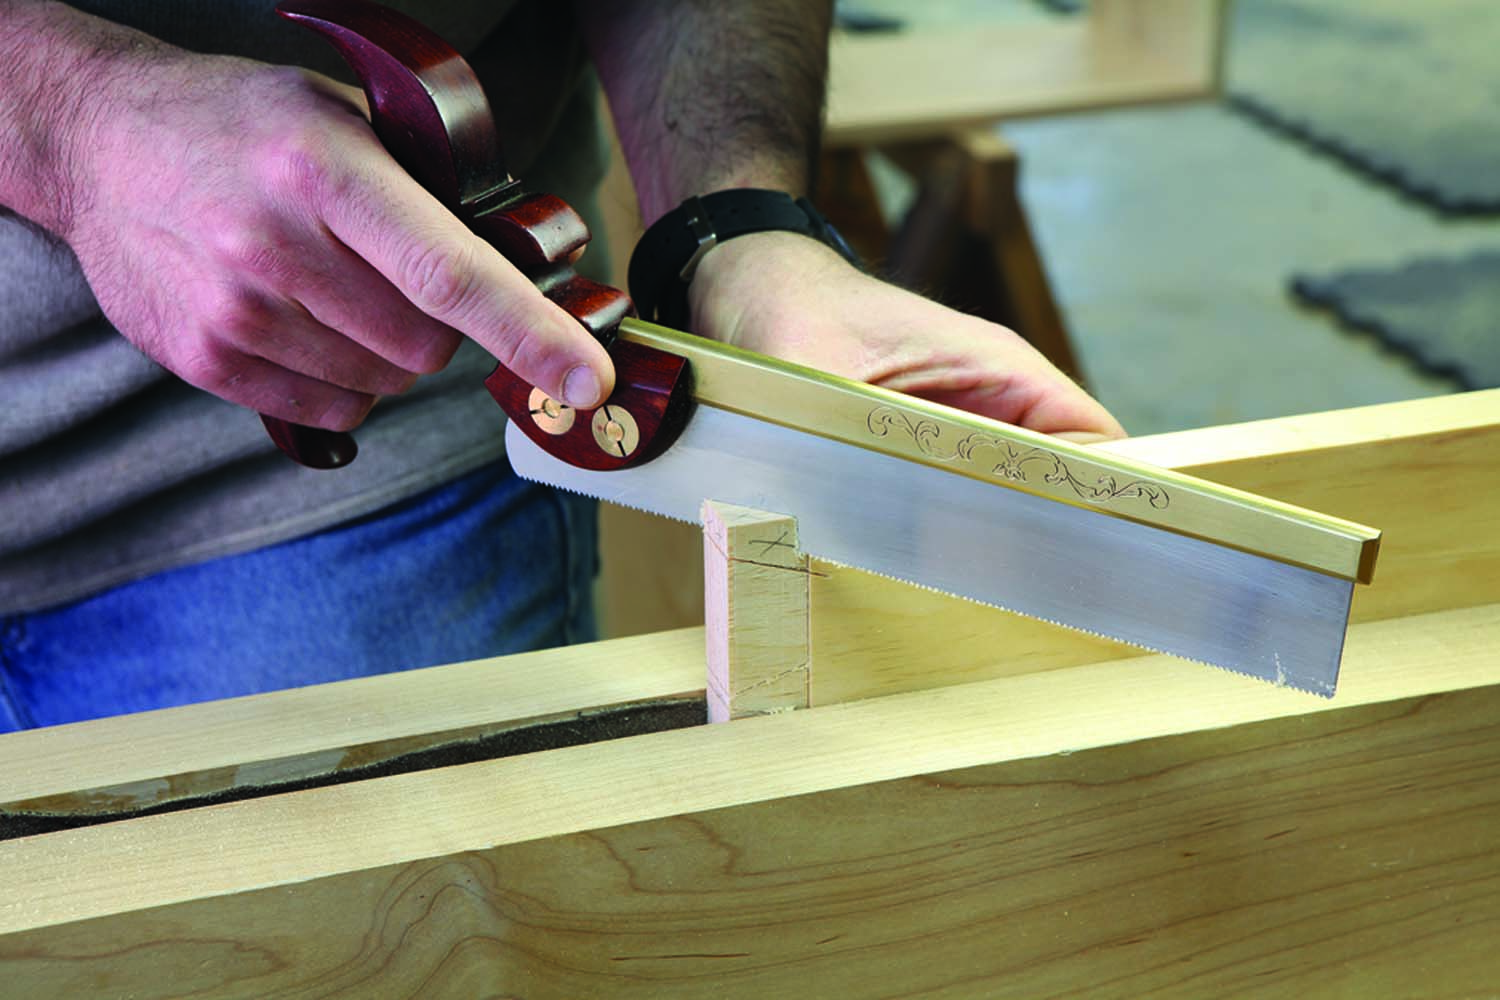
Slice the wacky waste. Then turn the board on its side and saw the miter on the front edge. This looks like a complex cut, but just follow the line. It makes sense when the waste falls away.
Now position the board so the front edge of the corner faces the ceiling. Take a miter square (or your combination square) and use it to lay out the miter from the tip of the case to the baseline. When I mark this miter, I use a thin-lead (.3mm) mechanical pencil.
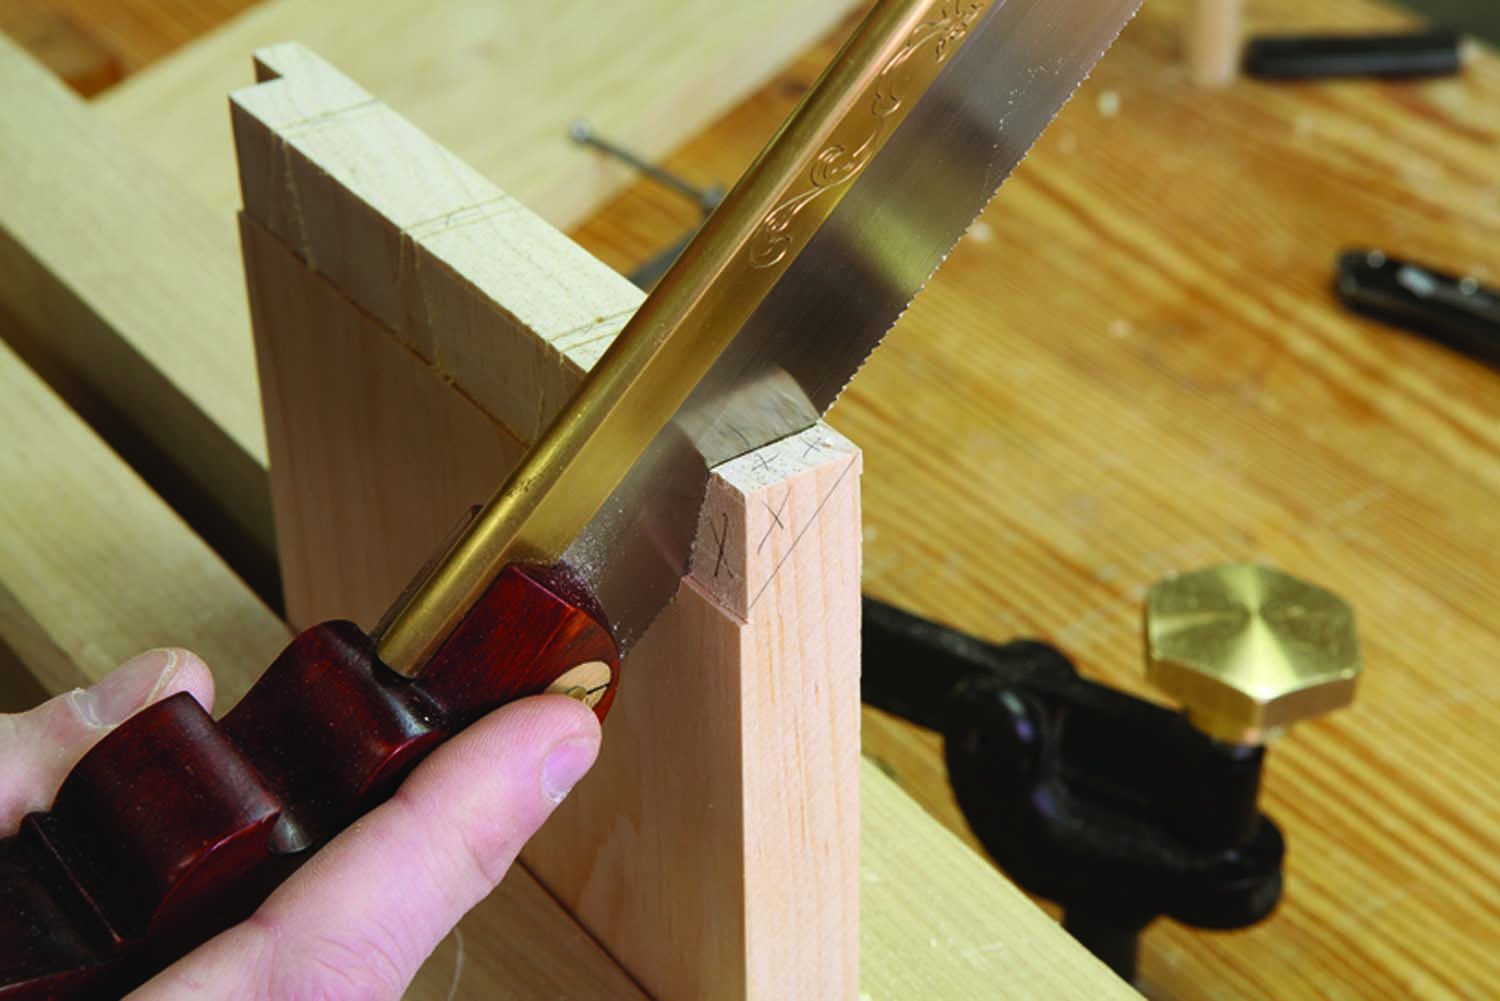
An inside job. Turn your tail board around and cut the front tail on the inside of the corner. It’s a 45° cut.
Cut this miter freehand to free the waste at the front of the corner. You’ll need to angle the saw at 45° to make this cut. Again, try this once on scrap and you will be a pro.
When that waste has fallen away you can clear out the waste between the other tails. I use a coping saw. But feel free to bang it out with a chisel. 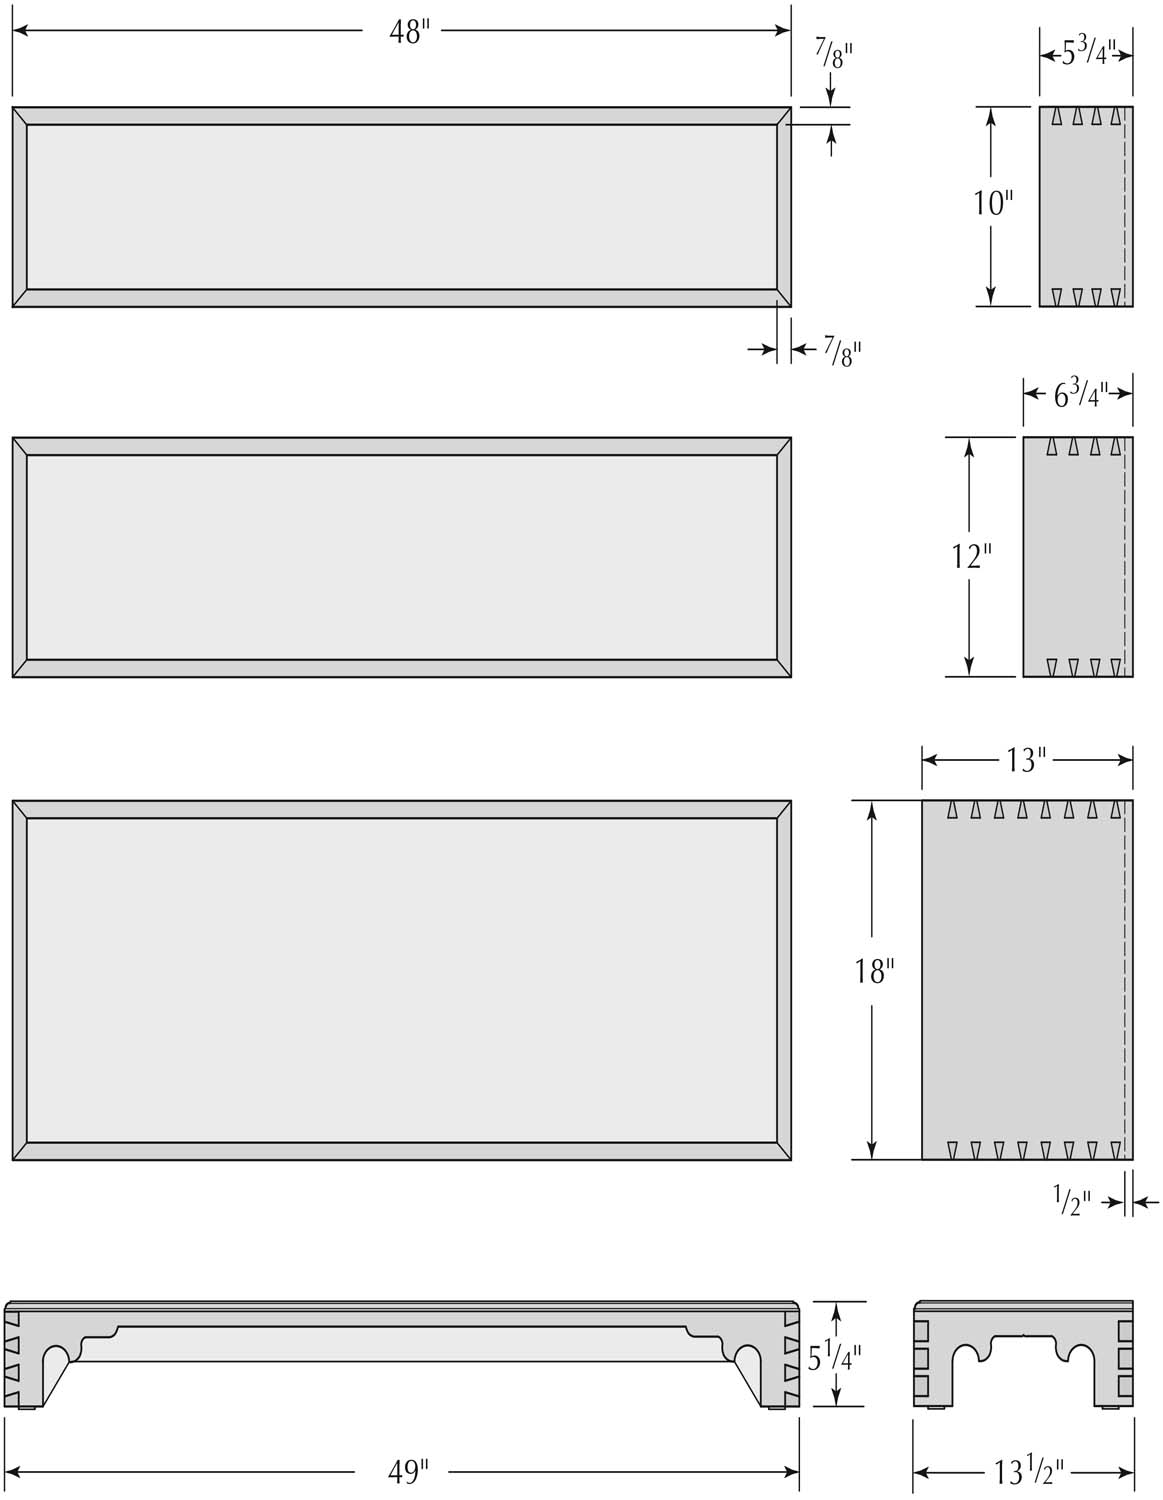

Pin Layout
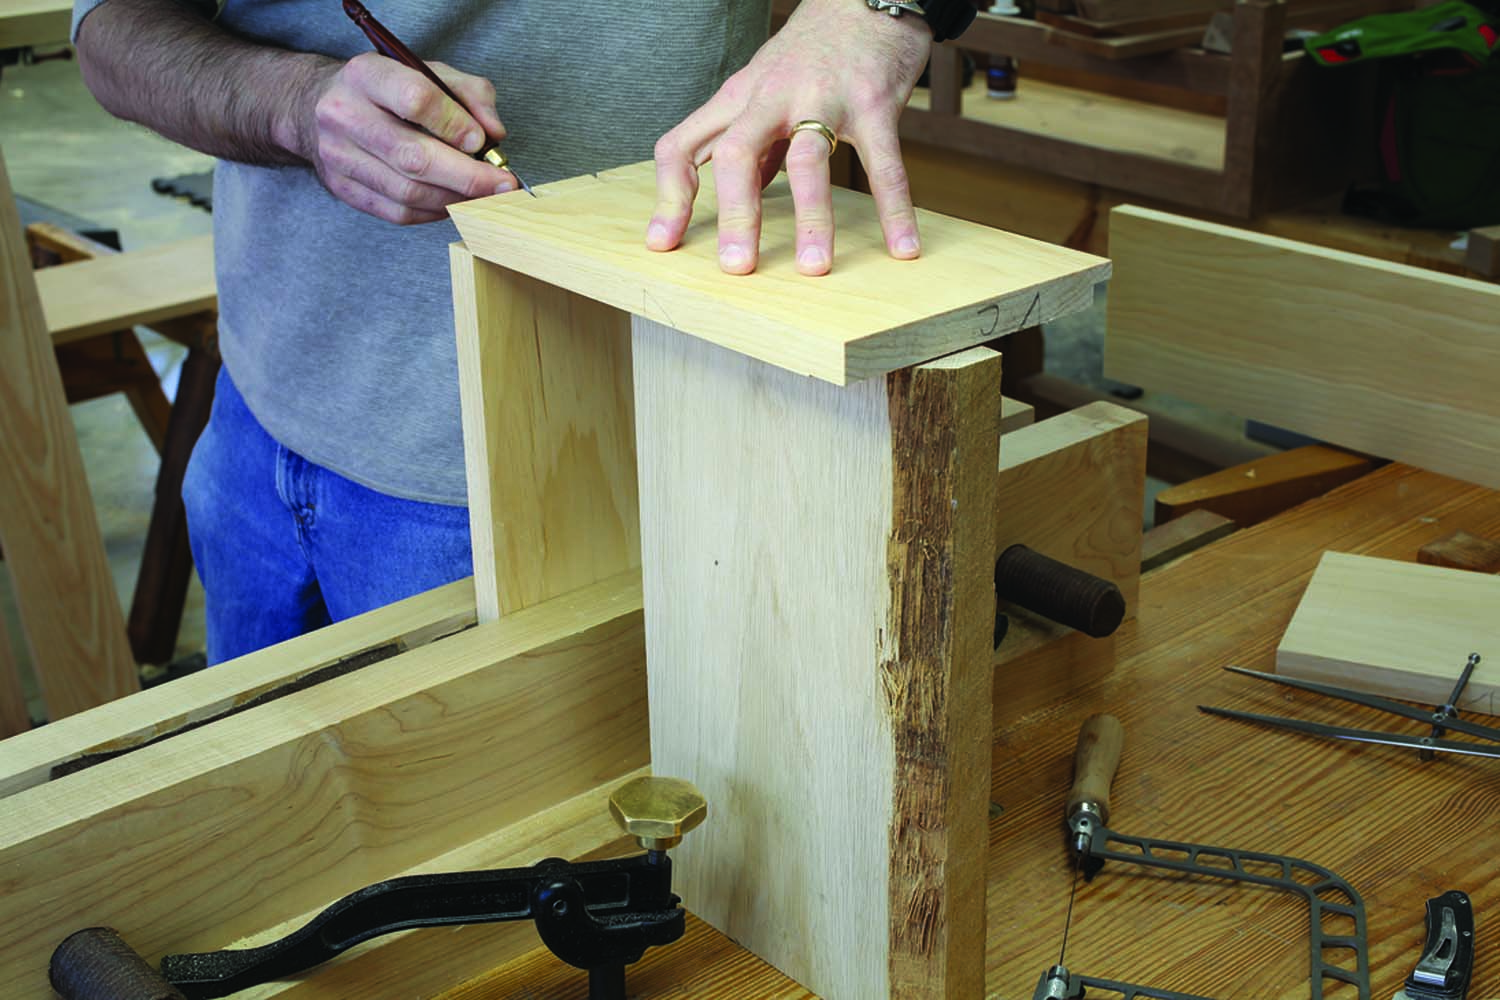
Tails, meet pins. I have my tail board resting on a scrap to keep it in position as I press its shallow rabbet against the pin board. Knife in the joint. Use light strokes at first, followed by heavier ones.
When the waste is clear, you need to transfer the pattern of the tail board onto the pin board. The shallow 1⁄16“-deep rabbet makes this a cakewalk. Clamp your pin board upright in a vise. Place the tail board’s rabbet on top of the pin board and press the two together. When the two are mushed together, trace the shape of the tail board onto the pin board with a marking knife.
The little mitered section at the front is tough to get a spear-point knife into. Depending on the acuteness of the tip of the knife you can do a fine or a lousy job. Do your best and then “infer” (read: guess) the remainder of the slope with a ruler and a knife.
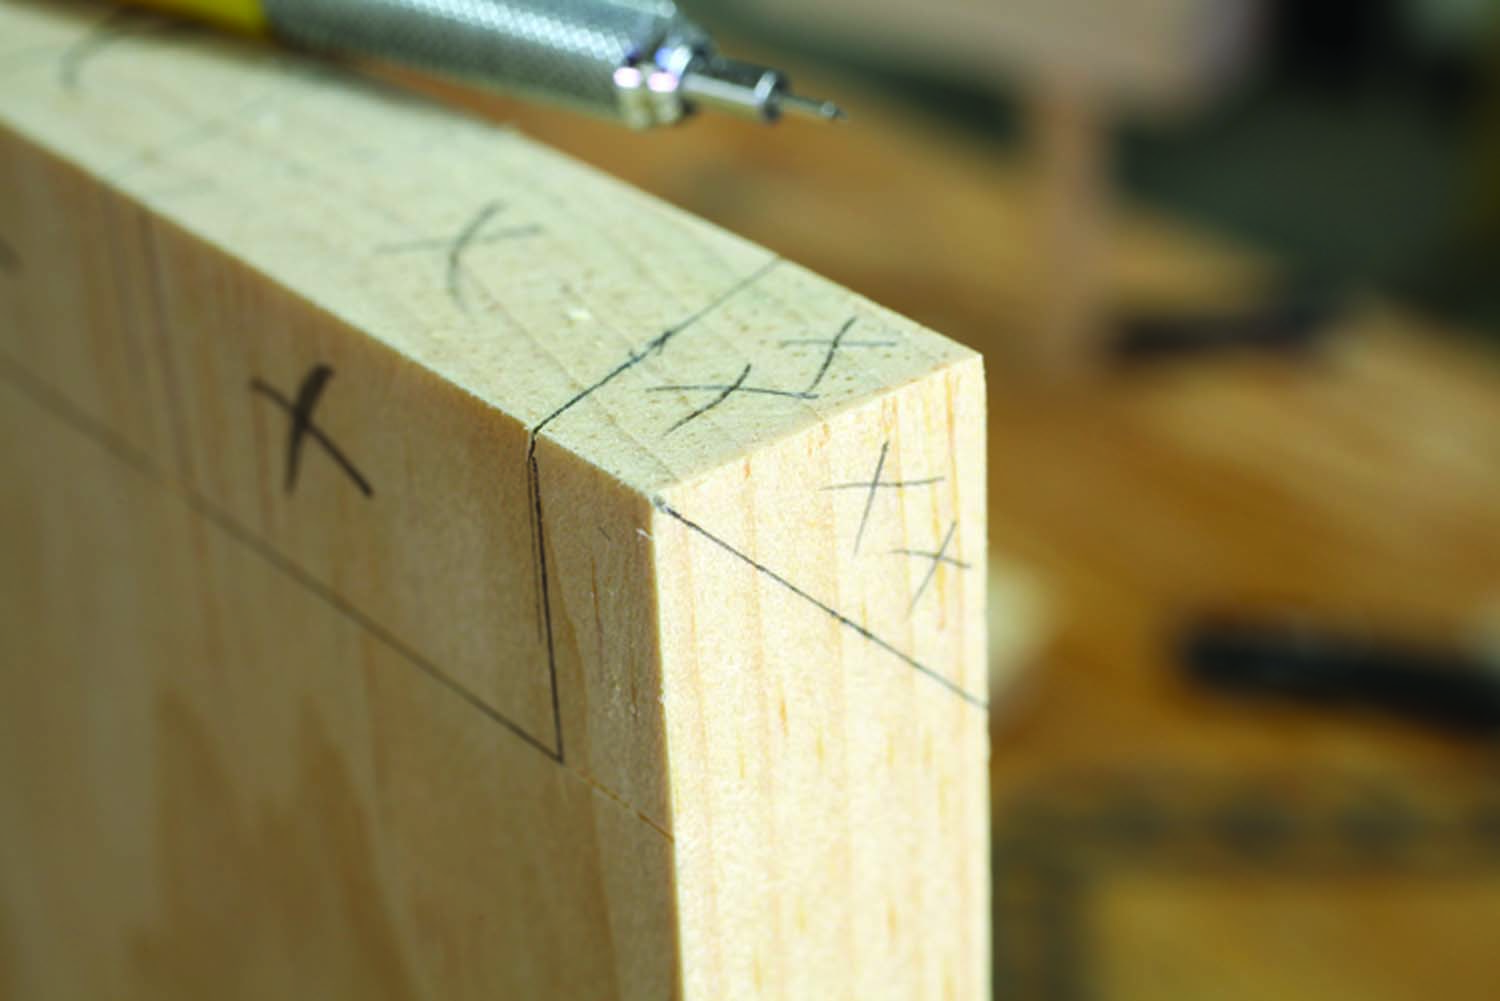
More wacky miters. Here’s the completed pin board layout, with the waste marked with “X”s. Clear out the waste between the pins, then cut the miter.
With the lines marked out on the end grain of the pin board, I take the extra step of dropping those lines down the face of my pin board to my baseline. It slows me down, but it’s a habit I have yet to break from my first dovetail class.
Slice all the pins with your dovetail saw. But before you remove the waste between the pins, cut the miter at the front of the pin board.
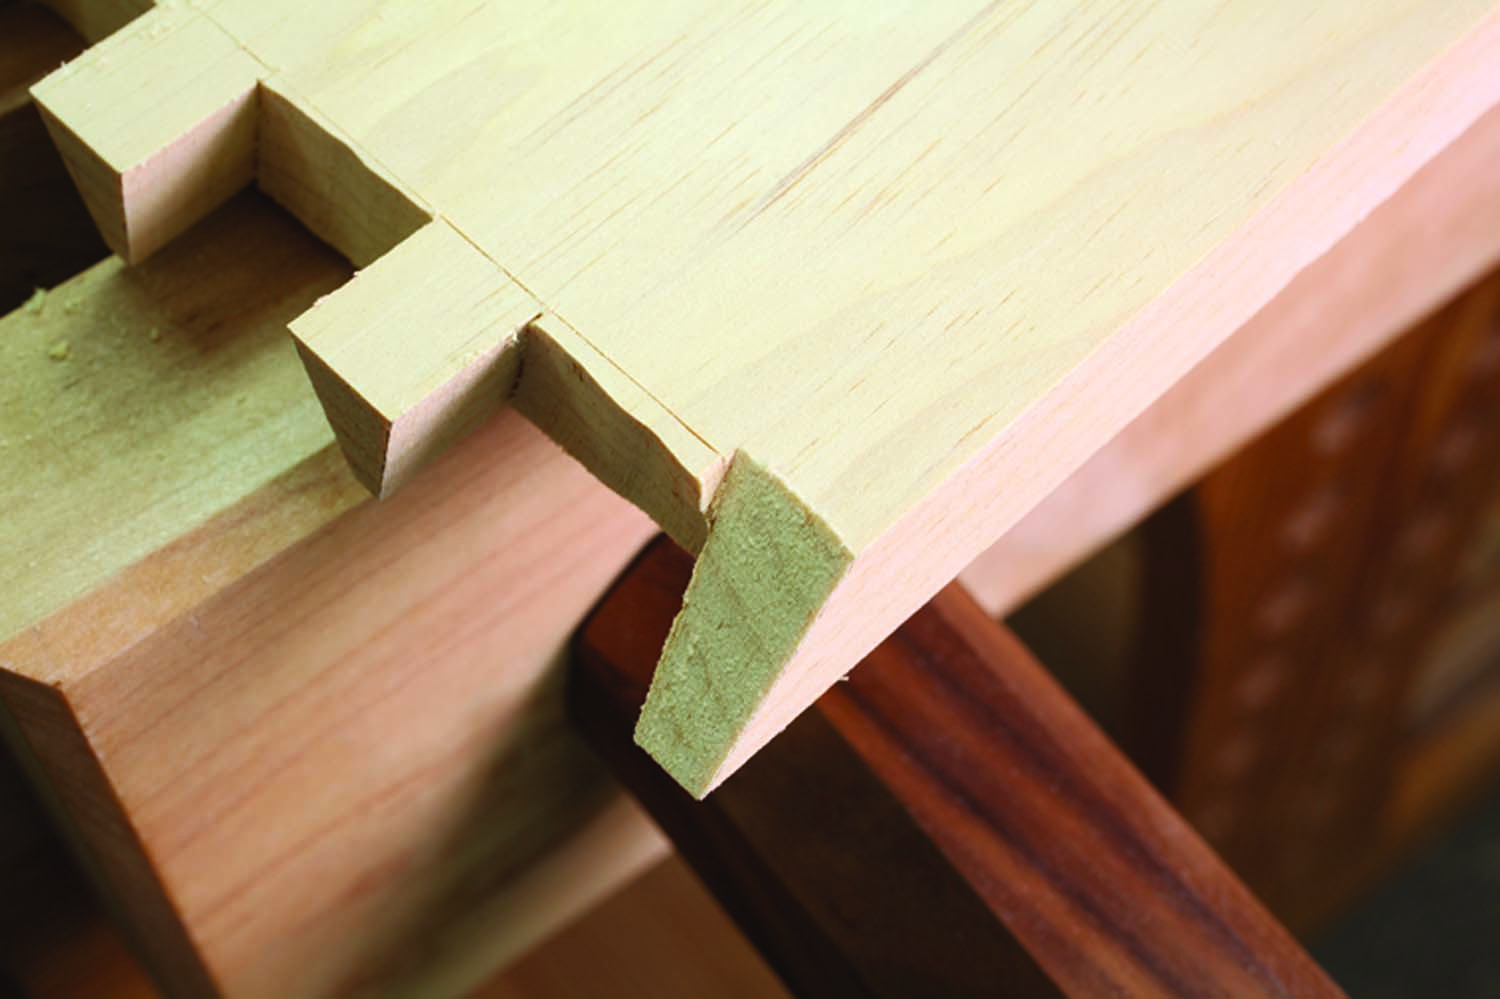
The pin board result. This board looks a little more straightforward than the tail board. It’s basically a standard-looking pin board with a miter cut on its front edge.
Clamp the pin board on its side and lay out the miter from the tip of the board to the baseline – just like you did with the tail board.
Saw the pins and remove the waste between the pins using a coping saw and chisel. Then saw the miter (on the waste side) freehand. If you are sloppy, clean up the cut a bit to the line with a shoulder plane.
Fit & Slice
When you have the pins and tails cleaned up to your satisfaction, it’s time for the fun part: fitting the miters.
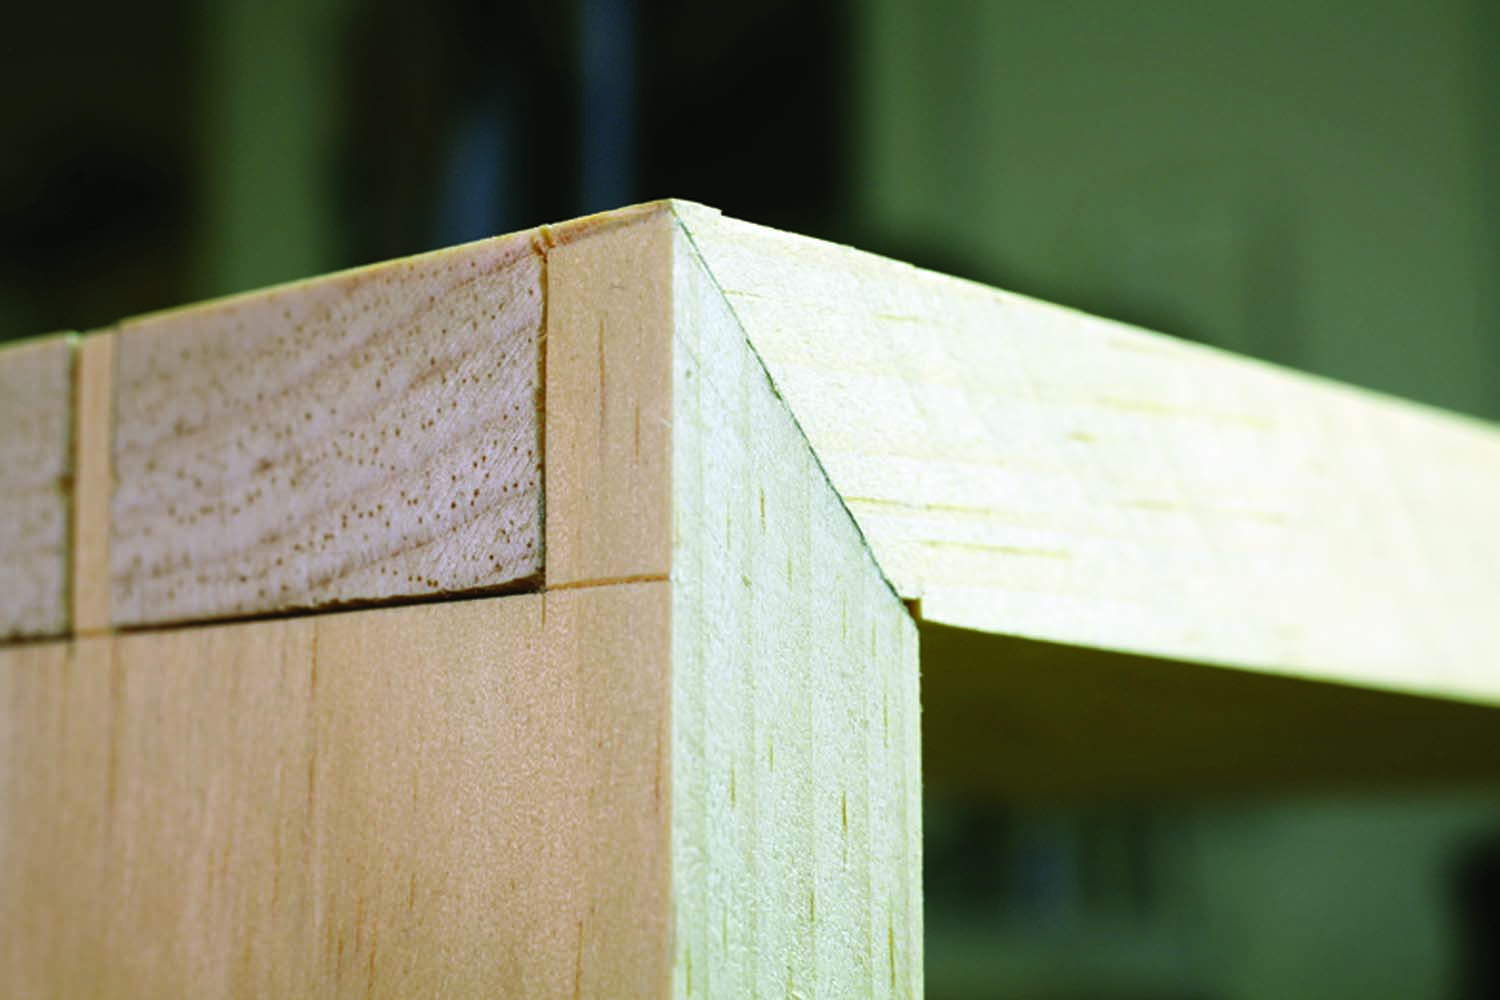
Needs a fit. You can see how the tail isn’t fully seated in its socket. The way to fix that is to saw through the miter.
Drive the tail board onto the pin board. What is likely to happen is that the tails will seat everywhere but up by the miter. The miter is what is preventing the tail from landing home at the bottom of the pin socket.
When the parts are driven together, they will generate some pressure right at the miter – a good thing. Place the joint on your workbench so the miter faces the ceiling. Take a thin-kerf saw and cut through the miter freehand.
Yes, you read that right. Saw through the miter freehand.
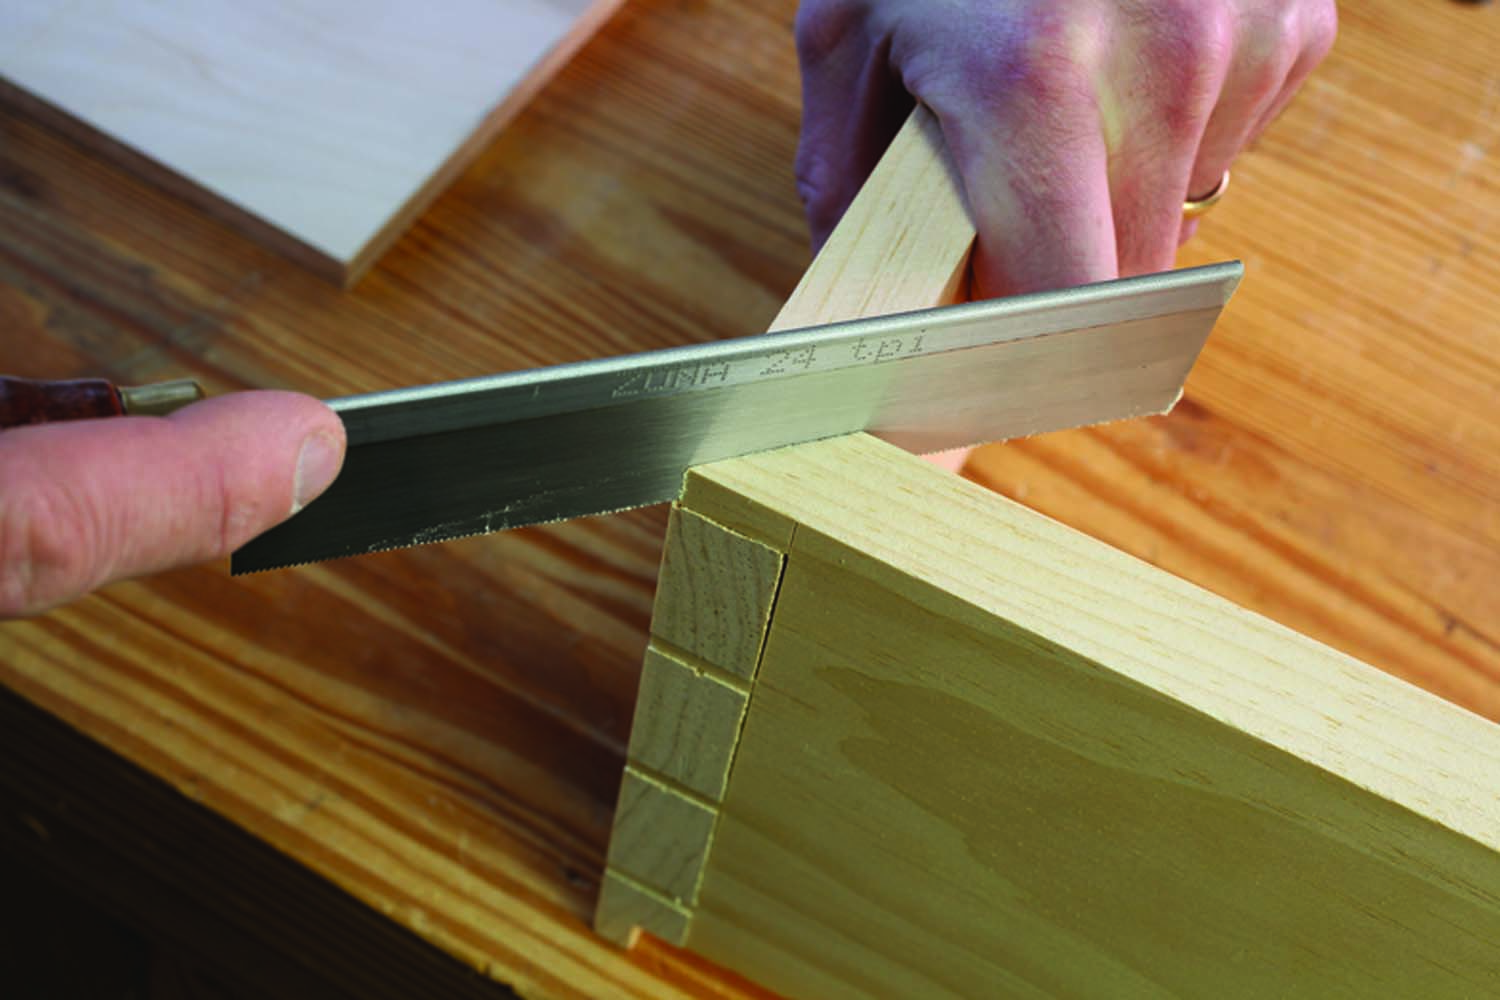
Saw right through. Use a thin-kerf saw and cut right through the miter. The joint might pinch the blade a bit. That’s OK. It means the process is working.
The set of the teeth will remove the excess wood on either side of the saw plate. As you saw, you should feel the wood pinch the blade. Keep sawing. When you reach the bottom of the joint, slide the saw out and the miters should draw closer together. The evidence of this will be that the tail will seat more deeply in the pin socket.
If the miter is tight and the tail is fully seated, you are done. If the tail isn’t fully seated, saw through the miter again.
Sometimes the pressure from the joint isn’t enough to pull the miters together as you are sawing. If this happens, clamp the joint and then saw it.
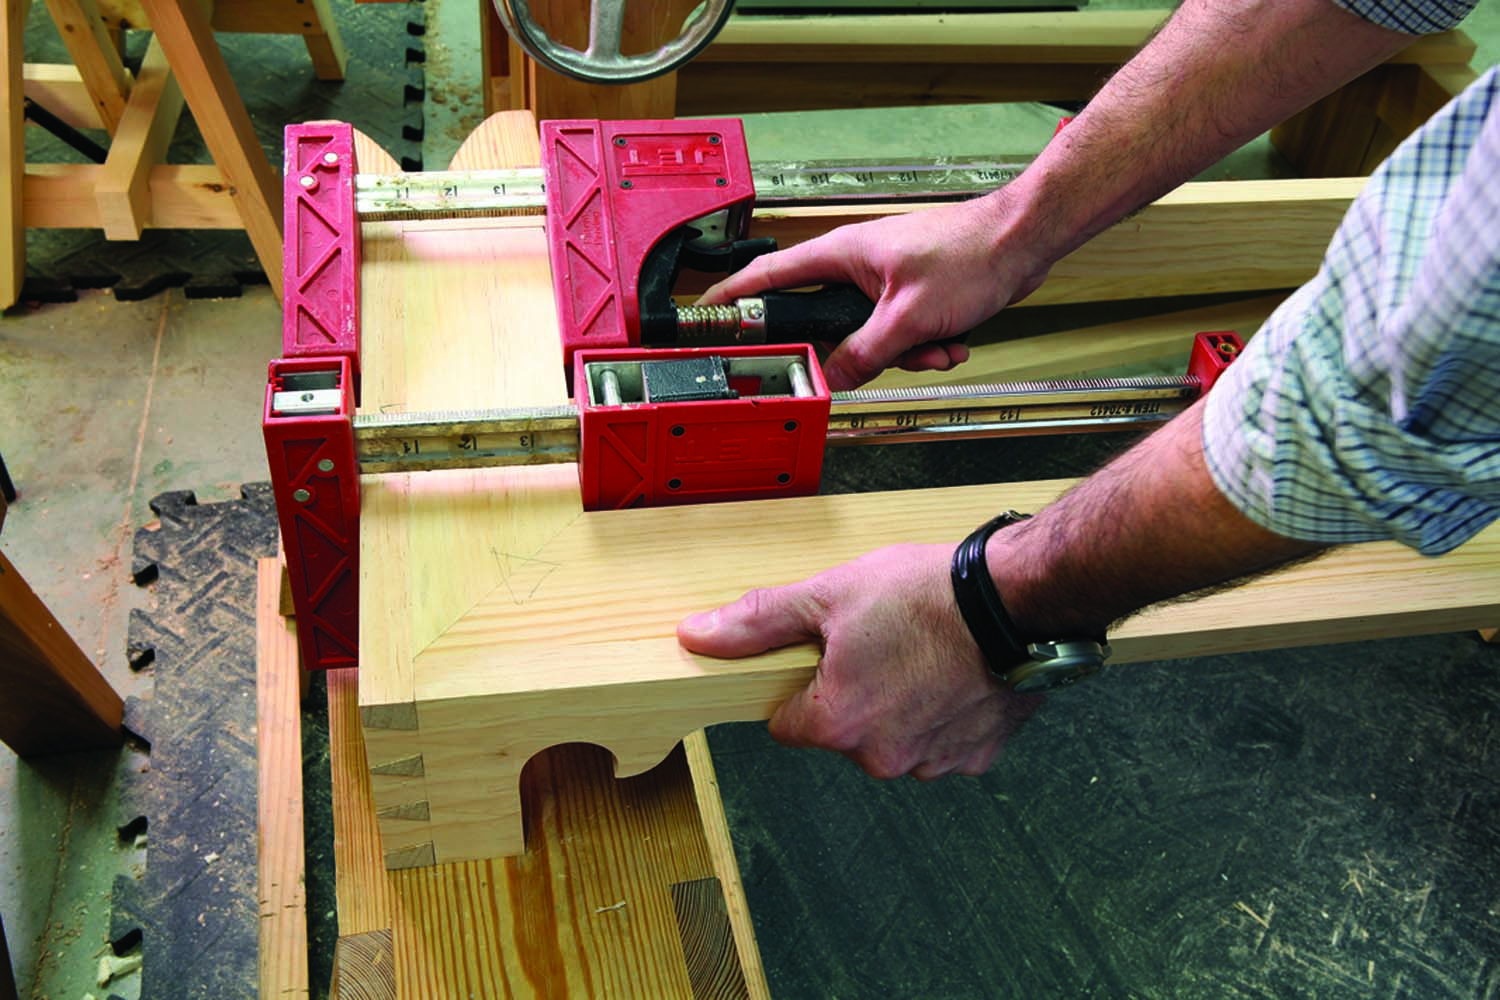
Miters that won’t show. This will be covered by the lower case and moulding, so it doesn’t have to look pretty. It just has to be strong.
Make all the boxes using these techniques. Yes, it takes some time, but by the end you’ll be able to make this joint without hesitation, and it’s a fine one to have in your arsenal.
The Backs
The backboards for these boxes are nothing more than 1⁄2“-thick pine boards that are shiplapped, beaded then nailed on the back of the boxes after the bookcase is finished. You can make your backs now or later.
The Plinth
A traditional plinth looks delicate but will support the entire weight of the book boxes above without any problem. The trick is to design it correctly.
The corners of the plinth should be dovetailed before you cut the scrollwork to create the feet. If you cut the scrollwork first, the plinth boards will be too fragile for dovetailing.
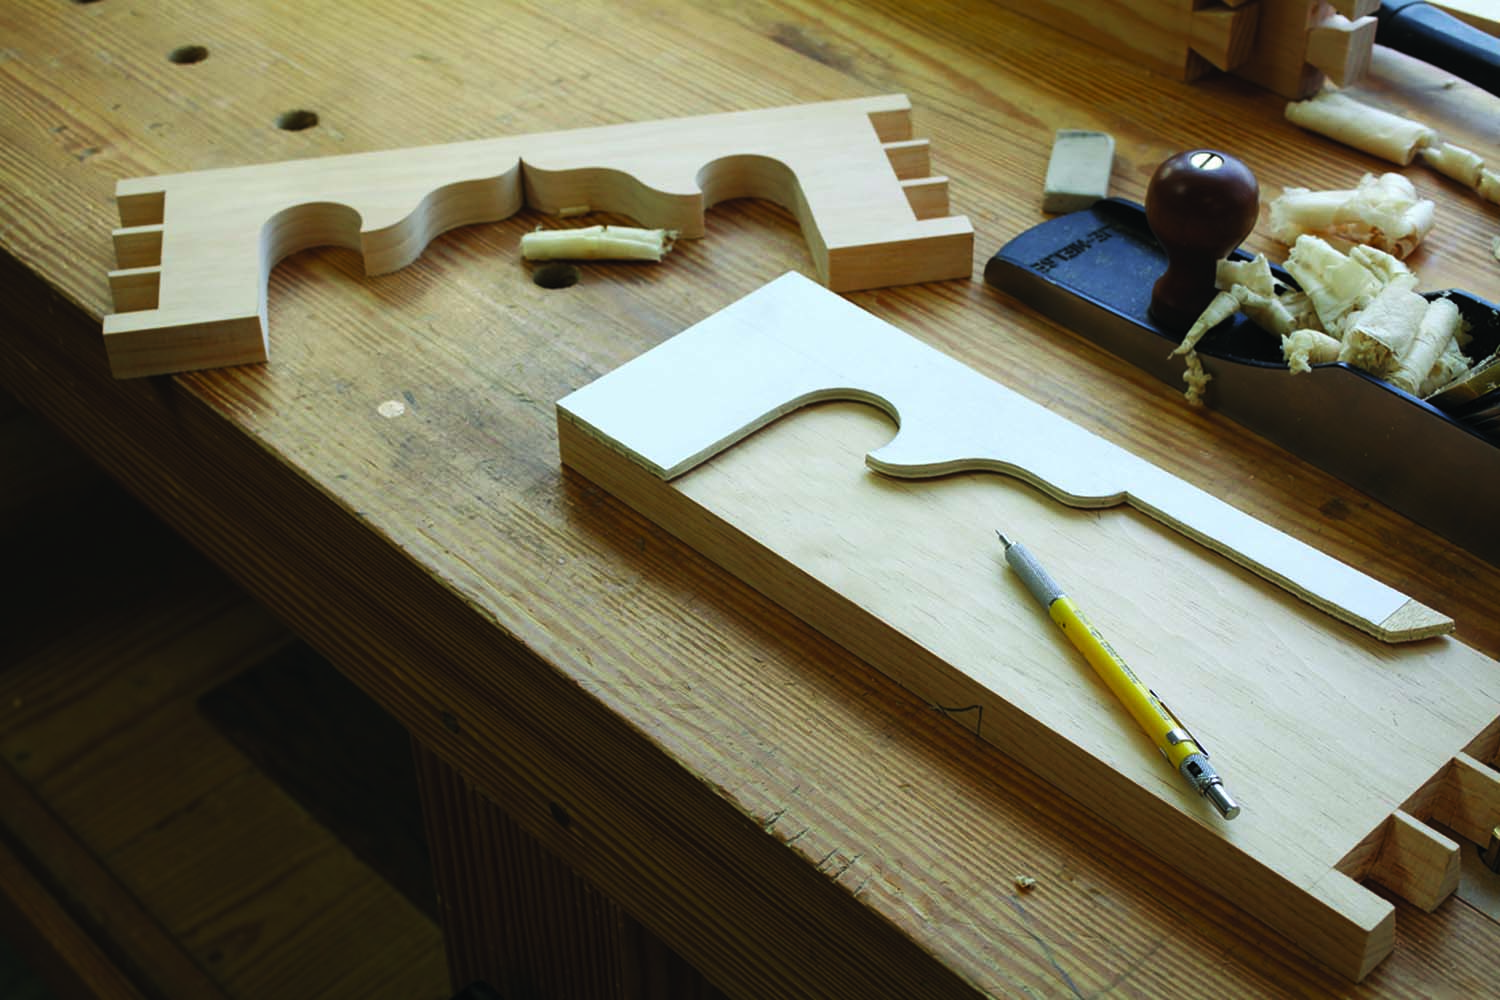
Trace, cut, shape. The plinth design is where you can alter the design to suit your house. Like Shaker stuff? Look at Shaker feet and draw something similar on your feet.
After dovetailing the corners, trace your foot design onto the front, back and ends. I drew my shape freehand and it was based on a typical design of the period. Once the shapes are laid out, cut the scrollwork and clean up the saw cuts with rasps or an oscillating spindle sander.
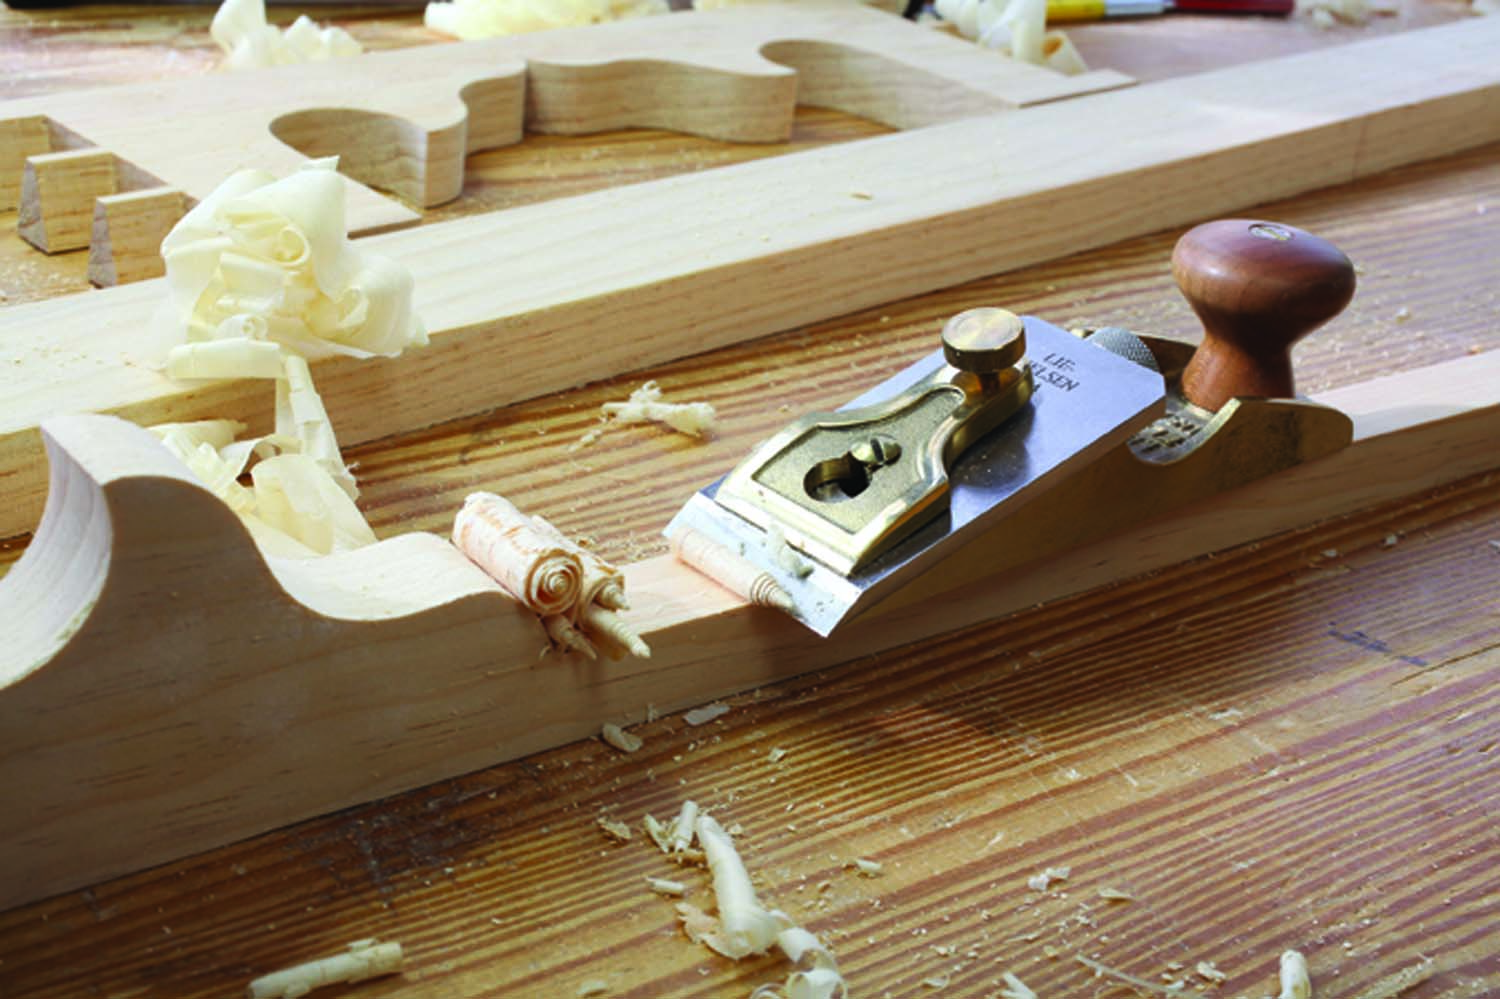
Clean the corners. I use a block plane to dress the long straight run on the front. But when it comes to the corners, a chisel plane is handy for getting right up against the scrollwork.
Assemble the four plinth pieces with glue, clamps and lots of care. This is when the pieces are fragile. I destroyed one foot while clamping things together. Luckily, I was able to glue it back on.
With the outside of the plinth complete, work on the inside guts that offer brute strength. I glued a mitered three-sided frame inside the plinth to give it strength. I used 3″-wide boards that were scrap. Really, anything wider than 2″ will be fine here.
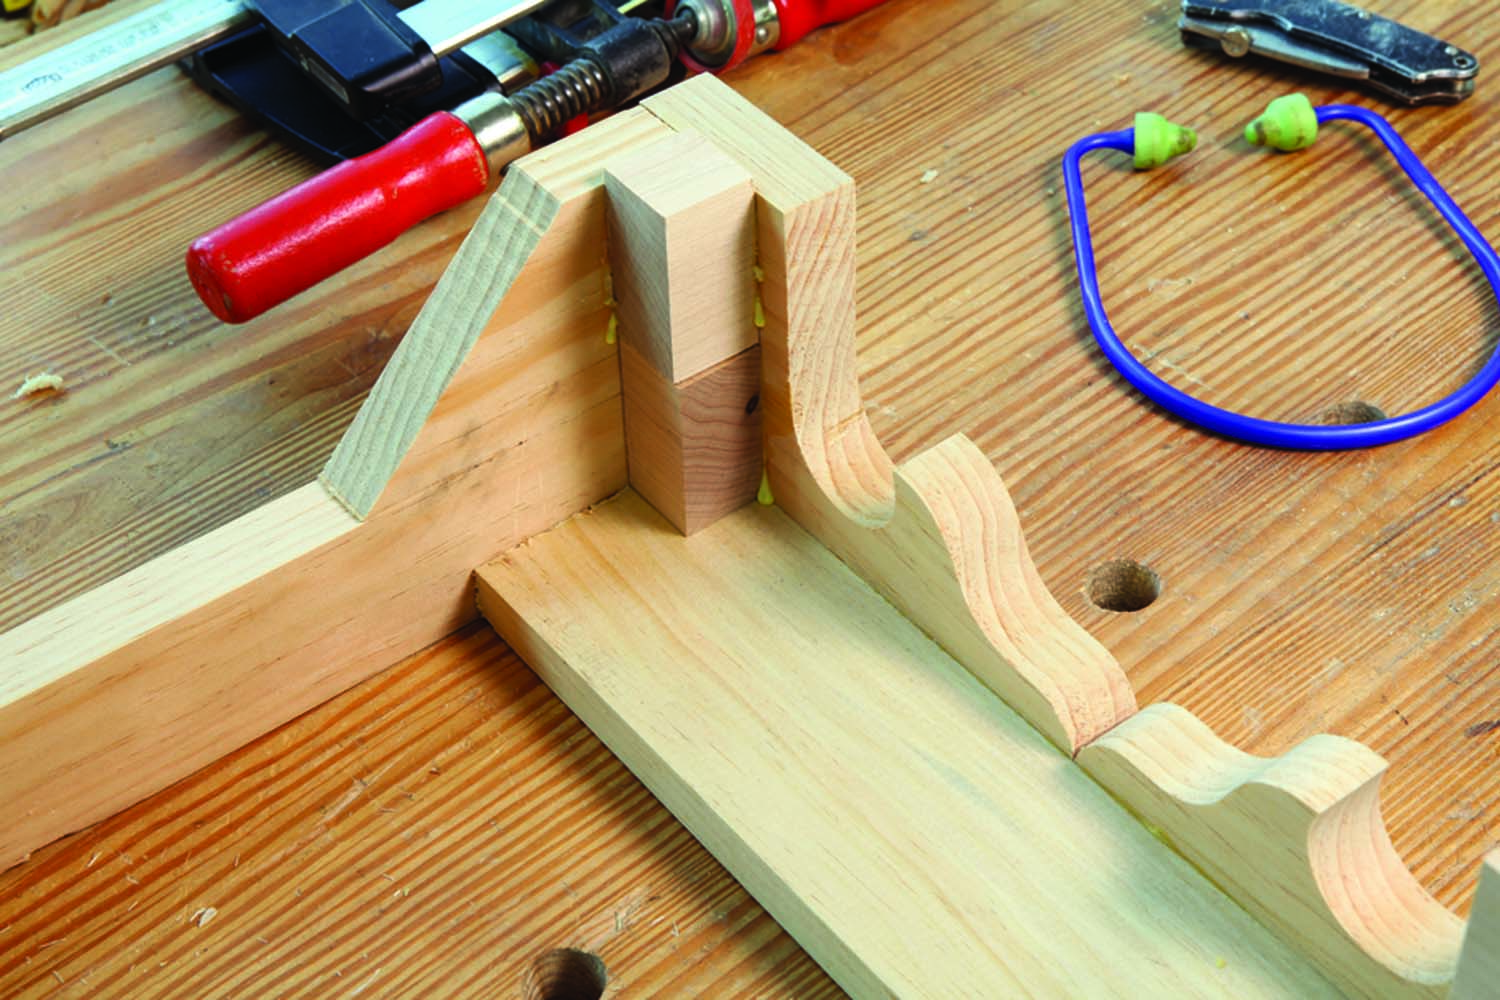
Glue blocks. These maple blocks do almost all the work. They are 1⁄8″ proud of the foot of the plinth and support all of the weight of the book boxes. They also strengthen each corner to protect them from swift kicks.
Once you glue in the mitered frame, flip the plinth over and glue in 1″ x 1″ maple blocks in the corners. These glue blocks reinforce the corners of the plinth and carry the weight of the entire bookcase. When made properly, the maple blocks should extend 1⁄8” from the bottom of the plinth.
Moulding & Finishing
Trim all the dovetails and prepare the plinth, backs and book boxes for finishing. When that is done, place the lowest book box on the plinth and glue and nail a small moulding around the lowest case. I use a small square ovolo profile here, which matches the period.
To finish the bookcases, I applied two coats of orange shellac, followed by one coat of dull-sheen lacquer. The versions at Monticello are dark brown.
After the finish was dry, I nailed on the backboards using clout nails then stacked the book boxes in place on top of the plinth. To keep the boxes from sliding around, I screwed each box to its neighbor using #8 x 11⁄4” wood screws. And to keep the bookcase from tipping forward should a toddler attempt to scale it, I attached the whole thing to the wall with an anti-tipping kit.
Then came the best part – loading the bookcase with my woodworking books. These book boxes added 24′ linear feet of storage for my books, which have been piling up in my office.
But joy turned to defeat. I have more books than I thought. When loaded, this case holds only half my books. I need to build a second set.
Hmmm, perhaps Jefferson’s book boxes were just nailed together. 
Video: Watch a free video of the author cutting the easy mitered dovetail.
SketchUp: Click here for the free SketchUp model of this project.
Here are some supplies and tools we find essential in our everyday work around the shop. We may receive a commission from sales referred by our links; however, we have carefully selected these products for their usefulness and quality.


