We may receive a commission when you use our affiliate links. However, this does not impact our recommendations.
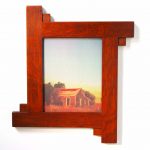
Peeling surfaces on inexpensive furniture give veneering a bad name. It’s actually a sophisticated technique with a rich history dating all the way back to the Egyptian pharaohs. So it may be surprising to learn that with just a few basic tools, wood glue and an inexpensive vacuum bag (something the Pharaoh’s cabinetmaker could only dream of), you can create beautiful book-matched veneer panels that will give your projects a touch of elegance that’s fit for royalty.
Veneer 101
Veneer can be rotary cut (peeled from a log like paper towels from a roll) or sliced like lumber to reveal plain-, rift- or quarter-sawn figure. Individual pieces of veneer (also called “leaves”) are kept in sequential order as they’re cut from the tree, resulting in a stack, or “flitch.” The leaves are usually as long as the tree was tall. All the leaves from a flitch will have the same color and texture, and nearly identical grain patterns. This feature makes veneer perfect for decorative techniques such as book-matching that make creative use of the wood’s grain and figure. To create a book-match, you simply open two sequential leaves of veneer like a book to form a mirror image.
Buying Online
Most major veneer vendors sell only full-length leaves, which is fine if you’re making book-matched panels for a kitchen-full of doors. But if you only want to make one or two panels, check out eBay. You’ll find a host of reputable vendors and a wide selection of sequential veneer leaves in smaller sizes and quantity.
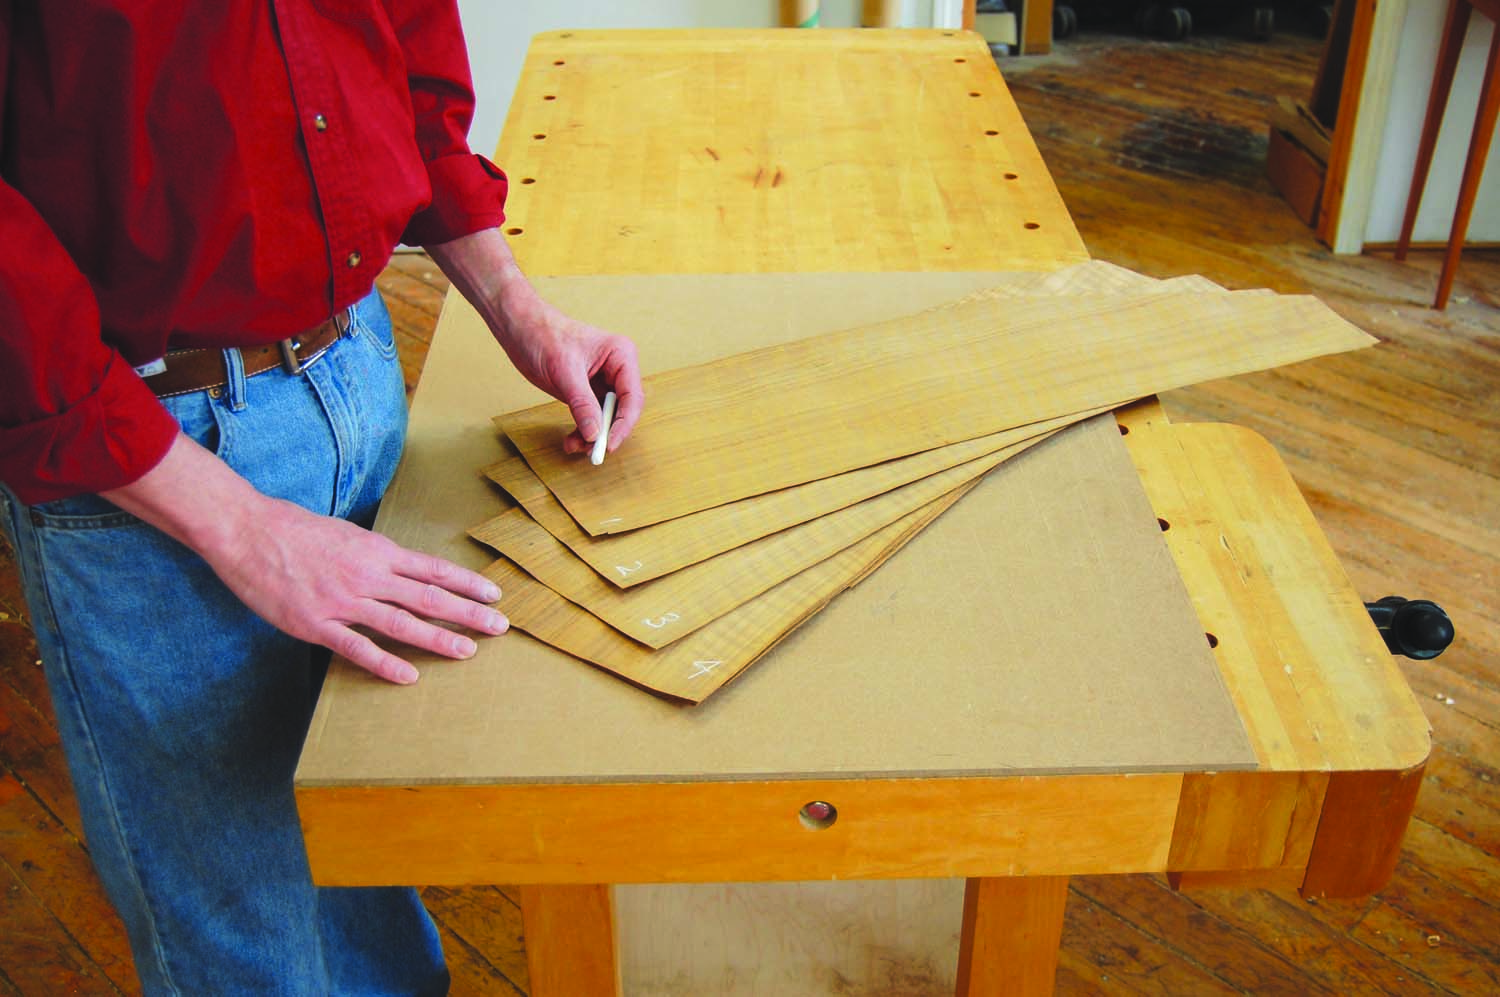
Photo 1. Number each piece of veneer. Veneer sheets (called “leaves”) come stacked as they were cut from the log. Adding numbers makes it easy to keep them in order.
Veneer is commonly rolled up in a box for shipping. Upon receipt, immediately unroll the leaves and number each one in order to maintain the original sequence (Photo 1). Always store veneer flat—place a piece of MDF or melamine on top of the stack so the leaves don’t curl.
Find the Book-Match
Book-matching takes advantage of the sequential nature of veneer. Start by choosing two sequential veneer leaves that are a bit longer than the panel you plan to make and more than half of the panel’s width. Keep in mind that your book-match must start out larger than the substrate, so you can cut it to fit. For the 11″ x 16″ panel shown here, I‘m using leaves that are 6″ wide.

Photo 2. Find an attractive pattern. To make a book-match, you open two sequential veneer leaves like a book to create a mirror image. A mirror has the same effect.
Move a mirror around the top veneer leaf until you find an attractive book-match (Photo 2). In this case, holding the mirror at an angle creates an interesting, V-shaped pattern, but it also reduces the veneer’s width at one end, so you have to make sure there’s enough veneer left to meet the minimum size requirements. Starting with wider veneer allows holding the mirror at a sharper angle for a more dramatic effect. Once you decide on a pattern, draw light pencil lines along the inside of the mirror to indicate roughly where to make the cuts later.
Cut the Veneer

Photo 3. Cut the two veneer sheets you’ve chosen to rough length. Stack the sheets as they came from the tree. Then cut in toward the center to avoid ripping out the edges.
The first step is to stack the leaves as they came from the tree and cut them slightly larger than the panel (Photo 3). I use a straight edge and a utility knife for this job.
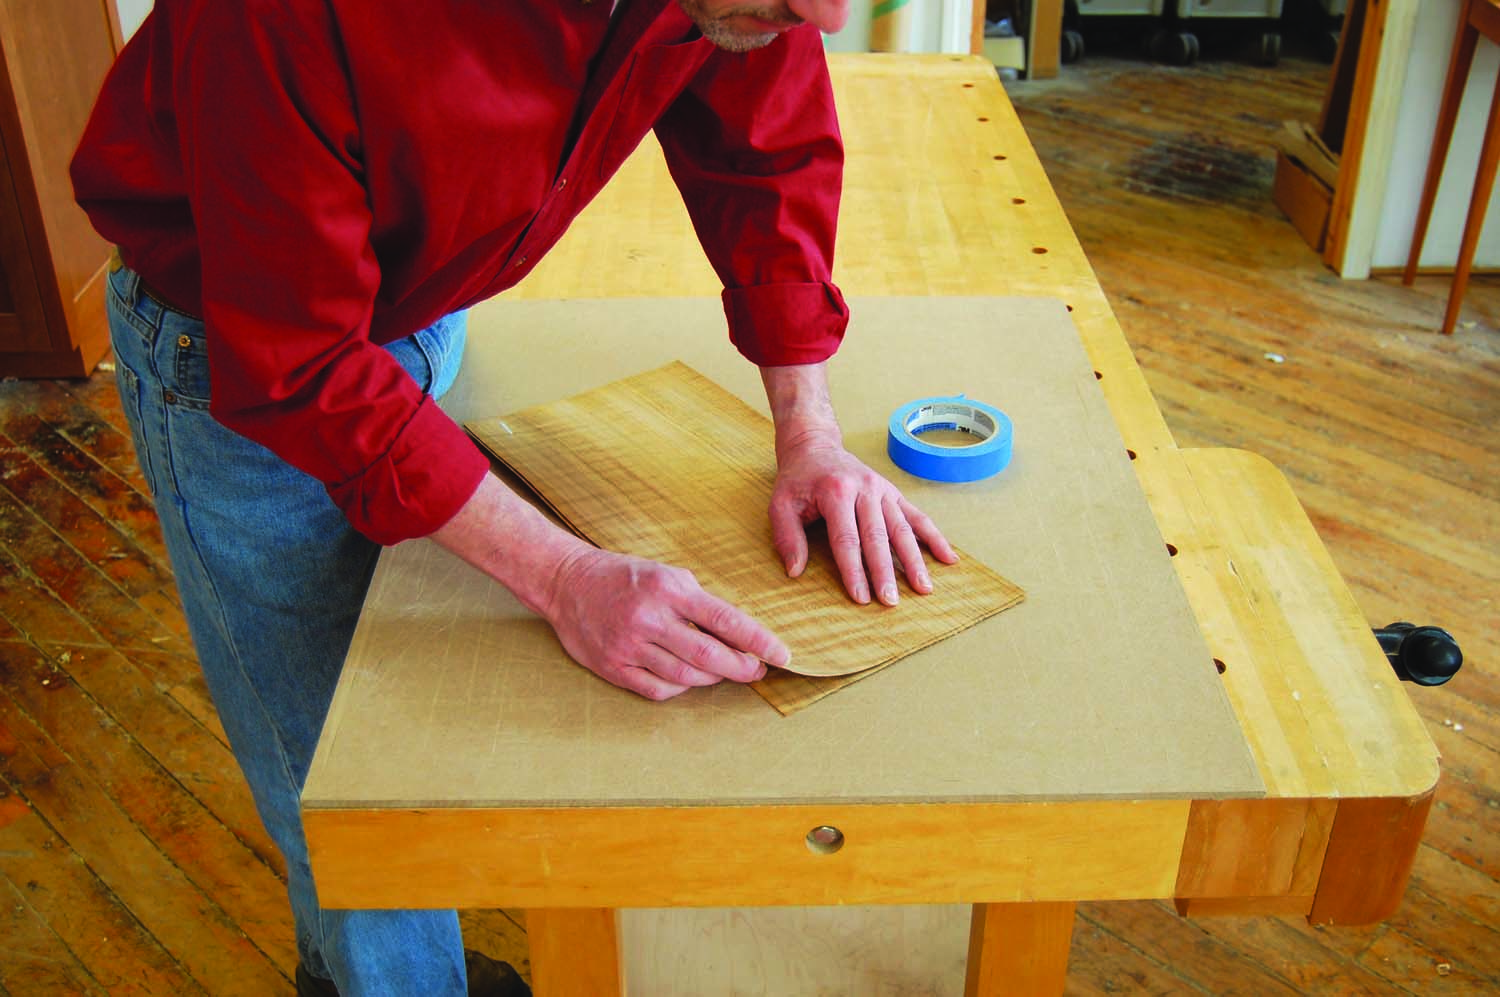
Photo 4. Carefully align the grain patterns of the two veneer leaves at one end, offsetting the edges as necessary. Then tape the sheets together and repeat the process on the other end.
The next step is critical for a perfect book-match, as you must cut through exactly the same spot on both veneer leaves to achieve a true mirror image across the seam. As before, stack the leaves in sequence, as they came from the tree. Then match their grain patterns at one end (Photo 4). This is important, so take your time. Then use blue painters tape to tightly tape the leaves together at this end, while making sure the alignment stays perfect. (Blue painters tape adheres well enough, but not so well that it pulls out fibers of wood when it’s removed.) Repeat the process to align the grain on the other end. If you’re making two identical panels (as for adjacent doors), stack, align and tape four consecutive pieces of veneer.
There are a number of ways to cut through the veneer at the book-match seam, but I prefer to use a hand-held veneer saw, especially when cutting through a limited number of leaves. A veneer saw, which has very small teeth that are beveled on only one side of the blade, cuts cleanly and creates a very nice seam—provided it’s sharp. Fortunately, pre-sharpened veneer saws are available.
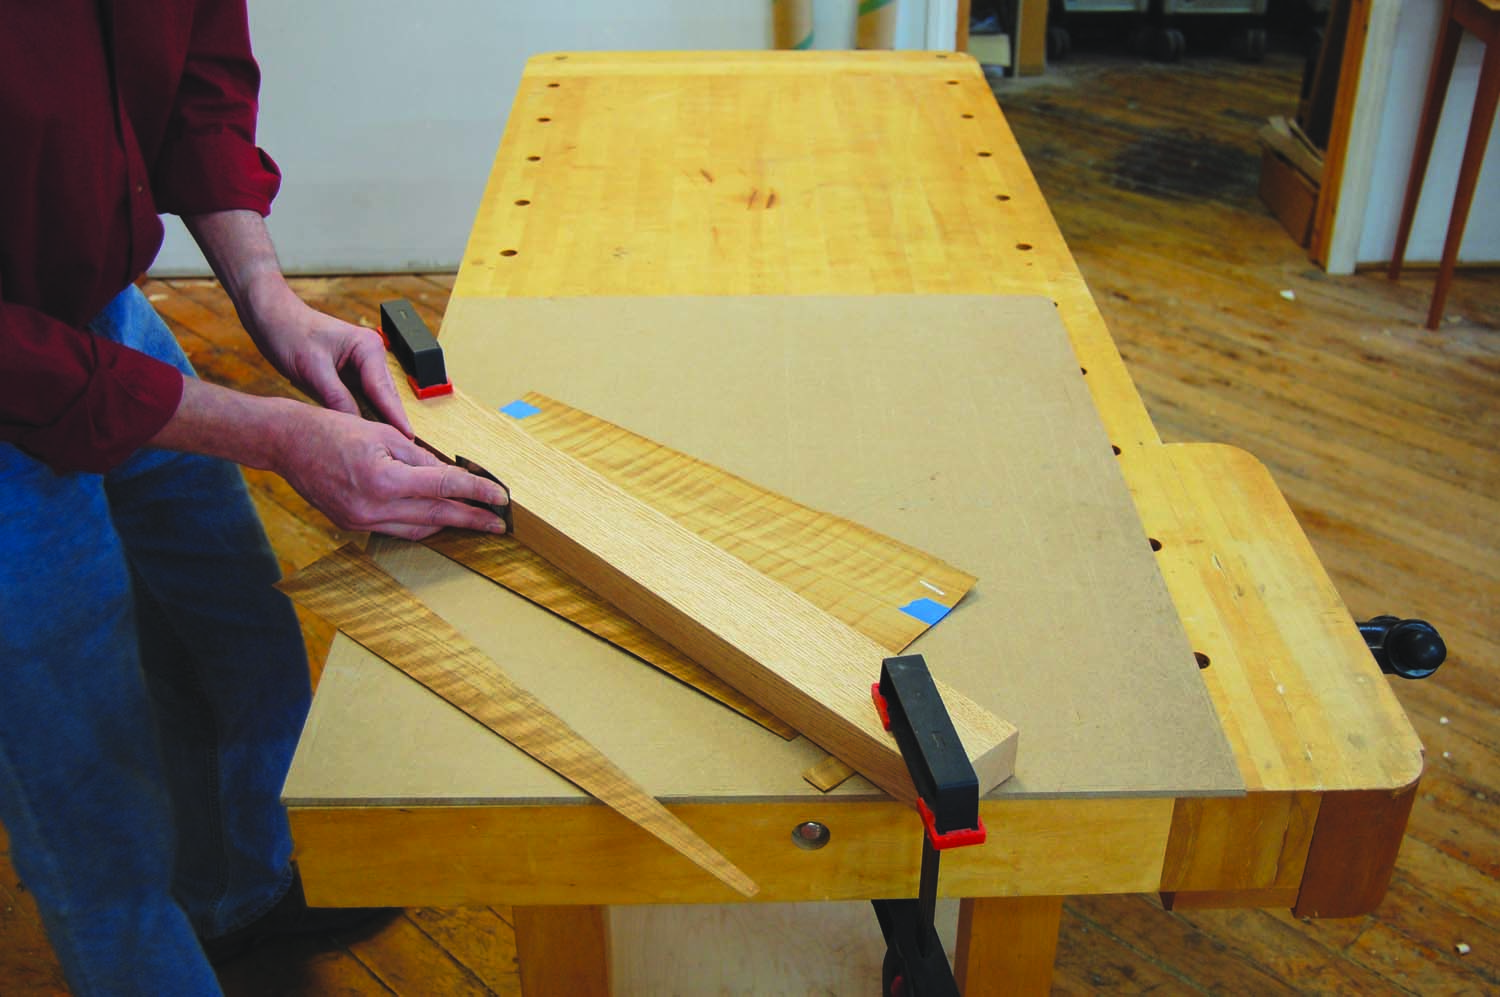
Photo 5. Cut through the veneer at the book-match seam using a veneer saw, a board jointed flat and square as a straightedge and scrap veneer shims to keep the board from bowing.
It’s imperative to cut the veneer dead straight (Photo 5). Since both leaves are cut at the same time, any deviation will be magnified when they’re joined. To assure the best results, install a piece of 1/4″ MDF on your bench and use a 1-1/2″ thick piece of straight-grained lumber that’s been milled flat and square as a straightedge. Arrange the veneer on one corner and clamp the straightedge on the pencil line drawn with the mirror Locate the clamps so they don’t interfere with the saw’s handle or blade. Place two small scraps of veneer (the same thickness as the leaves) under the straightedge as necessary, to keep it from bowing in the middle. (There’s a risk of tear-out if the straightedge isn’t tight against the veneer along its entire length.)
Cut through the veneer: Using four fingers of your right hand to hold the saw blade tight against the straightedge and with your left hand lightly on the handle, pull the saw back towards you from one end of the veneer to the other. Pressing too hard can cause a ragged cut and too much pressure on the handle can cause the saw to wander. It should only take two to three strokes to cut through each leaf.
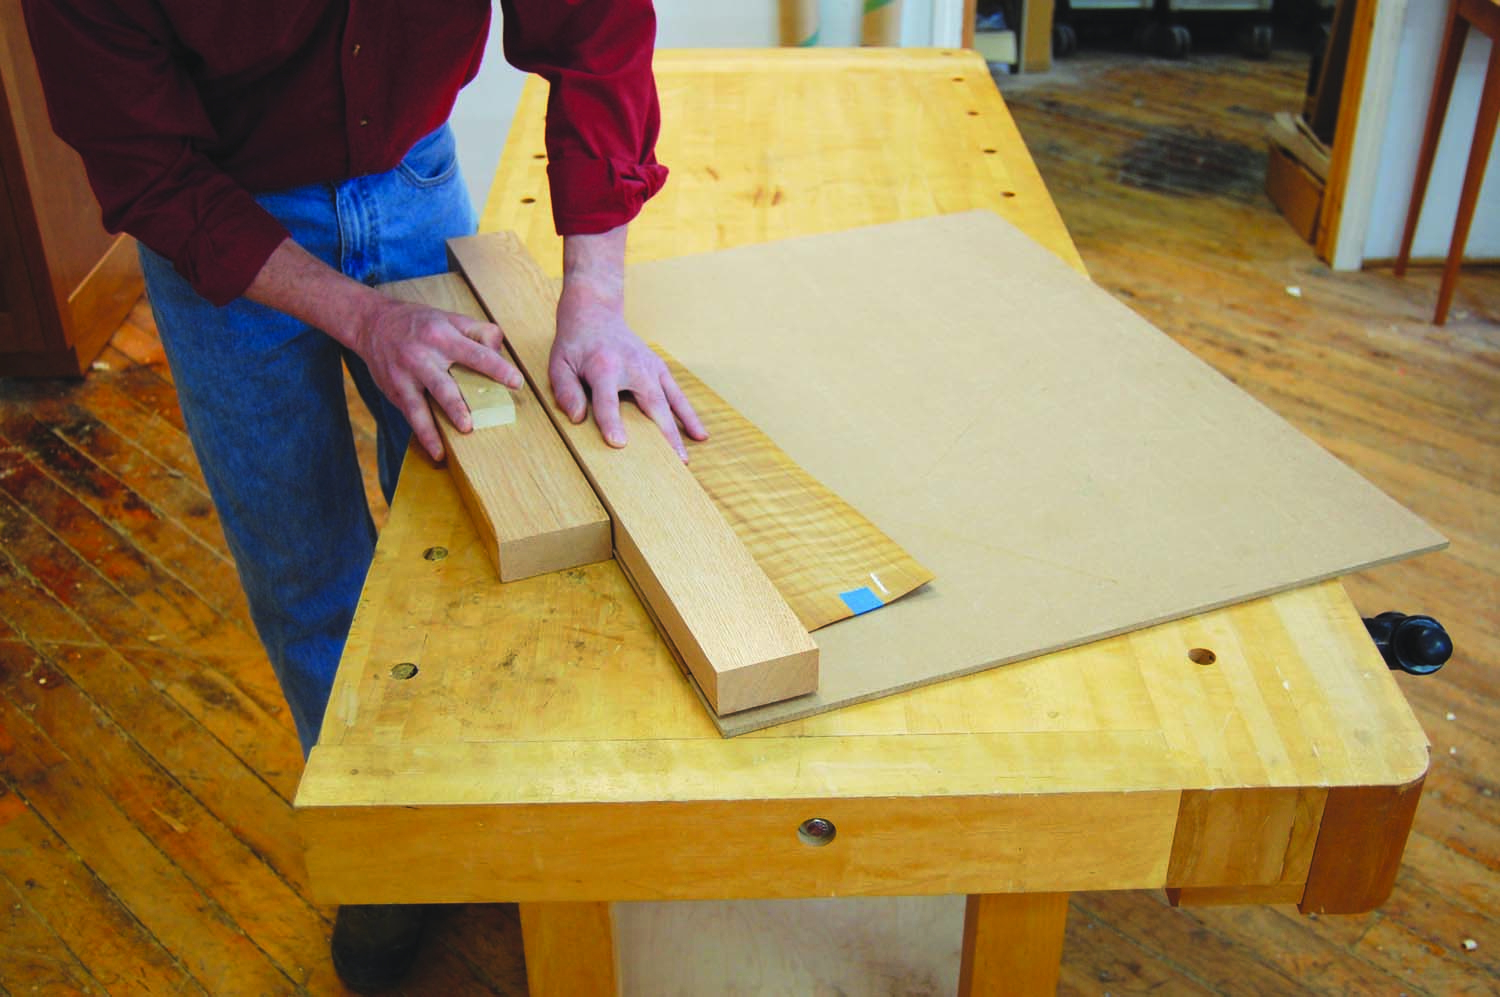
Photo 6. Smooth the cut edges by making full-length strokes with a shop-made sanding block that has 150 grit sandpaper adhered to its edge.
Refine the cut edges after removing the clamps and straightedge (Photo 6). Position the taped stack so it barely overhangs the MDF and press the straightedge firmly on top. Then sand the edge by making long, even strokes with a sanding block that has a straight, square edge and is at least as long as the veneer.
Join the Book-Match
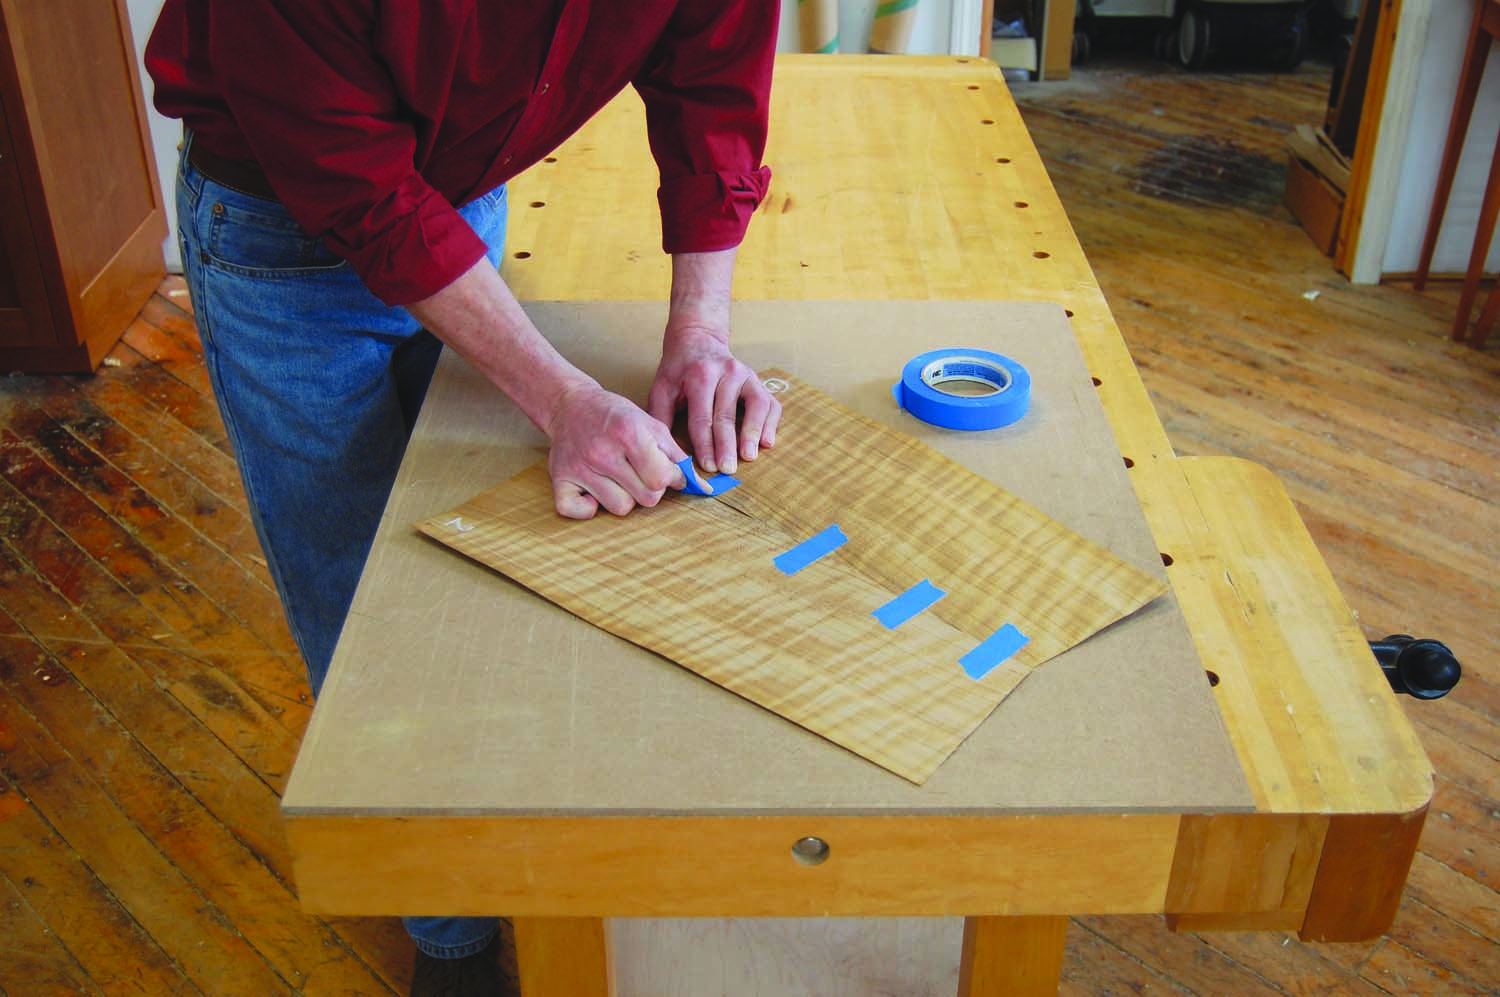
Photo 7. Tape the seam tightly together on the backside of the veneer, after flipping over one of the pieces to create the book-match.
Remove the tape and flip one piece over to create the book-match. Push the two pieces tightly together, taking care to align the mirrored grain patterns for the best match. Then flip over both pieces and repeat the process to determine which book-matched face looks the best. Examine the seams on both faces; if you see any visible defects, re-stack, re-tape and re-cut the pieces. If the seams look good, use small pieces of blue tape, every 3″ or so to temporarily “clamp” the seam on the back face of the book-match (Photo 7). Adhere the tape firmly to one piece and use the tape to pull the seam tightly together. Then turn over the veneer and examine the seam on the front to make sure it’s perfect.
Use veneer tape on the front seam. It’s a paper tape with a water-activated adhesive that’s easy to apply and remove without damaging the veneer. Solid and perforated versions are available. I usually use solid tape. It’s a bit stronger, but it obscures the seam. Perforated tape allows you to see the seam, so you can make sure it’s tight after taping.
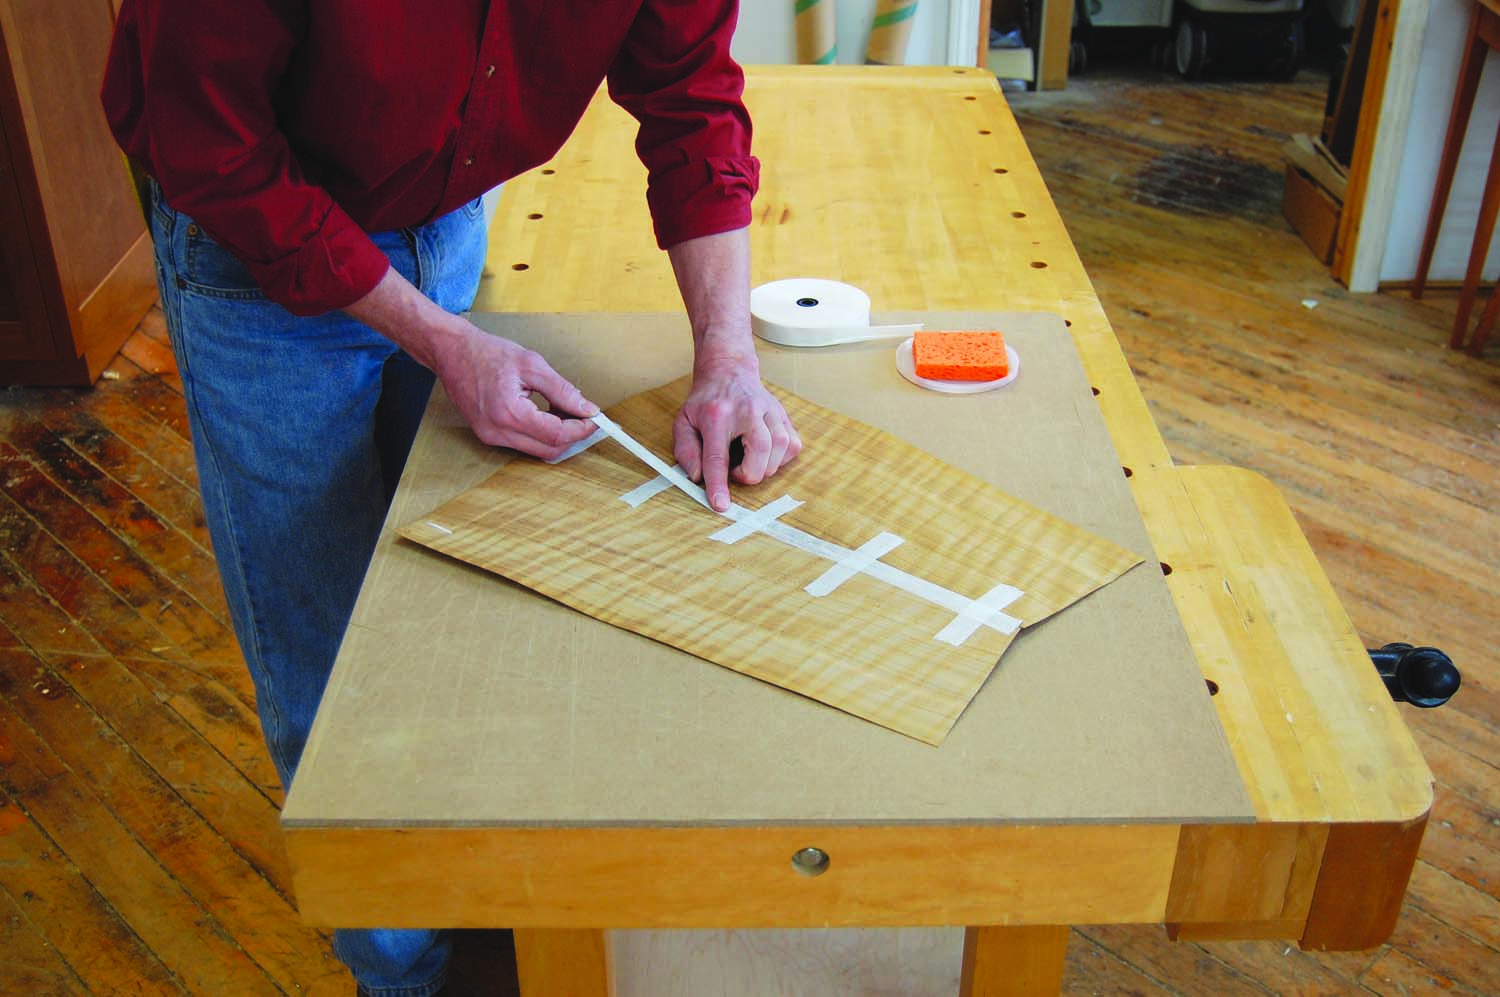
Photo 8. Use veneer tape on the front of the book-match. Tape the entire joint after applying short crosspieces. Wet the tape by pulling it between your finger and a wet sponge.
Cut short pieces of veneer tape (2″ to 3″ long) and moisten them by pulling the tape between your finger and a wet sponge (Note: The adhesive won’t adhere properly if it’s too dry or too wet, so experiment on scrap veneer before proceeding.) Apply the tape across the seam every few inches, starting at one end and smoothing as you go to avoid bubbles. Then apply a piece of tape down the entire seam over the top of the cross pieces (Photo 8). Burnish the tape by rubbing with your fingers or a piece of wood with softened corners to make sure it’s fully adhered everywhere. If some spots don’t properly adhere, immediately remove the tape in those spots and apply freshly wetted tape; don’t worry if the tape overlaps. Veneer tape typically dries in just a few minutes, and it shrinks as it dries, which pulls the seam together even tighter. After the veneer tape has dried, make sure to remove the blue tape on the back.
Prepare the Substrate
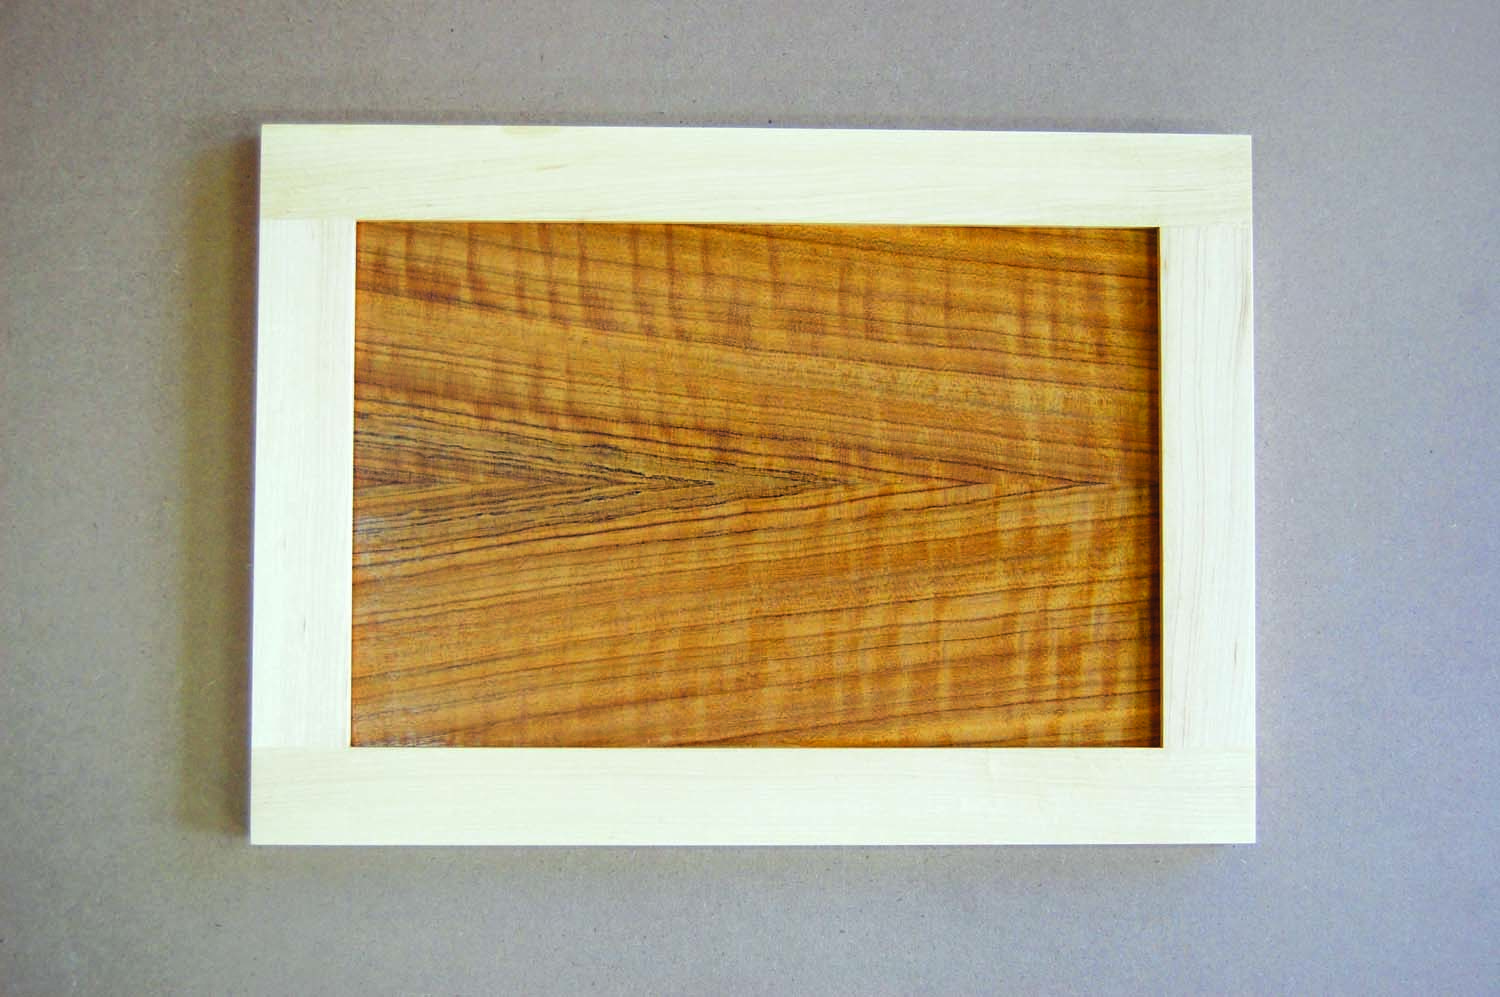
To form the panel, the veneer will be glued onto a smooth, flat and stable substrate such as 1/4″ MDF, which is commonly used because it’s economical and widely available. You’ll have to veneer both sides of the substrate to keep the panel from bowing. If the back of the panel won’t be seen, you can use a single leaf of less costly “backer” veneer on that side.
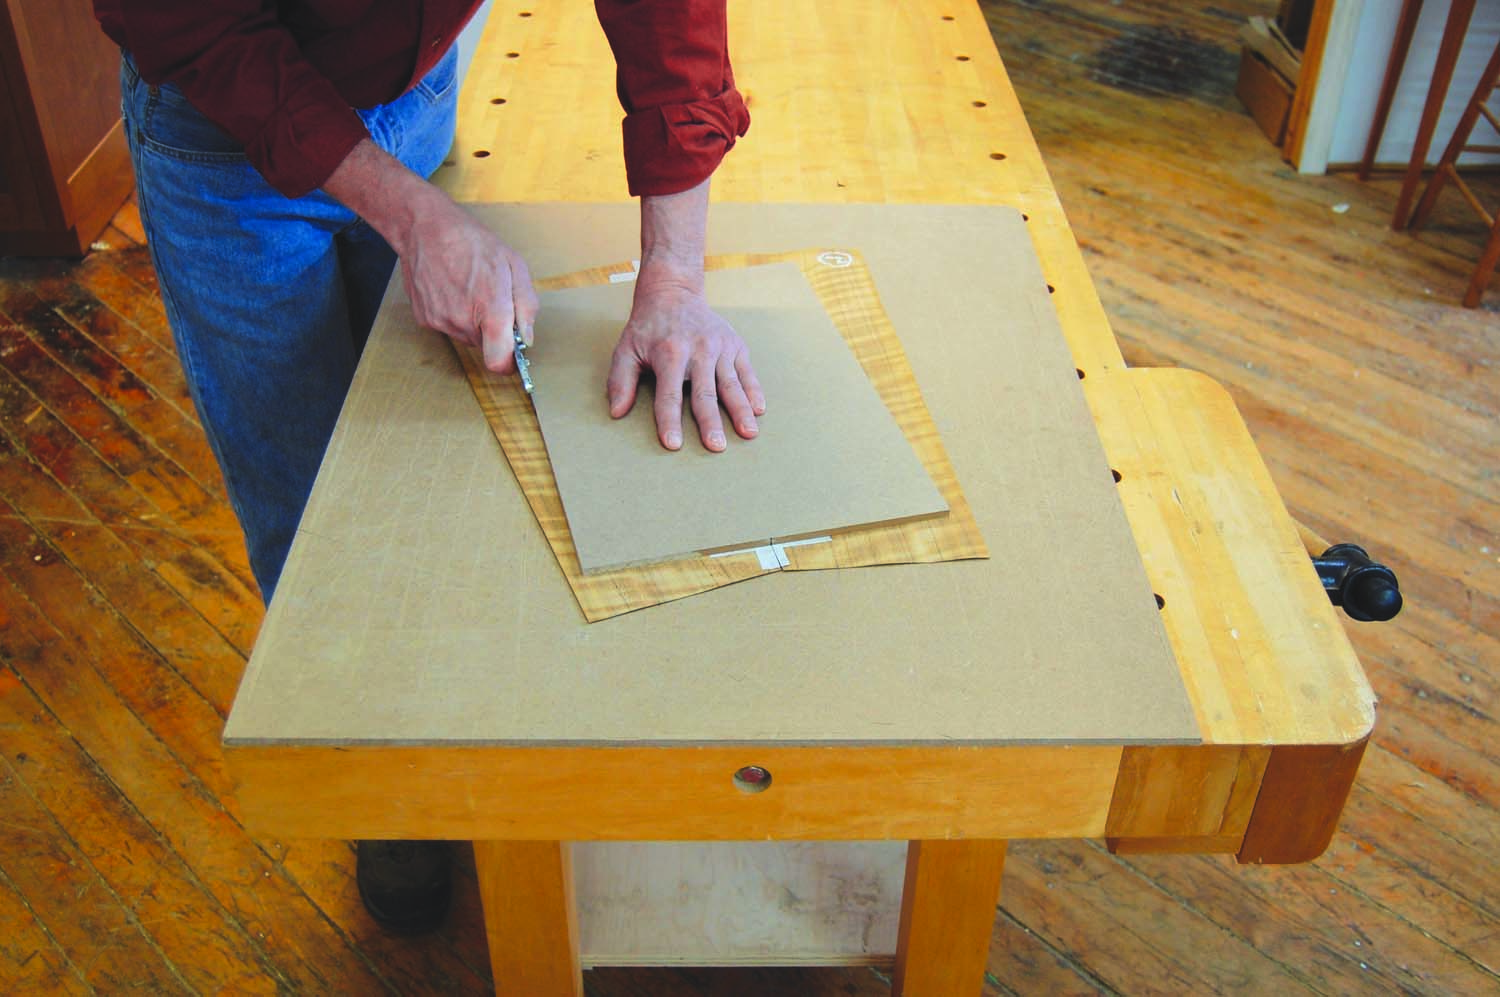
Photo 9. Cut the veneer to match the substrate. Align center marks on the substrate with the book-match seam. Then cut from the ends to the center on each side
Cut the substrate at least 1/2″ larger than the panel’s final width and length so you can cut off squeezed-out glue and re-square the panel if the veneer slips during gluing. Mark the center on both ends of the substrate. Then lay it on top of the veneer and line up the marks with the book-match seam (Photo 9). Hold the substrate tightly on the veneer and use a utility knife or veneer saw to remove the excess veneer. Cut the backer veneer the same way.
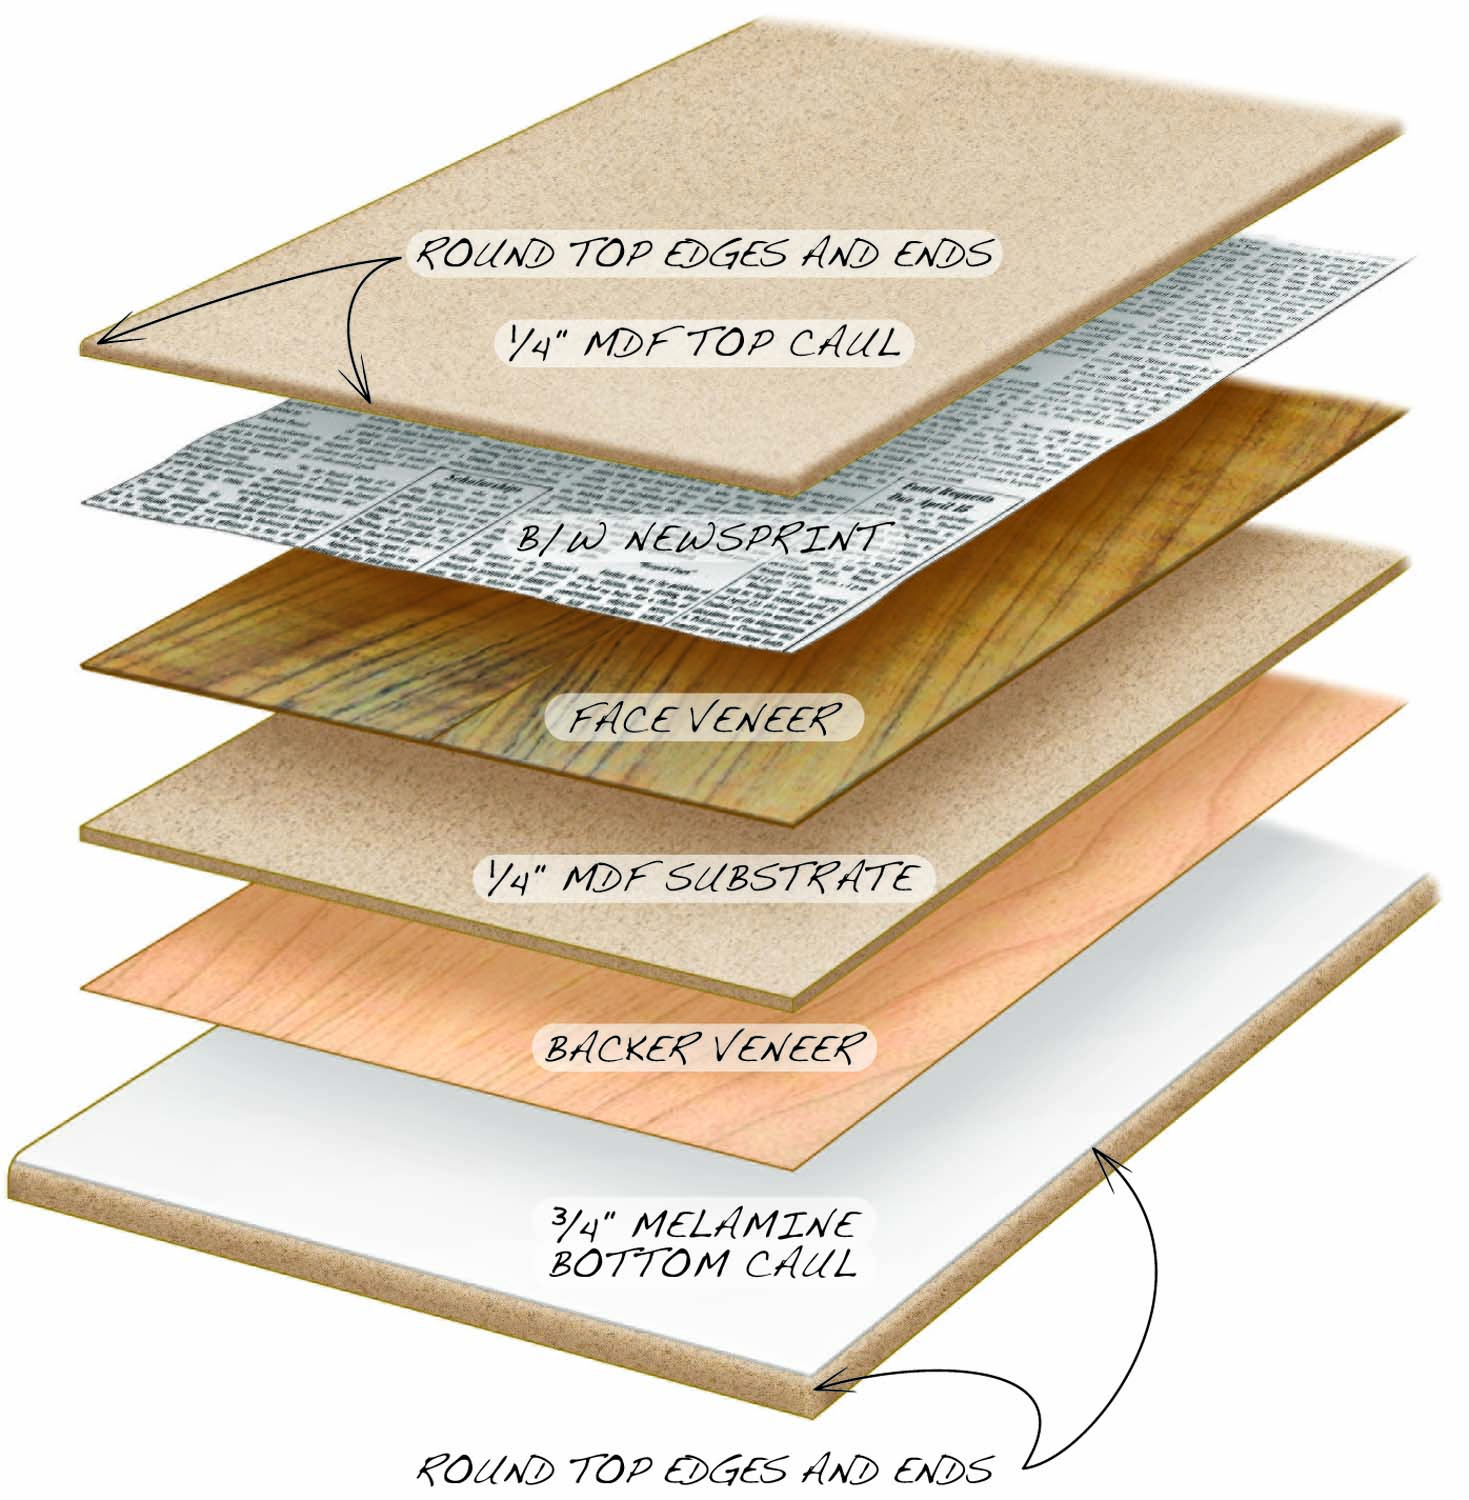
Fig. A. The Veneer Stack
Prepare for Gluing
A variety of glues can be used for veneering, but yellow wood glue is the best choice for simple veneered panels like this one. I like to use Titebond Extend. It’s one of the more rigid PVA glues and it has a few more minutes of open time than regular yellow glue. If additional moisture resistance is required, use Titebond III.
A vacuum bag is the easiest and most flexible method for pressing veneer onto a substrate. The traditional method of using cauls and clamps works just as well—as long as you make sure the clamping pressure is evenly distributed. But with a vacuum bag, you don’t have to worry—it provides even pressure on the entire panel equal to atmospheric pressure, nearly 2000 lbs/sq. ft. A small pump, 4′ x 4′ bag, and associated tubing costs about $400.
Inside the vacuum bag, the veneer and substrate are stacked between cauls to evenly distribute the pressure and prevent any dried glue or other contaminants from damaging the veneer (Fig. A). The bottom caul can be larger than the panel. I use 1/2″ melamine for this caul because glue won’t stick to it. The top caul must be the same size as the panel. (If it’s too small, some of the veneer won’t adhere; if it’s too large, the vacuum pressure can break it.) Since each top caul has to be custom sized, I use 1/4″ MDF and add a piece of newsprint between the veneer and MDF to keep glue from sticking to the caul. Break all edges and corners of the cauls so they don’t damage the vacuum bag.
Press the Panel
Make sure all the blue tape has been removed as you stack the veneer, substrates and cauls in order. Flip the stack so that the backer veneer is on top. Then set the backer veneer (tape down if it’s book-matched) onto the melamine bottom caul.
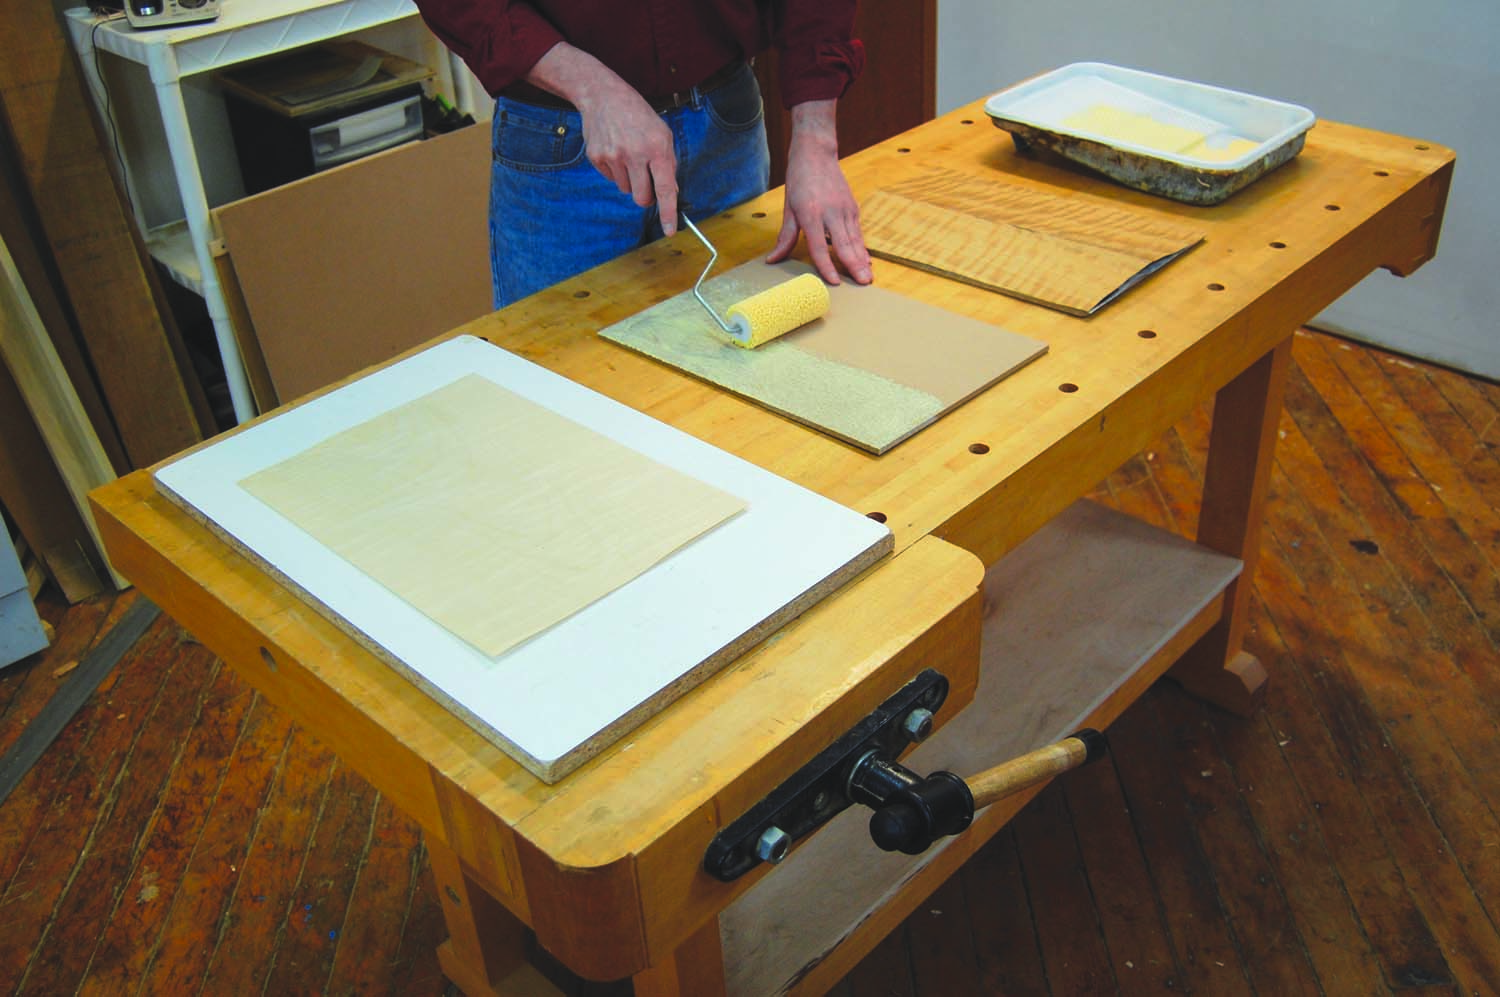
Photo 10. Roll a thin even layer of glue onto the substrate after stationing the backer veneer and the inverted veneer stack so you can work efficiently.
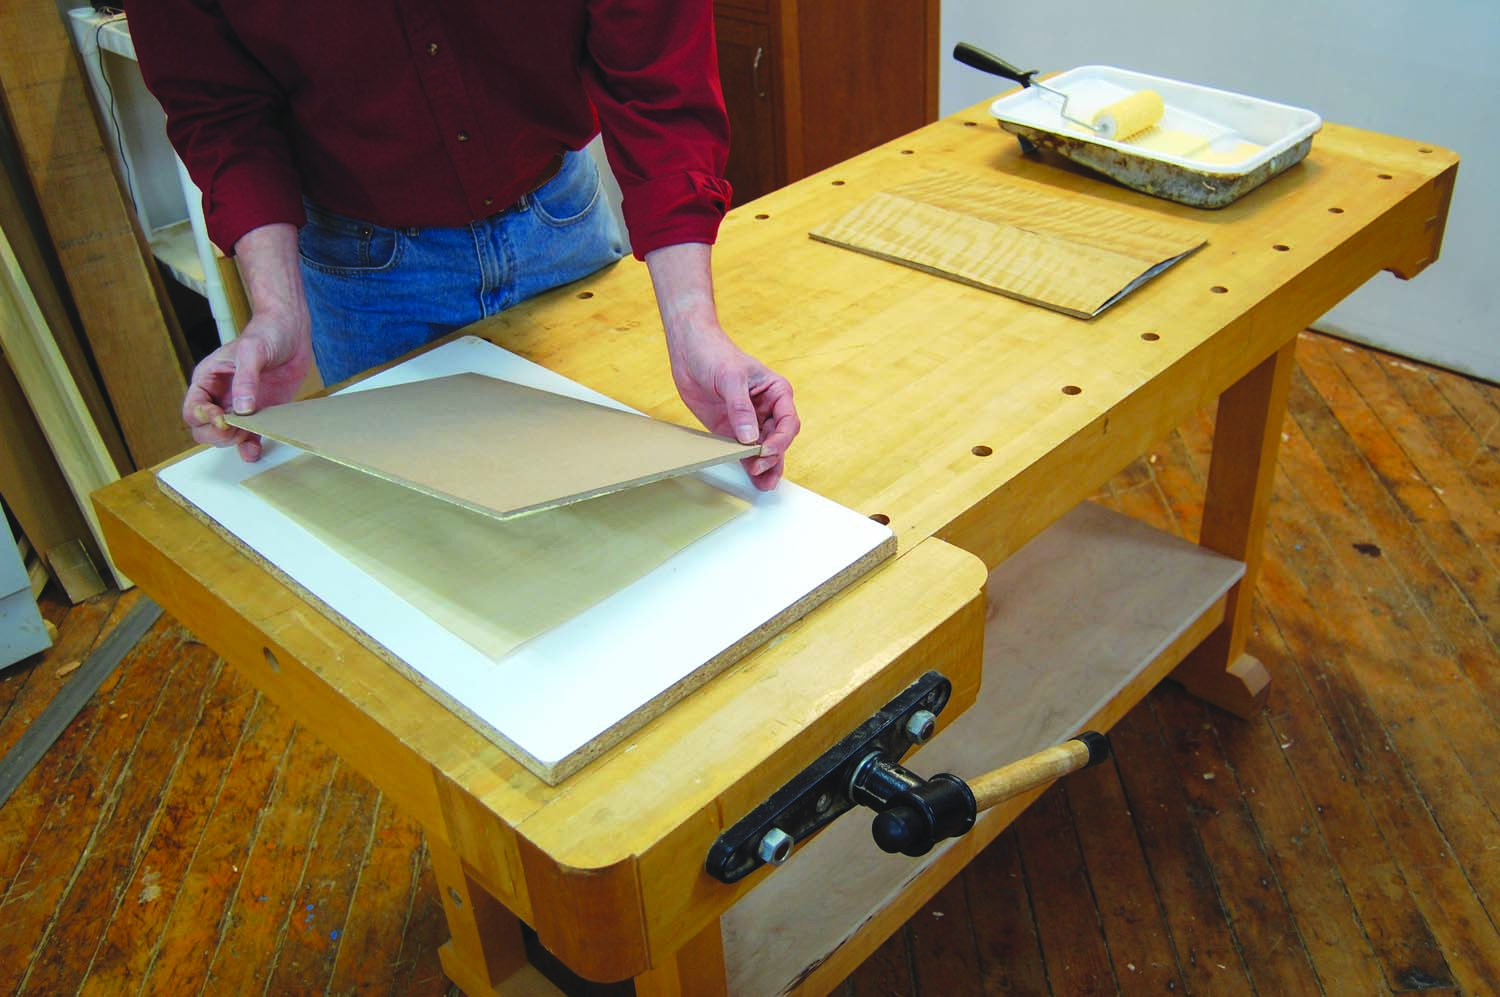
Photo 11. Carefully position the substrate on the backer veneer, glue-side down. Then roll glue on its exposed face and carefully position the book-matched veneer on top, tape-side up.
Apply a thin, even layer of glue to the substrate (Photo 10). Never apply glue to the the veneer—it will curl before you can get it into the bag. Carefully place the substrate glue side down onto the backer veneer (Photo 11). Next, apply glue to the other side of the substrate and then carefully position the book-matched face veneer. Immediately put the newsprint and top caul on top of the face veneer (Photo 12). Then use blue tape on all four sides of the stack to help hold it in place. Open the vacuum bag and insert the entire stack, taking care not to shift the veneer. (Because the top caul is the same size as the panel, it’s easy to tell if any of the pieces have moved.) Seal the bag tightly according to manufacturer’s instructions and turn on the vacuum pump. Hold onto the stack while the air evacuates to keep anything from shifting and to smooth out any air bubbles or creases in the bag (Photo 13).
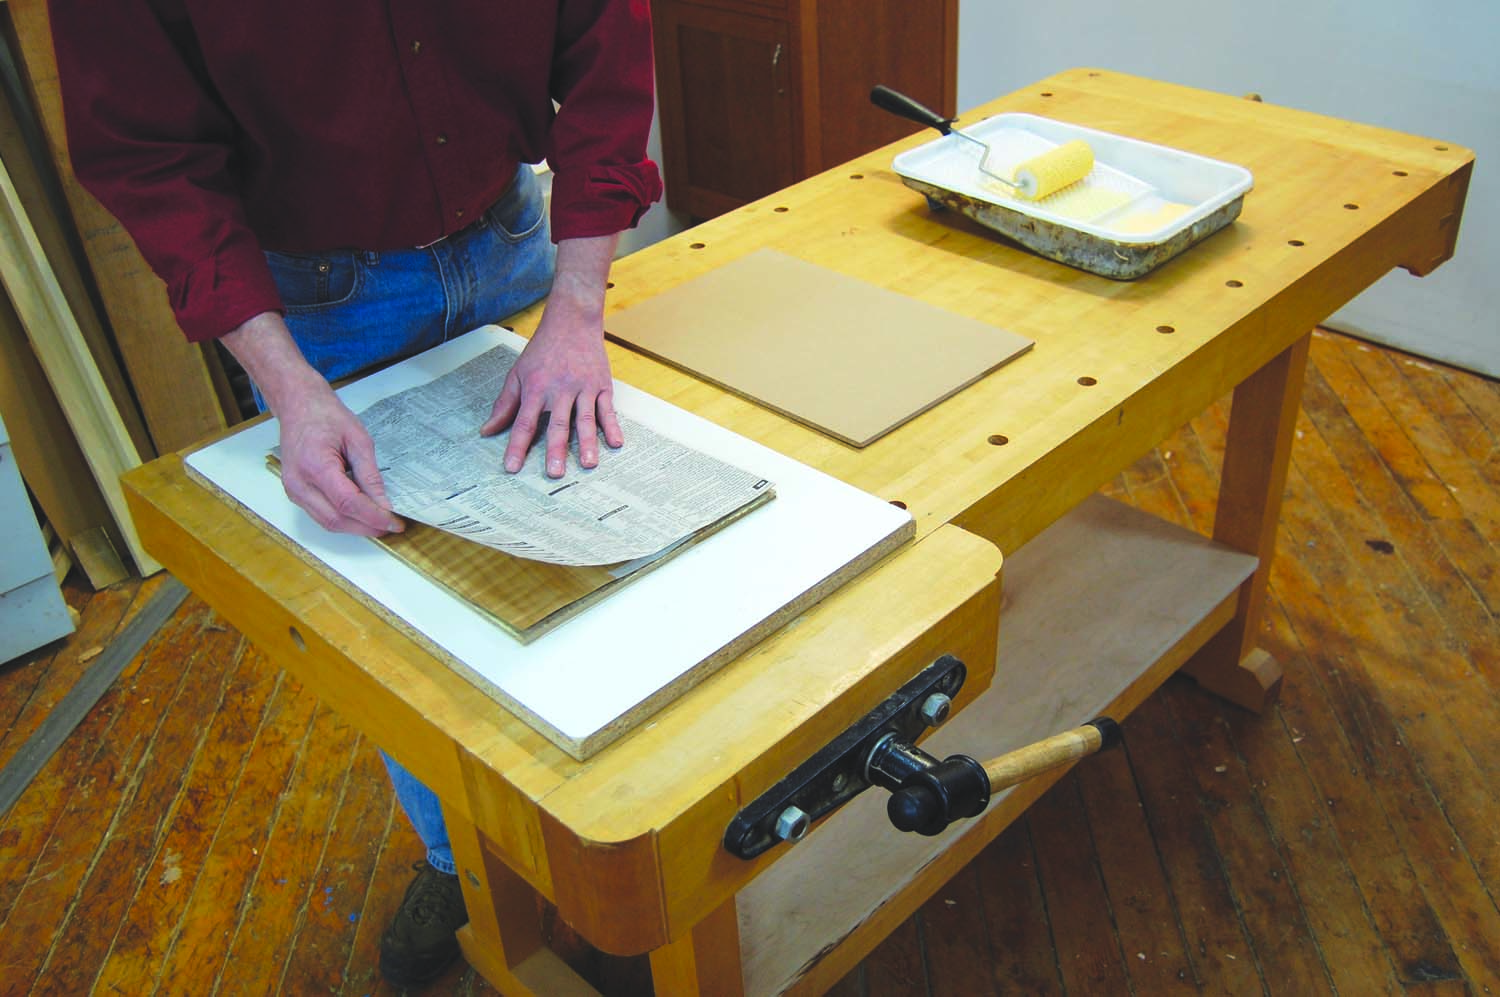
Photo 12. Place newspaper between the book-matched veneer and the top caul to absorb any glue that bleeds through, so the veneer and caul won’t get glued together unintentionally.
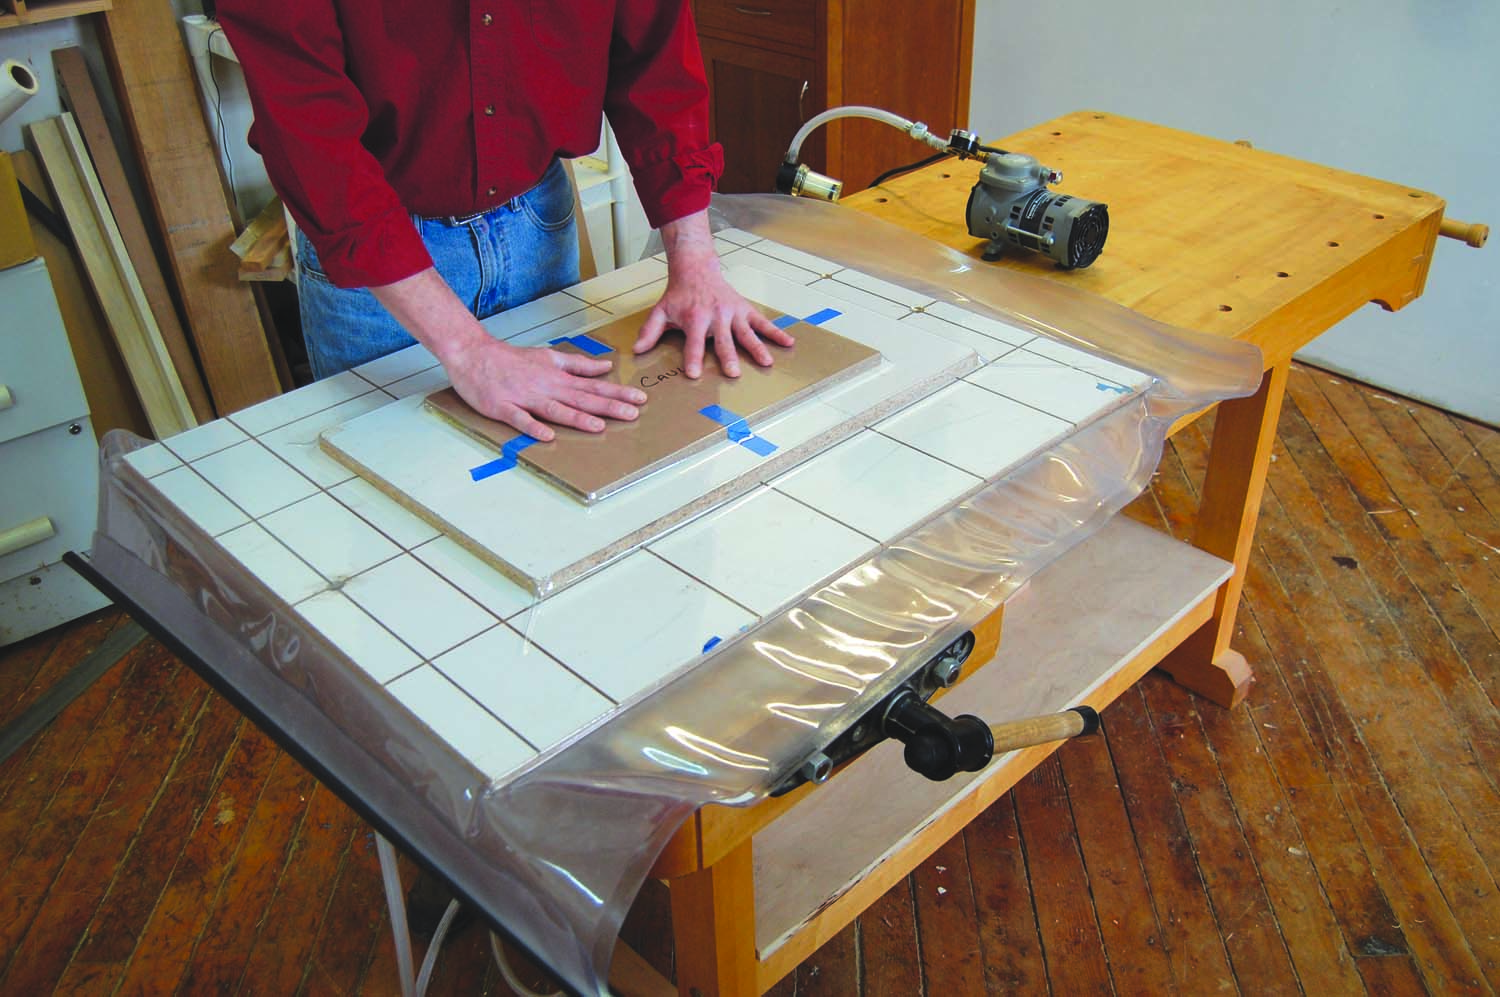
Photo 13. Clamp the veneered panel with vacuum pressure after inserting the stack in the bag and making sure none of the parts have shifted.
Finishing Up
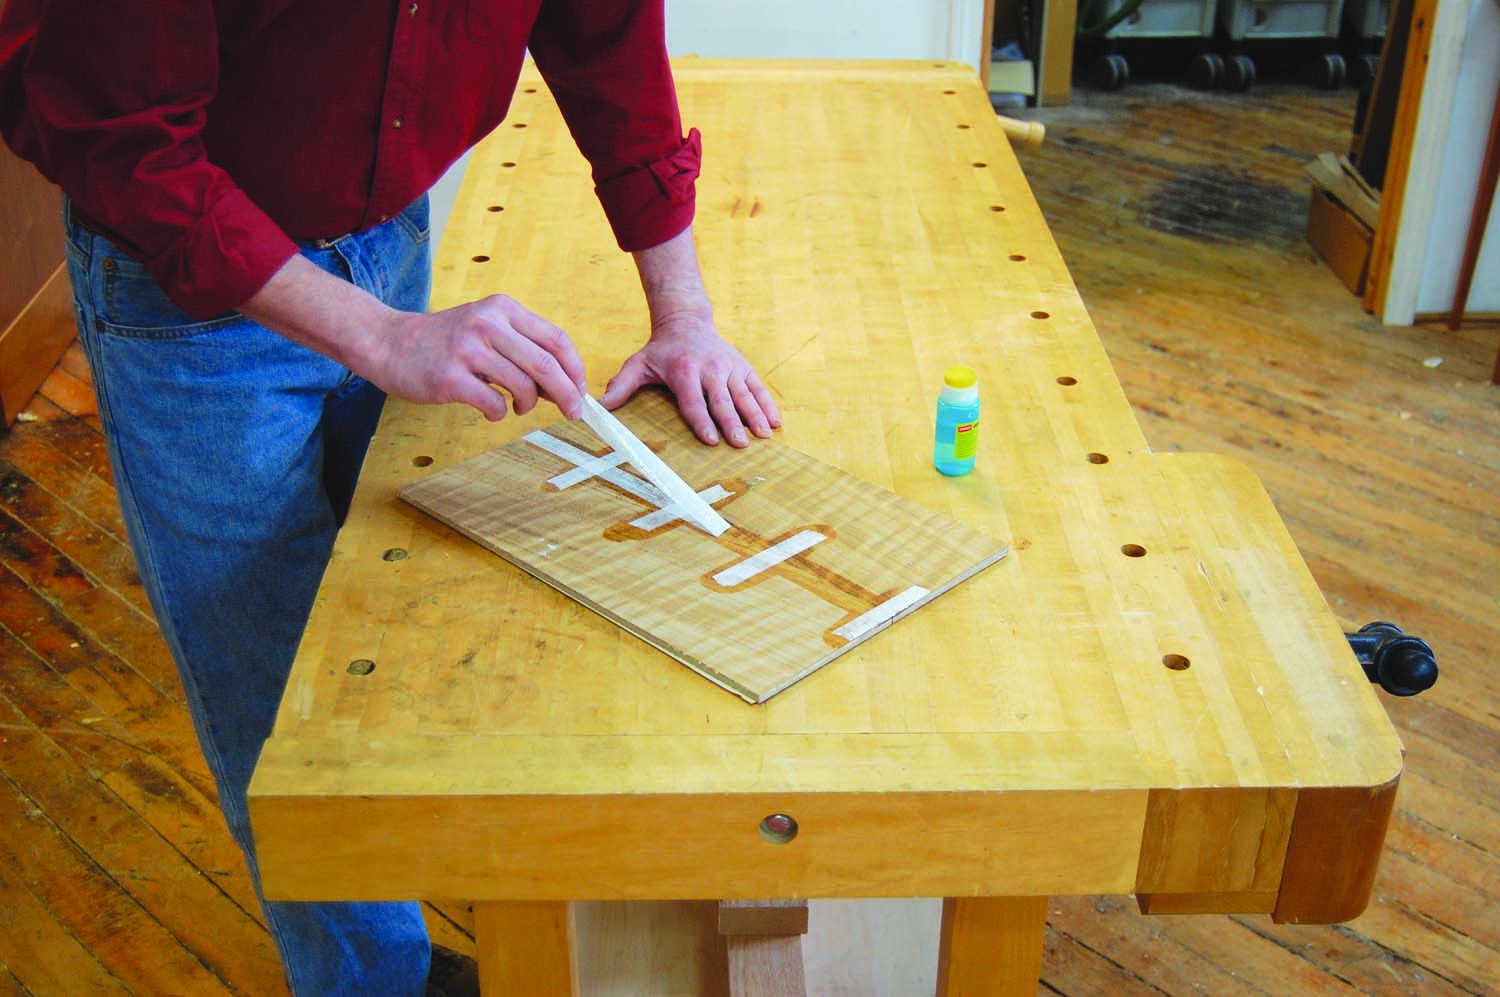
Photo 14. Peel off the veneer tape after wetting it and waiting a couple of minutes. A bottle with a sponge applicator wets the tape more evenly and with less mess than a sponge.
PVA glue can’t completely cure in a vacuum, so remove the panel from the bag after about one hour and allow it to dry at least 24 hours with air circulating around all sides.
Remove the veneer tape with a sponge or an envelope moistener (Photo 14). Use a wet nylon abrasive pad to scrub off any remaining residue. Then wet the entire panel on both sides and look for bubbles where the glue didn’t adhere properly (water makes the bubbles stand out). A hot iron will flatten these bubbles, if there’s glue under them. If the iron doesn’t work, you’ll need to inject glue with a syringe and then flatten the bubble by clamping it. Finish the panel by scraping, sanding, and cutting it to final size.
Bio
Greg Larson is the owner/director of the New England School of Architectural Woodworking (NESAW) in Easthampton, MA. For more information, visit nesaw.com.
Here are some supplies and tools we find essential in our everyday work around the shop. We may receive a commission from sales referred by our links; however, we have carefully selected these products for their usefulness and quality.