


We may receive a commission when you use our affiliate links. However, this does not impact our recommendations.
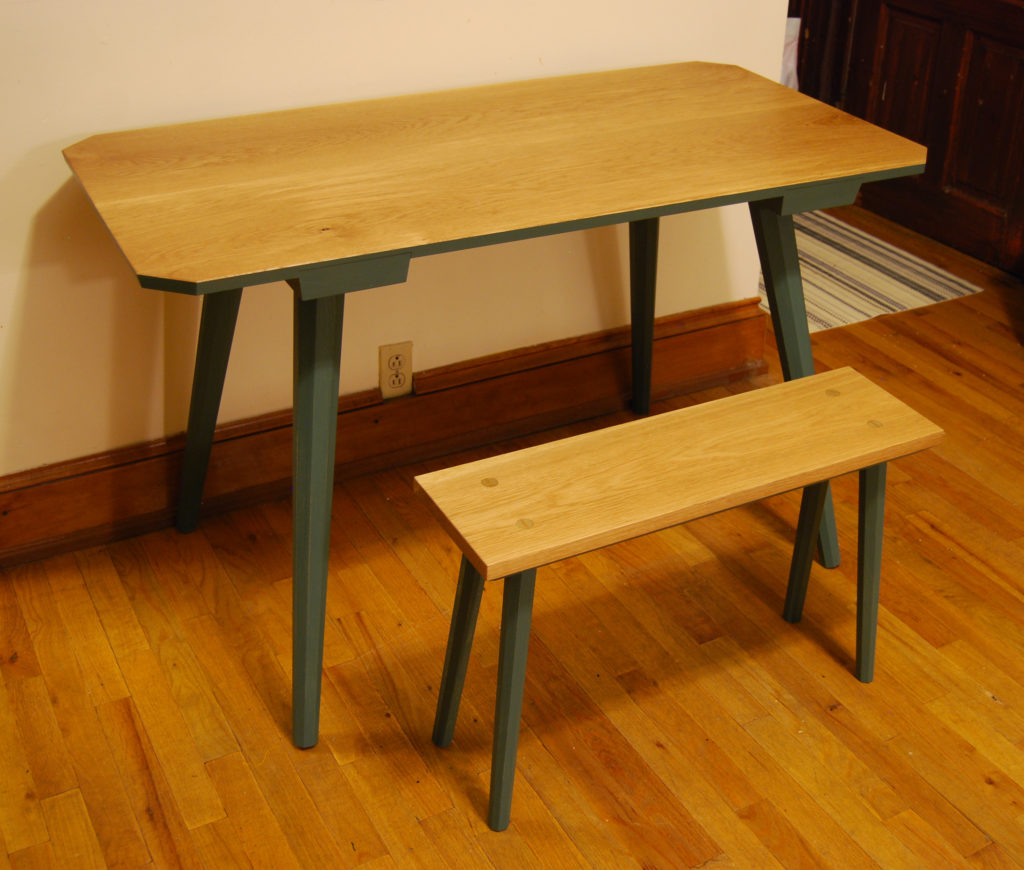
The table (and its little bench brother). The staked furniture process is great for quick, simple and beautiful forms, with strong joinery.
When Josselyn and I moved out here to Covington, I refused to do two things. For one, I wasn’t going to bring some of the beater furniture that had been following us around since college. And two, I didn’t want to buy any cheap furniture when we got here, with the plan of replacing it. This led to the need to build durable, good-looking furniture with some speed, and a few meals on the couch.
Christopher Schwarz’s staked table and chair designs rise to the call for quick, durable furniture. After building our coffee table a week or two back using staked legs, I decided that the worktable, from Chris’s “Anarchist Design Book,” was the right piece for our kitchen table. I knew I wanted to use white oak for its beauty and durability, and I also knew I wanted to emulate the finish on one of Chris’s tables that sits in his Lost Art Press showcase, with a painted undercarriage and solid wood top.
The construction for the worktable is straightforward – four legs get mortised into two battens, which are in turn fit into the tabletop with two large sliding dovetail slots.
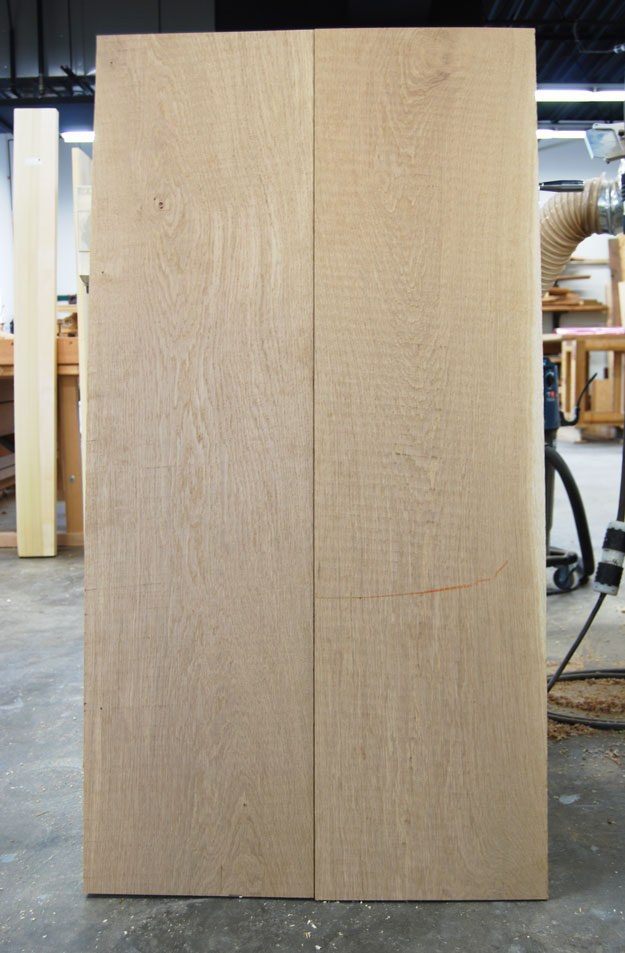
This was one long flat-sawn white oak board that was cut in half (with a few defects also removed) to make this nice two board top.
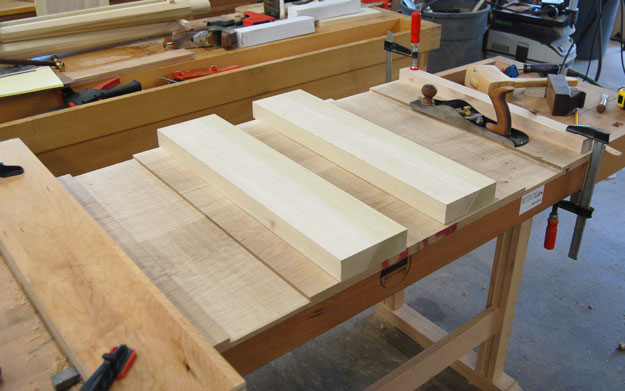
Armed with that information, I went down to the lumberyard and bought some poplar for the battens and legs and a gorgeous 13-1/2″ wide flat-sawn white oak board. The oak boards make this project a bit of an experiment – white oak sometimes cups or warps, and wide flats-sawn boards like this would only increase that likelihood. However, the construction of this table, with the large battens fit across the grain, may act to resist this movement. The tabletop is glued to the undercarriage on one side to push the expansion movement to the back of the table – if cupping does develop, I can always put in some simple fixtures to hold down the table where necessary in the future.
A good omen for the quality and stability of this board came immediately – it did not move after being crosscut, milled and stickered in the shop for a few days, and so, I proceeded with making the tabletop. This meant jointing and glueing the two halves of the tabletop.
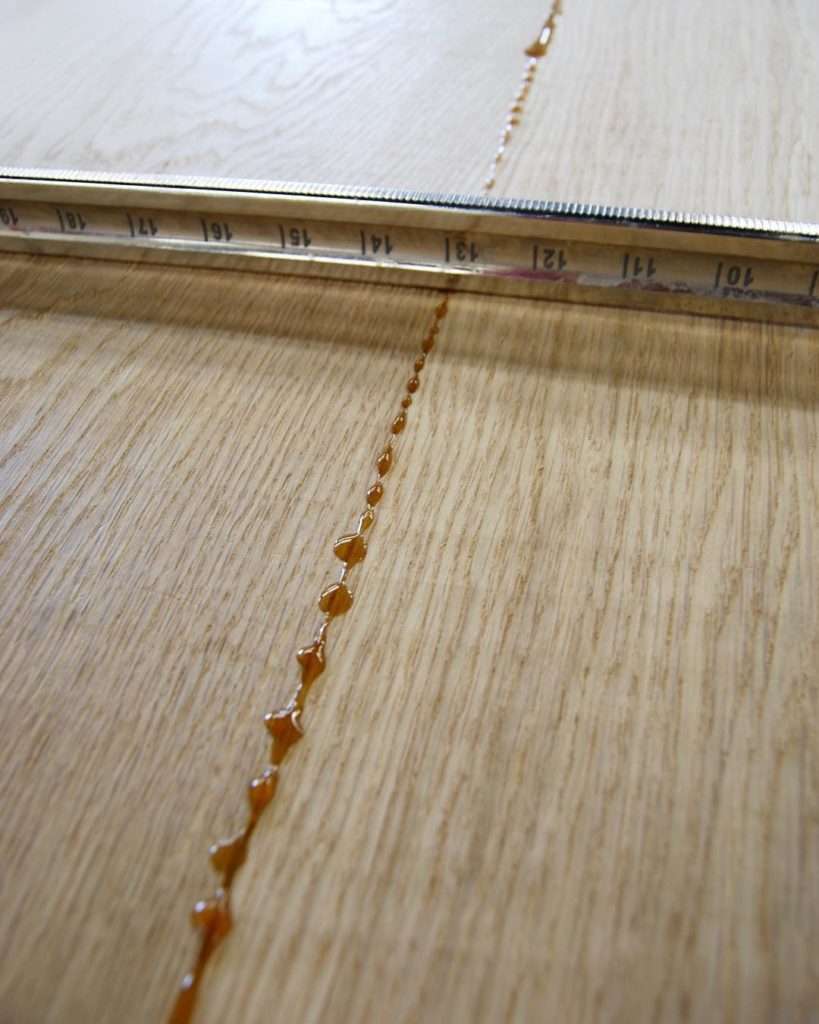
Just the right amount of glue, and a good edge joint, leaves you with a perfect joint. I want to see squeeze-out, not rivers of glue, but not bone dry.
This is pretty long edge joint, at 52″ or so. Armed with a long jointer plane and square, though, it isn’t too demanding a task. I put a very light spring in the middle of the board, to ensure contact across the long edges. I used hide glue in the glue-up, and the results show above. I’m always looking for squeeze-out during a glue-up. Its absence says that I didn’t use enough, though too much means a big clean-up. I shoot for little beads of glue poking out of joint.
The tabletop was too wide to pass through our planer, so after the glue-up, there was some handwork to be done, with my trusty Lie-Nielsen No.62 and my Krenov smoother.
Here, the process from milled lumber to leg. First, I tapered the stock, then turned the tenons, and finally planed the facets. The turning and tapering steps could be reversed – personal preference, I guess. I think I just wanted to get on a lathe that day.
While waiting for the tabletop’s glue to cure, I worked on the legs. I chose poplar for the legs because it’s inexpensive, strong and easy to work. I’m painting all of the poplar, so all I was looking for at the lumberyard was clear, straight-grained wood.
I milled the pieces to 2 1/2″ square, and then tapered the stock to 1 1/2″ at the bottom. To put in the tapers, I bandsawed to a pencil line and then finished the taper by hand with a jointer plane. Next, I turned the massive 2″ cylindrical tenons (not conical, like the previous table). Using the lathe to turn the tenons is easy – I used a parting too to establish the shoulders and depth, and then used a roughing gouge and skew chisel. I cut a 2″ hole in a piece of maple scrap, and used that as a turning gauge, along with outside calipers.
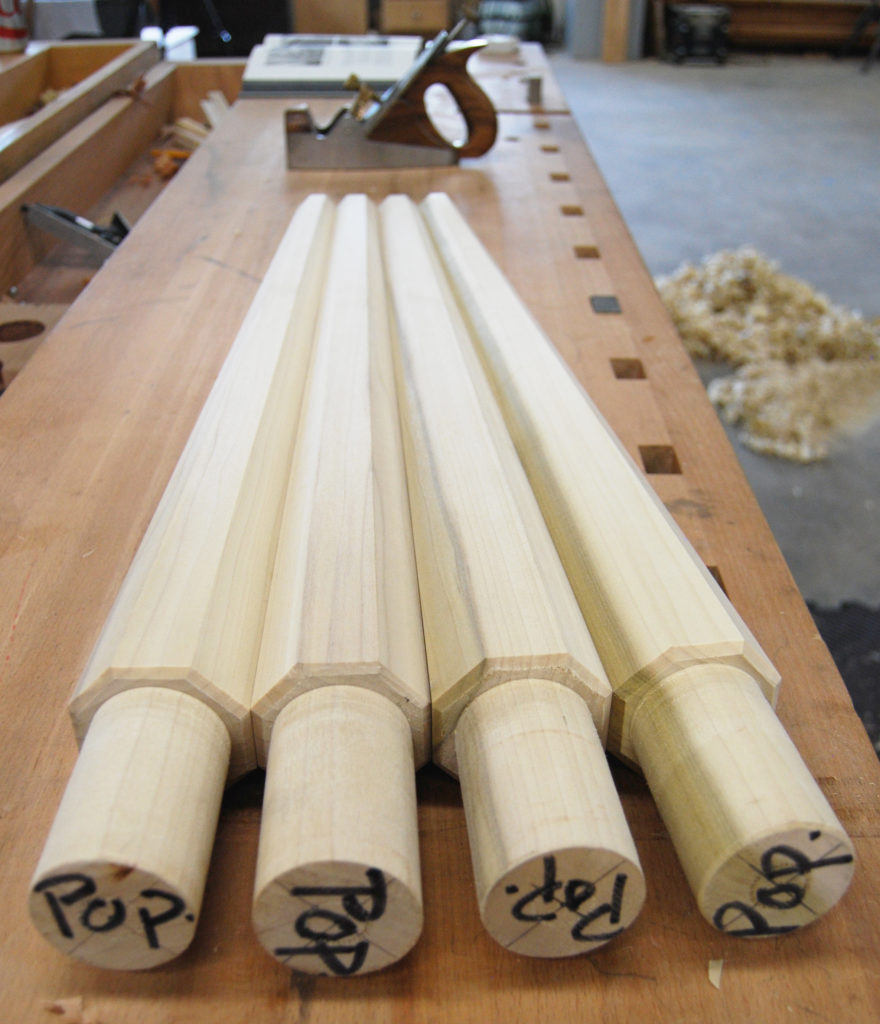
After turning the tenons and roughing out the tapers at the band saw, I used a plane to put in the octagonal facets and smooth the surfaces.
With the tenons in place, I planed the octagonal tapers using a smoothing plane. You can use a sled with a deep v groove to hold the piece while putting in these facets, but I just held the work between the tail vise and a bench dog.
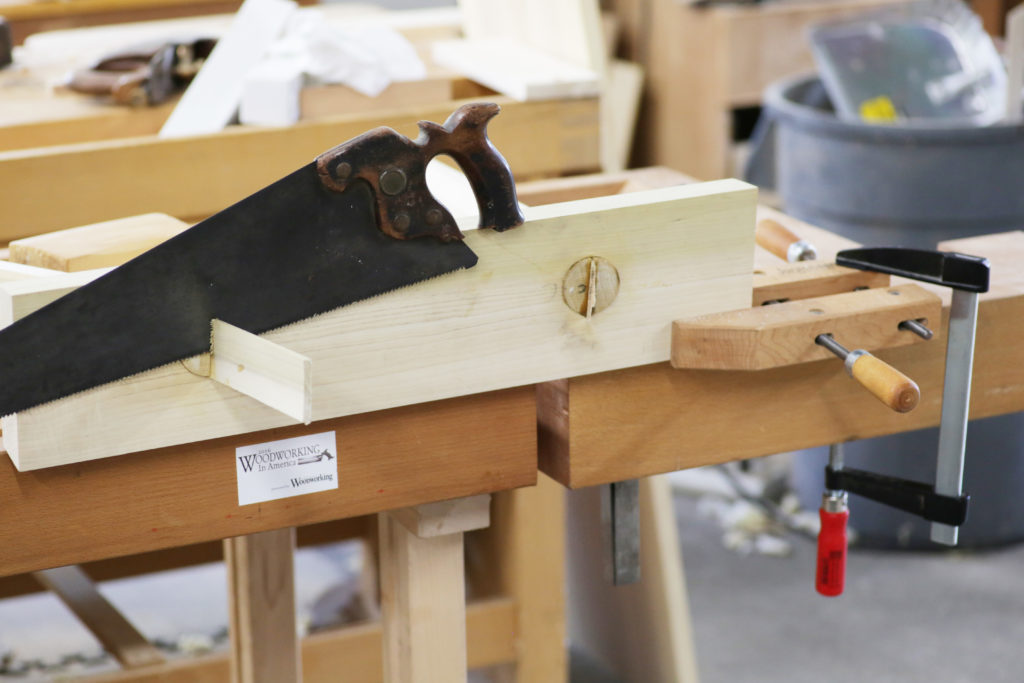
The battens were milled from poplar, and have a dovetailed cross-section that corresponds to the sliding dovetail mortises.
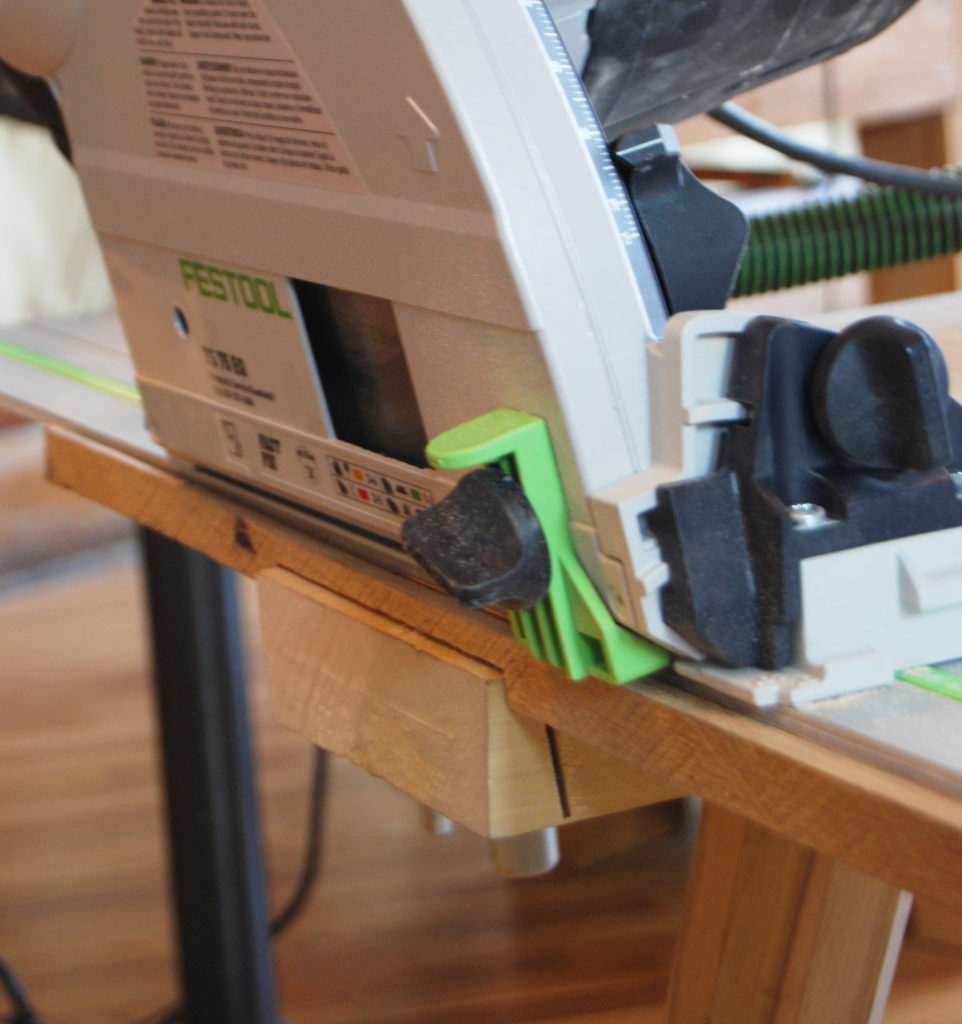
With the legs done, the next step was to route the sliding dovetails and fit the battens. This was accomplished with a router and handplane – I wrote the process up in a post last week. I was looking for quick ways to put in the joinery, and so I used some power tools. In the end, I think the hand tool approach is a bit nicer, a lot cleaner, and not really much slower – I’ll probably turn more towards the hand tool process in the future, or some middle ground between the two.
A simple angle bed for the drill press gave me a consistent splay on the legs. The sightlines drawn on the board are aligned with the point of the Forstner bit and the center of the drill press column, so nothing goes askew. Also, firmly clamping everything down here was important – a 2″ Forstner bit has some torque capabilities that need to be dissuaded.
With carefully fit battens and slots, and a tabletop that remained stable and flat through the process, I proceeded with the last bit of joinery in the table, the 2″ mortises in the batten. On the staked coffee table, I used a power drill to drill my angled mortises – here, because of the size and depth of the holes, I used an angled auxilliary bed for the drill press.
The process for drilling these mortises was not too different from using the handheld drill. I used an awl to mark the center of the hole and drew sightlines at the correct splay angle through these points. To line that angle up correctly, I lined up the pencil line, the point of the Forstner bit and the post of the drill press. I also clamped the battens to the table before drilling to ensure there wasn’t any movement – a 2″ Forstner bit has a fair amount of torque, and I didn’t want anything whipping around if something grabbed during the cutting.

Here the mortises are drilled, and the legs are fit, but not wedged to glued yet. It was worth doing a dry run here, to check that the angles of the mortises came out right.
A quick dry fit confirmed that the angles were correct, and the tenons fit properly. If you are turning tenons or drilling large mortises for the first time, it may be worth leaving the tenons until this point – the 2″ mortises can wind up a tiny bit big, due to slop in drilling. Fitting the turned tenons to their final mortises may be easier, and more accurate.
I also had a quick moment of reflection at this point – I see so many “simple” ways of putting legs on a board of wood or project – bent metal, preturned legs, reclaimed joists, etc. These batten/leg units could easily be fit under any tabletop, with or without the sliding dovetails. They’re easy to make, cost very little (~$18 of poplar) and will do a lot aesthetically for your slab, tabletop, etc. As a design element, they’re simple, cheap and fast – it’s hard to get all three in a single package.
I used longish wedges in the tenons, because I had them on hand (they’re the saw off tapers from the legs). First, I crosscut them close to the tops, and then plane them.
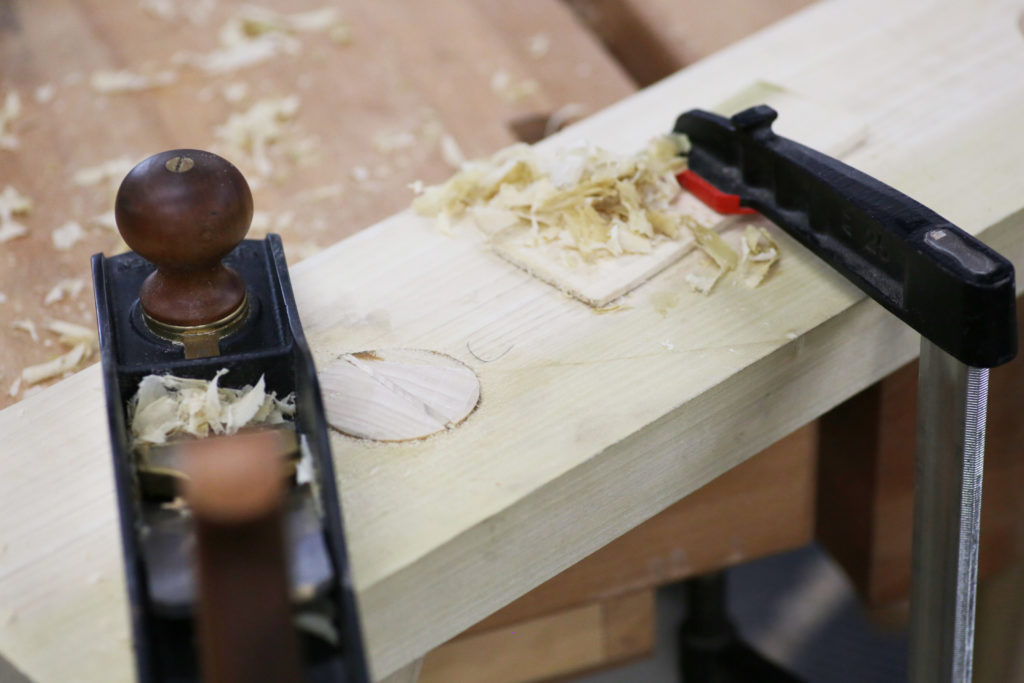
Time to flatten the proud tenons, so the batten will slide in and out of its mortise.
The battens and legs were now ready to glue up. I sawed a kerf down the middle of the tenon, stopping about 1/2″ from the shoulder. I also drilled a 3/16″ hole at the bottom of the kerf, which is intended to halt a split in the leg during the wedging process (though this may be somewhat superstitious). I put some hide glue on both the tenon and mortise, pounded them home and wedged them.
After letting the glue sit overnight to cure, I came back to flush the wedges and tenons to the top of the batten. First, I sawed off the bulk of the material, and then I moved to the low angle jack plane to bring it fully flush. I was careful to only take down the tenon, because any material I take away from the surrounding batten surface may change how it fits in the dovetail slot.
The worktable is assembled and glued. The tabletop is oversize here and will get trimmed down now that it’s been permanently assembled.
At this point, the table went together, and it could’ve stay like this – a knockdown table, without glue between the batten and tabletop. However, I was going for durability here, not portability. I decided which side of the tabletop would be the front, and applied glue to the front 6″ or so of the batten and tabletop slot. I pounded that home, and clamped it – this large flat area will help resist cupping, though it isn’t wide enough to cause movement issues. Glueing at the front will push the seasonal movement of the top to the back of the tabletop, and the joints in front will stay clean. I have to admit, I started to like the look of the oak and poplar together. I’d decided at the outset, however, that I wanted to try a two-tone milk paint and raw wood aesthetic.
After the glue-up, the tabletop was trimmed and beveled all at once, with the track saw.
Next, I trimmed down the length and width of the tabletop. I also wanted to bevel in the top and battens slightly – a good job for a track saw. I wrote this process up in a separate post last week, detailing how much I like using track saws when building furniture.
After dimensioning and beveling the top with the track saw, it was time to prep for the finish. I smooth-planed and then sanded everything to #320 grit. After #180 grit, it was all hand sanding – I hate those little orbital sander squiggles, and doing it by hand with the grain solves that issue. And yes, I could’ve done the whole tabletop with a plane – but for Osmo polyx oil (the finish I’m using) I prefer a sanded oak texture rather than the planed oak texture. It feels a bit more uniform and smooth, as the pores are more covered and filled. Because I sanded instead of planing, however, I had to check for more raised grain while finished, and touched it up with some sanding between coats of finish..
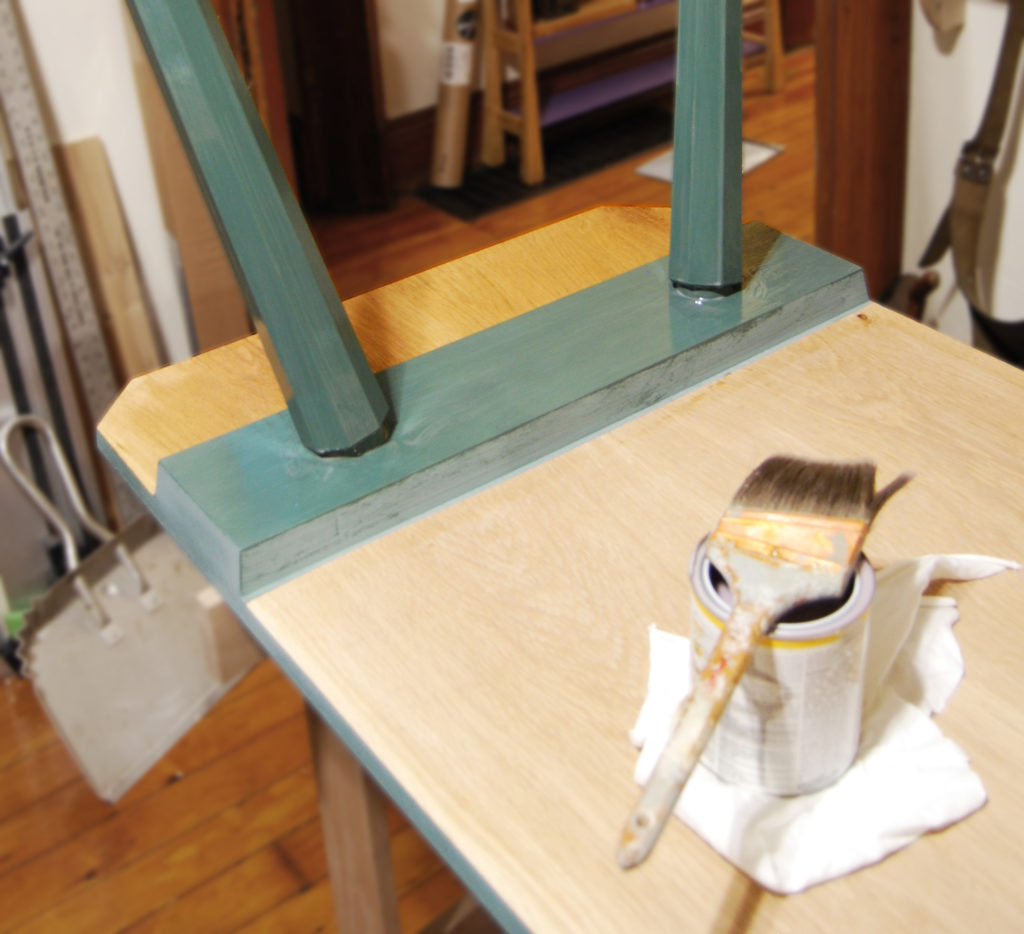
Here the milk paint has already been applied, and the Osmo is going on over everything. The color change isn’t much, but the sheen, albeit matte, gives a depth to the color and grain of the painted and bare surfaces.
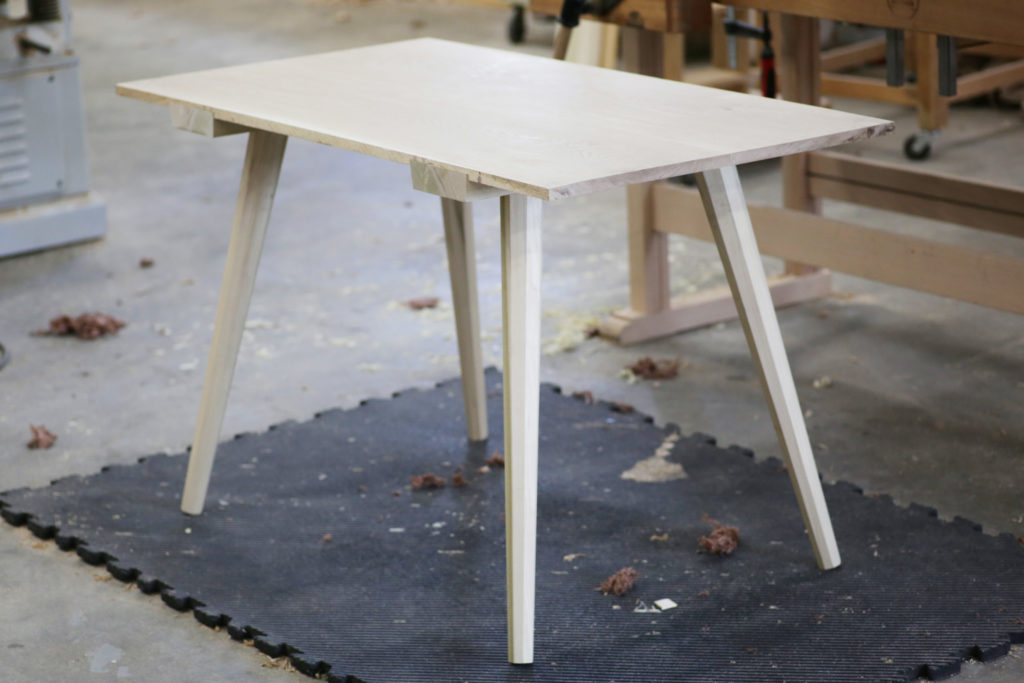
As always, the piece started to really develop a personality towards the end. This table is just inside the door to the kitchen, and with my midnight snack runs and groggy morning coffee stumbles, I’ll be a bit less dinged up than usual with softer corners. So, I cut them off, making four small cut corners, and an eight-sided tabletop – it goes nicely with the eight sided legs.
The milk paint also went on beautifully. It took three coats, the first of which was sanded down thoroughly. The next two coats needed only a bit of buffing between and after them. I used Mirka Mirlon, fancy scuff pads I saw on Peter Galbert’s Chairnotes blog a while back, and the stuff works great to burnish the paint, without removing too much.
Finally, after the paint had been buffed one last time and breaking the edges with a small plane, the entire table got three coats of Osmo Clear Satin Polyx Oil. This oil is hard to find in stores, but can be ordered online, and it is well worth it – it’s quickly becoming my catch all finish. Between Osmo and shellac, I don’t really feel the need to use much else – and the poly I used on the madrone ended up begin tough, but not my favorite look.
Osmo has a few things going for it. For one, it’s as easy to apply as any oil – flood the surface, wait (10 or 15 minutes seems about right), and then wipe off the excess. That means no pre-finishing before assembly. It also leaves a durable surface with an even matte sheen, and it doesn’t color the wood much. Speaking of coloring the wood, the finish is available in a bunch of colors – at the Center for Furniture Craftsmanship, I saw a lot of great examples of students using the white Osmo on ash and other light colored woods. I’ve used Osmo for some time now, even on the tools I was making, and it always beat out my expectations.
And with that, the table is finished:
The table and its little bench brother. Even though the construction style is relatively different between the two, the milk paint, leg shape and similar woods stitch the aesthetics together nicely.
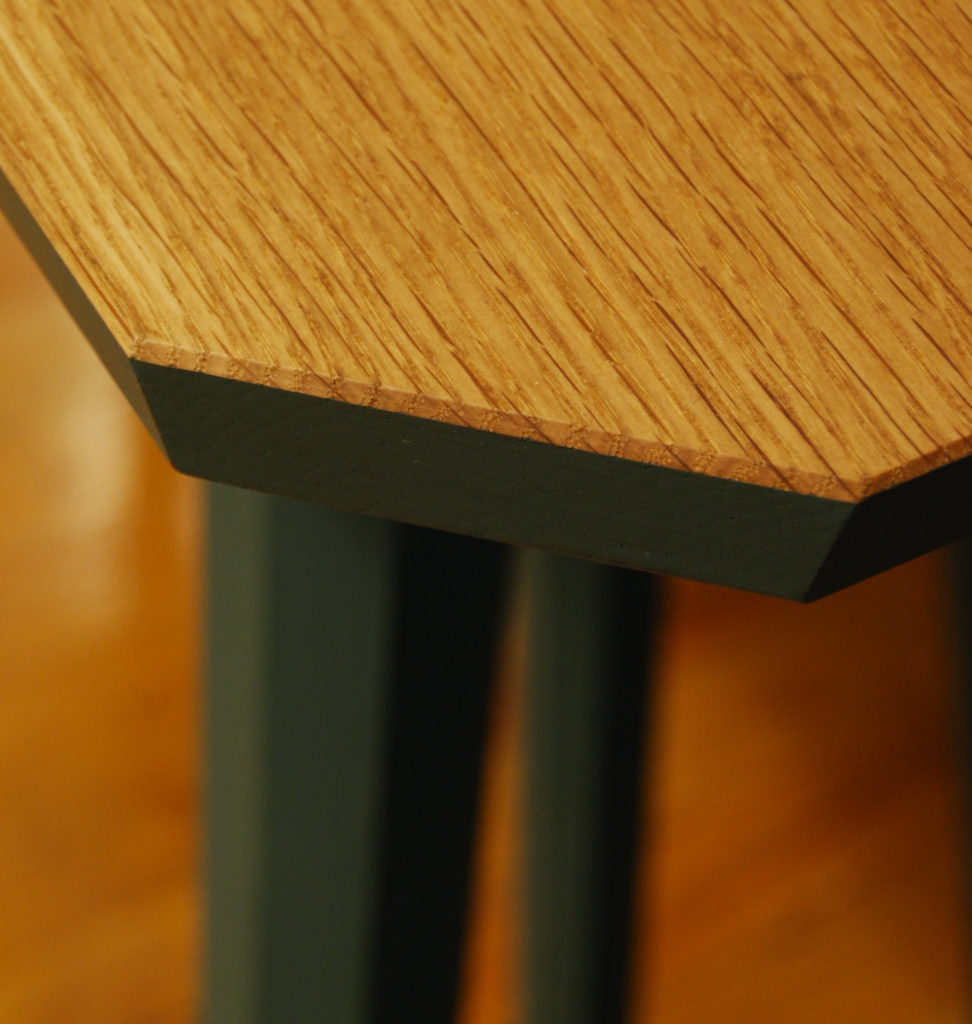
A small chamfer frames the oak tabletop and leaves a clean line separating the oak and painted surfaces. I put this chamfer in after the paint and before the Osmo, so it became a great dividing line between the raw and painted wood.
The finishing schedule was a little slow on this guy – I gave each coat of Osmo a day to cure, so in the mean time, I skipped ahead and made a matching staked bench. This, again, was based on one of Chris’s designs from the “Anarchist Design Book.” I made mine with very little splay because I wanted a small footprint that could be tucked under the table or against a wall when not in use.
The table has been through a few meals now – I’m happy to say that it works. More importantly, it feels solid, the Osmo holds out against spills and it looks great in the kitchen. A table doesn’t need much to pass muster, but this one feels like it will continue to do so for a long time, and look good doing it. And, like any good project, it only begets more furniture to make – any good table needs a few good chairs!
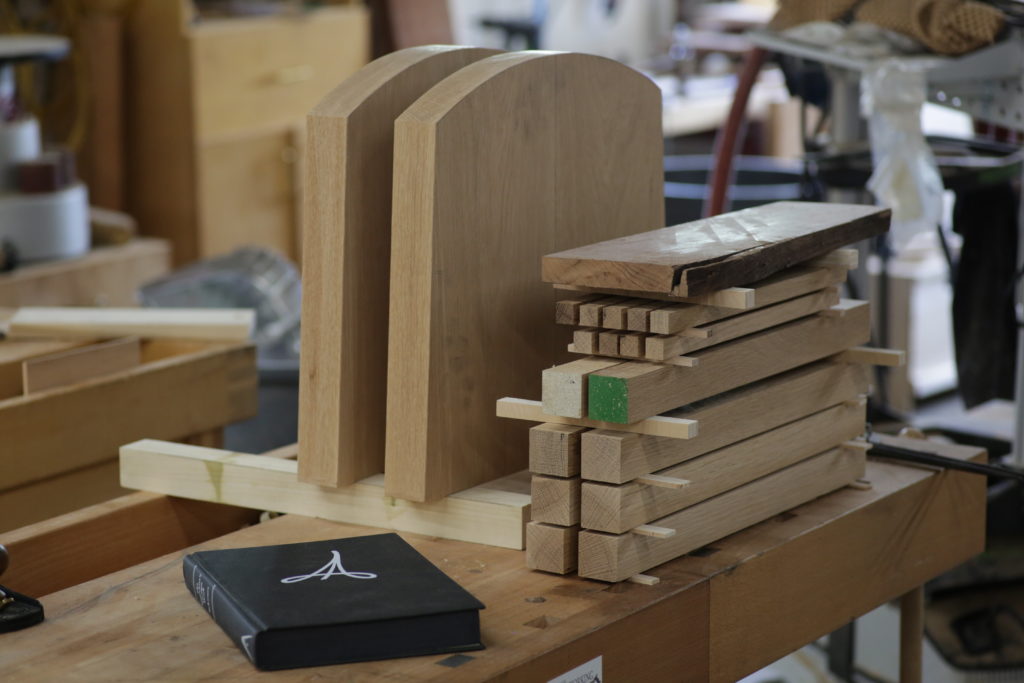
Already milled up and ready to go – the parts for two staked chairs.
Here are some supplies and tools we find essential in our everyday work around the shop. We may receive a commission from sales referred by our links; however, we have carefully selected these products for their usefulness and quality.


Brendan – I was really inspired by your table, so much so that I made one for my son. Turned out great and it was really an interesting introduction into staked construction for me. I love the milk paint (blue in my case) and the contrast with the small chamfer on the top.
There is a great little detail hidden here in a photo caption: using the offcuts from tapering the legs as the wedges. I think that is a great idea and for all of us who plane the tapers on the legs this opportunity would never present itself. This is even better than saving your tenon cheek offcuts “just in case”. This is actually making use of that waste. Maybe this is obvious to everyone else but me… I love reading how other people make similar objects to ones so many of us likely have and being surprised by ingenious little changes like this.
that chamfer and the contrast it creates against the paint are killer. I’m not usually a fan of painted, but this works really well!