


We may receive a commission when you use our affiliate links. However, this does not impact our recommendations.
by Tom Caspar
Need more bench space? Who doesn’t? Here’s a terrific solution: a folding worktable that’s both big and strong. And we mean strong.
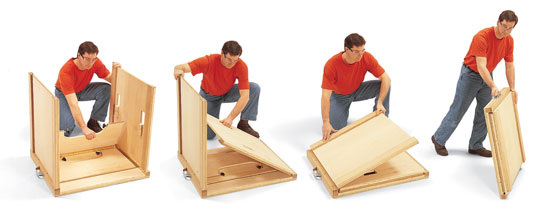
You can set it up in only a minute and be ready for routing, sanding, planing—you name it. When you’re done, fold up the table into a super-compact unit only five-inches thick and stow it away. Here today, tucked away tomorrow.
Strong = Heavy
This table weighs in at about 70 lbs., a bit more than the full sheet of plywood it’s made from. A lighter table made of smaller plywood parts would be more portable, but not stiff enough to use as a real workbench (Photo 1). For heavy-duty use, extra weight is actually a plus. This table stays put!
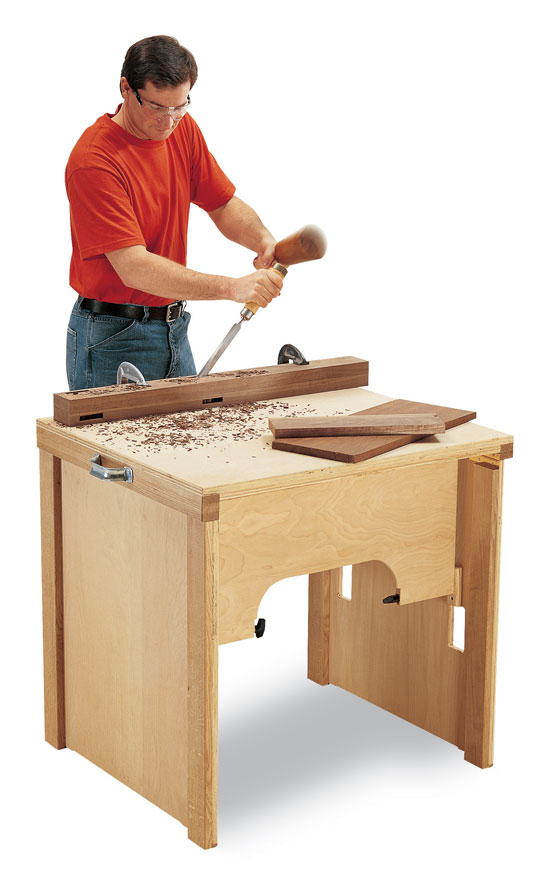
Photo 1: This worktable is built for strength. It won’t wobble, sag or walk across the floor. Weighing 70 pounds or so, it’s not going anywhere until you stow it away.
The keys to this table’s strength are its wide rails, rigid continuous hinges and hardwood legs. The oversize rails and long hinges prevent the table from racking. The solid-wood legs prevent the plywood end panels from bending or shaking.
Go ahead and shove this table around the shop. The hardwood legs can take the punishment. Folded up, it stands on a durable hardwood rail, so you can slide the table across the floor into a small cubbyhole (Photo 2).

Photo 2: This table is built like a rock but knocks down in only a minute. You don’t need any tools and you don’t have to keep track of any loose pieces. Simply unscrew four knobs, fold the rails and legs on top of each other and tuck the worktable away.
Tools and Materials
This is a low-cost, easily built plywood project.Total cost is about $75, half for the wood and half for the hardware. You can build it in a day, no sweat, using little more than a tablesaw, jigsaw, hacksaw and a drill. All you have to do is cut a few plywood pieces to size, rip and cut some narrow 3/4-in.-hardwood boards to length and accurately drive in a whole mess of hinge screws. To make setting the hinges a lot easier, we recommend using a self-centering bit (see Sources).
Build your table from one sheet of an inexpensive grade of birch plywood (about $40). Fir plywood and MDF are even less expensive, but both are inferior substitutes. Fir plywood is usually quite twisted and MDF is way too heavy.
You’ll need some 3/4-in. solid wood for mounting the hinges. Plywood won’t do, because the hinge screws run into the edge of these boards. This would place the screws between the plies and chances are they wouldn’t hold. Pine isn’t a great choice, either, because it’s too soft to hold small screws well. Go with a hardwood that’s milled flat so you can glue its faces together. Birch or red oak are good choices.
Pick up most of the hardware at a hardware store or home center (see the Shopping List, below). It’ll add up to about $35. A good chunk of that is for the continuous hinges, but they’re worth it. Standard butt hinges allow too much play and the table would wobble.
The only hard-to-find items are the large knobs on the rails. We used T-style knobs because they offer a lot of leverage and have a low profile (about $2 each, see Sources). (Round knobs won’t allow the table to fold completely flat.)
Making the Plywood Parts
Begin by cutting up the entire sheet of plywood (see Fig. B). Note in the Cutting List (below), that End Panels B and C differ in length by 3/4-in. because they fold underneath stacked blocks of different thicknesses.
Rails D and E require a bit more tablesaw work. Cut grooves in both rails for the threaded rod (Photo 3, page 78). You can use a dado set or make multiple cuts with a standard blade. Then create a flat surface for the T-style knobs to bear against (Detail 1, page 77) with a crosscut on the tablesaw. Attach a tall backer board to your miter gauge and stand the rails on edge to make these cuts perfectly straight and square. Cut the arches in the rails with a jigsaw.

Photo 3: Cut one long groove in each rail to receive the four pieces of threaded rod that hold the table together. Use a tall fence and a featherboard to steady the workpiece. Then, cut out an arch in the rail so your hands have room to turn the knobs on the threaded rods.
Keep the jigsaw handy. Cut three clearance holes, one in the edge of Rail E and two in End Panel B (Fig. A). The holes allow all the parts of this table to fold flat.
Making the Locking Bolts
Four stout bolts with T-handles lock this table together. Cut the bolts to length from threaded rod. Sitting in the groove, with the handle attached, the bolts must stick out about 5/8-in. beyond the end of the rail (Detail 1).
Glue a T-handle onto each threaded rod with epoxy or a special permanent glue made for nuts and bolts, such as Loctite or Thread Locker (available at hardware and auto stores for about $2.50 a tube). Heavily round the other end of the bolt with a file or grinder so it easily engages the T-nut.
Place the bolts and washers in the rail’s grooves. The bolts are held in place by small strips of hardwood cut to fit the groove (Fillers J, Detail 1, above right). Glue in the fillers. With a clamp or two, squeeze down on the fillers so they bite into the screw’s threads a bit. When the glue is dry, the bolts shouldn’t slide freely (or they’ll fall out when you fold up the table!). Dab a little grease onto the bolts to make them turn easier.
Cut and drill four plywood blocks to receive T-nuts (Parts H, Detail 2). Pound in the T-nuts and clear the deck for assembling the table. All the parts are now cut to size and ready to go.
Attach three of the hinges to three of the six hardwood Riser Blocks F (Photo 4, and Detail 3). Attach a hinge to Rail D as well (Detail 4, above right). Toss the screws that come with the continuous hinges. They’re too short and fragile. Use the larger screws included in the Shopping List, below. Don’t bother to countersink deeper holes in the hinges for these screws. The heads don’t show, so it’s not worth the trouble.

Assembly
Put the table together in three stages (Fig. C), upside down, level by level. Test the parts as you go to make sure they fold flat.
Screws alone do a surprisingly good job of aligning the parts and holding this table together. Glue the parts to make the table even stronger.
Step 1. Attach Spacer G1 to the underside of Top A. Butt Rail D to the spacer and screw the hinge to Top A.
Screw Spacer G2 to the top. Butt one Riser Block F with an attached hinge to the spacer and screw the riser block to the top. Clamp Rail E to the hinge and screw the hinge to the rail.
Step 2. Attach a Riser Block F (with no hinge attached) flush with the left side of the table. Screw another Riser Block F (with a hinge attached) on top of it. Attach End Panel B to the hinge.
Thread two T-Nut Blocks H onto the bolts in Rail D and Rail E. Be sure the T-nut faces out (Fig. A, page 76). Screw the T-nut blocks onto the end panel (Photo 5).

Photo 5: Lock the table together with bolts and T-nuts. The T-nuts are buried in wood blocks that are screwed to the table’s end panels. Locating the blocks in exactly the right spot is easy.
Step1. Thread the blocks onto the threaded rod buried in the rail.
Step 2. Swing the rail upright. Then drive a screw through the T-nut block and into the end panel.
Step 3. Unthread the bolt from the T-nut block. Fold the rail down and out of the way. Then drive in the bottom screw through the T-nut block.
Step 3. Attach the remaining two Riser Blocks F (without hinges) flush with the right side of the table. Stack the third riser block (with a hinge attached) on top. Attach End Panel C to the hinge. Attach the T-nut blocks the same as before. Glue on the Legs K1 and K2. (Note that they go on the inside of Panel B and the outside of Panel C; see Fig A.) Glue on the Feet L and attach the handle.
Once the table is assembled, round over all the edges with sandpaper, a file, or better yet, a 3/16-in. round-over bit in a router. To keep the table from rocking on an uneven floor, insert 1/4-in. T-nuts and bolts into the ends of the plywood panels as very simple and easy-to-adjust levelers.


Source information may have changed since the original publication date.
Sources
Woodcraft Supply (800) 225-1153, www.woodcraft.com
-T-Style knobs. 5/16 in. – 18, #142226; $2 each.
-Self-Centering hinge bit for #5 & #6 screws, #16141; $10
Here are some supplies and tools we find essential in our everyday work around the shop. We may receive a commission from sales referred by our links; however, we have carefully selected these products for their usefulness and quality.


