We may receive a commission when you use our affiliate links. However, this does not impact our recommendations.
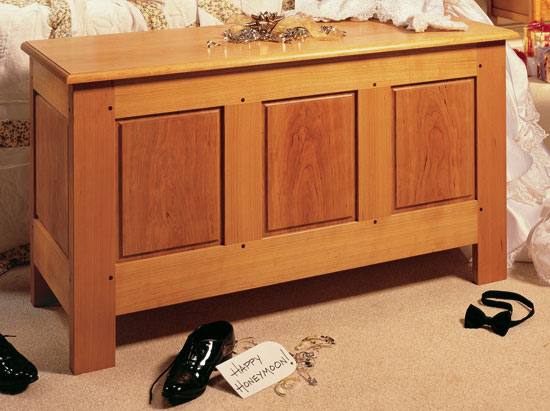
Frame & Panel Hope Chest
Mortise and Tenon Joinery the Easy Way
by Tom Caspar
I used to struggle with mortise and tenon joinery. I tried every new
system that came along, but they all seemed way too complicated. One day
a friend of a friend walked into my shop, said “Throw away those fancy
jigs!” and showed me an elegant way to make these classic joints. This
blanket chest is the ideal project to showcase this technique.
One of the ways I used to get into trouble with joinery was to
constantly measure everything. No more. Whenever possible, I use “the
thing itself” to guide my cuts, especially in mortise and tenon work.
That is, I use an object, not a ruler, to measure directly from one
thing to another. Settle on the most important sizes first, make the
pieces and then everything else falls into place.
You’ll see how fool-proof the system is in building this blanket
chest. The design utilizes a form of frame and panel construction that
goes back hundreds of years. This joinery has proved to be durable and
reliable, so if you’re thinking of making an heirloom project, here’s
one that will last many generations.
Tools and materials
You should have some experience
milling rough lumber straight and
square before tackling this project.
You’ll need a jointer and a planer to
prepare the wood, a carbide-tipped
stack dado set to cut grooves and
tenons and a miter gauge you can
trust to make square cuts. I prefer
a mortising machine for its speed
and accuracy, but you can use a
plunge router or a drill press to cut
mortises.
You’ll need three different thicknesses
of rough hardwood. I used
Pennsylvania cherry, which is easy
to work and available in both rift
and plain sawn boards (see Sources, below). The legs are made of 8/4
stock and require about 10 board
feet of lumber. The rails and stiles
come from 5/4 stock and you’ll
need about 30 board feet. I used the
straight grain of rift-sawn wood in
the legs, rails and stiles to offset the
plain-sawn top and panels, which
required about 20 board feet of
4/4 wood. I used about 12 board
feet of white pine for the bottom
boards and back panels partially
for economy, but mainly because I
like the smell.
Begin by milling all the legs and
rails to thickness, width and length
(see Cutting List, below). Be sure to
cut the rails to their overall length,
which includes both tenons. Mill the
stiles to thickness and width, too,
but leave them a bit long for now.
Make a few extra short rails to use
as test pieces down the road.
The grooves
I’ve learned the hard way that it’s
best to make the mortises first,
then size the tenons to fit them.
Begin mortising by making the
grooves, because they define the
sides of the mortises. In addition,
the depth of the grooves
defines one end of the mortises
(see Fig. B). Notice how the bottom
of the groove becomes the
edge of a tenon. In this project, the groove
is “the thing itself” that’ll guide
your cuts.
Make the grooves on the tablesaw
with a dado set. It’s a simple
set-up: the groove is 3/8" wide,
3/8" deep and 3/8" from the fence
(Fig. A, Detail 2). Mark the face
side of each piece before you
begin to cut. The face side always
goes up against the fence. Groove
one edge of all the rails, including
the test pieces, and both edges of
the stiles.
Cut one stopped groove in each
leg (Photo 1). You’ll have to limit
the length of the groove because
it stops at the bottom edge of the
lower mortise (Fig. A). Clamp
a stop block to a long auxiliary
fence board.
Reset the fence to the left side
of the saw blade to cut the other
groove in each leg. Use one of the
legs as a measuring tool to position
the fence. Unplug the saw,
nestle the grooved edge of a leg
right on top of the dado set (face
side pointing to the left) and snug
up the fence. Run the other face of
each leg up against the fence when
you cut the groove (Photo 2).
Next, cut the wider groove that holds the bottom in place (Fig. A, Detail
5). It will become the lower edge of a tenon.
Use the top of the rail as your reference edge.
The tenons on these lower rails fit exactly
between the two kinds of grooves you’ve
made (Fig. B).
The mortises
Deepening parts of the grooves creates the
mortises. Where exactly do the mortises
go? Pick up any rail and you’ve got the
information right in your hand.
Lay the top rail on a leg and you’ll be using
“the thing itself” (Photo 3). Place the rail so
it barely hangs over the leg (Photo 4). Just
follow the lines down from the grooves (Fig.
B). Cut a piece of wood the length of the
panel opening (Cutting List, below) to precisely
position the lower rail.
Once you’ve marked one leg, clamp all the
legs together and transfer the mortise marks
from the first leg to the others. Make the
mortises 1/8" deeper than the length of the
tenons (Photo 5).
The tenons
Having made the mortises, cut the tenons to
fit them. You won’t have to measure. Simply
use the parts you’ve got so far. To get started,
install the dado set with all its chippers and
raise the blade the height of the outer wall of the groove (Photo 6). This is the
same distance as the tenon’s shoulder,
because this is a flush joint.
Try this dado setting on a test piece
(Photo 7). Adjust the height of the
dado set until the face of the tenon is
exactly in line with the groove (Photo
8). Then cut both ends of all the long
and short rails. You’ll be revisiting this
setting later, so improvise a simple
paper indicator to record it (Photo 9).
Cutting the opposite face of the
tenon requires lowering the dado set.
Leave the fence where it is. Place a rail
with its face side up next to the blade.
Lower the blade until it lines up with
the bottom wall of the groove, just as
you did before. Cut a test piece and try
it in the mortise (Photo 10). This is a
finicky setting, so it will take a number
of attempts to get it right. Record this
blade height, too.
Saw each haunch on the bandsaw
(Photo 11). Lay it out directly from the
mortise (Fig. A, Detail 3). The haunch
serves three purposes: it fills in the
groove; adds more gluing surface; and
widens the tenon to fight racking of
the case. It’s great. I use a haunched
joint in table legs, too.
Finish the legs by beveling the
inside corners (Fig. A, Detail 3). Tilt
the blade away from the fence at a
15
Product Recommendations
Here are some supplies and tools we find essential in our everyday work around the shop. We may receive a commission from sales referred by our links; however, we have carefully selected these products for their usefulness and quality.