We may receive a commission when you use our affiliate links. However, this does not impact our recommendations.

Cut mortises of any width and length in stock of virtually any size.
Here’s a win-win proposition: Spend a day in your shop and turn your drill press into a mortising machine. This fixture makes it easy to cut mortises in multiples for doors, tables and frames. It has four components: a fixed base, a sliding table, an adjustable fence, and an adjustable stop mechanism. Building it requires less than a half-sheet of 3/4″ plywood or MDF and some easily obtainable hardware. I use Forstner bits to create the mortises.
How it works

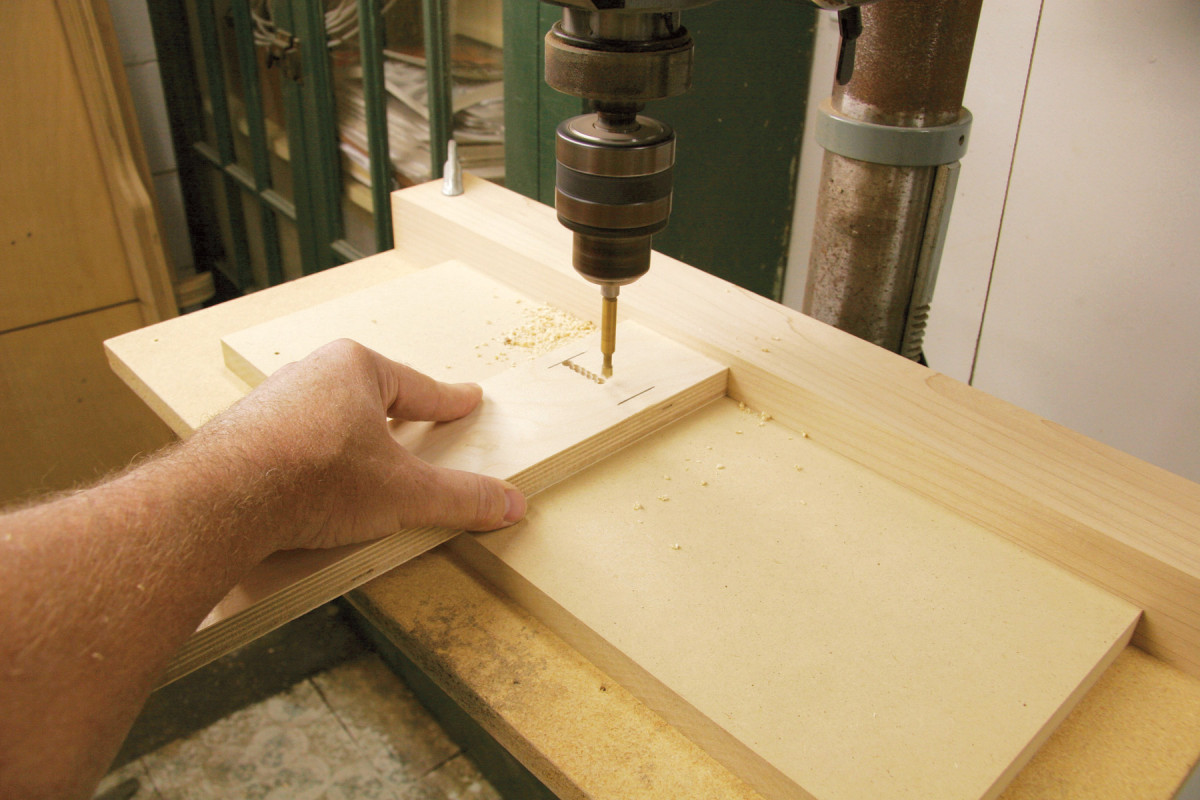
Step 1. Adjust the fence to center the bit on the mortise centerline.
Mark the centerline and both ends of the mortise on one workpiece and use it to set up the fixture. Place the workpiece on the sliding table, lower the bit to the desired mortise depth and set the depth stop. Then adjust the fence to center the bit on the mortise (Step 1).
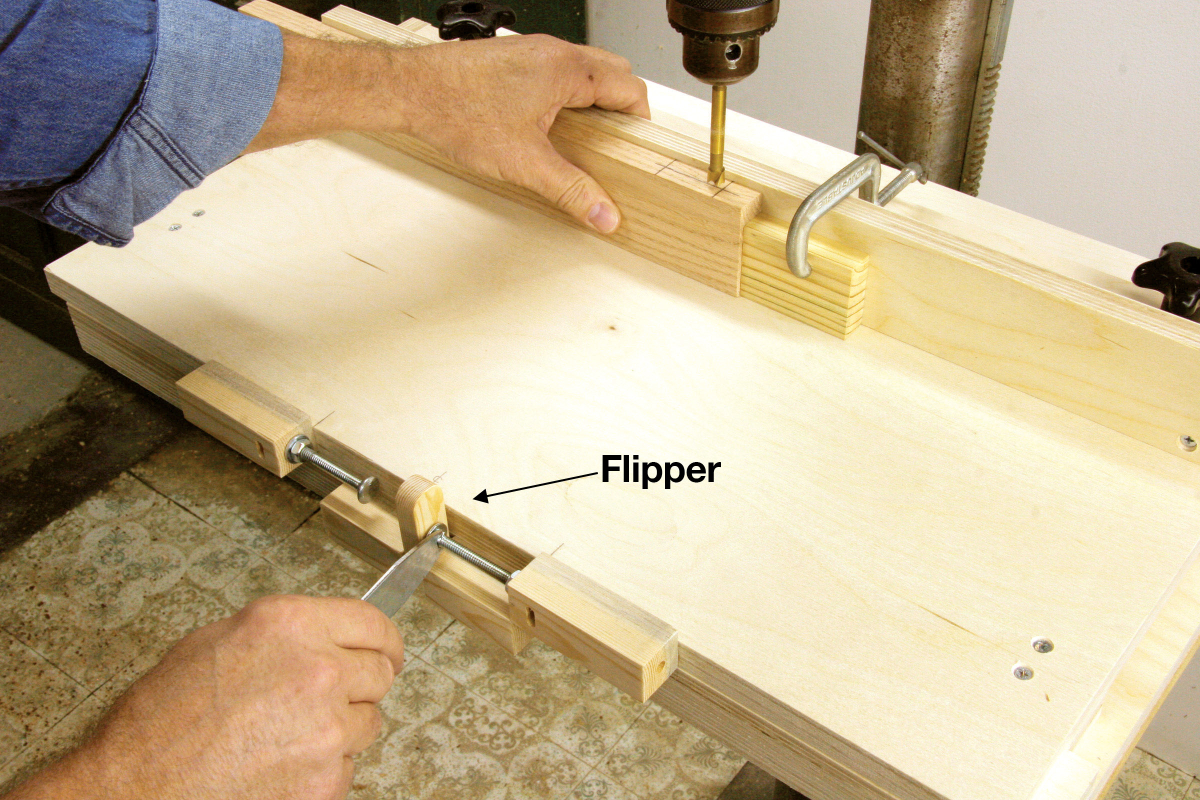
Step 2. Locate the right end of the mortise, clamp on a stop block and set the first stop bolt.
Maximize the sliding table’s travel by lowering the flipper and backing off the stop mechanism’s bolts. Next, roughly align the right end of the mortise with the outside edge of the bit and clamp a stop block against the workpiece.
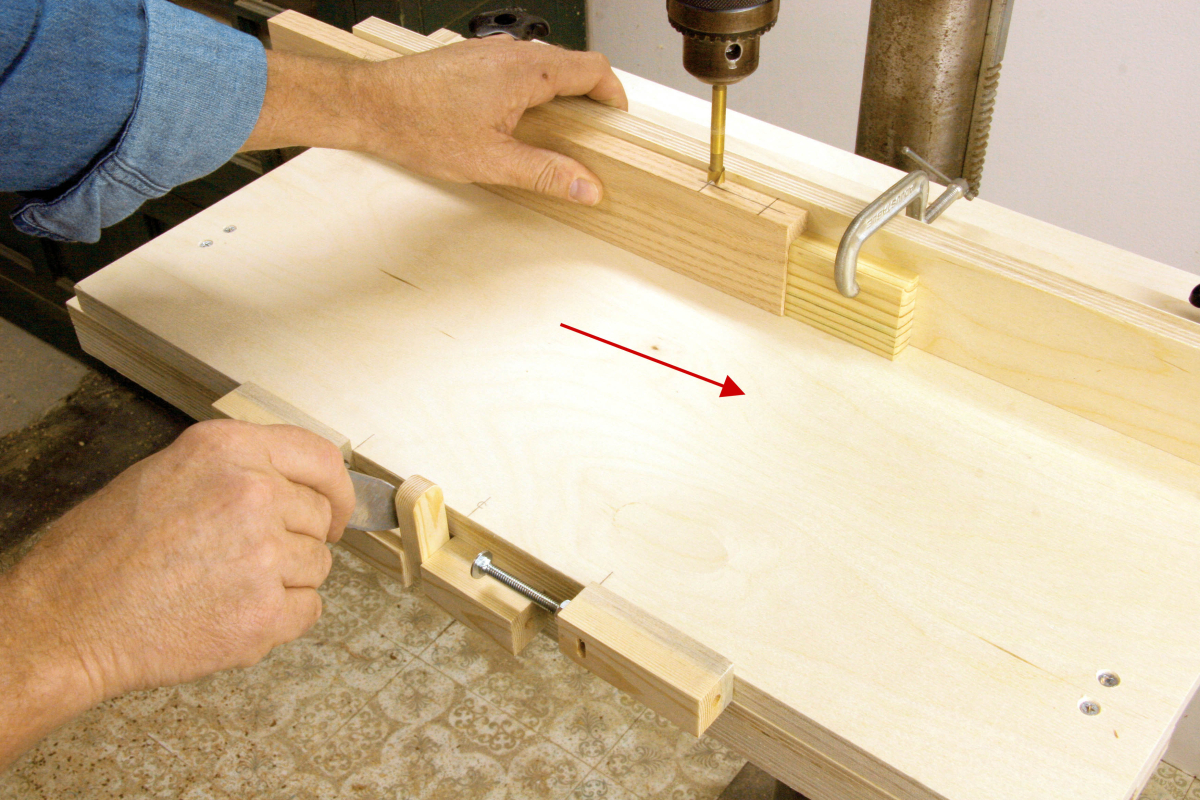
Step 3. Slide the table to the left end of the mortise and set the remaining stop bolt.
Then use the sliding table and the flipper-stop mechanism to dial in the bit’s exact location (Step 2). Repeat the procedure to locate the other end of the mortise (Step 3). The fixture is now ready to process multiple pieces with mortises of the same size and location.
Step 4. Rough out the mortise by sliding the table and drilling a series of overlapping holes.
Create each mortise in two steps. First, drill overlapping holes to remove most of the waste (Step 4). Then complete the job by making incrementally deeper passes with the bit while sliding the table back and forth (Step 5).
Step 5. Complete the mortise by sliding the table back and forth as you slowly lower the bit.
Build it
Start by attaching the guides to the base and the runners to the sled (A–D, Fig. A, below, and Cutting List, at bottom). Sand smooth one long edge of each guide and runner, as these edges will rub against each other when the sled slides back and forth. Square the guides to the base, with the sanded edges to the inside, and fasten them with glue and screws.
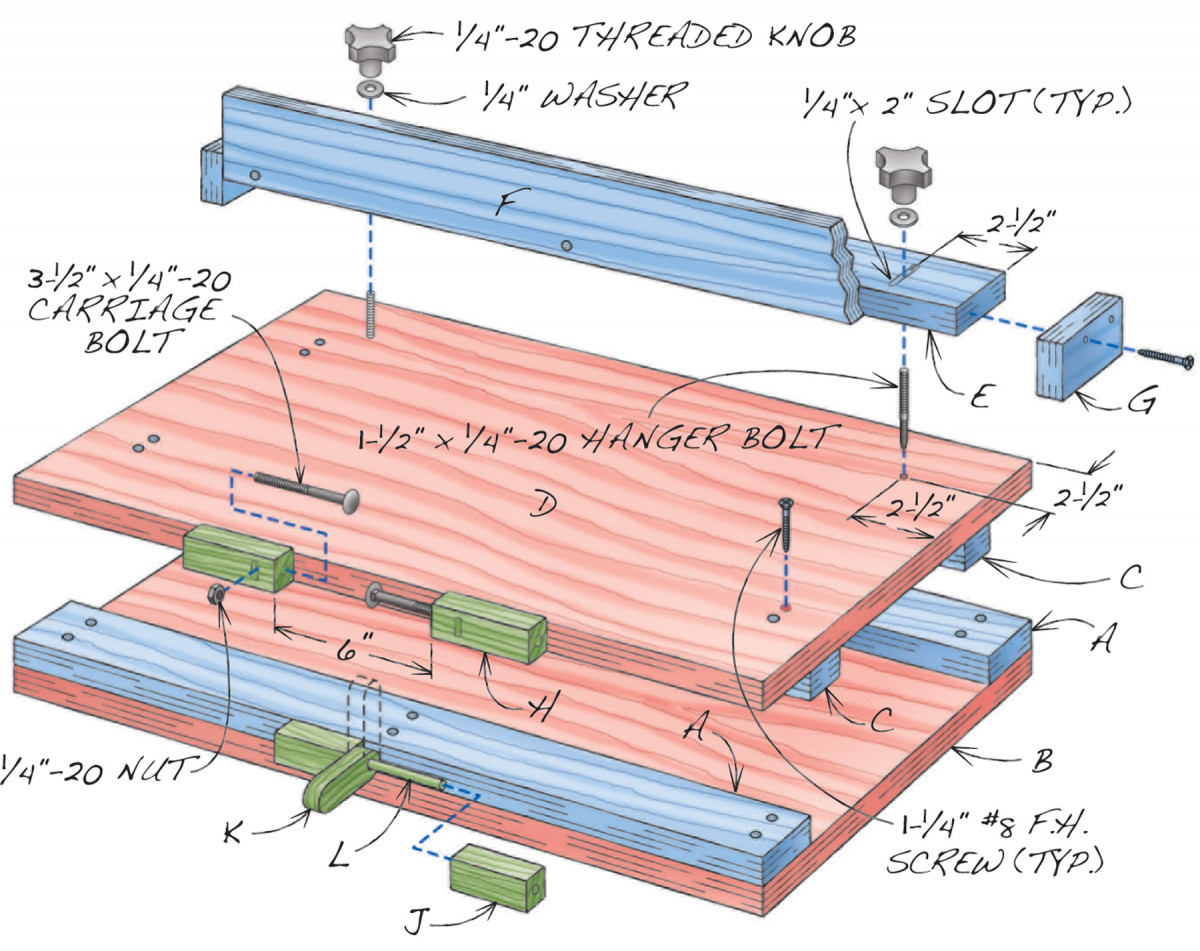
Fig. A) Mortising Fixture
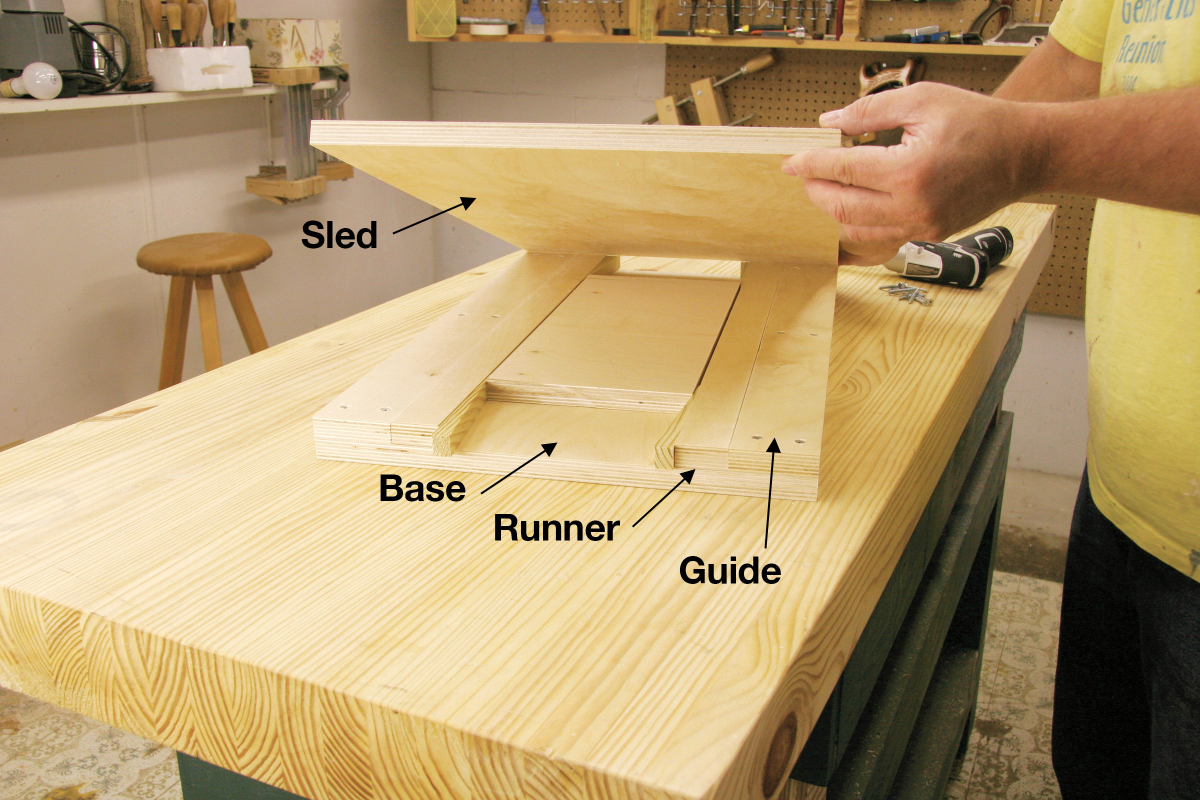
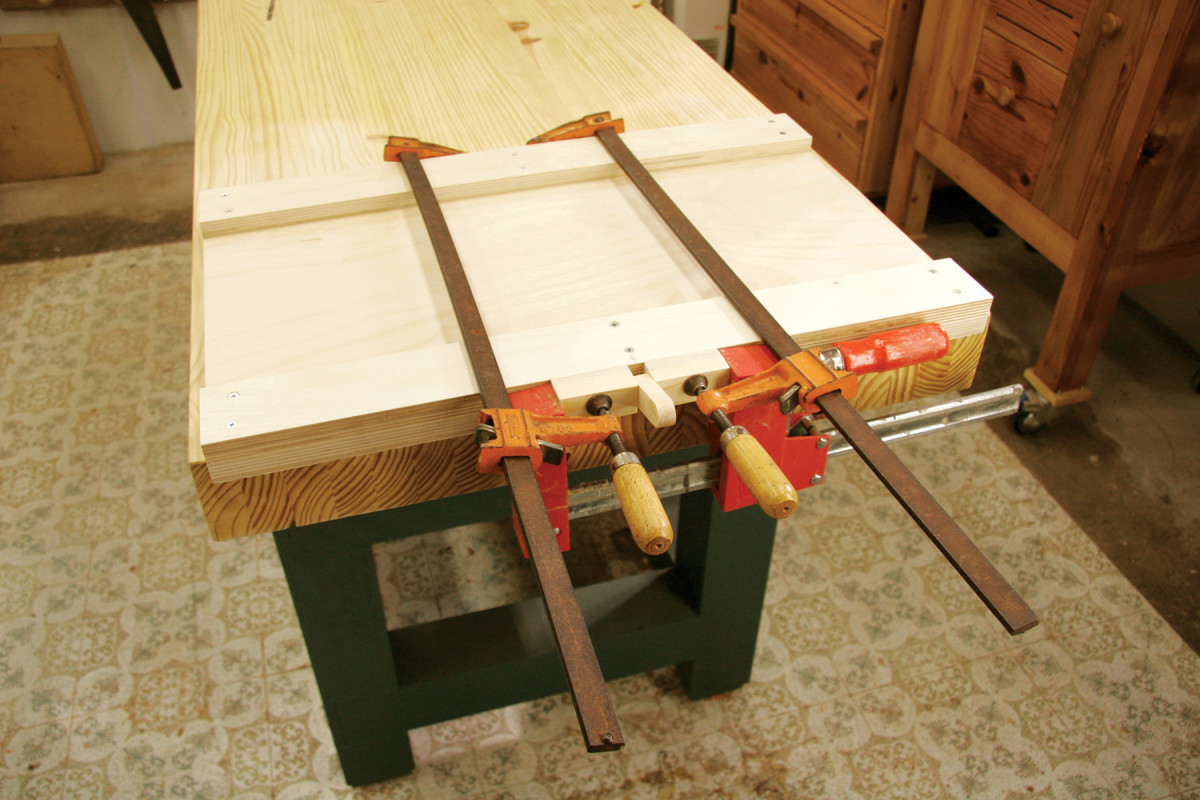
1. Locate the sled’s runners by wedging them against the guides mounted on the base.
Place the sanded edges of the two runners against the inside edges of the guides. Then use a piece of scrap wood and some wedges to hold the runners snugly—but not too tightly—against the two guides (Photo 1). Place the sled on top of the base assembly and square it. Then screw the sled to the runners. Remove the scrap wood and wedges. Then test the sled to make sure it slides smoothly, without binding or wobbling from side to side. If the fit is too tight, rub paraffin on the edges of the runners and guides. If the fit is too loose, glue a piece of veneer to one of the edges.
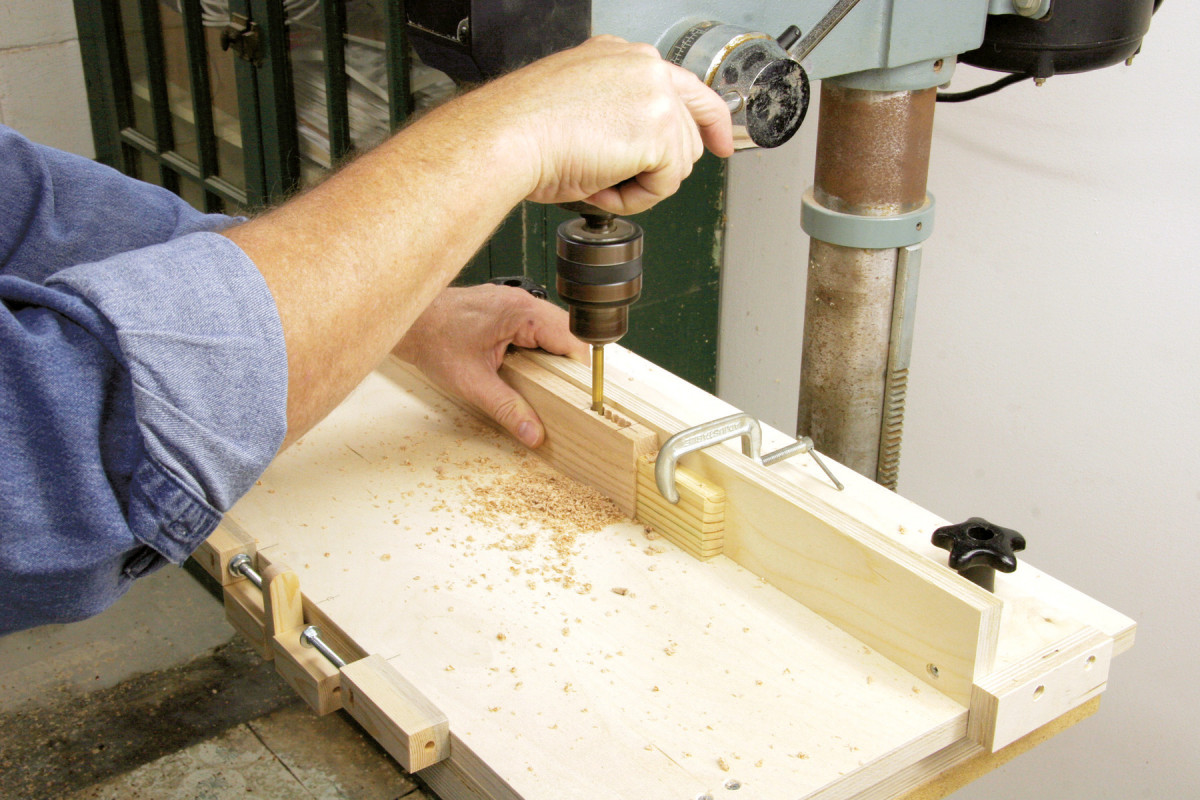
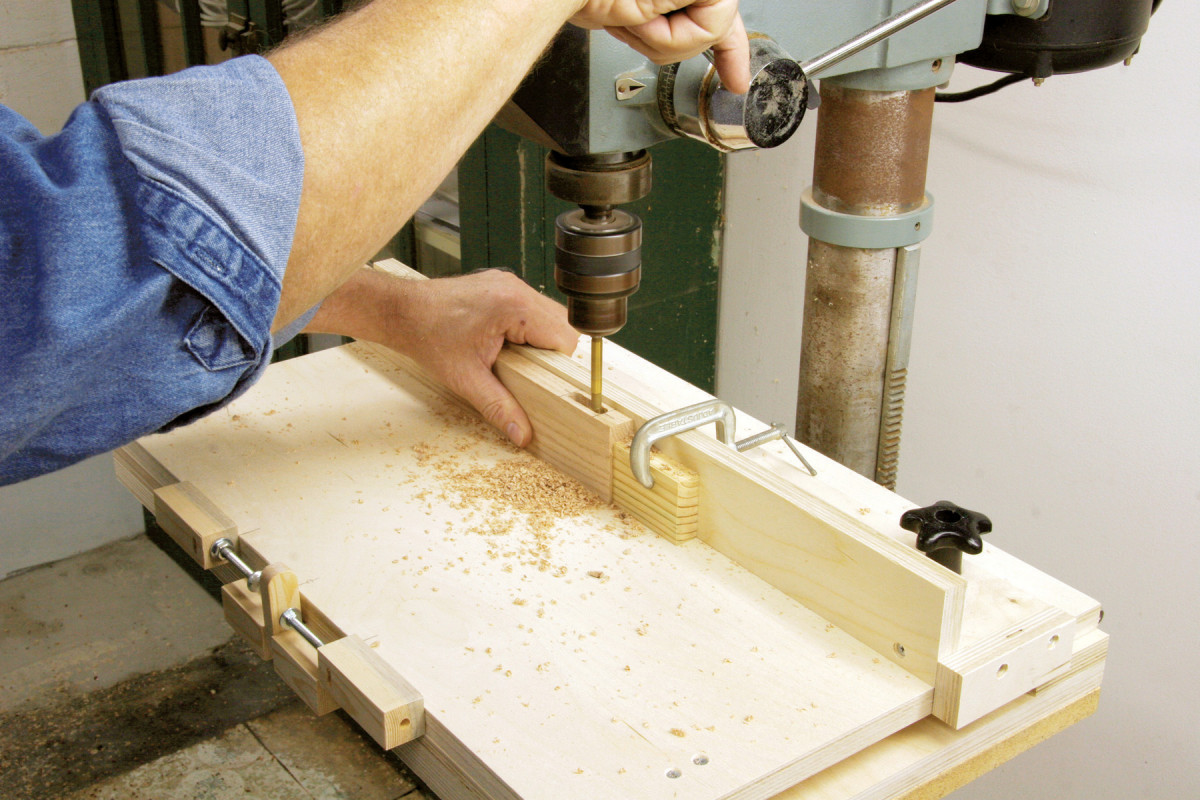
2. Create the slots in the fence cleat by drilling overlapping holes and then smoothing the shoulders.
Outfit your drill press with a sacrificial table and clamp on a fence. Then use a 1/4″ Forstner bit to cut a pair of 2″ long slots through the fence cleat (E), 2-1/2″ from each end (Photo 2). After drilling the overlapping holes, create the slots by sliding the cleat back and forth while slowly lowering the bit. Glue and screw the fence face (F) and the guide blocks (G) to the cleat. Then set the assembled fence on the sled and use its slots to locate the holes for the hanger bolts that attach these two parts. Note that the fence assembly is a tiny bit wider than the sled, so it will slide freely. Drill the hanger-bolt holes.
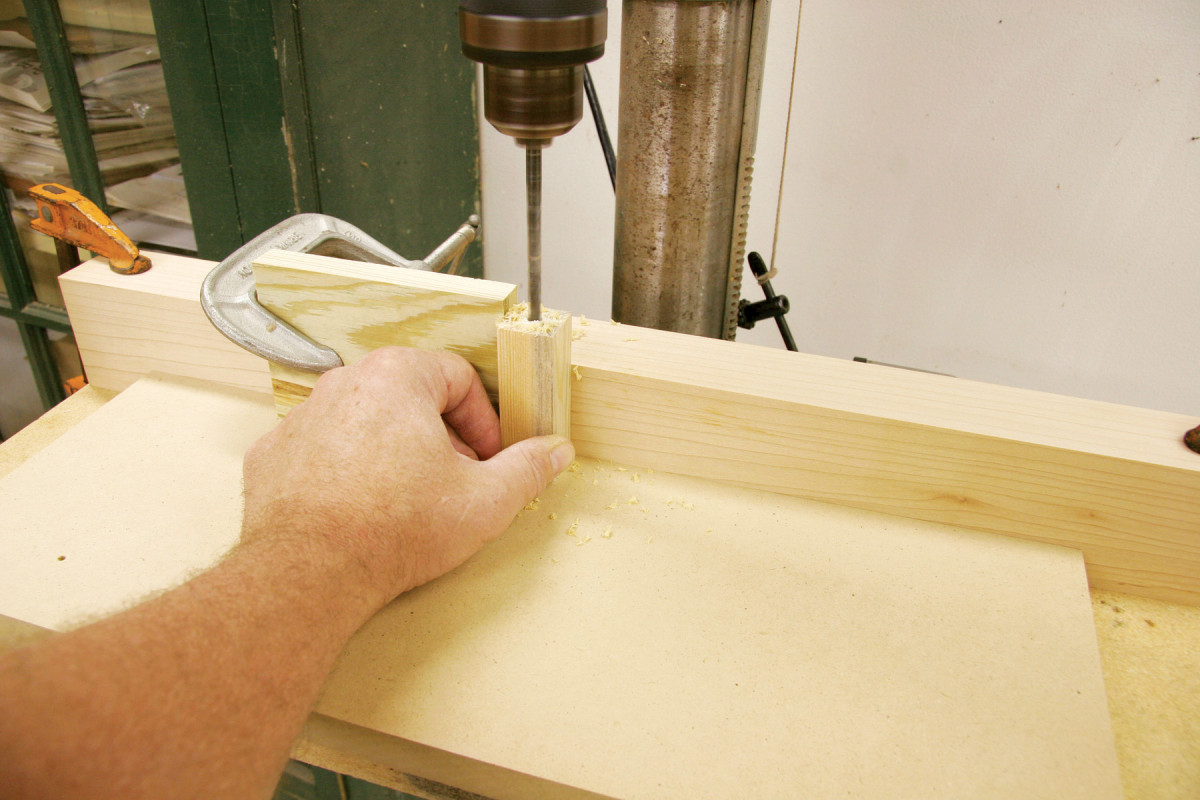
3. Drill a hole through each adjustment block and flipper block. Provide additional support to securely hold these narrow pieces.
Cut the adjustment blocks (H) and flipper blocks (J) to final dimensions and drill a centered 1/4″ dia. hole lengthwise through each block (Photo 3). Use the sacrificial table and clamp a scrap 90° block to the fence to locate and support these narrow pieces while drilling.
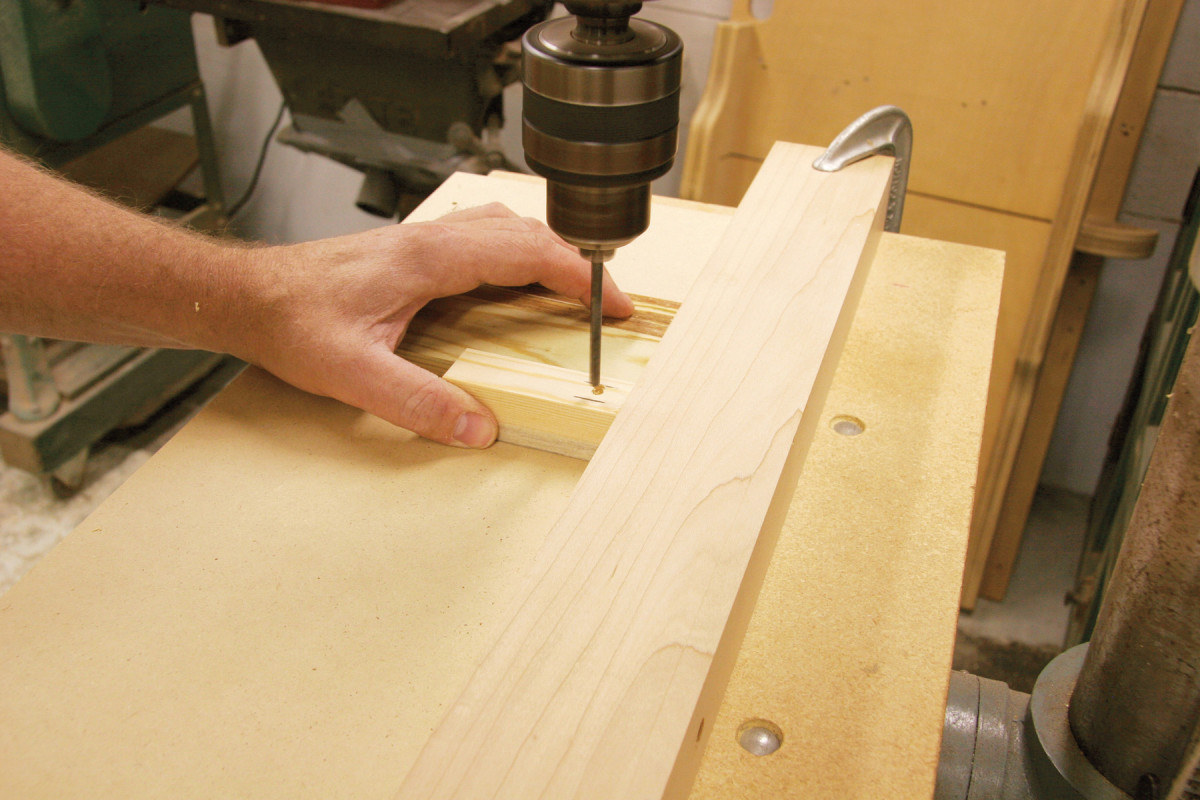
4. Create a housing for the captured nut in each adjustment block by drilling overlapping stopped holes.
Next, cut a stopped mortise in the side of each adjustment block for the captured nuts used to thread the stop bolts (Photo 4). This time, lay the 90° block on the table next to the adjustment block and press both pieces against the fence while drilling the overlapping holes and reaming out the slot. Cut the slots just wide enough to capture the nut, so it can’t rotate, and just deep enough for the bolt to thread into the nut. Center the adjustment blocks 6″ apart on the front edge of the sled and glue them in place, flush with the bottom of the sled (Photo 5).
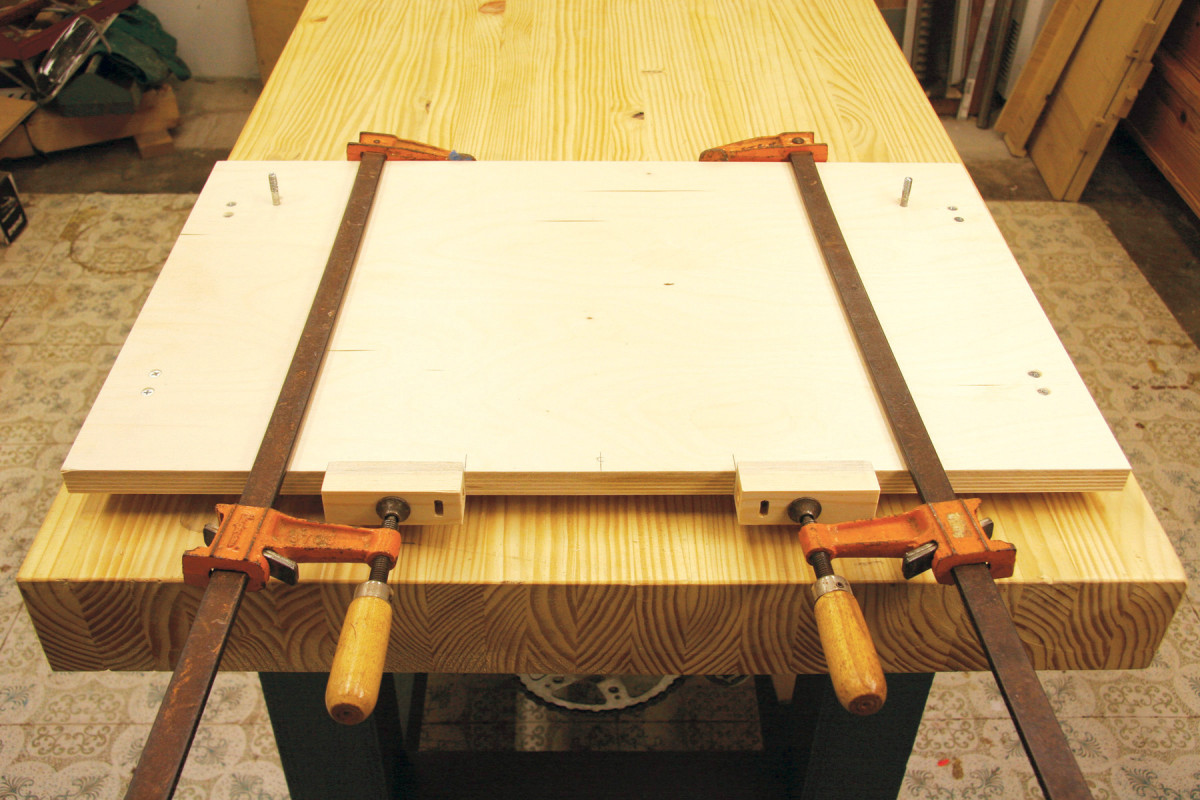
5. Glue the adjustment blocks to the front of the sled, spaced 6″ and flush with the bottom.
Cut out the flipper blank (K) and drill a 1/4″ dia. hole at one end, aligned with the holes in the flipper blocks. Then round both ends of the flipper. Slide the dowel (L) through the flipper and install both flipper blocks without glue. Test the flipper’s operation by setting the assembly against the fence on the sled and making sure the flipper doesn’t rub against the mounting surface. Adjust the shape of its back end if necessary. Then center and glue the flipper assembly to the front of the base (Photo 6). Press the blocks against the flipper, but make sure the flipper flips.
6. Glue the flipper assembly to the base, flush with the guides.
Install the fixture by fastening its base to your drill press. I keep a wooden table mounted on top of my drill press’s metal table, so the base of this fixture simply screws into the wooden table. I use the same screw holes each time, so the fixture is always correctly positioned. Place the sled in place on the fixture’s base and you’re ready to cut some mortises.
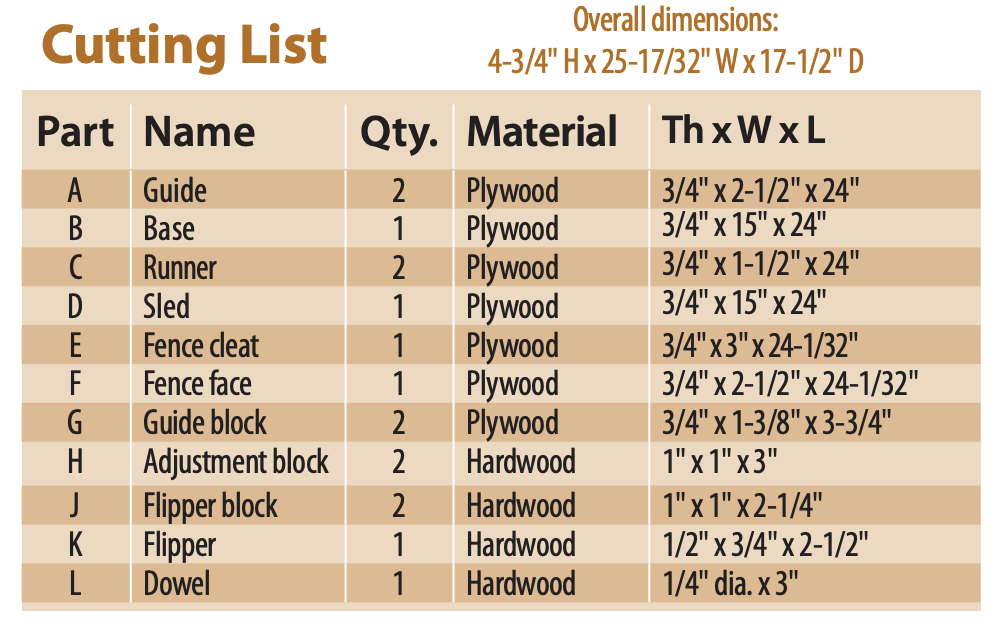
Drill Press Mortising Fixture Cut List
Here are some supplies and tools we find essential in our everyday work around the shop. We may receive a commission from sales referred by our links; however, we have carefully selected these products for their usefulness and quality.