|
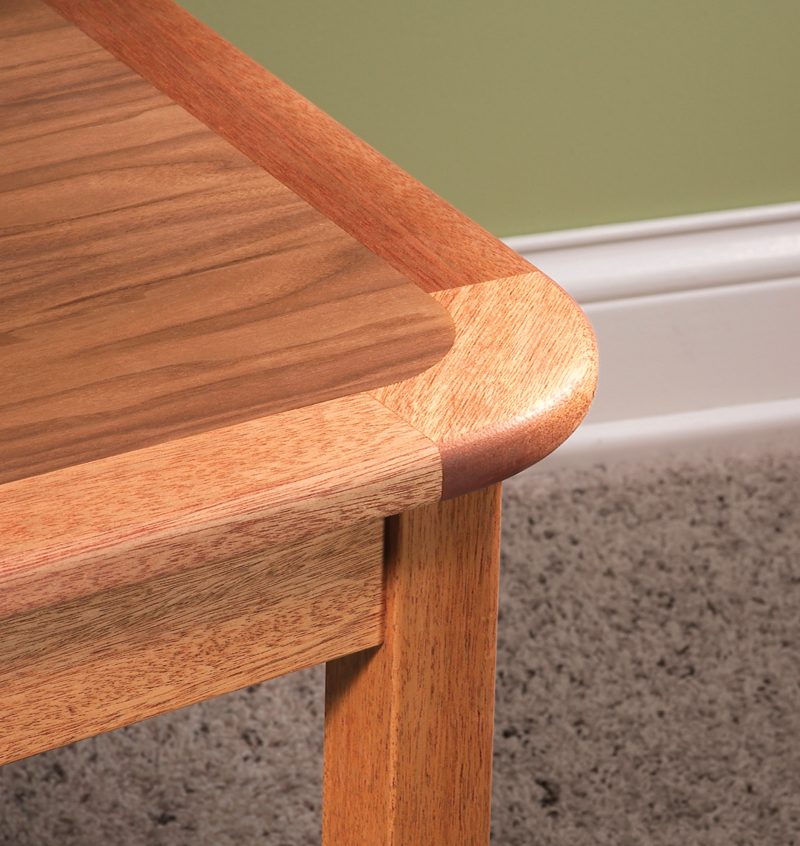
Have you ever marveled at large, expensive conference tables with thick, solid edging and curved corners? The center of the table is usually a beautiful veneer surrounded by solid-wood edging that not only looks cool but can stand up to a lot of abuse from chairs. It doesn’t take long for a woodworker’s eye to stray from the beautiful looks to the daunting joinery on those rounded corners. “How did they do that?” we wonder. To cut these parts, big shops use a computer-controlled router that costs more than most luxury cars. Here’s how you can get the same results in your garage shop with a few simple templates and a handheld router. The templates give you an automatic fit between the inside curve of the edging and the outside curve of the tabletop.
The next challenge is fitting all those edging pieces around the table. I’ve got a neat trick to help you out there as well.
Although these are not difficult techniques, you must follow
the steps carefully to get good results. I used these techniques to make a 26-in. x 50-in. tabletop that has a 1-in.-thick by 2-in.-wide edge (Fig. B, page 75). The techniques can be used on any size of table or edge molding (see also “Teak Coffee Table”).
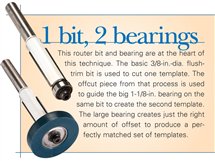
One bit, two bearings
Build the templates
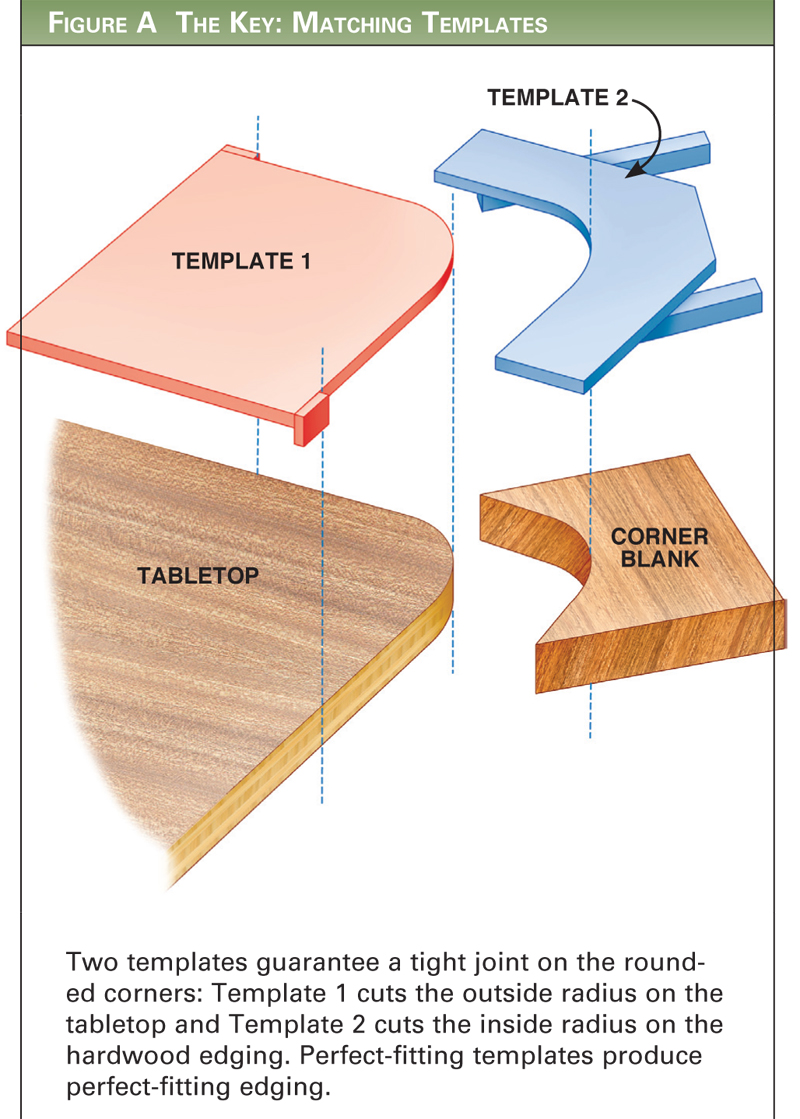
Templates 1 and 2 (Fig. A, below) produce the curved
outside corner on the tabletop and the matching inside on
the solid-wood edging. To make the matching templates,
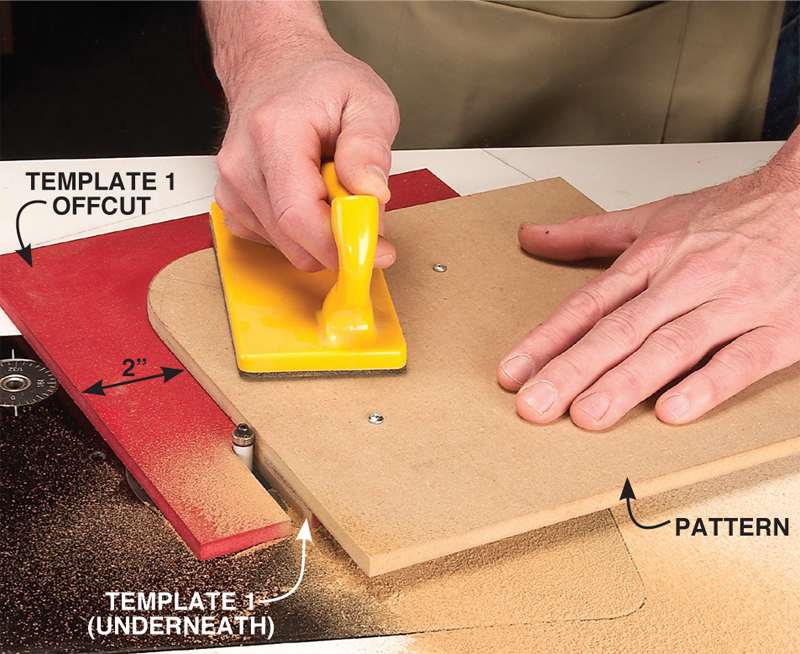
you first need to make a one-time pattern to cut the profile
on Template 1 (Photo 1). That template’s profile is cut
from a 10-in.-square blank that yields an offcut. The offcut
in turn is used to make Template 2, ensuring a perfect fit.
To make the one-time pattern, use a compass to lay out
the corner arc radius you desire on a 10-in.-square piece of
3/8-in. MDF. Saw and sand the corner to final shape. Attach
the pattern with screws to another 10-in. square of 3/8-in.-
thick MDF. Use a 3/8-in.-dia. bottom-bearing flush-trim bit to cut out Template 1 on the router table (Photo 1). Add guide strips to the sides to complete Template 1.
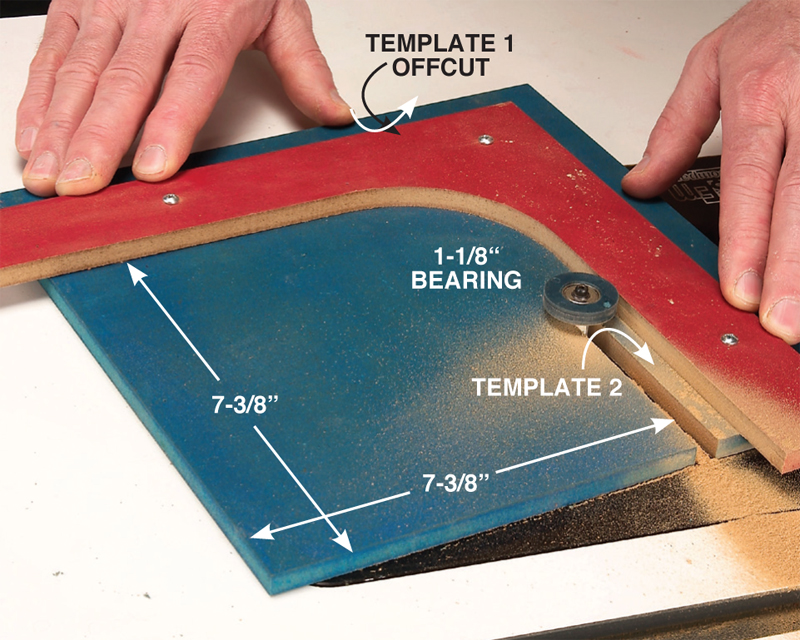
Use the offcut from Template 1 and a 1-1/8-in.-dia. bearing on your 3/8-in.-dia. bit to make Template 2 (Photo 2). Use a corner blank as a spacer to locate the guide strips on the bottom of Template 2 (Fig. C, below). The strips center the corner blank in the jig. You’ll need to build a hold-down jig (Fig. D, below). Template 2 is used in conjunction with the hold-down jig to rout the curve on the inside of the corner edging. You may have to adjust the cutout and/or the height of the spacer blocks on the jig to accommodate different radii or edging thicknesses.
Template 3 is used to create the outside curve on the hardwood border. Simply saw and sand it to final shape and add guide strips.
Rout the parts
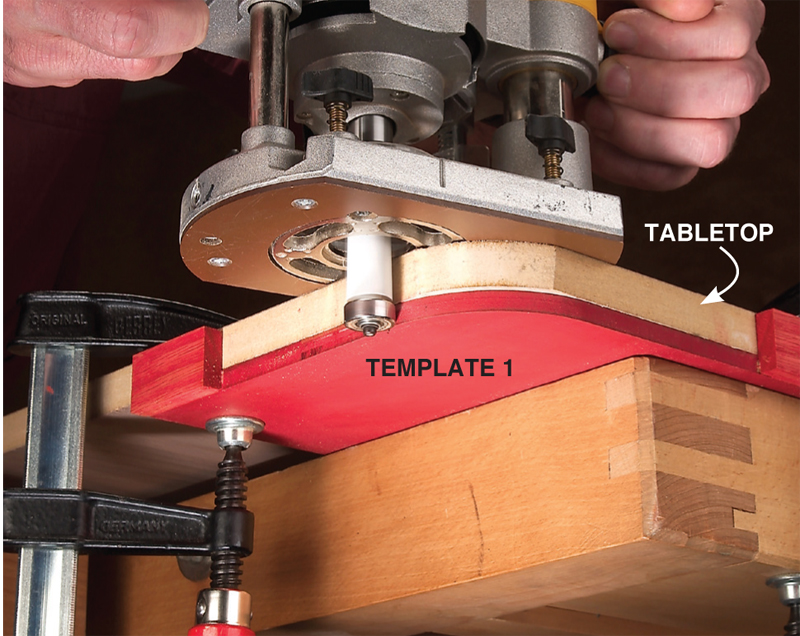
Cut the tabletop to final length and width. Cut the curved corners 1/16 in. to 1/8 in. oversize using a jigsaw. Clamp Template 1 to the bottom side of the tabletop. Rout the curve with a bottom-bearing bit (Photo 3). I prefer a 1/2-in.-shank bit in this step, because you get less chatter than with a 1/4-in.-shank bit.
The next step is to rout the slots for the splines in the edge of the tabletop (Photo 4). The splines are made from hardwood. Rip the splines on your tablesaw, leaving them a bit thicker than the slots. Take the splines to your planer and shave off the thickness until you get a snug fit in the slots. Cut the splines to length, including a number of 1/2-in.-long segments for use on the corners (Fig. B).
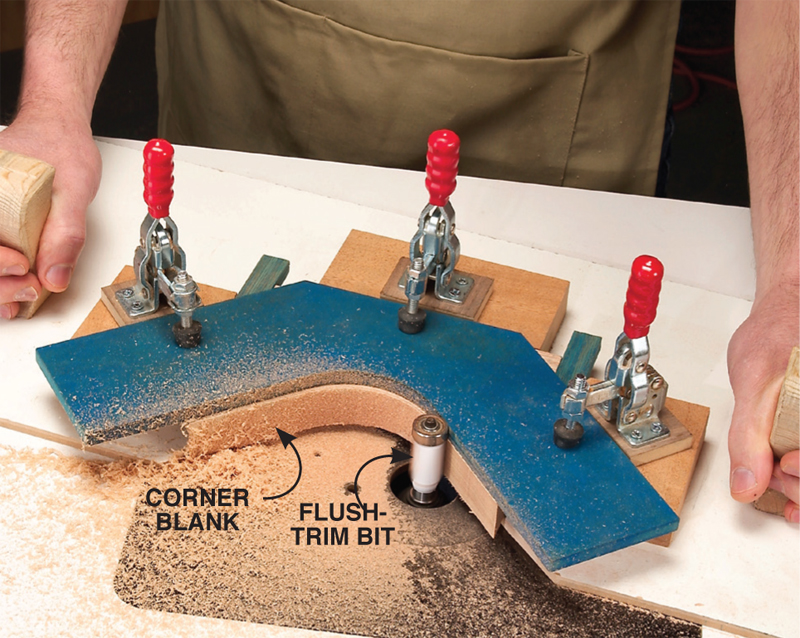
Mark the inside curve on the corner blanks (Photo 5) and rough-cut on the bandsaw. Clamp the corner blank and Template 2 into the hold-down jig and rout the inside curve (Photo 6). Rout a couple extra corner pieces. You will use them later for test cuts.
Install the slot-cutting bit in your router table. Use the extra corner blanks to test the height of the slot cutter until the blank sits just a whisker above the veneer (Photo 7).
Next, slot the straight molding parts. You’ll have to reset the slot-cutter height, because you won’t be using the hold-down jig. If you make moldings that are wider than
2 in., it is a good idea to reinforce the miters with splines or biscuits.
Mark lines on the tabletop at 90 degrees to each side at points 2 in. from a corner (Photo 8). Hold a corner blank to the tabletop and mark it for the miter cuts. Draw the miter lines 92 degrees to the tabletop’s edge. This creates a wedge-shaped pocket that makes it easier to get a tight joint between the straight and curved edging (Fig. E, below). You only need to draw miter lines on one blank. It will be used to set up the tablesaw miter gauge for all the corner cuts.
Cut the miters on your tablesaw with the miter gauge set to 47 degrees (Photo 9). Use a stop block and clamp to hold the corner molding in place. Don’t worry if the cut misses the pencil lines slightly. The finished size of the corner molding isn’t critical because of the built-in 1/4-in. safety margins.
Attach the edge molding
Here’s where the sweat starts to break out on a woodworker’s brow. At this point, you’ve taken care of the joint between the edging and the tabletop. Now the problem is fitting all eight edging pieces end to end around the perimeter. The first step is to attach the four corner blanks (Photo 10). Next, use a test board to determine the precise angle for the ends of the straight molding (Photo 11). Test-fit every joint. You may have to tweak the angle for each end on the straight pieces.
Attach the straight moldings to the tabletop one at a time. If you have cut one too short, don’t worry—you have a second, even a third chance. The secret is shown in Fig. E (below). Use a liberal amount of glue on the end grain joints, because end grain absorbs more glue than side grain does. Complete the tabletop by routing the outside curve on the edging with Template 3 (Photo 12). Carefully sand or scrape the solid-wood edging flush with the tabletop. For some added detail, you can rout a chamfer, round-over or other profile around the edge of the solid-wood molding. We used two different wood species to help highlight the edging in the photos. The technique also works great using a single wood species.
Want to try this technique on a real project? Check out the “Teak Coffee Table”.
Sources
(Note: Product availability and costs are subject to change since original publication date.)
The Wood & Shop Inc., woodnshop.com, 314-731-2761, MDF, 3/8 in. x 2 ft. x 4 ft.
Jesada Tools, jesada.com, 800-531-5559, 1/4-in. shank, 3/8-in.-dia. flush-trim bit, #606-095; Rabbit-master plus bearing kit (includes 1-1/8-in.-dia. bearing), #791-703; 1/2-shank, shear-action flush-trim bit, #606-690; 1/4-in. slot cutter with bearing, #622-364A.
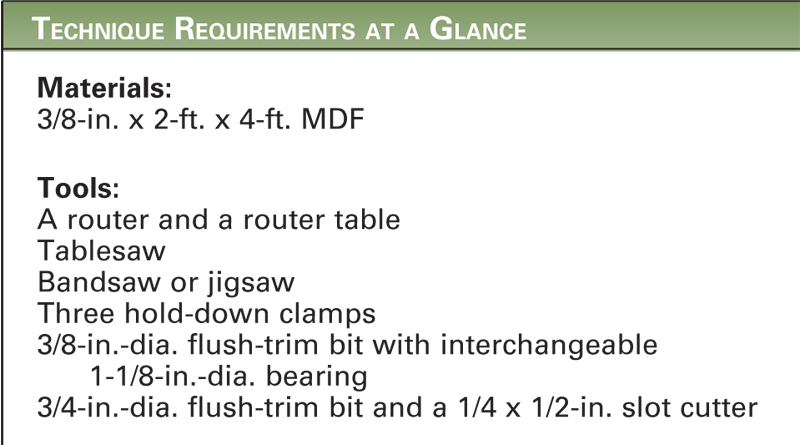
Technique Requirements at a Glance
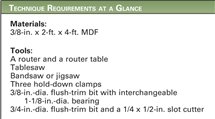
Fig. A: The Key: Matching Templates
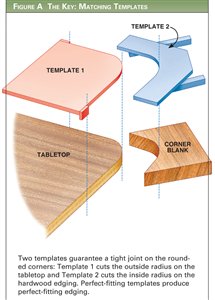
Fig. B: Exploded View
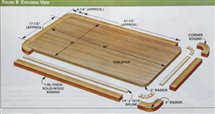
Fig. C: Three Templates
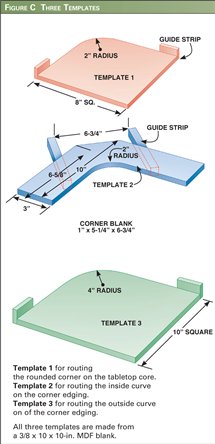
Fig. D: Hold-Down Jig
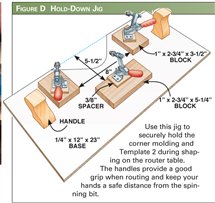
Fig. E: Fitting the Straight Pieces

This story originally appeared in American Woodworker November 2005, issue #118.

November 2005, issue #118
Purchase this back issue.
|
|
Click any image to view a larger version.
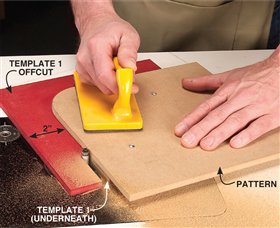
1. The key to making perfectly mating parts is to rout precise templates. Use a pattern shaped to the corner radius on the tabletop to make Template 1. The offcut is then used to make Template 2.

2. Use the offcut from routing Template 1 to make
Template 2. A large bearing is put on the same bit to
create the required offset. This guarantees that Template 2 nests perfectly against Template 1.
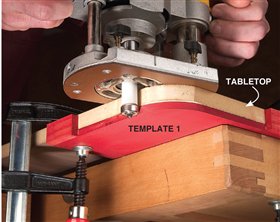
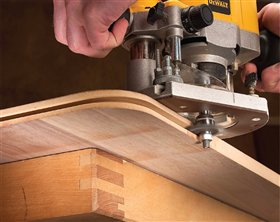
3. Rout the round corners on the tabletop using
Template 1 and a flush-trim bit.
4. Rout the spline slot on the tabletop’s edge. Splines align and strengthen the joint between the edging and the tabletop.
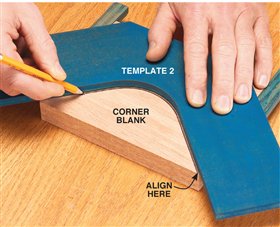
5. Use Template 2 to lay out the inside curve on the solid-wood corner blanks. Note the grain direction on the blank. The corners of the blank line up with the inside edge of the template curve. Cut out most of the waste on the bandsaw.

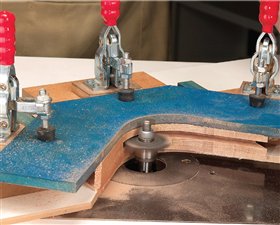
6. Flush-trim the inside curve on the corner blank. Hold the template and the corner blank firmly together with a clamping jig. The jig also keeps your fingers a comfortable distance from the spinning bit.
7. Slot the inside edge of the corner molding. Position the slot so the top of the edging is slightly proud of the veneered center.
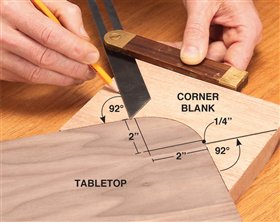
8. Mark the miter cut locations on the corner blank. The cuts should start 1/4 in. beyond the point where the curve ends. This keeps the joint off the curve where it would cause a gap.
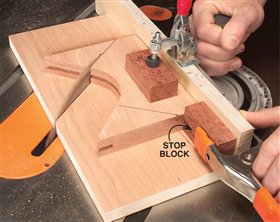
9. Miter the corner blanks. Set the miter gauge to 47 degrees. Use a clamping jig with a stop block to hold the molding in place. Cut one corner; then flip over the corner and cut the second corner.
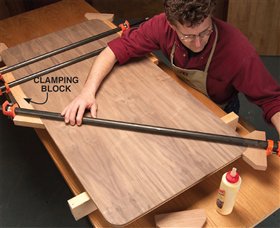
10. Glue the corner blanks to the tabletop. An angled clamping block makes the job easier.
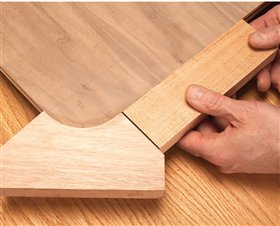
11. Trim the angle on a scrap board until you get a perfect fit with the corner edging. Use that angle to cut the corresponding end on the full-length piece of straight edging.
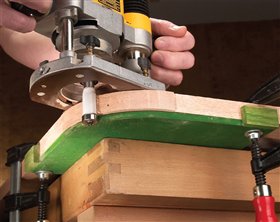
12. Rout the outside curve on the corner molding using Template 3 after all the edging is installed. Sand the edging flush with the veneer and add a slight round-over for a friendly look and feel.
|