Most woodworkers probably have a natural
aversion to working with plastic laminate. After
all, we love wood, not plastic! I managed to steer
clear of the stuff for years before a bathroom
vanity job forced me into it. I was surprised to find
it wasn’t so bad! I’d been missing out on a great
product that has a thousand uses beyond the
durable, easy-to-clean countertops found
in kitchens and baths.
Think Outside
the Countertop
Plastic laminate has a hundred uses
beyond the kitchen countertop.Around
the shop, it makes an ideal wear surface
for jigs, fences, extension tables, assembly
benches—anywhere a tough, easyto-
clean, low-friction surface is needed.
Unlike wood, plastic laminate
requires no clamping, sanding, staining, painting or varnishing.After machining,
you’re left with a perfectly smooth,
colorful and durable surface that’s ready
to use.
Plastic laminate not only creates a
durable surface, it also adds significant
strength. For example, a particleboard
shelf with a laminate top, bottom and
edge can hold three times the weight of
a raw, uncovered particleboard shelf.
Plastic laminate can also liven up
your projects with bold colors.Whether
it’s multi-colored shelving or a dark
green top on a walnut computer desk,
plastic laminates offer a broad pallet
of colors.You can even find some pretty
good imitations of leather and metal.
So, if you’ve shied away from working
with plastic laminate, it’s time to
get familiar with this durable and versatile material.
In this article we’ll walk you through
making a basic countertop with
radiused corners. We’ll also show you
how to make a countertop with a wood
edge.Laminate requires a few specialty
tools and some practice, but once you
master the skills, you may find yourself
choosing plastic laminate for countertops,
shop fixtures, doors—all sorts of
projects!
What Is Plastic Laminate?
Very simply put, plastic laminate is made
with layers of paper and resins pressed
together under high temperatures and
pressure to form a sheet about 1/16-in.
thick. The top layer of paper gives the
laminate its color.
Don’t mistake melamine for plastic
laminate. Melamine is really only the
single colored layer pressed onto one or
two sides of particleboard.Because the
colored layer is so thin,melamine does
not wear as well as laminate. Also, it’s
not available in as wide a selection of
colors, textures or patterns.
Many home centers carry plastic
laminate, but the choices are limited,
and the sheets are usually 4×8 and
smaller.However, you can special order
sheets up to 5 ft. x 12 ft., in a wide array
of colors and textures. (See Sources,
below for laminate manufacturer contact
information.)
Tip: Hang on to your leftovers.
Scraps of plastic laminate make
great shim stock for setting an even
gap around drawers and doors.
Choosing a Substrate
Plastic laminate is so thin, the surface
underneath it (the substrate) must be
sturdy and smooth. Because it’s relatively
cheap, the most popular choice
for a substrate is 3/4-in. high-density
particleboard. Medium-density fiberboard
(MDF) works equally well but
will cost you about 30-percent more.All
of these substrates are sold at home
centers in 4×8 sheets.
Build the Substrate
Make sure the substrate is perfectly
clean, flat and free of blemishes,because
they’re sure to show through the laminate.
Cut your top to size on the tablesaw.
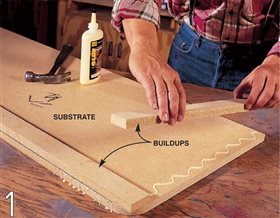
Countertops typically have a builtup
edge to give them a more substantial
look.Cut 2-in.-wide strips of particleboard
for front-edge buildups. Glue
and nail (or clamp) the strips to the
outside edges for a full 1-1/2-in.-thick
nosing (Photo 1).Use a portable jigsaw
to cut a 2-in. radius on the outside corners.
Then sand the edges and radiused
corners perfectly even.
Cut the Plastic
Laminate to Size
Once your substrate is built, you’re
ready to cut the laminate sheet to size.
Full sheets of laminate are flimsy and
hard to handle. If you’re working alone,
we recommend cutting the sheets down
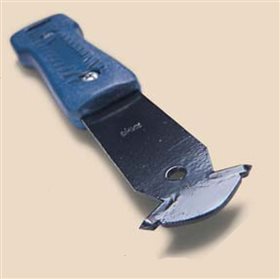
to manageable size using a scoring tool or a circular saw. You can also cut
laminate on your tablesaw using a simple
hold-down jig.
Cut the laminate 1/2-in. larger in width
and length than the substrate dimensions.
Cut the large surface piece first,
then the thin strip for the vertical edge.
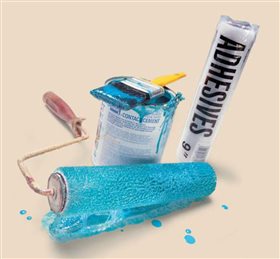
Now you’re ready to cement the laminate
to the substrate. Remember, contact
cement works differently than other
adhesives. After coating both surfaces to
be bonded you let the cement dry before
you put them together. Once dry, the
two surfaces will bond instantly on
contact, and there’s no turning back.
You can’t reposition the piece.Weird
stuff,but it really is the best adhesive for
laminate work.
Apply the Laminate Edge
For countertops, always do the vertical
surfaces first and the top or horizontal
surface, last. That way the horizontal
top overlaps and protects the vertical
edge from chipping when you drag
heavy appliances or dishes off the countertop.
For vertical surfaces like doors,
it’s just the opposite; horizontal first
and vertical, or edges, last.
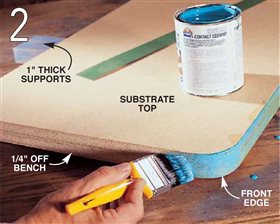
Position the substrate onto a couple
pieces of 1-in. scrap so the bottom of the
built-up edge is 1/4 in. off your bench
(Photo 2). This will accommodate the
1/4-in. overhang of the laminate piece
and allow you to use your bench as a
guide for getting the strip placed evenly
on the substrate.Apply contact cement
to the edge of the substrate and the
back of the laminate strip.
Let both surfaces dry to the touch.
Depending on the humidity, this could
take as long as an hour or as little as 15
minutes. Touch it with your fingertips
to test for dryness.The cement should
not stick to your finger. Keep the bottom
edge of the laminate strip in contact
with your benchtop to keep the
strip parallel to the substrate. Start at
one end and carefully press the laminate
strip to the edge of the substrate.
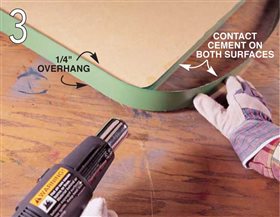
Don’t forget about those radiused corners!
When you’re a couple inches away
from the radius, grab your heat gun
and heat the laminate strip a few inches
on both sides of the radius (Photo 3).
Gently bend the laminate strip around
the curve and work your way to the
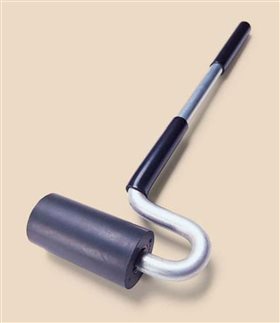
end.To ensure a complete bond, apply
pressure along the entire edge with a
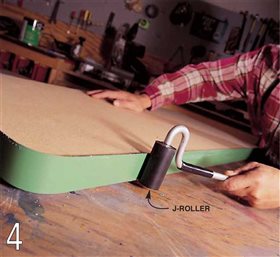
J-roller (Photo 4).
Flush-Trim the Overhang
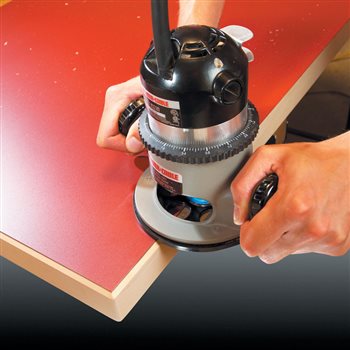
Now you can trim the edges flush with
the substrate. Hang the edge of the
workpiece over your work surface to
allow room for the router base. Clamp
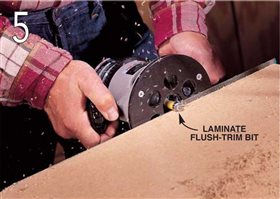
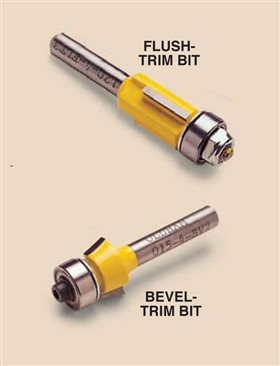
the countertop in place. Install your laminate
flush-trim bit in your router. Trim
the top and bottom edges (Photo 5).
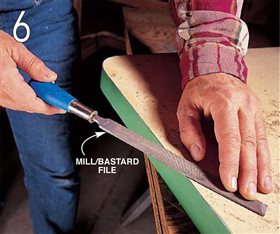
Use a file or sanding block with 120-
grit paper to make sure the top and bottom
edges are perfectly flat (Photo 6).
Apply the Laminate Top
Double- and triple-check that the substrate
surface is completely clean! Even
the tiniest wood chip or bit of dust will
create a bump in the smooth laminate
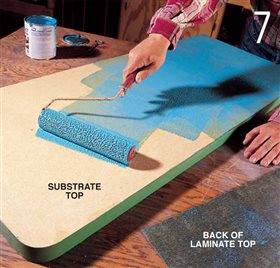
surface. Coat the top of the substrate
and back of the laminate with contact
cement using a lint-free paint roller
(Photo 7). Cover it generously but keep it from oozing onto the edge face.
Wipe off any overflow with a damp
rag.When the cement is dry, place
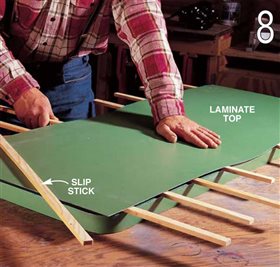
clean, splinter-free slip sticks, about
4 to 5 in. apart,onto the substrate top
(Photo 8). Slip sticks can be 1/2-in.
dowels or square pieces of wood.
The slip sticks keep the two cement coated
surfaces from touching until
you get the top positioned precisely.
Flip the laminate onto the slip sticks
so you’ve got an even 1/4-in. overhang
all around.
Don’t get over-anxious with this
step. Starting in the middle, gently
pull out the slip sticks and press the
laminate onto the substrate. Work
your way to one end and come back
to the middle and work your way to
the other end.
Use a J-roller over the entire surface
to ensure a good bond. Be careful
with the roller near the edges.
Getting too close to the overhanging
edge could snap the laminate (see
Oops!, below). If you don’t have a
roller, just wrap a cotton rag around
a 2×4 and push the edge of the covered
2×4 firmly over the entire area.
Trim the Laminate Top
Use a little mineral spirits on a rag
and rub any excess contact cement from the face of the laminated edge
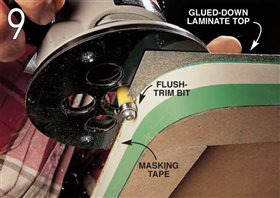
until it’s perfectly clean. To protect
the vertical edge from burn marks as
you trim, cover the front edge with
masking tape. Keep the tape a hair
below the top edge (Photo 9).
Next, flush-trim the laminate with
your router. Note: Be sure there are no
burrs or loose screws on your router
base that could scratch the laminate.
Use a sanding block with some 220-
grit paper to remove burrs. Trim the
top, letting the bearing ride along the
taped edge (Photo 9). Move the
router from left to right, keeping the
base flat on the top.
Tip: If your trimming bit gets
clogged with contact cement,
you’ll need to clean it. Turn off
the router, remove the bit and
soak it in mineral spirits. Use an
old toothbrush to remove the
cement.
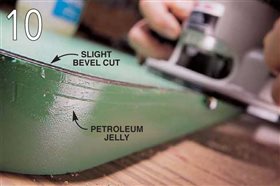
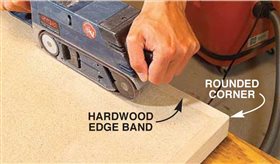
Ease the sharp top edge where the
laminate meets with a bevel-trim bit
(Photo 10). Install the bevel-trim bit
in your router so only 3/16 in.or less
of the cutting edge is exposed. Bevel
the top edge only. Now step back
and admire your work. |
|
Click any image to view a larger version.

1. Glue and clamp the buildups to the bottom of the substrate to give the
countertop a thicker, more substantial appearance. Use nails to pin the
buildups in place so they won’t shift around under clamp pressure.

2. Brush contact
cement on the
edges. Particleboard
edges which are
porous and may
require two coats (let
the first coat dry
about 30 minutes).
Brush contact
cement on the back
of the laminate strip
when you apply the
second coat to the
edge. Use supports to
hold the substrate off
the bench.

3. Use a heat gun on
curves to soften the
laminate. Press the
laminate onto the
substrate with a
gloved hand.

4. Roll the surface of the laminate firmly to ensure a good bond to
the substrate.

5. Trim the top
and bottom
edge of the
laminate strip
flush to the
substrate. Use a
laminate flushtrim
bit for this
job. Be careful not
to tip the router
as you cut.

6. Smooth any
irregularities
left after routing
with a file or
sanding block. Be
careful not to
round over the
edge. File only in
the direction
that pushes the
laminate into the
substrate, not
away from it.

7. Roll contact
cement on
the substrate
and the back of
the plastic
laminate. Let it
dry on both
surfaces before
assembly.

8. Use “slip sticks”
to separate the
laminate from
the substrate.
Align the laminate
top with the
substrate, keeping a
1/4-in. overhang on
all sides.
Remember:You
won’t be able to
move the laminate
once it touches the
substrate. Start in
the middle and pull
out the slip sticks
one by one, pushing
the laminate onto
the substrate as
you go.

9. Trim the
laminate flush
with the substrate
all the way around
the top. Masking
tape protects the
laminate from
scorching should
the bearing get
clogged with
contact cement
and seize up.

10. Use a beveltrim
bit to ease
the sharp edge
where the two
laminate pieces
overlap.A thin
coat of lubricant,
such as petroleum
jelly, protects the
finished edge from
scarring.
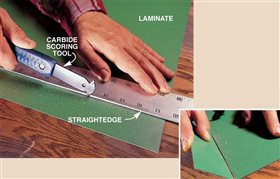
3 Ways to Cut Plastic Laminate

1. Cut the laminate with a
carbide-tipped scoring
tool. Make at least four
firm passes to score deep
enough for a clean break.
Pull up gradually from one
end of the score to the
other (inset photo).

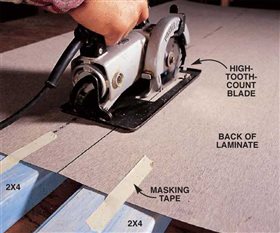
2. Cut the
laminate with a
circular saw. Set
the blade 1/4-in.
deep and hold the
laminate up off
your bench with
2x4s, as shown.
Use a high-toothcount,
carbide
blade in your saw.
Secure the
laminate face
down on the 2x4s
with tape.

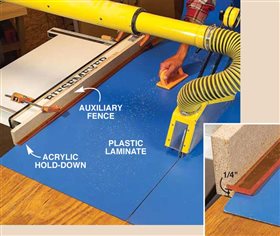
3. Cut laminate with a
subfence on your
tablesaw. The simple
subfence shown here fits
tight to the top of your
tablesaw so the laminate
can’t sneak under the
fence and get jammed.
A narrow strip of
acrylic holds
the laminate
down on the
table while
letting you see
where the
laminate
contacts the
fence. |


