|
“Plus c’a change, plus c’est la même
chose.” This centuries-old French
expression translates something like
this: “The more things change, the
more they stay the same.” It’s a bit of
wisdom that seems appropriate for
woodworkers. Though technological
advances can change our tools and
methods of work, we often work to
standards that artisans established
hundreds of years ago.
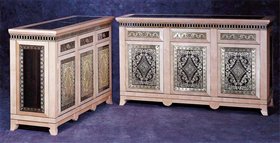
The marquetry and inlay work I do today is inspired by and measured
against the skill and creativity of
woodworkers who have practiced the
craft for 500 years. Most notable
among these artisans was André-
Charles Boulle, whose last name is
often used to describe the inlay technique
that I used on the commodes
shown here. During his lifetime
(1642 – 1732), Boulle supplied
French royalty with furniture that was
incredibly rich in surface ornamentation.
Boulle’s inlay materials included
tortoiseshell, brass, pewter and even
animal horn. For contrasting woods,
he often used rosewood, ebony, kingwood,
and other dense, dark-toned
tropical species.
Boulle’s marquetry technique was to
make two contrasting sheets of intricate
inlay that were cut from a single
sandwich of materials. If the sandwich,
or packet, contained two layers
that were light and dark, the two final
products would be a sheet with a light
pattern on a dark background, and a
reversed sheet, with a dark pattern on
a light background. One sheet would
have been considered the primary pattern,
in French the première partie.
The opposite pattern was called the
counterpart, or contrapartie. By sawing
both patterns out of one packet
and reassembling them on two trays,
the background of the première partie
becomes the motif of the contrapartie.
Boulle made cabinets with both patterns
in a single piece, or pairs of contrasting
cabinets.
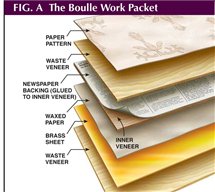
Preparing the packet
I have developed a way to do Boulle
marquetry with modern tools and
materials. This Boulle project uses
two materials: sheet brass and dark
bog oak veneer. They are assembled
into a packet (Fig. A) with a sheet of
waxed paper, backing layers of thick
veneer, and the pattern.
I use standard brass that is .032-in.
thick and veneer that I saw myself and
sand down to exactly the thickness I
need. This veneer should be slightly
thicker than the brass, to make the
final cleanup easier (Photo 9). It’s a
lot easier to sand down wood to make
it flush with the brass than vice versa.
For this leveling process I have found
that the veneer I make on the bandsaw
holds up better than regular sliced
veneer because the wood fibers
haven’t been crushed. Even so, I glue
a piece of newsprint to one side of the
veneer with hide glue to strengthen the veneer when I cut the packet on
the jigsaw. The brass is scuffed with a
piece of fine hacksaw blade on the
side that will be glued down to the
cabinet. I use 1/16-in. thick poplar
veneer for the two outermost veneer
pieces, which are sacrificial—they
only serve to stiffen the packet. The
wax paper lubricates the saw blade.
When you make up your own
Boulle packet, each layer should be
the same width and length. Assemble
the layers with veneer tape and use
yellow glue to fasten the pattern on
top (Photo 2).
Intricate cuts
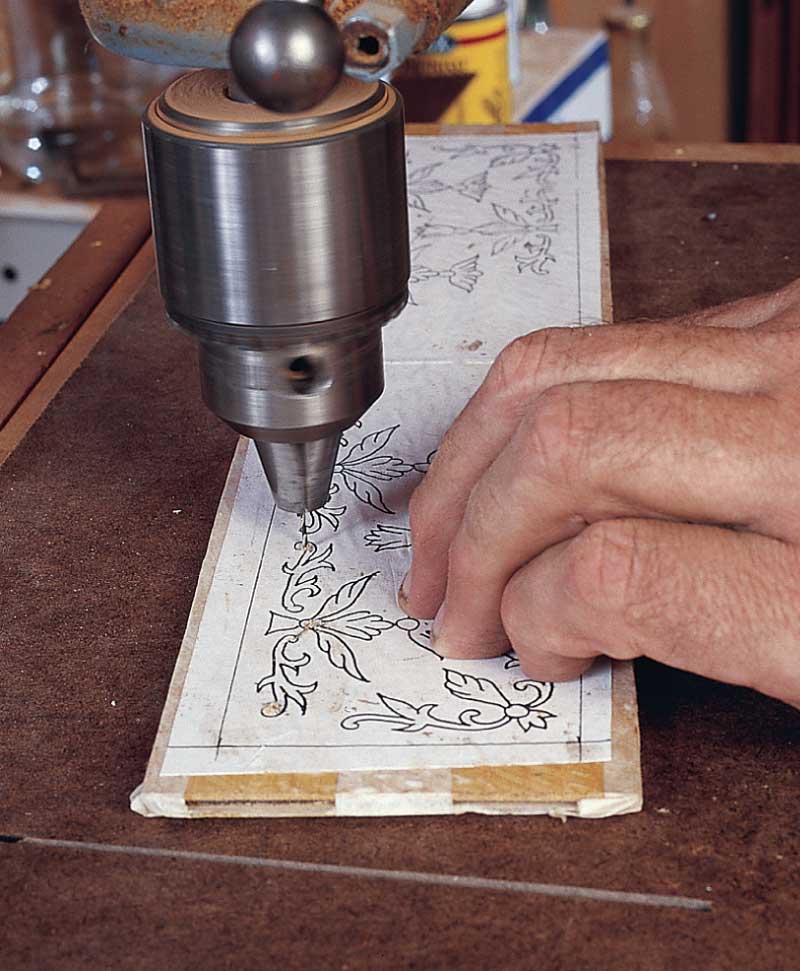
Before you begin cutting, drill starter
holes for the scrollsaw blade in every
motif (Photo 3). I usually put them at
the apex of sharp corners so they’re less
noticeable. I use a No. 60 (.04 in.-dia.)
bit for this work (see Sources, below).
You can do the pattern cutting by
hand using a fretsaw, but I prefer to
use an Excalibur parallel-arm scrollsaw
and a superfine No. 1 wood-cutting
blade with at least 20 tpi (see Sources, below). The advantage of the scrollsaw
over sawing by hand with a fretsaw is
that it keeps the cut square to the
work and allows you to maneuver the
work with both hands.
I generally start sawing near the center,
so the packet is supported fully by
the saw table (Photo 4). This is especially
important if there is a motif
with lines inside other parts. Despite
the minuscule size of the blade, it can
still be hard to saw crisp points. I run
the blade back and forth, turning it
slightly each time. This “carving” usually
broadens the kerf enough for a
tight turn. When I get near the end of
a cut, I slip a piece of cardboard under
the packet to support the motif. This
also prevents tiny cutouts from falling
through the hole in the saw table. The
leaves on this particular design have
veins, made from saw kerfs, which will
be filled with dark epoxy during final
glue-up.
As I cut individual motifs free, I
place them on a felt-covered tray that
is larger than the final piece (Photo 5).
The felt grips the pieces, preventing
them from sliding and getting lost.
You can discard the wax paper and
sacrificial veneers as the motifs are cut
out, but keep the brass and wood layers
together.
Preparing the inlay pieces
for gluing
When you’re done cutting, you’ll be
left with two “grounds,” the large
pieces into which the inlay will be
placed. One is wood, into which the
brass will be inlaid (the première
partie), and the other is brass, into
which the wood will be inlaid (the
contrapartie). Glue a piece of kraft
paper to the top side of each ground,
using yellow glue or hide glue. This
creates a bottom for each of the cavities
where a motif will go.
I typically assemble the première
partie and contrapartie at the same
time (Photo 6). Glue the brass piece
into the wood ground, then glue the corresponding wood piece into the
brass ground. Use a small dab of yellow
glue on the back of each motif.
You’re putting the assembly together
upside down, so you should be gluing
down the shiny side of the brass and
the papered side of the wood. Do
your best to keep the kerf from the
saw blade even all around each motif.
Gluing the inlaid panels
With the inlaid pieces glued to the
kraft paper, you’re ready to glue
them to the substrate that you will
use in the cabinet construction.
Traditionally, hot hide glue was used
in this step, but I prefer the strength
and workability of epoxy (Photo 7). It
holds the scuffed brass and wood
veneer to the substrate and fills the
voids left by the saw blade, including
those of the leaf veins. I use black
wood dye to darken the epoxy so it
matches the color of the bog oak.
For the cabinets shown here, I used
MDF as a substrate, cutting the core
pieces oversize so they can be trimmed
later on the tablesaw. You can do the
glue-up with clamps, a press (as I did),
or vacuum equipment. Lay up the
panel as follows: On the bottom place
a thin sheet of rubber. This will
absorb the bumpiness of the panels,
with their differing thicknesses of
brass and wood. For one-time use,
non-corrugated cardboard will do. On
top of the cushioning layer, lay newspaper
or wax paper to prevent the
epoxy from sticking to the cushion.
Next, place the inlaid sheet, with the
scuffed side of the brass up. Coat your
core piece liberally with epoxy and
turn it upside down on the inlaid
sheet. Coat the other side of the core
with epoxy, and cover with a piece of
backer veneer. Top with a newspaper,
a caul, and then clamp (Photo 8).
Cleaning up the panel
The panel will be plenty messy when
it comes out of the press, but it’s
immensely rewarding to watch the
inlaid pattern emerge during clean-up.
Use a cabinet scraper to remove the
paper (Photo 9), then switch to a double-
cut *** file, working from all
directions. Don’t file too vigorously,
or the heat will soften the epoxy. I
usually switch back and forth between
the two panels so they stay cool.
When the designs begin to appear,
switch to hand sanding (Photo 10). Although this is tedious, it’s necessary
to avoid heating the brass. Any voids
that you discover can be filled with
the tinted epoxy.
Trim and finish the panels
Once the panels are clean and flat,
they can be trimmed to fit the
intended cabinetry. Brass is soft
enough to be cut with carbide-tipped
blades, but use a high-quality ATB
combination blade. The brass will
tarnish unless it has a protective finish.
Traditionally shellac was used,
but I prefer sprayed-on lacquer.
Fig. A: The Boulle Work Packet
|
|
Click any image to view a larger version.
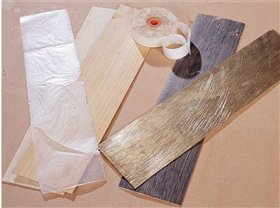
1. The essence of Boulle work is cutting intricate patterns in a
packet consisting of thin brass sheet, dark-colored veneer, waxed
paper, and sacrificial veneers, that are placed on the outside for stiffening.
Veneer tape holds the layers together.
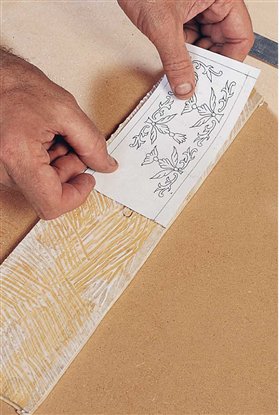
2. The pattern is glued on to the
packet using yellow glue. After sawing the
packet, it’s possible to separate the layers,
so that two complementary inlaid sheets
can be made.
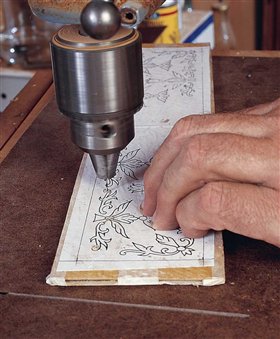
3. Drill starter holes for the scrollsaw
blade inside every motif, using a
tiny drill bit. The best place to locate
these holes is in sharp corners, where
they’ll be hard to notice.
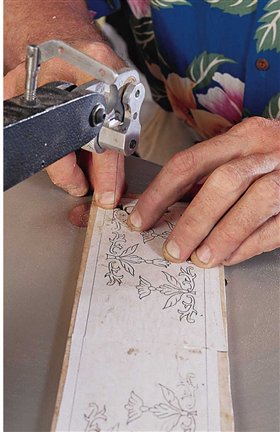
4. Cut out the pattern using a scrollsaw with
an extremely fine blade. Cut directly on the lines.
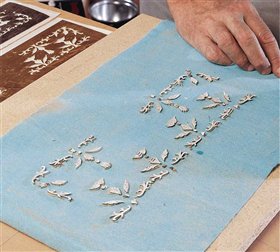
5. Arrange the cutouts on a felt-covered board that is larger than the finished sheets
will be. When you’re done, separate the packet and you’ll have a wood background and
a brass background, each with the pattern cut in it.
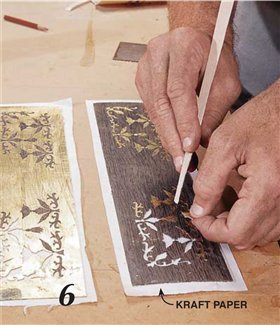
6. Assemble the inlaid sheets by gluing
both the ground and the inlaid cutouts
onto a piece of kraft paper, using yellow
glue. This will hold all the pieces together.
Keep the gap around each piece even.
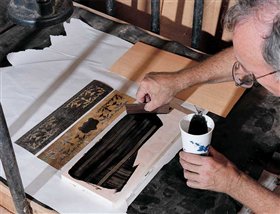
7. Coat the substrate to which you plan to attach an inlaid sheet with epoxy. In this
case, the glue was colored black to match the dark veneer. The epoxy fills the kerf left
by the saw blade and firmly glues both wood and brass.
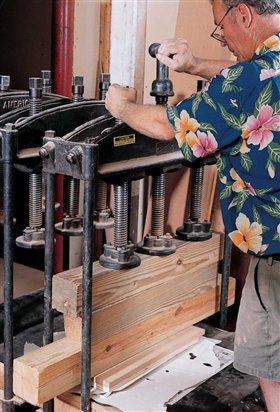
8. Press the assembly until the epoxy
sets. You should epoxy a veneer to the
back of the substrate for stability, and
use a rubber or cardboard cushioning
layer against the inlay work, because
it’s bumpy.
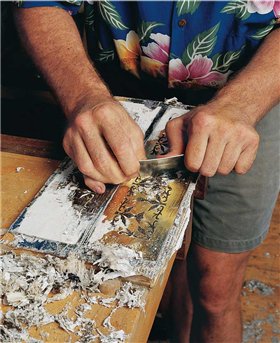
9. Scrape the paper off the finished panel, using a cabinet
scraper, and then use a file in all directions to level the panel.
Work slowly so the brass stays cool; heat breaks down the
adhesive.
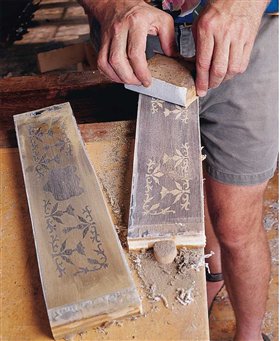
10. Finish by hand sanding, using a hardwood block behind
the paper to keep the work flat. Start with 80 grit and progress to
400. When you’re done, lacquer the panel to keep the brass from
tarnishing.
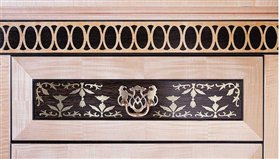
Intricate inlaid patterns have been made for centuries. The
author’s cabinets capture the glory
of the traditional Boulle technique,
with modern tools and materials.
|