We may receive a commission when you use our affiliate links. However, this does not impact our recommendations.

Glazing Techniques from a Pro
Use gel stains to add richness, depth and color.
By Kevin Southwick
Some wood finishes have richness and depth that combine to create a special warm glow. This glow usually comes with age, resulting from natural changes in the wood, due to its exposure to light, and to a patina that develops at the wood’s surface, in and on the finish. By imitating the effects of time, glazing can also create this glow. Basic glazing techniques are easy to learn, and they provide a much faster way to enhance a finish than waiting for Father Time.
Glazing techniques use stains differently than the way they’re normally used. Instead of staining the raw wood, glazing is done after a finish has been applied, so instead of soaking in, the color sits on top of the sealed, nonporous surface.
Glazing can be done with any coloring material that will adhere well to a sealed surface (see “Glazing Materials,” below). Glazing materials need to be thick. Several brands of oil-based gel stains work well as glazes. However, regular thin oil stains don’t work well, because they don’t contain enough binder to stick to the finish, or enough color to be effective. In general, oilbased glazing materials are usually easier to work with, because they have a longer working time than water-based materials. They’re also easier to remove, if something goes wrong.
Projects of all sizes can be glazed. Here, I’ll use a mahogany picture frame to demonstrate how to use a couple of basic glazing techniques to add color and character. These techniques can also be used to change a color for matching purposes, to add a subtle warm tone to an otherwise cold finish, and to age reproduction pieces. Many fancy faux finishing techniques also use glazing methods and materials.
Virtually goof-proof
Because glazing is done on a sealed surface, it’s very forgiving. If you don’t like the results, oil-based glaze can easily be erased with mineral spirits, as long as you act before the glaze hardens. (Color will be retained only in areas where the surface is left porous.) This means that almost nothing can go wrong, and you can practice all you want.
The best colors for glazing to imitate the effects of age are in the medium brown range, like dirt. Golden or amber colors are best for adding warmth to a pale finish, such as a clear finish on new pine, birch or maple. The goal for this mahogany frame is to deepen the overall color and enhance the molding and carving by leaving a little more color in the grooves and crevices. The gel stain I’m using is a medium dark brown color that’s on the cool side. No thinner was added.
Seal the Surface
The first step for both techniques is to seal the wood so that the glaze can’t soak in (Photo 1). Here, I’m using amber (also called orange) shellac for sealing, because of its warm glow and fast dry time, but any film building finish will work. Four coats of 1-1/2-lb cut shellac will ensure thorough sealing and provide an attractive finish. (To create a 1- 1/2-lb cut, mix 1 part canned amber shellac with 1 part denatured alcohol.) More coats may be required to fully seal end grain or carvings. Let each coat dry for half an hour. Sand lightly between coats with 400 grit sandpaper or ‘0000’ steel wool. Sand after the last coat, too, to prepare the surface for glazing. The scratches from the fine abrasive will help catch the glaze.
Glazing with cheesecloth
Once the wood has been sealed, the first glazing technique is similar to staining raw wood. You apply the glaze (Photo 2) and then wipe it off (Photo 3). But instead of using an ordinary rag for wiping, you use cheesecloth. Like the bristles of a brush, cheesecloth’s loosely woven texture gently removes the glaze from the surface, so you can remove as little or as much as you want. You can remove the glaze uniformly, to leave an even coating of color, or wipe across carvings, flutes and fillets to leave glaze in the crevices.
Glazing with brushes
Round natural bristle sash brushes are hard to beat for applying and removing glaze. They’re especially well suited for pushing glaze into corners and grooves. They’re also excellent for leaving just the right amount of glaze on the surface to create the desired effect. The best strategy is to use one brush to apply and work the glaze, and a second, clean brush for final touch-up. Start by working a small amount of glaze into the first brush on your disposable palette (Photo 4). Then transfer the glaze to the surface (Photo 5). Sash brushes allow you to apply, work and remove glaze all at the same time. You can add or remove color, work selectively or overall, and you can work crevices as easily as high spots.
As you continue to apply and remove glaze while you work the surface, it’s important to keep the brush from becoming overloaded (Photo 6). Switch to the clean brush to finish the job (Photo 7).
The glaze begins to harden and becomes difficult to work after about five minutes. It’s important to finish working the glaze before this happens. Remember, it’s also possible to remove the glaze and start over. Once you’ve completed the job, allow the glaze to dry overnight. After the first coat is dry (24 hrs above 60° for gel stains), you can repeat the process to add more color and/or highlights.
The final step is usually to apply clear finish to lock the glaze down under a protective layer, or to provide an appropriate sheen. But if the finished object is more decorative than functional, and the sheen is consistent, this step may not be necessary, as is the case with this frame.
Click any image to view a larger version.
Technique 1

1. Start by brushing on thin coats of amber shellac to seal the wood and add a warm tone. Let the shellac dry, then sand lightly.

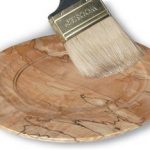
2. Next, cover the surface with glaze. The simplest method is to generously brush on the glaze using a disposable brush.

3. Finish by using cheesecloth to wipe off the excess glaze. Cheesecloth provides more control than ordinary cotton rags, so you can leave a little color in grooves and crevices.
Technique 2

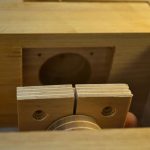
4. For maximum control, use a natural bristle sash brush to glaze the sealed surface. Put a small amount of glaze on a palette. Dip the brush in the glaze and then remove the excess on a clean part of the palette.

5. Dab on the glaze and then brush it out. The sash brush allows you to delicately apply and spread the glaze.

6. As you work the surface, keep the brush from becoming saturated with glaze by cleaning it on an absorbent towel or rag.

7. Switch to a clean brush for final glaze removal. It’s a good idea to take off your glazestained gloves for this step, so you don’t mess up the work you’ve done.
Glazing materials
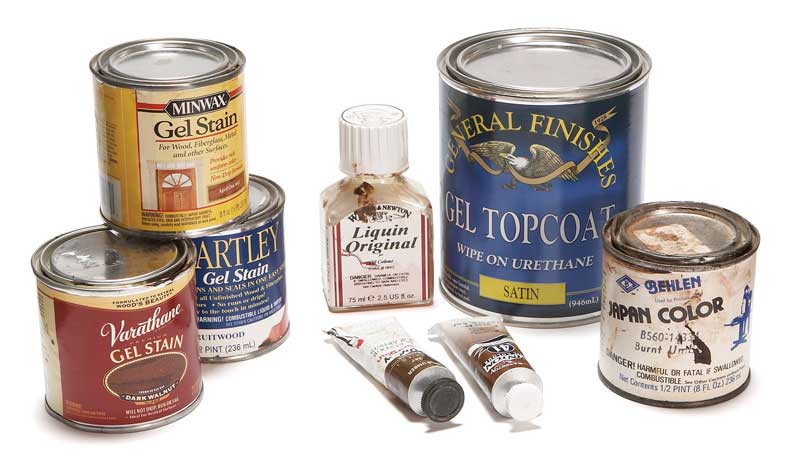
Gel stains work well for glazing, but making your own glaze offers unlimited options for color and consistency. To make your own glaze, you need concentrated color, such as japan color or artist’s oil, and an oil-based glazing medium to use as a “binder,” to make sure the color will adhere to the surface, and to provide a smooth, thick consistency.
Clear gel varnish and artist’s glazing medium both work well as binders; artist’s glazing medium allows a longer working time. Start by putting a small amount of binder in a mixing container, then add small amounts of color and whisk in with a brush until the desired concentration is reached. Paint thinner or mineral spirits can be added in small amounts (from 5% to 20%) to increase working time. Just remember, glaze needs to be fairly thick to work.
This story originally appeared in American Woodworker August/September 2009, issue #143.

August/September 2009, issue #143
Here are some supplies and tools we find essential in our everyday work around the shop. We may receive a commission from sales referred by our links; however, we have carefully selected these products for their usefulness and quality.