


We may receive a commission when you use our affiliate links. However, this does not impact our recommendations.

Super-tune your saw for absolutely straight, smooth and burn-free cuts.
When my contractor’s saw was new, it cut perfectly. Over the years, it gradually went out of whack. I’ll show you what I did to accurize it so that my blade cuts true again.
Precisely aligning your saw’s blade doesn’t require any special tools, but it sure helps to have a dial indicator. An inexpensive one costs about $30. Some special hardware is also a big help when you make small adjustments under the table (see “PALS Simplifies Alignment,”). You don’t need this hardware to follow my procedures, but I guarantee it will save you time and frustration.
Have you had these problems?
Accurizing your saw should solve one or more of these aggravating problems. With the blade set at 90°, your rip cuts may be burnt (A). On the other hand, your boards may pull away from the fence (B). Wide crosscuts may tail off, out of square (C). But even if those cuts are perfect, you might have similar problems with the blade set at 45° (D).
Before you begin the accurizing procedures, make sure your fence lines up perfectly with the miter-gauge slot. In addition, check your miter gauge. It should be exactly set to 90° and shouldn’t wobble in the slot. These fixes could solve all your problems right away.
Click any image to view a larger version.

Trunnion brackets are the answer.
The mechanism under a contractor saw is relatively simple (see photo, below). Two trunnions, connected by long tie rods, allow the blade to tilt. The trunnions have semicircular raised ridges that ride in grooves in the trunnion brackets. This mechanism allows the blade to tilt.
The trunnion brackets are bolted to the table through oversized holes. Loosen the bolts and you can move the brackets back and forth more than 1/8″. Vibration can cause the rear bracket to move, which skews the blade out of alignment. The solution to this problem is to move the bracket back to its proper position. That only solves half the problem, however.
Your blade can be perfectly aligned at 90° and still be off at 45°. How does that happen? When you tilt the blade, you also tilt the motor, which is cantilevered off the back of the trunnion tie rods. Over time, vibration and the motor’s weight may cause the rods to twist in relation to each other, so they’re not in the same plane. This shifts the rear trunnion and skews the blade. Moving or lifting the saw by the motor may have the same effect.
You can solve the 45° alignment problem in two ways. I prefer to lower one or both trunnion brackets with shims. It’s slow-going, but controlled and precise. You can also untwist the rods. To do this, you loosen the tie-rod nuts at the motor end, insert a lever between the rods and pry. I’ve tried this method, but I found it too awkward and hard to control the results.

If you could look through the table of a contractor’s saw, here’s what you would find. The trunnion brackets are bolted to the underside. Loosening these bolts allows you to move the brackets, which realigns the blade to the miter slot.
Align the blade at 90°, then 45°.
Aligning your blade is a two-step process. First, you set the blade at 90° and align it parallel to the saw’s miter slot (Fig. A). Second, you tilt the blade to 45° and check its alignment again (Fig. B). Each alignment procedure requires shifting the trunnion brackets in a different way. You can’t reverse the order; you must perform the 90° alignment before moving on to the 45° alignment.
Fig. A
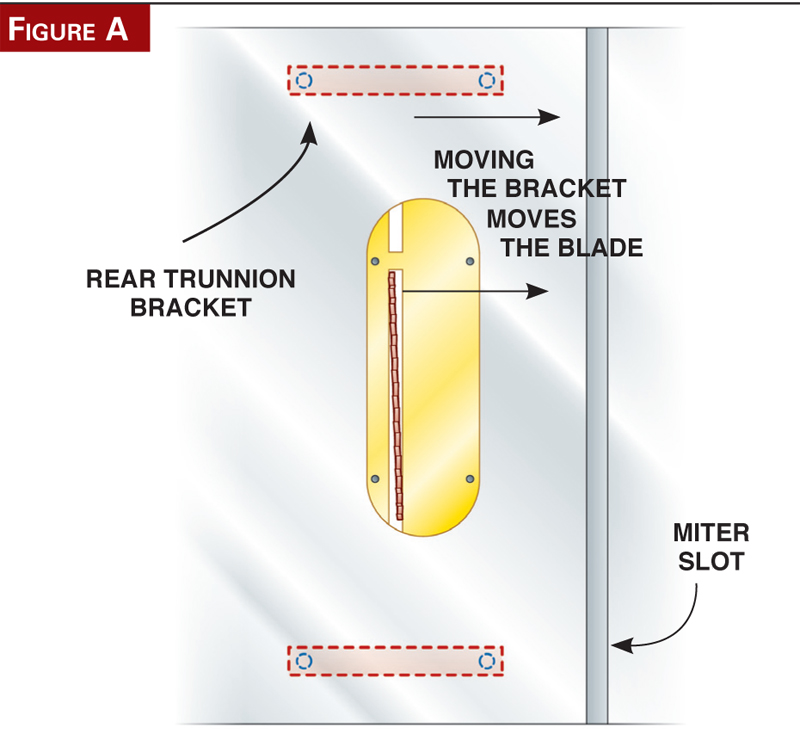
To align the blade at 90°, shift the rear trunnion bracket left or right until the blade is perfectly parallel to the saw’s miter slot.
Fig. B

To align the blade at 45°, lower one or both trunnion brackets by inserting shims under the table. This brings the blade back into alignment.
PALS simplifies alignment.
Aligning your blade can be fussy work, but a precision alignment and locking system (PALS) makes the job a lot easier. PALS includes a few pieces of precision hardware that fit on your saw’s rear trunnion bracket. Believe me, it’s the best $20 you can spend on your contractor’s saw. After your saw is trued, PALS prevents it from creeping out of alignment again.
When your table saw blade needs aligning, you have to shift the saw’s rear trunnion bracket side to side to put things right. The low-tech way to do this is to tap the bracket back and forth (see below). Inevitably, you smack too hard and overshoot the mark. The PALS method is more sophisticated and much quicker. To move the bracket, you turn a pair of opposing screws. In effect, you dial in the adjustment. Installing PALS is easy and doesn’t require special tools. It fits most contractor’s saws. First, you replace the rear trunnion bracket’s bolts with studs. (You don’t have to remove the bracket to do this.) Then you install an L-shaped bracket with an adjusting screw on each stud. The PALS hole precisely fits the stud, unlike the oversized holes in the bracket. The adjusting screws bear against the bracket’s ends. Turn the screws and you precisely move the bracket. When the screws bear against both sides of the bracket and their nuts are tight, the bracket isn’t going anywhere.
The PALS adjusting screws also make the complicated 45° alignment procedure much easier (see below). With PALS, you can loosen and lower the rear bracket without losing its correct position.

90° alignment
I use a dial indicator to measure the blade’s alignment (see Sources), but you can also use a combination square. I installed the PALS system before beginning the alignment procedure, but it isn’t absolutely necessary.
1. Position the blade. First, unplug the saw. Tilt the blade to 5°. Gently rotate the handle back toward 0°. This relieves any strain from over-tightening the tilt mechanism that might have distorted the readings. Raise the blade to its full height. Lower it one-quarter turn to remove strain.
2. Remove play from the miter-gauge bar. If the bar wiggles in its slot, insert paper or packaging tape between the bar and slot. You can also push the miter gauge right or left when you take a reading, so it always butts against the same side of the slot. Place the miter gauge in the saw’s right-hand slot.
3. Mark the blade. Remove the throat plate. Locate a tooth at the blade’s front that’s at or just below the table. Make a mark on the blade’s plate immediately below this tooth.
4. Zero the indicator at the blade’s front. Clamp the indicator’s base to the miter gauge. Adjust the indicator so its spring-loaded ball foot touches the mark. Clamp the indicator so its plunger is depressed halfway. Set the indicator to zero.

Accurate measurement with a dial indicator makes realigning your saw’s trunnion brackets much easier. Clamp the indicator to your miter gauge and zero it on a spot you’ve marked at the blade’s front.
5. Rotate the blade. Move the indicator to the blade’s back and relocate the ball foot on the mark. If you get a positive reading more than .004″, the back f the blade is too close to the miter gauge slot. To align the blade, the rear trunnion bracket must be moved away from the slot. If the needle moves in a negative direction and you get a reading more than .004″, the bracket must be moved toward the slot.

Rotate the blade, slide the indicator forward and measure the same spot. A negative reading indicates the blade’s back is skewed too far from the miter slot. A positive reading indicates the opposite. Ideally, the difference between the front and back measurements should be less than .004″.
6. Shift the rear trunnion bracket. From behind the saw, slightly loosen the bracket’s bolts. (You may have to remove the saw’s rear rail for access.) If you’ve installed PALS, turn its adjusting screws to move the bracket left or right. If you don’t have PALS, drive the bracket left or right using a hammer and a pointed stick or dowel. A small tap will make a big difference, so take it easy.

Shift the rear trunnion bracket by slightly loosening its bolts and gently tapping left or right with a hammer and a pointed stick. The blade moves with the bracket. This crude method works OK, but you’ll find installing a PALS system makes this adjustment much easier.
7. Measure again. Repeat Steps 4 and 5 to see where you are. When the two readings are .004″ or less apart, you should be good to go. Tighten the brackets’ bolts and measure one last time. On the PALS system, tighten both adjusting screws against the bracket to lock it in place.
45° alignment
Before starting this procedure, make sure your blade is aligned at 90°.
8. Measure the alignment. Repeat Steps 1 through 5 with the blade tilted away from the indicator. Adjust the blade to 44° to remove strain. 9. Identify which bracket to lower. See the chart below. To shim the front bracket, go to Step 10. To shim the rear bracket only, skip to Step 12.

Measure the blade’s alignment at 45°. Repeat the same front-and-back measuring procedure you used to align the blade at 90°. This time, the blade is tilted away from the dial indicator.
10. Shim the front trunnion bracket, if needed. Remove the motor and turn the saw over. Install two 5/16″ washers under each bolt. Tighten the bolts. Turn the saw back on its feet and install the motor. You shouldn’t have to turn the saw over again.
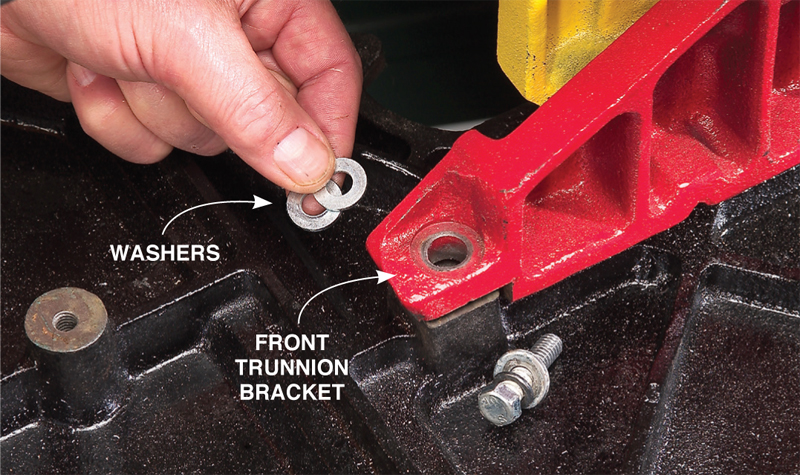
Place two washers under each side of the front trunnion bracket if it must be lowered. This requires turning the saw over. Washers will overcompensate, so you don’t have to turn the saw over a second time. Fine-tune the alignment by shimming the rear bracket, with the saw upright. This bracket is easily accessible.
11. Check 90- and 45° alignments again. Repeat Steps 1 through 8. You should get a positive reading in Step 8, which means the rear bracket must now be lowered. Move on to Step 12 to fine-tune the 45° alignment.
12. Shim the rear bracket. Use scissors to cut U-shaped shims of various thicknesses. Brass shim stock works best (see Sources). The shims’ correct thickness can only be determined by trial and error. Start with .006″ shims. Slightly loosen the bracket’s bolts and insert one shim around each bolt.

Place thin metal shims under each side of the rear bracket to align the blade. You’ll have to experiment with different thicknesses to make the alignment spot-on. It may seem odd, but a paper-thin shim can shift the blade quite a lot.
13. Repeat the 90° alignment procedure (Steps 1 through 7). It’s no fun, but you must correct for any side-to-side movement in the bracket whenever you’ve loosened it. If you have installed the PALS system, chances are the rear bracket will not have moved, but it’s still worth checking.
14. Check the blade’s alignment at 45°. Repeat Step 8. If the readings are within .004″, you’re done. If the reading is positive and more than .004″, use thicker shims. If it’s negative by more than .004″, use thinner shims. Then measure again.

Sources
(Note: Product availability and costs are subject to change since original publication date.)
In-Line Industries, in-lineindustries.com, 800-533-6709, Contractor saw precision alignment
and locking system (PALS).
Little Machine Shop, littlemachineshop.com, 800-981-9663, Dial indicator set,
#1782.
Lee Valley, leevalley.com, 800-871-8158, Brass shim stock sampler pack, #27K07.50.


