


We may receive a commission when you use our affiliate links. However, this does not impact our recommendations.
Improve your accuracy and control with these 5 router jigs.
By: Bill Hylton
Why buy a commercial jig when making one yourself will triple your enjoyment? First, you’ll experience the joy of building a useful shop fixture from nothing more than some scrap wood and a good idea. Second, you’ll enjoy the money you’ll save. And finally, as all woodworkers understand, you’ll have the satisfaction that comes with saying, “I made it myself.” The five jigs described here are all designed to deliver improved accuracy, control and adjustability for a lifetime of better routing.
Fence Micro-Adjuster
This jig enables you to make tiny, accurate adjustments in positioning a router table fence. A pair of jigs clamp to the tabletop, one at each end of the fence. Each jig has a stop that extends to meet the back of the fence. The stop is a simple cap screw that you turn with an Allen wrench. The two screws, in 3/8-in.-16 and 3/8-in.-20 sizes, have different thread pitches that produce different rates of adjustment. An L-shaped Allen wrench makes it easy to track the amount of adjustment, for example, a quarter turn or half turn. By retracting the cap screw in small increments, you move the fence backward to slowly reveal more of the cutter or forward to reduce bit exposure. By moving only one end of the fence, you can make some incredibly small adjustments. For example, if one end of the fence is moved back 1/64 in. (a quarter turn of the 3/8-in.-16 bolt) and the other end remains stationary, the router bit will make a 1/128 in. deeper cut.
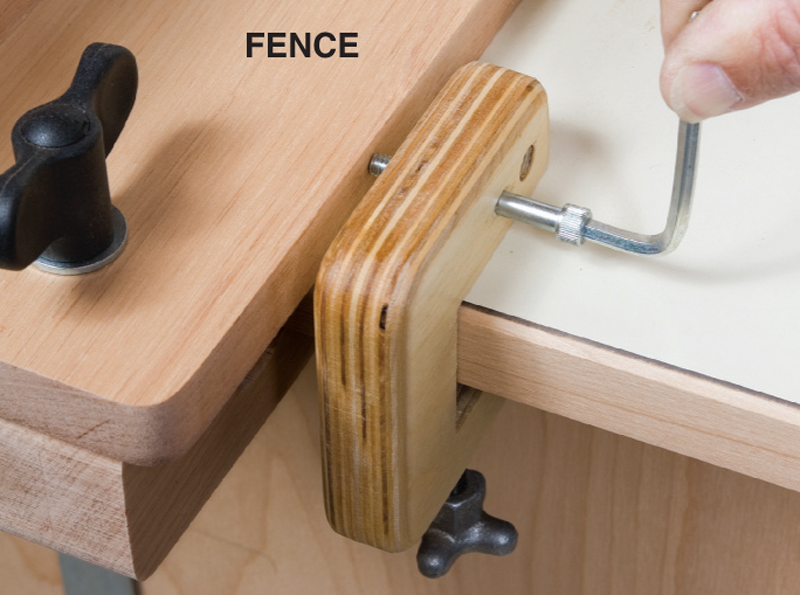
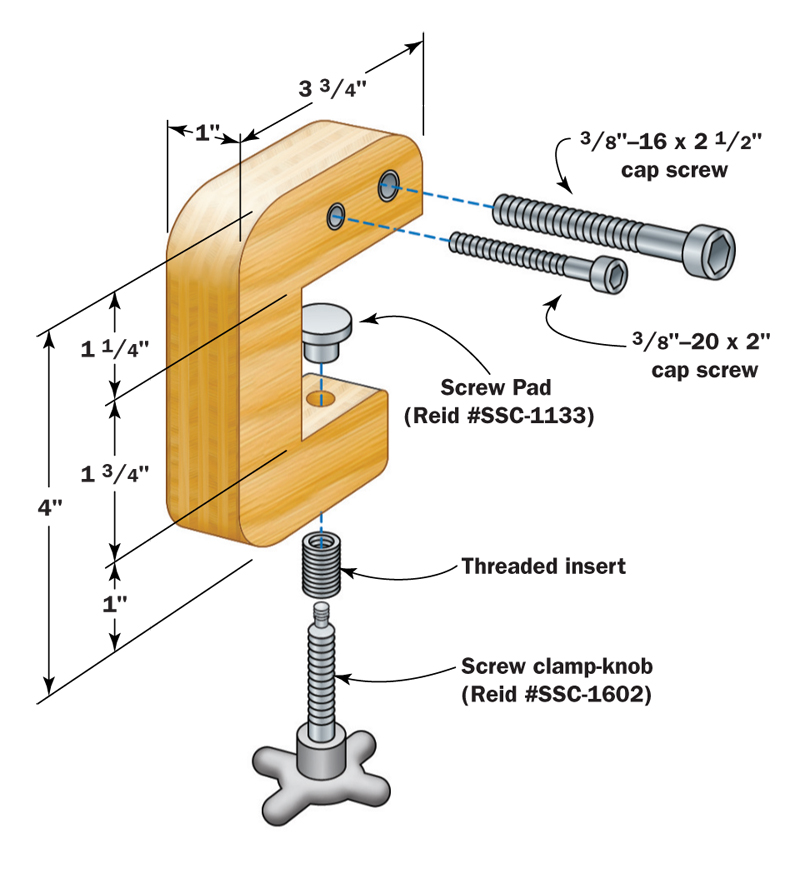
Face-glue two layers of 1/2-in. multi-ply plywood to create a blank for the jig body. Adjust the opening and overall dimensions as needed to match your router table. The hardware is available at hardware stores.
Springboard
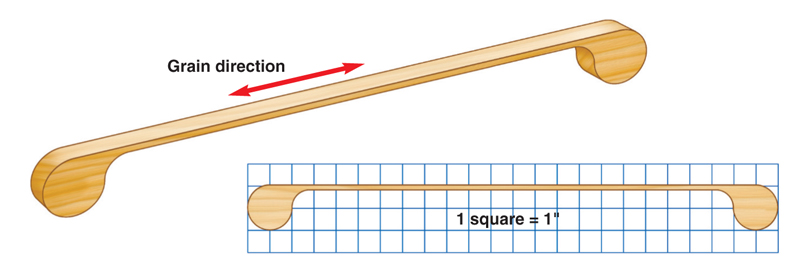
This unusual jig—a bow-like affair with a clamp pad on each end—can be secured to the fence or tabletop and employed in place of a featherboard.
Making the jig is a straightforward bandsaw project (see the pattern below). The jig’s length can be adjusted to suit any router table. Species with natural resilience, such as oak, ash or hickory, make the best springboards.
To use the springboard, clamp one end in place, flex the jig to create pressure against the workpiece and then clamp the other end in place. Two springboards can be used simultaneously to hold a workpiece against the fence and the table as it passes by the bit.
Select a straight-grained board and lay out the springboard so its thin middle section follows the grain direction exactly. Avoid any grain run-out because it could result in a weak point that might fracture under tension. After you cut the springboard from the blank, sand it smooth to reduce friction where it contacts the stock.
Depth Gauge
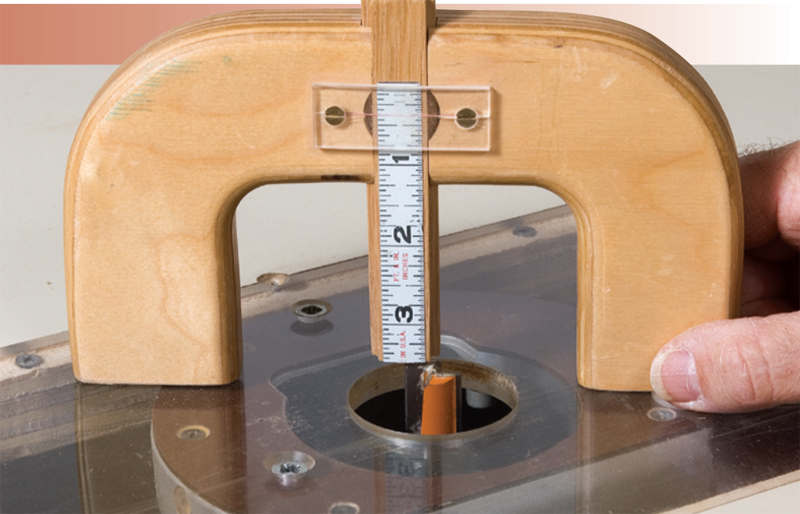
Setting bit height is either a hit-or-miss proposition based on eyeballing or a simple measuring task featuring a depth gauge jig. The latter approach is faster and more accurate. Plus, it saves aging knees by eliminating that awkward hunkering down motion to reach bit level. With a depth gauge, you simply set the desired bit height and then raise the bit until it hits the bottom of the slide bar. With a piloted bit, make sure the slide clears the bearing and touches the cutter.
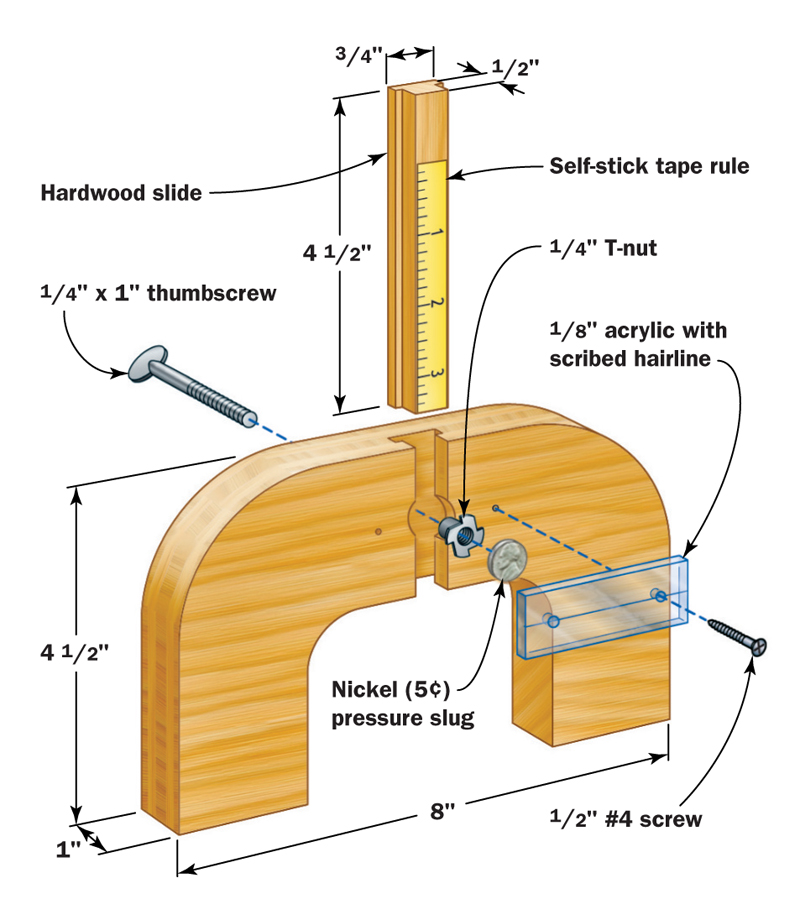
Built from multi-ply for strength and stability, this depth-gauge jig requires a short length of self-stick measuring tape with large numbers, a thumbscrew and a little piece of clear acrylic.
Lay out the depth-gauge body on some plywood. Drill the hole for the nickel 1/16-in. deeper than the T-slot using a 7/8-in. Forstner bit. Plow the T-slot with a T-slot router bit before shaping the body. The slide is a simple T-molding made by cutting two rabbets on the edge of a board and then ripping the molding free. Apply the self-stick tape rule at the bottom. Secure the acrylic plate with a couple of screws.
Zero the gauge by setting it on a flat surface, for example, your tablesaw. Let the slide drop to the table and lock. Score a line on the face of the acrylic over the 0-in. mark on the tape. Drill the holes slightly oversize in the acrylic plate to allow some minute adjustment, if necessary.
Sources: Lee Valley, leevalley.com, 800-871-8158, Adhesive bench measuring tapes, 48 in., #25U02.02. MLCS, mlcswoodworking.com, 800-533-9298, T-slot cutter, #6334.
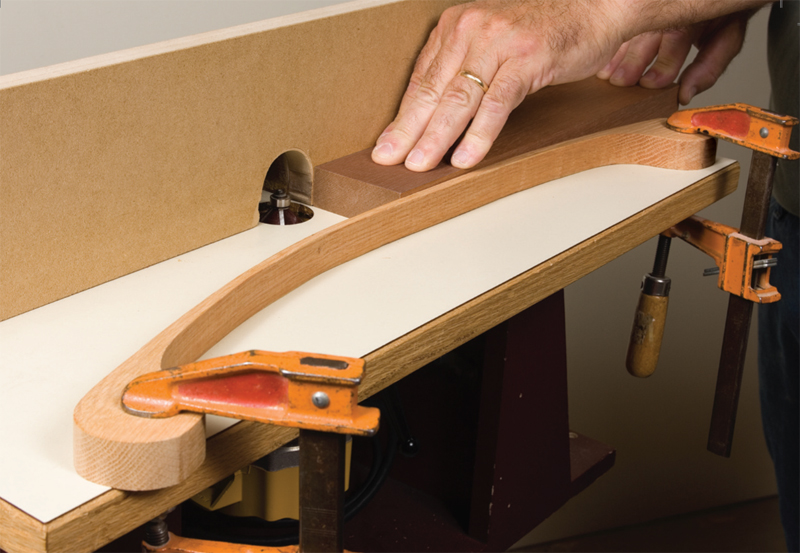
Adjustable Trammel
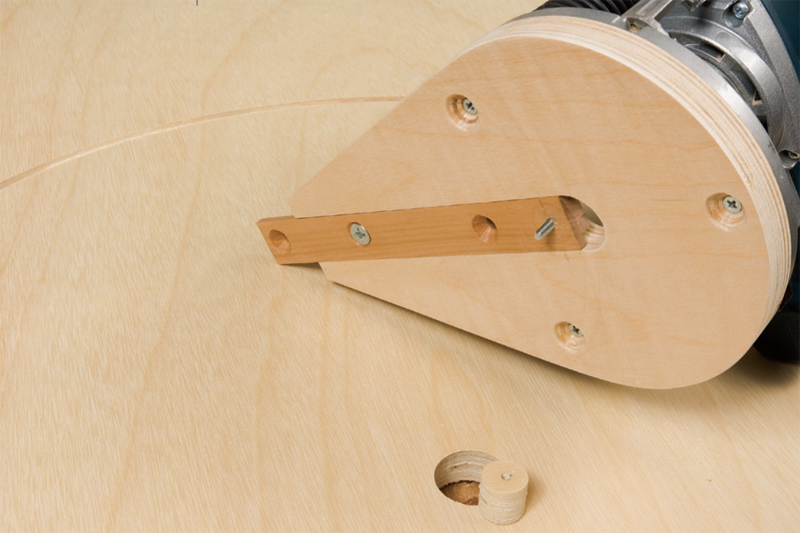
This trammel uses interchangeable arms to create circles and arcs of different diameters. It can handle jobs as varied in size as the small plug you see in the photo at right and the broad arc on the base of a wide cabinet. The short arm has two pivot holes and three mounting holes. You can reverse the arm and use different pivotmounting hole combinations to cut 1-1/2-in. to 16-in. diameters. The longer arm creates diameters up to 36 in. A small plunge router works best with the trammel because it has the ability to both initiate a cut and extend its depth quite easily.
Lay out the trammel’s base on a blank of 3/4-in. sheet stock—multi-ply works best. Make the blank extra long so the pivot block can be cut from it later. Rout the two-step groove while the blank is still a rectangle. Cut the pivot block from the blank. Drill the bit opening with a Forstner bit. Then cut the baseplate profile on a bandsaw and sand the edges.
Each arm is a simple T-shaped molding made to fit the stepped groove in the base and pivot block. To machine the arms, rout two rabbets on the edge of a wide board and rip it to thickness. Cut the T-shaped molding to the desired lengths. Drill and countersink holes for adjustment bolts. Then tap holes for a pivot screw.
Tip: If you don’t have a trammel and want to cut a small hole or disc, drill a small hole in the router baseplate and drop it onto a headless nail driven partway into the workpiece. Doing so makes the base a very short-armed trammel.
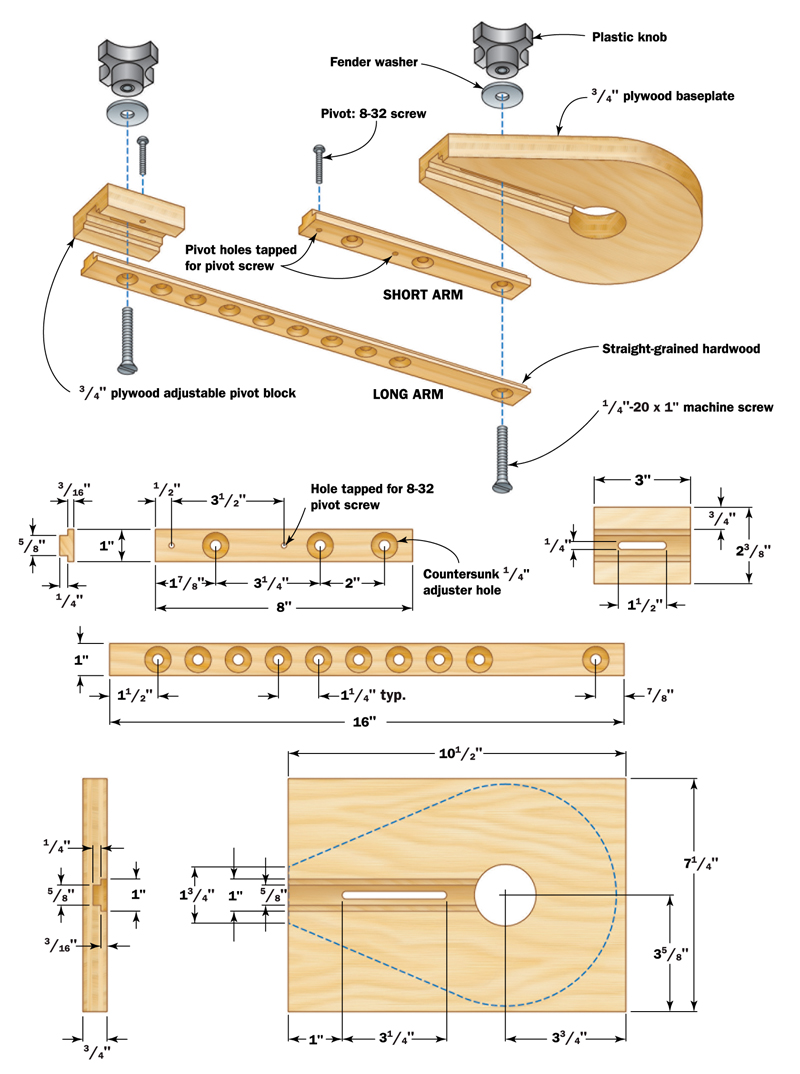
Source: Lee Valley, leevalley.com, 800-871- 8158, 2-in. four-arm knob, #00M55.40.
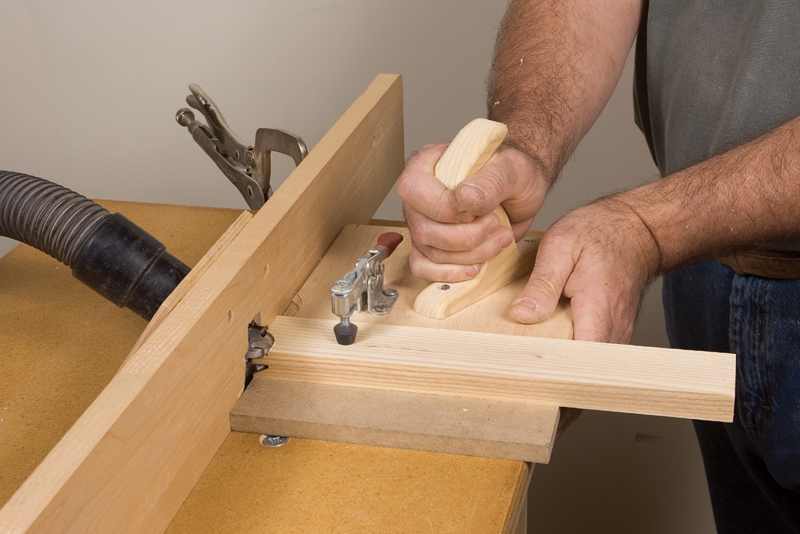
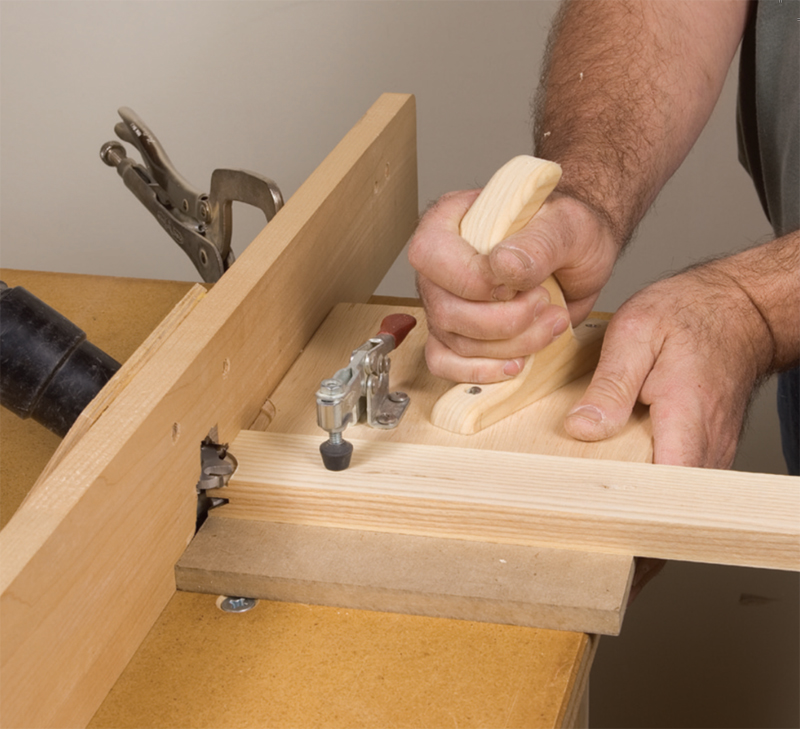
Coping Sled
End-grain milling can be difficult. The stock tends to walk, angling forward or backward instead of staying at right angles to the fence. In addition, the leading corner can dip into the bit opening in the fence.
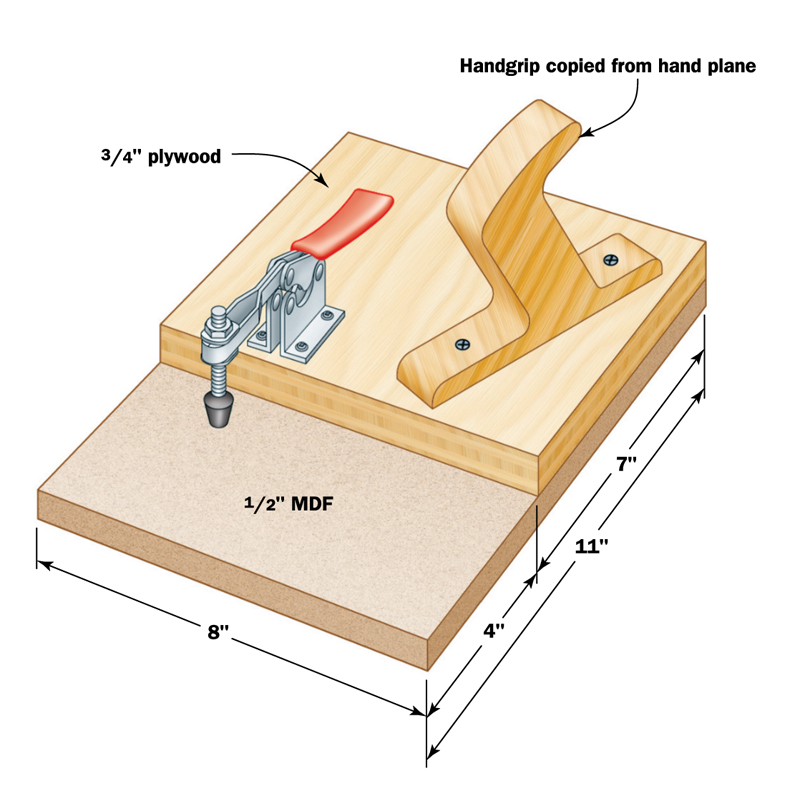
A coping sled solves these problems. It holds a rail securely during a cut and backs the cut to protect against tearout. The sled doesn’t rely on a miter-gauge groove, and it is large enough to bridge the opening in the fence. The comfortable handle provides a sure grip on the sled and keeps your hands out of harm’s way.
The router bit mills the sled’s fence. This isn’t a problem as long as you use the same sled with the same bit and height every time. In fact, it helps set the bit height. Because these sleds are easily made from materials in your scrap bin, you could have a number of sleds on hand for various bits. An alternative is to install a strip of scrap wood—3/4-in. square pine would work nicely—between the fence and the workpiece and let the router chew it up. Or simply replace or rotate the 3/4-in. plywood fence.
To use the jig, make sure your fence is set flush with the cutter bearing. Position the workpiece on the sled. For incremental cuts, hold the piece slightly back from the edge of the sled for the first cut. Then reposition the piece flush with the sled base. Hold the sled firmly against the fence while you make the cut.
Use 1/2-in. stock for the base so the toggle clamp’s force won’t distort it. Make the handle from doubled up 1/2-in. birch multi-ply or from maple. If you use maple, pay attention to the grain direction; it should move diagonally across the handle profile to minimize short-grain weaknesses. Trace the profile of a bench plane handle onto the handle blank. Cut out the handle on the bandsaw and file and sand it smooth. Install the handle at an angle so that during operation the pressure is naturally applied into the fence as well as down on the sled.
Apply a thin coat of paste wax or shoe polish to the bottom of the sled. Let it dry and then buff it to a high shine. This will virtually eliminate friction between the sled and the tabletop.
This story originally appeared in the February/March 2007 issue of American Woodworker magazine.

Finally, this rare issue of American Woodworker (Digital Issue) magazine can be yours! Discover the fascinating contents of the February/March 2007 issue including such plans, projects, and articles as:
- 5 Great Router Jigs
- 60+ Router Tips, Jigs, & Products
- Annual Router Special: Plunge Routers! Trim Routers! Cool Router Joint-Maker! Router Tune-Up Tips! New Router Accessories!
- Shaker Sideboard Made the Easy Modern Way
- Plus: 12 Tips for Successful Gluing, Simple Outdoor Bench, and Use Your Router as a Biscuit Joiner
Get your copy today at shopwoodworking.com.
Here are some supplies and tools we find essential in our everyday work around the shop. We may receive a commission from sales referred by our links; however, we have carefully selected these products for their usefulness and quality.


