


We may receive a commission when you use our affiliate links. However, this does not impact our recommendations.
For many contemporary woodworkers the plane’s position as the iconic tool of woodworking has long since been replaced by the table saw, but for the traditional woodworker it remains our most important and most varied tool. One special advantage – apart from the pleasure and safety in using a plane rather than a machine – is that many of the jigs and fixtures needed by table saw and router woodworkers are unnecessary. Rather than spend time jigging the machine to make a particular operation possible, the traditional woodworker can simply reach for the appropriate plane and get on with it, without further ado. Nevertheless, there are a number of jigs and fixtures that can make planing both faster and more accurate. You can use them with metal-bodied planes as well as with wooden ones.
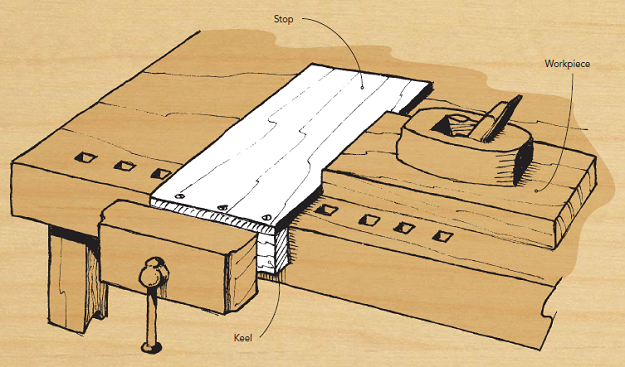
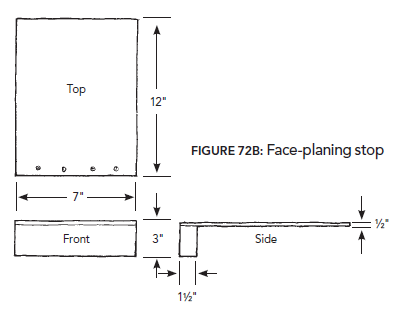
Face-planing Stop
Faster to set up than using a pair of regular bench stops – which in any event presupposes a tail vise that not all benches may have – is a single wide stop held by a keel in the face vise. You simply butt the workpiece up against the stop, and proceed with confidence. In situations that also require cross-planing, see the planing board described later in this post.
Click for a larger image.
Construction – The actual stop can be quite thin. Assuming your bench is as flat as it should be, and further assuming that the workpiece has already been made flat, something no thicker than ½ ” will work well. Note that for maximum utility the stop should not be thicker than the workpiece or it will be in the way and you will need constantly to turn the workpiece end-for-end.
Attach the stop to a substantial keel and note that the longer the keel the wider the stop will be, and the wider the stop the less it will deflect under pressure.
Although the stop is cross-grain to the keel, the thinness of the stop makes it unimportant to worry about any difference in seasonal wood movement. A small crack or two will hardly affect the utility of the fixture.

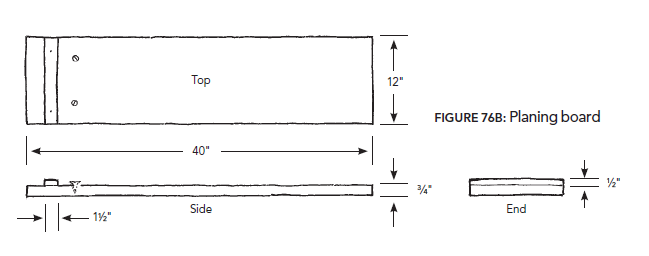
Planing Board
Should your bench top not be perfectly flat, or if the board being planed is slightly bowed, when you attempt to plane the high side the pressure of the plane may cause the end of the workpiece held against the bench stop to rise – and no longer be held in place. The solution is to use a specially prepared, perfectly flat board, at least as big as the workpiece to be planed, which can be more easily held against the stop.
Click for a larger image.
A couple of flathead woodscrews (which may be raised or lowered according to the thickness of the workpiece) will act as stops. If you have any concern about the screws damaging the end of the workpiece, attach a small stop strip to the board as well. As a further precaution against the workpiece lifting clear of the stop (or of the screws) when you apply pressure to its center, place a shaving or two under the high spot.
Construction – The planing board is one example where medium density fiberboard (MDF) is perhaps the best material since it is not likely to warp. However, the use of a thin stop strip rather than screws is a better idea with MDF since constant adjustment of the screws will eventually cause them to fall out.

Hand-router Shoe
The electric router having usurped the name of the original hand tool, the latter must now be distinguished by being called a hand router. The common metal versions which are made in several sizes descend from a simple wooden design known as an old woman’s tooth. They are usually provided with depth gauges, fences, and variously shaped irons. But one thing these modern tools all lack is the ability to work an area larger than the base that constitutes their sole.
To make the hand router capable of flattening a recessed or sunken surface much wider than the tool itself, attach a wide wooden shoe with screws through holes (often provided for this purpose) in the tool’s base, as shown in the image at left. Make the added shoe big enough to bridge the workpiece. In the setup as shown, the tool is positioned in the center of the shoe. It might need to be repositioned closer to one end should you need to work into a corner or along an edge.
–Graham Blackburn
 Buy Graham’s new book, “Jigs & Fixtures for the Hand Tool Woodworker,” for dozens more ideas like what you see above!
Here are some supplies and tools we find essential in our everyday work around the shop. We may receive a commission from sales referred by our links; however, we have carefully selected these products for their usefulness and quality.


What do you mean, My bench top is NOT FLAT?
Arrrghhhhh…..