We may receive a commission when you use our affiliate links. However, this does not impact our recommendations.
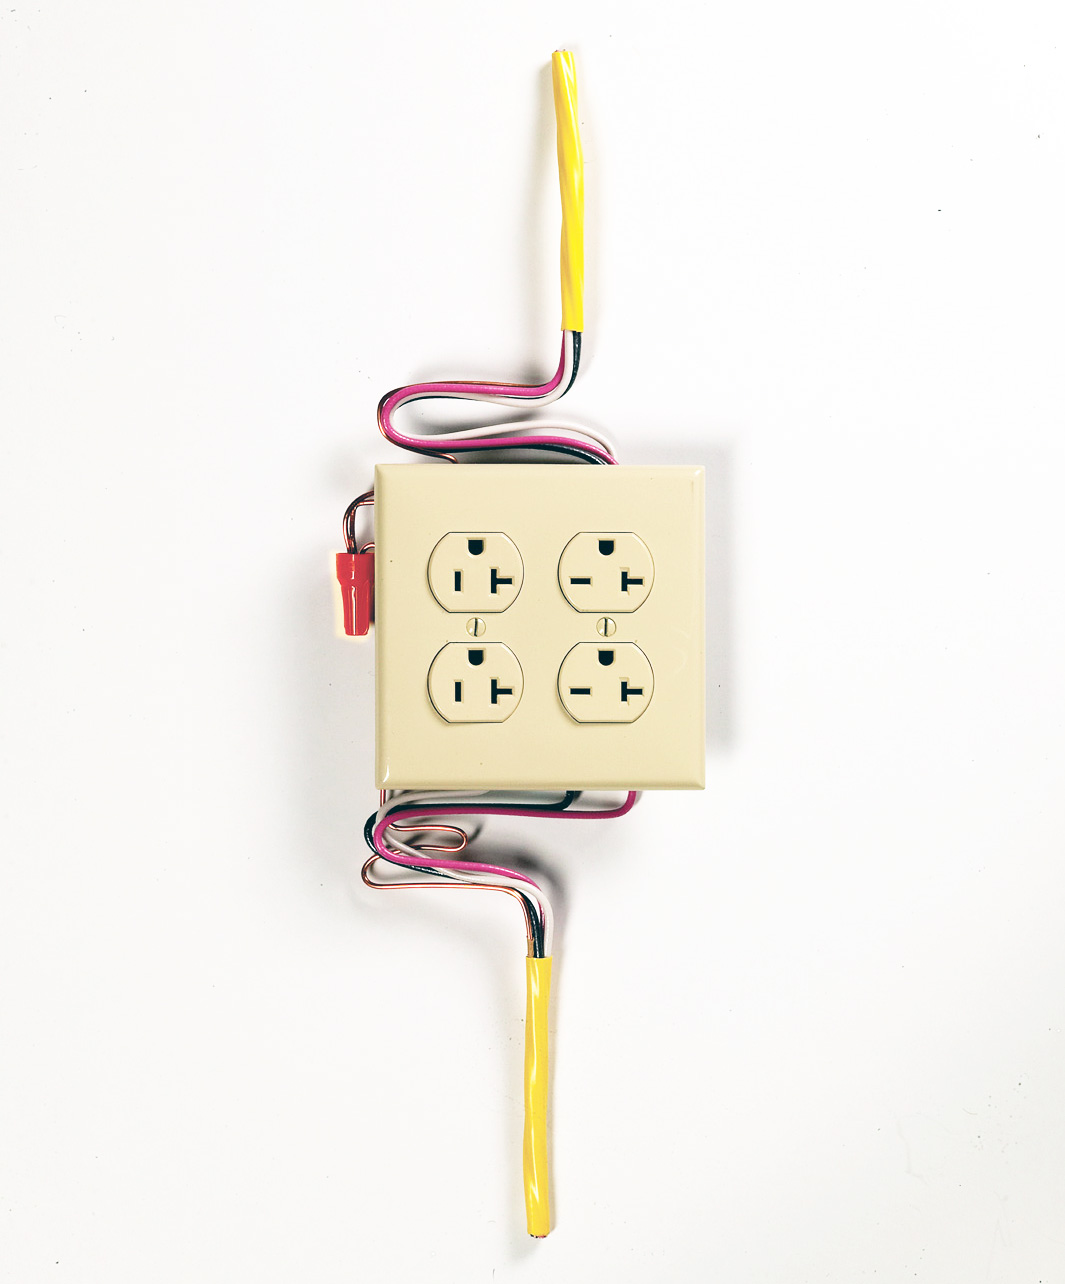
FIGURE A: Here are 120V (left) and 240 volt (right), 20-amp receptacles.
A single cable provides 120-volt and 240V service.
Every article I’ve seen describing the wiring of a shop for both 120 volts and 240V uses separate cables for each voltage, which is a significant waste of time, effort and cable. Here I describe how a single cable can be used to provide both 120V and 240V service to a single two-gang wall box.
For many home woodworkers this wiring method is an easier, less expensive way to add 240V service to an existing 120V shop.
FIGURE B: Here is an example of the 120V/240V wiring for a two-gang box. Leave at least a foot of cable in the box to allow for the accordion folding so the receptacles can be easily connected to the wires and then pushed into the wall box.
I describe only the connection scheme, and appropriate plugs and receptacles here. You should consult one of the many home wiring books carried at home centers for basic wiring instructions. I strongly suggest those inexperienced with electrical wiring practices (or those who aren’t up-to-date on their local electrical codes) to contact a licensed electrician instead of attempting this on their own. Wiring requires a certain expertise.
The key to this system is the same technique employed for wiring an electric dryer or range, which uses a single cable to provide both 240V for the heating elements and 120V for the lights and motor: a three-wire-plus-ground cable. Using dedicated 240V circuits for heavy-current machines such as cabinet saws, planers, shapers, etc. is a very conservative approach for a one-man shop where only one heavy machine is in use at a time.
In my shop I employ a single 20-amp circuit to feed all the 120V and 240V machinery, plus a 240V, 20-amp, two-conductor cable to feed the central dust collector. The use of a two-wire cable is permissible for 240V circuits if you color the white wire with a black or red magic marker at the connection points to indicate it is “hot.” A second three-wire cable provides dual 120V 20-amp circuits to round out the shop installation. These principles can be extended to multiple machine circuits.
If the 120V receptacles are located in an unfinished space (garage or basement), the National Electric Code requires ground fault circuit interrupter (GFCI) protection. You should check with your town’s wiring inspector to see if your specific shop space requires GFCI receptacles. If it does, you will need a GFCI receptacle for each 120V outlet. If GFCI-protected 120V circuits are required, it may be more economical to run separate, conventional two-conductor circuits; one for 240V and one for 120V. The 120V circuit can then be protected with a single GFCI breaker and employ conventional receptacles. In that case you may want to use separate wall boxes for each voltage to reduce the wiring load in a box.
Component Selection
Heavy-duty commercial, “spec” or industrial-grade duplex receptacles should be used for shop applications; avoid residential or contractor grade units. Duplex receptacles rated for 20 amps at 125V are readily available. But 250V, 20-amp receptacles commonly found at home centers only have single outlets. Duplex 250V, 20-amp receptacles are available, but you will probably have to go to an electrical supply house to obtain them.
Duplex receptacles provide twice as many outlet connections with no extra work so are well worth the effort to locate. Like clamps, you can’t have too many outlets. The Leviton No. 5462 is a duplex 250V, 20-amp receptacle available in brown or ivory. You will also need 250V male plugs for your machines. These are available at home centers, and come in 15- and 20-amp versions, which have different pin shapes, but either plug will insert into a 20-amp receptacle. I recommend the 15-amp plug for maximum flexibility. You might also want to purchase a matching 15-amp female connector and 14-gauge rubber covered cable to make a 240V extension cord. This cable should be two wires plus ground.
When buying receptacles, be sure to obtain units that can be backwired. It will greatly simplify your installation work. Backwiring means that you simply strip off a 1⁄2” length of insulation, insert the bare wire into a hole in the back of the receptacle and fasten it by tightening the corresponding screw. This is much easier than wrapping the bare wire around the screws, especially when making multiple connections in a wall box. Note: Early versions of backwired receptacles made the connection by spring pressure only. This type has been discontinued and is illegal for 20 amps in some locations. Be sure your backwired receptacles clamp the wire by tightening screws.
I find the two-gang PVC box most convenient for housing receptacles, but get the 2 3⁄4“-deep model. The shallow boxes won’t hold the necessary wire and heavy-duty receptacles. These boxes are available for new work (when the studs are accessible) and old work (where sheetrock covers the studs). The latter are easily secured to the sheetrock surrounding the hole cut for the box. If you’re working with conduit, again get a deep box combination. A 2 1⁄4” box with a 1⁄2” cover will handle the receptacles and wiring.
Wiring a Wall Box For Machines
For 120V/240V shop applications I use three-wire 12-gauge nonmetallic (NM) sheathed cable, which is suitable for 20-amp circuits, and common-trip, two-pole, 20-amp circuit breakers. The cable actually contains four conductors: three insulated, colored red, black and white, plus a bare copper ground conductor. The white conductor is called the “neutral” while the bare copper wire is called the “ground.”
All neutral and ground conductors are connected to the neutral bus bar in the main service breaker panel. The red and black conductors are connected to the circuit breaker terminals and carry the “live” voltages. A connection between the red and black conductors supplies 240V; a connection between the white and either the red or black conductor will provide 120V. So this single cable carries both voltages to the wall box receptacles.
In my shop, the wiring is all concealed behind walls, so NM cable is appropriate. If your shop has exposed wall wiring, use metal or plastic conduit on the exposed walls where the wiring is subject to physical damage.
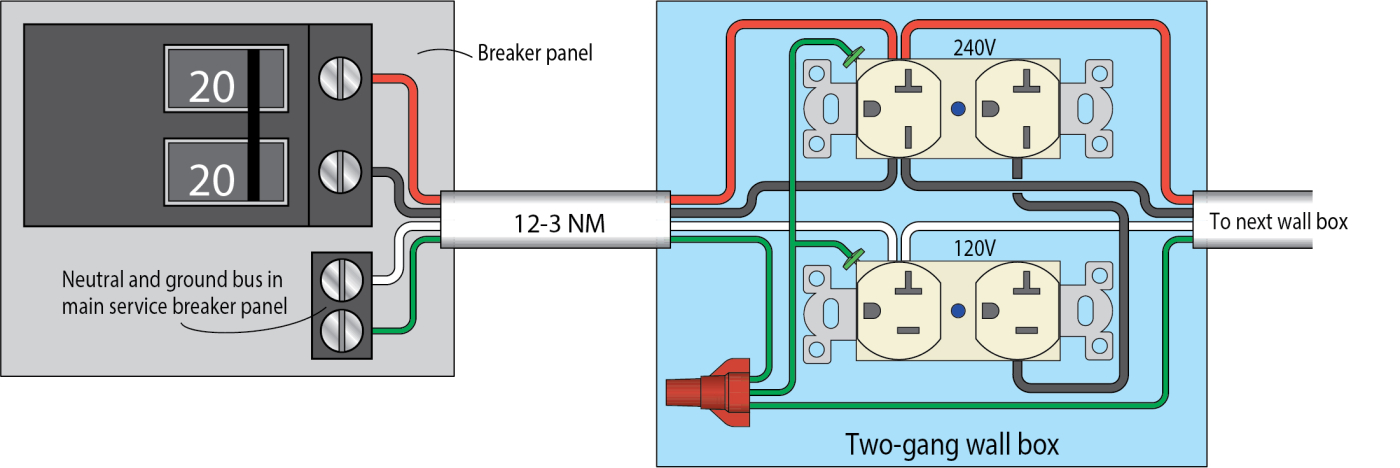
FIGURE C: Here is a schematic diagram of the 120V/240V electrical connections from the breaker panel to the duplex outlets in a wall box.
The 120V/240V wall box connections are illustrated in Figure C, shown above. I prefer to make the through connections between the input and output cables in a backwired connection clamped by a single screw. The pigtail to feed the 120V receptacle’s brass screw is backwired to the remaining screw on the black side of the 240V receptacle. Note: The white or neutral wire is only used for the 120V outlets and must always be connected to the silver screw. A photograph of the actual wiring is shown in Figure B, near top of page.
Ground connections are not backwired; they are made to the green, hexagonal screws, and must be wrapped clockwise around the screw head. The three ground wires in the box are finally connected using a wire nut. When making these pigtail connections between the receptacles, you will find it convenient to temporarily attach the receptacles to the wall cover plate to hold them in the proper relationship while fastening these wires.
Additional 120V Circuits
It is good practice to have additional 120V circuits in your shop. Lights should never be on the same circuit as machines or they will dim when machines start. If you use appliances such as glue pots, hot plates, coffee pots, etc., which can be in continuous operation, they should also have a separate 120V circuit. These might be on when machines are also in use, leading to a tripped breaker if not on a separate circuit.
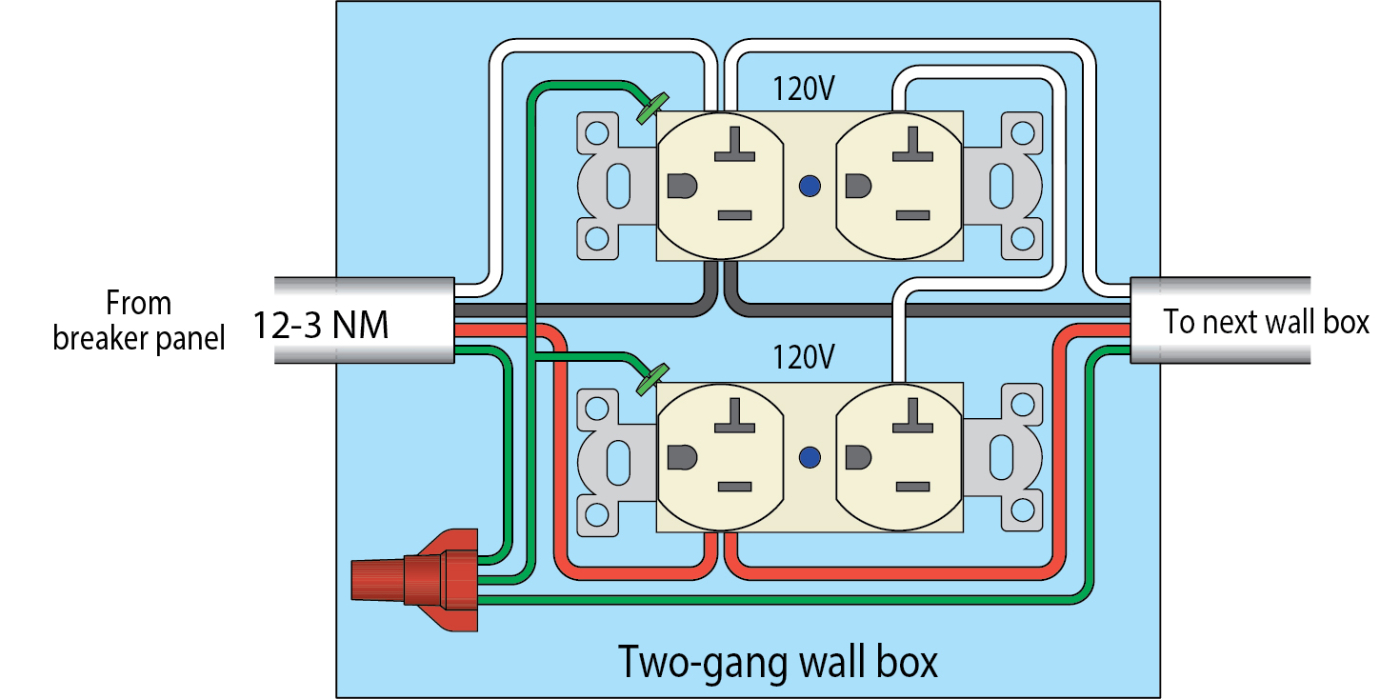
FIGURE D: Here is a schematic diagram of the wall box electrical connections for dual 120V, 20-amp circuits.
The good news is that if you add a 120V circuit, the use of 12-3 NM cable will permit two independent 20-amp circuits in one 4″ wall box as illustrated in Figure D. The connections at the breaker box are the same.
For safety, you must use common-trip, two-pole, 20-amp breakers to ensure all power to a wall box is off when the breaker is off. In the wall box, the neutral white wires are connected to the silver screws on the receptacles, and the black and red wires to the respective brass screws. The ground connections are the same. Again, this connection will not operate with GFCI protection unless each receptacle is GFCI.
Bruce is a registered professional electrical engineer, an author of electrical engineering textbooks, and a retired lecturer from the Massachusetts Institute of Technology.
Here are some supplies and tools we find essential in our everyday work around the shop. We may receive a commission from sales referred by our links; however, we have carefully selected these products for their usefulness and quality.