We may receive a commission when you use our affiliate links. However, this does not impact our recommendations.
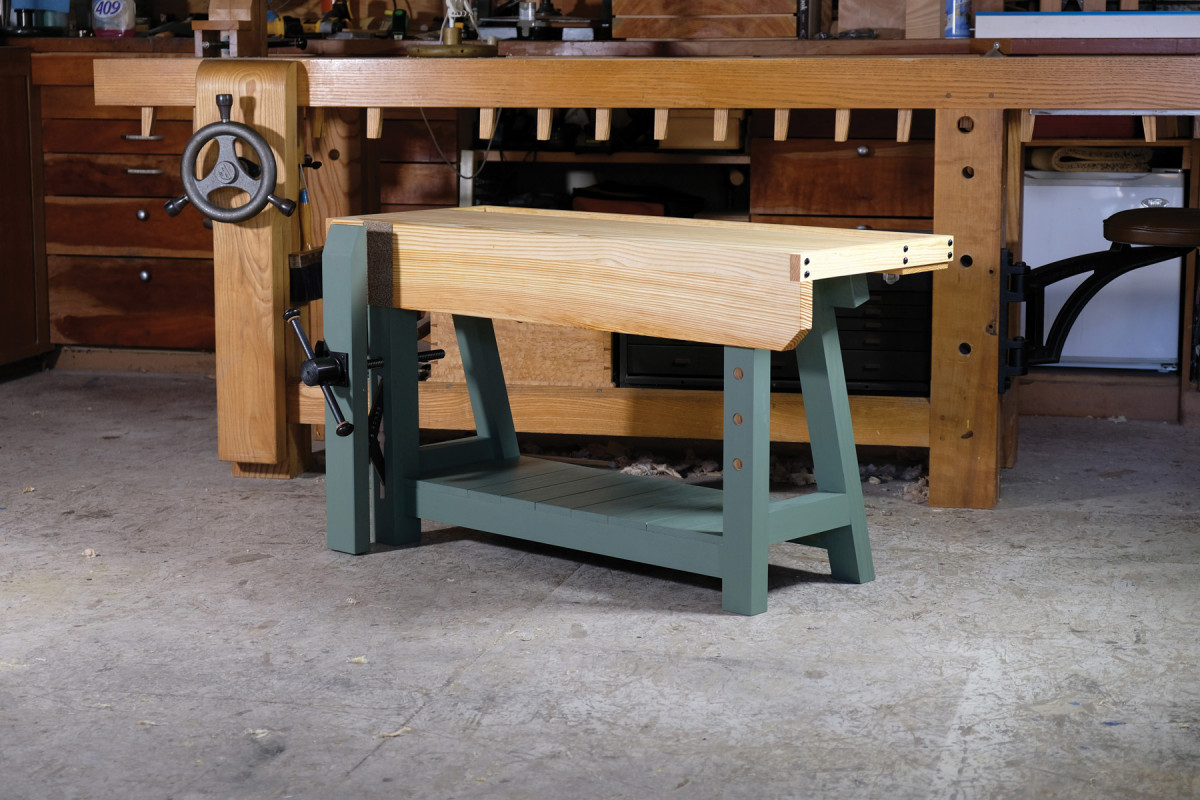 Build a small workbench with full-sized features for a budding woodworker.
“The bench is probably the most important item in the workshop.”
Those are Charles H. Hayward’s first words in his article “Fitting up the workshop: the bench.” As a woodworking vise manufacturer and bench maker, I couldn’t agree more. Tons of ink has been spilled about workbenches in the last 20 years, and I’m one of the guilty parties, so I won’t bore you with design philosophy on this one. OK, maybe a little.
First off, a little background on why I decided to make a kid’s workbench in the first place – perhaps a bit ironic for a 43-year-old bachelor. I’ve lived next door to my brother for a number of years and have probably spent more time in the shop with my nieces and nephews than if I’d had my own kids. Relationships between parents and children aren’t always conducive to teaching (I’m reminded of why the “Car Talk” guys recommend that parents not teach their own kids to drive). But trying to be the fun uncle placed me in a position to not only teach without the typical parent/child dynamics, but to make the workshop a fun environment instead of a stuffy classroom. In my experience, fun is the key element in teaching kids woodworking.
Earlier this year I decided to build a kid’s workbench as a prize for the Handworks hand tool event in Amana, Iowa. The idea was simple. Build the bench, then have kids write their name on the edge of a piece of basswood held in the bench’s leg vise, then plane off the shaving (along with their name) and place it in a box for a drawing the next day. The winner would take the bench home with them.
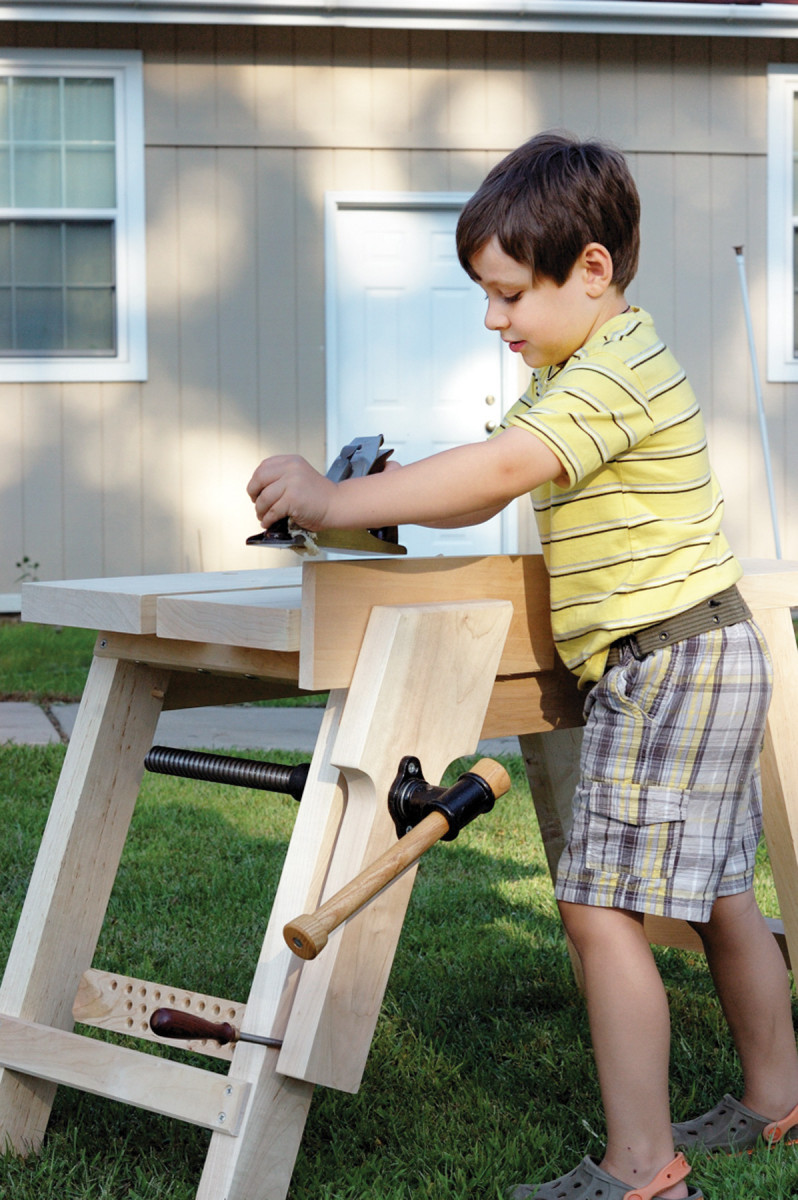
Building a bench for a kid gives them a huge boost of self-confidence.
Dozens of kids participated, and it was great fun watching half of them completely ignore the piece in the vise and start planing the top of the bench itself! One young boy spent a long time at the bench and made many shavings (but only one with his name on it). I watched him several times, and it was apparent that he’d spent time in the shop. I was extremely busy both days of the event, and only found one moment to take some video of the kids planing away. It was this boy who I ended up recording and posting to social media. The next afternoon we had a young girl reach into the box of names and pull out one winner. Incredibly, out of dozens of names, the winner was the same boy I had recorded the day before. I knew that this bench was going to a good home.
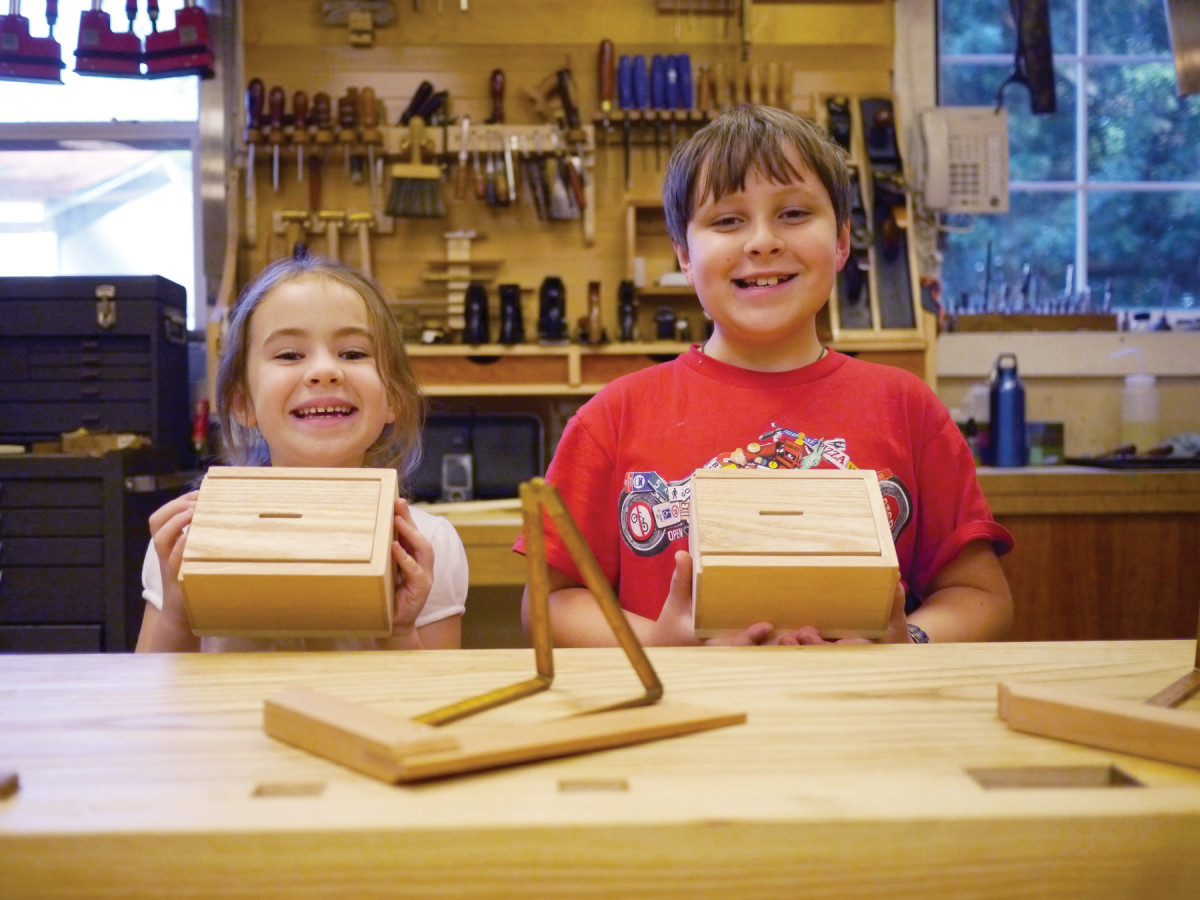
A sliding-lid bank is a great first project for your kid. Especially when you drop a $20 in the slot before they take it home.
Designing the bench was rather easy. I’d flipped open my new copy of the “The Woodworker, Volume 4” (Lost Art Press) and there it was on page 1,170: a basic bench that would scale down perfectly. I’d built a few kid’s benches over the years and I knew that it only needed a couple workholding features – a face vise and a planing stop. Kids don’t need anything more than this. For this bench I used the Benchcrafted Hi Vise hardware to build a leg vise. But you could use any basic iron face vise, and this is exactly what Hayward shows in his article.
Before you get too deep into building this bench, you might want to dust off an old Black & Decker Workmate and toss some softwoods on it to see if your kid has some interest. I did this early on with the kids, and they were hooked. The Workmate can be set up at the perfect height for a young child, and the clamping capabilities are sufficient for that first dabble into the craft. It’s not ideal, though, with its sharp metal edges and somewhat awkward layout, but there’s no better hook than telling the kid that the next project is his or her own bench.
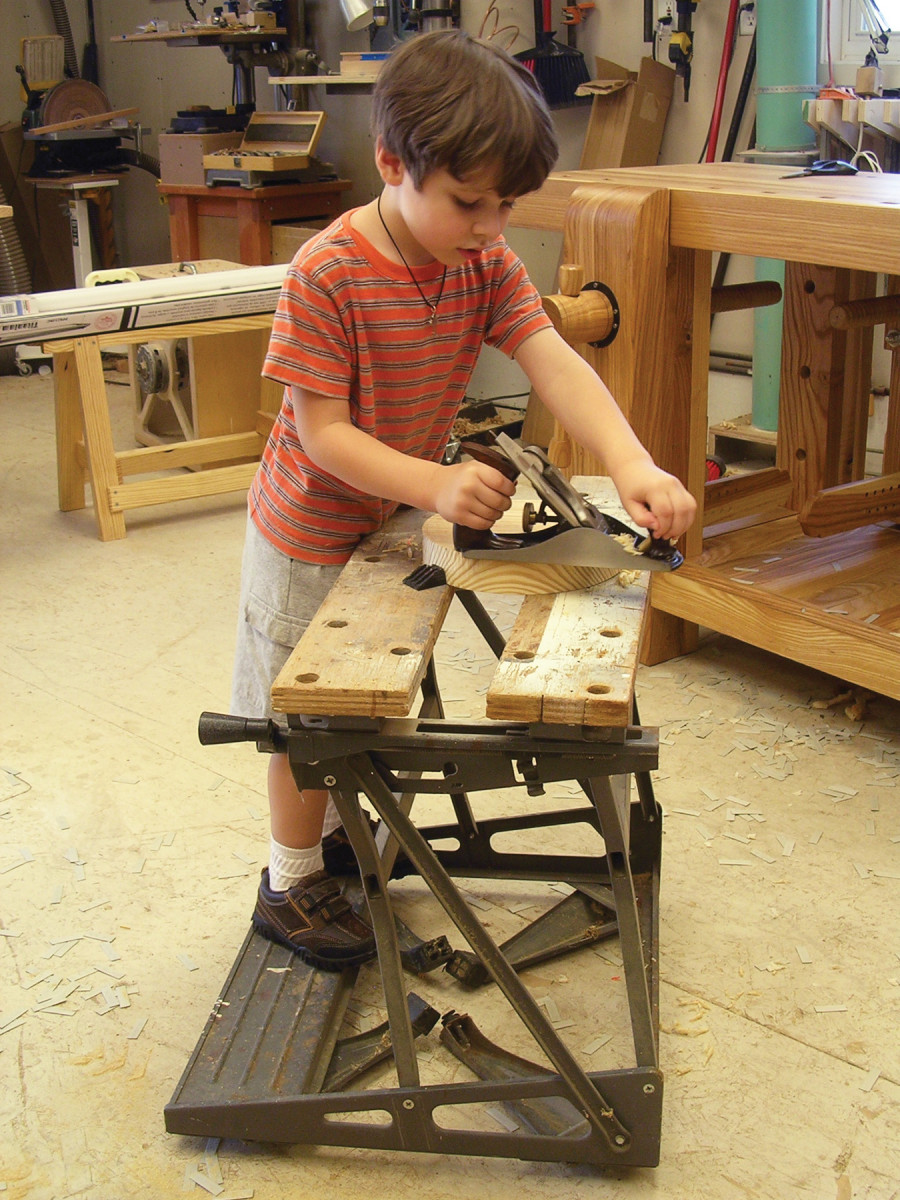
The Black & Decker Workmate makes a great tester bench to see if your kid has that first spark of interest.
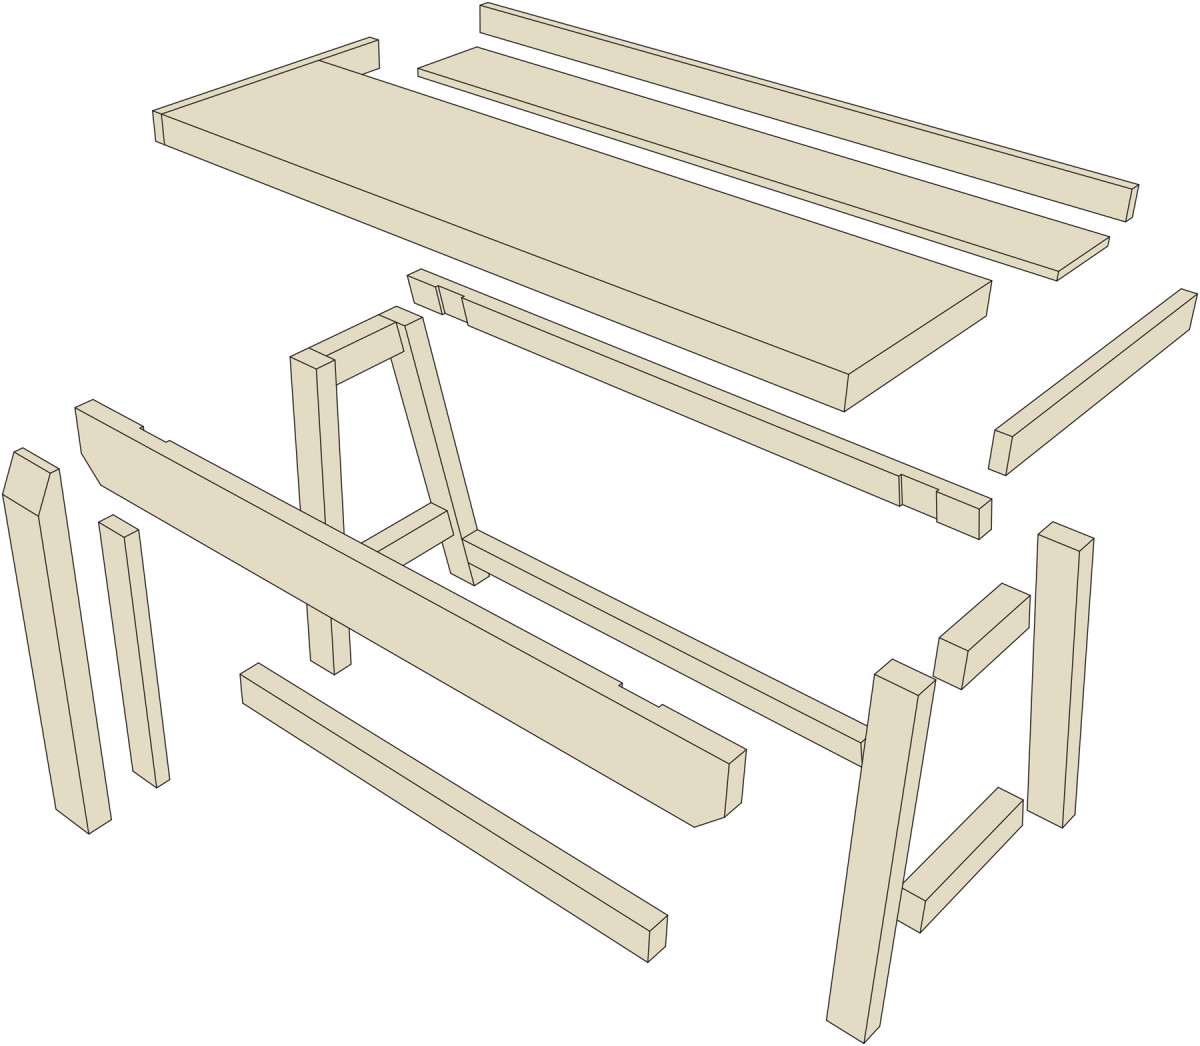
To get started, I drew all the major components in SketchUp right from Hayward’s plan, then using the scale feature I made the height 24″ and all the components scaled down just about perfectly. I’ve included a cutlist, model and drawings of the bench, but don’t be a slave to either. If you want to make a wider or narrower bench, simply make the rails between the front and back legs longer or shorter. If you’re using a leg vise, double check that you have enough space between the front and back leg for the screw’s length with the vise completely closed. The measurements I used here work with the Benchcrafted Hi Vise hardware.
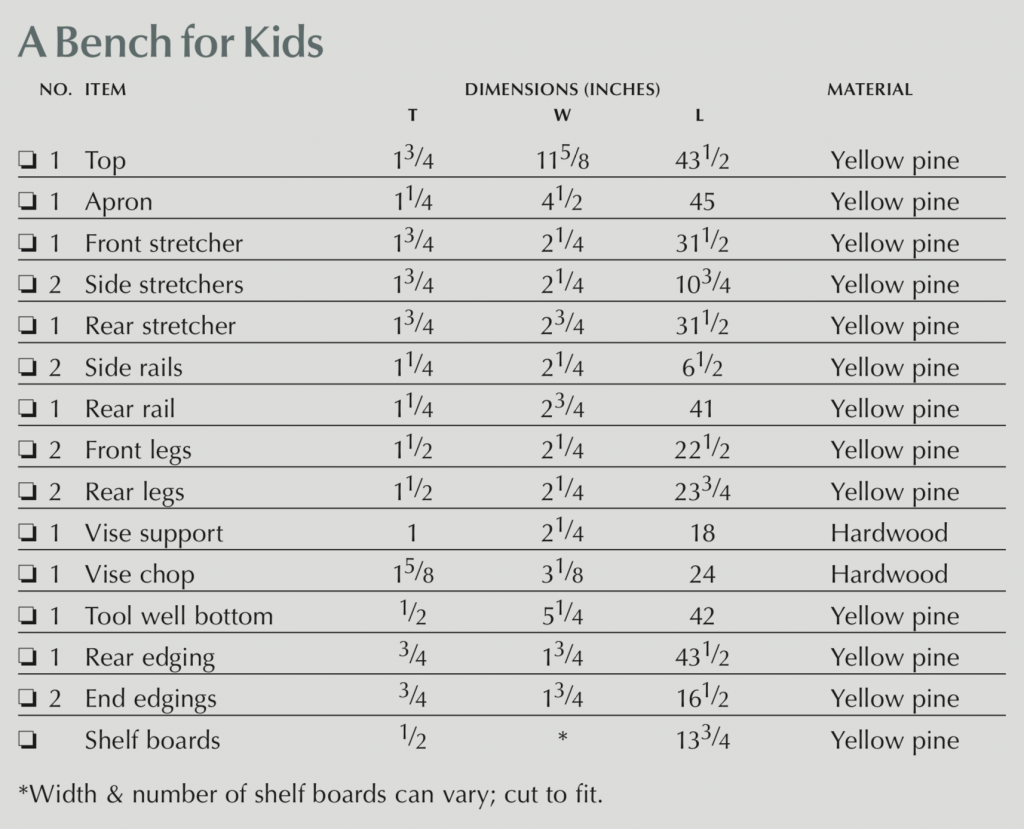

 All the components can be made from 8/4 stock. I used yellow pine from my hardwood lumber dealer, which comes with the full 8/4 thickness, but you could easily use 2X material from the home center. My legs and rails ended up being 13⁄4″ thick. If using 2X material, 13⁄8″ would be fine after jointing and planing.
Go to detention. After ripping, this wood threw a temper tantrum and got bent out of shape, so I pushed it into a corner and let it cool off for a time out. A couple days and a second round of jointing and planing yielded flat stock.
Simple Joinery
Once I had true stock to work with, it was time for joinery. And here was where I enlisted the help of my German friend, Mr. Domino. For full-size benches I never skimp on joinery. I like to view workbenches as miniature timber frames – I want every bench I build or design to be in use for at least a couple hundred years. But for a kid’s bench that won’t ever see vigorous use, the Domino is just about the perfect joinery system. It’s plenty strong enough, and the speed and ease of layout and cutting means you won’t feel ridiculous as you might had you spent a week cutting through-wedged tenons. It doesn’t take much more time to double up on the Dominos either, and it adds loads of glue surface and strength. If you don’t have access to a Domino, you can of course build the bench with traditional joinery. I won’t tell on you, I promise.
Cutting parts for a project with Domino joinery is straightforward. Just cut each of your legs, stretchers and rails to final lengths. You don’t need to add any length for tenons.
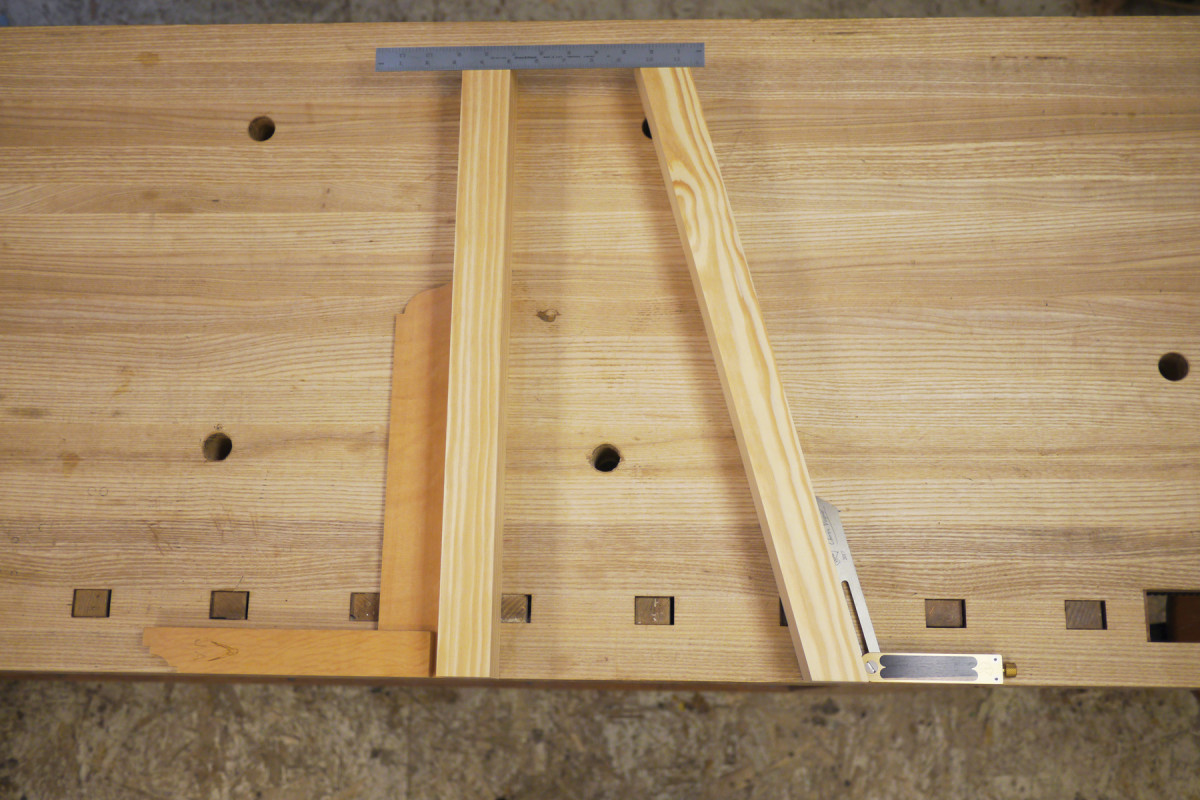
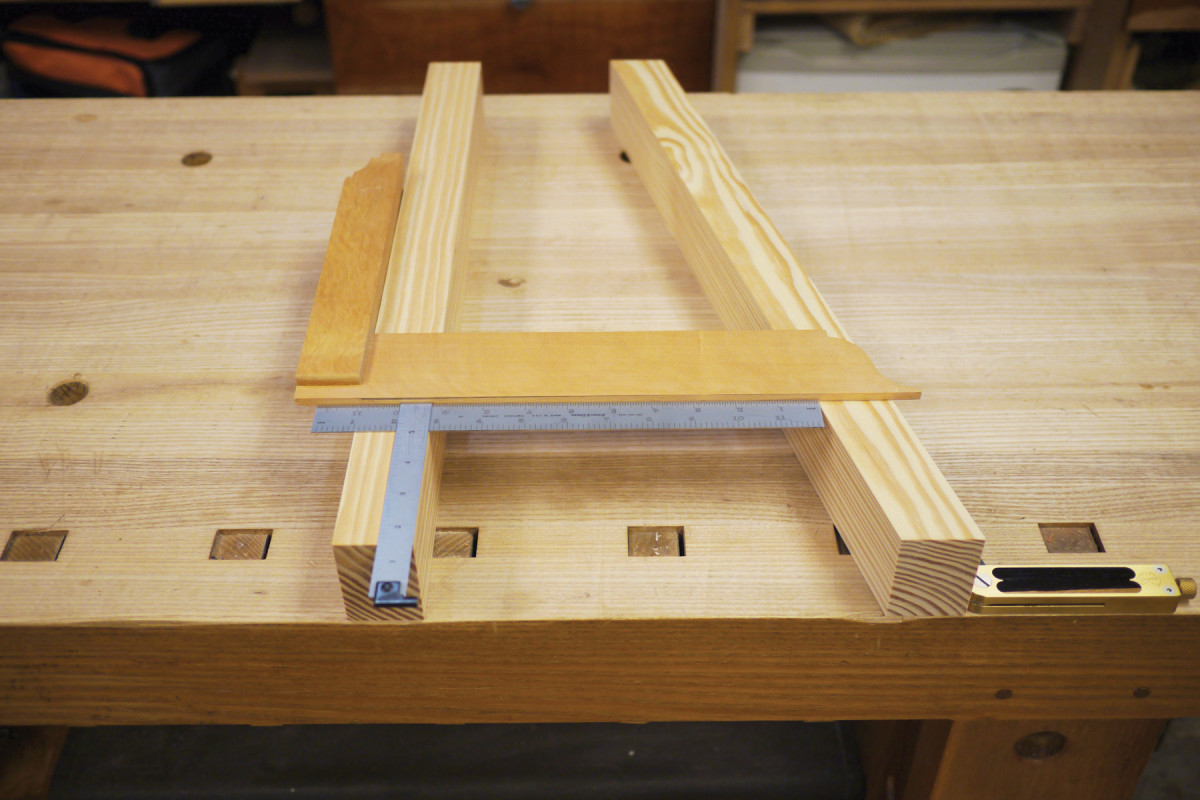
Measure up the rail lengths by using a real-time mock-up of the legs – the leg spacing is determined by your choice of bench width. The large square and bevel gauge position the legs perfectly for accurate measuring. The same technique is used to measure the length of the stretchers.
Don’t go to recess. Try to sneak up on the correct length so the top surface of the rail ends up dead flush with the top of the legs. If it’s too long or short, it will either be proud or recessed. I nibble away the length at the miter saw during my snack break.
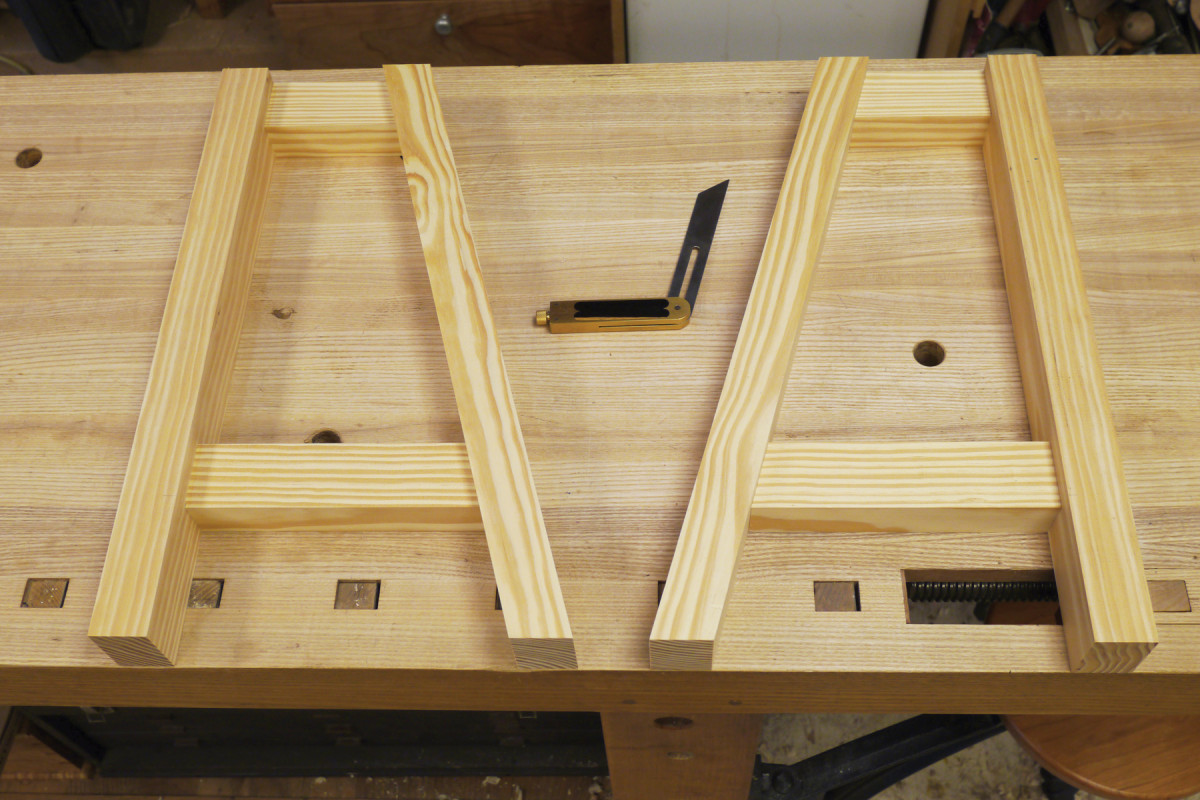
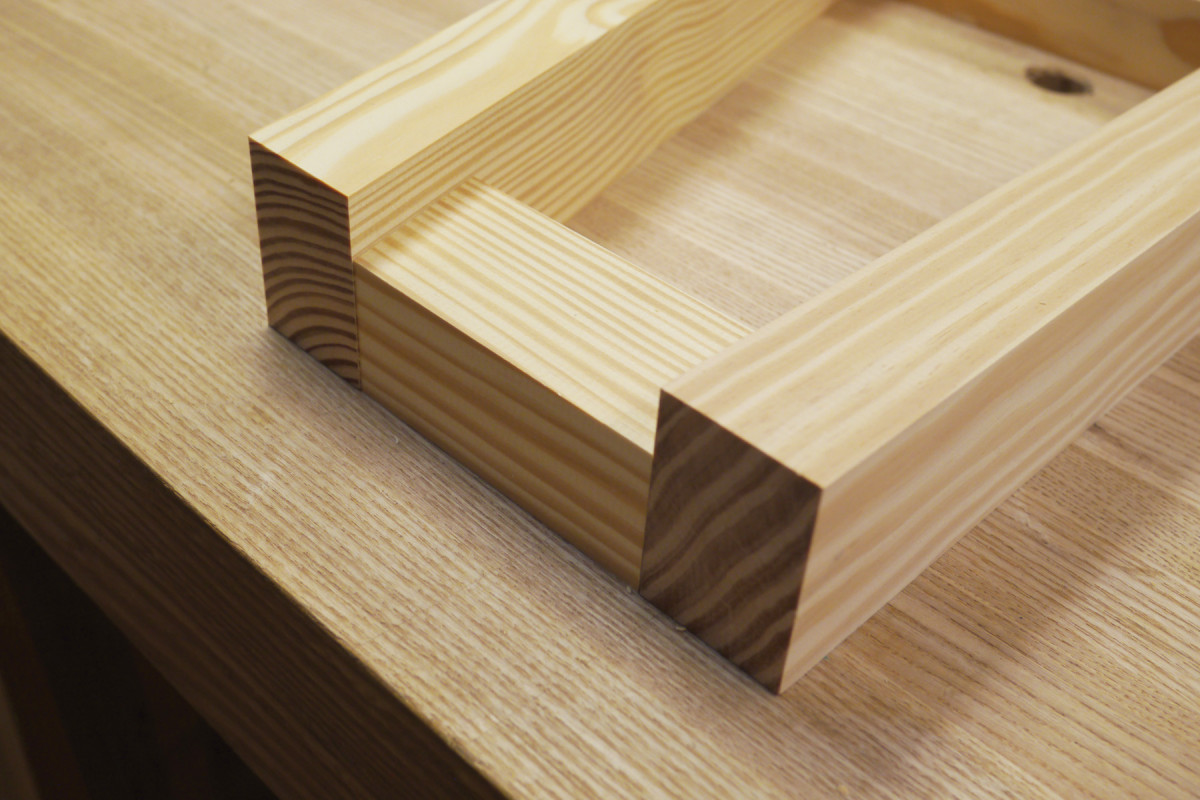
You get an A+. Here are the two leg assemblies cut to final dimension and dry-fit without Dominos.
Marking the layout for Dominos is also easy. All you need is one tick mark spanning each joint and away you go. If you’ve ever used a biscuit joiner, you can use a Domino. I set the fence on the machine for a double tenon centered on the thickness of the stretchers and rails, because they are the thinner members. I cut the first mortise (Domino slot) on all the workpieces, adjusted the fence, then cut all the lower mortises. That step took maybe 20 minutes. The Domino is so fast you’ll think you’re cheating, so make sure the teacher isn’t watching.
Cutting the Domino mortises can be tricky on short and narrow pieces. Festool makes a special table for holding pieces like this. But so do I – it’s called a workbench. Mine has a tail vise and bench dogs. I gang up on the little rascals and pinch their sides between the dogs. This gives more surface area for the fences of the Domino. The last thing you want is for your workpiece to jump over a fence during class, so doubling up on these is a good move. It also cuts your clamping time in half, leaving more time for after-school antics.
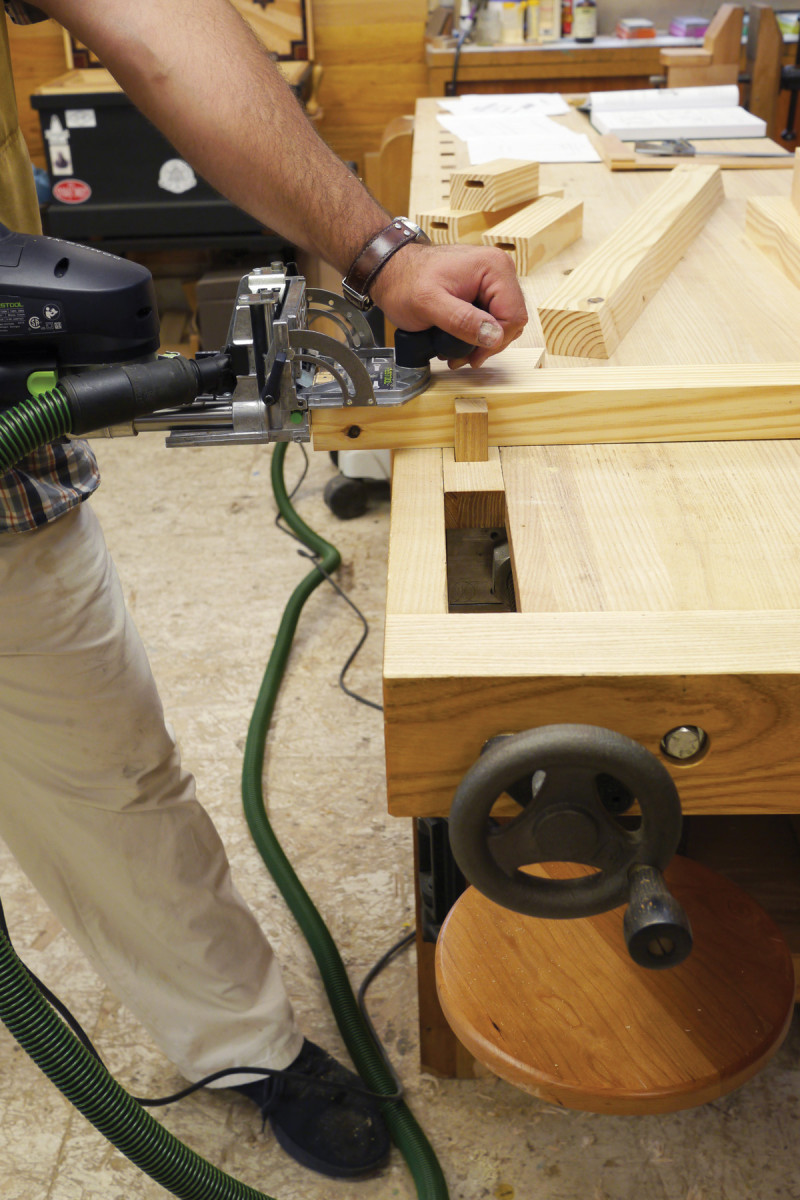
Let’s play Dominos. Here’s the setup for cutting the mortises – quick and simple. A tail vise and dogs are handy here, but some pupils don’t like dogs and their wagging tail vises. I have two words for them: Principal’s Office.
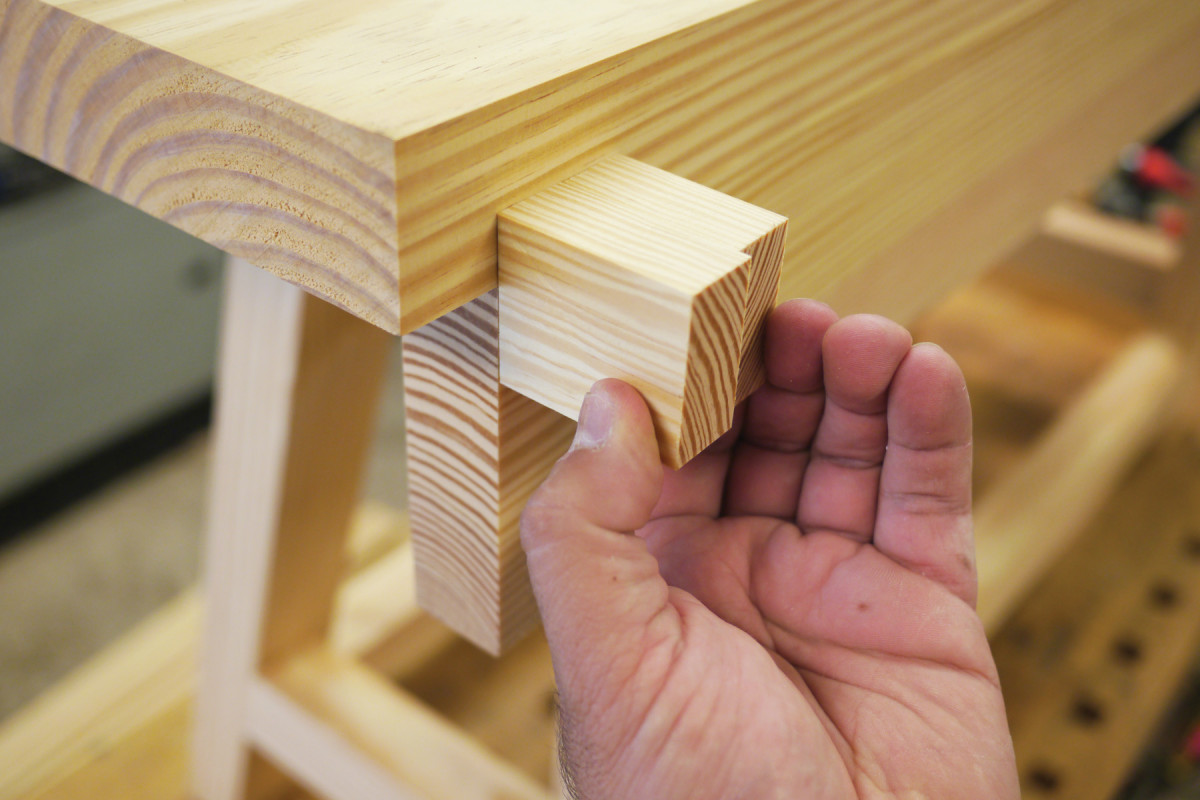
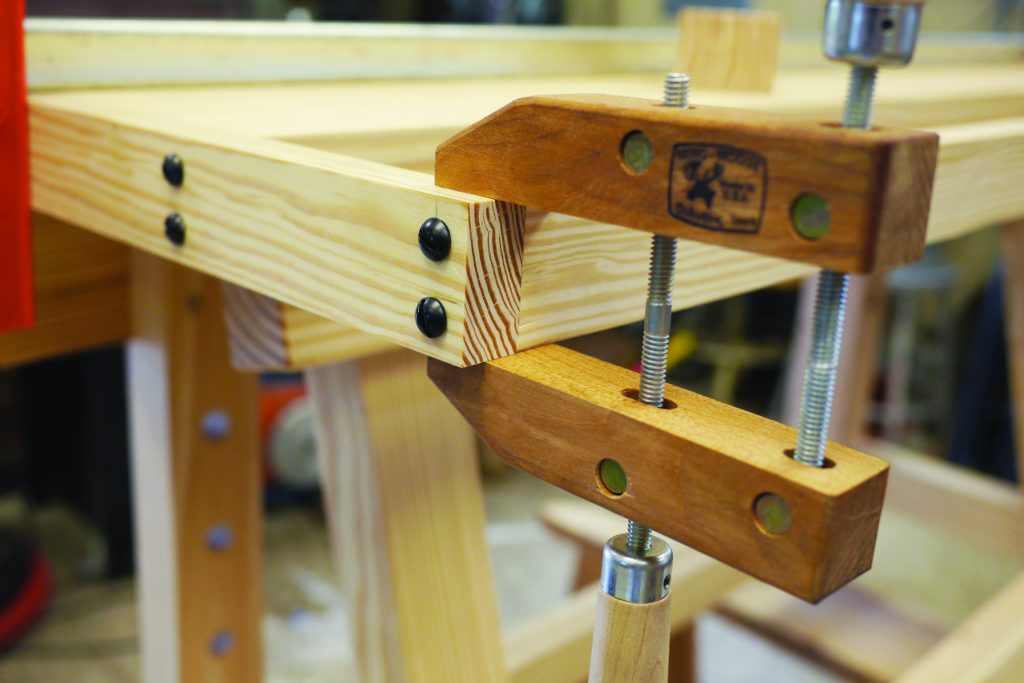
Once the mortises are cut, it’s a good idea to dry-fit every joint. Assemble the bench and make sure every joint goes together with all the Dominos in place (or your tenons, if you went the traditional route). Clamp the leg assemblies together at the front strecher to mark for the front apron. The front apron is joined to the upper part of the legs in a shallow dado cut into the back of the apron. Clamp the apron to the upper part of the legs and mark the location of the legs onto the back of the apron. The dado is only 1⁄4″ deep, so I cut it on the table saw by nibbling away the waste, then cleaned up the bottom of the dado with a router plane.
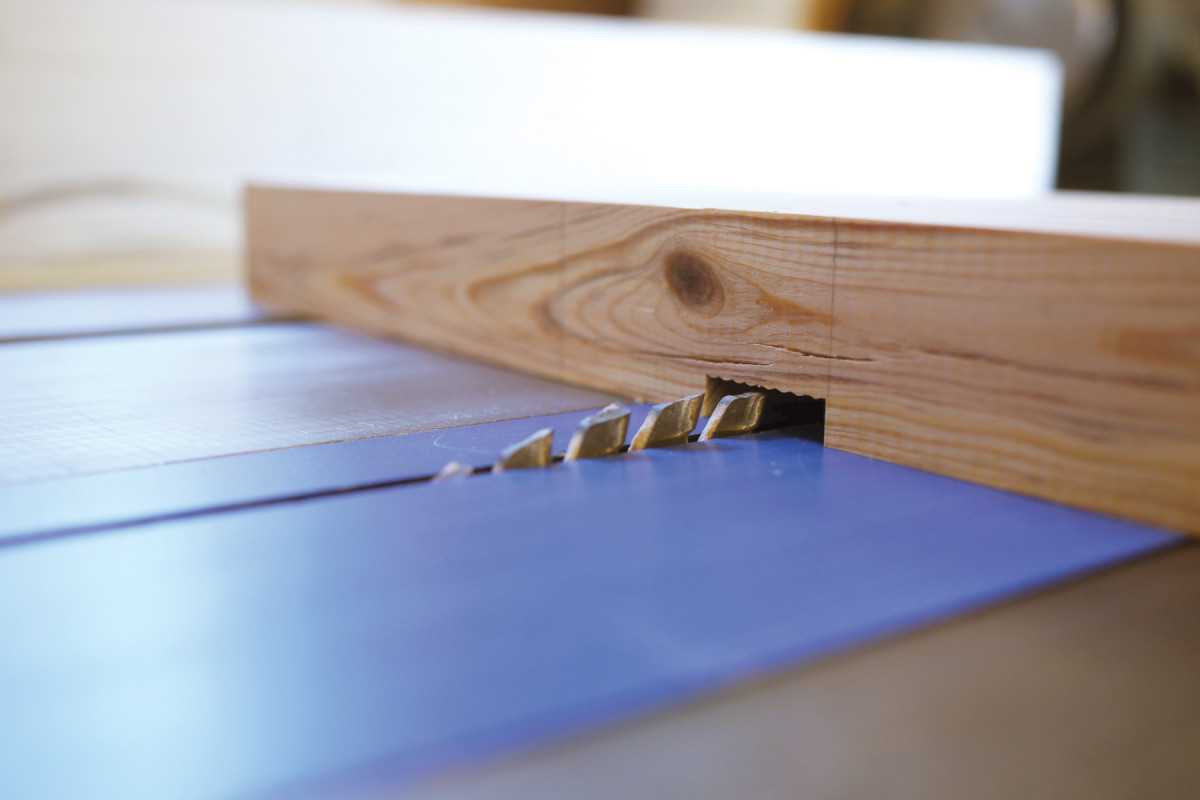
I don’t use a dado stack for the mortises because I’m too lazy to mount it. Instead, I take multiple passes with a combo blade, then clean up with a router plane.
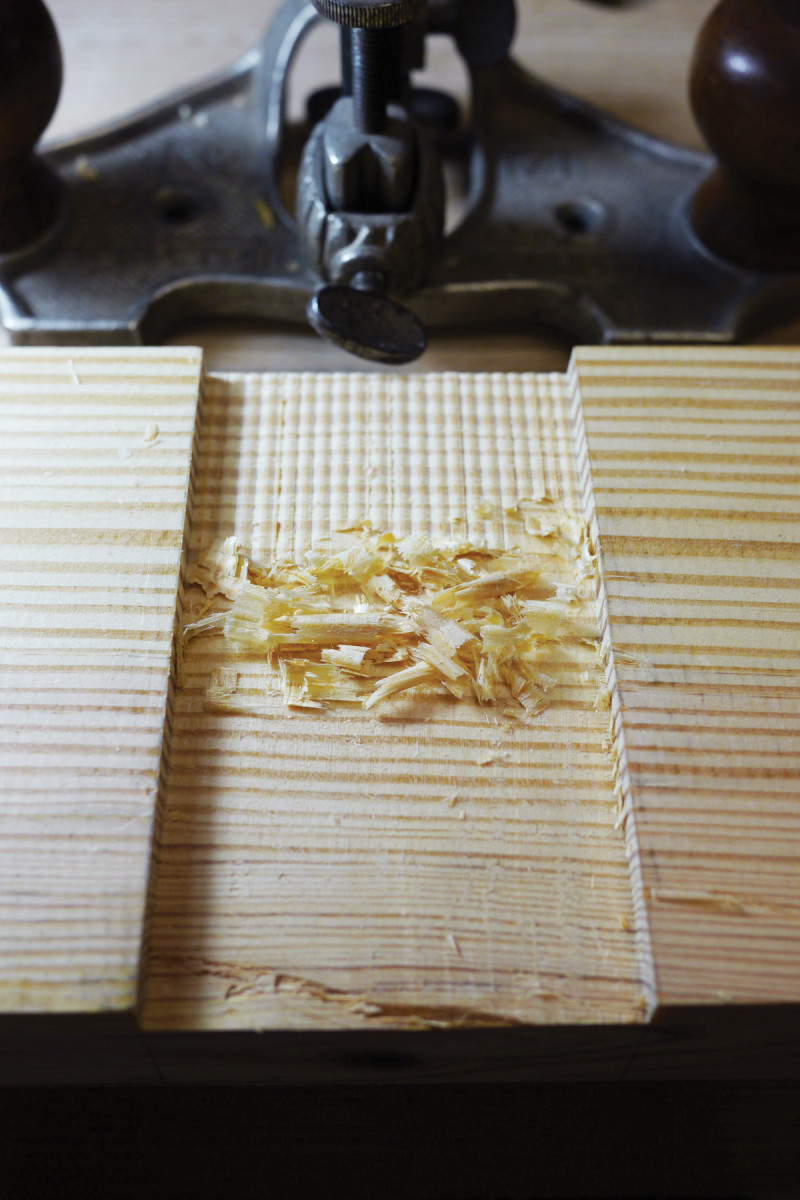
Router planes are the greatest. They are like hand tool power tools, if that makes sense.
The Vise
With the front apron joinery cut, you have a decision to make. Mount an off-the-shelf iron vise or install a leg vise, like I did. I’ll talk about how to do the latter. Because the front apron is proud of the front leg by 1″, I laminate a 1″-thick piece of hardwood onto the front leg below the apron. This provides a strong place to mount the pins that support the vise mechanism. The vise itself is contained entirely within the leg and chop, so the installation should be completed now, before gluing the bench together. I won’t cover all the details of the Hi Vise installation here because you may not be using this specific vise. (Instructions are available, however, at the Benchcrafted website.)
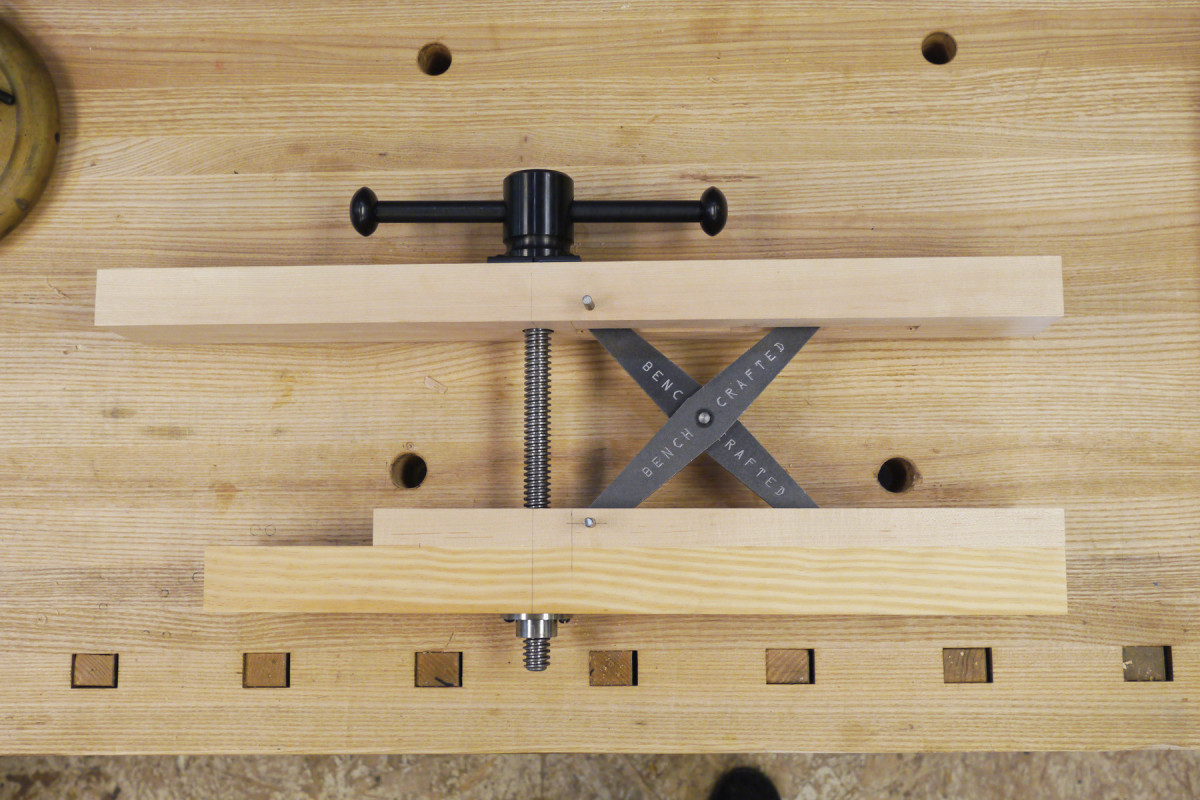
Install the leg vise before you glue the bench together.
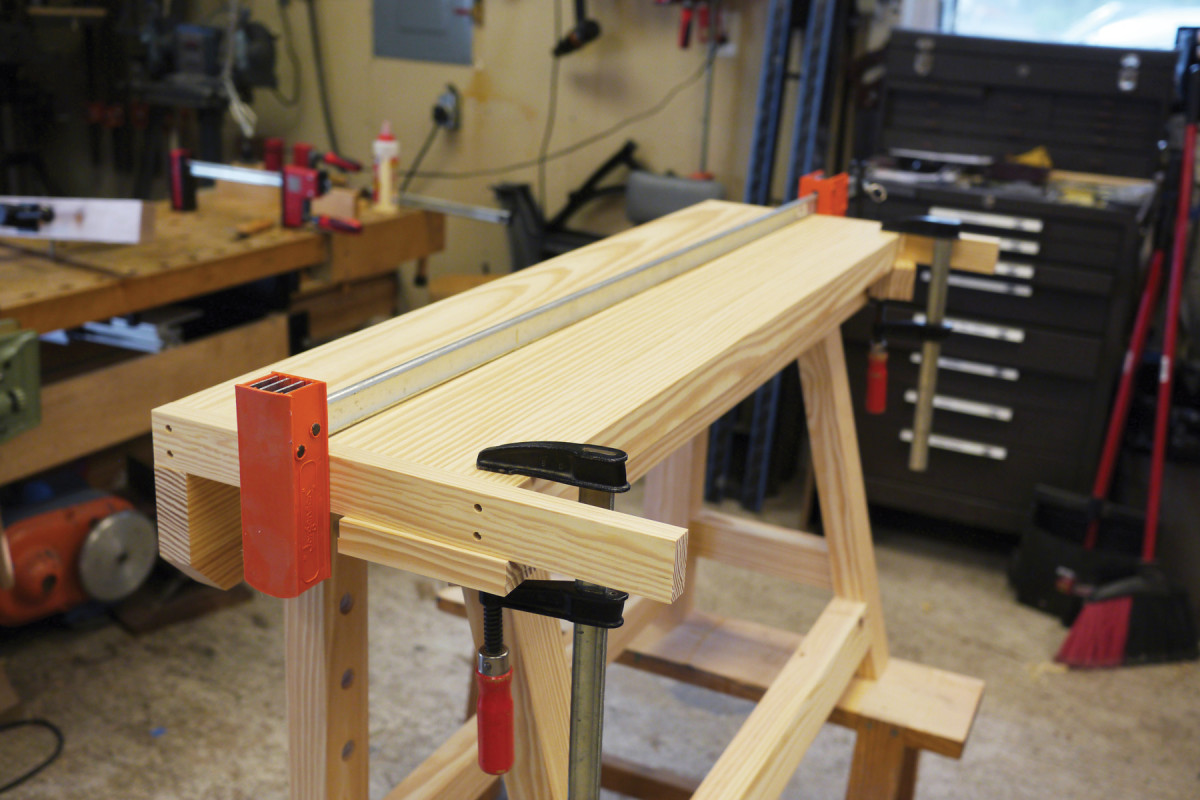
Once you have the bench’s top flattened and planed to thickness, you can dry-assemble the bench and get a final length for the vise chop. This allows you to disassemble the vise, cut the chop to length and do any decorative shaping as well.
Finishing the Build
To cut the top to length, mill up the stock that makes up the edging so you have a final thickness. You need this thickness because the top is shorter than the front apron by exactly twice the thickness of the edging. I don’t measure any of this, so put your rulers away kids. Rather, hold up two thicknesses of edging to one end of the top (with the other end flush to the end of the apron) and mark the length. No arithmetic here, so it’s OK to flunk math. (I did!)
Here I’m marking the length of the top – the apron length minus two thicknesses of edging.
With the top cut to length and width, you can glue the front of it to the apron. Make the joint as perfectly flush as you can, but err on the side of the top being proud of the apron. It will be much easier to flush the edge of the top to the apron rather than vice versa.
Now disassemble the dry-fit base to smooth plane the surfaces. Don’t go overboard here. What you want is to just remove the mill marks. If you’ve built the bench entirely by hand, well, you don’t need any instruction from me on how to do this.
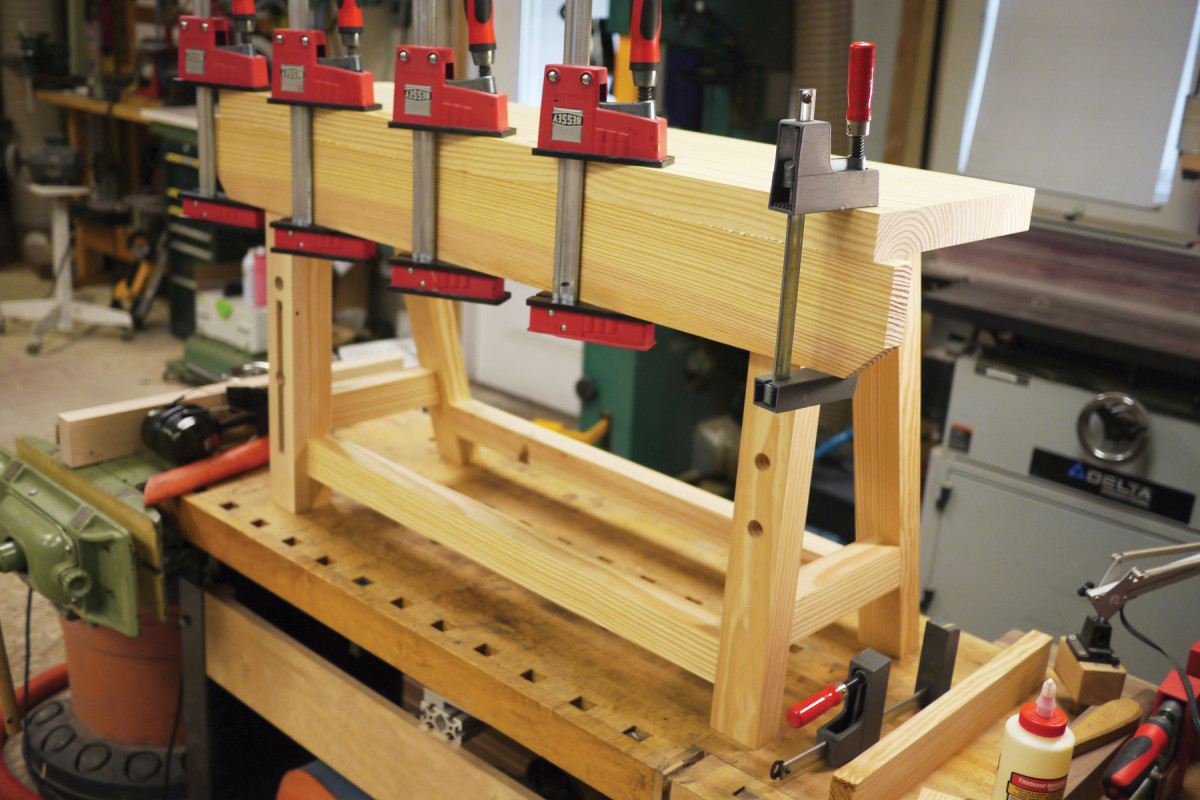
Now glue the base together. I use the offcuts from the angled rails as cauls between the clamps and the back legs. After the glue in the leg assemblies cures, glue and assemble the stretchers to the assemblies. Once the glue in the base is cured, rip the upper back rail with a 15º angle on the top side (and bottom, too, if you want; I didn’t) and fit it up just like the front apron, with 1⁄4″-deep dados. Glue and clamp, then flush it up to the top with a long plane.
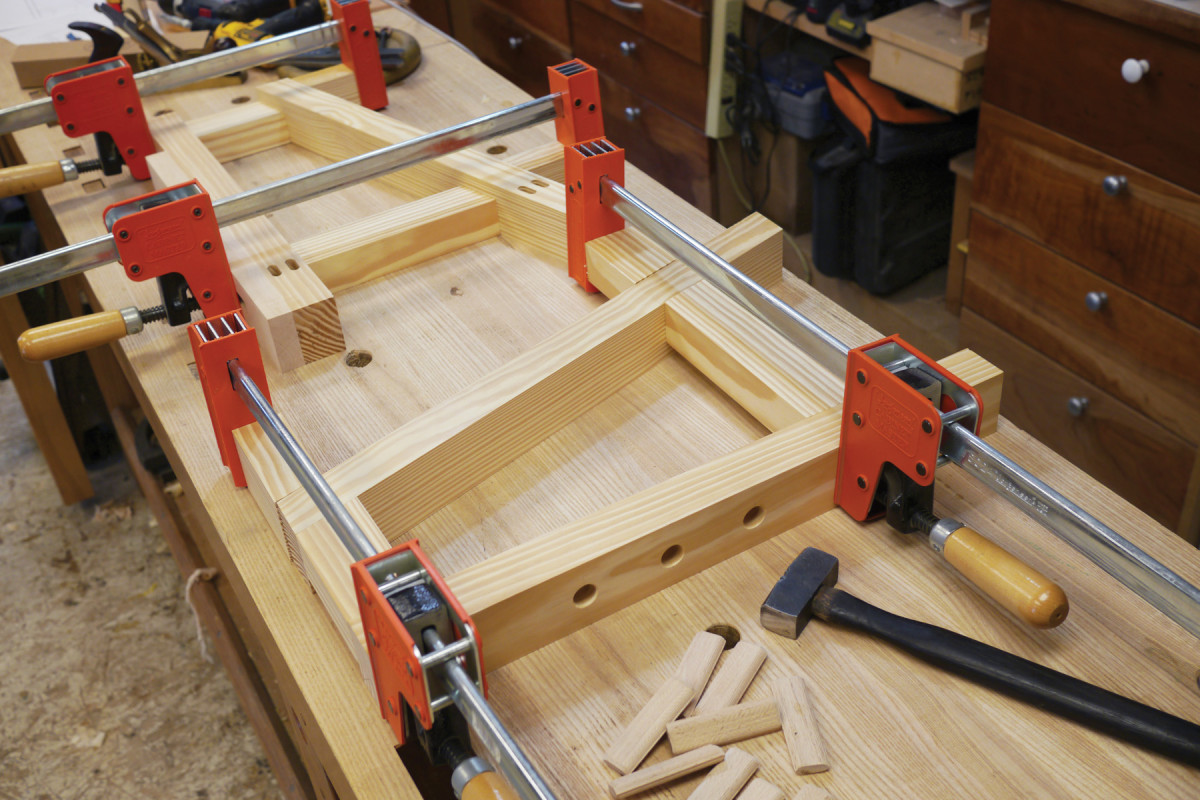
Angled spacer blocks make leg assembly glue-up easy.
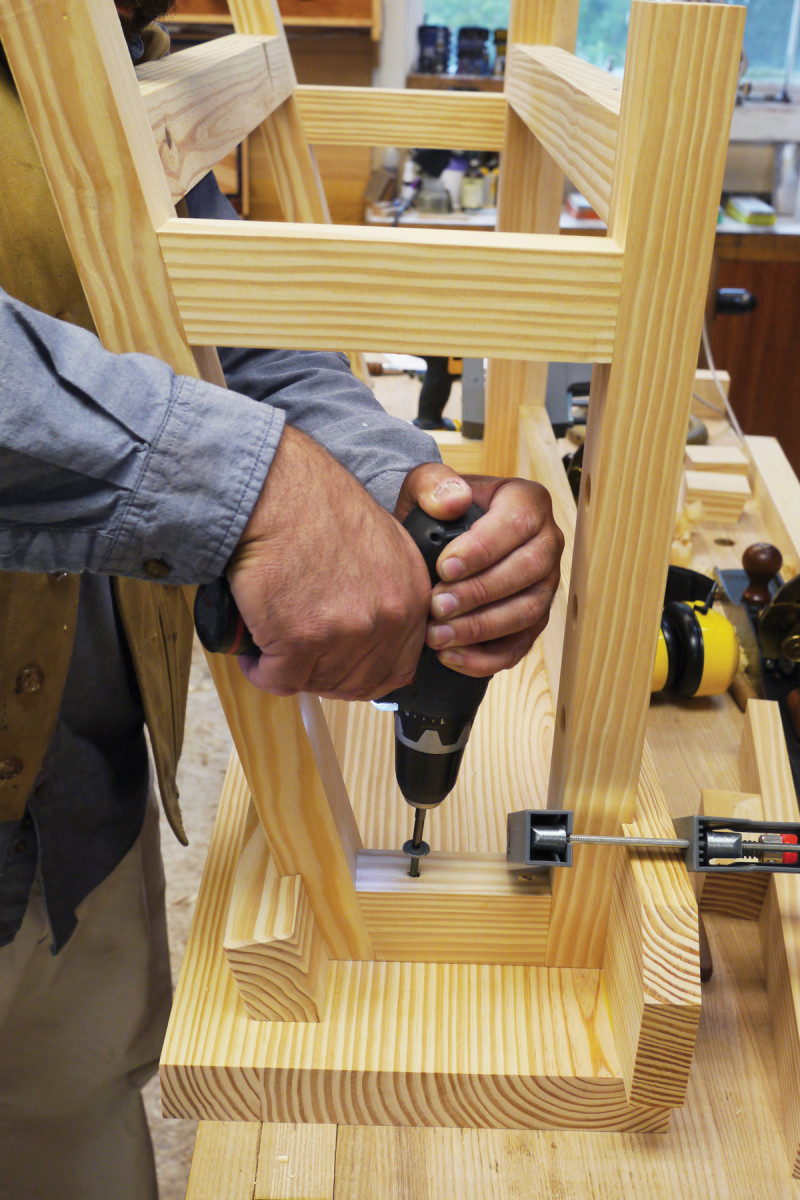
The top is held onto the base with lag screws. Use two in each upper rail. Make sure the front apron is clamped firmly to the legs when you drill and drive the lags. And no matter what teacher says, it’s actually OK to drill and drive.
Get that joint flush or you’ll have loads of cleanup planing to do. I’m not gluing the top to the base here, just using it as a support.
To bolster the rear edging I handscrew it to the side edging. This helps keep the wood from splitting while screwing. Hayward says to nail these on, but I’m not Hayward the Magnificent. Nailing into end grain equals splits in my book. Big robust screws and properly sized pilot holes are wonderful things.
I clamp a cleat to the top on both ends on which to rest the edging to measure its length, drill the screw holes then attach it to the top. The cleat keeps everything lined up and helps you to not think too much.
Once the top is screwed to the base and the edging is attached, you can install the tool tray bottom. It’s just a piece of ½”-thick pine nailed on from underneath. I used square cut nails with a robust head. I also leave a 2″ gap at the leg-vise end of the well to sweep out shavings. The shelf boards down below are plain, nailed on with two finish nails in the center of each board, with a 1⁄16″ gap between each board. The ends are notched to fit around the legs.
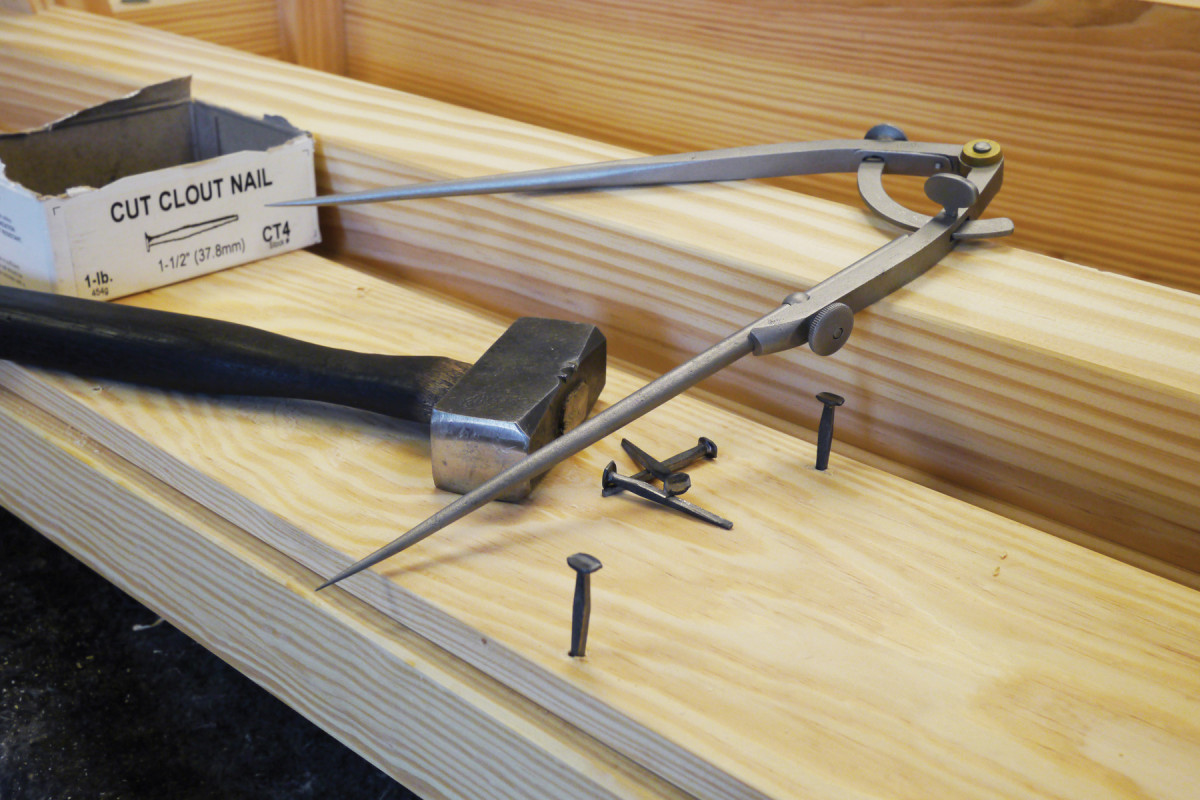
I have zero clout. So I try to buy it whenever I can. I use clout nails to attach the tool well bottom, laying out the spacing with a pair of big dividers. There’s a nail about every 6″.
And just like that, class is over, the bell has rung and the bench is done. If you want to paint the base and vise chop like I did, simply unscrew the top from the base and put a coat of oil on it, then apply two coats of paint on the base and chop. I like solid-color deck stain. It looks a lot like milk paint without any of the associated mixing and shelf life.
Using the Bench
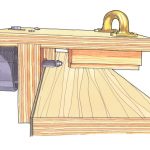
To hold boards for edge work, just use the leg vise. To plane the faces of boards, also use the leg vise with a planing stop. To make the planing stop, screw a 1″ x 2″ hardwood cleat on edge to the short end of a 1⁄4″-thick piece of plywood or hardwood that’s about 4″ wide x 12″ long. Clamp the piece of the hardwood in the leg vise with the longer board flat on the workbench, and it becomes a full-width planing stop. (The one shown below is for a full-sized bench.) I don’t recommend a metal toothed stop for kids for obvious reasons. This full-width stop is user-friendly and will keep any board from moving about, while teaching good technique at the same time.
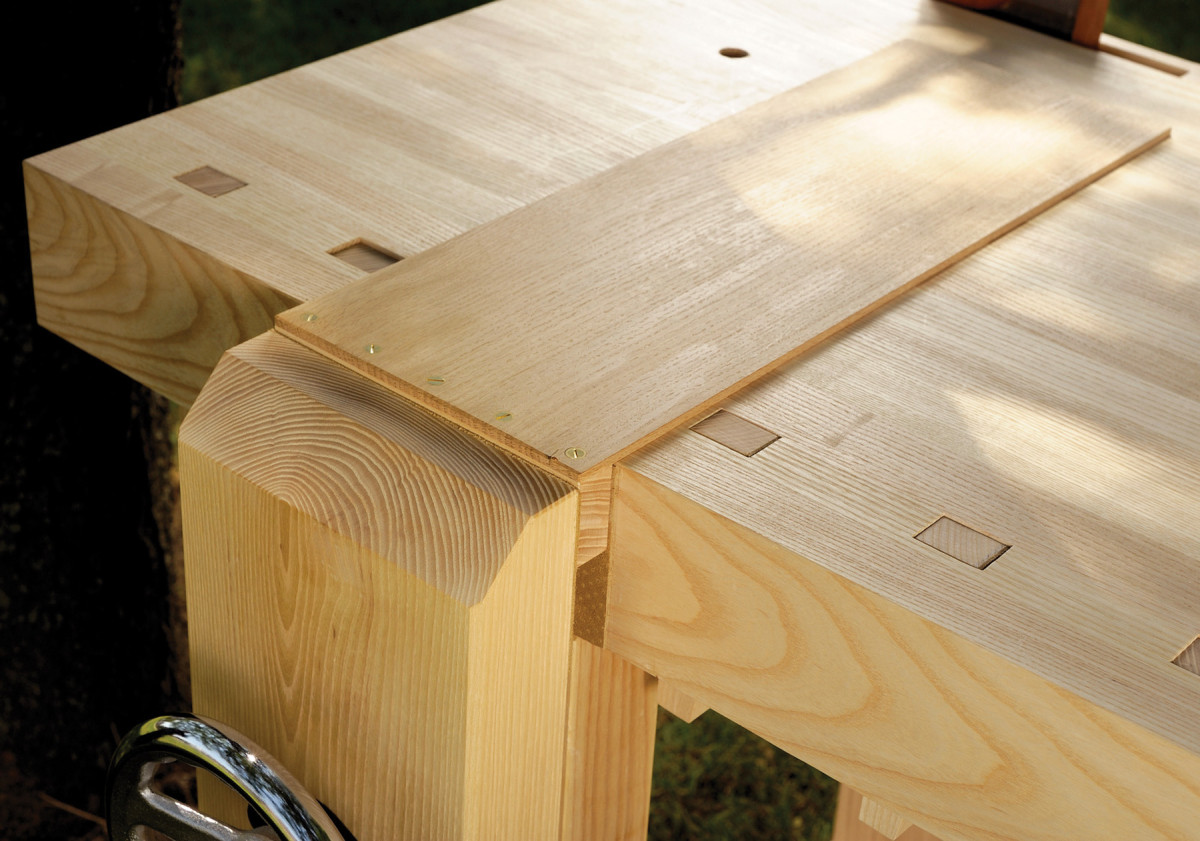 To hold boards for end work, use the leg vise or simply clamp boards to the front apron and top with small clamps. You could also add holdfast holes, but that might be a little overkill for a kid’s bench. The holes in the right leg are for supporting longer boards. Just stick a ¾” dowel in and it’s ready to go.

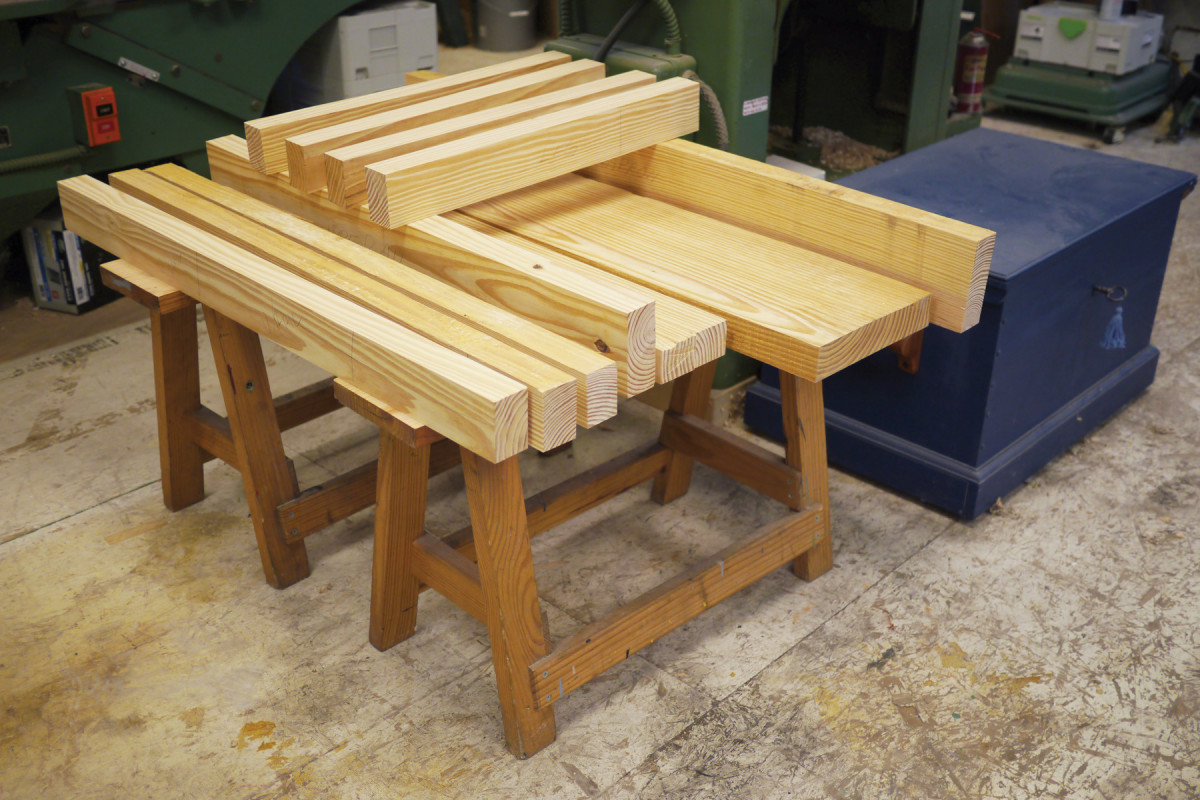
I’m using four benches here to flatten the top of a bench, including the bench I’m flattening. Looks ridiculous, I know, but my back is happy. I will enjoy recess today.
Website:Visit the author’s website and blog, and read more about his workbenches, tools and process.
Here are some supplies and tools we find essential in our everyday work around the shop. We may receive a commission from sales referred by our links; however, we have carefully selected these products for their usefulness and quality.