


We may receive a commission when you use our affiliate links. However, this does not impact our recommendations.
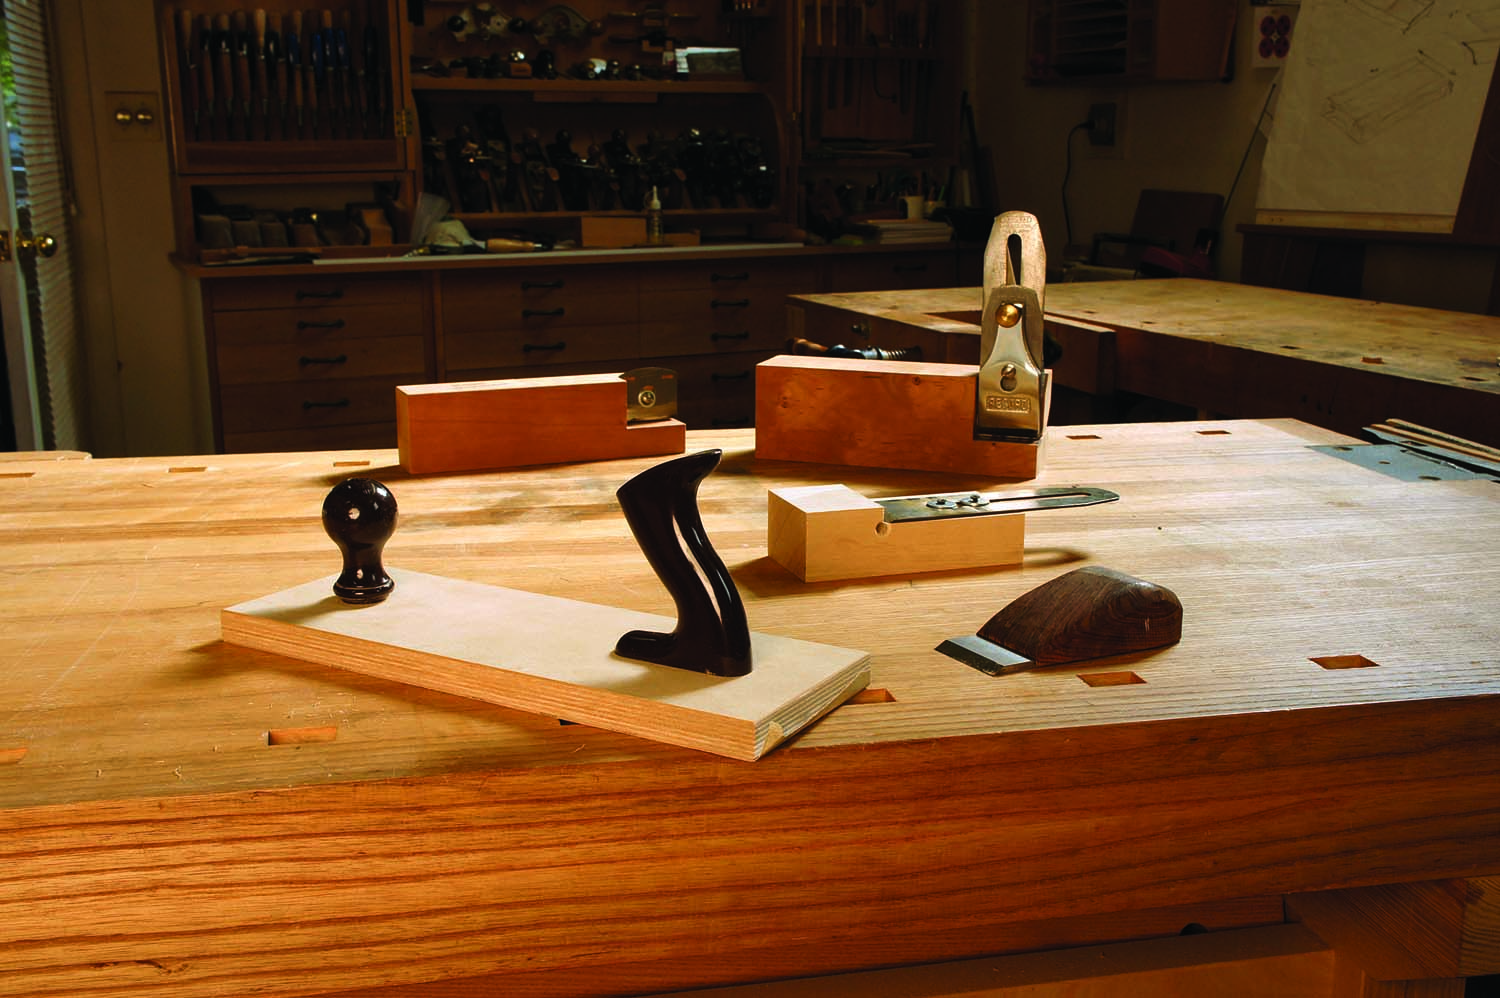
New tools from old. Don’t let those old planes just sit and gather dust – the parts can be used to make some clever new tools (clockwise from left): a sanding block, a simple string inlay thicknesser, an adjustable string inlay thicknesser, a dowel-making jig and a chisel plane.
The box arrives in the mail and the new plane you’ve been yearning for has finally arrived. You spend a few minutes admiring the workmanship, then get to work flattening the back of the plane iron and honing a razor sharp edge. You take a few whisper-thin shavings and feel contentment.
Later comes the unsettling question: What do you do with your old handplane – the one that never quite cut the way you wanted it to? Or what about that just “plain awful” plane you picked up at a garage sale or on eBay, or the one that fell off a bench and broke? I’ve had quite a few planes over the years that fell into each of these categories, and rather than toss them or sell them off I’ve been able to make very productive use of many of the parts.
What kinds of planes? And what is actually useful? Almost everything has some part or other that can be re-
purposed (well, maybe not the stamped sheet metal block plane a friend once gave me). But whether you salvage the handles, the blade or other parts, there’s almost always something that can be put to good use.
Repurpose the Knob & Tote
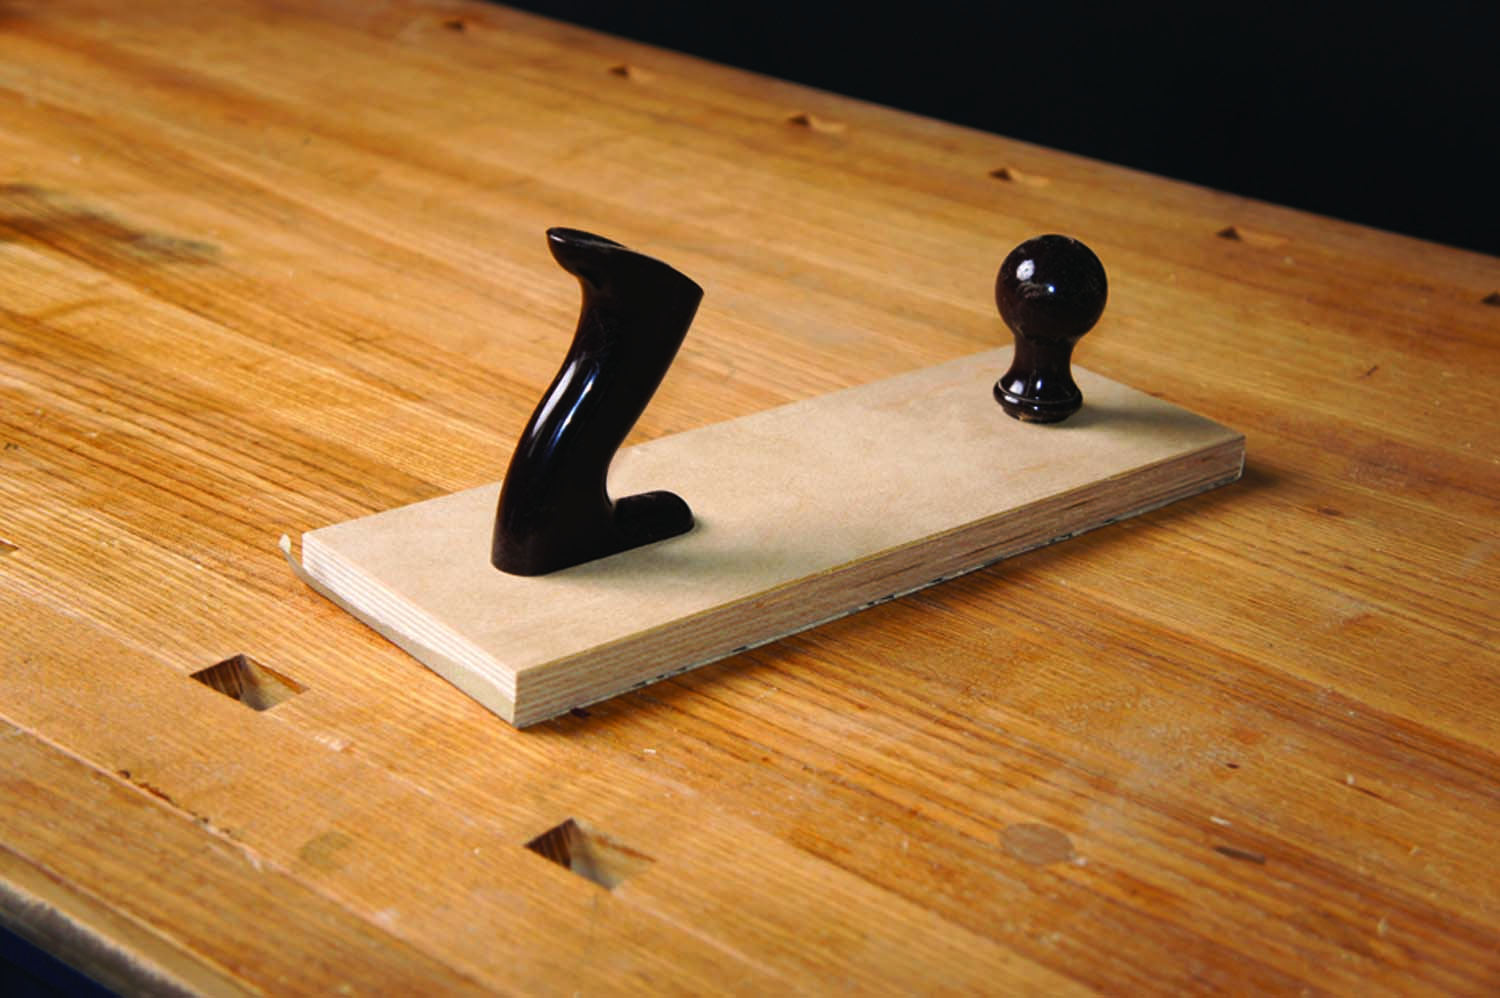
Sanding block. Attach the knob and tote to a piece of plywood and you have an instant sanding block (attach sticky-back sandpaper on the bottom of the plywood before use).
The easiest parts to reuse are the handles. The knob can work as the handle for a shop-made router sub-base with an offset handle. This is particularly useful for edging tabletops, especially with larger router bits.
You can also glue some thin rubber to the bottom of a knob and use it as a handle to help increase the pressure on a plane iron when lapping the back flat (if your knob is hollow, you may have to plug the hole). The tote and the knob can be used to make up a simple “sanding plane” – a large sanding block. The handles make it much easier to use than a plain block.
Put the Blade Back to Work
One of the most useful parts of a decommissioned plane is, of course, the blade. In many cases, blades are interchangeable between planes, and you can just sharpen your old one up and keep it handy so you don’t have to stop to sharpen while you’re working; you can just switch blades. An extra blade for a block plane could be ground to a steeper angle, effectively raising the cutting angle and allowing you to cut more difficult grain with less tear-out.
You can’t do exactly the same thing for a bench plane, but you can add a back bevel to create a steeper cutting angle. You may also want to sharpen an extra blade with a crowned edge, giving you the option of working with or without a crown without re-grinding your main blade.
Unfortunately, upgrading to one of the newer and better planes on the market may completely rule out all of these “extra blade” options. Most of the blades on these planes are significantly thicker, and an old iron won’t work. Picking up an extra plane iron or two for any of these reasons makes sense anyhow.
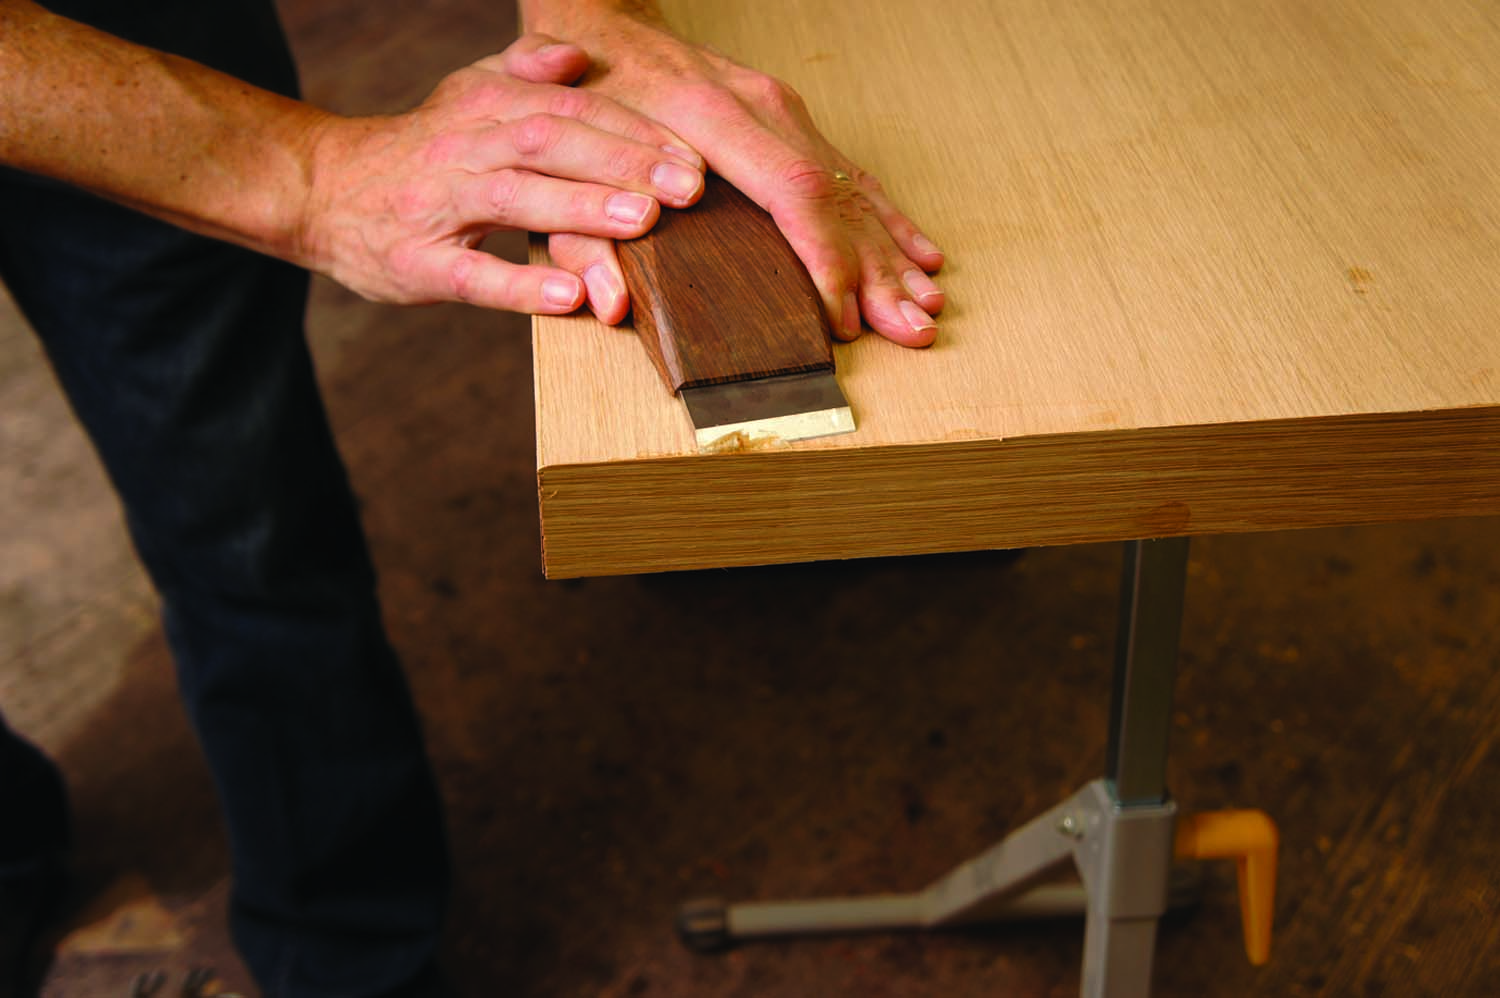
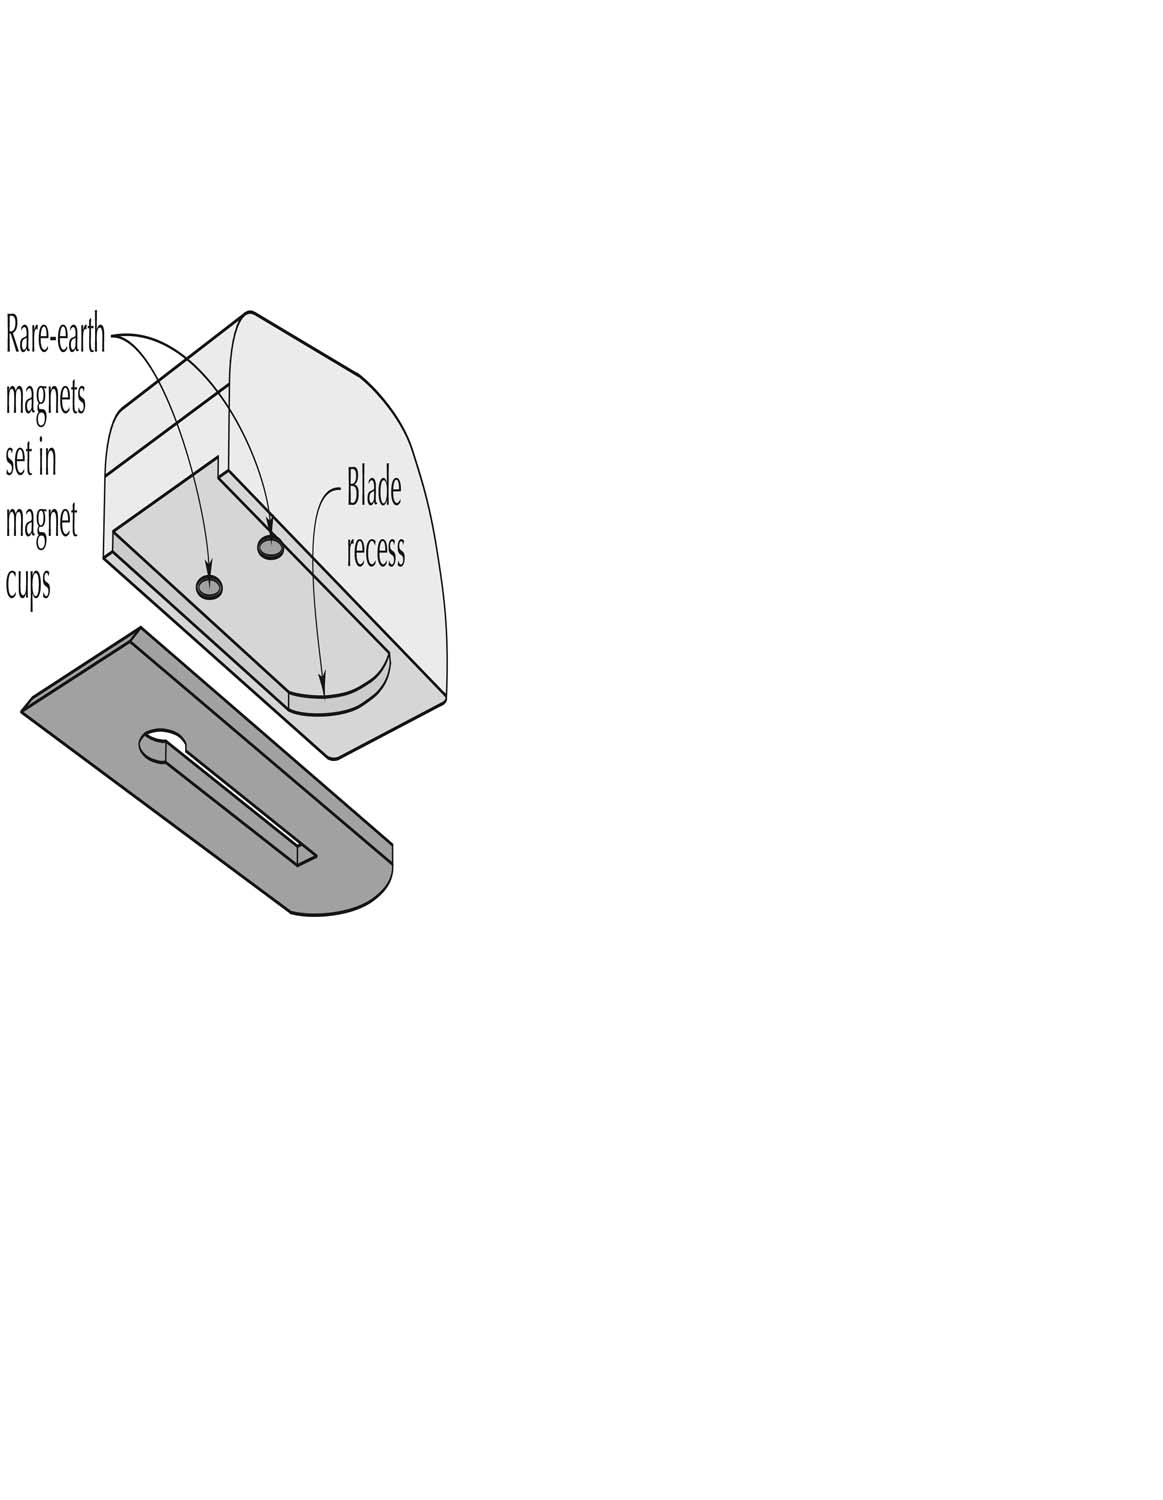
Chisel plane. Rare earth magnets hold the blade tight to the handle in this chisel plane.
There are many other options for a blade, however. A little bit of work using a router or a chisel and a router plane to make a blade recess can transform a small block of wood into a blade handle, essentially creating a chisel plane – great for cleaning glue out of corners or for paring things flush. To keep the blade fixed in place, screw a pair of magnet cups for 3⁄8” rare earth magnets into the blade recess in the handle. Pop the magnets in and snap the blade into place. You’ll be surprised how well this holds. In fact, to remove the blade safely, you’ll have to hold it tight against the bench and pull the handle off.
Make a Tool for Making Dowels
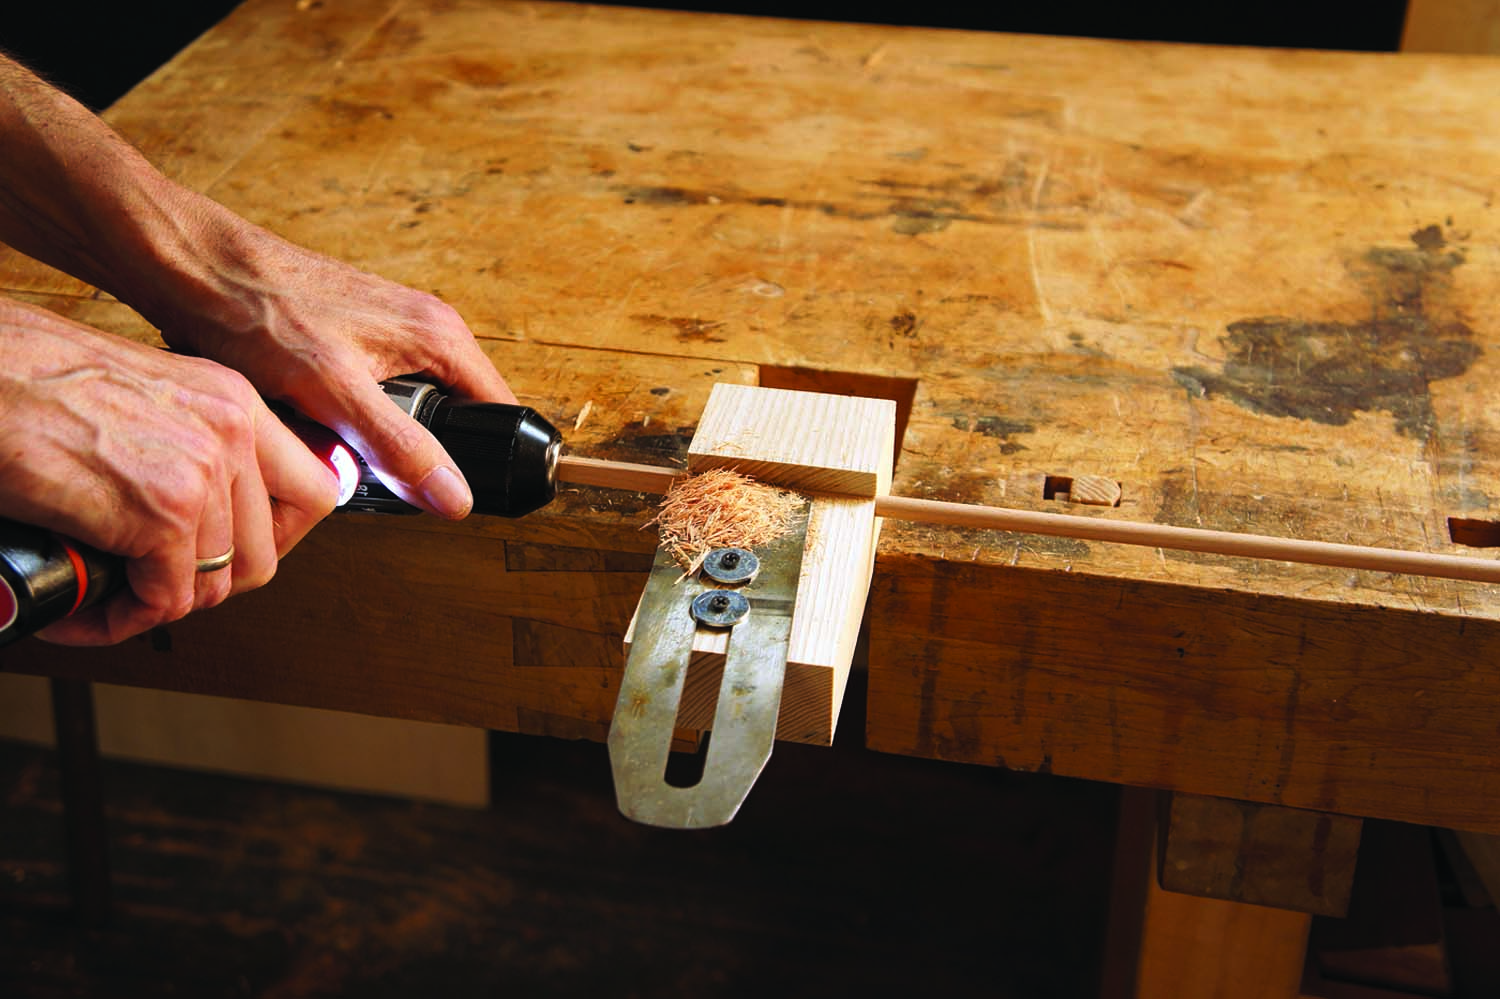
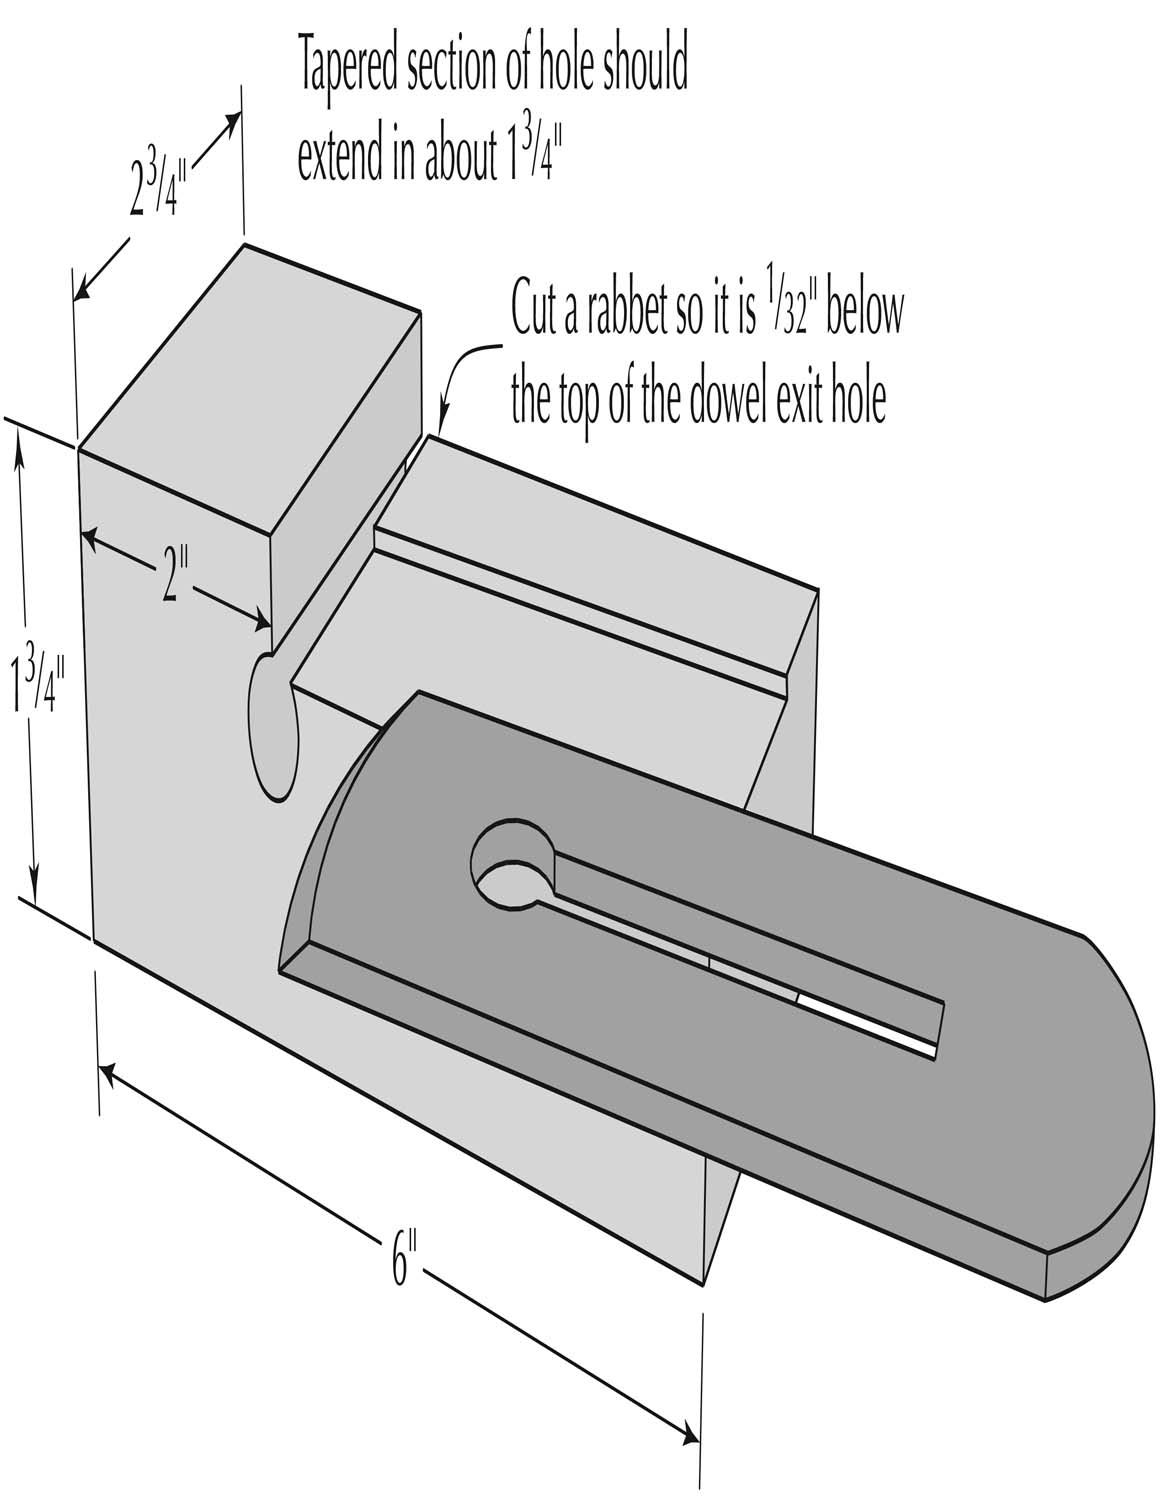
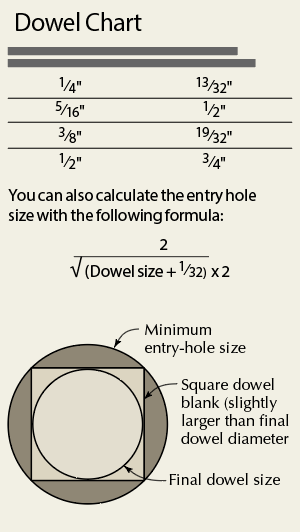
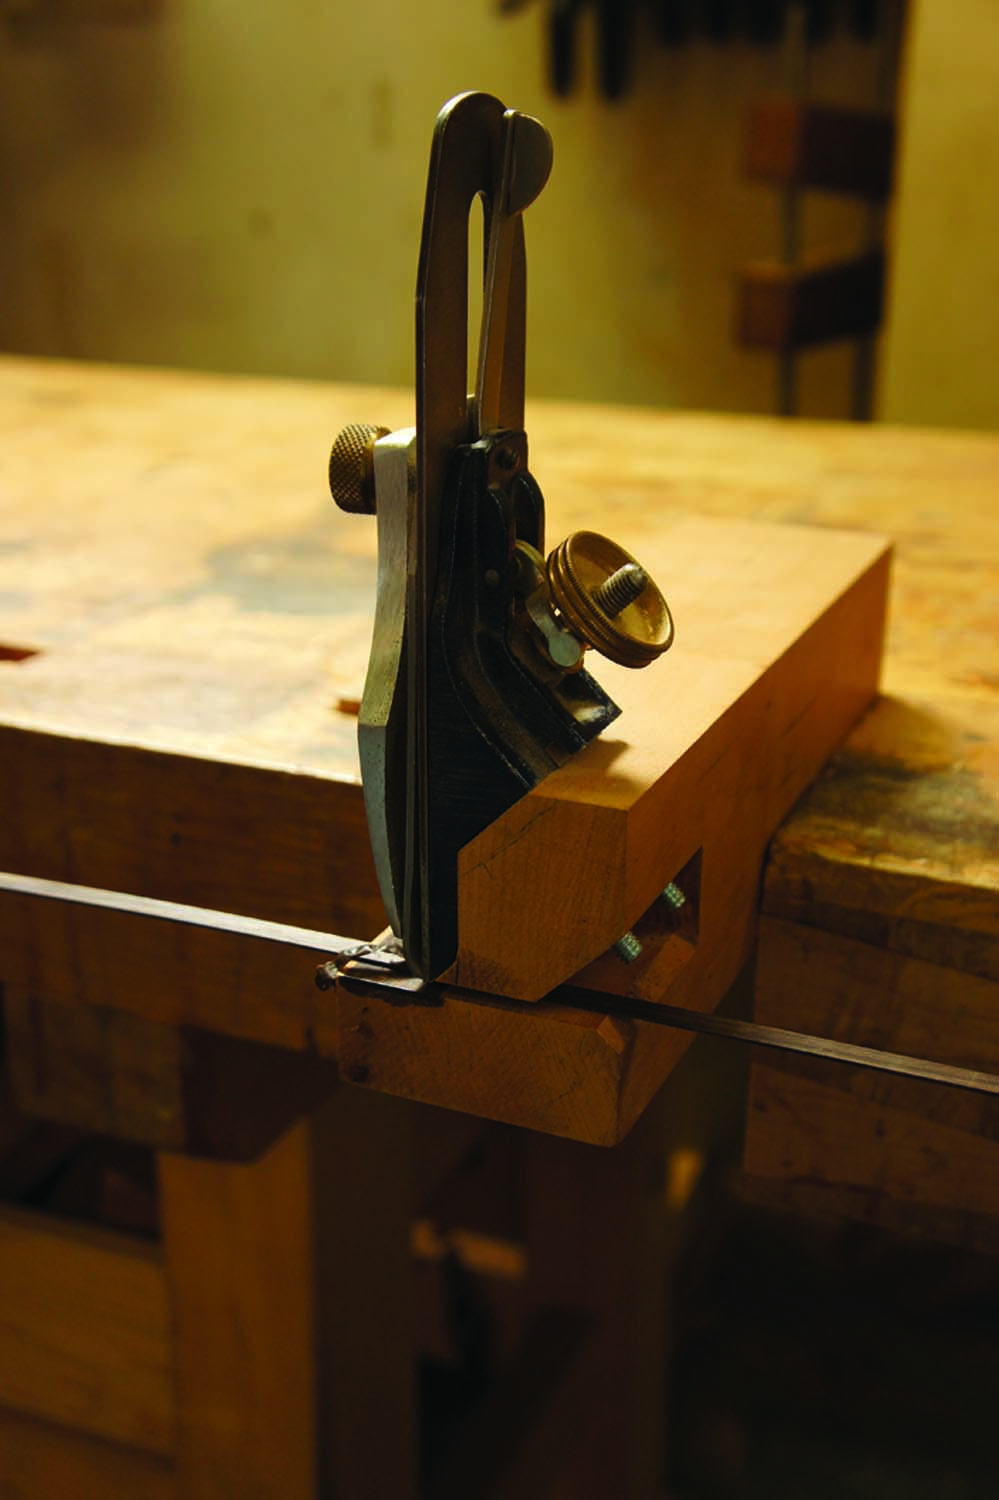
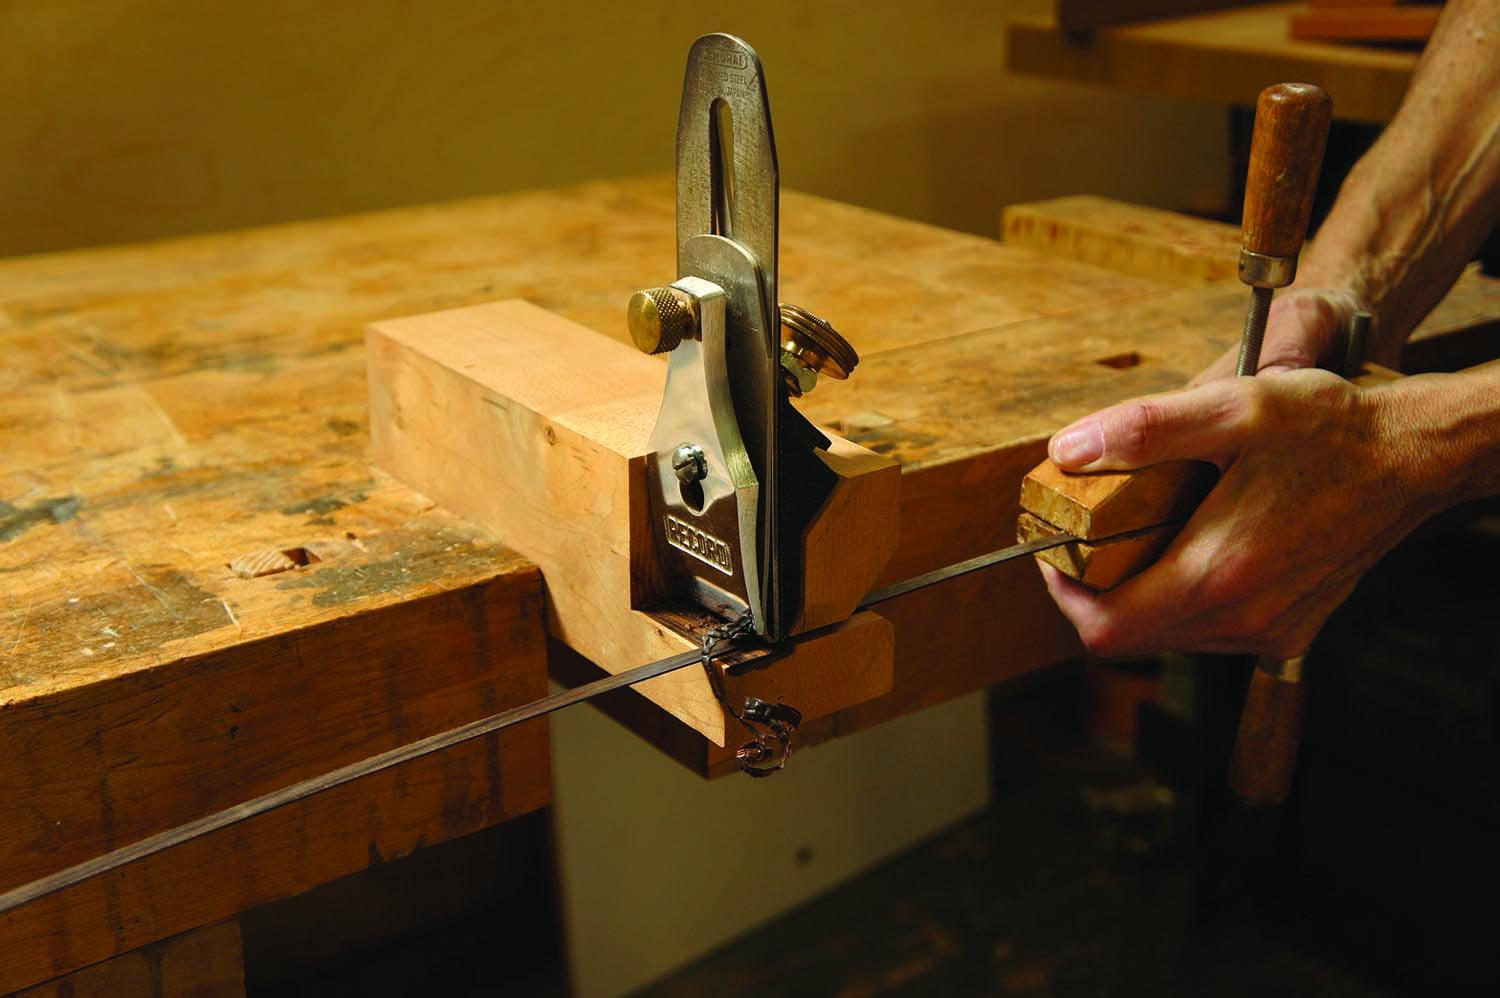
Custom dowels. With this jig, you can make your own dowels – and you can customize the jig to fit your dowel-diameter needs.
It’s a little trickier, but you can also use the blade (or a spokeshave blade) to create a dowel-making tool, with which you can create your own custom dowels, 1⁄4” in diameter and larger.
First, the edge of the blade needs to be ground and sharpened in a curve with a radius of roughly 12″ to 13″.
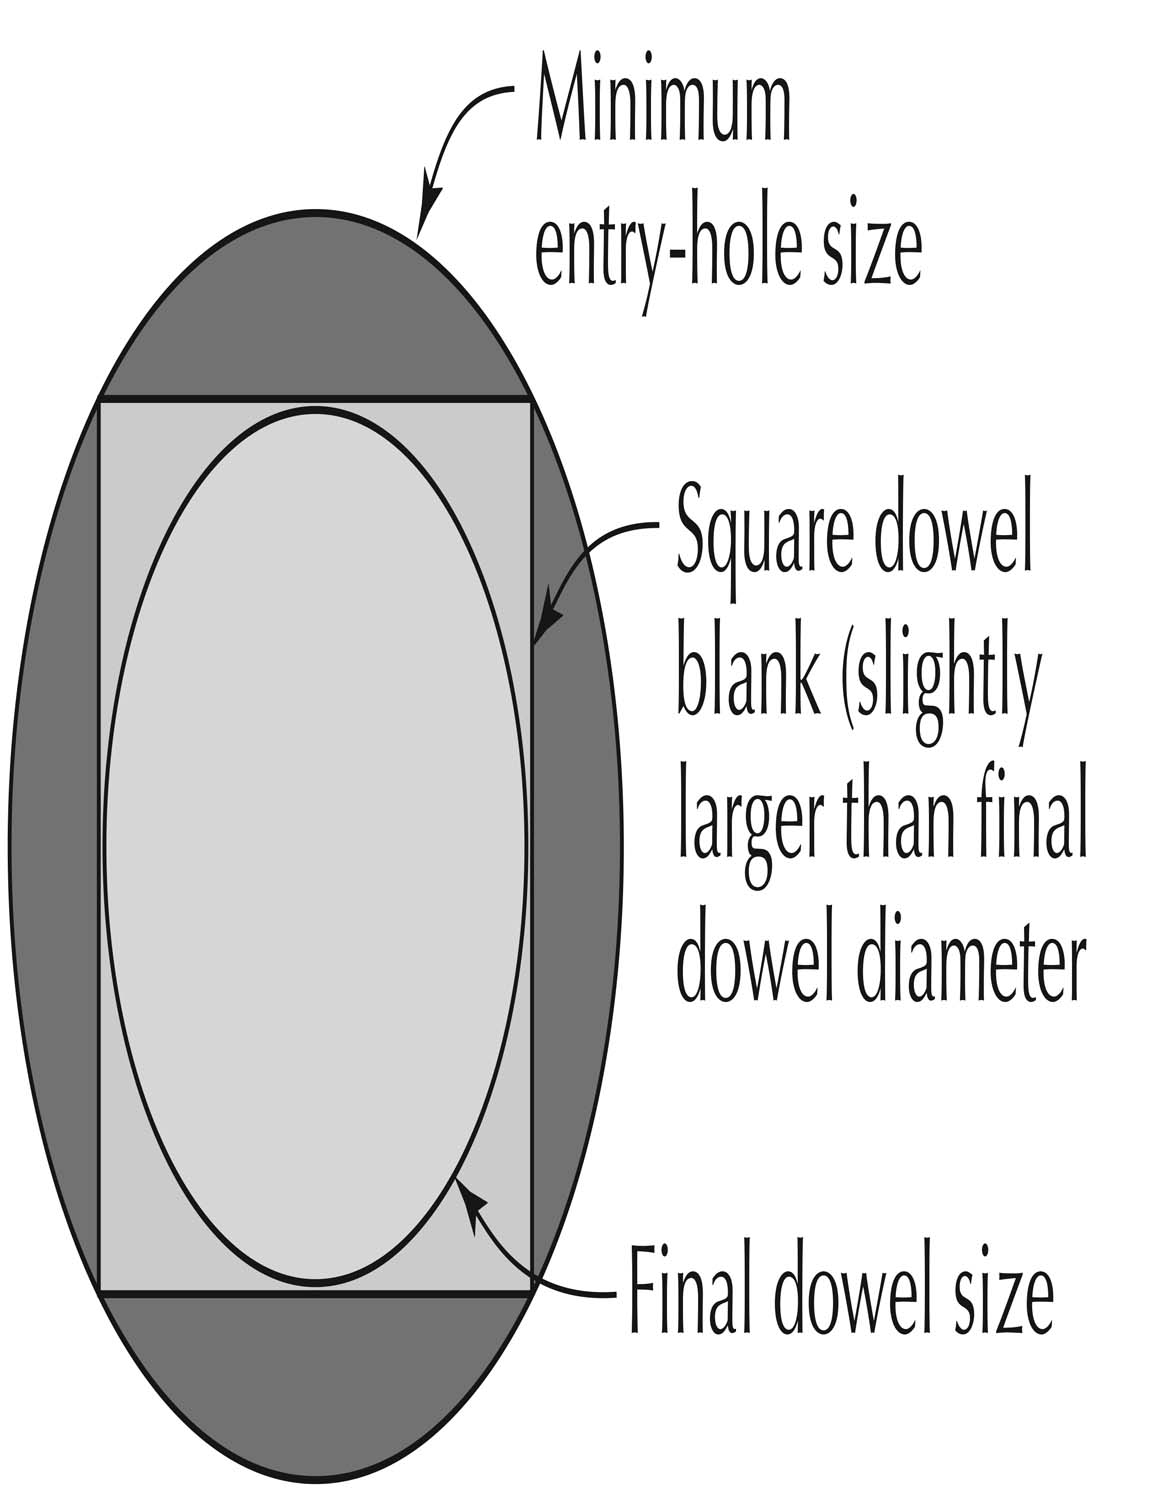
Next, make the body of the dowel-cutting jig. Start with a 13⁄4” x 23⁄4” x 6″ block of wood, and drill a hole the same size as the diameter of the dowel you need.
Now you need to enlarge one side of this hole so you can insert a square blank (see “Dowel Chart” below). Ideally, this entry hole should taper down to the finished hole size (a taper reamer will do this easily – Lee Valley sells one that’s just about right), but you can certainly make do with a series of incrementally larger holes creating a stepped taper. I just used drill bits 1⁄64” larger for each step in the taper.
Cut a large rabbet into the body of the jig, sneaking up on the proper depth, which is 1⁄32” below the top of the dowel-sized hole. This rabbet will naturally cut into more of the tapered part as well. Now you just have to screw the plane blade down onto this rabbet, bevel-side up, so that the curve extends into the tapered section just a little, and the blade stops cutting once the dowel reaches the correct diameter. This will take a little bit of fooling around – but not that much once you see how it works.
The best way to cut the dowels is to push a rotating blank through the jig with a drill. I have done two things to chuck up the dowel. You can roughly shave down an inch or so at the end of a square dowel blank to more-or-less round then simply chuck it up directly in the drill. If you are planning to make a lot of dowels, your best bet is to get a square socket for a socket wrench of the appropriate size, and drive that onto the end of the square blank, then attach that to your drill with an adapter.
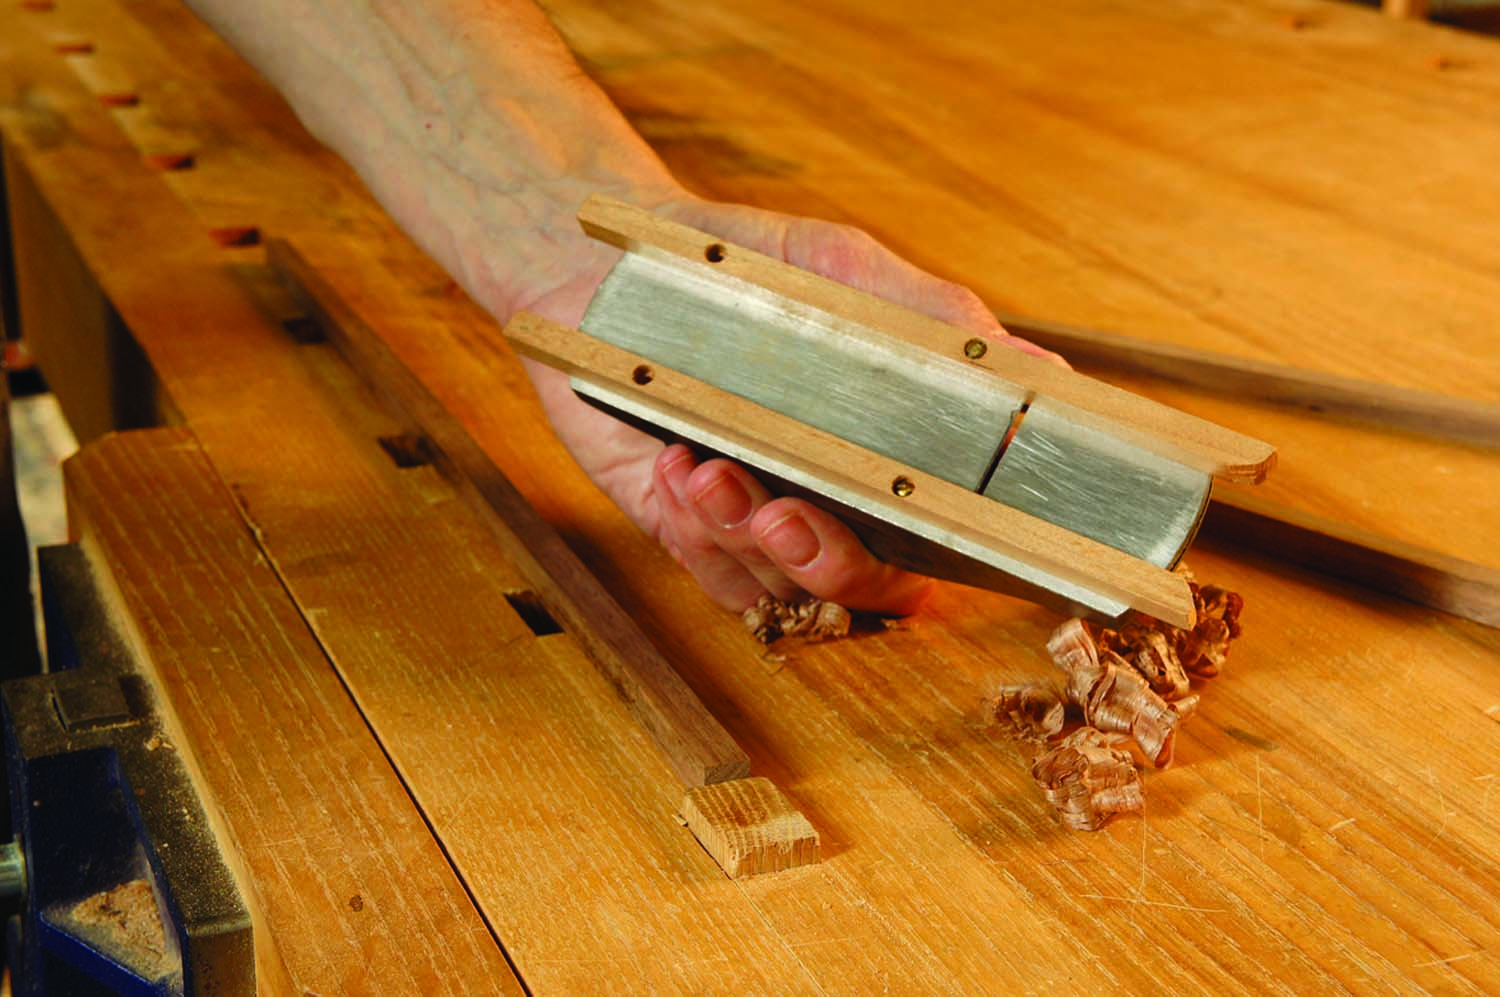
Two Inlay Stringing Thicknessers
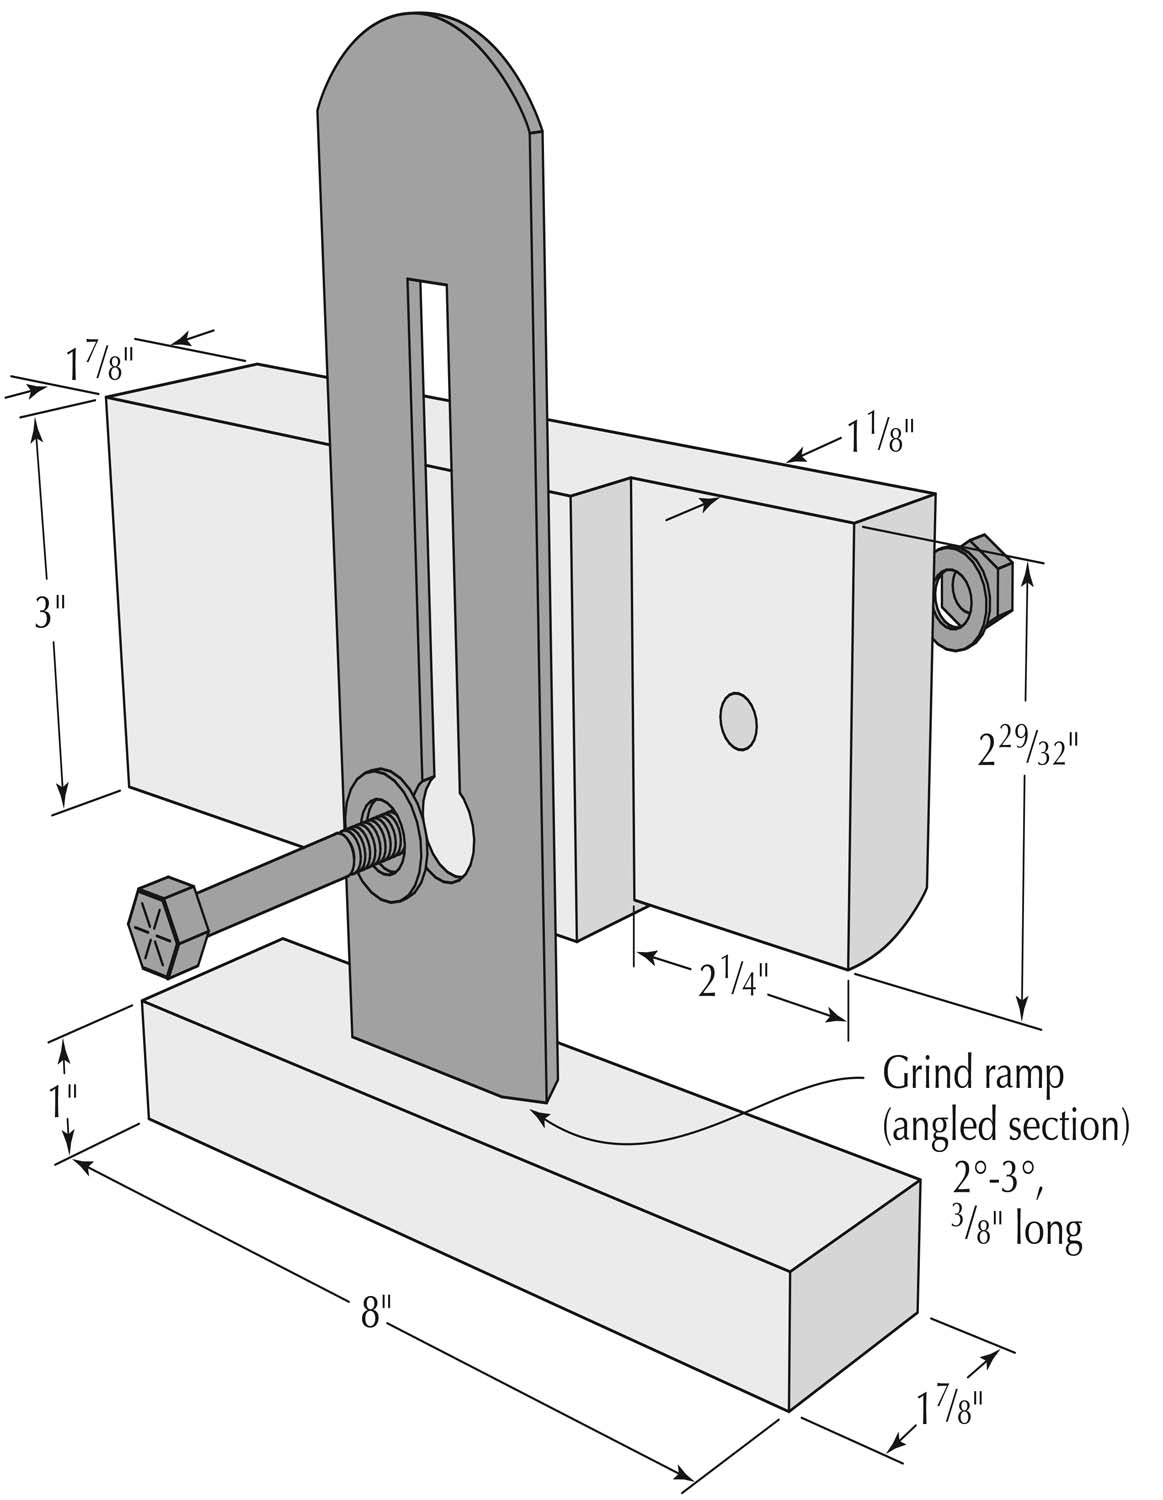
It’s a little bit simpler to make an inlay stringing thicknesser out of an old plane or spokeshave blade. Start by regrinding the edge to a 45° bevel and hone it to a sharp edge. You’ll also need to grind then hone an angled section on the side of the blade, which will allow you to progressively shave the slightly thicker stringing stock down to the exact thickness needed for the inlay grooves.
The wood blank for the thicknesser starts out at roughly 41⁄8” x 8″ x 17⁄8” thick. Slice off a section that is 1″ thick, and set it aside for now. The rest of the blank now needs to be shaped to hold the blade in position and to allow for clearance for the stringing. This can be done on the table saw, holding the blank in a tenoning jig. Then bevel or round over the back edge to make it easier to pull the stringing through without breaking it. Now glue the bottom slice back on. Hold the plane iron in place and mark for a bolt hole (or two) to attach it to the jig. Set the location of the plane iron using a feeler gauge to set up the distance you need from the bottom of the opening.
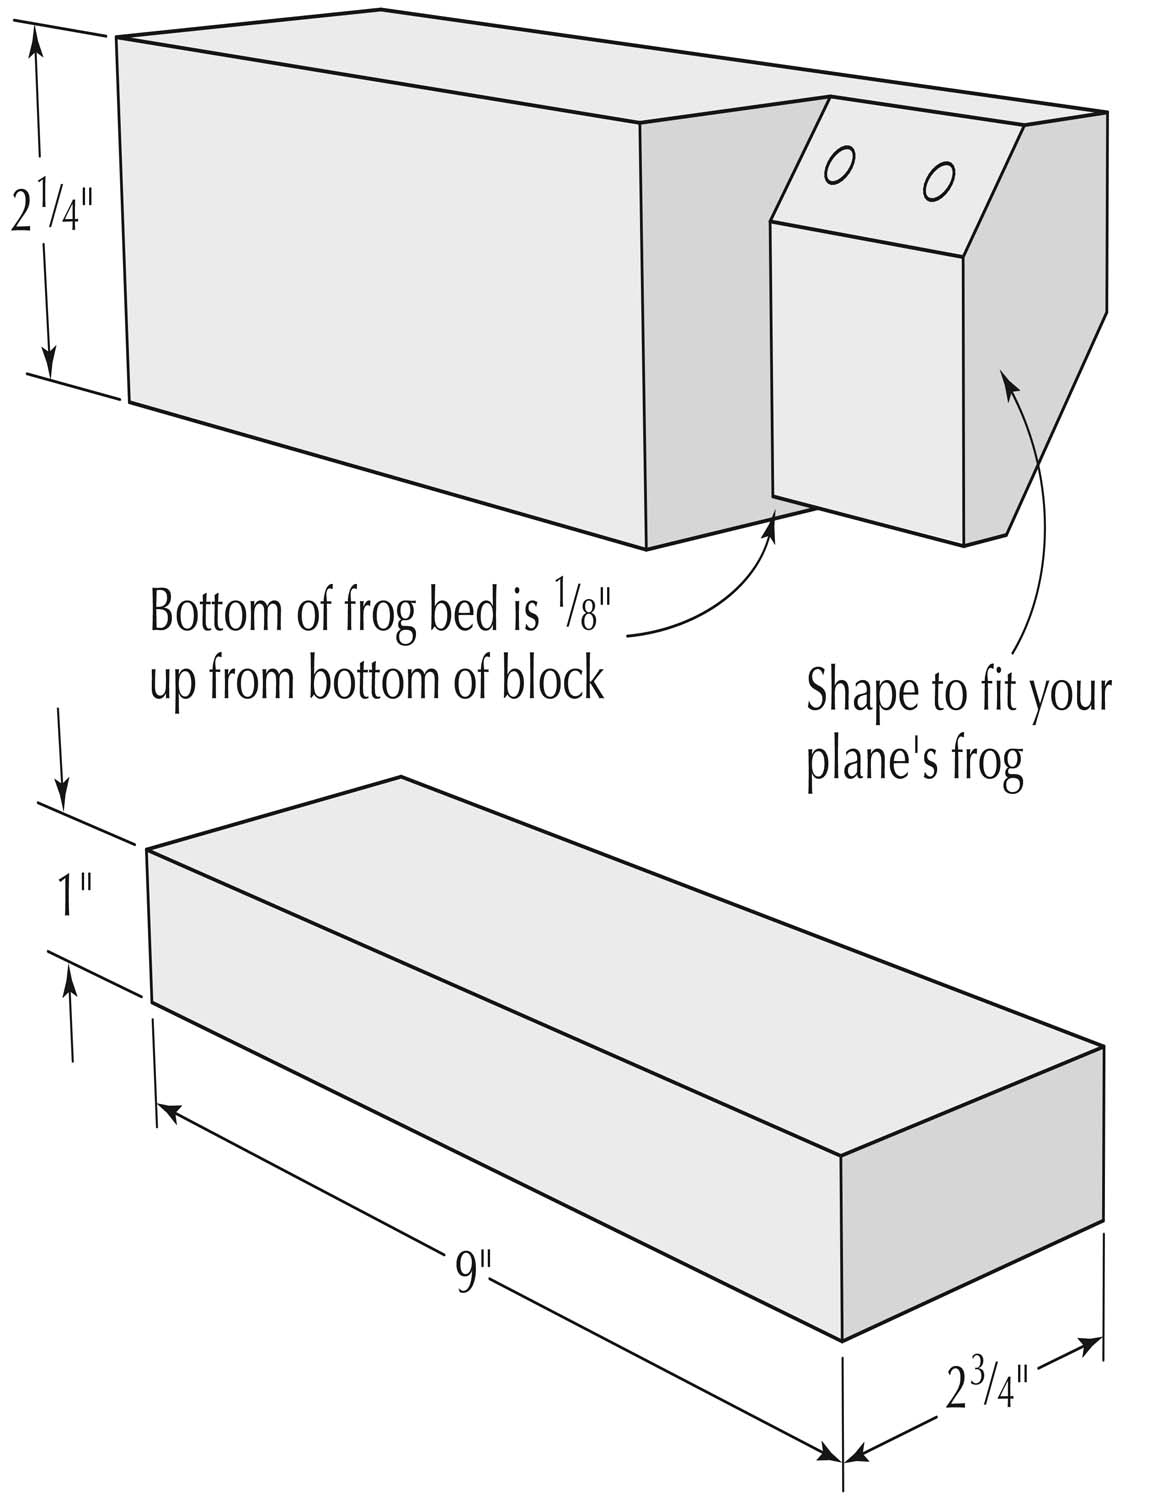
Adjustable inlay thicknesser. While the simple inlay thicknesser at left is a snap to build, it cuts only one stock thickness. A little more work, and you can build a tool that incorporates a frog to allow you to adjust the iron for more versatility. At right is what the adjustable inlay thicknesser looks like from behind; below is how I use it.
To use the thicknesser, clamp it in a vise and pull your stringing through, starting out at the angled edge of the blade and working your way in until you’re able to pull the stringing through on the flat section of the blade. I’ll often use a small clamp on the end of the piece of stringing to give me a better grip on the thin wood.
A more complex, but much more versatile (and adjustable) inlay stringing thicknesser makes use of the complete frog assembly, including the blade and chipbreaker. The basic method is the same as the simpler version, but here, you’re mounting the frog on the jig instead of just the blade. This gives you the ability to adjust the thickness, or to start out with stock that is less precisely milled. It also gives you flexibility to adjust the angle of the blade, although straight is usually best.
You’ll still need to start by re-grinding the bevel of the blade, and adding the “ramp” – the angled section on the outer side of the blade. Working with the jig blank (33⁄8” x 9″ x 23⁄4“) is similar to making the simpler thicknesser: Slice off the bottom inch, then shape the bed for the frog on one end to match your plane’s frog. I did that work upright on the table saw with my tenoning jig, using a V-block (two 45° rip cuts in a board to create a 90° notch down the center of the block) to hold the jig blank for the 45 °cuts.
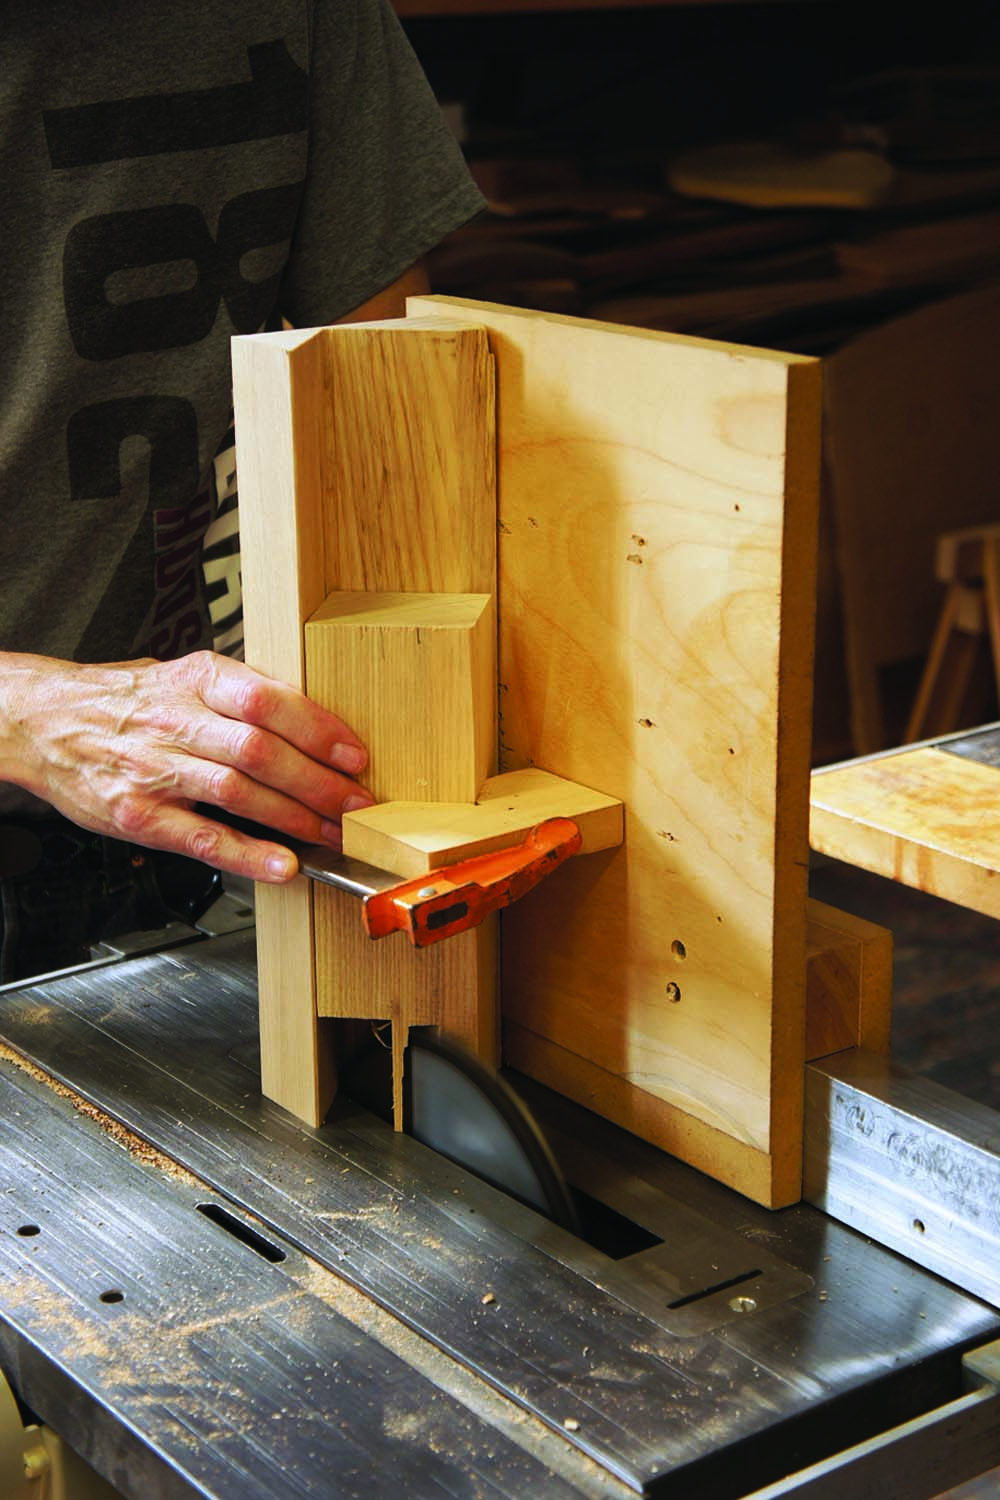
Table saw safety. A tenon jig and V-blocks keep you safe at the table saw as you make the cuts for the adjustable inlay thicknesser.
Once all of the cuts are made, hold the frog (without the blade) in place and mark for the mounting holes, which are centered in the bolt slots in the frog. Drill the 1⁄4” holes straight through the angled section. I used square nuts with the bolts, and recessed them into the back of the block – but that’s purely for aesthetics; they don’t have to be recessed. I pushed the 1⁄4” bolts through the holes, threaded on the nuts, then scribed around them with a marking knife, and chiseled the recesses for the nuts.
Finally, bolt the frog into place, install the blade, chipbreaker and cap iron, then adjust the blade as needed. You may find that you have to grind back the leading edge of the chipbreaker to get the blade into position and adjusted properly.
No-scrap Reuse
Not interested in scrapping your plane? You can still add a very useful feature to an intact plane – but it’s an operation you probably wouldn’t want to perform on one of your favorites.
This modification involves drilling and tapping four small holes that can accept 4-40 bolts. You can then attach reference strips to the bottom of your plane. This is the easiest way to plane strips that are perfectly flat and exactly to thickness. I’ve used this method for making perfect half-lap joints, grid-work for door muntins, and lattice work. The reference strips in these cases are sized to plane your stock down to a thickness that fits exactly into the notches. But precise stock of any width up to what will fit between the reference strips can be made this way.
Perfect strips. Attach reference strips to a block plane to produce precise stock.
It can be helpful to set up a plane with a higher cutting angle for this kind of work so you have less trouble with grain direction. On the block plane I used, I ground a 45° bevel. You could add a back bevel to a bench plane to get the same effect. Be sure to do your planing on a flat bench. I usually plane against a single bench dog; clamping between dogs can sometimes spring the piece you’re planing, and you also need the entire length of the stock solidly on your bench and not spanning the typical opening created by the tail vise.
Is there a leftover or damaged plane body in your collection? Not much hope for that. The best bet might be a door stop. Using it as a fishing sinker might work, too. PWM
Jeff is a Chicago-based furniture maker and woodworking teacher. He’s currently working on a new book covering the essentials of craftsmanship, due out next fall from Popular Woodworking Books.
Here are some supplies and tools we find essential in our everyday work around the shop. We may receive a commission from sales referred by our links; however, we have carefully selected these products for their usefulness and quality.


