We may receive a commission when you use our affiliate links. However, this does not impact our recommendations.
Inlay outside the box. Think differently about inlay as you slice and fit fans – assembled from wedges – into recesses created at your drill press.
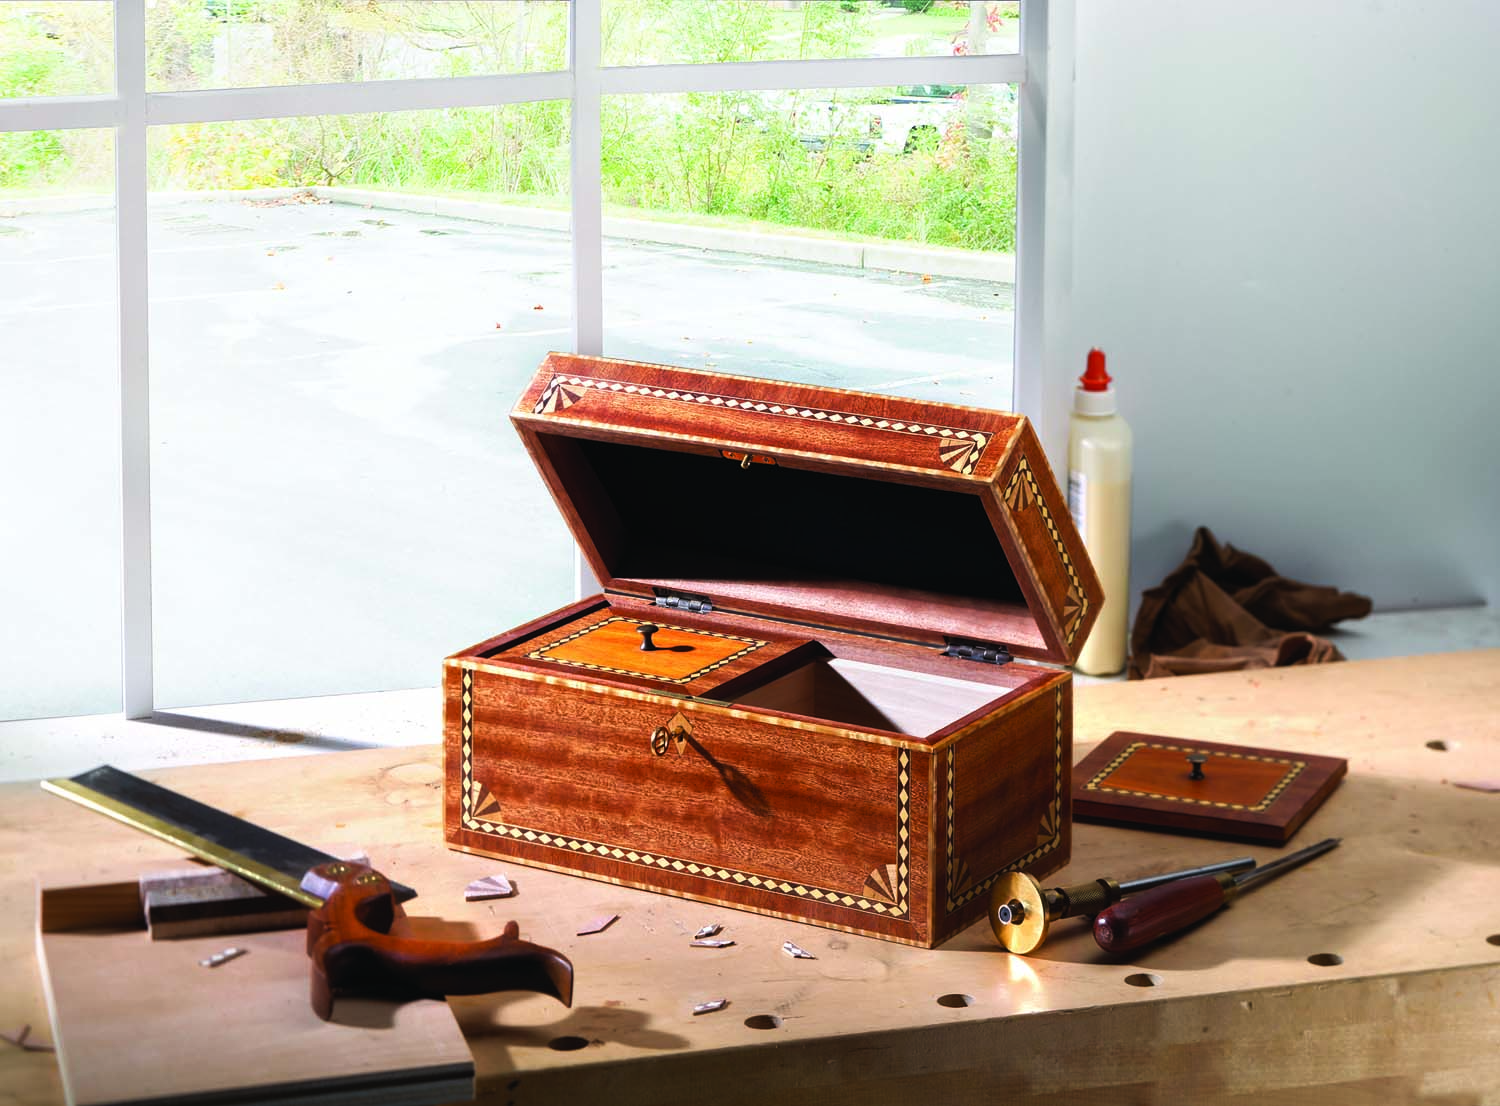
Use unconventional techniques to create a traditional tea caddy.
England began to import tea about the middle of the 17th century. When first introduced, tea was expensive, so it was a drink affordable only to the wealthy. That, of course, was an invitation to smugglers who, during the next 100 years, drove down the cost to make tea available to the masses.
As the demand for tea increased, the need to store and protect the tea leaves also grew. By the mid-1800s, woodworkers were making wooden tea caddies of single-, double- or triple-compartmentalized boxes.
Traditionally, caddies are a study in veneer. The boxes are built in pine, oak or mahogany, then veneered with figured hardwoods and inlaid with intricate designs. While my caddy has figured hardwood and striking inlay, there is no veneer. This is how to accomplish similar results using methods that are much more simple.
Choose, But Choose Wisely
From the get-go, my inlay had to jump from the caddy. That meant no dyes or stains to mute the contrasting colors. I also wanted a mahogany-like color and good figure, so I chose quartersawn sapele for its strong stripe; the inlay is walnut and maple.
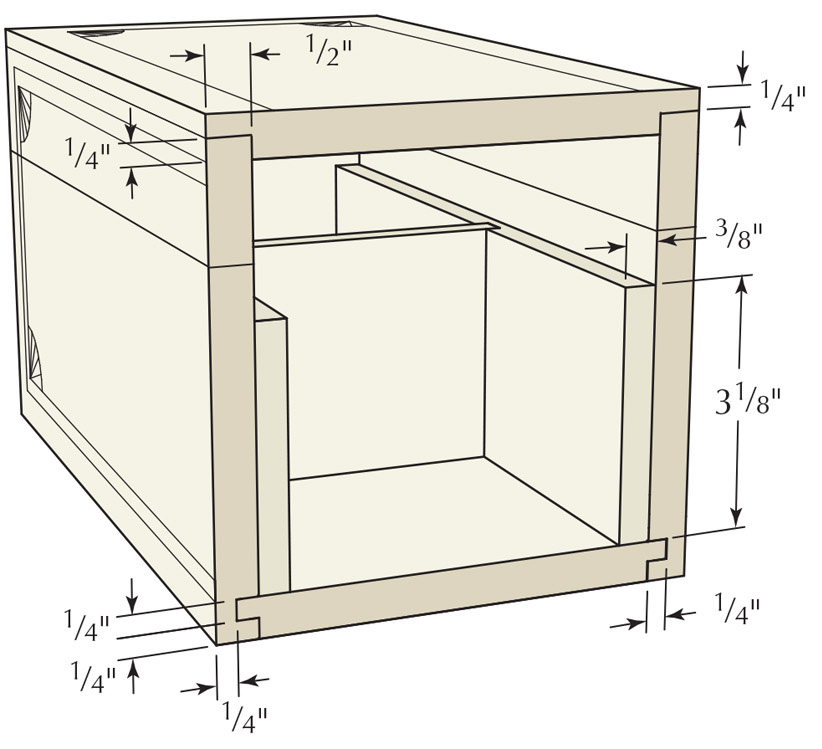
To begin, cut and size the four pieces that make up the box, as well as the caddy top. Before any machine work begins, establish the area for the bandings, both inlay and cross. Scribe lines 3⁄4” in along all four edges of the top. But because the caddy top sits on top of the top edge of the box (adding a 1⁄4” in height), only the bottom edges and the ends of the box sides are scribed at this setting. To scribe lines along the top edges of the box sides, adjust your cutting gauge from 3⁄4” to 1⁄2“.
Not by the Book
Proper spacing. A spacer, to compensate for the 1⁄4″ added when the box top is attached, moves the box parts into the proper position.
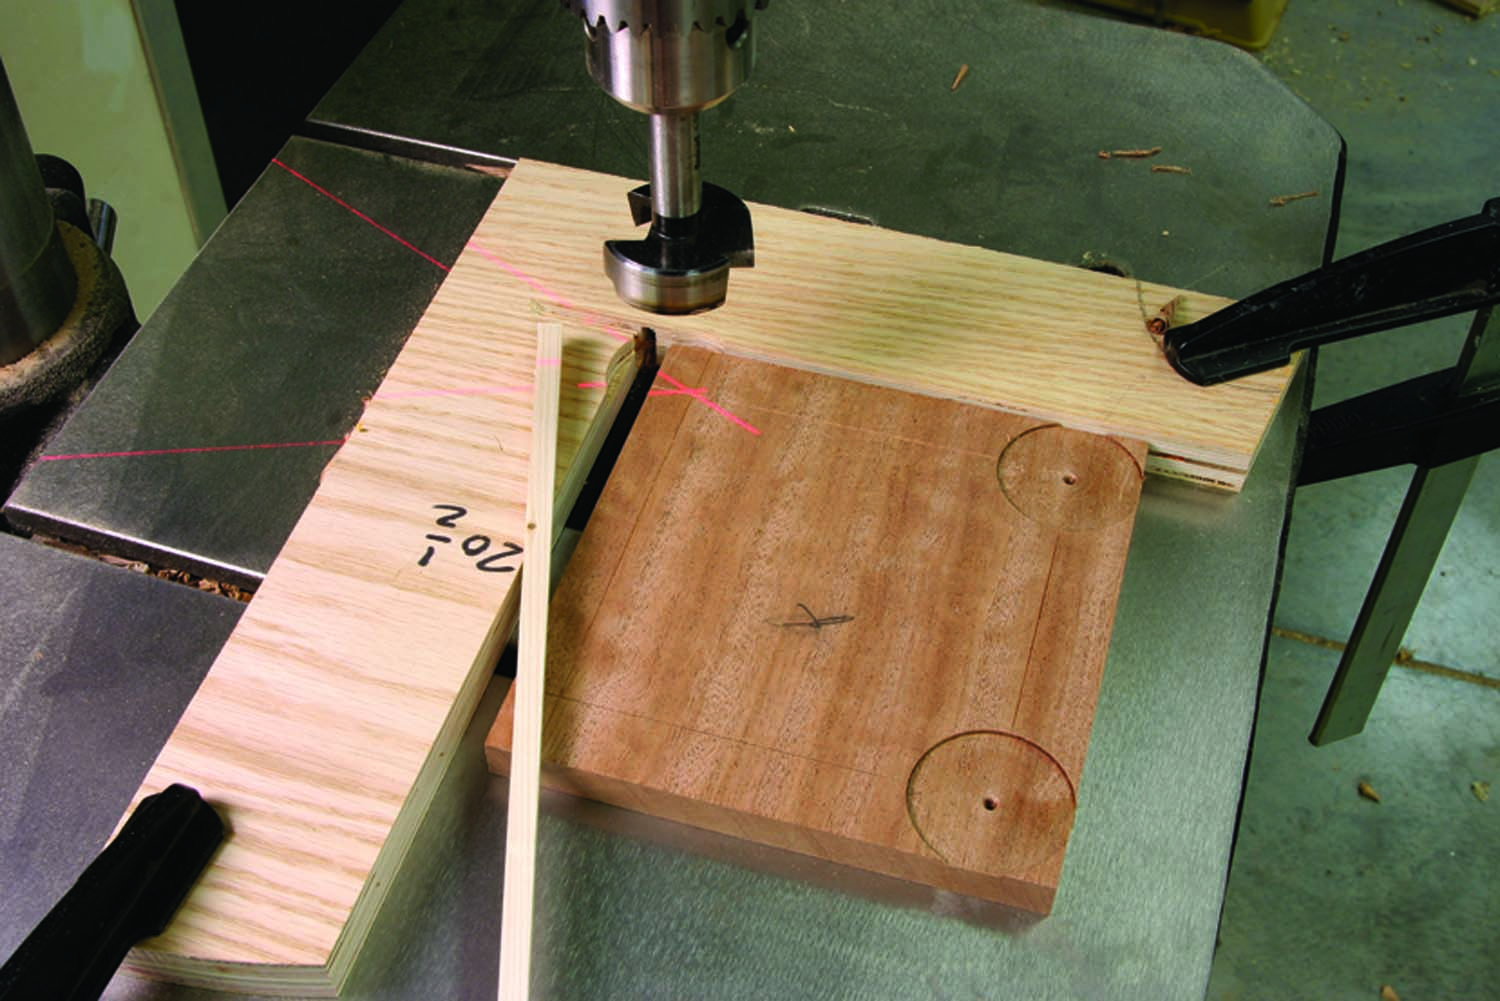
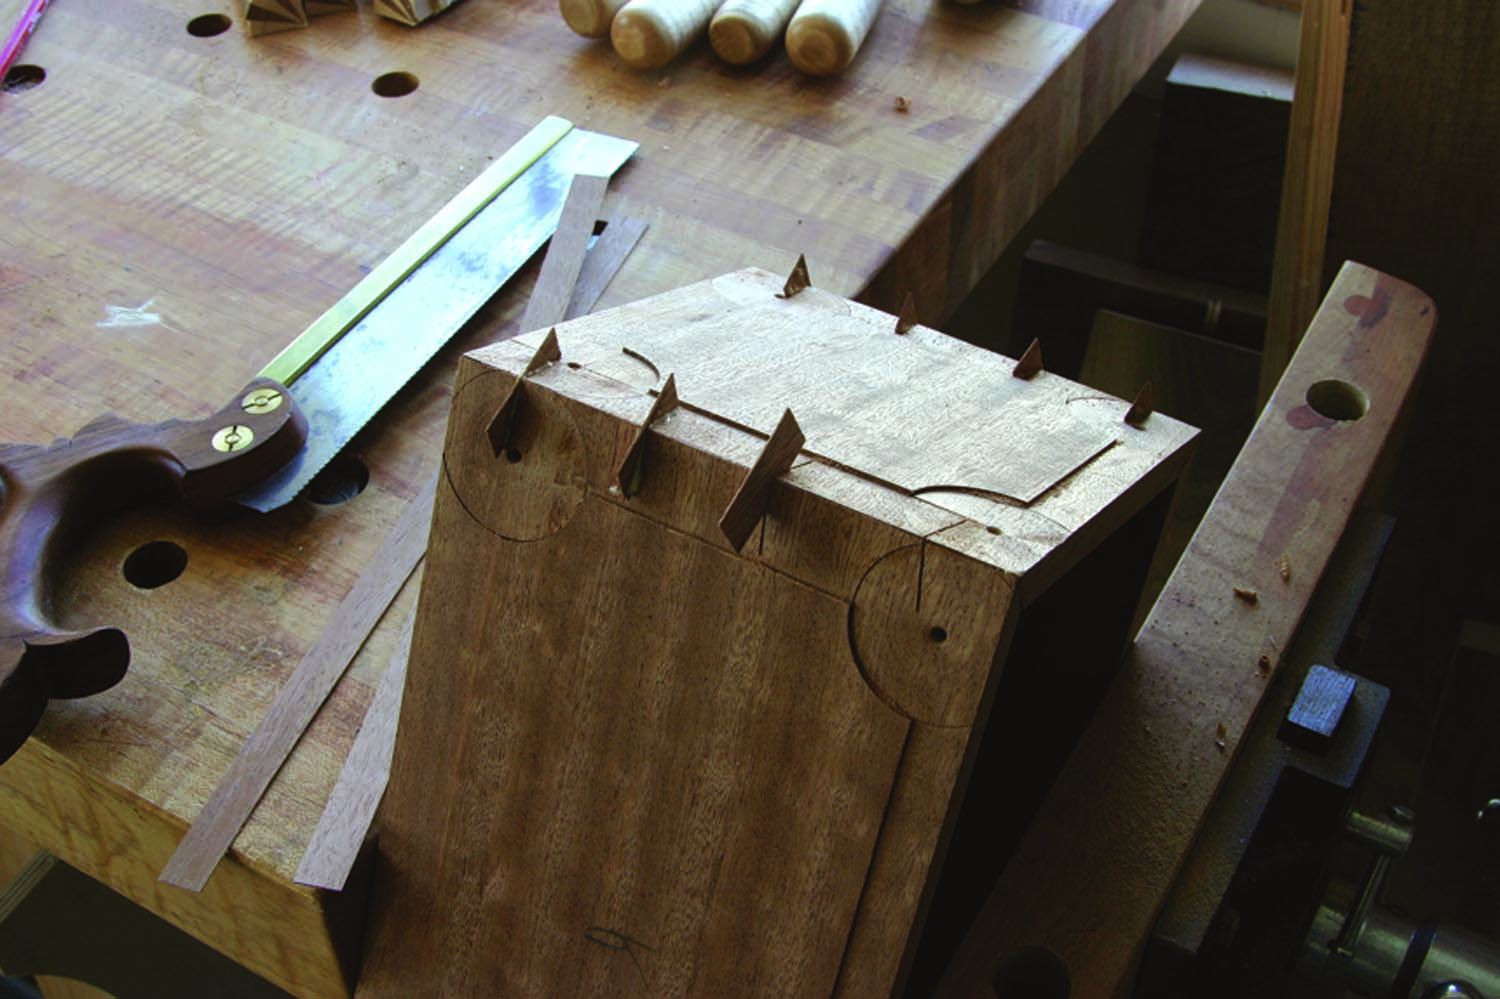
Preparing the panels for inlay is also not very traditional. Set up a drill press with a 15⁄8” Forstner bit to cut the fan recesses. Create an L-shaped plywood fence to accurately align each fan location. Set the fence and panel so the bit is centered over the intersection of two 3⁄4” scribe lines. Clamp the fence in place, set the drilling depth to 1⁄16“, then cut the recesses at each corner.
The drill locations along the top edges change, so space the panel away from the fence using a 1⁄4“-square spacer set between the fence and your panel along the 1⁄2” scribe line.
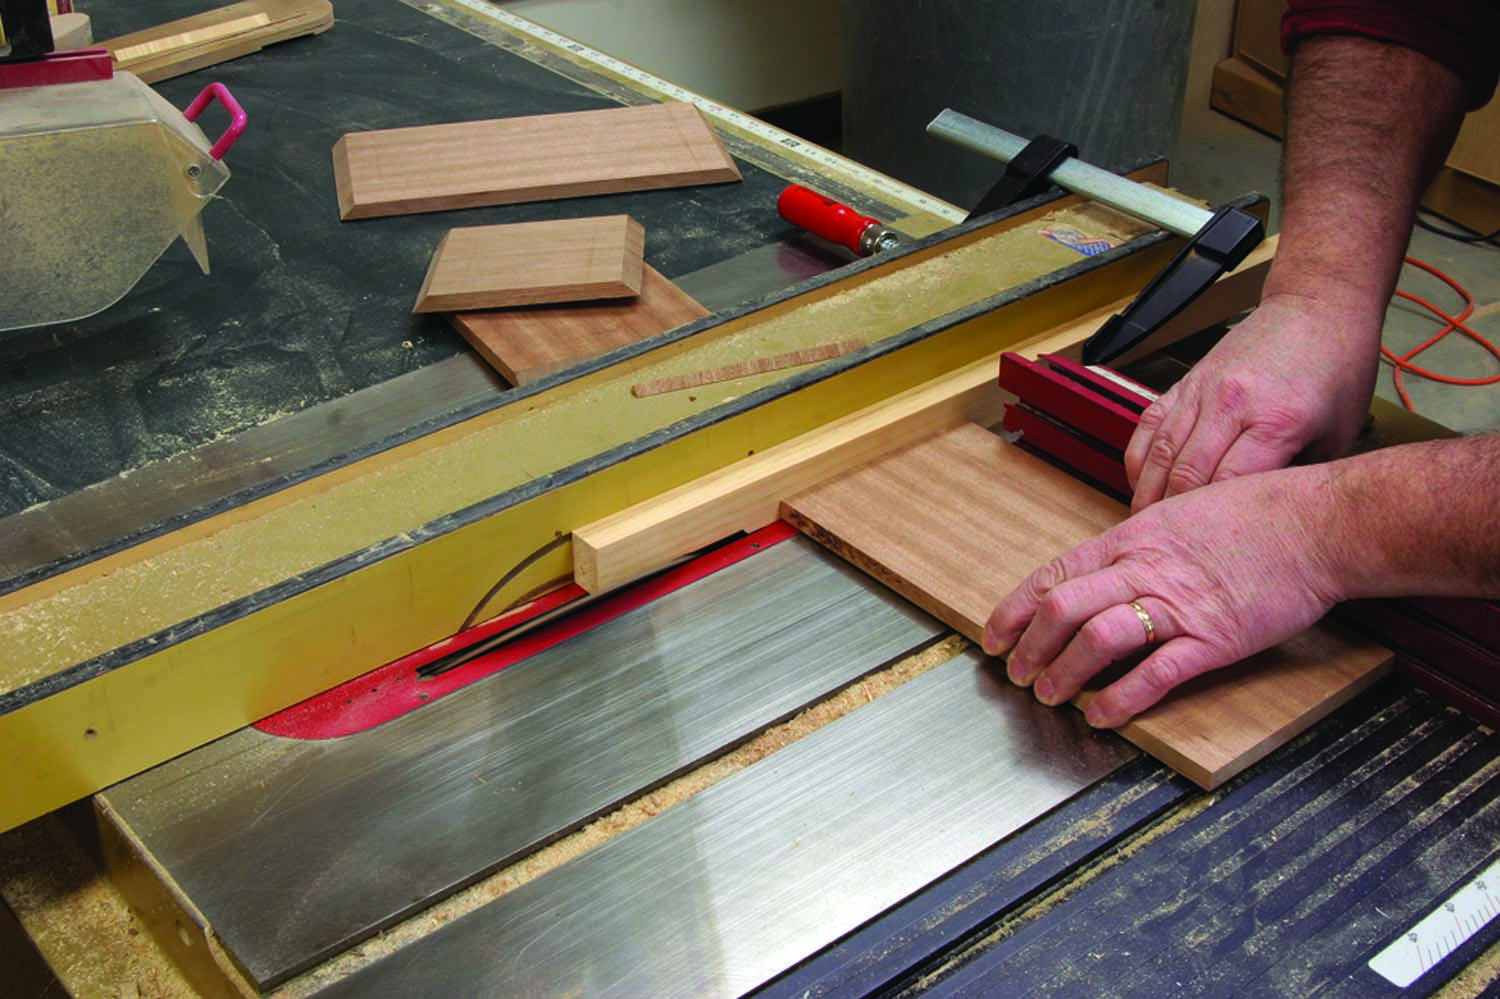
To complete the recesses for the inlay, adjust your table saw to remove 1⁄16” of thickness from the show side of all parts, including the caddy top. Cut from center point to center point of the fan recesses – the top edge requires a blade height adjustment.
Assemble the Box
Accurate lengths. It’s important that all the parts maintain their length relationships. Use a step-off block held behind the blade center. You don’t lose contact with the block until you’re into the cut.
The four main parts of the box are joined with 45º-mitered corners. The miters need to be accurate. Use a step-off block as shown at right to ensure a matching length after the cuts (as long as your original parts were also identical when sized).
With the blade back to vertical, plow a 1⁄4” x 1⁄4” groove in the box parts. Set the groove, into which the caddy bottom fits, 1⁄4” up from the bottom edge.
Measure the groove from beveled cut to beveled cut, then mill the bottom to size and thickness (leave room for expansion, if needed). Rabbet the four edges of the bottom so the resulting tongues fill the grooves with the bottom flush with the box.
Thin reinforcement. The seldom-used veneer-keyed miters add tremendous strength to a mitered corner.
Arrange the pieces so when folded together they form a box – alternate the short and long pieces. Make sure to align the top edges before joining each piece to the next with a short length of tape. With the tape in place, flip the unit so the inside of the miters are up, then apply a thin layer of glue to the bevels and allow it to soak into the end grain. After a few minutes, apply another layer of glue then fold the parts together as the tape acts as a hinge. Don’t forget to slip the box bottom in place as you assemble the box. Once the box is folded together, add a piece of tape to the final corner and allow the glue to dry.
With the glue set, remove the tape then cut saw kerfs across the corners, as shown in the top right photo. The kerfs are angled to the corners, similar to the slope of dovetails (the degree of slope doesn’t matter). When filled with thin stock milled for a tight fit, these veneer-keyed miters help secure the joint. Glue the veneer into the kerfs, then trim the pieces flush to the caddy.
Cut a 1⁄2” x 1⁄4” rabbet along all four edges of the top so that the field fits inside the box. The top is simply glued to the box. This is a cross-grain attachment, but there is no way around the problem – if the top were set into grooves as is the bottom, there would be problems with the cross banding used on the top. (Less movement is one advantage of quartersawn wood.)
Wedges to Fans
Be exact. Setting the saw blade at less than 9º leaves your section short of 90º, while a setting of more than 9° results in excess trimming.
Traditionally, corner fans are made from pieces of veneer. After reading Jameel Abraham’s “Precision Inlay, Simple Tools” in the April 2011 issue (#189), I decided to make a length of fan inlay that is sliced as needed. It worked great.
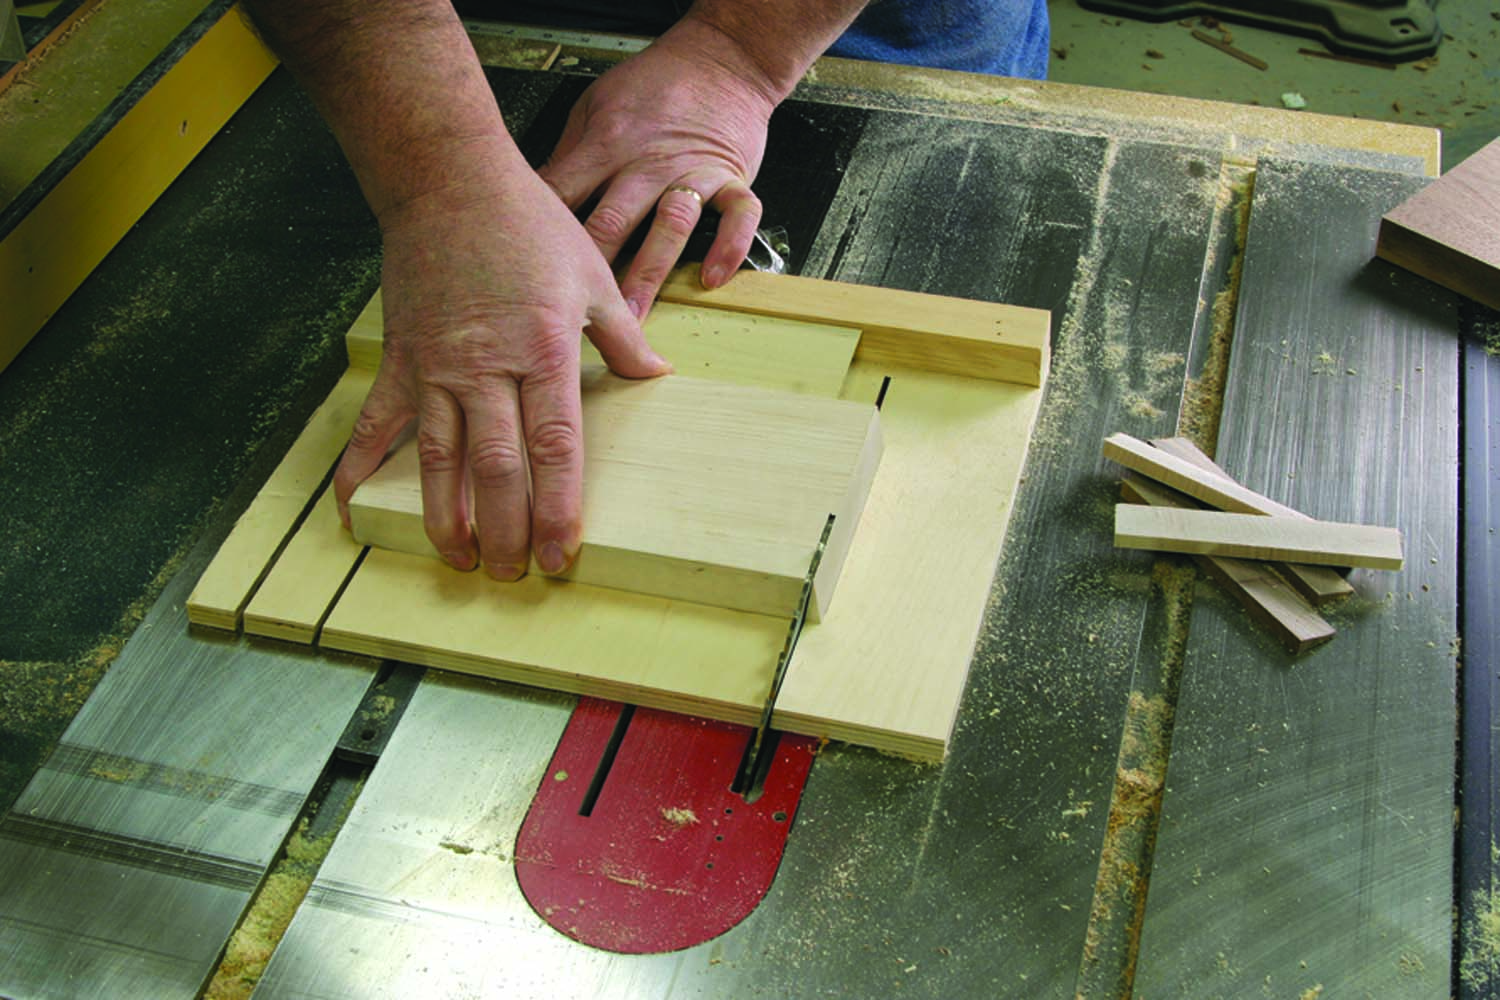
Begin with a simple table saw jig, as shown in the photo above. Tip the blade to 9º. With a couple 7⁄8“-thick pieces of four-squared scrap – use contrasting colors such as maple and walnut – cut one end square at the 9º setting. Flip the stock face down, then align the cut so the resulting offcut is a perfect, 7⁄8“-tall triangle. (A mark on the jig helps align each cut better than a stop-block – the block tends to hold your offcut at the blade.) Make enough pieces to create a couple fan sections.
Cut extra. Twenty fans are needed to complete the box, but as you’re sure to lose a few in the next steps, extras should be cut.
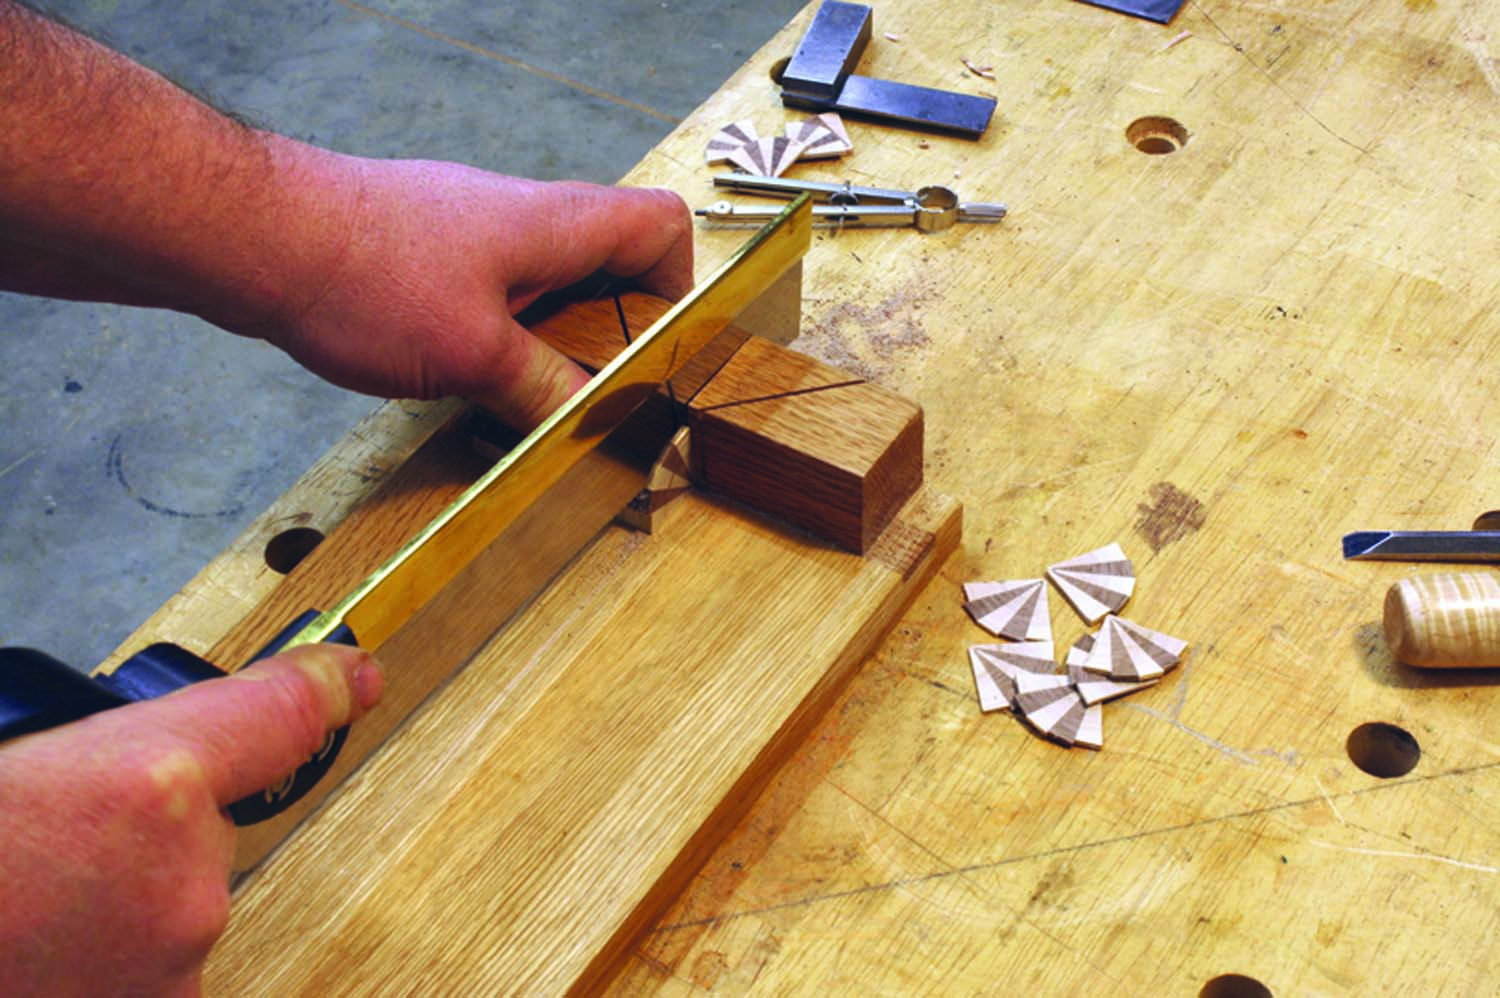
Arrange five pieces in an alternating pattern – I used maple for the two outermost wedges. You’re gluing end grain, so use plenty of glue as you assemble the fan inlay section. Arrange the wedges so the outer two pieces meet to form a tight point. Use rubber bands as clamps. Place bands at 1″ intervals or the point end of your section will open as the glue dries. A dried fan section is then sliced by hand to produce individual fan inlays – keep the fan thickness at 3⁄32“.
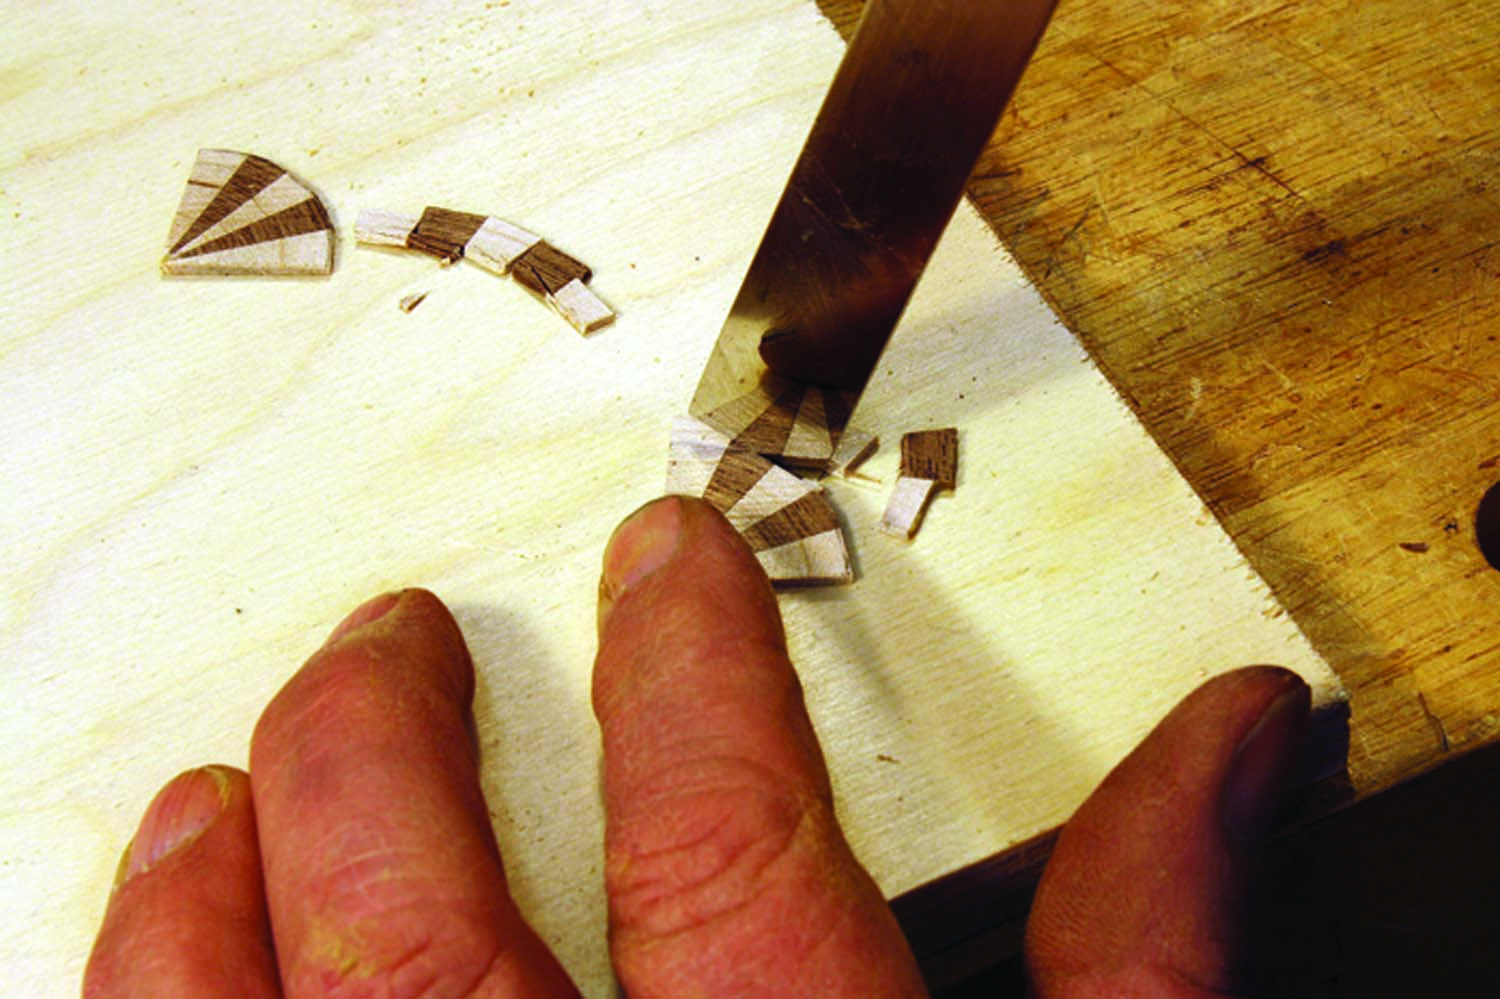
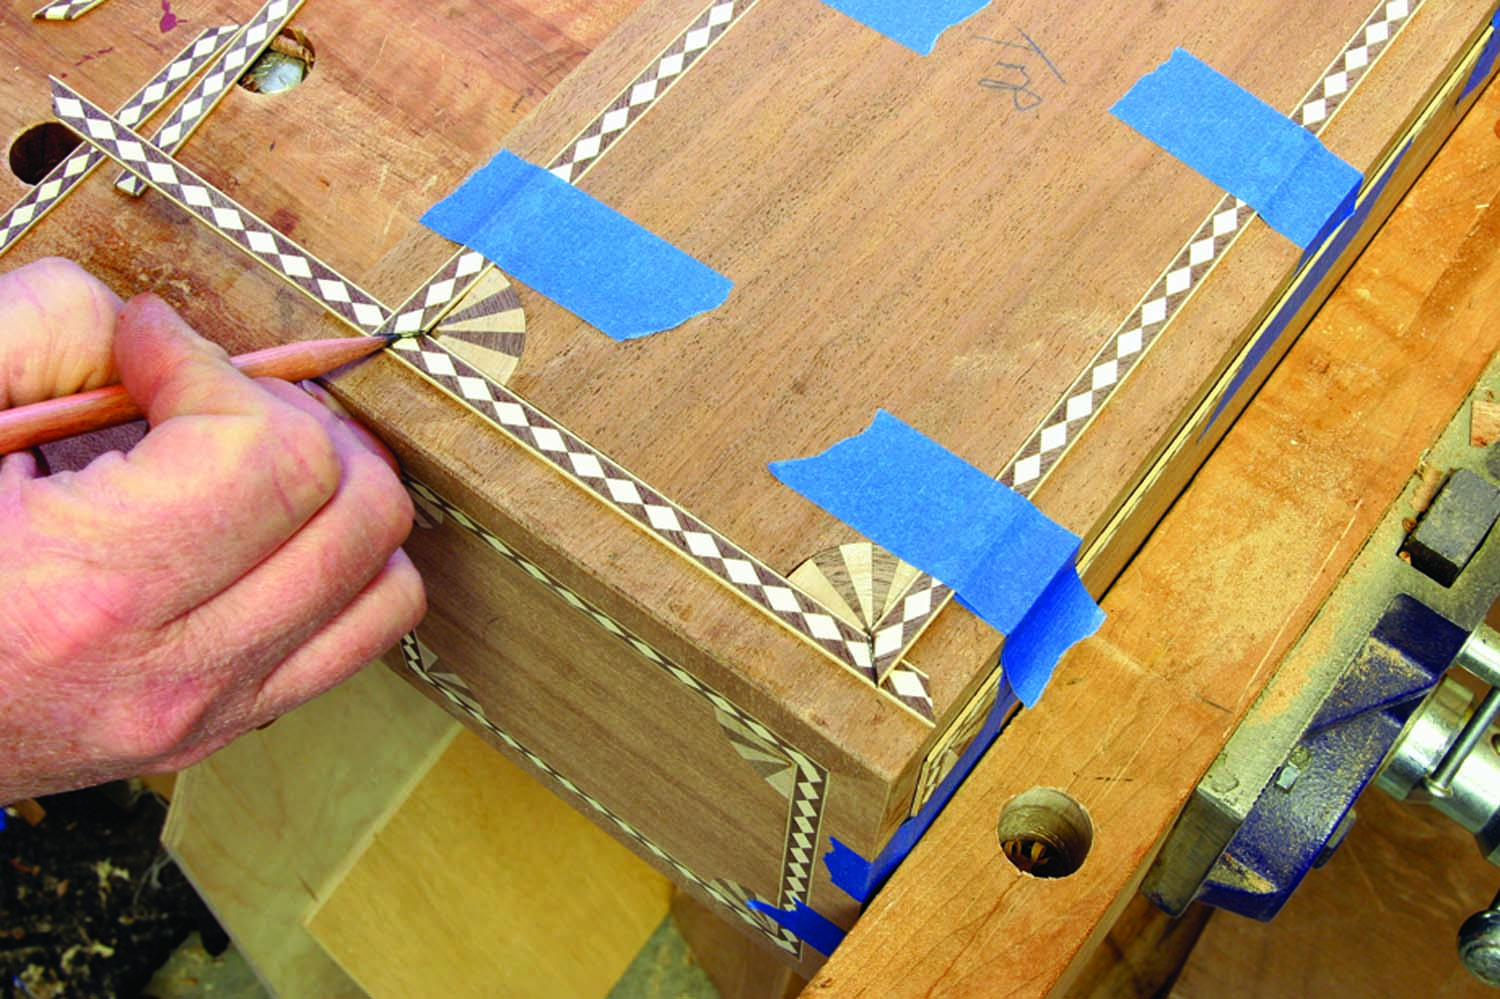
There is a trick. Trimming the fans to shape is easy work, but don’t cut directly at the line – sneak up on it.
Set a compass to 13⁄16“, place its pivot leg at the point of the fan then draw a quarter circle across the inlay. Next, trim the fans using a flat chisel in a rocking motion. Keep one corner of the chisel in contact with a sacrificial board as you work to the line. Final smoothing can be done with a file.
The trimmed fans fit perfectly into the recesses created by the drill bit. Apply glue to the fan then affix the fan in position with a rub joint – a piece of blue tape across the fans helps secure the edges to keep them from lifting as the glue sets. Once the glue dries, trim the edges of the fans (if necessary) to align with the straightedges of the box.
Remaining Inlay

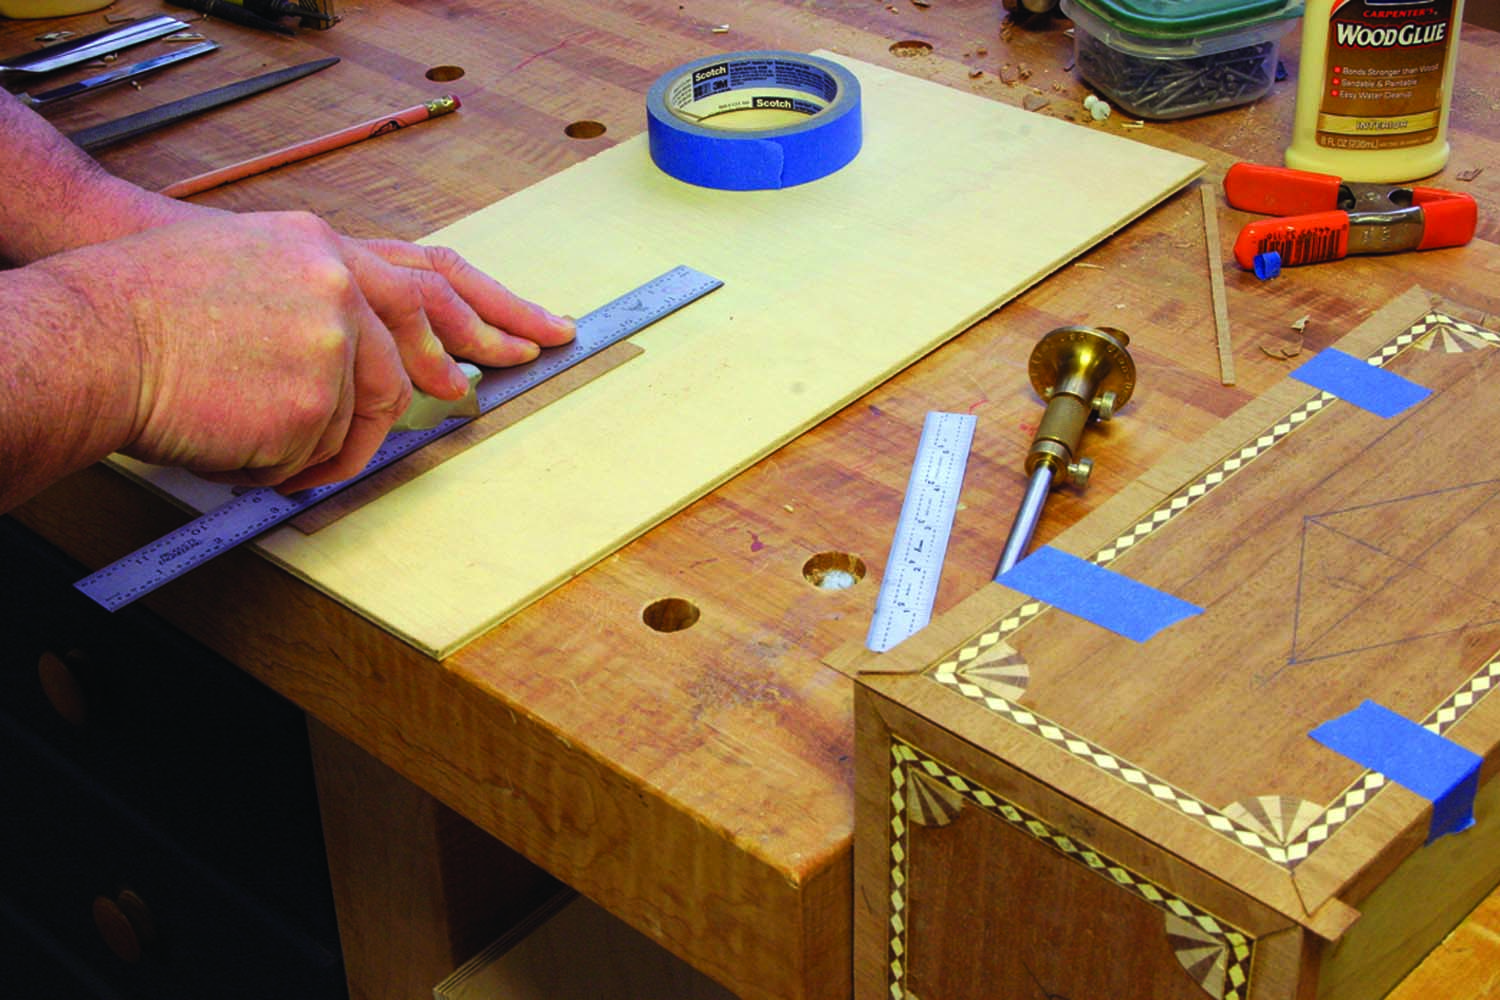
Position is pertinent. Any inlay pieces should be centered to achieve the best look. It’s not enough to simply run the inlay banding around the field.
Because the diamonds on this 1⁄4“-wide, store-bought banding are tight end-to-end, it’s more difficult to achieve a well-matched corner. Begin on the long sides of each panel. Center the inlay to the box and place a mark on the inside edge of the banding where it meets the edge of the panel. Looking at the reflection in the back of a shiny chisel allows you to make a near 45º cut without measuring each piece. Trim both ends then temporarily attach the banding with blue tape.
Easily aligned. Fine-tuning the position of the end inlay banding is simple when positioned under the mating pieces. Slide the piece until the best look is attained.
With the two long pieces set in position, slide a short section of the banding under the two trimmed ends and transfer the exact cut location with a pencil or marking knife. Match the designs for the best look.
Take two. The cross banding fits to the caddy just as the inlay banding did: work the two longer sides, miter the ends, then mark the remaining pieces off of those.
As you finish fitting the banding to a panel, glue the pieces to the box. Apply glue to the banding pieces then use a rub joint to secure the fit. Add pieces of tape to secure the bandings in position until the glue dries.
The cross banding that wraps the field just outside the inlay banding is cut from 2″-long pieces. Slice those pieces into 3⁄32“-thick veneer using your band saw then use a spindle sander to dial-in the thickness to 1⁄16“. The number of pieces you need depends on the width of your stock at the start. There’s no big expense here, so make sure you prepare enough material.
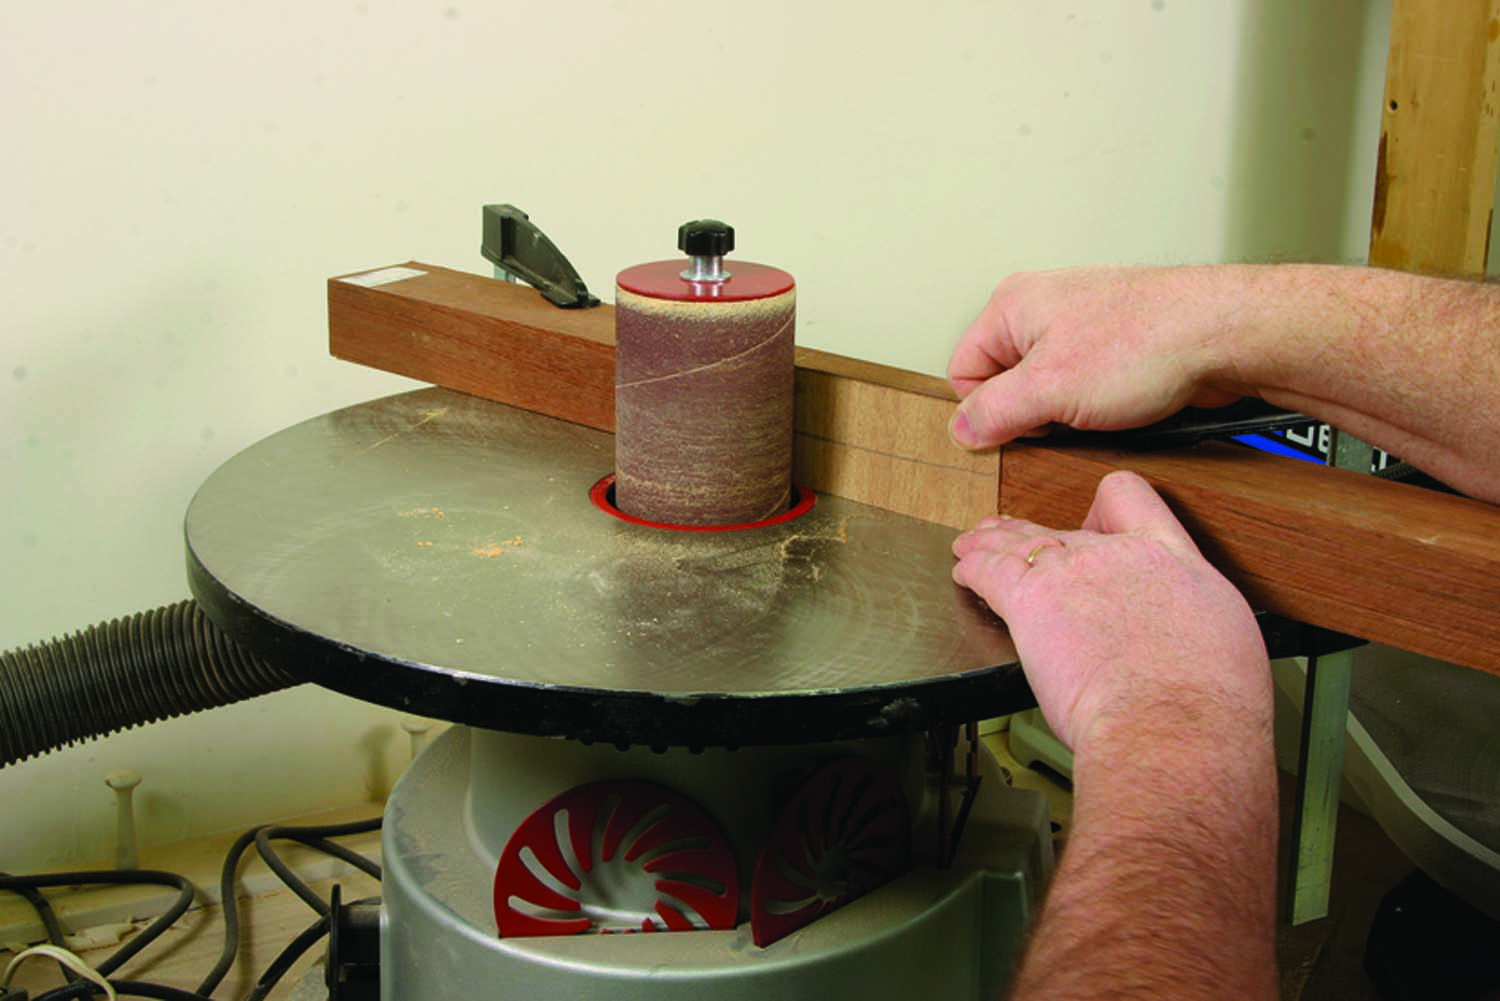
Modified thickness sander. To flatten and thickness the cross banding, squeeze the band-sawn pieces between a fence and the sanding drum of a spindle sander.
Score a cut line with your cutting gauge to establish the width of the cross banding, then make the cuts using a utility knife and straightedge. Fit and install the cross banding just as you did the inlay banding. Of course, the longer runs may be two or more butted pieces.

Rabbet. Miter. Glue. Climb-cut the 1⁄8″-deep by 1⁄8″-wide rabbet to help alleviate any tear-out, then fit the maple corners to the box. Quality craftsmanship dictates mitered corners.
With the cross banding installed and the glue dry, bring all surfaces flush with a card scraper or by sanding. Next, install the last bit of decoration for the box, the tiger maple 1⁄8“-square pieces. These protect and hide the cross banding edges.
Use a router and rabbeting bit to cut the edges of the box. Rout and install the vertical corners of the box first, then move on to the horizontal corners. As you rout the horizontal corners, you cleanly trim the previously installed maple inlay. Miter the corners of the 1⁄8“-square stock and use tape to hold the inlay secure as the glue dries.
 Hardware & Finish
Separate the lid from the box at the table saw. The cut line is positioned 1⁄4” below the uppermost fan inlays. Use a thin-kerf 71⁄4” saw blade to save as much of the box as possible. Adjust the fence so the box bottom rides along the fence allowing the top to be the offcut. Raise the blade to 9⁄16” and cut the two long sides of the box.
Next, cut and install a snugly fit filler into the kerf. Attach a clamp to the center of each of the long sides of the box then cut the two ends. As you make the cuts, the lid stays put. It’s easy.
Install the 1⁄8“-square maple inlay along the cut lid and box edges. Miter the corners. Also, make and fit the interior partitions. The partitions are two long pieces that are cut to just fit inside the box and have centered dados to catch the middle divider. These pieces are slip-fit in the caddy.
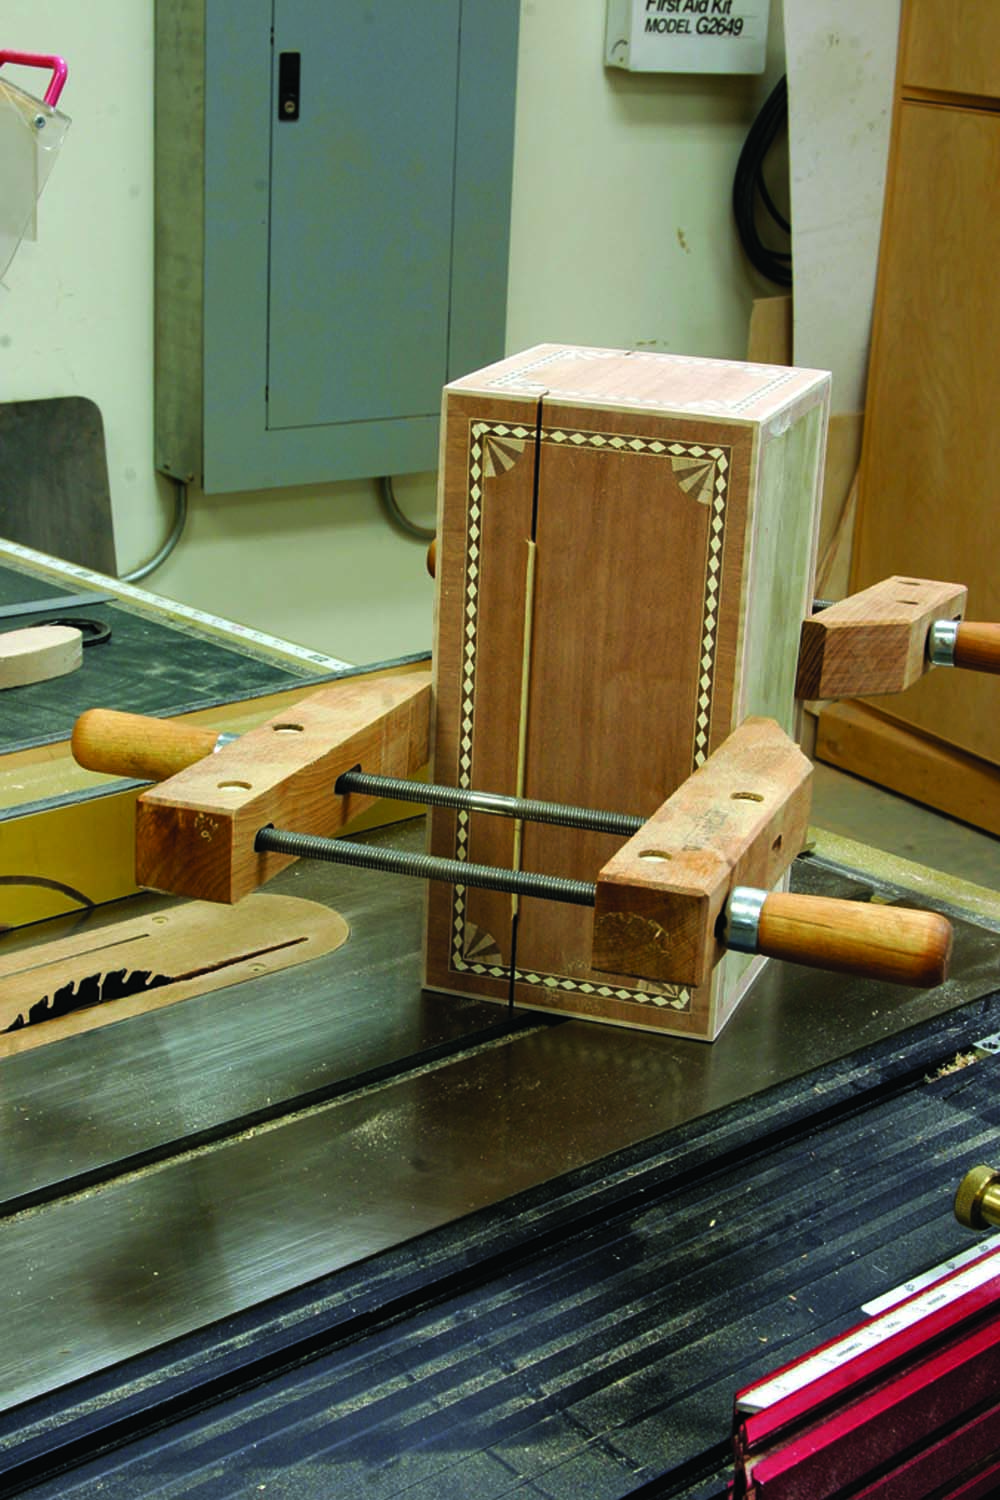
Fill the slot. To keep the caddy lid from springing free as it’s separated from the box, fill in the thin kerf with spacers. Add a couple clamps to hold everything secure.
Mill the material for the compartment lids, cut the 5⁄8” recess for the bandings then add the inlay banding and cross banding just as you did on the box. The lids are rabbeted so that the 1⁄4“-lips rest on the partition.
Sand the project to #180 grit after you fit the hinges and lock to the caddy. Your finish could be as simple as a few coats of an oil/varnish mixture, however, due to time constraints, I added a coat of oil to highlight the wood grain, followed by a couple coats of shellac and a layer of dull-rubbed effect lacquer.
The handle makes for easy transport and a velvet-wrapped plywood panel squeezed into the lid dresses up the interior.
This box is a perfect example of how non-traditional techniques can lead to traditional-looking results. You don’t need a veneer press. While I doubt this box will caddy any tea, I’m sure you’ll find a taker when it’s complete – if you wish to part with it, that is.
Video: Watch as a fan is sliced, marked and trimmed for the tea caddy.
Video: Watch Rob Millard create a traditional fan inlay using veneer.
Web site: Get more information on inlay bandings, including shop-made designs.
Free SketchUp Model: Click here for the free SketchUp model of this project

Here are some supplies and tools we find essential in our everyday work around the shop. We may receive a commission from sales referred by our links; however, we have carefully selected these products for their usefulness and quality.