We may receive a commission when you use our affiliate links. However, this does not impact our recommendations.
 Turn a contractor’s tool into a precision woodworking machine.
 Turn a contractor’s tool into a precision woodworking machine.
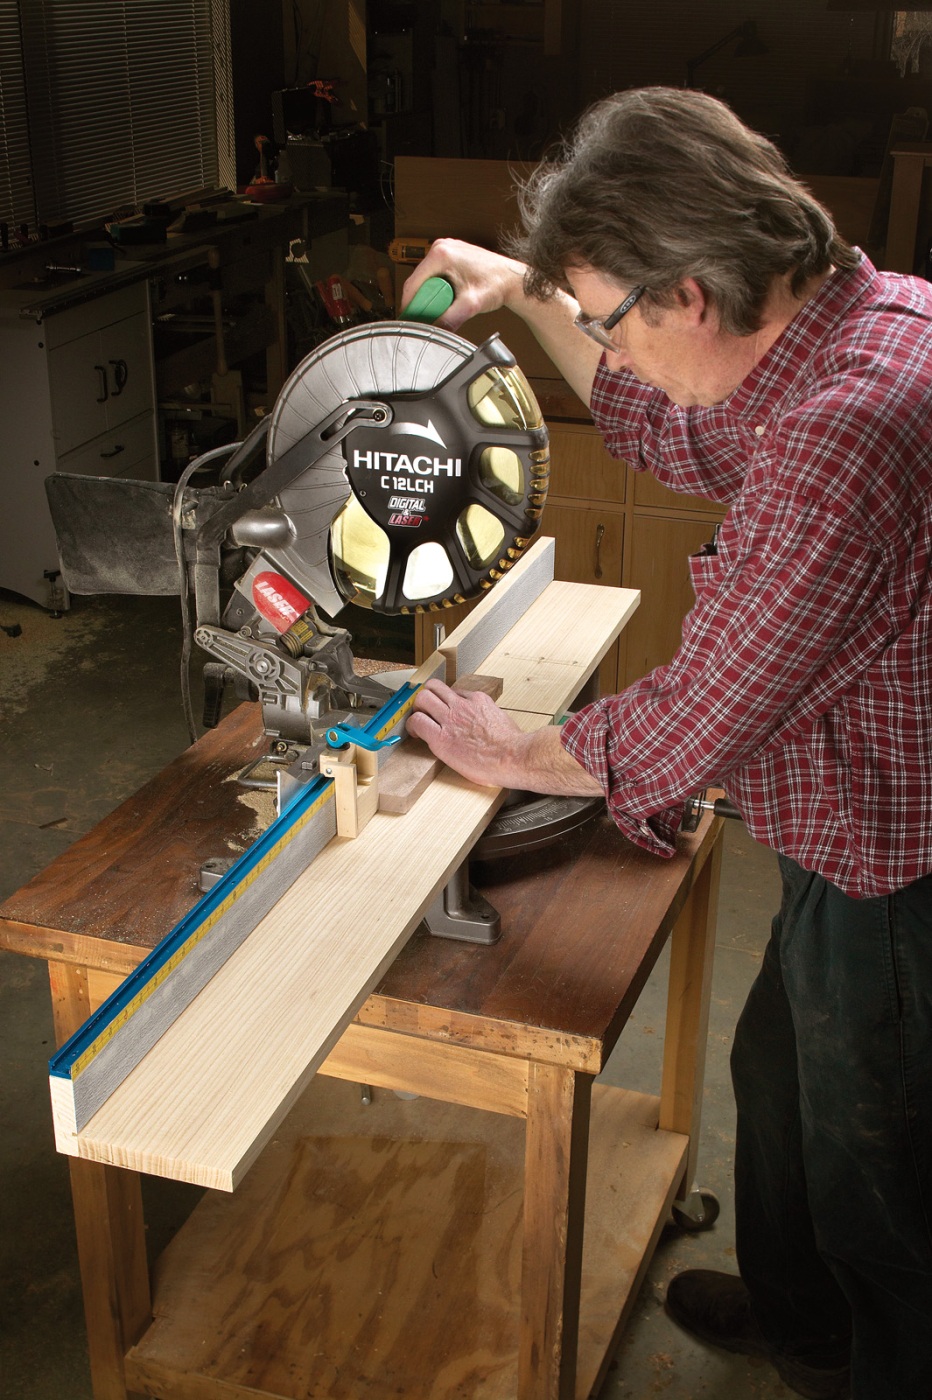
I don’t know of too many woodworking shops, whether home or professional, that don’t have a miter saw as part of their equipment. A miter saw is a fine alternative to a radial-arm saw or circular saw for rough-cutting lumber. It’s also an accurate alternative to the table saw for crosscutting and squaring solid lumber.
My problem with a miter saw is that it’s a job-site tool that’s been put to work in woodworking shops. Because of that, it has some – let’s not call them deficiencies – eccentricities that aren’t the best for woodworking.
Miter Saw Eccentricities
Because the miter saw was designed for portability, its table isn’t very large and so it lacks adequate support for many woodworking activities. The fence and table capacity is actually too short to conveniently trim a table leg to length, let alone support a standard-length piece of rough lumber.
The fence on a miter saw is designed for carpentry work and is usually undersized, a challenge to align and allows considerable tear-out at the back of a cut. While some saws have tables that address the tear-out problem below the board with zero-clearance throat plates, that doesn’t address the fence that allows for tear-out.
Then there’s the question of stops. Often the work on a miter saw requires cutting a number of pieces the same length. Some manufacturers have made a nodding acknowledgement of this need and added a fairly basic stop. But again, it falls short of the precision we’d prefer for woodworking.
There are dozens of plans for building carts and support stands for miter saws that address these issues. We’ve designed and built some ourselves. But the problem with these accessories is that they can cost as much, if not more, than the saw itself.
So we’ve come up with an add-on for your saw that will easily and affordably take your job-site saw into the workshop with capacity and precision.
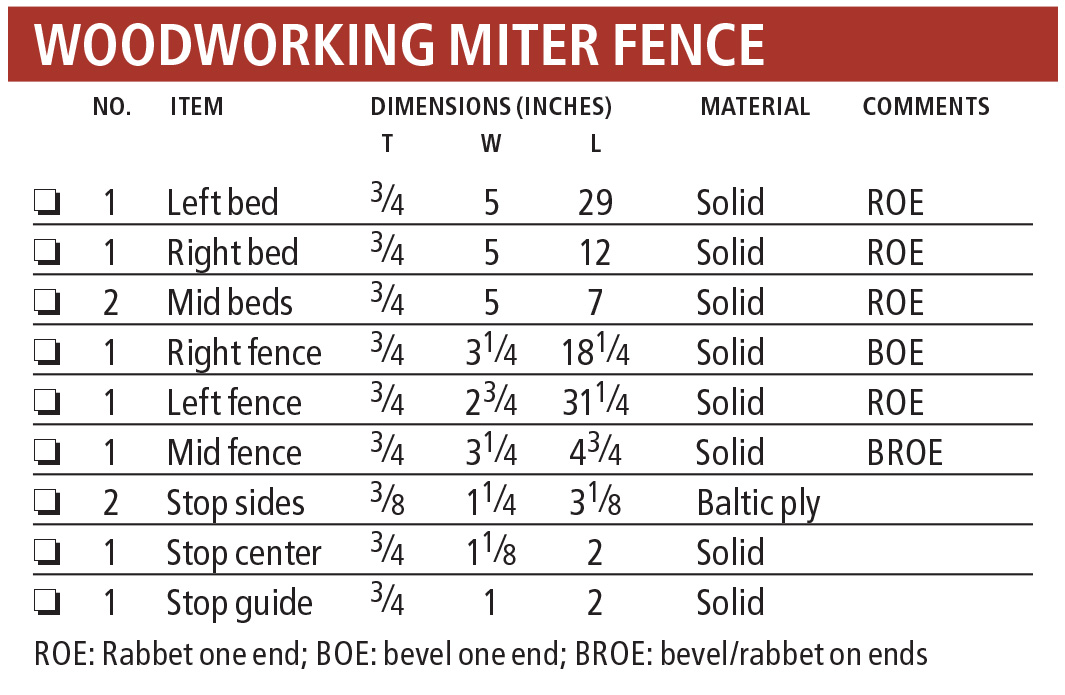
Woodworking Miter Fence Cutlist
 The Right Saw
Before we dive into the upgrade, let’s take a moment to consider the saw itself.
Woodworkers are tool addicts. If one cordless drill is good, three must be better. So when it comes to miter saws, what we all really want is a sliding compound miter saw. Is that tool’s 12″ crosscut capacity worth the extra expense? Not all that often. But in the interest of satisfying the more-is-better desire in all of us, we suggest a 12″ compound miter saw (around $400), rather than a 10″ (usually less than $250). You can usually gain an extra inch in crosscut capacity with a 12″, but it’s up to you to decide if the expense is warranted.
Another feature to consider is the type of fence on the miter saw. In our opinion the easiest fence to adjust is a split-fence design, meaning the two fences can be independently adjusted. Many miter saws have a single casting incorporating both fences. If the casting is out of parallel you pretty much need to bend the casting (which isn’t all that easy) to align the fences to 90° to the blade.
If you already have a saw with a single fence casting, by adding our complete fence and bed system to your saw you’ll be able to shim to align everything perfectly.
Why Our System is Better
The woodworkers on our staff gathered together in the shop to stare at our miter saw and decide what we’d change. We came up with these upgrades:
• An auxiliary table that would support at least a 30″-long piece of wood and provide a zero-clearance cut at the blade to reduce tear-out at both exit points.
• A fence that would provide adequate height and a zero-clearance cut at the blade.
• Both the fence and table need to be able to be “renewed” after cutting at a miter or bevel to maintain the zero-clearance capability.
• A stop system that could quickly move out of the way and that would function along the length of that 30″ table.
• The system had to be inexpensive, leave the saw portable and be able to adapt to any miter saw.
We managed to come up with a system that meets all our expectations: The hardware comes in at less than $40 and lumber should run another $30 (or less if you use shop scraps); by screwing half-lapped replaceable sections to the fence and bed, zero clearance can be maintained indefinitely; by mounting the longer bed and fence (35″ capacity) to the left of the blade only (the side where most woodworkers cut from) the overall size and weight was held to a minimum. And the system screws to the existing fence of your saw so it’s virtually universal.
Mill Your Own Wood!
The bed pieces (left, right and mid inserts) are 5″-wide. You may be tempted to make them wider to support a wider board (as I was), but you’ll find that the bed will quickly obscure the miter scale mounted on the saw. Test the board width on your saw to see what width you can get away with. You may need a narrower bed, or you may be able to go wider.
The fence pieces (right and mid inserts) are 3-1⁄4” wide (high), with the left fence measuring 2-3⁄4” wide to allow space for the 1⁄2“-tall T-track. These dimensions also should be checked against your miter saw to make sure the blade guard will clear the fence height when beveled to a 45° cut.
To benefit from the replaceable mid-insert pieces it makes sense to run extra material for more than a couple of sets at the same time you’re running the main pieces. This way the material thickness and the half-lap joints will be easily interchangeable.
I suggest using a stable, tight-grained wood for your upgrade system. Maple or ash (my selection here) works well.

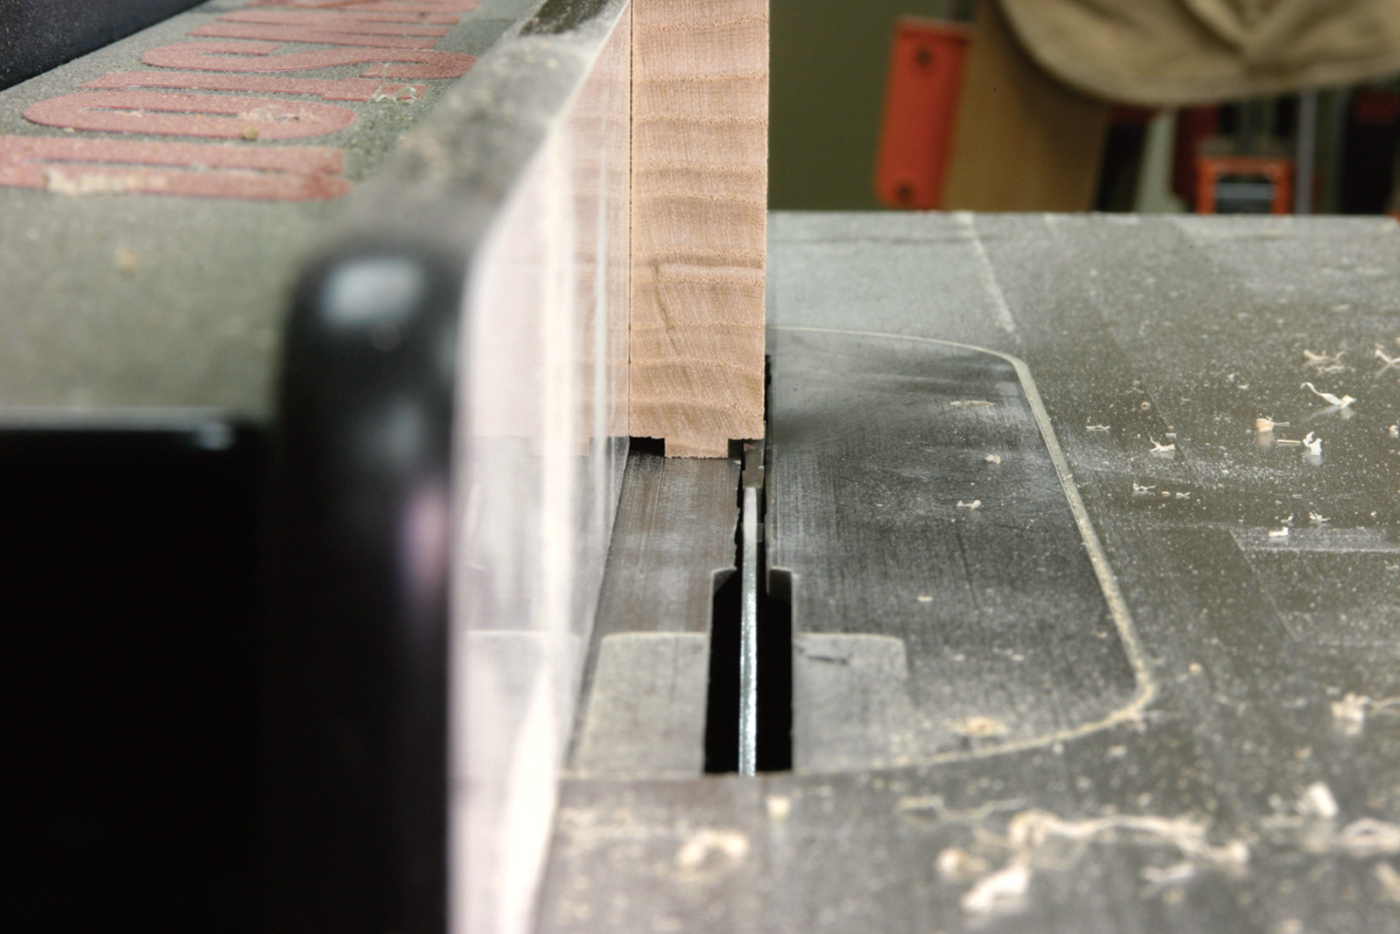
A simple 3⁄4″-wide rabbet is the secret to the mating half-lap joints. After determining the exact center of the board thickness, a 1⁄2″ straight bit is set to cut to that height. The fence is set for the final width of the rabbet, but the first pass is made at the edge of the board.
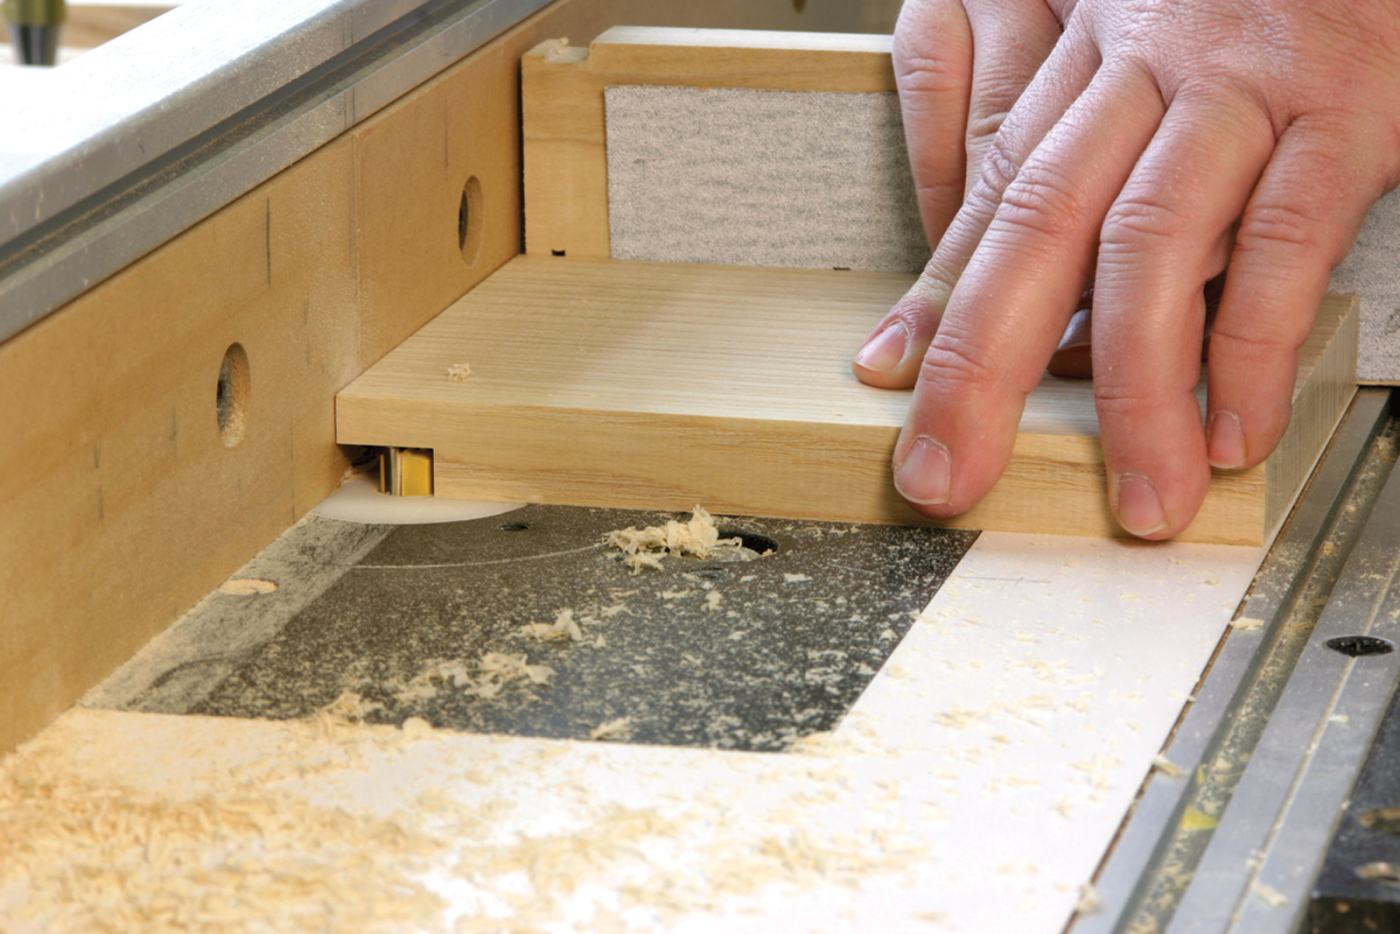
The second and final pass is made to complete the rabbet. Repeat both steps on each mating piece. Note the sandpaper on the miter gauge fence to keep the piece from moving during the cuts.
After milling the pieces, head to the router table and insert a 1⁄2“-diameter straight bit. You need to cut rabbets to form the half-lap joints on the left, right and mid-bed pieces, as well as the left and mid-fence pieces.
Dust Removal
I would like to tell you we also came up with a great way to make your miter saw dust free, but we didn’t get that lucky. But we did come up with a way to keep dust from building up and making your cuts inaccurate.
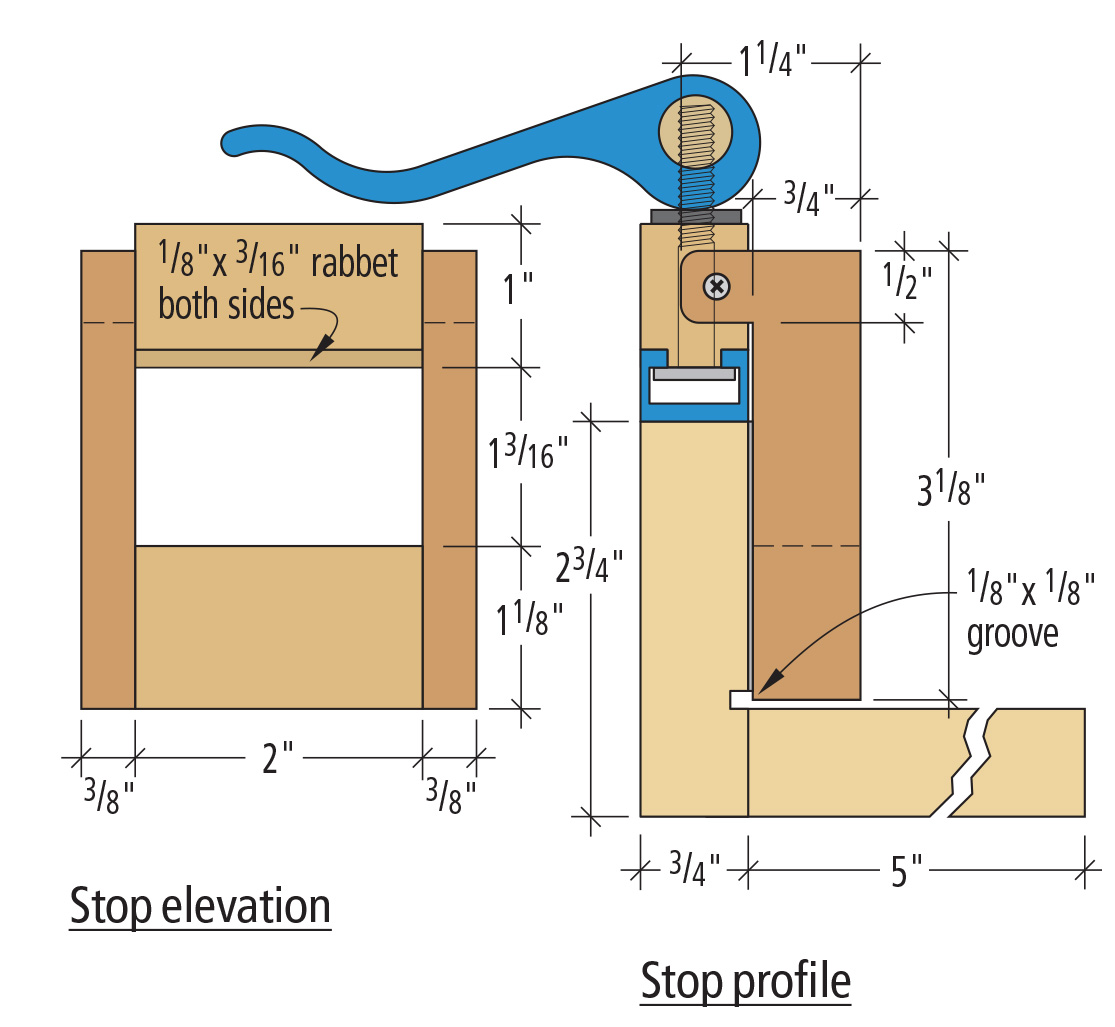
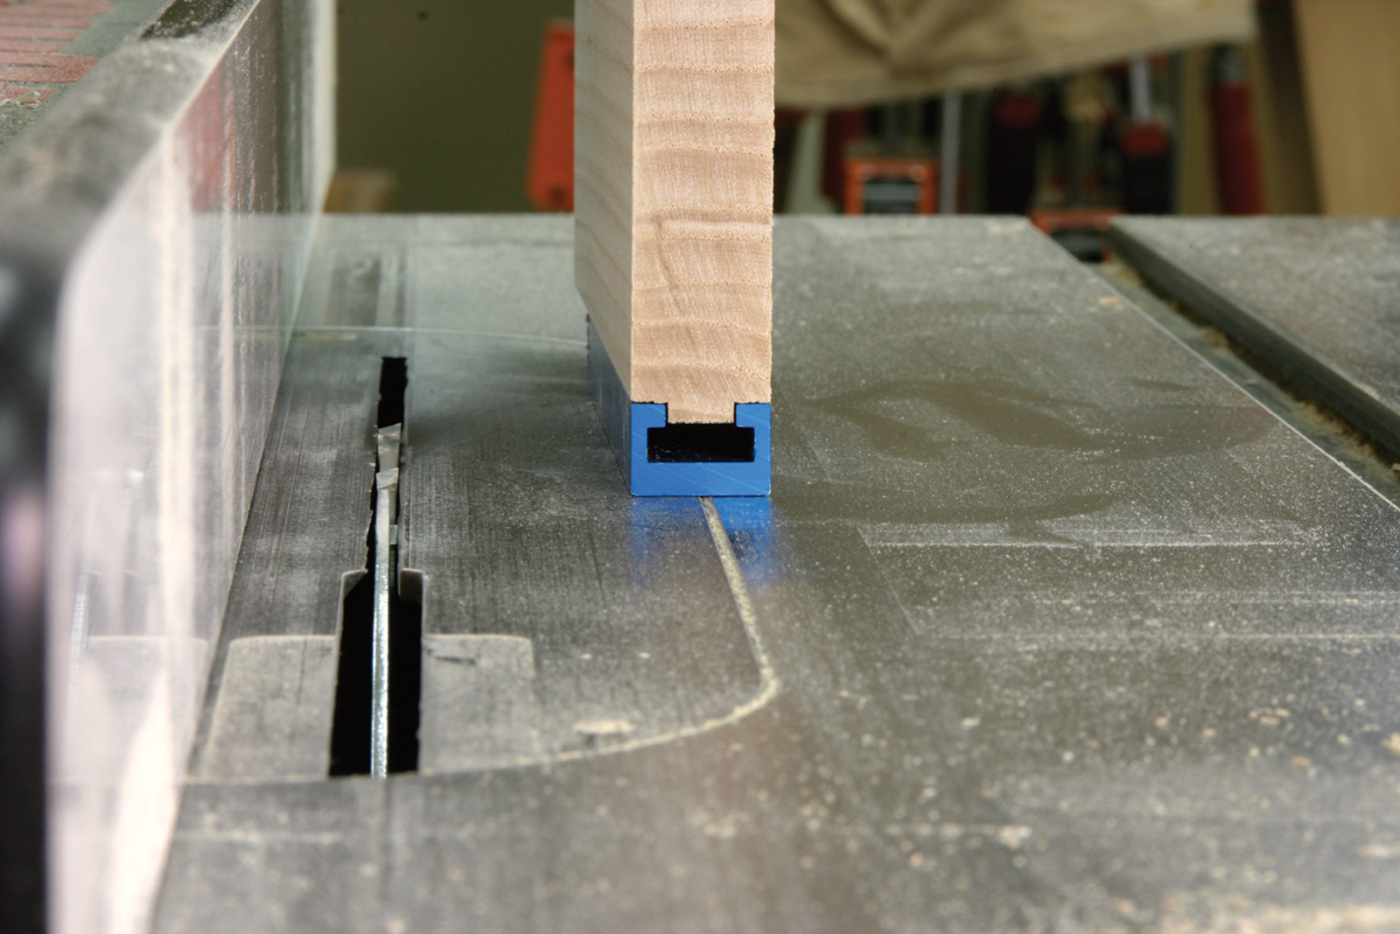
By adding an 1⁄8” x 1⁄8” groove to the fence faces just above the bed height, we created a channel that doesn’t allow dust to build up in the corner formed by the bed and fence. Sure, you’ll still have to blow the dust away every now and again, but this groove will help. Make these grooving cuts on the table saw with a standard ripping blade.
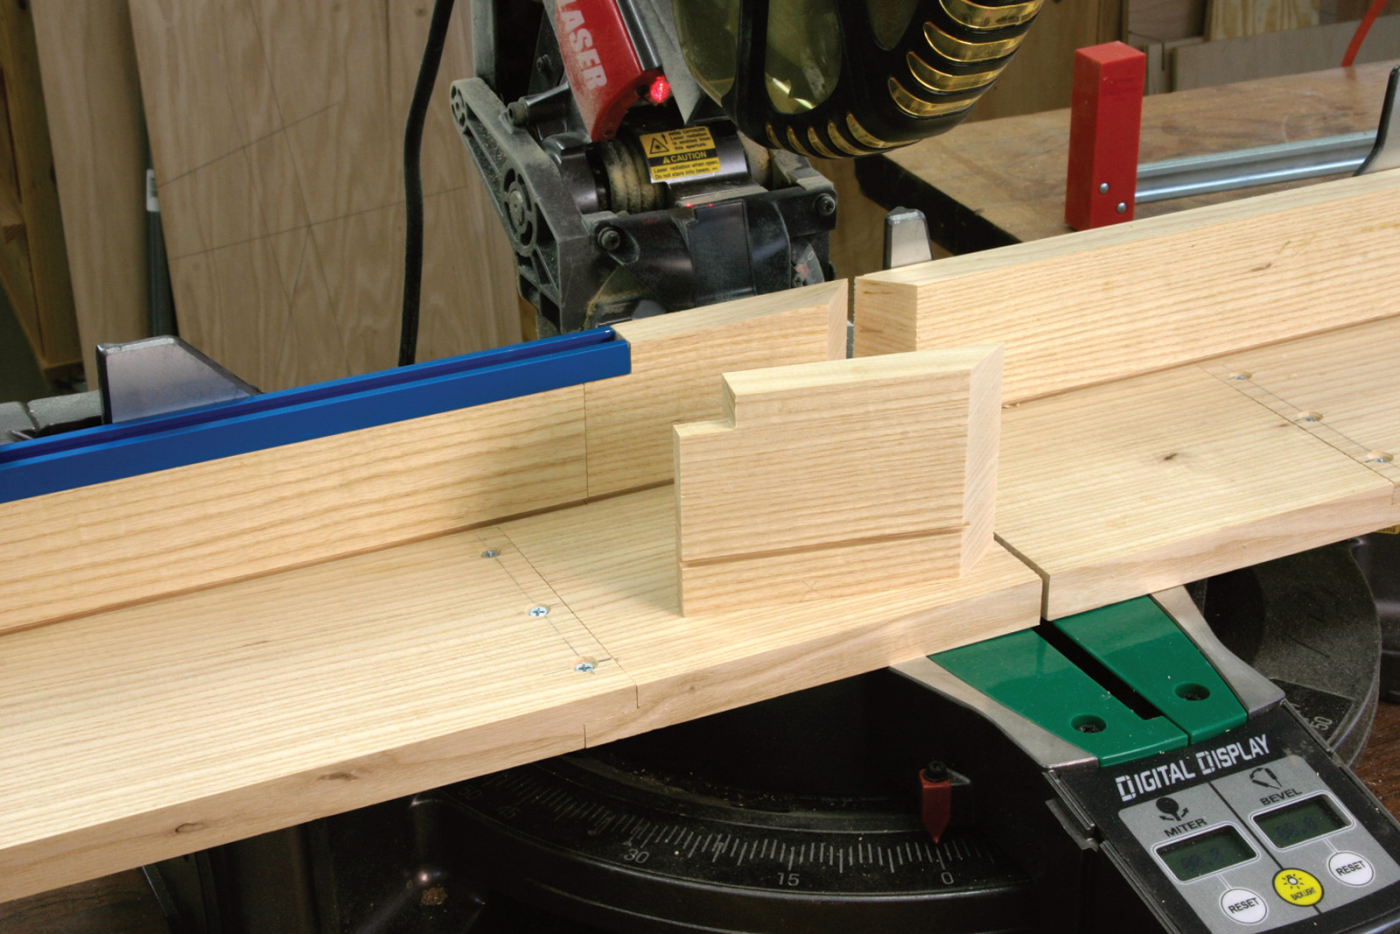
A replaceable mid fence is shown notched, grooved and mitered in front of the already attached mid fence. Making multiple copies when making the first will ensure you’ll always have a miter saw ready to run.
To create the zero-clearance fence opening, you may choose to miter the inside corners of your fence after the fences are attached. I chose to make those cuts prior to attaching. I still used my miter saw, but by cutting the miters first, I was able to locate the attachment point on the miter saw fence exactly, using the blade to orient the fences.
Lastly, I notched out the top edge of the mid fence 3⁄4” to allow the T-track to cross over the mid fence as shown on the previous page. This makes it possible to adjust the fence stop to within 3″ of the blade. Any closer than that and you’ll trim the T-track whenever you make a bevel cut.
Half-lap Assembly
It may seem simple enough to quickly screw the mid sections to the bed and fence pieces, but accuracy here will make replacement easier down the road.
Carefully mark the screw locations on both of the bed pieces and on the left fence. It’s important to catch the center of the rabbet width, so locate the screw holes 3⁄8” in from the half-lap tongue.
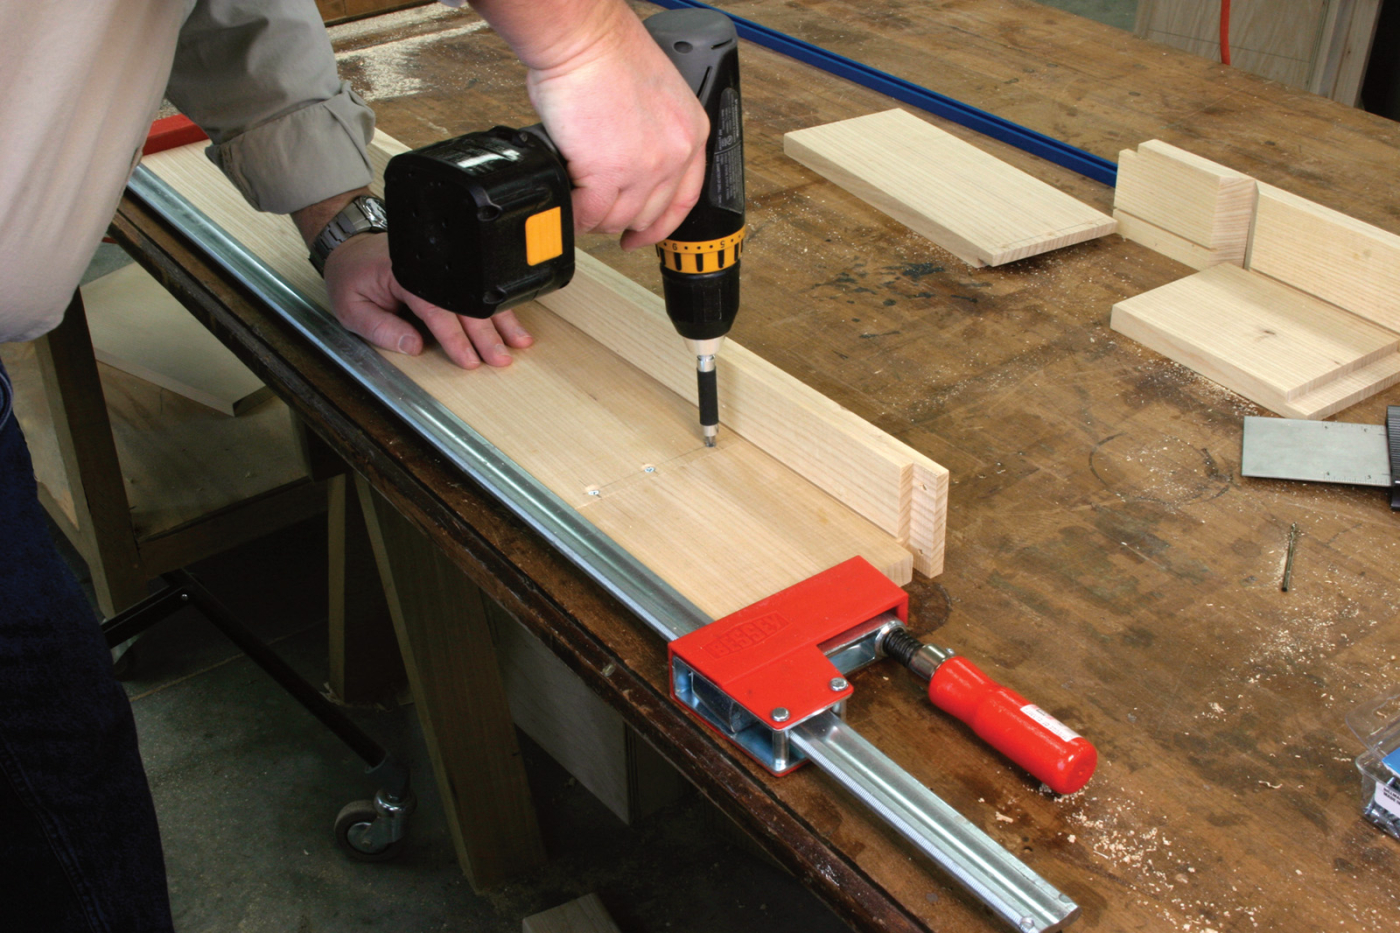
Accurately screwing the mating half-lap pieces together requires clamping the pieces together.
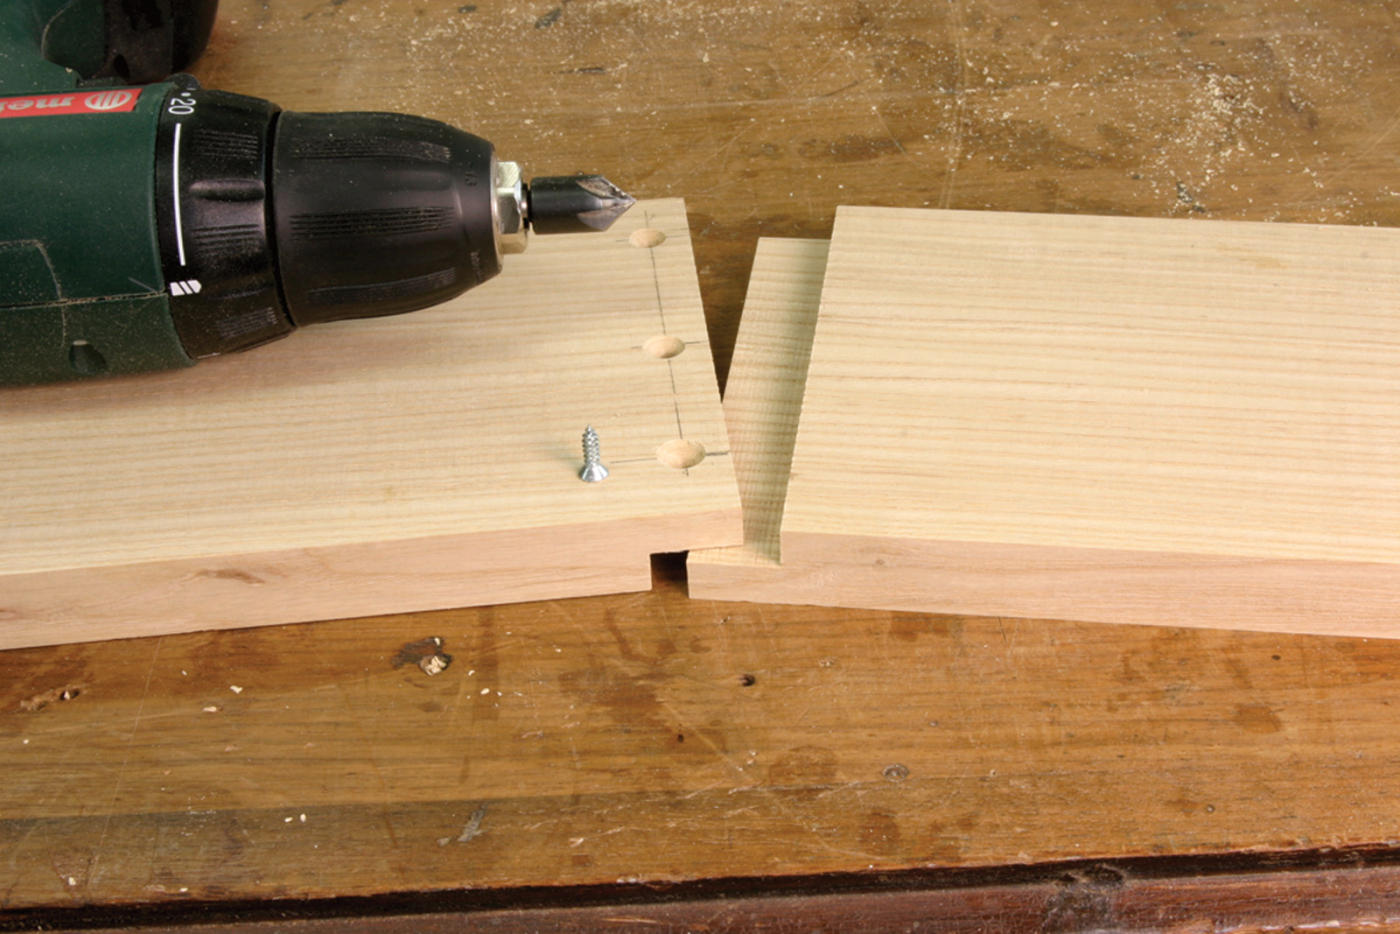
Countersunk pilot holes and flathead screws complete the assembly.
To assemble the pieces, I recommend using a clamp to draw the pieces together tightly during screwing. Pilot drill and countersink the holes for the #6 x 5⁄8” flathead screws.
Next, pilot drill and countersink the fence pieces to attach them to the assembled bed pieces through the back of the fences. Make sure at least one of the screws connects the mid-fence and mid-bed sections to keep these pieces stable.
Mounting to the Saw
With the bed and fence pieces screwed together, it’s time to mount the assemblies to your miter saw. Every miter saw will have different hole locations on the saw fence for attaching auxiliary fences. Some saws may have none at all. You’ll need to determine if you need to drill new (or maybe extra) holes in your existing fences to adequately attach the upgrade assembly.
With the fence/bed assemblies ready to attach to the saw, check to confirm that they will sit square when attached. Our right fence was out of square slightly and required shimming. We used strips of masking tape attached to the fence face to achieve a square fit.
You’ll also need to use a good square to check the angle of the fences on your saw, and make sure the beds and fences align evenly when attached to the saw.
One more step, then it’s time to move on to the stop. We could have added a hold-down to keep material tightly against the fence. Instead we opted for a more low-tech solution that still does a good job. We added a strip of self-adhesive sandpaper to the fence faces. You need to add it to the left, right and mid-fence to make sure the fences remain evenly aligned. A little trimming will be required, but a utility knife will make quick work of this step.
T-track and Stop
Your next step is mounting the T-track to the left fence. Cut the track to length using a hacksaw, then pre-drill and countersink the holes in the center of the track, paying attention to where on the fence the screws will attach. Take care to avoid the half-lap joint.
The stop itself is fairly simple, but you’ll need to do some fine-tuning as you assemble and attach the pieces. Start by cutting the two stop sides from 3⁄8“-thick Baltic birch plywood. Then notch the two sides at the same time (held together with double-sided tape) on the band saw to leave the mounting tongue.
To cut the rabbets for the stop guide, I used the table saw. Set the depth and fence location to allow the guide to run snugly in the T-track.
Next, find a piece of 3⁄4“-thick solid wood that’s about 2-1⁄2“-wide and about 10” long. Take your fall-off piece from your T-track and head to the table saw. By adjusting the fence location and blade height, cut two rabbets on the bottom of the piece to match the slot in the T-track.
The depth of the tongue shouldn’t be below the T-track lip, or the bolt won’t pull the guide tight.
Now crosscut a 2″ length from the piece and then head to the band saw to rip the block to the final 1″-wide stop guide and 2″-wide stop center. If you wish, make a second set of blocks for later use, while you’re at it.
Assembling the stop block is best handled on the fence itself. Before assembly, add an adhesive-backed tape measure (reading from right-to-left) to the front face of the T-track. You’ll need to trim about the first 4″ from the tape for it to align correctly with the saw blade.
Next, check the fit of your stop guide block, then drill a hole down through the center of the block for the bolt to attach to the cam clamp. Then mount the cam clamp and adjust the hold to snug the stop guide to the T-track.
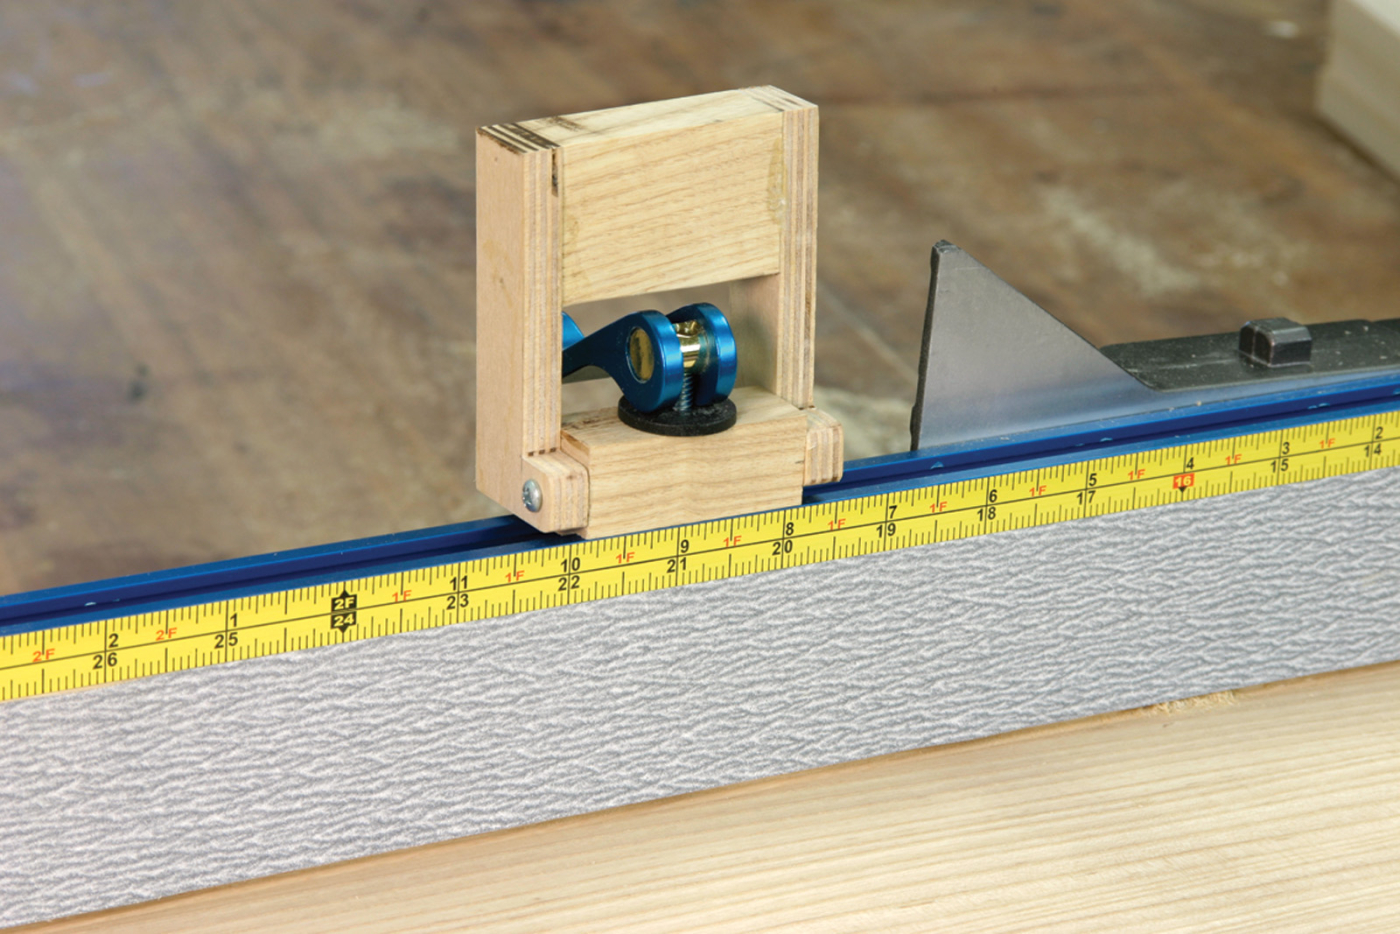
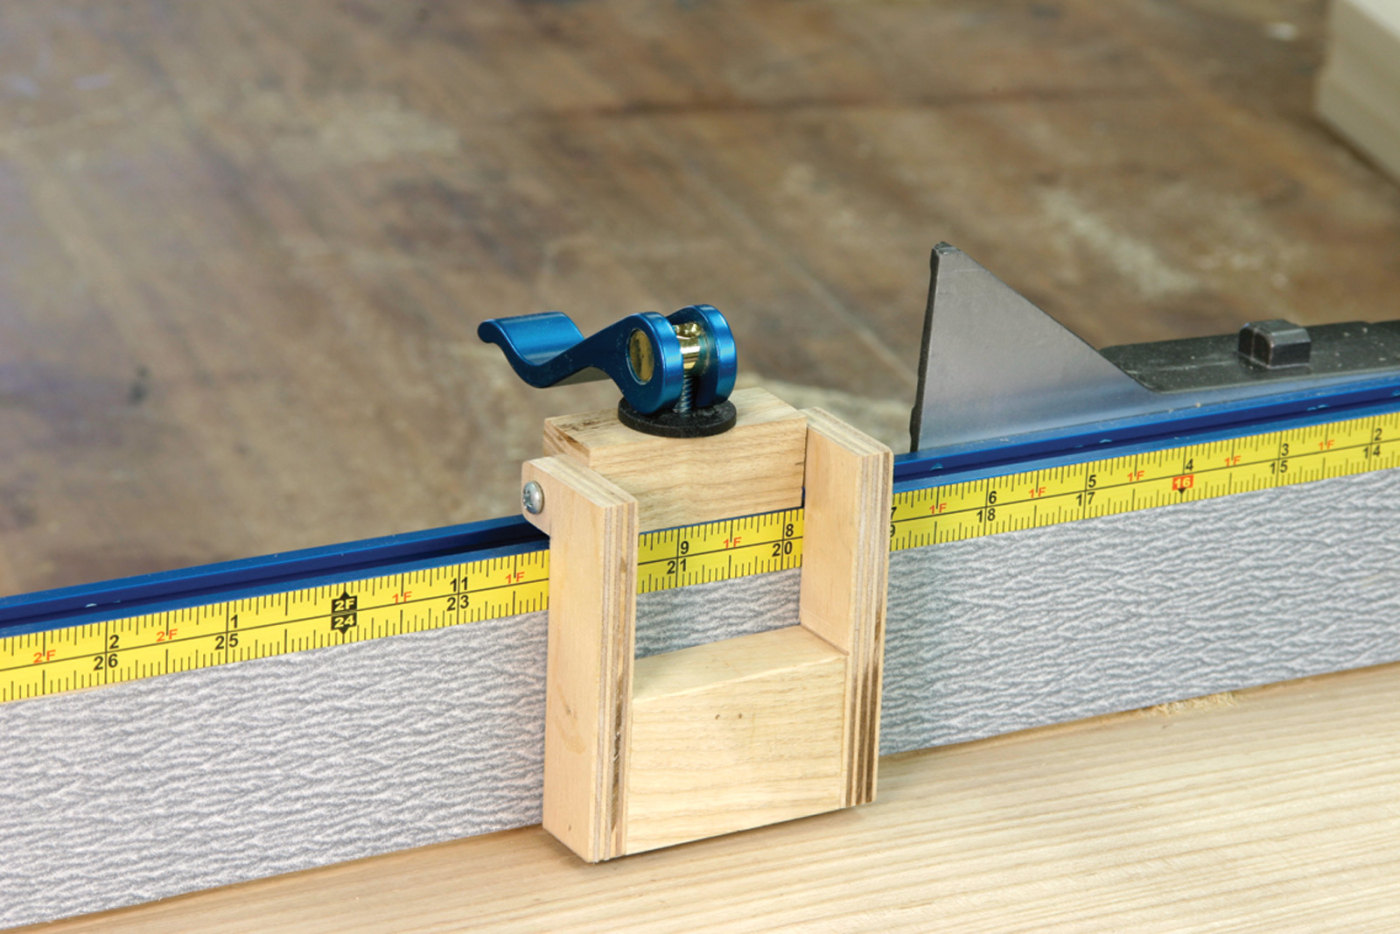
The flip stop is a simple design that allows the stop to clear the fence for rough cutting, then drop accurately into place for precise, repeat cuts.
The self-adhesive measuring tape added to the T-track ensures accuracy.
The next part is the fine-tuning area. The stop itself needs to be attached to the stop guide so that it will drop flat against the fence face. Drill the screw clearance holes in the stop sides, centering the hole in each tab. As you drill the hole, put a block of wood behind the tab to avoid tear-out as the bit comes through.
Place the stop in position against the guide and check the fit against the fence face. Then carefully mark and drill pilot holes in the guide block and attach the stop to the guide with two roundhead screws.
The stop should now easily swing up and out of the way of the fence face, or fit flat against the fence for repeat cuts.
You’re now ready to do precise woodworking on a miter saw. Store your extra mid-insert pieces somewhere safe and don’t hesitate to change them out to maintain that perfect zero-clearance cut – something your out-of-the-box saw couldn’t achieve.
Here are some supplies and tools we find essential in our everyday work around the shop. We may receive a commission from sales referred by our links; however, we have carefully selected these products for their usefulness and quality.