We may receive a commission when you use our affiliate links. However, this does not impact our recommendations.
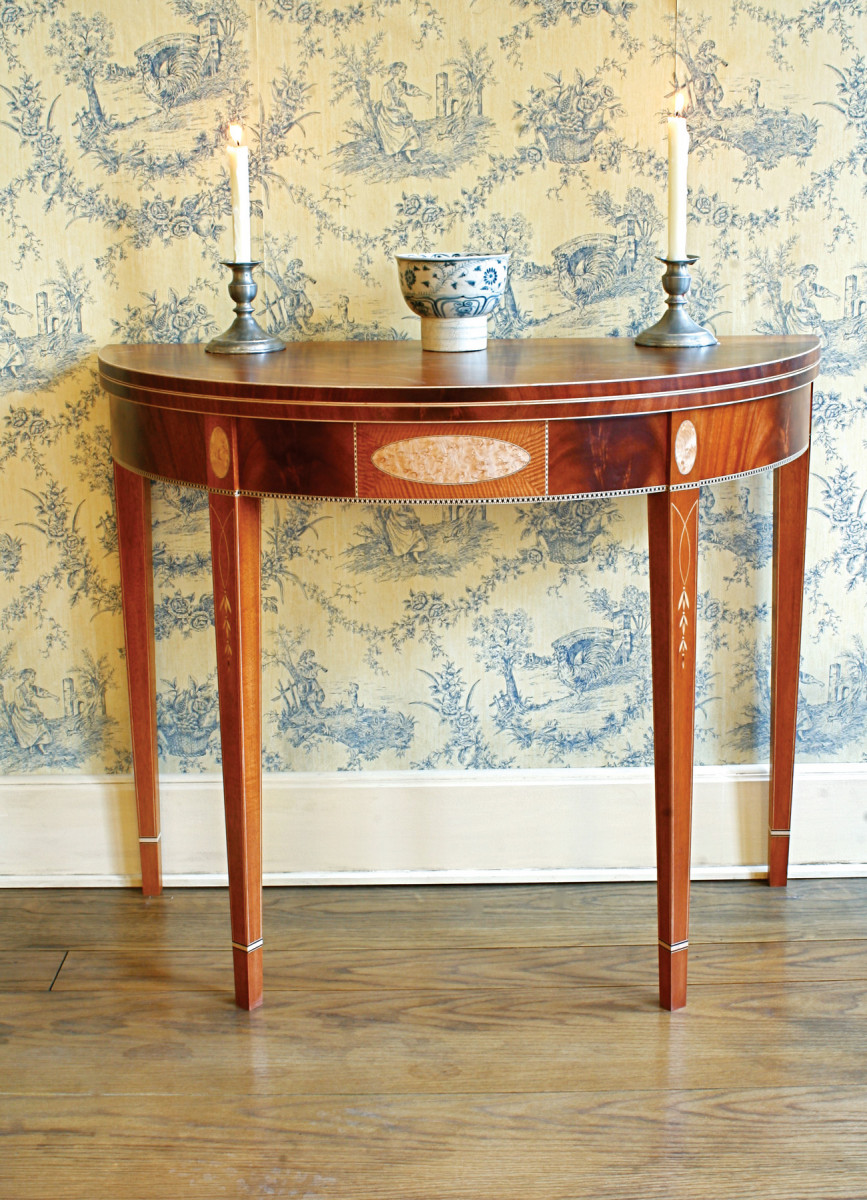
Restrained elegance in an American classic.
Someday in your woodworking career, you’ll want to reach for the sky. Maybe you’ll have an urge to make an ambitious piece of your own design, or perhaps you’ll prefer to walk in the shoes of cabinetmakers who have gone before and build an American classic. If you love period furniture, this table is for you.
Our table dates back to the early days of the American republic, when card-playing parties were often hosted in fashionable homes. During the day, the table was placed against a wall, with the top folded over. On the night of a party, the table was brought out to the middle of the room. The backs legs were swung out and the top opened up into a full circle.
In the decorative arts, the era of 1790 to 1830 is known as the Federal period. The demilune (“half-moon”) card table became an icon of Federal design, with cabinetmakers in each part of the country interpreting it in their own way. I’ve studied many Federal card tables and have come to prefer those made in Portsmouth, New Hampshire, for their restrained elegance.
This particular table is not a reproduction—it’s my own design, based on those Portsmouth pieces. Its method of construction and joinery are similar to the tables built in Federal-era shops. While you’ll most likely use power tools to mill all of the wood and to cut some of the joints, building this table still requires skilled work with hand tools. Once you’re done, I’m sure you’ll say with genuine pride, “I made that!”
Portsmouth Card Table Cut List
Overall Dimensions: 29-1/2″ H x 35-1/2″ W x 17-3/4″ D
|
Part |
Name |
Qty. |
Material |
Th x W x L |
|
A |
Apron brick |
50 |
Yellow poplar |
7/8″ x 1-1/2″ x 5-15/32″ (a) |
|
B |
Rear fixed rail |
1 |
Yellow poplar |
7/8″ x 3-1/2″ x 33-5/16″ (b) |
|
C |
Leg |
4 |
Mahogany |
1-5/8″ x 1-5/8″ x 28″ |
|
D |
Front veneer |
1 |
3/32″ x 3-1/2″ x 19″ (c) |
|
|
E |
Side veneer |
2 |
3/32″ x 3-1/2″ x 14-1/2″ (c) |
|
|
F |
Swinging rail, center |
1 |
Oak |
7/8″ x 3-1/2″ x 8″ |
|
G |
Swinging rail, end |
2 |
Oak |
7/8″ x 3-1/2″ x 13-13/16″ (d) |
|
H |
Top |
2 |
Mahogany |
3/4″ x 17-3/4″ x 35-1/2″ |
Notes:
a) Quantity includes about 6 extra. Miter both ends at 9°.
The apron is four layers high, for a total width of 3-1/2″
b) Includes two sets of dovetails, each 9/16″ long.
c) Length is approximate.
d) Includes 1″ tenon.
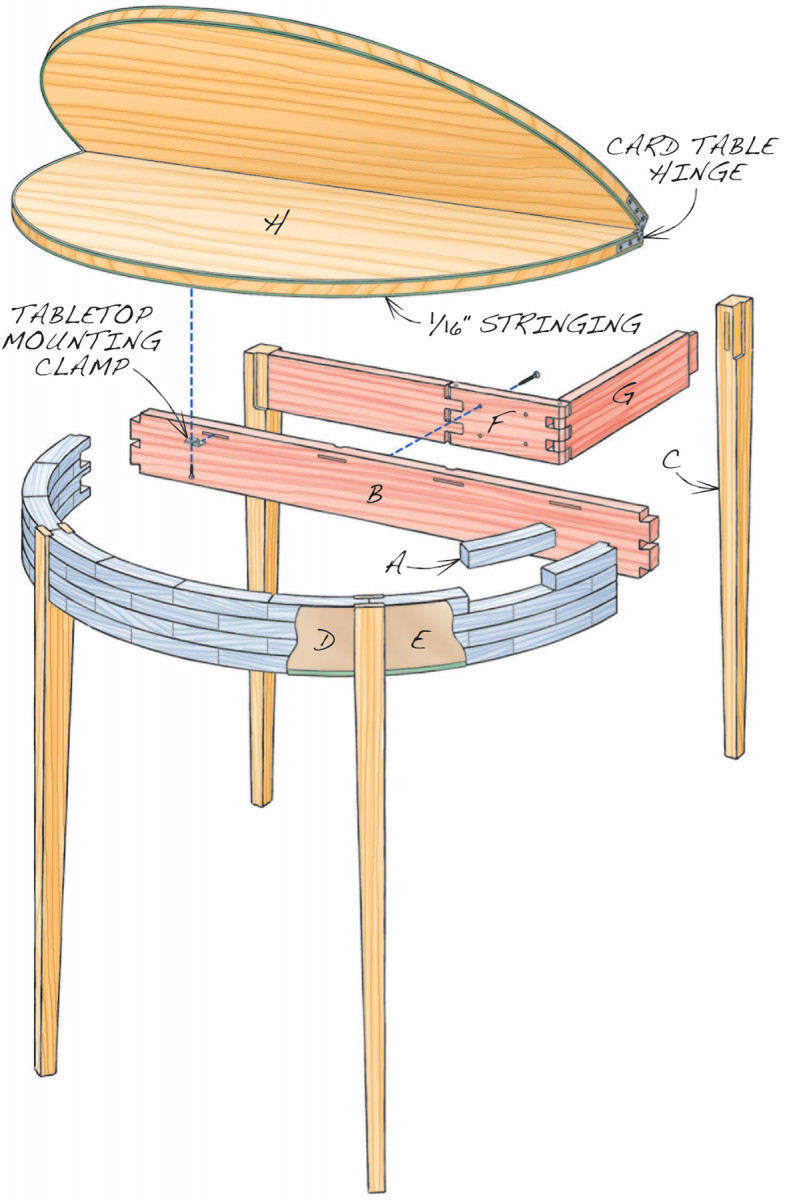
Fig. A) Exploded View
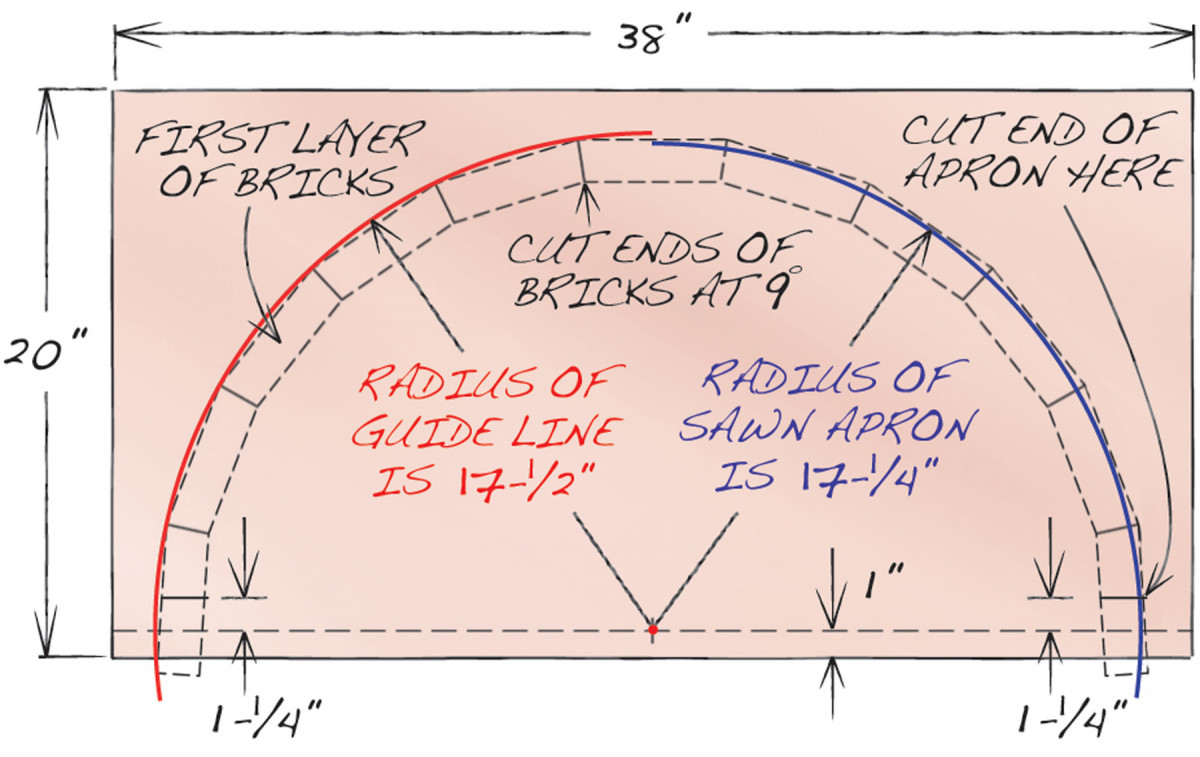
Fig. B) Apron Staging Board
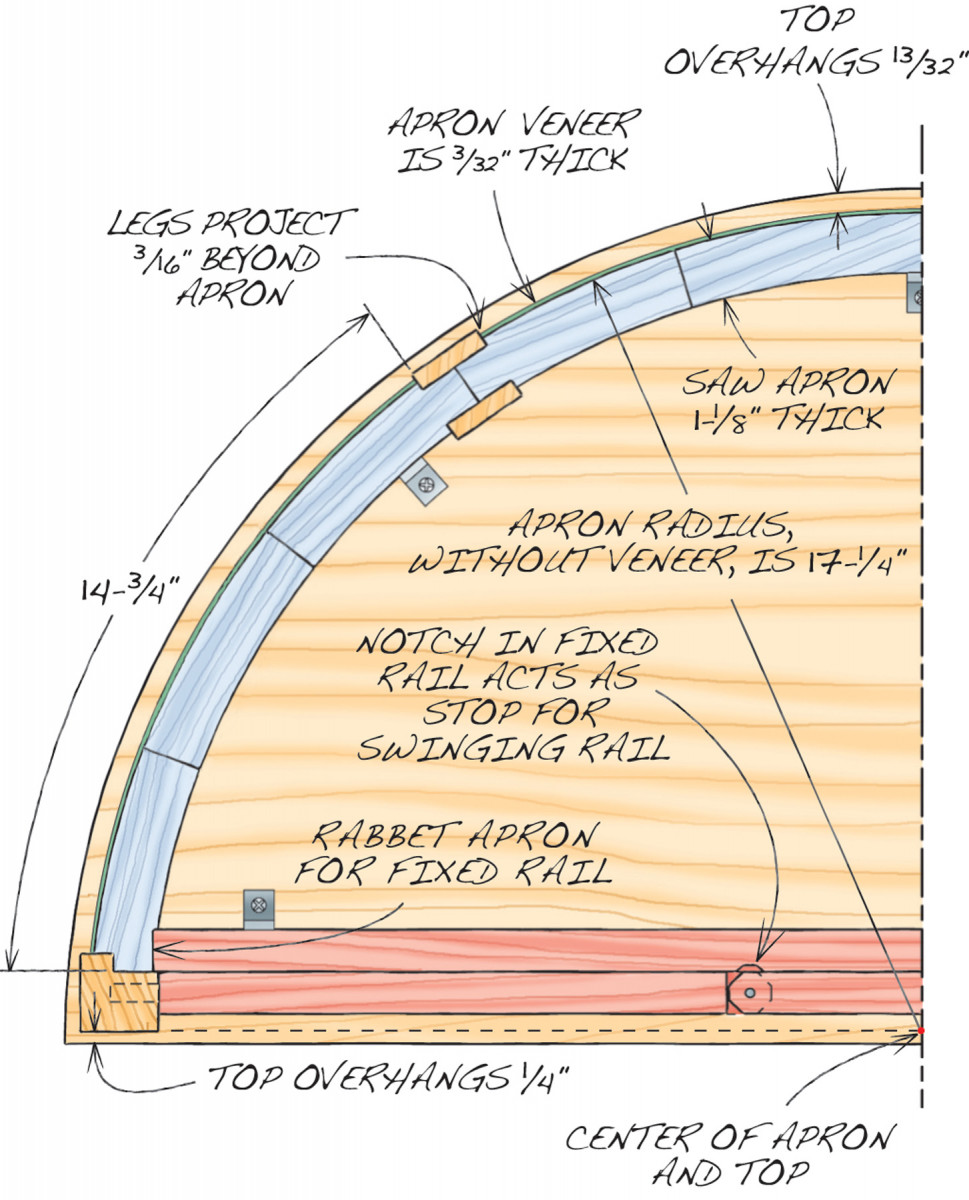
Fig. C) Plan View
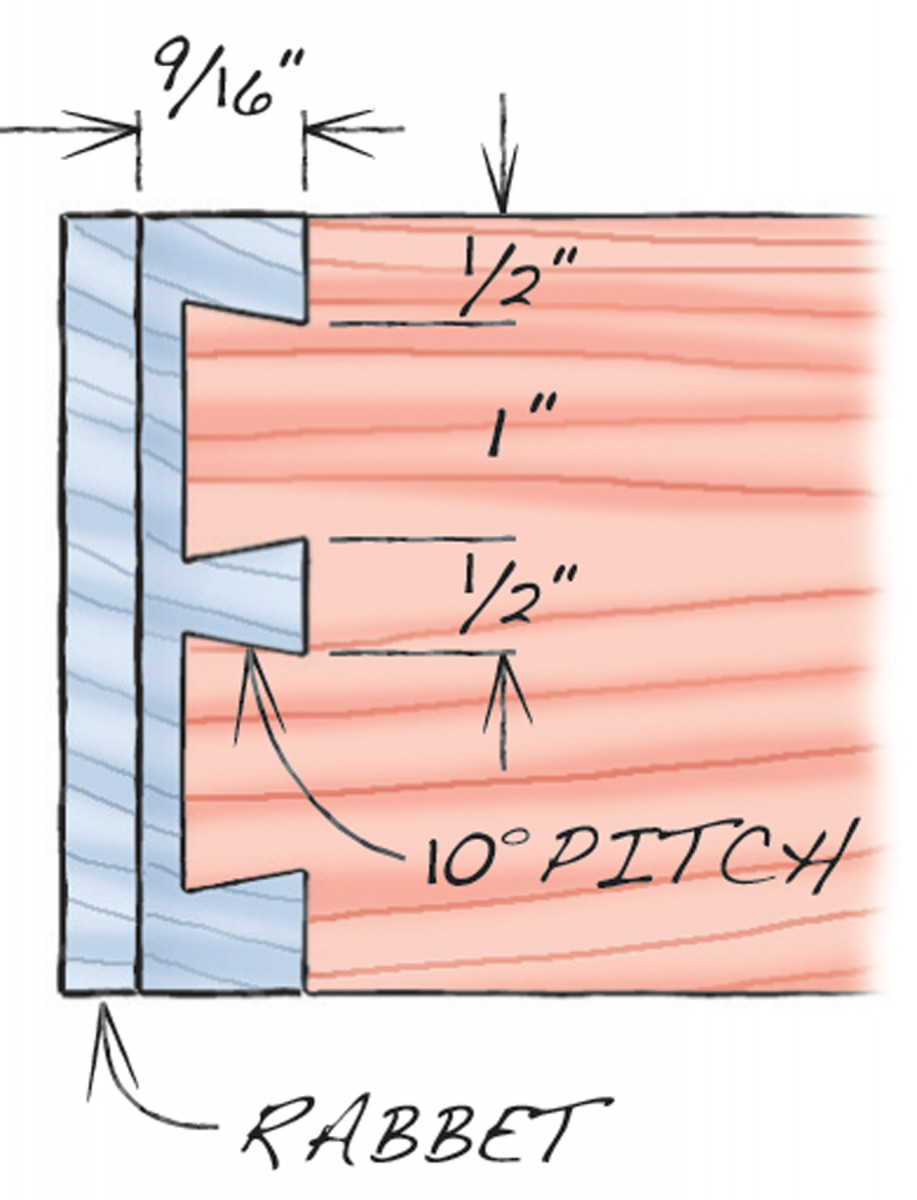
Fig. D) Dovetail Joints
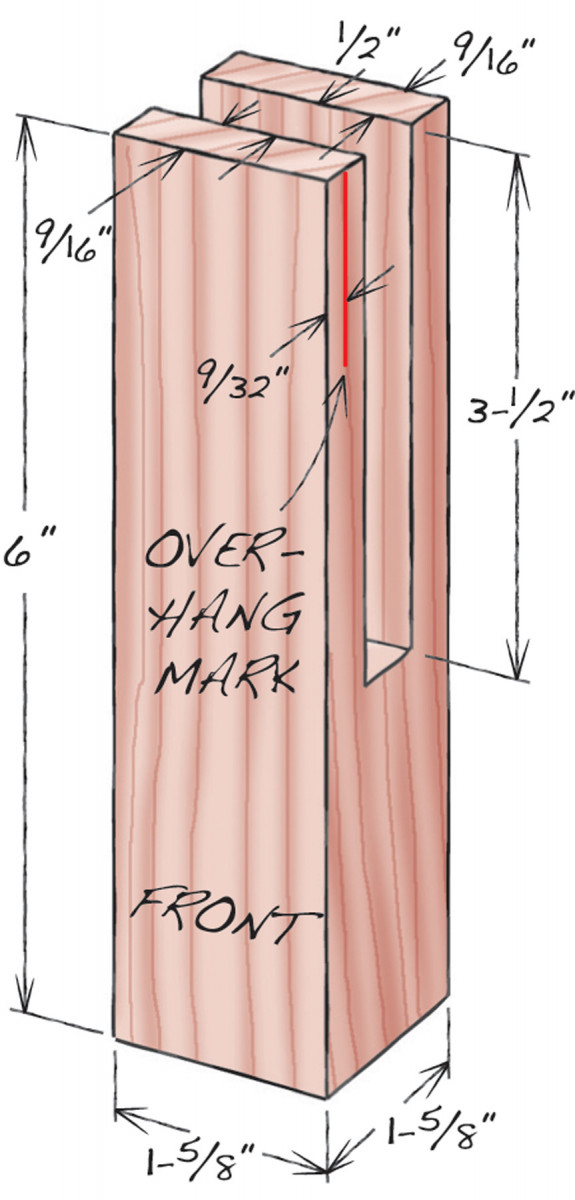
Fig. E) Leg Gauge
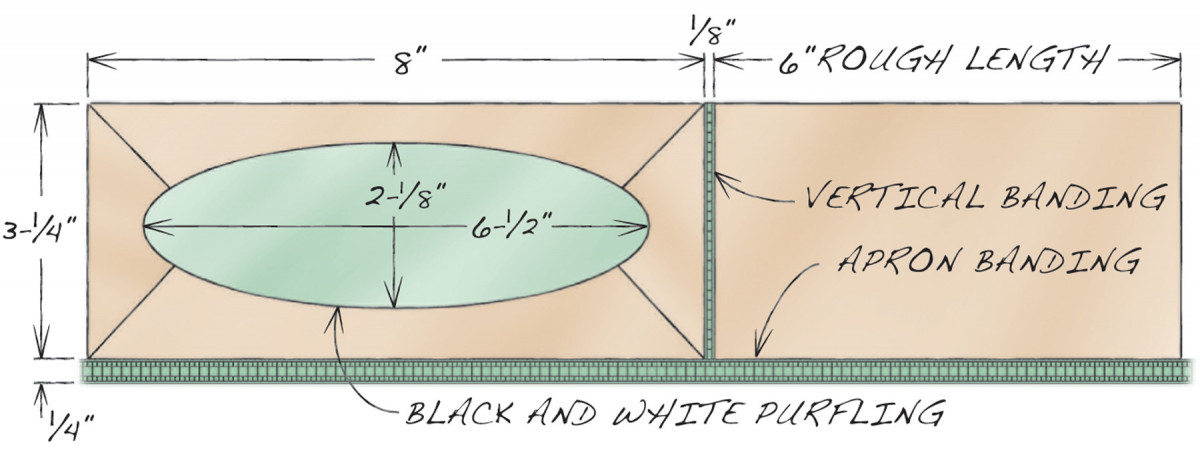
Fig. F) Curved Rail Center Panels
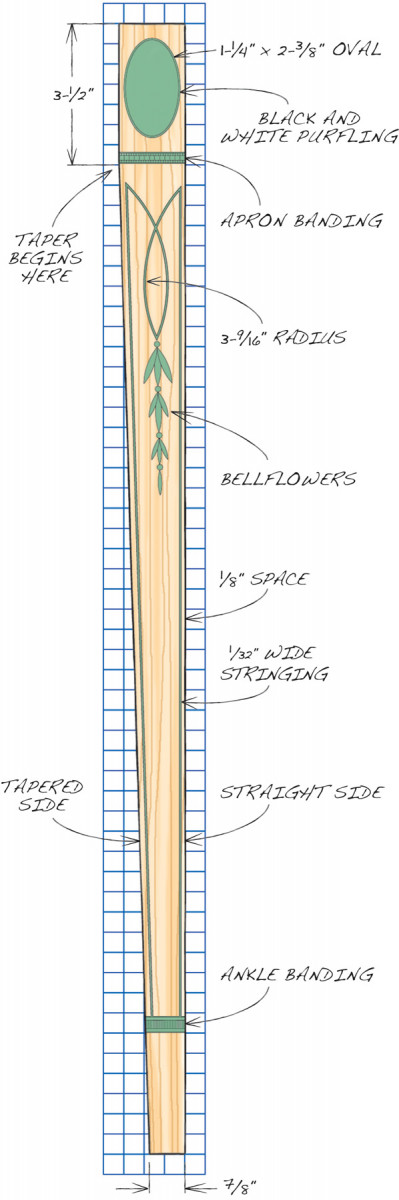
Fig. G Leg, Front and Side View (below)

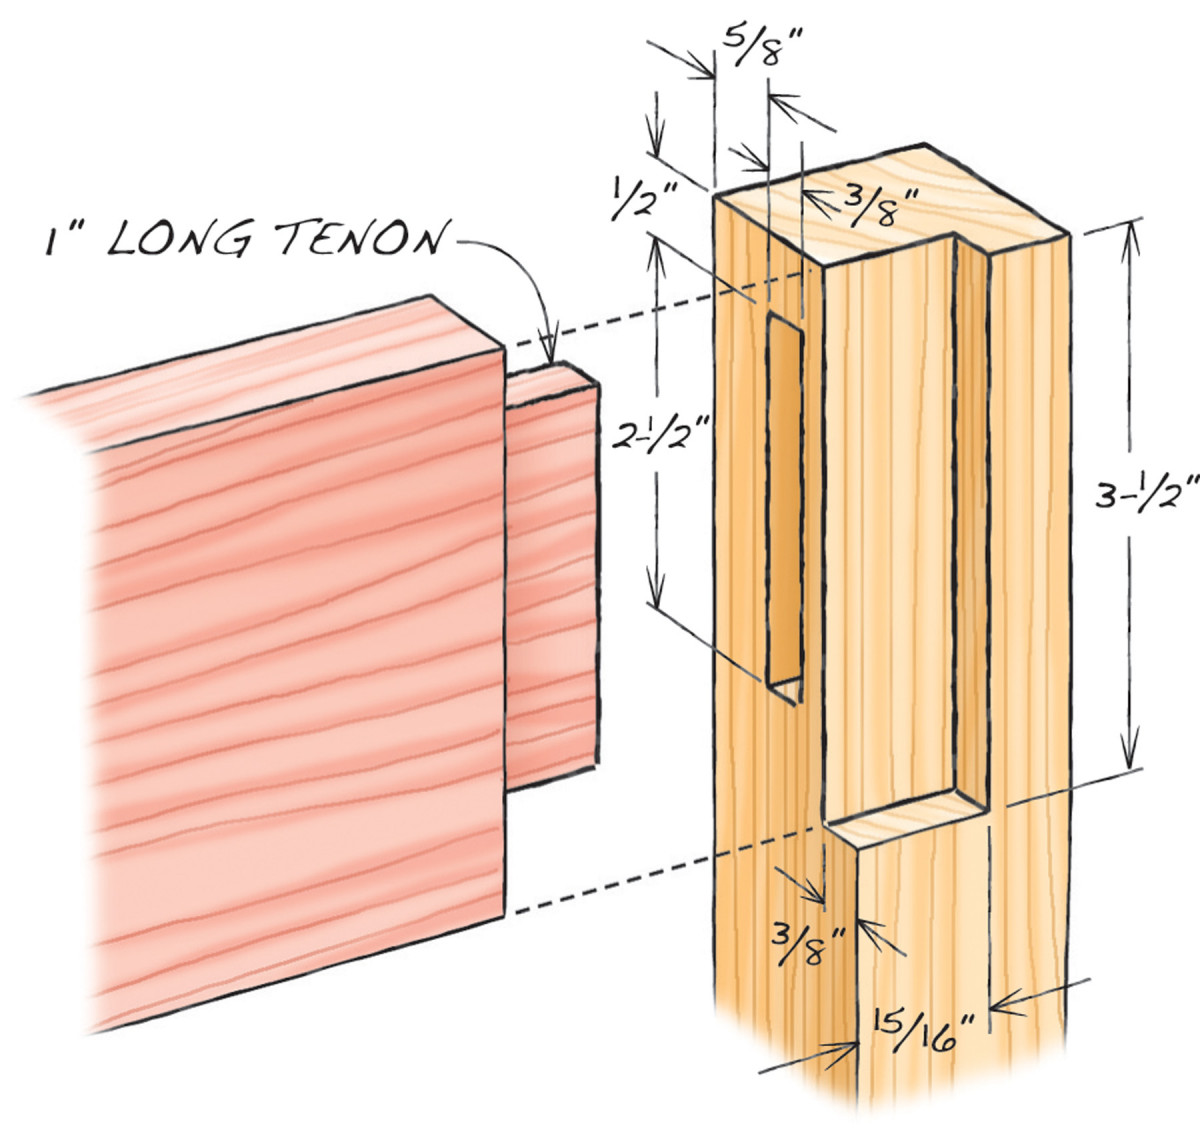
Fig. H) Rear Leg Joinery
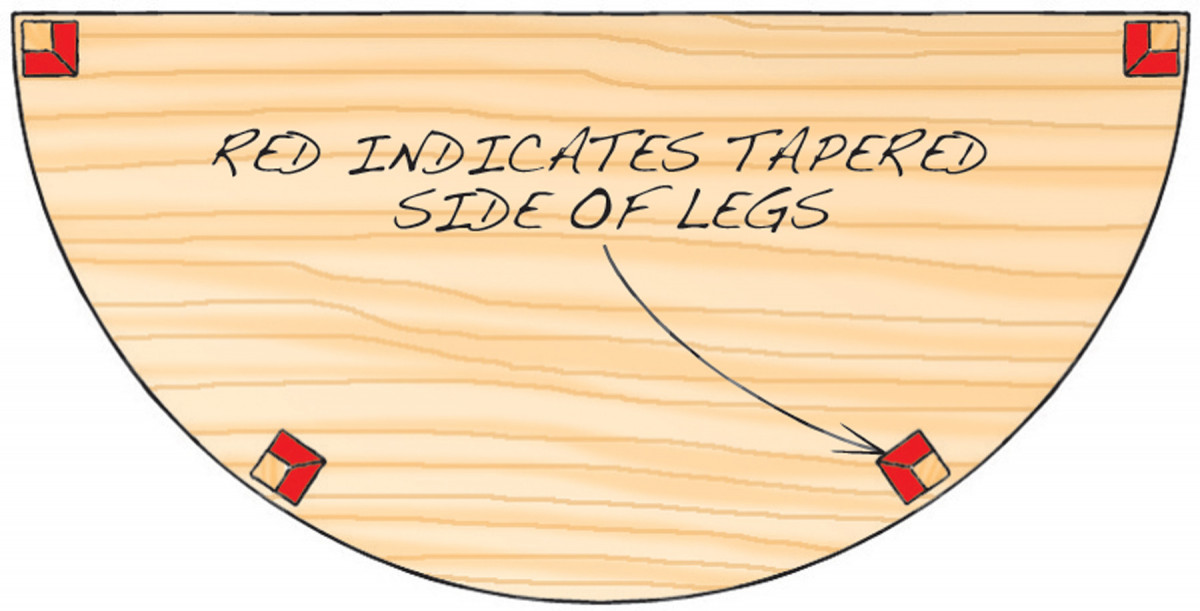
Fig. J) Orientation of Leg Tapers
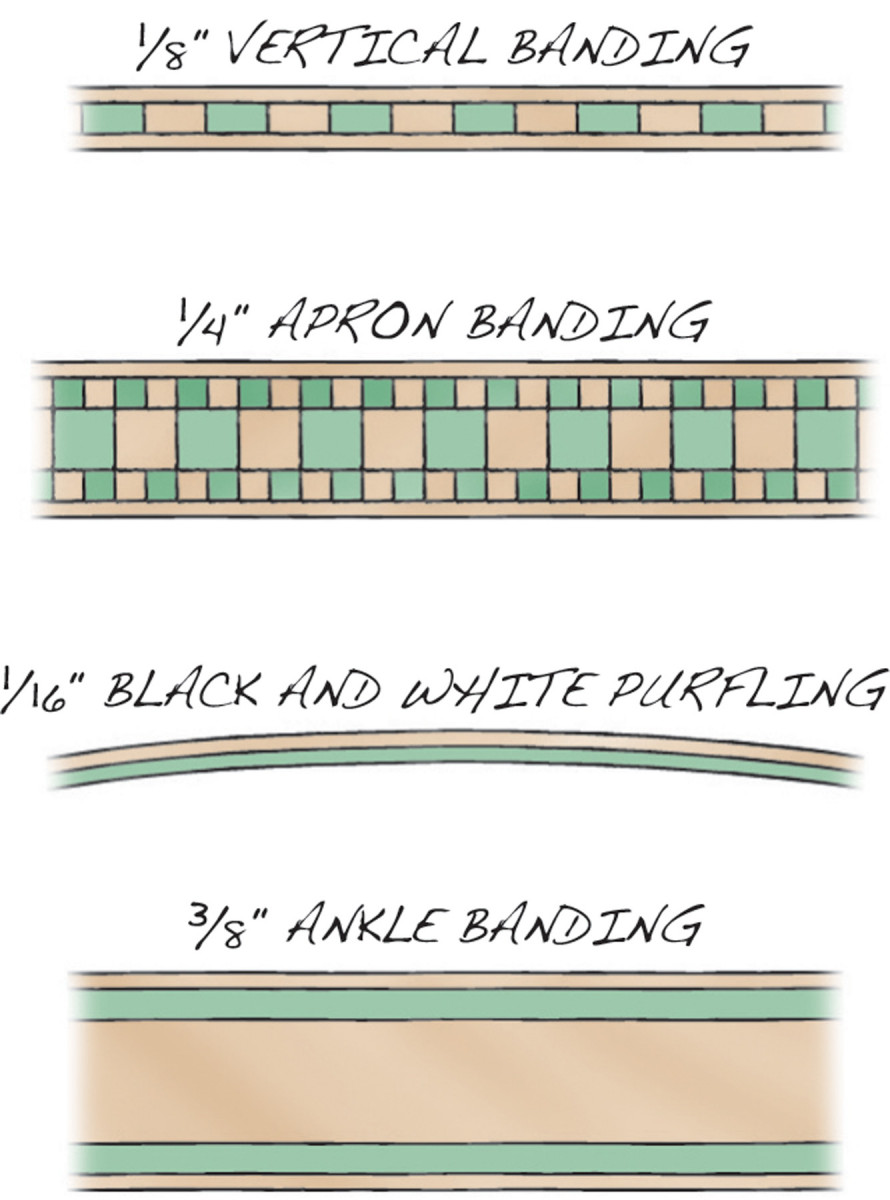
Fig. K) Bandings and Purfling
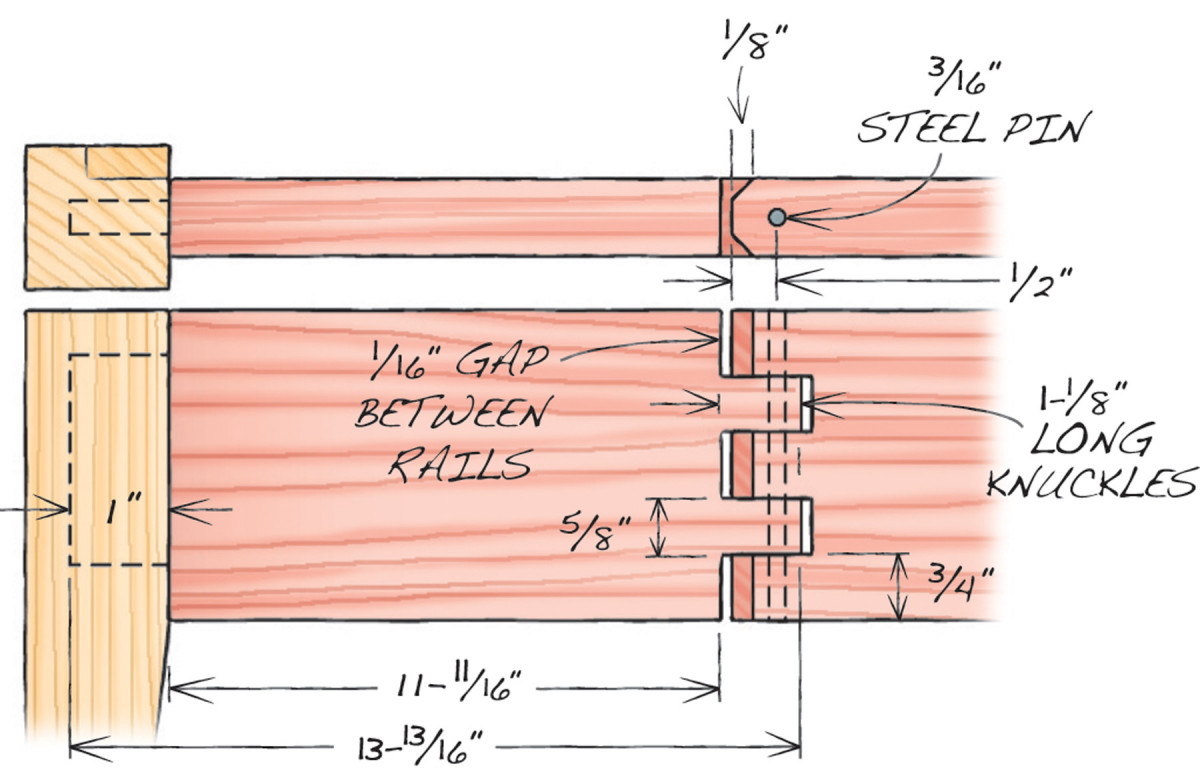
Fig. L) Swinging Rail and Knuckle
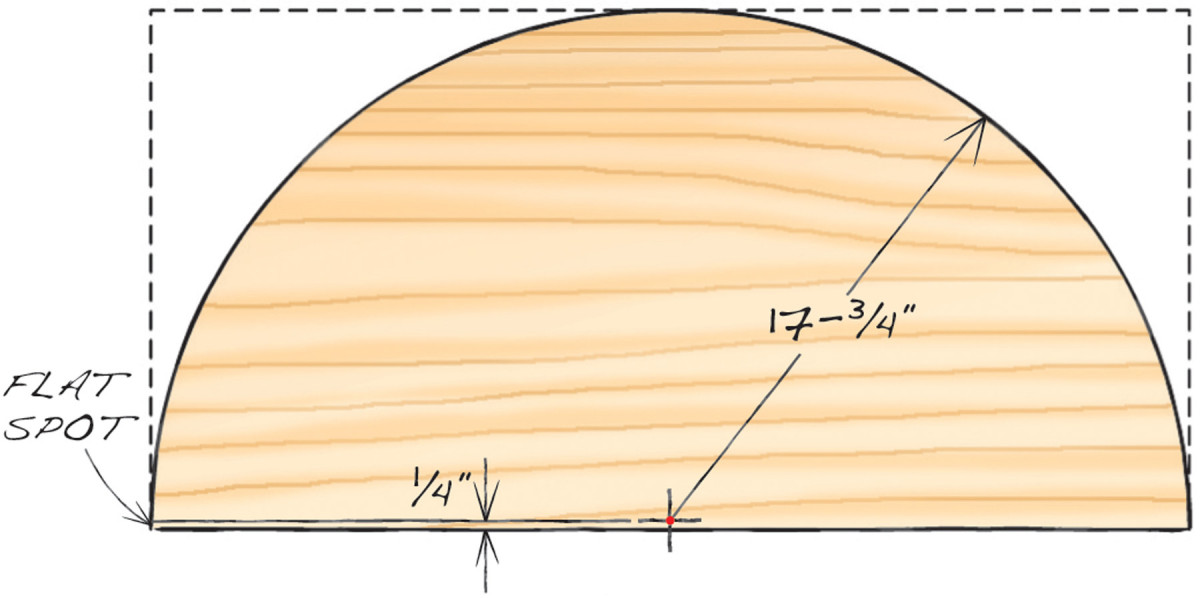
Fig. M) Top Layout
Build the apron
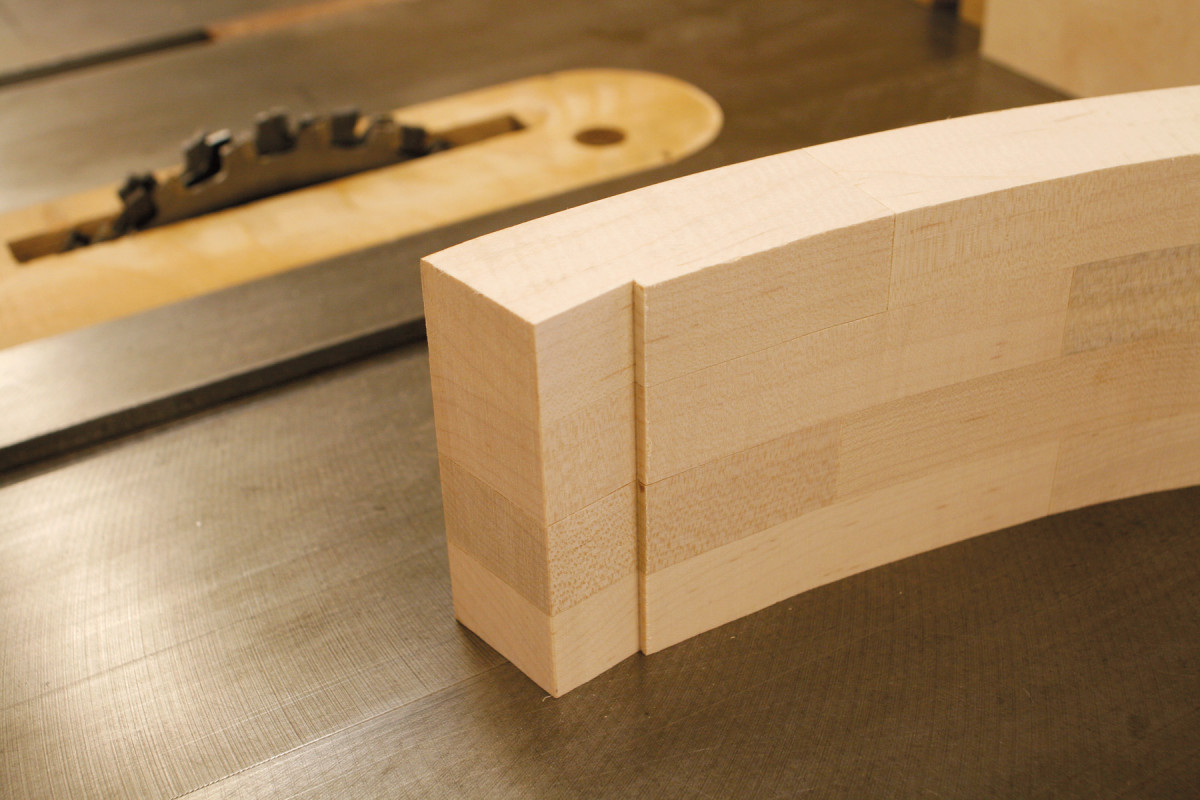
When most people first see a half-round card table like this, they assume that the apron is cut from one massive piece of wood. “That wouldn’t really work,” I explain. “It’s made from 50 pieces, not one.”
Those pieces are laid up like bricks in a wall (Fig. A). This technique was employed by Federal cabinetmakers and is still the easiest way for a builder in a small shop to make this type of apron. Begin by milling the bricks (A). Cut both ends of each brick at 9° (Fig. B).
In order to build the wall, make a staging board to guide you (Fig. B). The board must be dead flat to prevent the wall from becoming twisted. I use a sheet of melamine; lines drawn on it are easy to see and glue won’t stick to it. Using a trammel, draw a large arc on the staging board to indicate the outer perimeter of the wall. (Note that the radius of this arc is larger than the arc of the finished apron.)
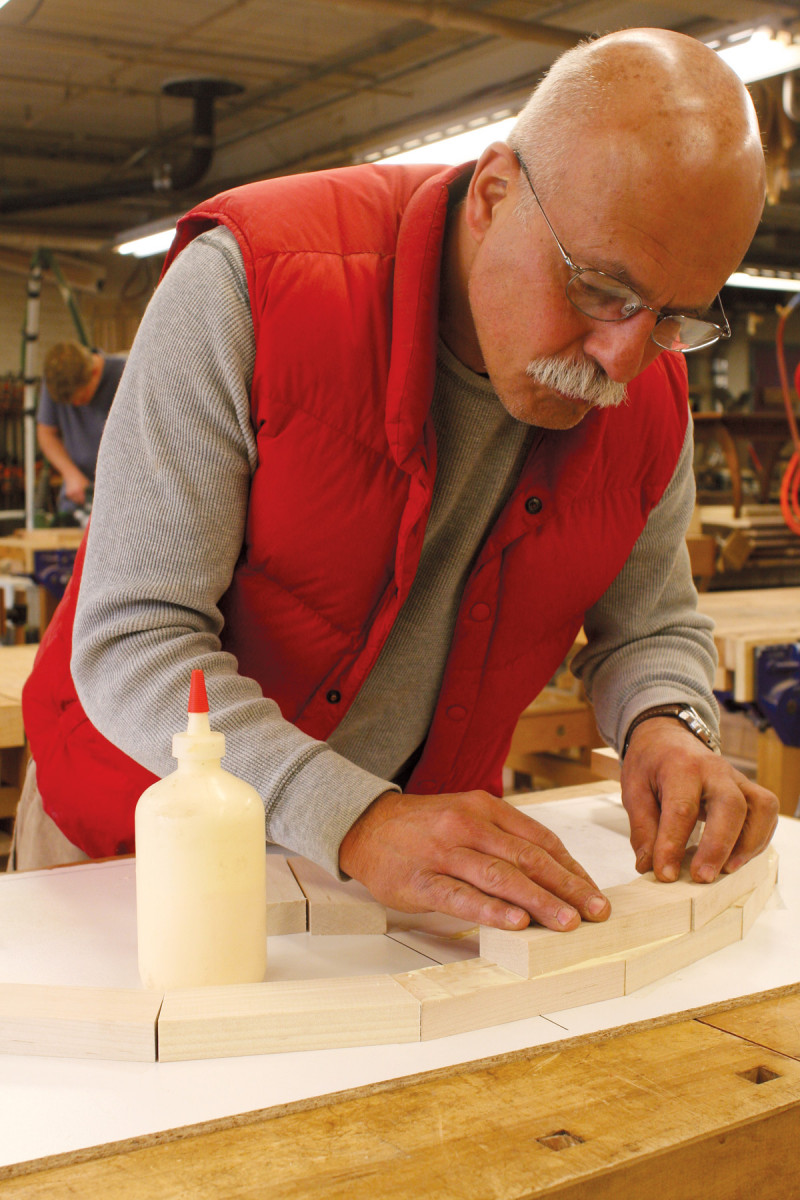
1. Glue up the curved apron by building a wall of overlapping “bricks.” The bricks don’t have to be clamped—just press down firmly and rub them back and forth until the glue grabs.
Lay down the first course of bricks inside the arc (Photo 1). Butter the ends of the bricks with glue. If the bricks don’t fit tight against each other, don’t worry. Small gaps are OK because the main source of the wall’s strength is its staggered structure. You don’t have to clamp the bricks end-to-end.
Build the second layer of the wall. These bricks should overlap the lower bricks about halfway. Again, you don’t have to clamp. Spread a generous amount of glue on a small portion of the lower layer, then press firmly on each new brick and rub it back and forth until the glue squeezes out and grabs. As you build the wall, use a square to make sure it is plumb. Let the glue dry overnight.
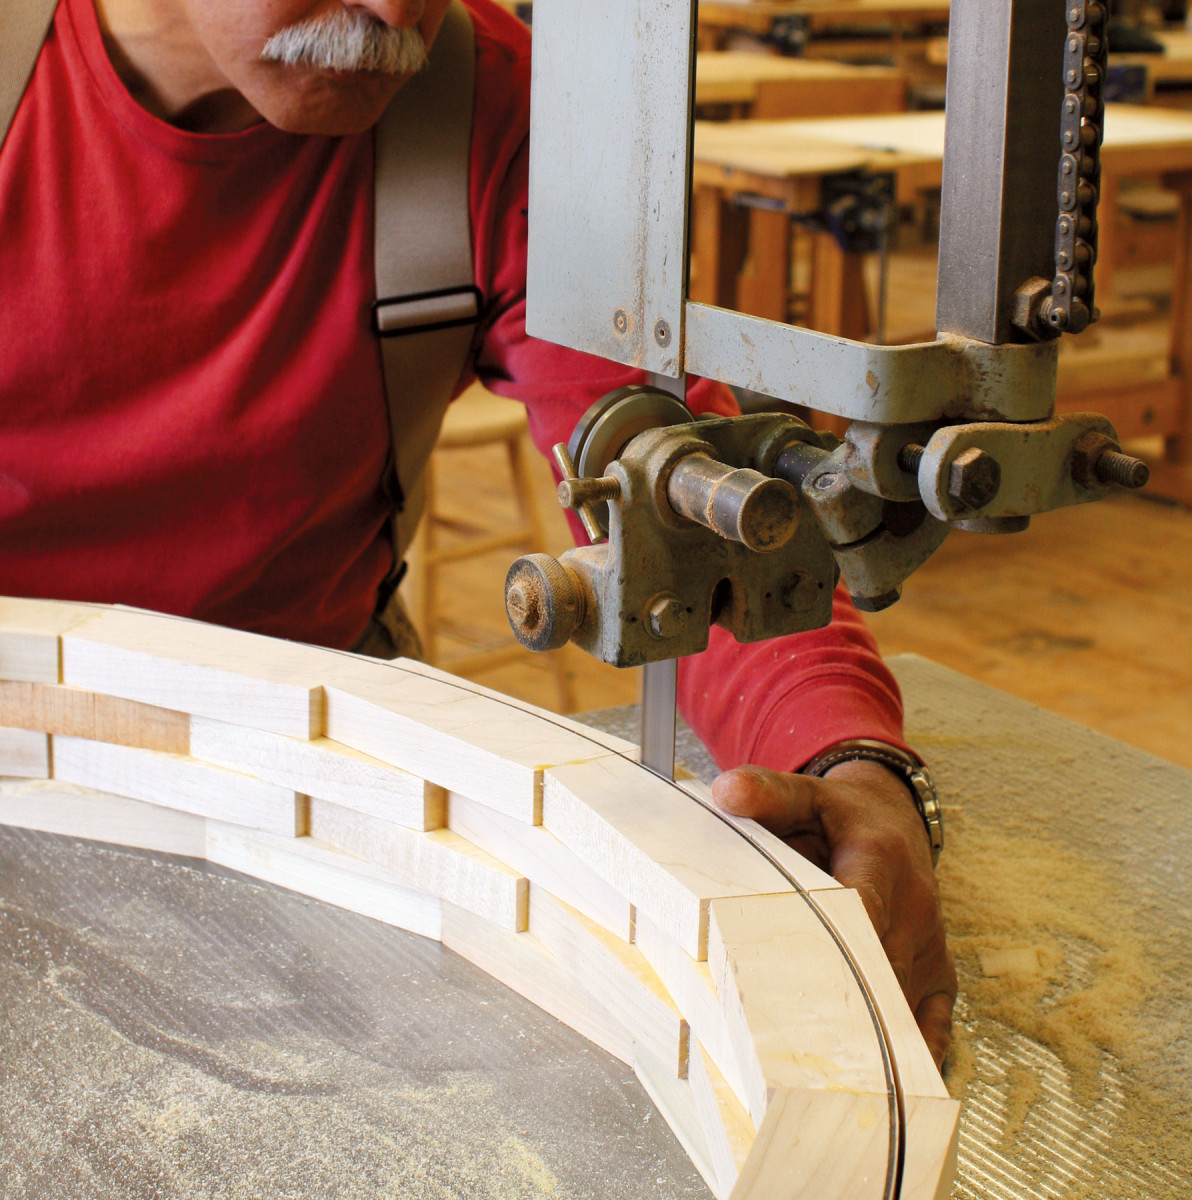
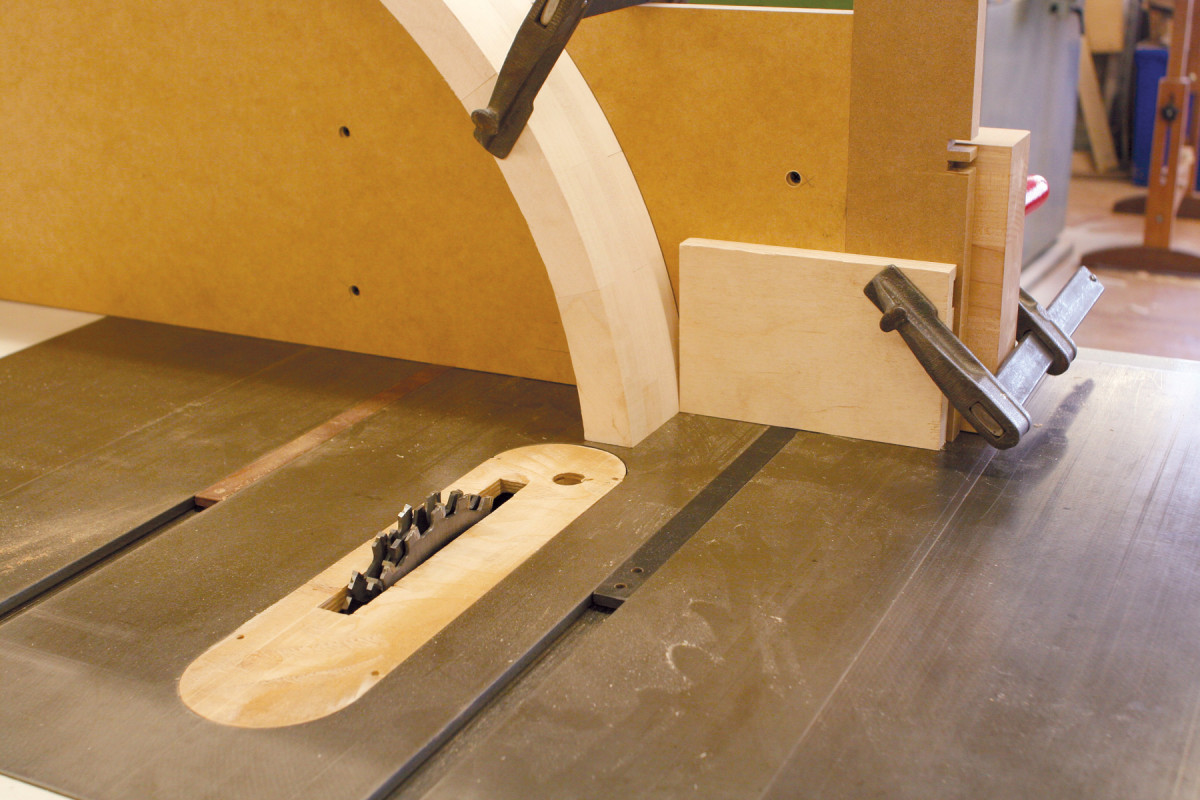
2. Saw both sides of the apron into a half-circle. Trim the ends of the apron on the bandsaw as well.
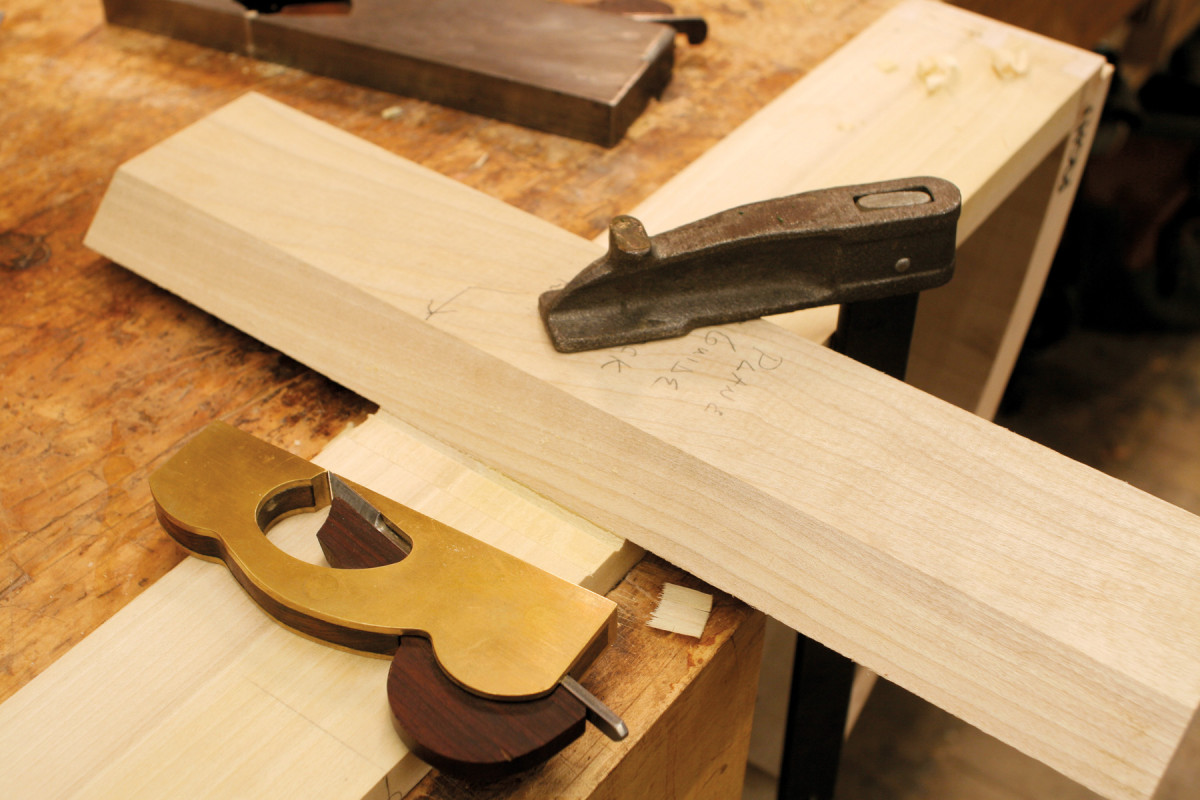
Draw the outside radius of the apron on the wall (Fig. B). (I use a half-round MDF template.) Saw the wall on the bandsaw (Photo 2). Leaving a small flat spot or divot is OK—you can patch it later, if necessary. Use a marking gauge to draw the inner radius of the wall and cut this on the bandsaw as well. If the outer surface of the apron is rough with teeth marks, smooth it with 60 or 80 grit paper.
Level the top and bottom surfaces of the apron with a No. 7 or No. 8 plane, making sure the surfaces remain parallel and square to the outside face. Cut the ends of the apron to length (Fig. B) using the bandsaw.
Make the apron joints
3. Saw rabbets on both ends of the apron to receive the back rail.
In order to join the rear fixed rail (B) to the apron, cut a shallow rabbet into each end of the apron (Photo 3). Use a dado set and support the apron with an extra-tall fence. Raise the dado set to 7/8″, the thickness of the rail.
3B.
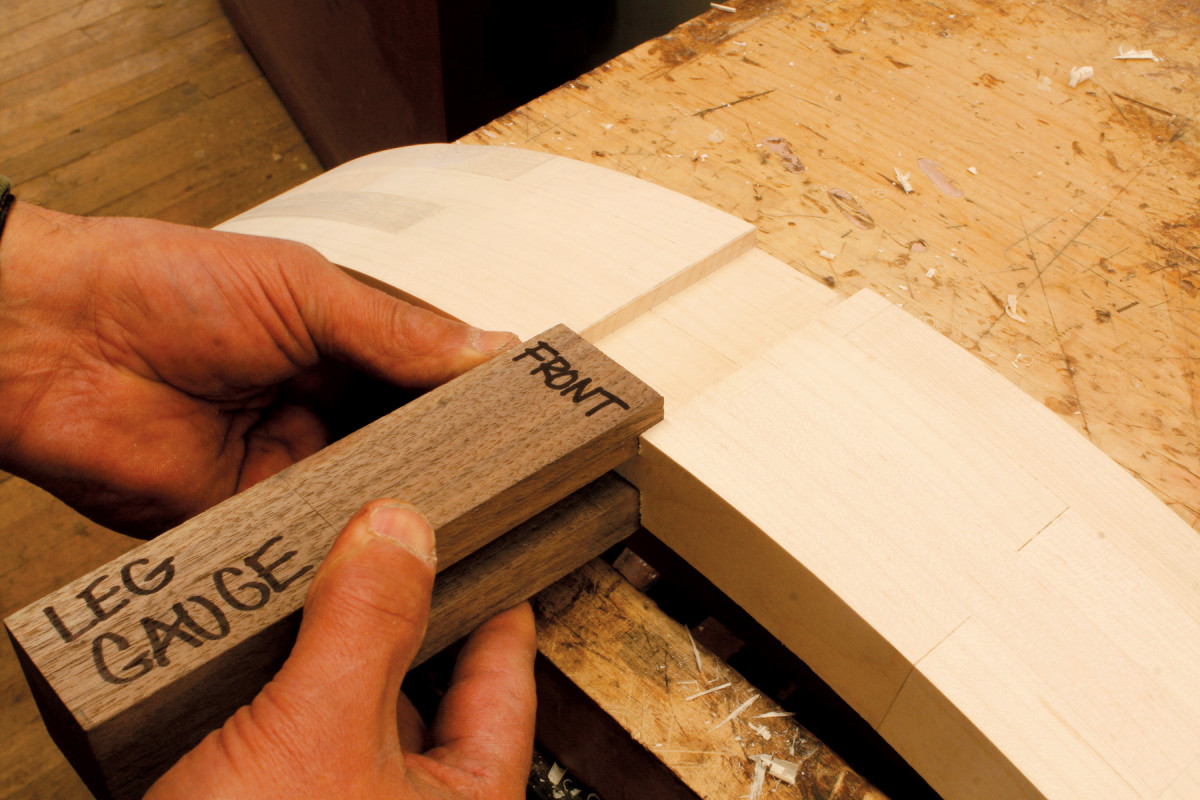
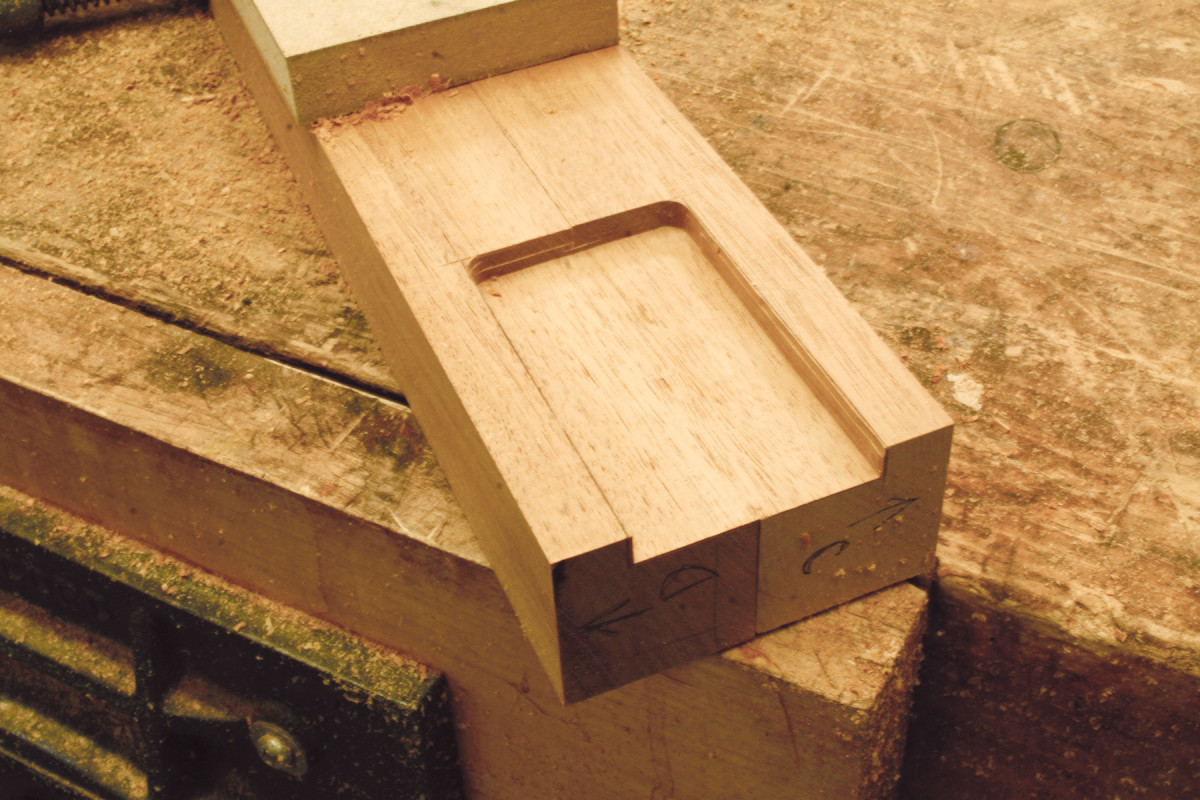
Next, lay out and cut bridle joints in the apron for the front legs (C). I’ve found that the best way to do this is to make two gauge blocks (Fig. E) that are the same width and thickness as a leg.

4. Make a gauge block for laying out the bridle joints that connect the front legs to the apron.
Cut a deep notch in each gauge block on the bandsaw, then chop out the waste (Photo 4). Mark both sides of each gauge block to indicate how far the front of the block should overhang the apron bricks (Fig. E).
5. Use the gauge block to lay out the joints. To orient the block, line up two overhang marks with the front of the apron.
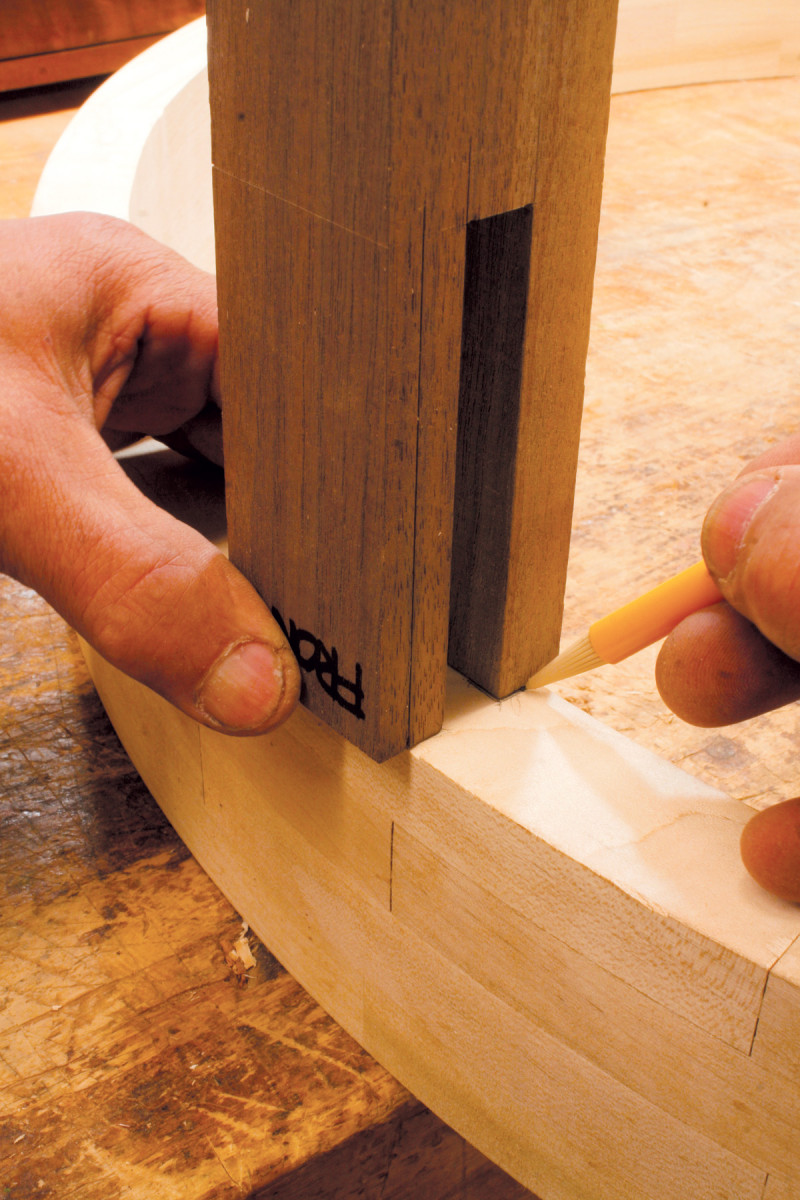
Mark the location of the bridle joints on the top of the apron by measuring from each end of the apron. (Fig. C). Place a gauge block on these marks, line up the overhang marks with the front of the apron and draw around the end of the block (Photo 5).
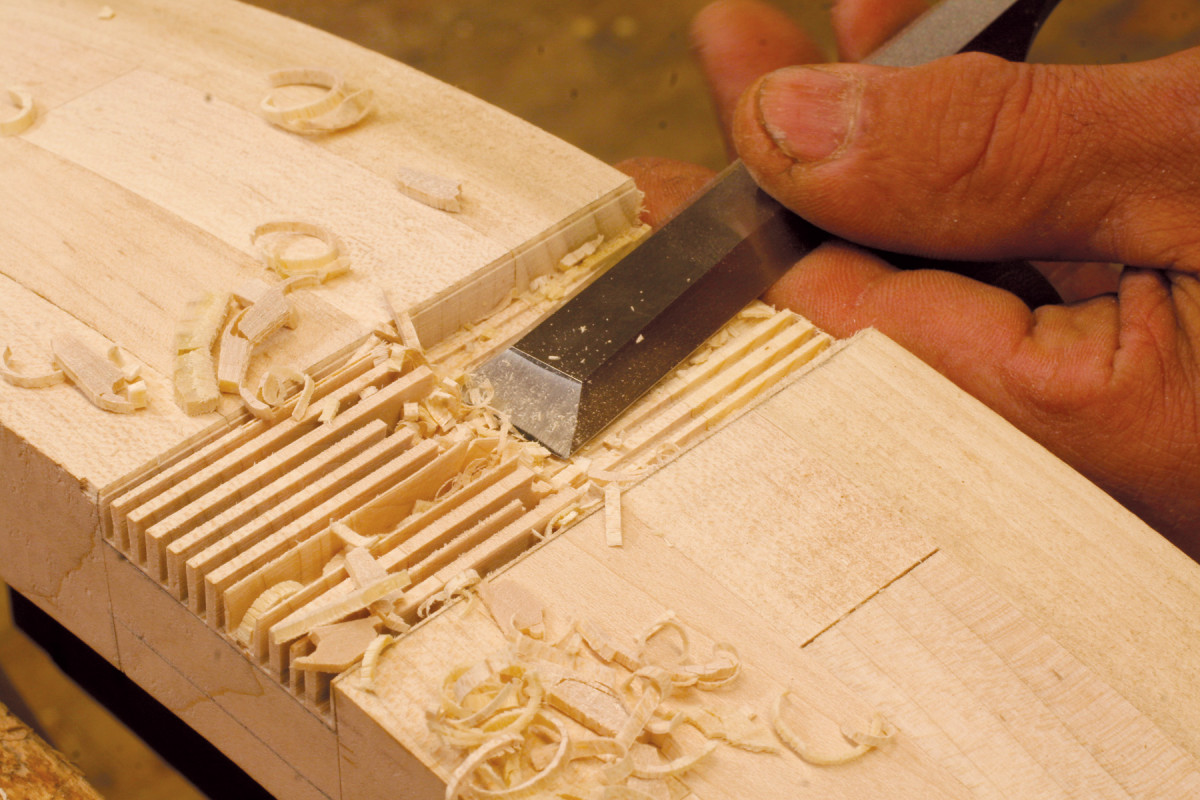
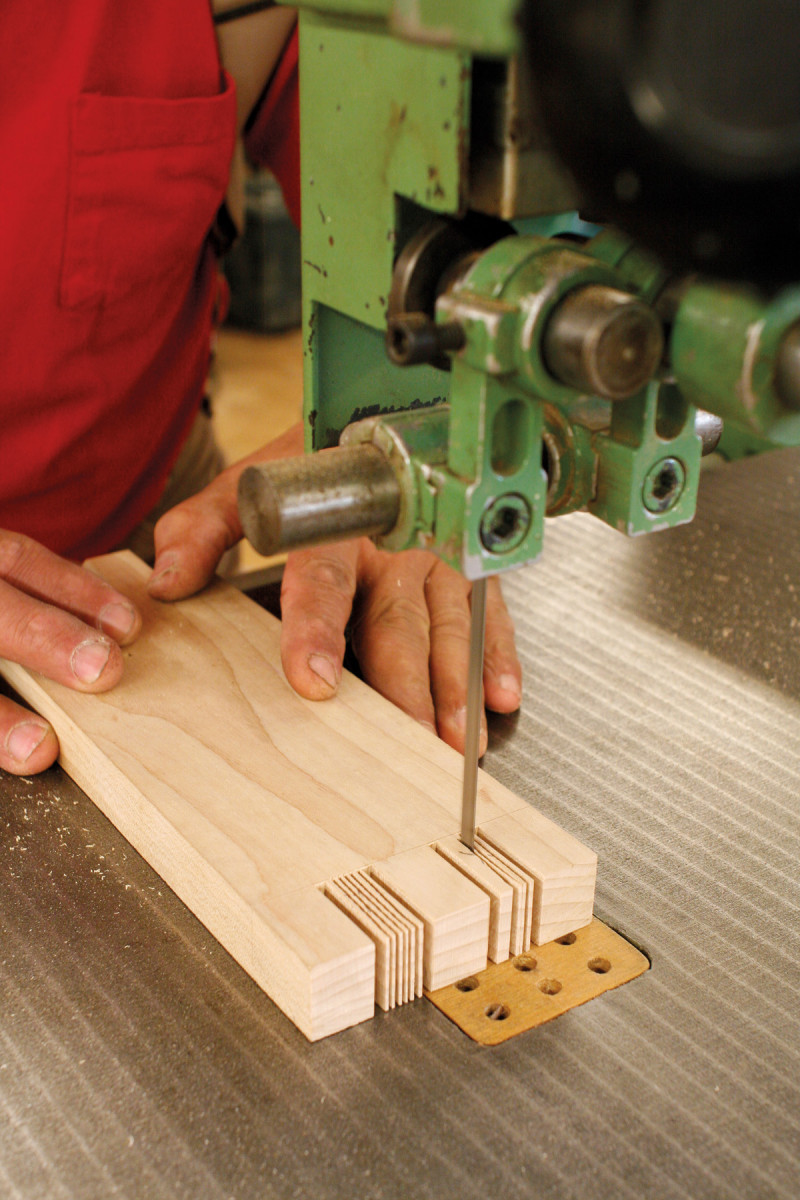
6. Cut kerfs on both sides of the apron using the bandsaw or a tenon saw. Clean out the waste with a chisel and a shoulder rabbet plane.
Use the bandsaw or a tenon saw to cut the outside edges of the bridle joints, then make a series of cuts across the joints to make it easier to pare and plane away the waste (Photo 6).
7. Test the fit of the bridle joint with the gauge block. If the joint is too wide or too narrow, let it be. Later on, you’ll mill the actual leg to fit.
Mark each gauge block as representing the left or right leg, then test the fit of the joint as you remove the waste (Photo 7). Make any necessary adjustments to the most accessible part of the joint. If the leg’s width doesn’t fit, use a plane to narrow the gauge block; don’t cut the shoulders of the apron. If the notch in the gauge block is too narrow, keep planing the apron; don’t try to widen the notch. Make sure the front overhang of the block remains correct.

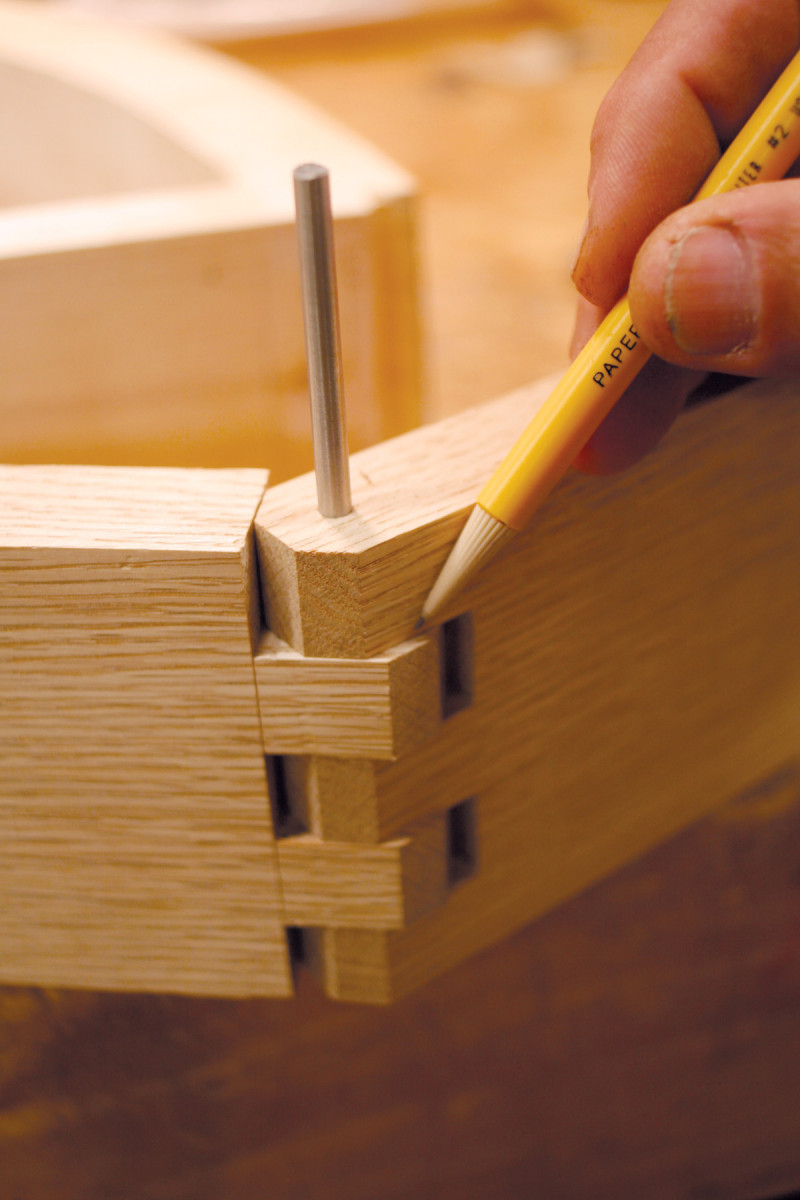
8. Cut large half-blind dovetails to join the back rail to the apron. Card tables of the Federal period were moved around a lot, so strong joinery was essential.
Next, turn your attention to the rear fixed rail. First, measure the distance between the ends of the apron, inside face to inside face. Add the lengths of two sets of dovetails (Fig. D) to calculate the total length of the rail, then mill the rail to final size. Lay out and cut dovetails on both ends of the rail, then place the rail in position on the apron and scribe around the dovetails to lay out the sockets (Photo 8). Saw and chop the sockets; then glue the rail in place.
Veneer the apron
9. Prepare extra-thick veneer for the apron. I make it myself by gluing standard-thickness veneer (and banding) to a flat board first. Resawing this board yields extra-thick stock.
Veneering a curved surface with a complex pattern of shapes, inlays and bandings has always been a formidable challenge, but I’ve figured out an easy way to do it. (For complete information on this, see “Veneering on the Curve.”) Here’s the short version. You prepare a flat board first, then glue the various elements of the design to it, one at a time, and level them off. Then you resaw the front of the board, removing a piece about 3/32″ thick. The resulting veneer is still flexible enough to bend around the apron, but thick enough to span over any slight imperfections in the apron’s surface without leaving telltale depressions or shadows in the finished piece.
10. Glue the veneer to the apron using a caul made from bending plywood and glued-on blocks. The extra-thick veneer will form a smooth curve even if the apron has a small flat spot.
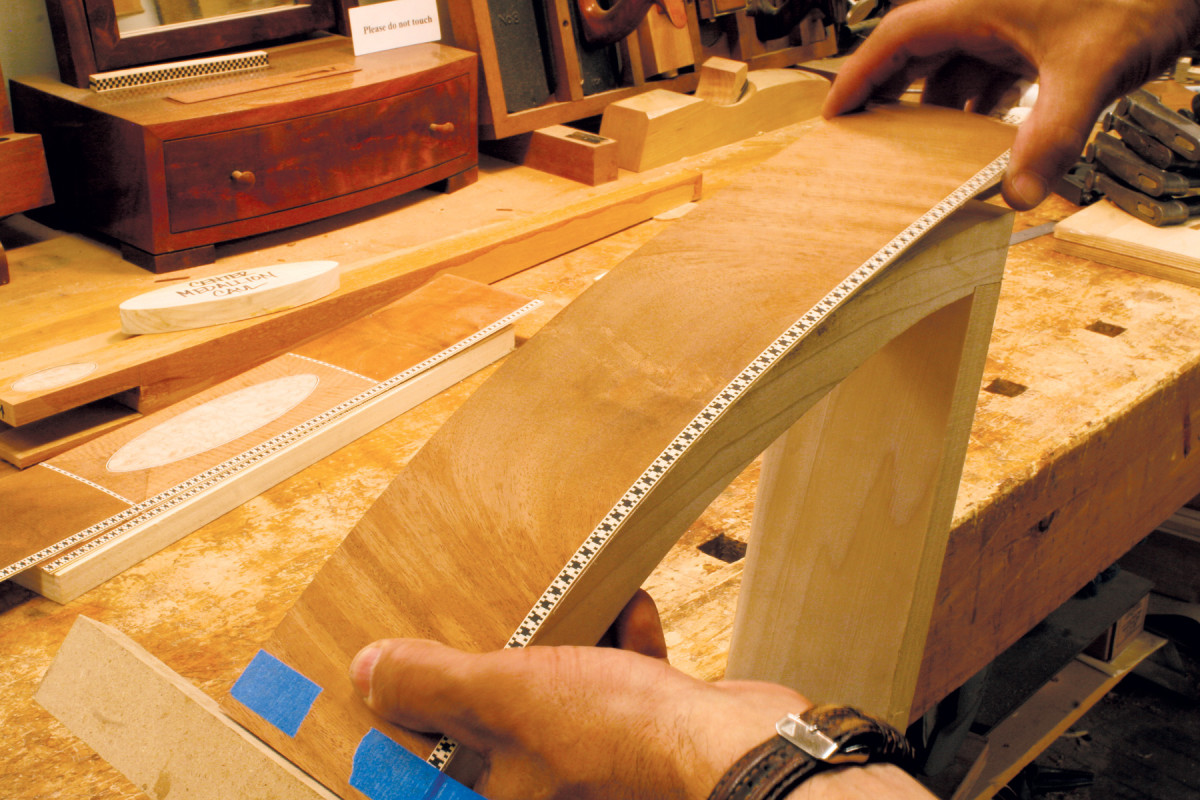
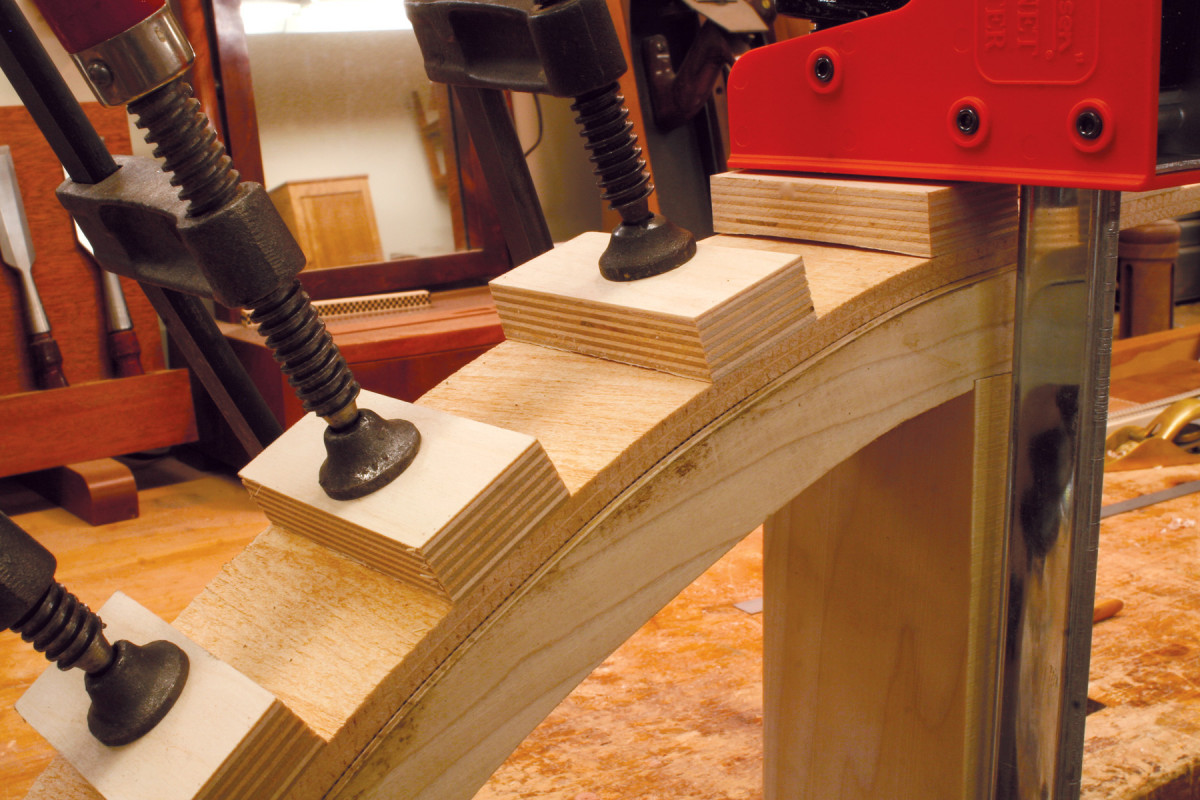
Start veneering the apron by applying the pieces (E) that span the front and back legs (Photo 9). Cut these pieces so they overhang the end of the apron and the bridle joint by about 1/8″. To ensure adequate and even pressure, use a clamping belt made from bending plywood and glued-on wood blocks (Photo 10). Glue on the center panel (D, Fig. F) in the same way, then trim off the overhanging portions.
Make the legs
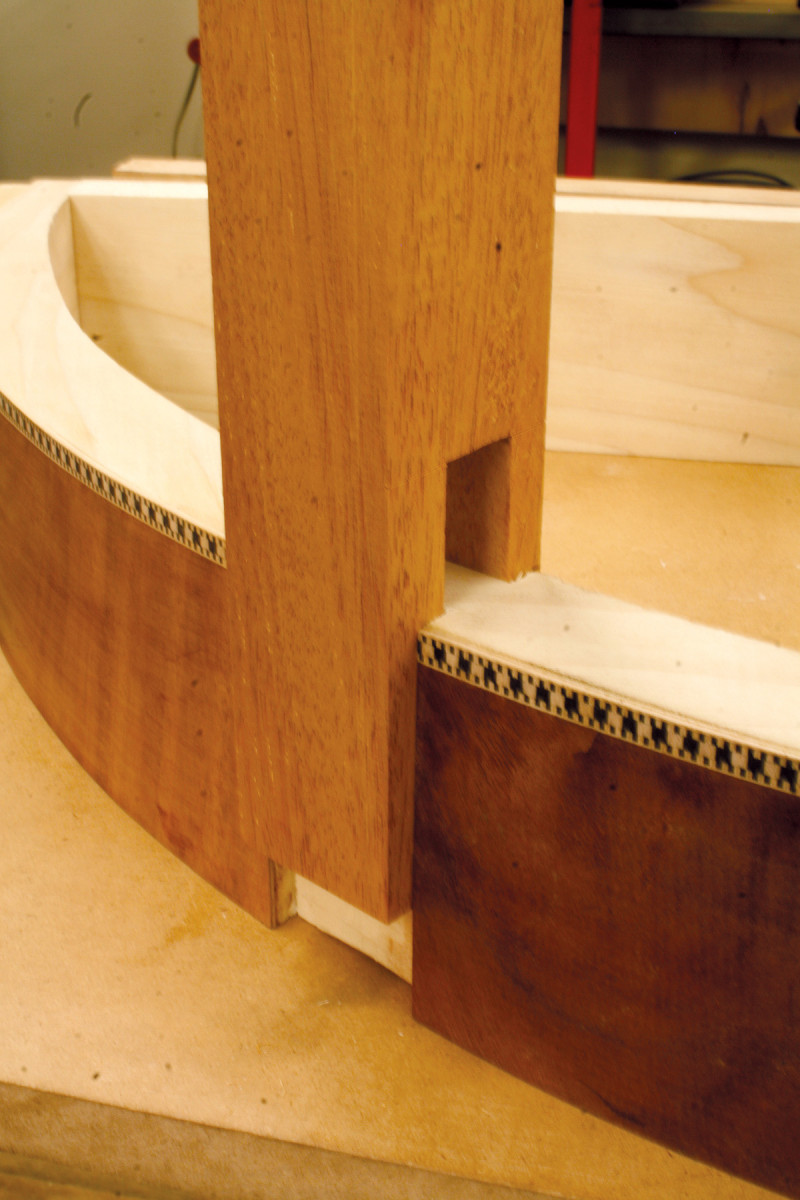
11. Trim overhanging veneer at the bridle joints. Make the legs and fit them to the apron.
Mill all four of the table’s legs, leaving them square for now. Cut notches in the two front legs, then fit them to the apron (Photo 11).

12. Cut mortises in the two back legs—they’ll be connected to rails that swing out from the table. These legs also require recesses in order to wrap around the apron. To rout the recesses, butt the legs together (12B).
Cut mortises in the two back legs to receive the swinging rail ends (G, Fig. H). In addition, rout a recess in each leg so it will be able to cover the end of the apron (Photo 12). Square the corners of the mortises and recesses.
12B.
Saw tapers on all four legs (Photo 13). Each leg is tapered on two sides, but in different ways—there are two “rights” and two “lefts” (Fig. J). As you can see in the illustration, the back side of each leg is tapered. None of the front sides are tapered. The “right” and “left” orientation of the legs refers to their sides. I like to think of it this way: The sides that face the center of the table, going around the apron, are the ones that are tapered. All of this can be quite confusing, I know, so don’t underestimate the need for extreme care at this stage. Mark your legs carefully, walk away, then come back the next day and make sure the layout is correct. Shading in the waste areas before cutting will help you visualize the correct arrangement of the tapers.

13. Taper the inside faces of all four legs. You’ll also taper one side of each leg—but proceed carefully. Two legs are tapered on the left side; the other two are tapered on the right side.
Finish the legs by adding their banding, stringing, bellflowers and inlay (Figs. G and K). Note that the ankle banding goes all the way around each leg, and that the back sides of the legs don’t have any stringing or other decoration on them.
Make the swinging rail
Mill the center (F) and ends (G) of the three-part swinging rail to final thickness and width. Cut the center section to exact length, but leave the end pieces 1″ extra long for now.
The knuckle joints that connect these parts allow the back legs to swing out and support the top. As you open each leg, the knuckles on the swinging rail stick out. They’ll bump into a stop, limiting the amount that the leg can swing to 45°. I’ll show you how this works as we go along.
14. Saw knuckle joints for the two swinging rails that are joined to the back legs. Make the outer cuts on the tablesaw. Remove most of the waste on the bandsaw, then chop out the rest.
First, lay out the knuckles on each piece (Fig. L). Carefully mark out what is to be removed and what will remain on each part. Make all the outside cuts for the bearing surfaces on the tablesaw, standing the pieces upright. Remove most of the remaining waste on the bandsaw (Photo 14), then chop to the shoulder lines. Your goal is to make a fairly tight fit between the fingers, so the legs won’t swing loosely when the table is moved.
15. The swinging rail pivots on a steel pin. The pin is positioned so that the knuckles on the pivoting side project by 1/8″ when the rail is opened at 45°.
Chamfer the ends of the rails by making bevel cuts on the tablesaw. Assemble the knuckle joints and drill holes for the pivot pins (see Sources, page 47). Cut the pins extra long, to make it easier to remove them during construction, then insert them in the joints. Open the joints and make sure that the knuckles on the end rails project about 1/8″ (Photo 15).
16. Notch the rear fixed rail opposite the point where the knuckles will stick out. This notch acts as a stop for the swinging rail.
Next, make the stops. They’re simply notches cut into the back fixed rail (Fig. C). Place the assembled swinging rail on the fixed back rail. Open each knuckle joint 45° and mark where the protruding fingers contact the fixed rail. Remove the swinging rail and plane 45° notches in the fixed back rail, using an angled board as a guide (Photo 16).
Place the assembled swinging rail back in position, lying flat, and note how long the end rails must be—including their tenons—so the back legs will project beyond the apron by the correct amount (Fig. C). Disassemble the swinging rail, cut the end rails to length, saw tenons on their ends and glue the rails to the legs.
There’s one more step: cutting rabbets on both ends of the apron to receive the back legs. Reassemble the swinging rail one more time and clamp it to the fixed back rail. Butt the back legs up to the apron and lay out the rabbets. Unclamp the swinging rail and cut the rabbets by hand.
Add the top
Make the two halves of the top (H) with identical curves (Fig. M). Glue in a small line of purfling all around the upper and lower curved edges of both pieces. Clamps aren’t necessary; tape will do.
Join the halves with card table hinges (see Sources). When laying out the mortises, be sure that each hinge’s knuckles protrude by 1/32″. This will ensure that the two halves clear each other when the top is opened.
17. Fasten the top to the base. Glue the rear legs to the swinging rail, then clamp this assembly to the table.
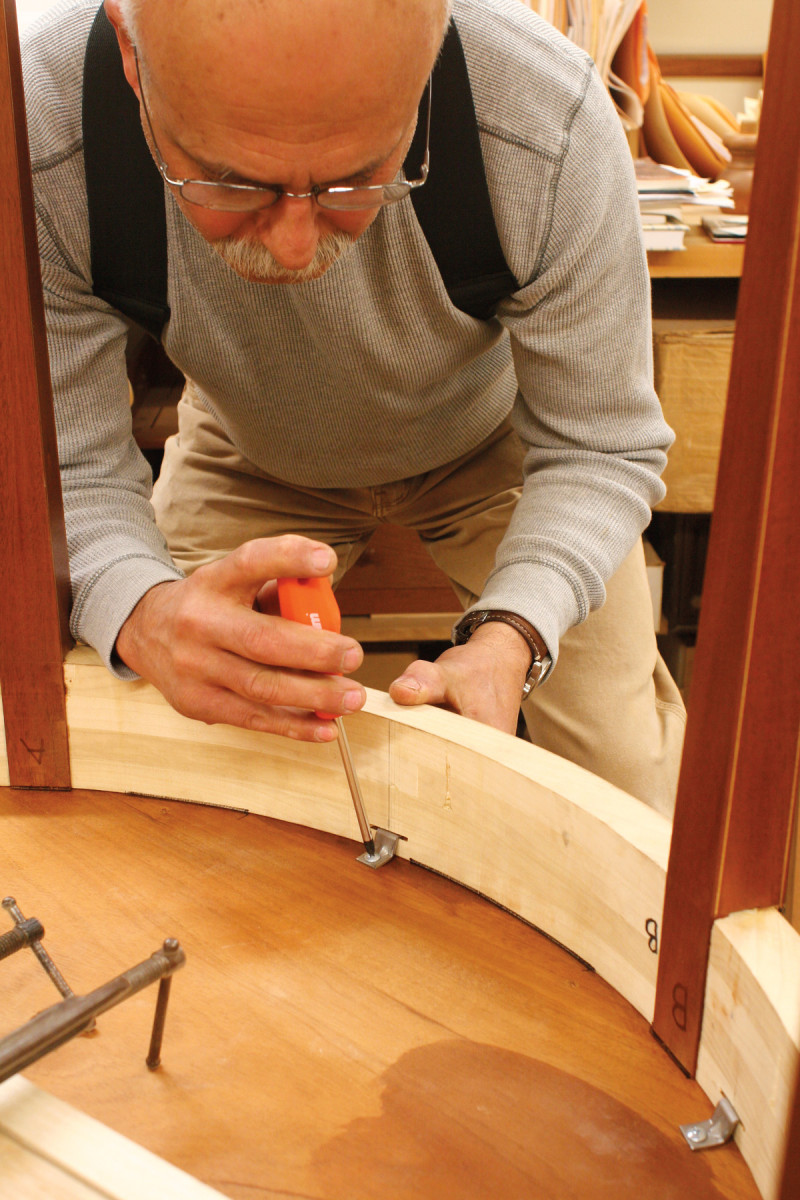
Rout slots along the inside edge of the apron and back rail to receive table top clips (see Sources). Clamp the swinging rail, with the back legs attached, to the back fixed rail. Fasten the top to the base (Photo 17).
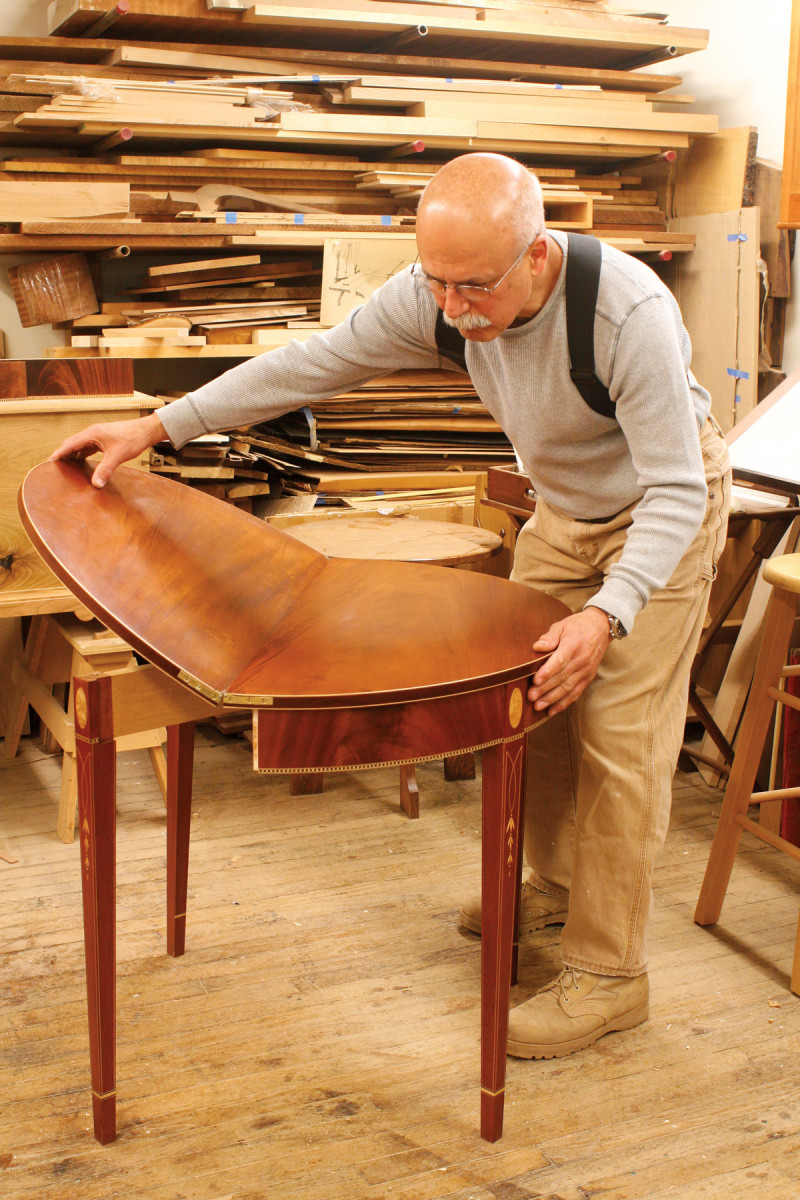
18. Swing out the rear legs 45° and open the top. Make sure the top lies flat on both legs. You may have to unclamp and adjust the position of the swinging rail to achieve this.
Turn over the table and swing out the back legs. Open the top and rest it on the legs (Photo 18). Check that the top lies flat and contacts both legs. If there’s a problem, unclamp the swinging rail and adjust its position.
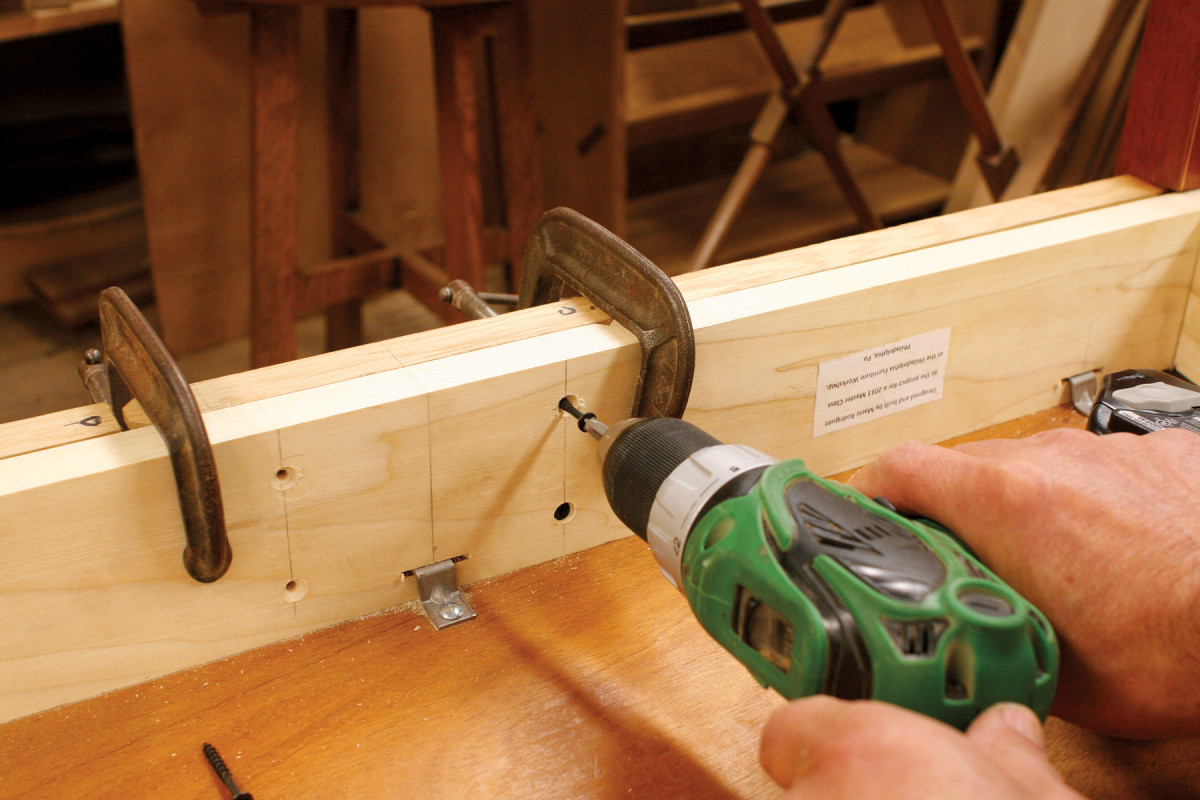
19. Once you’ve made any necessary adjustments, fasten the center portion of the swinging rail to the table.
Once everything is good, screw the swinging rail in place (Photo 19). Cut the pivot pins to final length and peen over their top ends so they won’t slip out some day, many years from now. Yes, this table will be treasured for that long!
Here are some supplies and tools we find essential in our everyday work around the shop. We may receive a commission from sales referred by our links; however, we have carefully selected these products for their usefulness and quality.