


We may receive a commission when you use our affiliate links. However, this does not impact our recommendations.
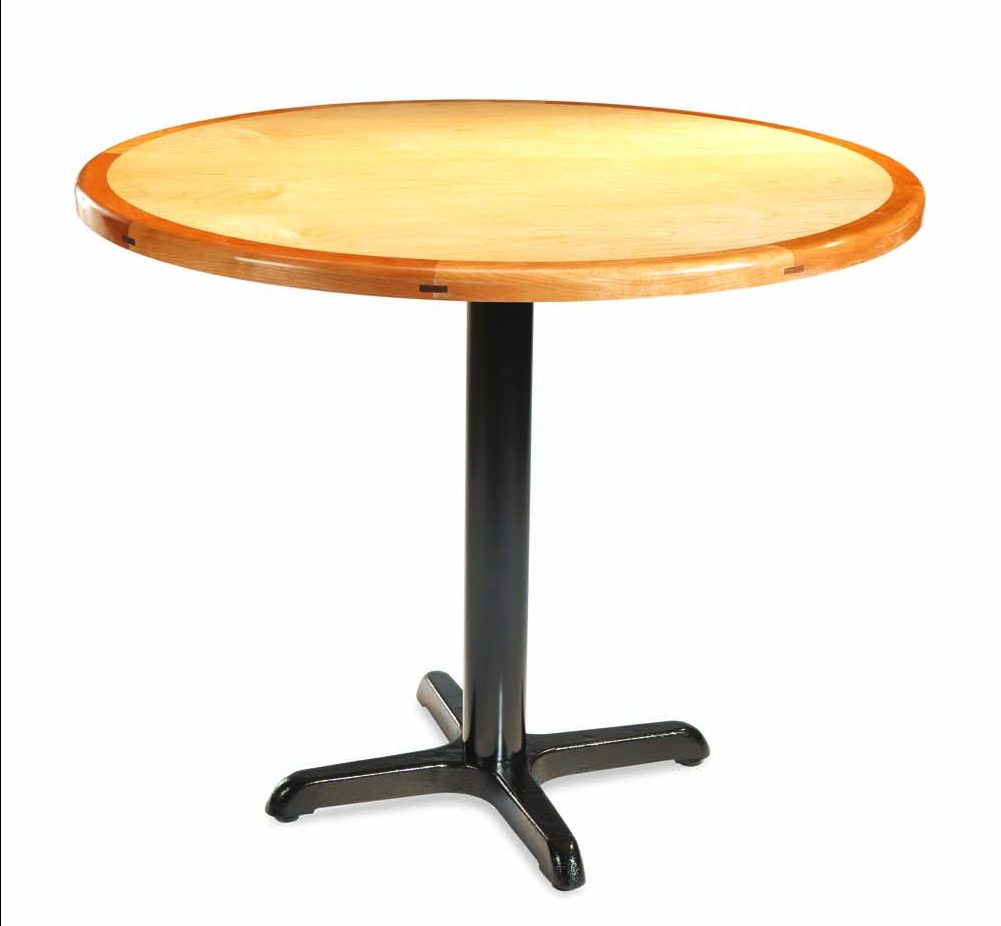
There’s something special about a small table with a round top—it invites intimacy. When I sit at one, I stop and savor warm memories of lingering with my wife in a quiet café or bistro years ago.
The task of making a round top can break that spell, however: it ain’t easy. Well, it could be easy if you just made the whole thing from solid wood sawed into a circle, but I don’t think a top like that has a pleasing look. A linear grain pattern usually fights with its shape.
You could also make a round top by ironing on thin banding around a piece of plywood, but sooner or later that banding will chip or delaminate, spoiling everything.
No, the kind of round top I have in mind has a plywood center and a wide, segmented rim of solid wood running around it. An edge like this can be rounded over to be elbow-friendly and is durable enough to take years of use and abuse.
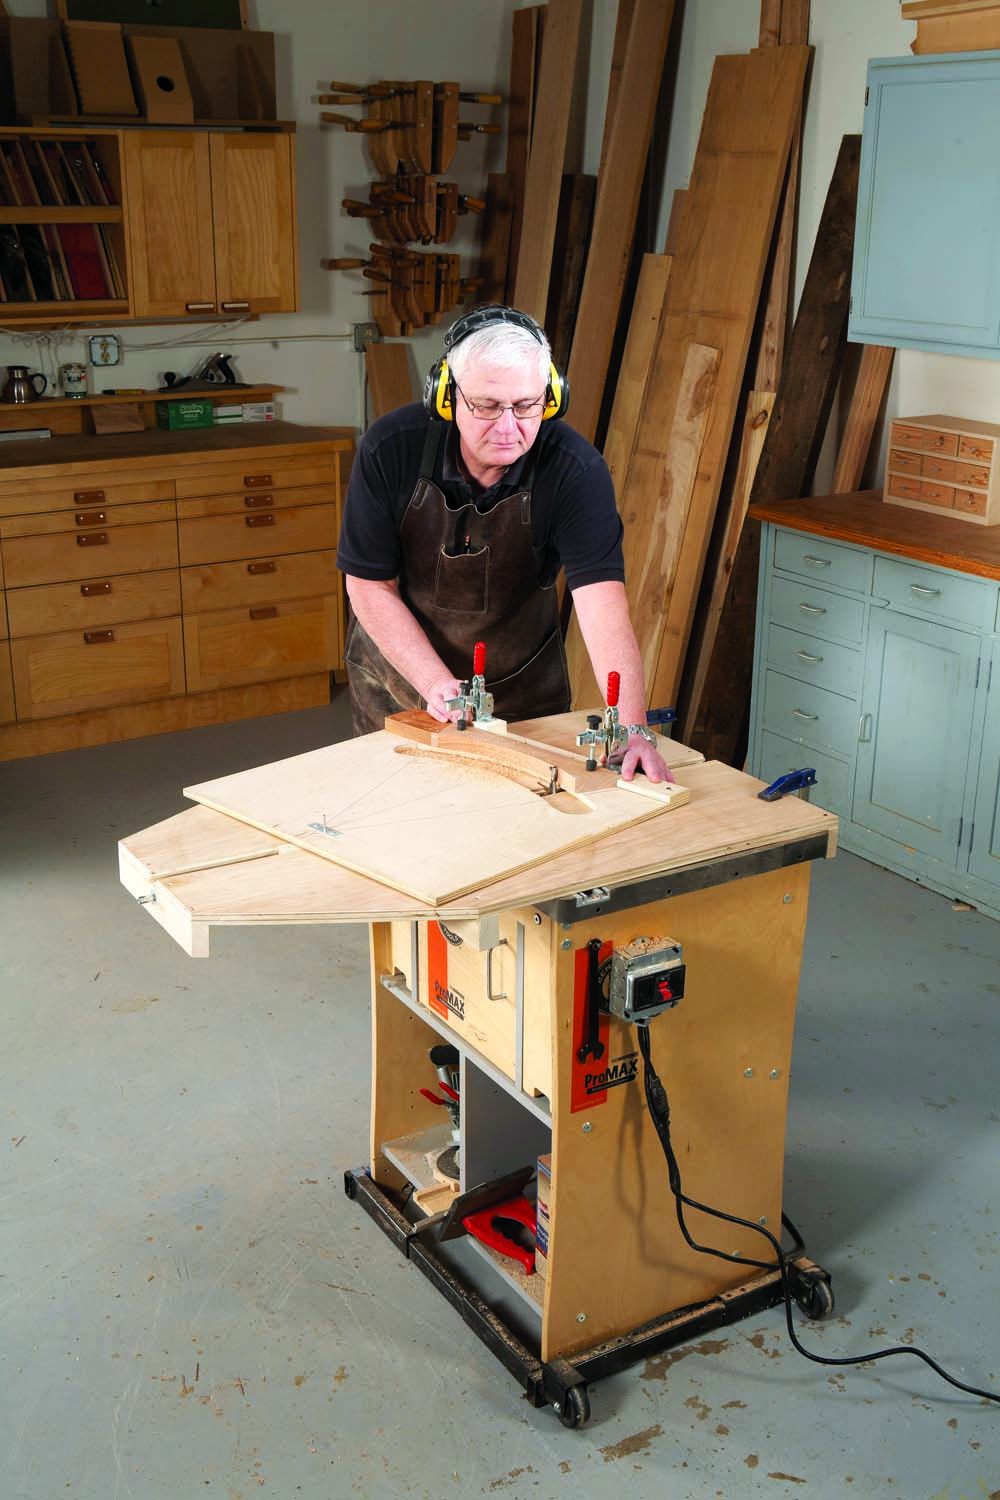
Making that rim fit tight is a perfect job for a router jig. I’ve designed one that makes both the plywood center and the rim with a high degree of precision. Before getting into the details of how to build the jig and how to use it, let’s take a quick look at what it does.
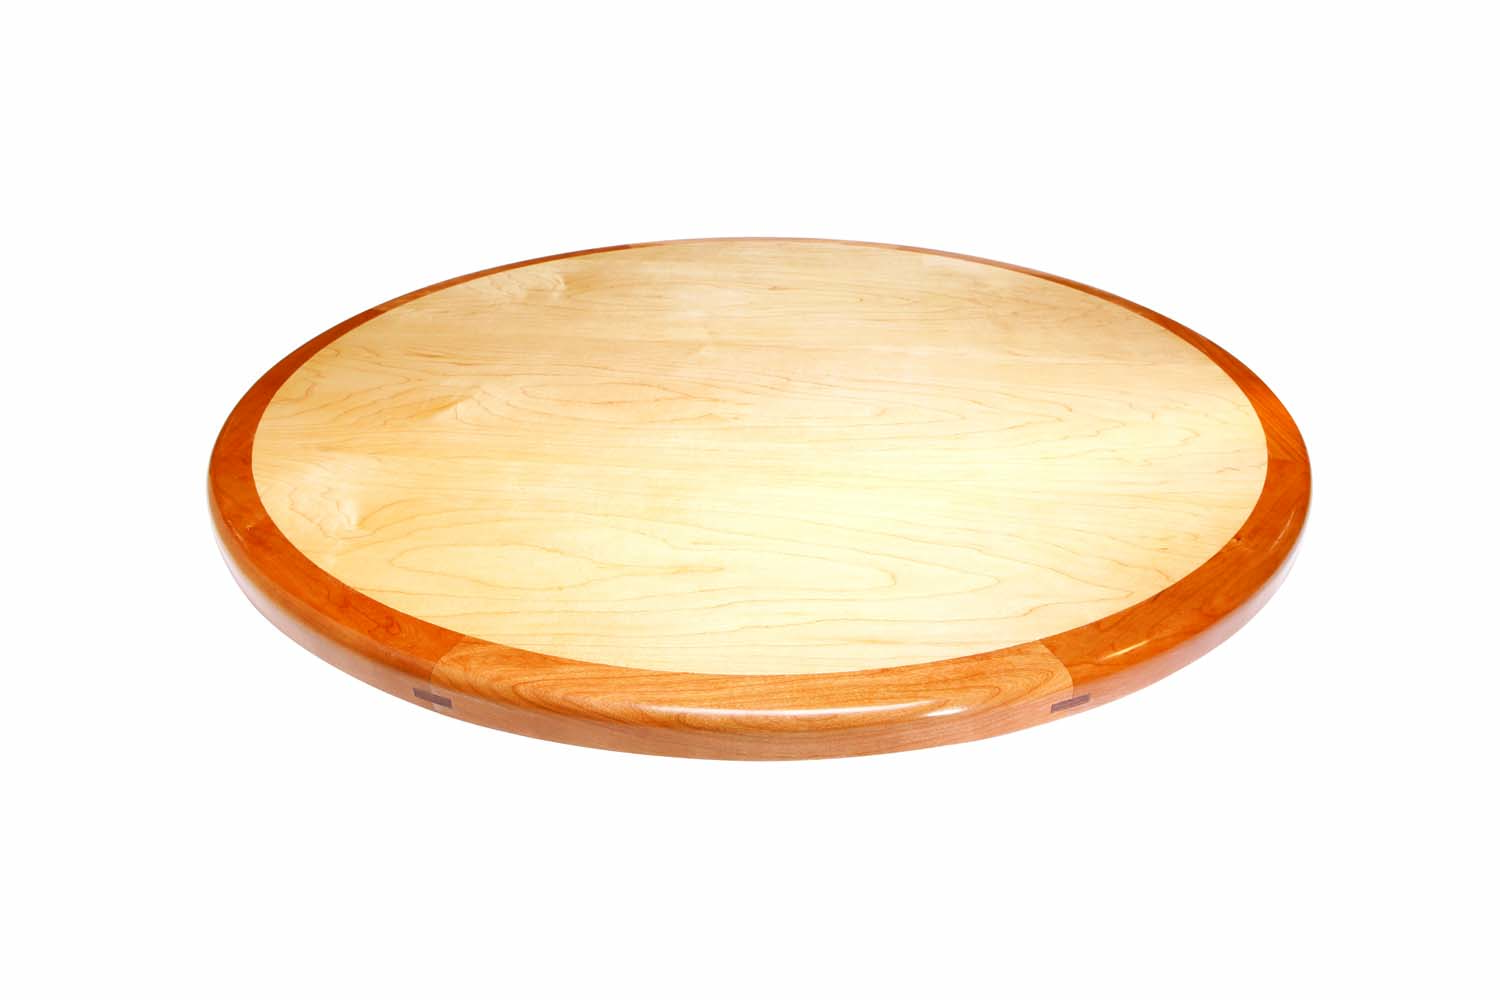
In this article, you’ll learn how to build a top like this of any size. The center of the top is birch plywood, while the rim is solid cherry. You’ll make both parts using just one router table jig.
Quick Start Guide
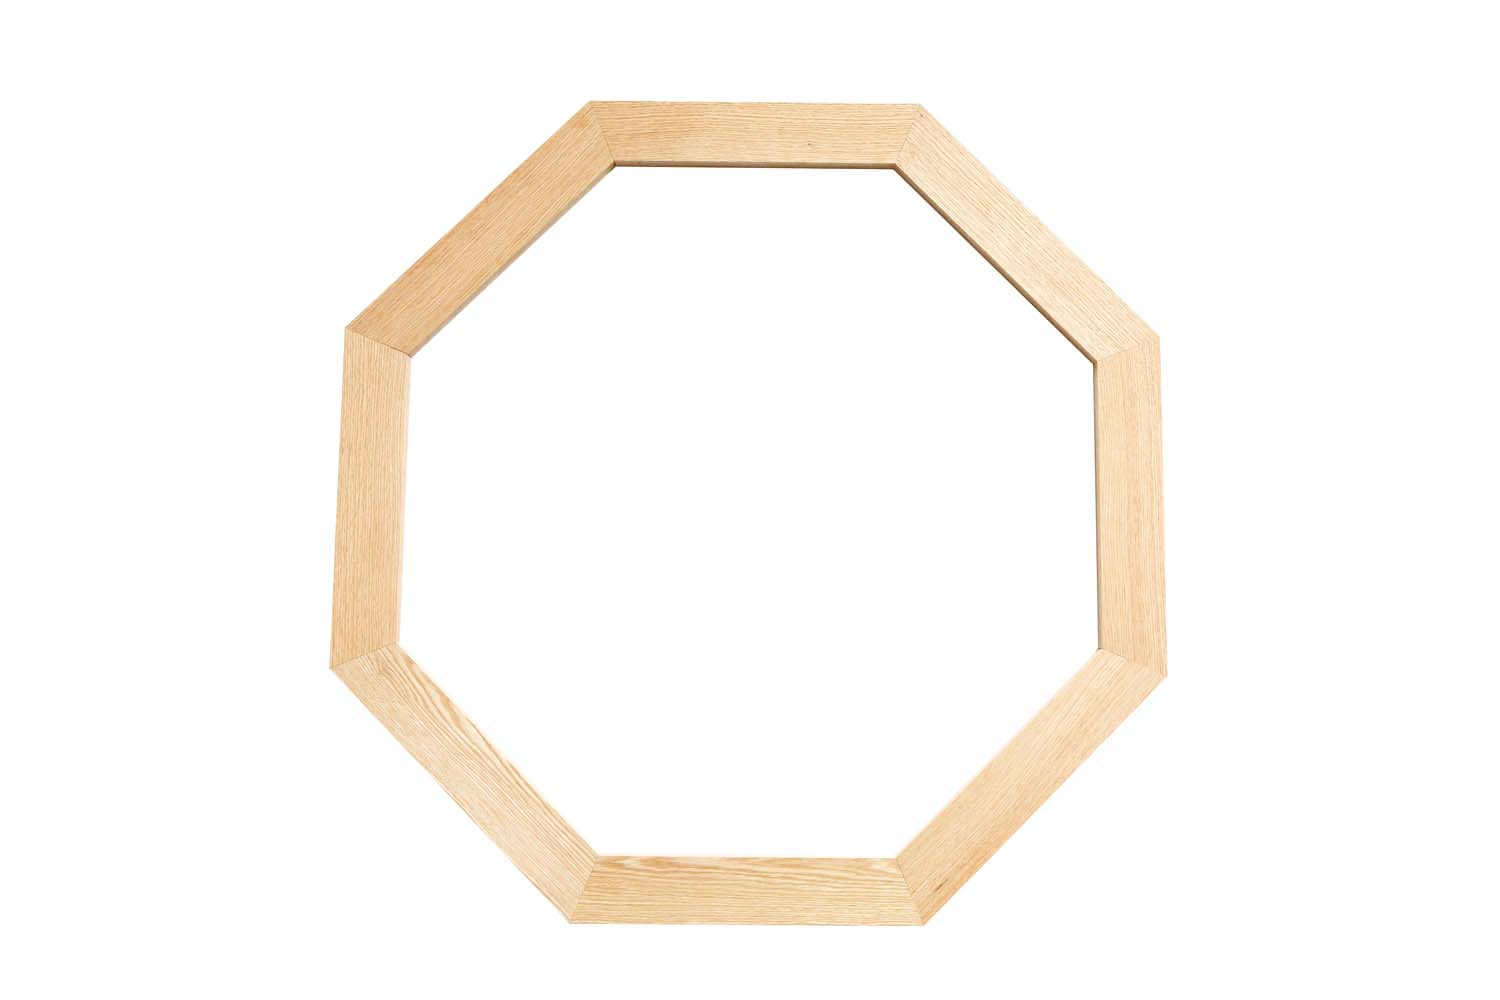
Step 1. Cut the wood for the rim segments so the pieces make a perfect octagon.
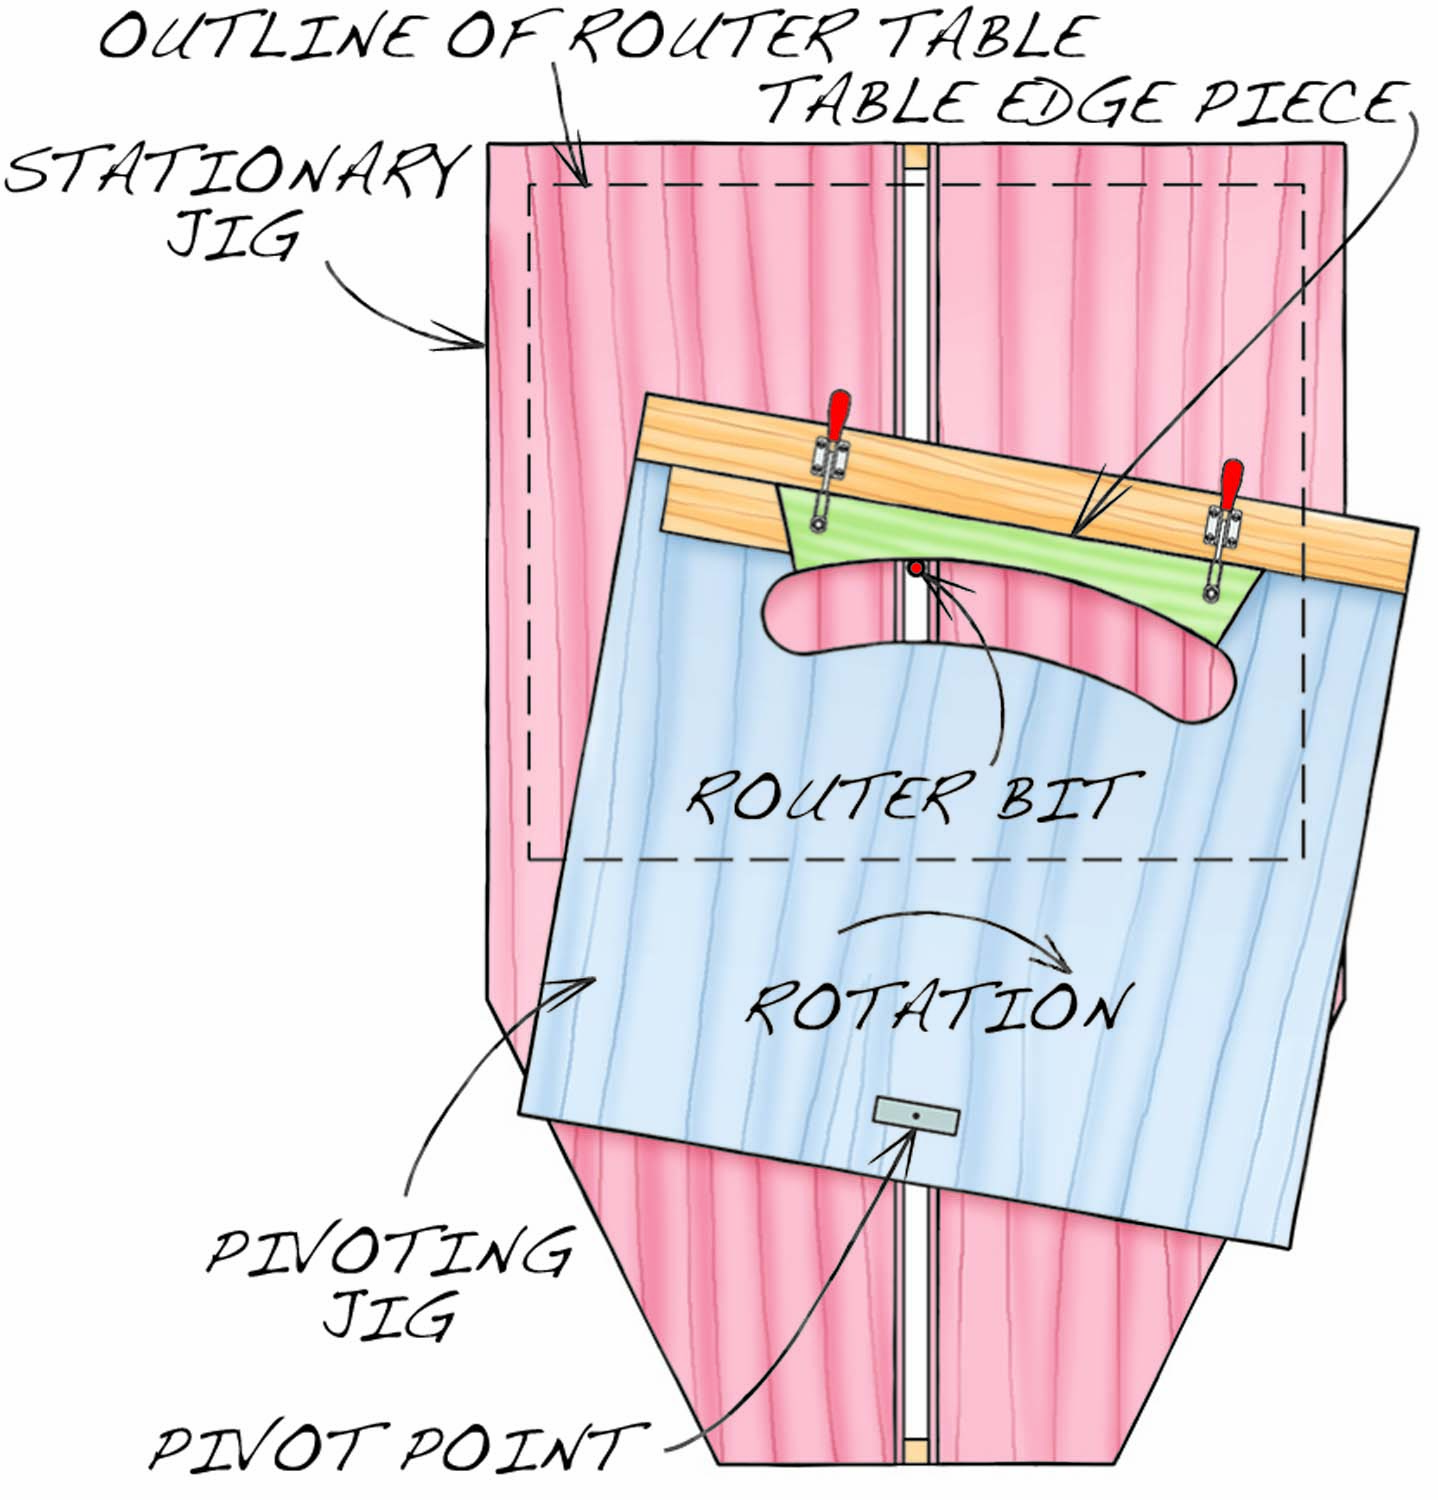
Step 2. (Fig. 05.) Rout circular arcs on the inside edge of each segment. The jig has two major parts; this step uses both of them.
Step 3. Clamp all of the pieces end to end, forming a straight-sided doughnut with a big hole in the center.
Step 4. (Fig. 06.) Make a plywood center that fits perfectly inside the doughnut. Here, you only use the lower section of the jig.
Step 5. Glue the rim segments around the plywood, using spline to keep them aligned.
Step 6. Cut the outside edge of the top into a circle, level the rim segments and rout a profile around the top.
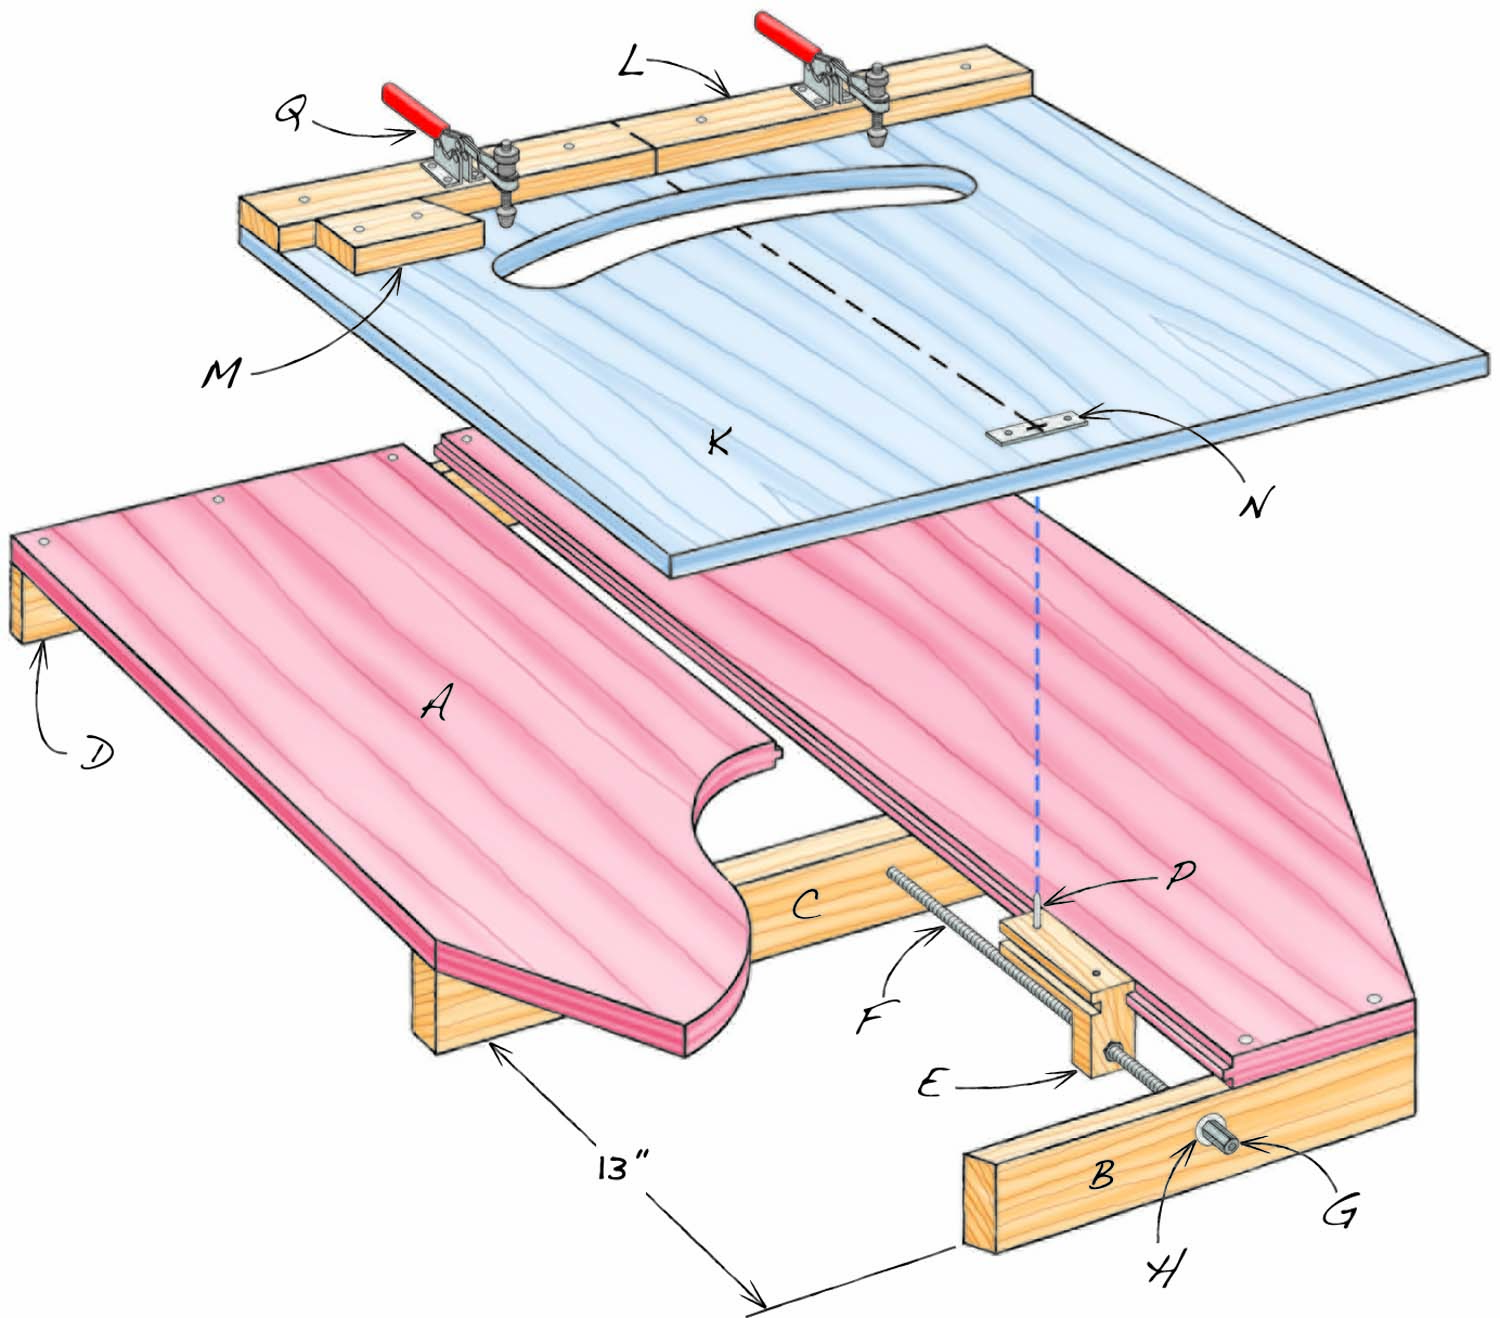
Fig. 01. Exploded View
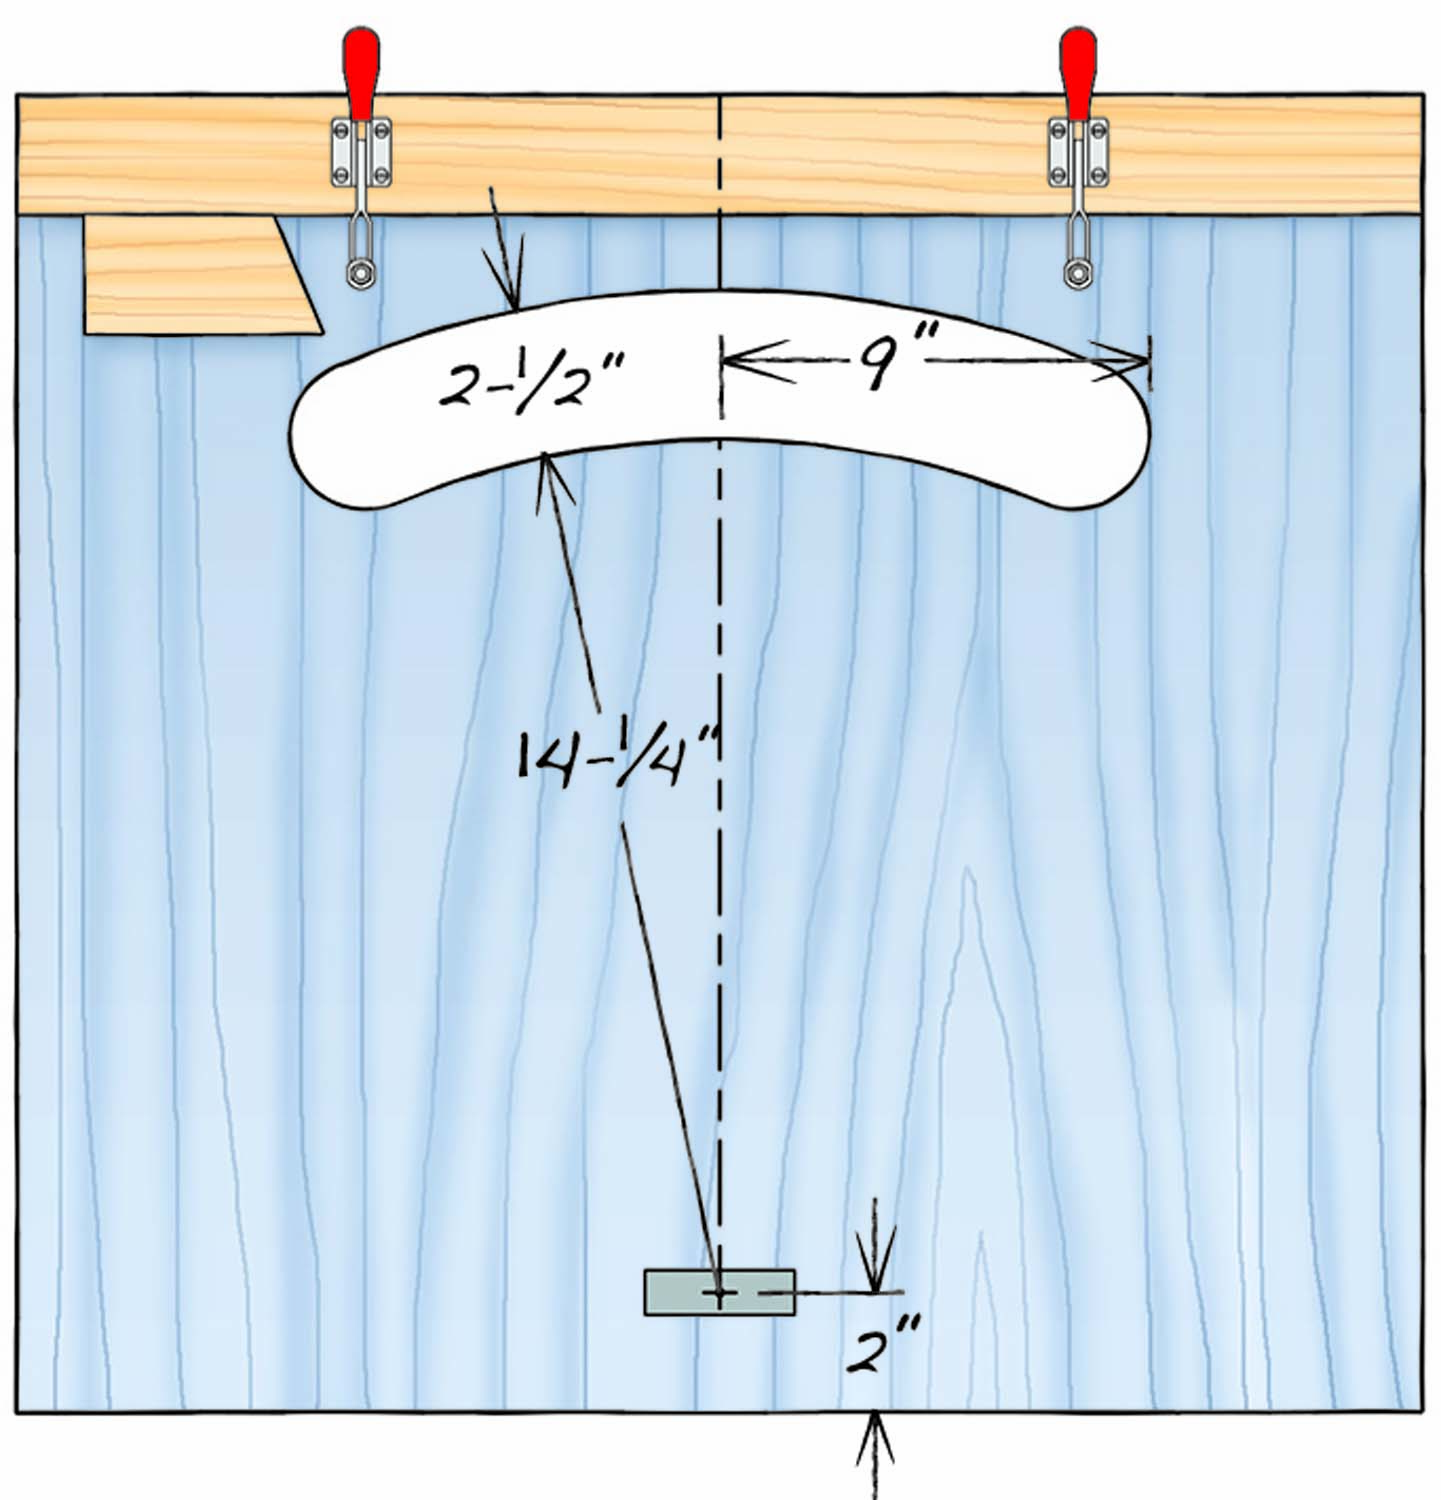
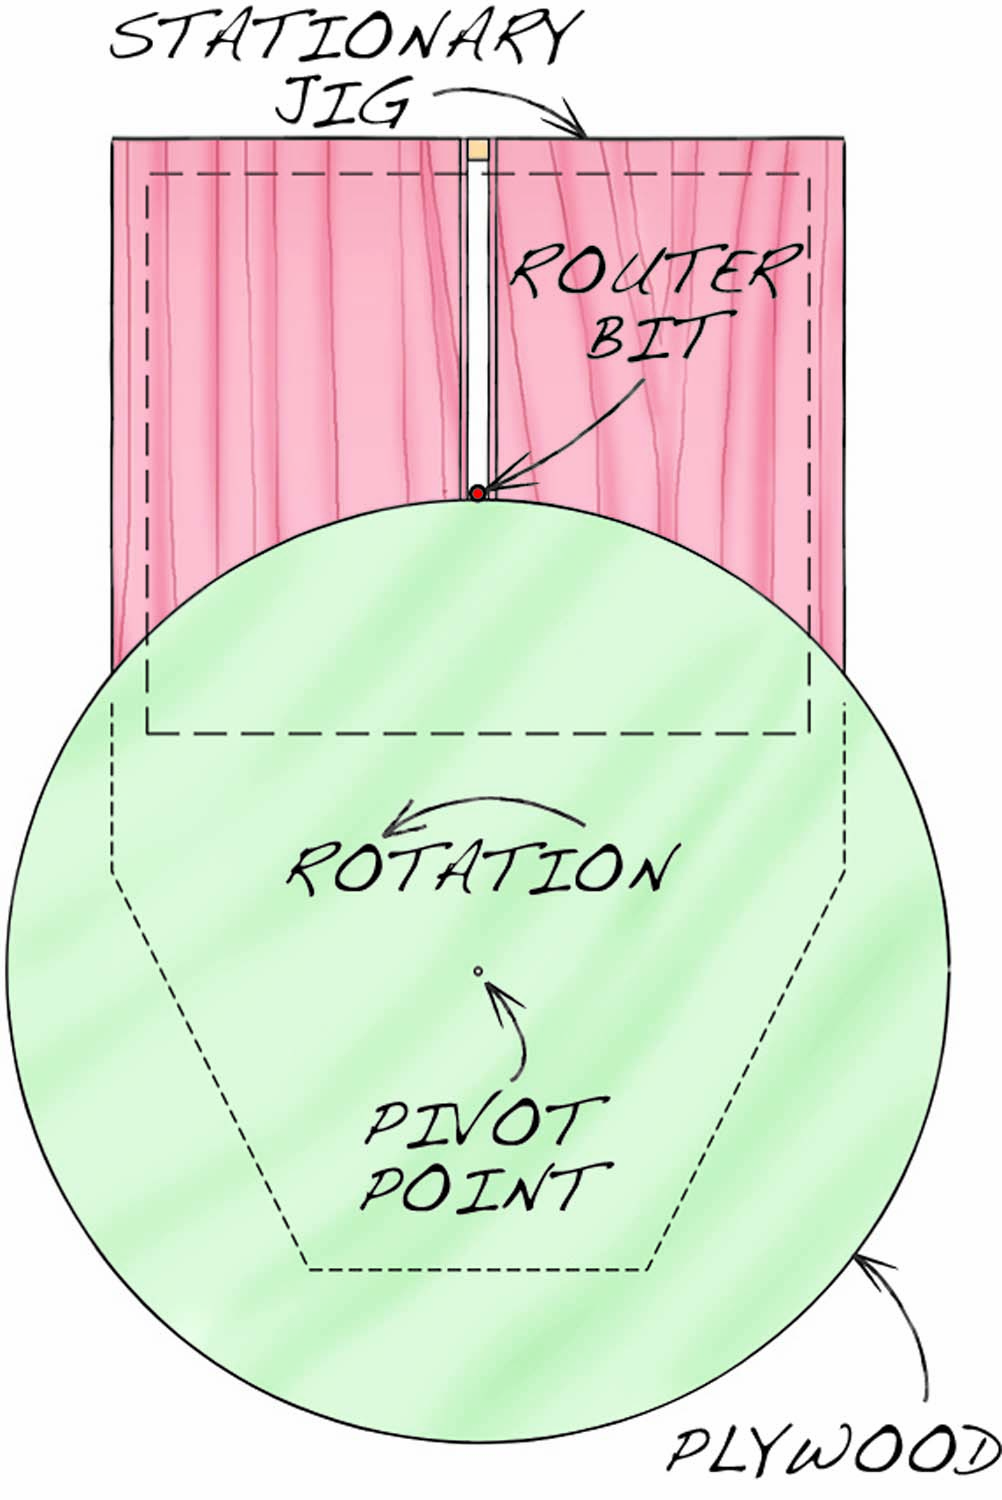
Fig. 02. Plan View of Pivoting Jig
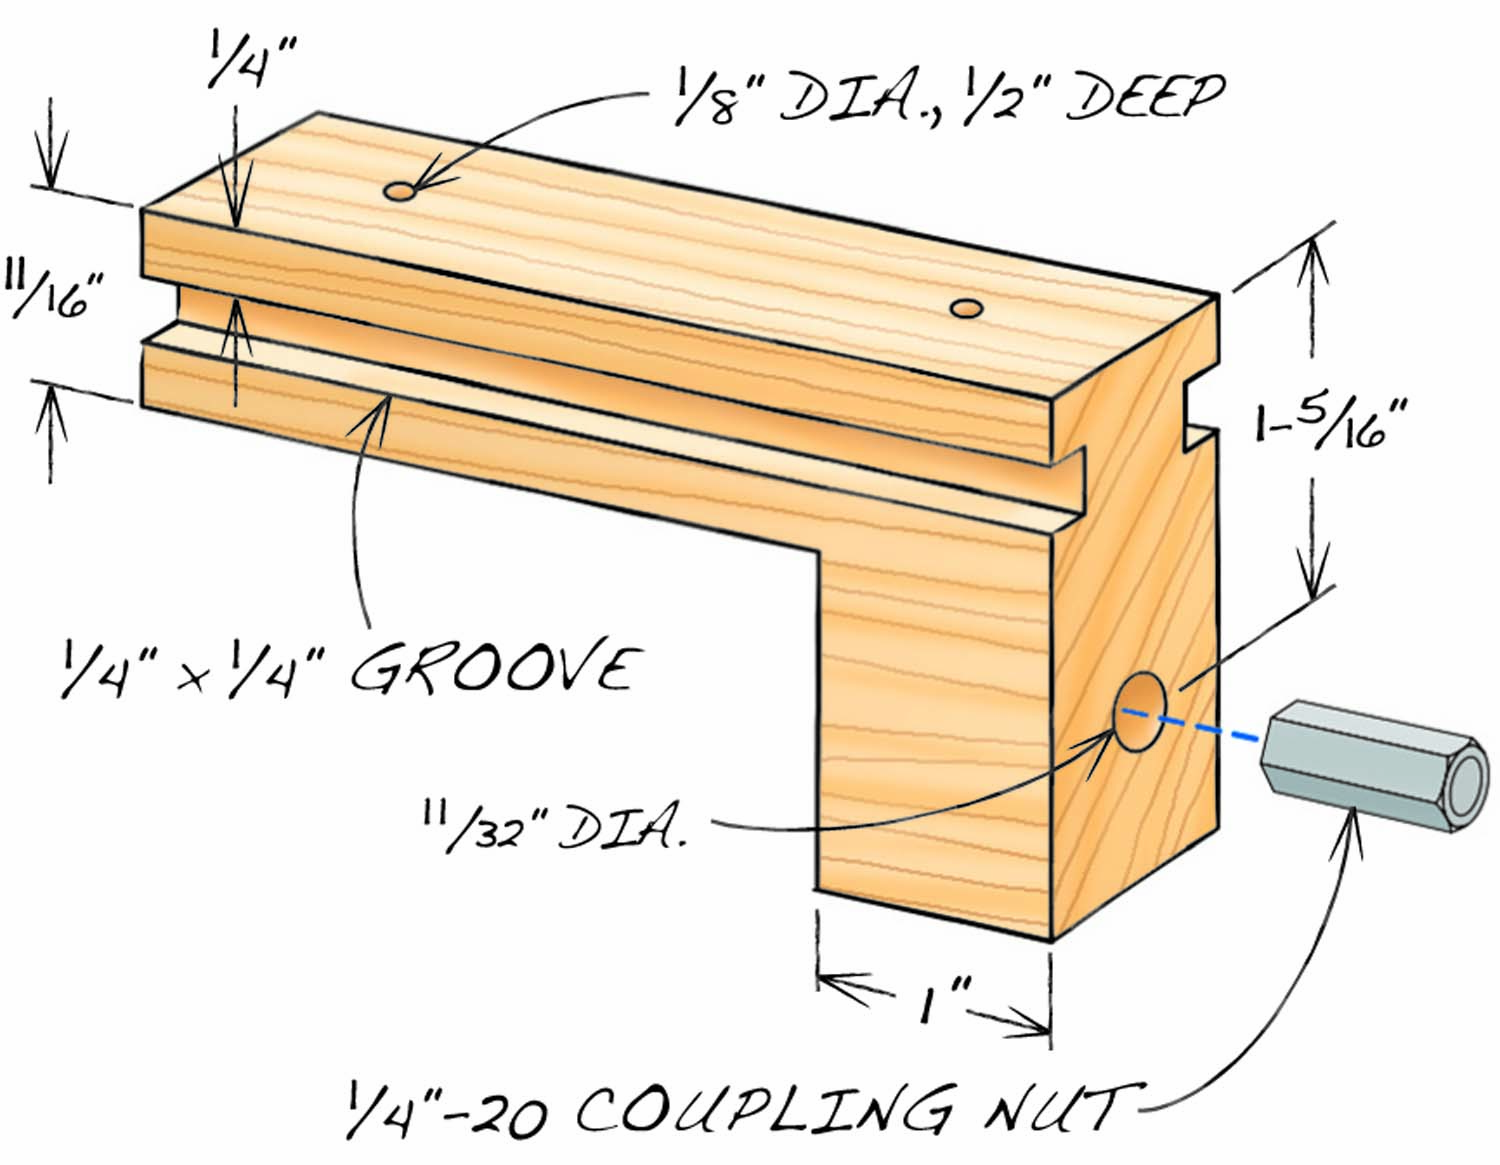
Fig. 03. Pivot Block
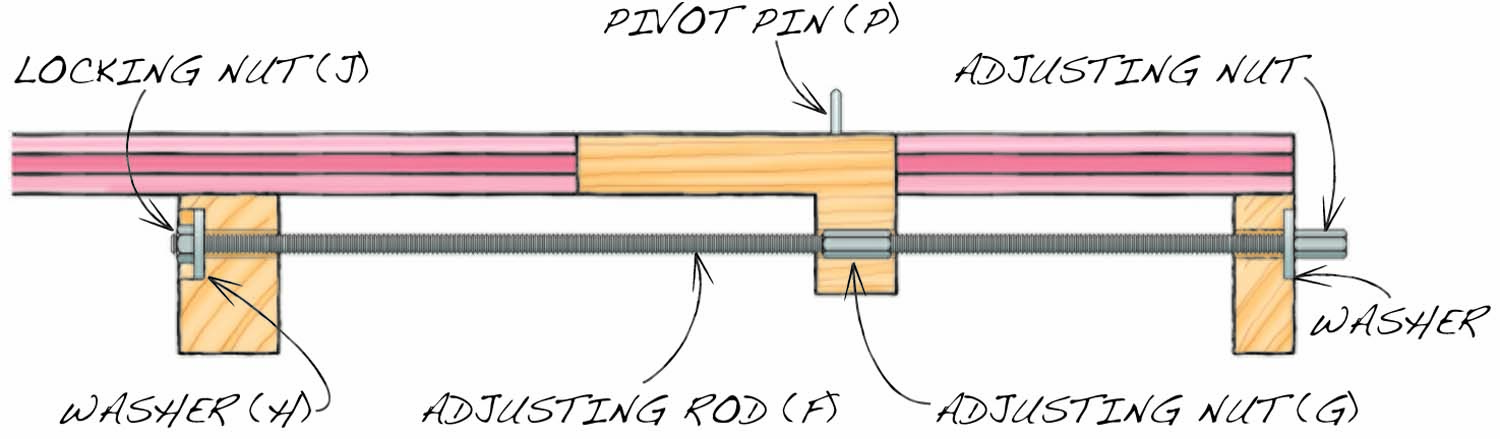
Fig. 04. Cross Section of Stationary Jig
Cut List
|
Table Rim Jig |
|||||
|
Overall Dimensions: 25-3/4 W x 39-3/4 L x 4″ H |
|||||
|
Section |
Part |
Name |
Qty. |
Material |
Th x W x L |
|
Stationary jig |
A |
Platform |
2 |
Plywood |
3/4″ x 12-1/2″ x 39-3/4″ |
|
B |
Cleat 1 |
2 |
Hardwood |
3/4″ x 2″ x 12-1/2″ |
|
|
C |
Cleat 2 |
1 |
Hardwood |
1-1/4 x 2″ x 26″ |
|
|
D |
Cleat 3 |
1 |
Hardwood |
3/4″ x 2″ x 26″ |
|
|
E |
Pivot block |
1 |
Hard maple |
1-1/4″ x 2″ x 4″ |
|
|
F |
Adjusting rod |
1 |
All-thread rod |
1/4-20 x 16″ |
|
|
G |
Adjusting nut |
2 |
Coupling nut |
1/4-20 x 7/8″ L |
|
|
H |
Washer |
2 |
Fender washer |
1/4″ x 1″ dia. |
|
|
J |
Locking nut |
1 |
Locknut |
1/4-20 |
|
|
Pivoting jig |
K |
Base |
1 |
Plywood |
1/2″ x 23-1/2″ x 22″ |
|
L |
Fence |
1 |
Plywood |
1/2″ x 2″ x 23-1/2″ |
|
|
M |
Stop |
1 |
Hardwood |
3/4″ x 2″ x 4″ |
|
|
N |
Pivot plate |
1 |
Aluminum |
1/16″ x 3/4″ x 2-1/2″ |
|
|
P |
Pivot pin |
1 |
Steel |
1/8″ dia. x 7/8″ |
|
|
Q |
Hold-down clamp |
2 |
|||
Build the Jigs
I designed these jigs to make tabletops from 28″ to 48″ in diameter. They’re very easy to build and also easy to modify for making tables of smaller or larger diameters. The fixed jig fits a router table with a top that’s less than 24″ deep.
Build the fixed jig first, starting by shaping tongues on both inside edges of the platforms (A). Make the three cleats (B, C and D), but don’t yet drill holes in them for the adjusting rod (F). Make the pivot block (E, Fig. 03) from a piece that’s at least 12″ long, for safety. Cut grooves the full length of this piece, then cut one end into the shape of an L. Lastly, cut the pivot block to final length. Drill a hole in it for the adjusting nut (G). Next, drill holes in the cleats for the washers (H) and adjusting rod—make sure that the centers of these holes align with the center of the hole in the pivot block (Fig. 04).
Fasten the cleats to the platforms so the pivot block slides without wiggling. Permanently mount an adjusting nut onto the front end of the adjusting rod using epoxy or Loctite. When you install the adjusting rod, tighten the locking nut (J) so the pivot block doesn’t have any front-to-back play.
The arc-shaped window in the pivoting jig’s base (K, Fig. 02) need not be precise—you can cut it with a jigsaw and leave the edges rough. Fasten the pivoting jig’s fence (L) so it’s even with the base. You’ll add the stop (M) later; its location will depend on the exact size of the rim pieces you make. Position the pivot plate (N) so that the distance from its hole to the fence equals the radius of the top you’re making (including the rim pieces.) Using a framing square, draw a centerline from the fence to the hole in the pivot plate, then extend the centerline up and over the fence.
Begin with the Rim
Let me show you how I used the jigs to make a top with an 8-sided rim that’s 36″ in diameter. First I drew the top full scale on a piece of plywood and figured out that if the rim was to be 2″ wide, I’d need to start with blanks that were 2-7/8″ wide and exactly 17″ long, from outside point to outside point. (Although the center of the top will be made from 3/4″ plywood, I made the rim pieces 1-1/4″ thick to make the whole top appear thicker.) So here’s where you’ll start: with a target diameter, a drawing and a precise size for the rim blanks.
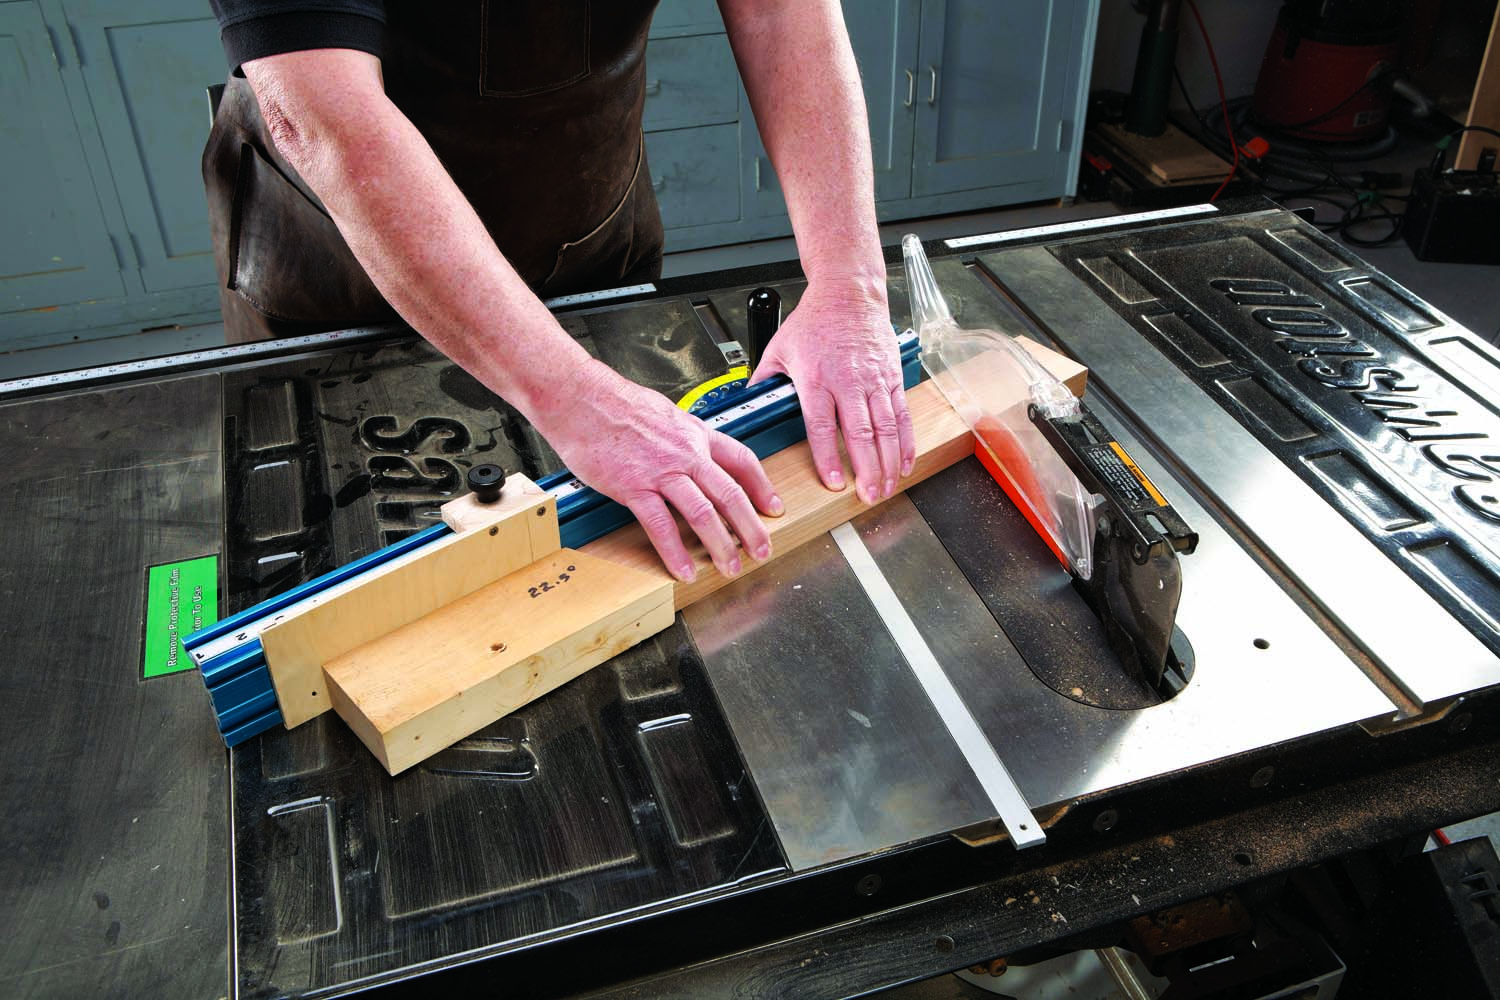
Photo 1. Make the rim segments first. This table will have 8, forming an octagon, so their ends must be cut at precisely 67-1/2°.
The next step is to cut the blanks accurately enough to form an octagon whose miters are perfectly tight (Photo 1 and “How to Make a Perfect Octagon,” at end). Make a few extra blanks in order to test your setups later on. Make a stop block (M) with one end cut at the same angle as the blanks. Draw a precise centerline across one of the blanks, then clamp the piece onto the pivoting jig (Photo 2). Fasten the stop to the jig.
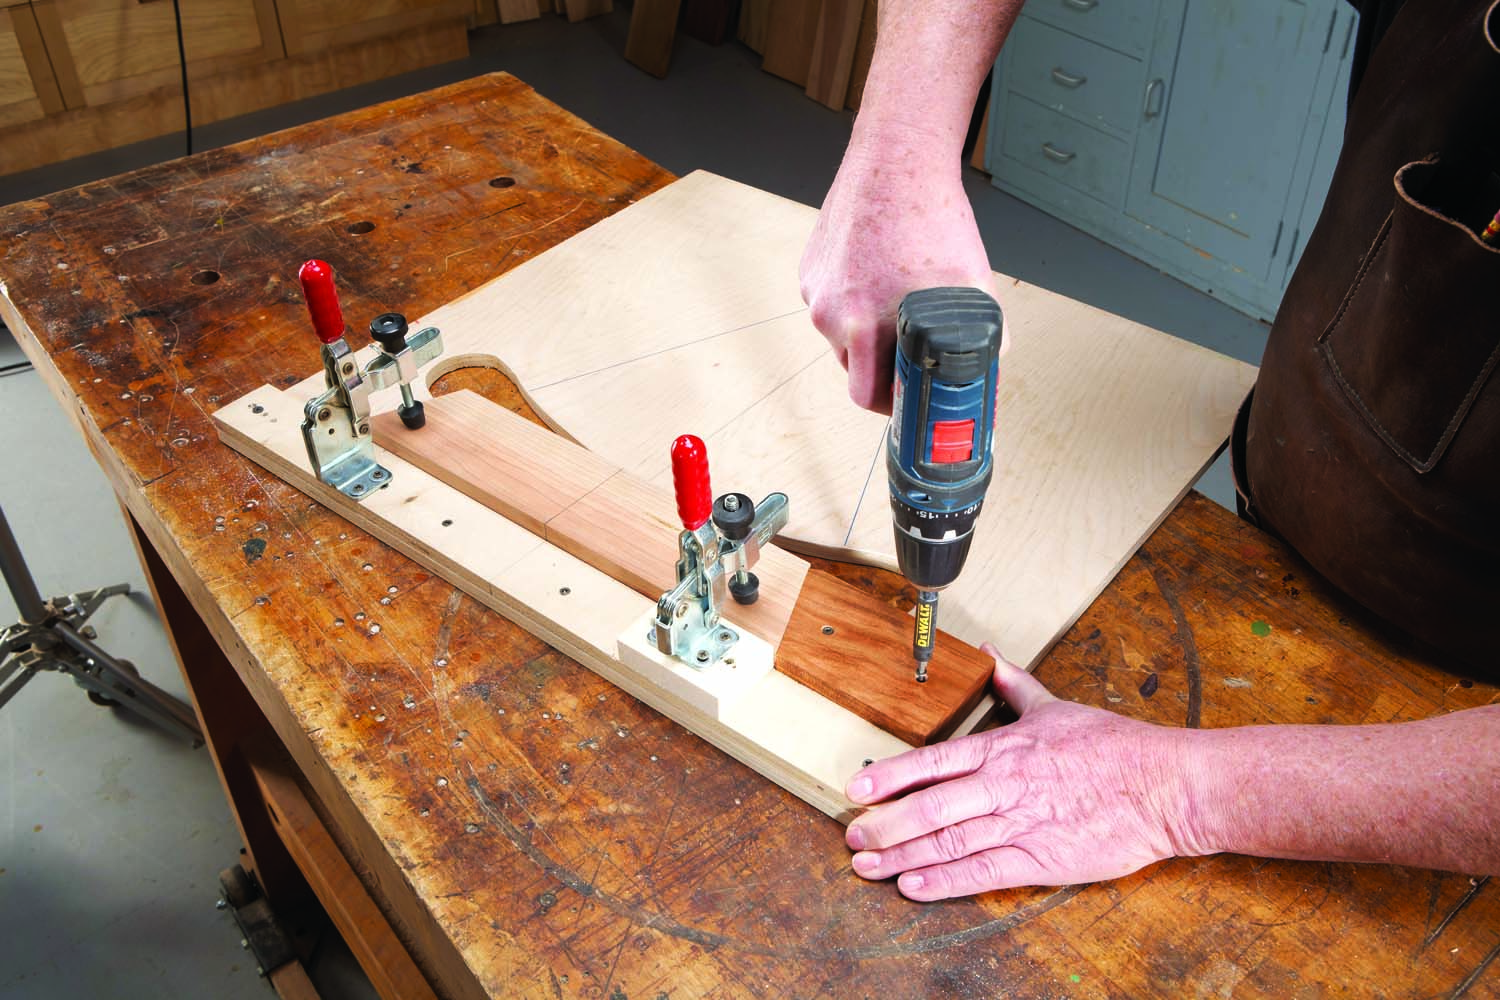
Photo 2. Line up the center of one segment with the centerline of the jig. Butt a stop against the segment and attach the stop to the jig.
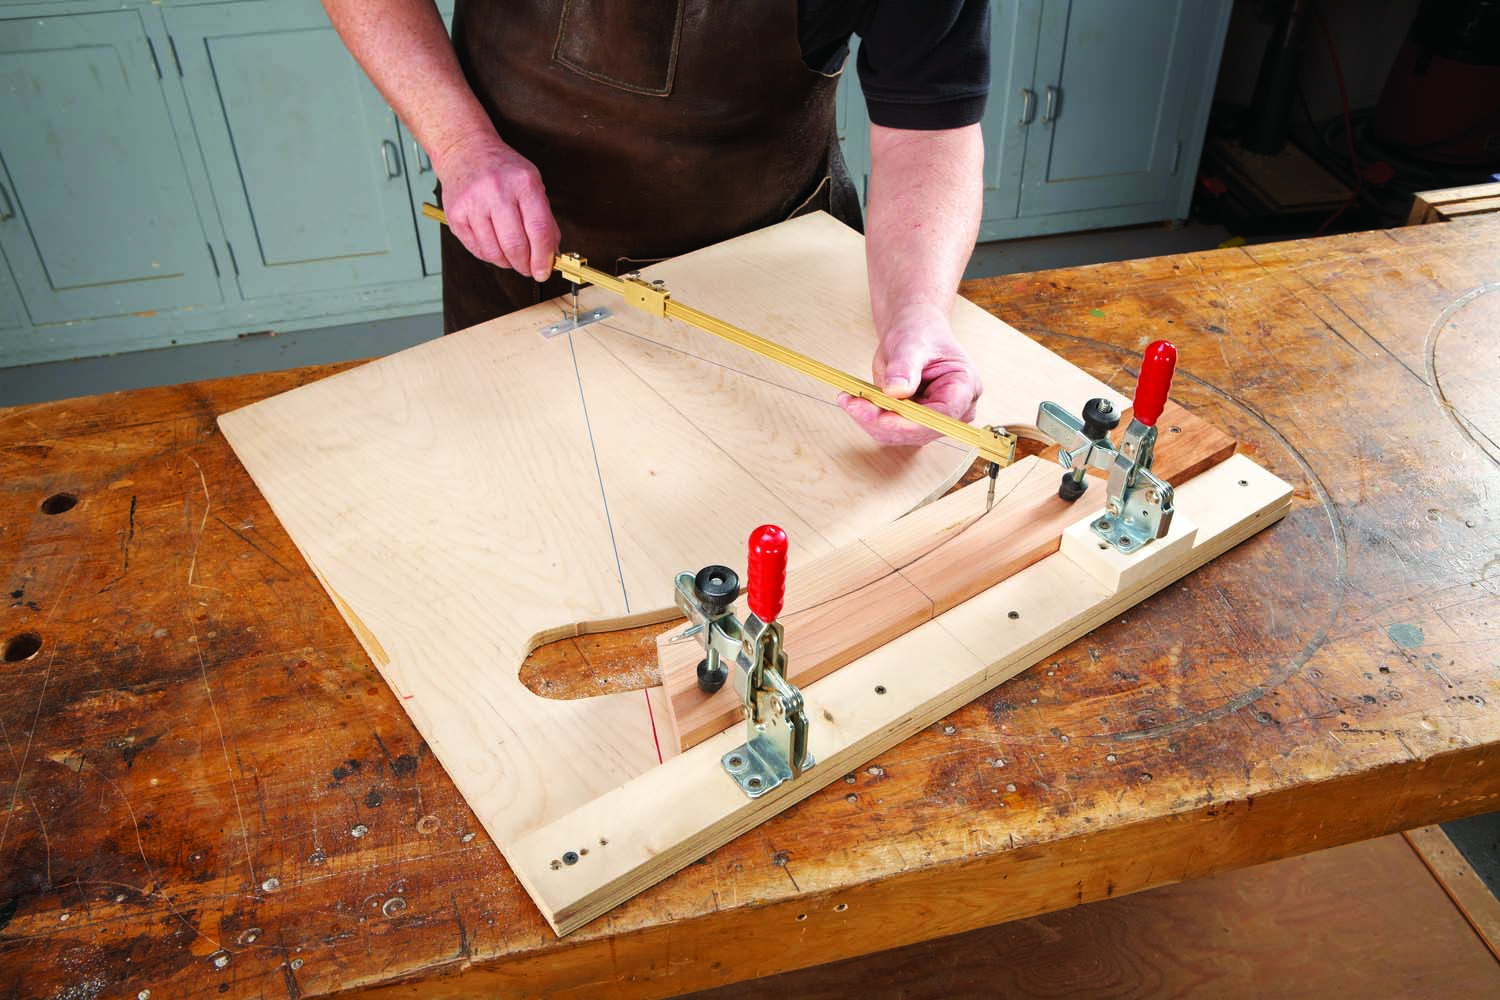
Photo 3. Use a trammel to draw an arc on the segment. The arc represents the inner, curved edge of the rim. Place the center of the trammel in a hole drilled through a metal plate attached to the jig.
Draw the rim’s inside radius on one of the blanks (Photo 3), then remove the waste from the blank with a bandsaw (Photo 4). Use this piece as a pattern to mark and saw the remaining blanks.
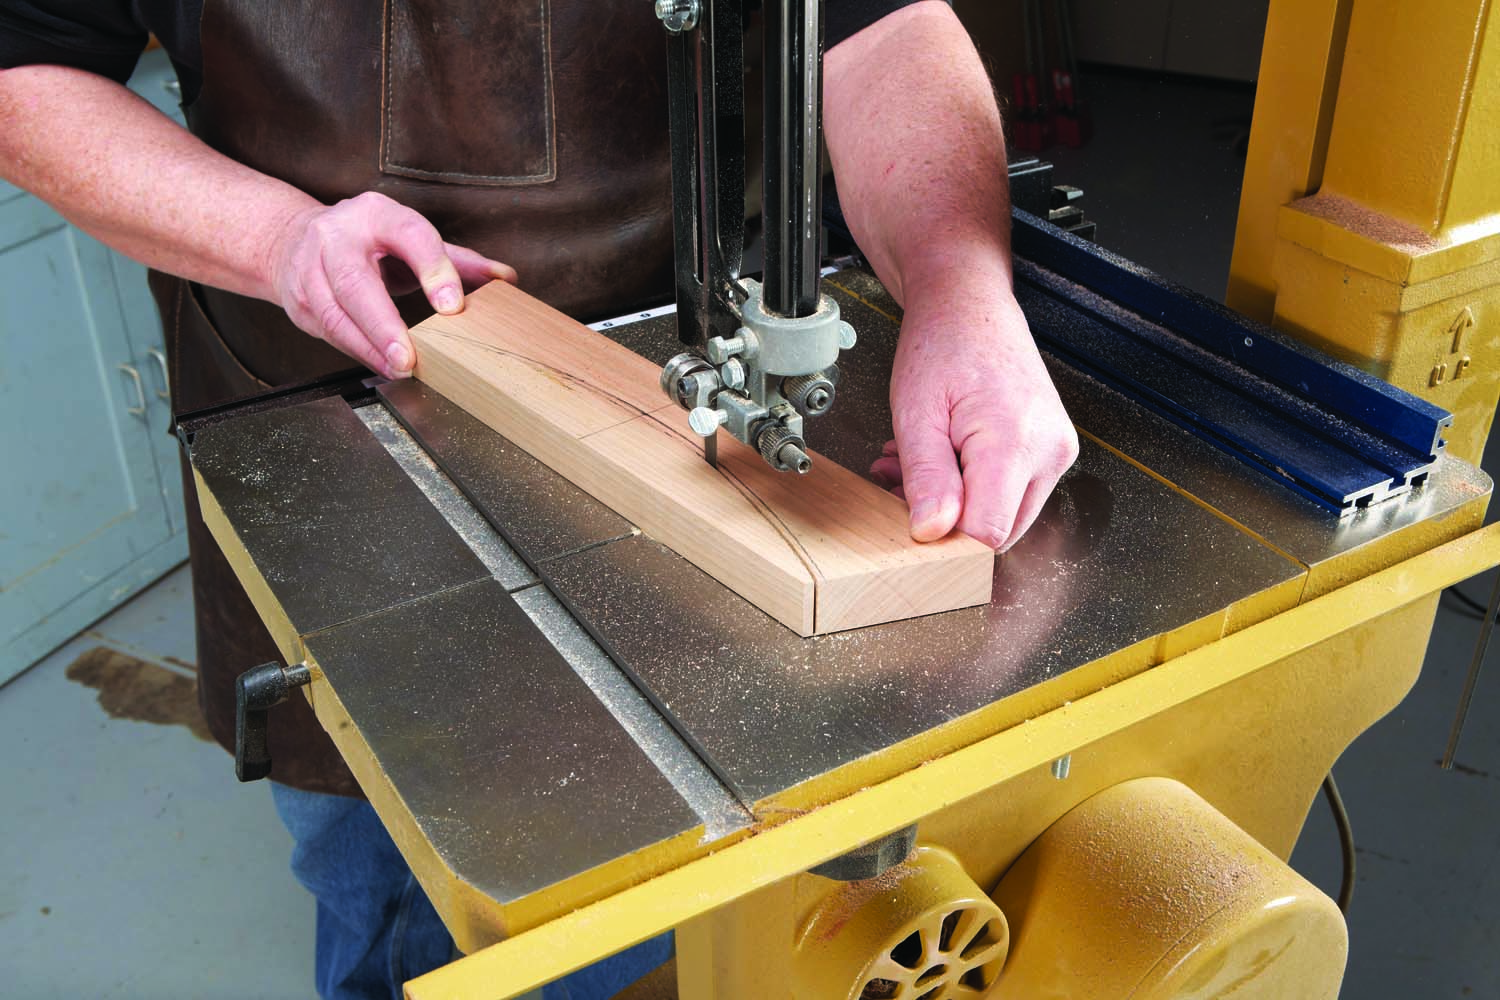
Photo 4. Saw the inner edges of all the segments. This is a rough cut, so stay at least 1/8″ inside the pencil line.
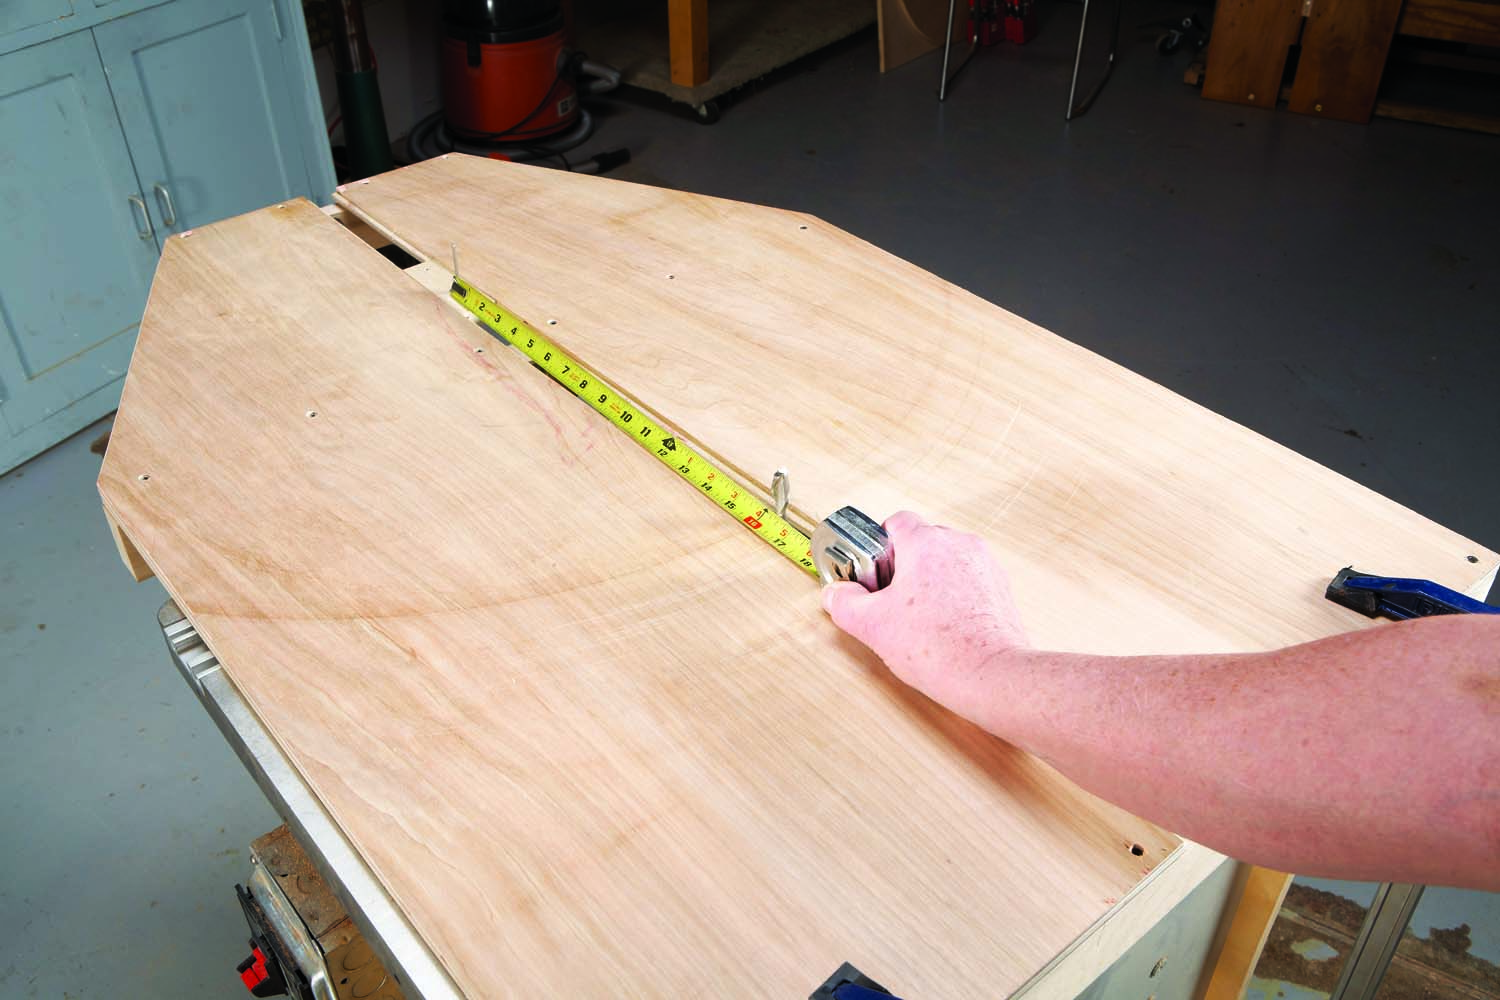
Photo 5. Clamp the lower half of the jig to your router table. Set the distance between a pin in the jig’s pivot block and the inside edge of the router bit equal to the trammel setting.
Install a 1/2″ dia. bit in your router table (an upcut spiral bit will make the smoothest cut), then clamp the fixed jig to the back of the machine (Photo 5). Adjust the position of the jig’s pivot block so that the distance from its pin to the outside edge of the router bit equals the inside radius of the rim. Mount one of the test pieces in the pivoting jig and rout its inside edge (Photo 6). Take two passes to make a clean cut. Turn off the router between passes and when clamping a new piece in the jig.
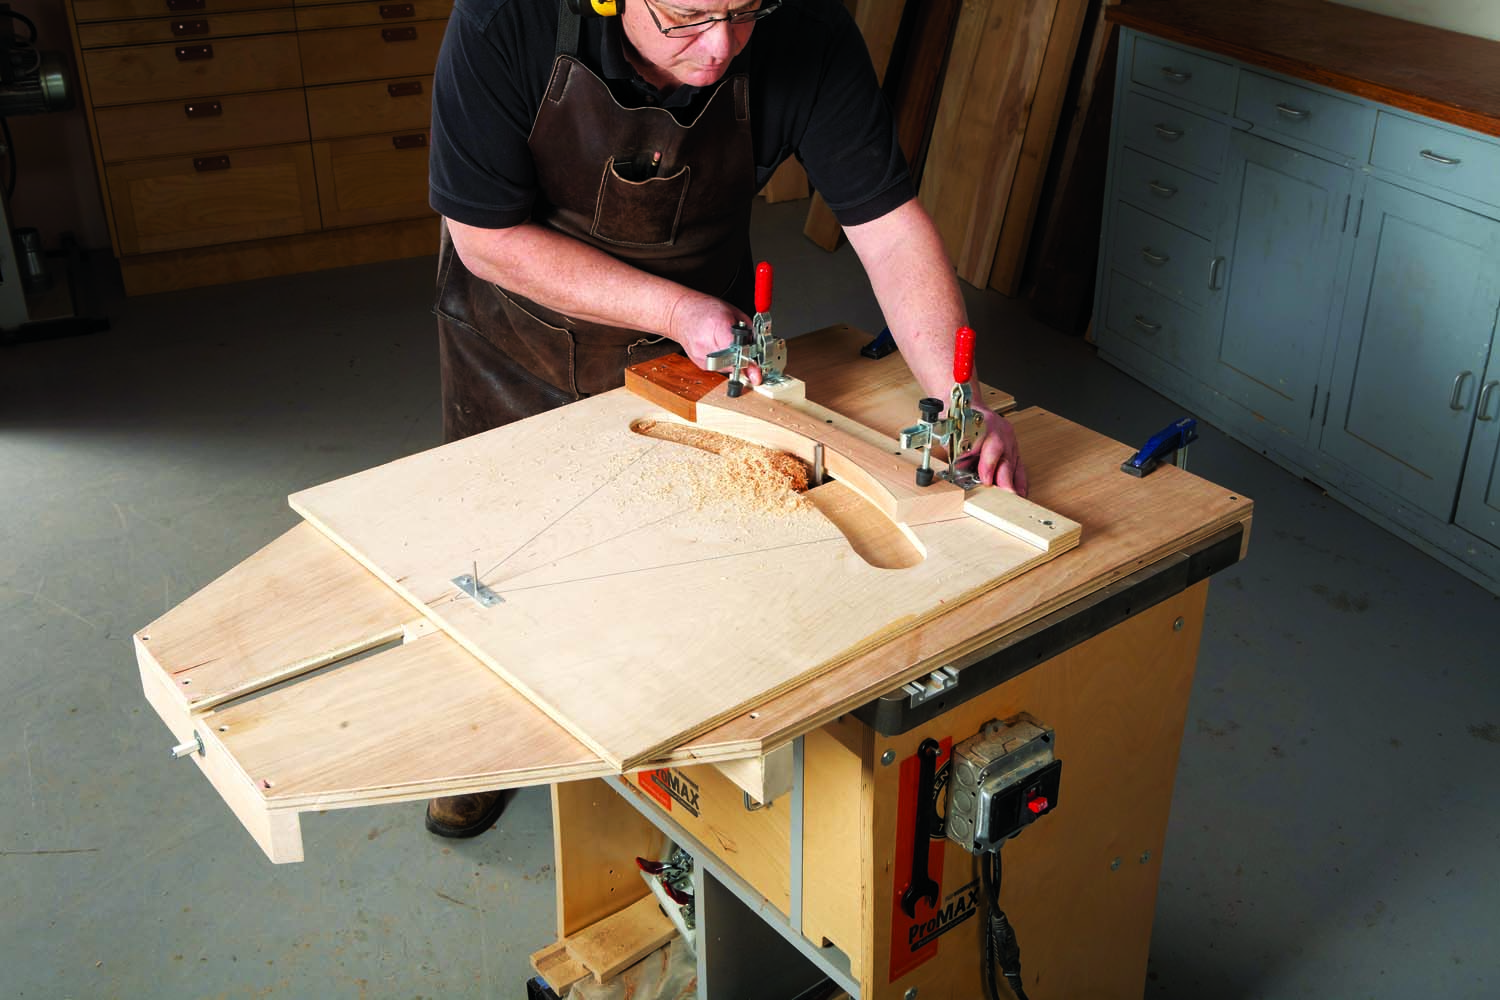
Photo 6. Place the upper half of the jig on the router table and rout the inner edges of the rim segments. Caution: Push the jig only away from yourself, against the rotation of the bit.
Photo 7. Measure both ends of each segment; they must be precisely the same width.
See if both ends of the test piece are the same length (Photo 7). If they’re not, add a shim or two to the jig (Photo 8) and try again. This system ensures that all the inside arcs on the rim pieces form a perfect circle.
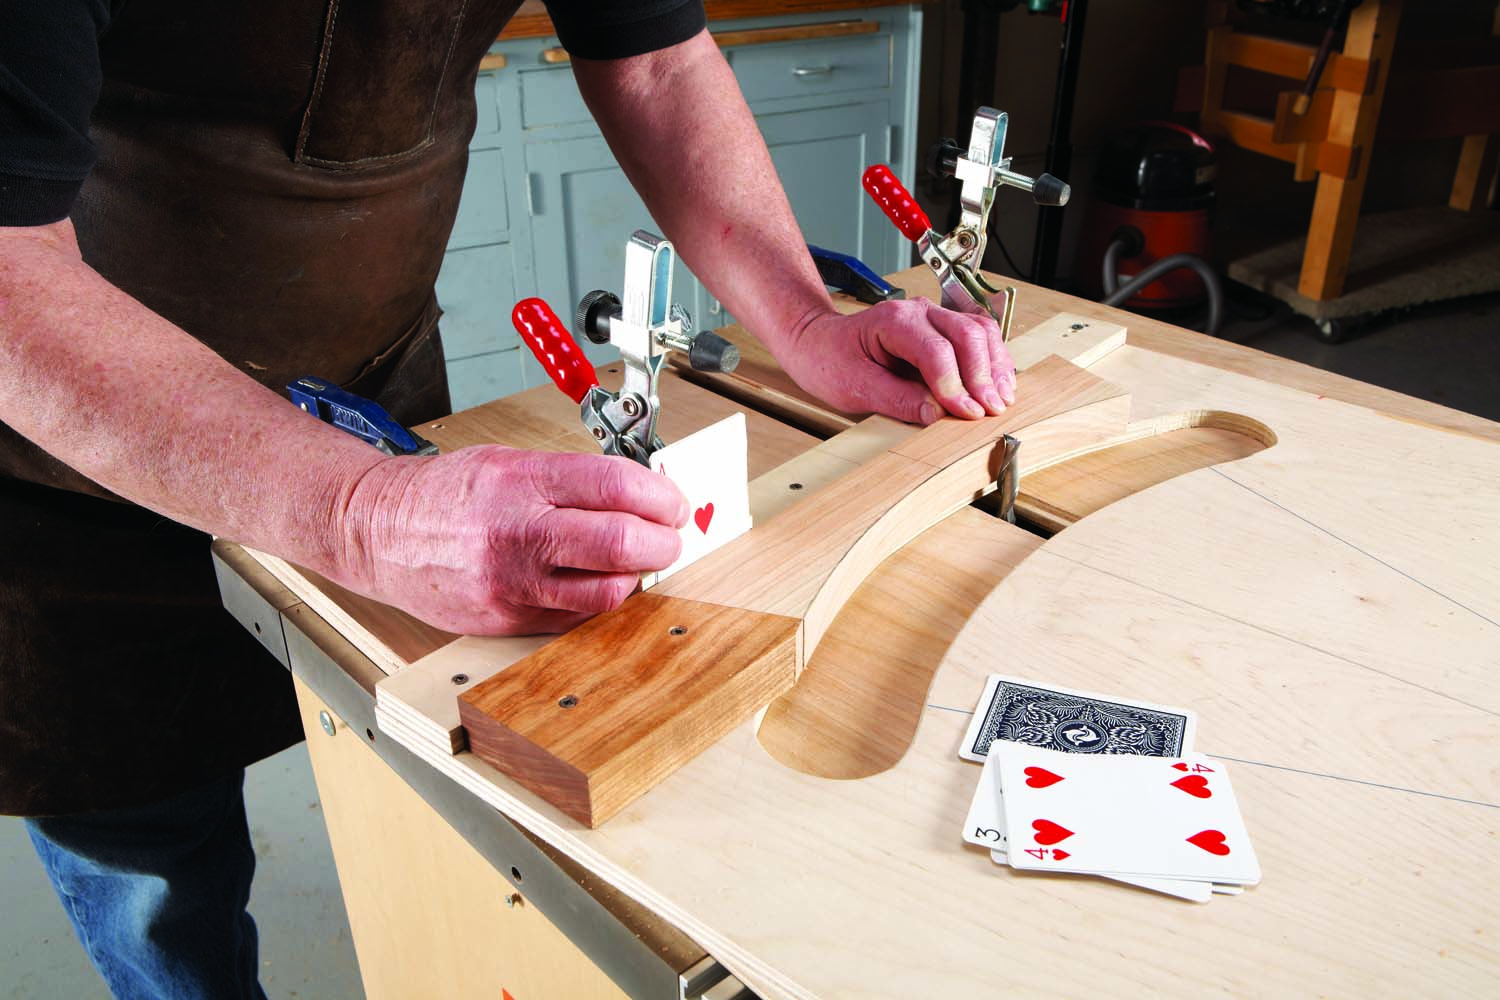
Photo 8. If one end is a bit wider than the other, add a shim or two to one side of the fence and rout the entire arc again.
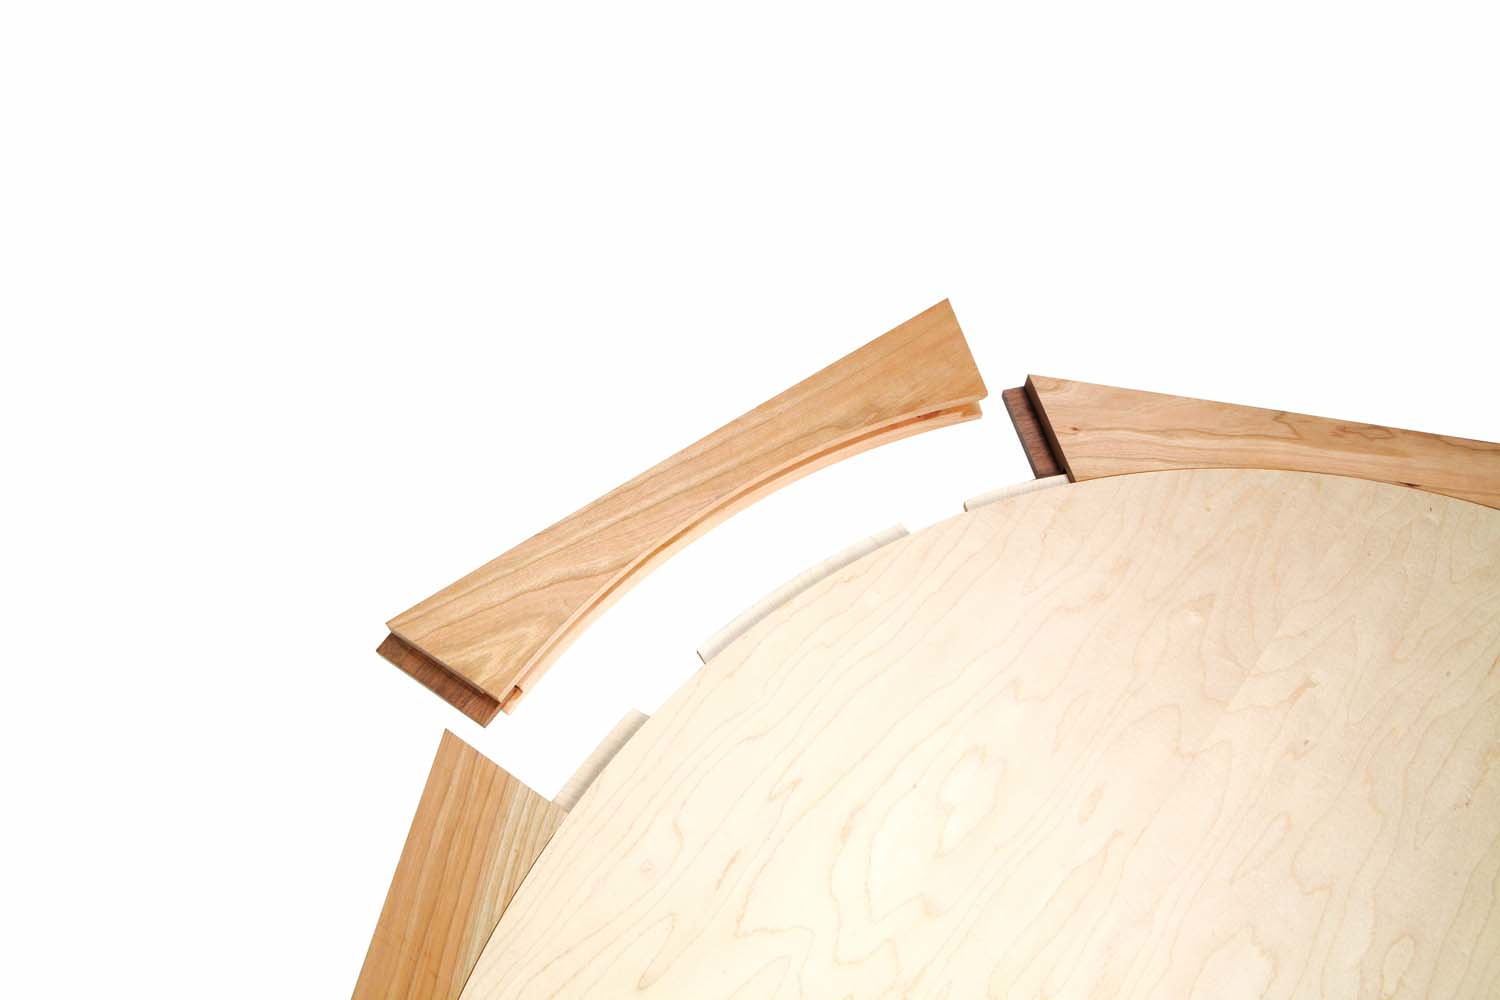
I’ve found that it’s essential to use spline in order to align the rim pieces with each other and with the plywood center. I made this particular top with shop-made spline that was 1/4″ thick and 1″ wide; in retrospect, 1/2″ wide spline would have worked fine and been easier to rout. Install a slot-cutting bit in your router table and cut spline grooves in the end of each rim piece (Photo 9). Make the spline with the grain running the short direction.
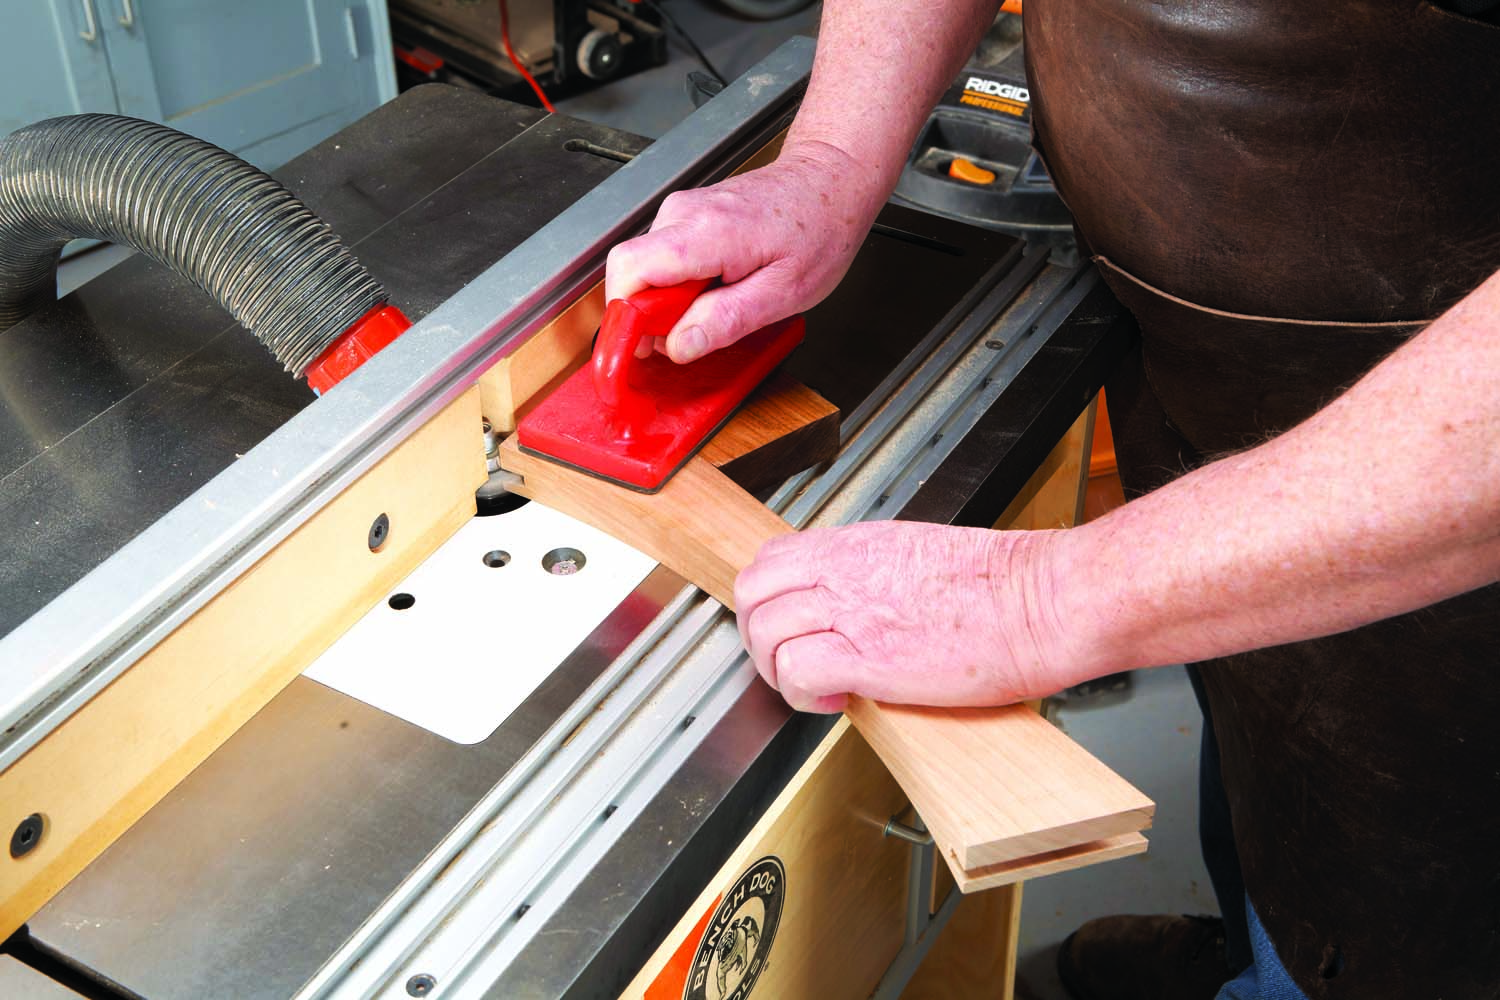
Photo 9. Rout grooves for splines in both ends of all the segments. To steady the pieces, back them up with a block cut at 67-1/2°.
Make the Center

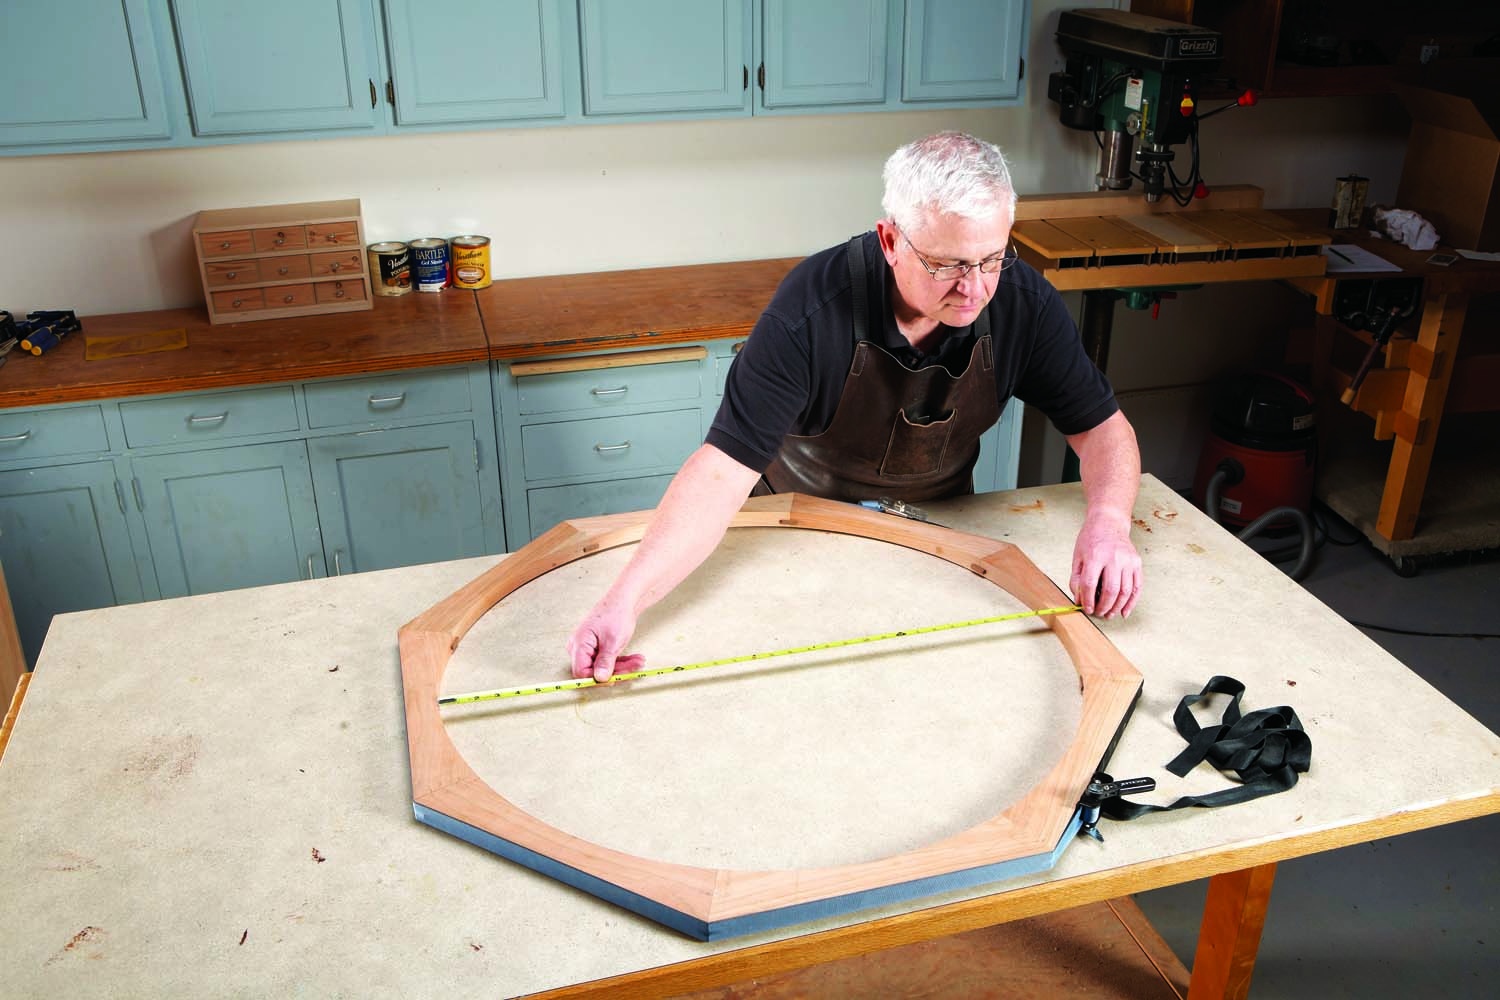
Photo 10. Clamp all of the segments into a circle using a band clamp. Measure the diameter of the circle.
You started with a theoretical diameter for the plywood center of the table—now it’s time to calculate its actual diameter. Clamp all of the rim pieces together and measure the distance across the circle they form (Photo 10). Draw a circle about 1/8″ larger than this on your plywood and cut it out (Photo 11).
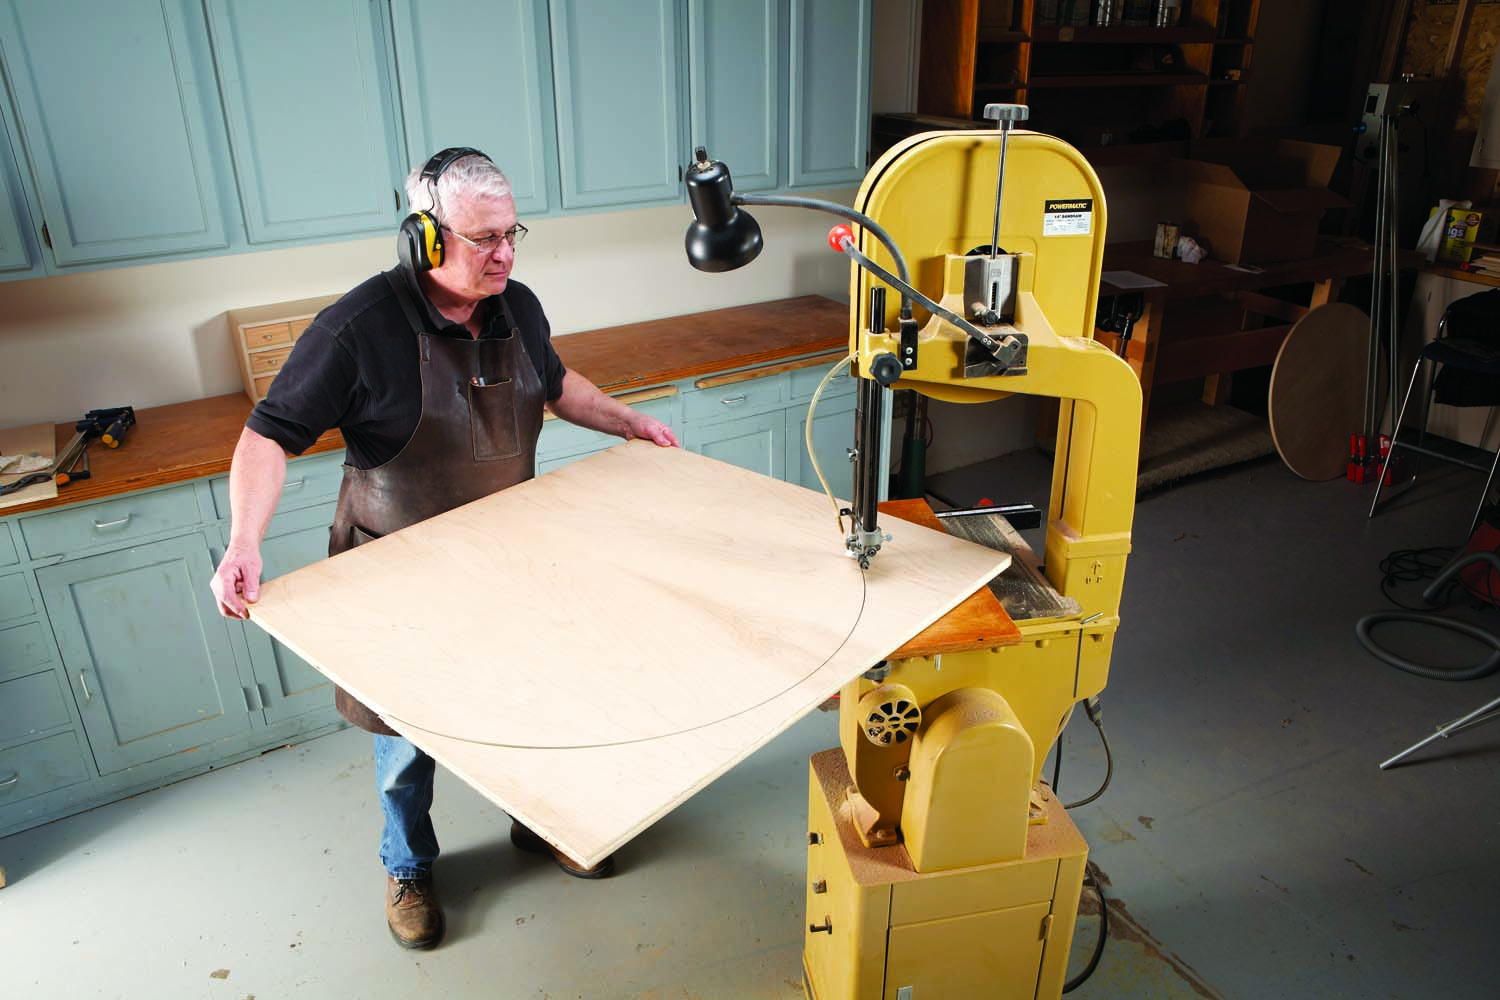
Photo 11. Draw a circle approximately 1/8″ larger on a piece of plywood and cut it to rough shape on the bandsaw. I use a circle-cutting jig that allows me to spin the plywood on a pivot point.
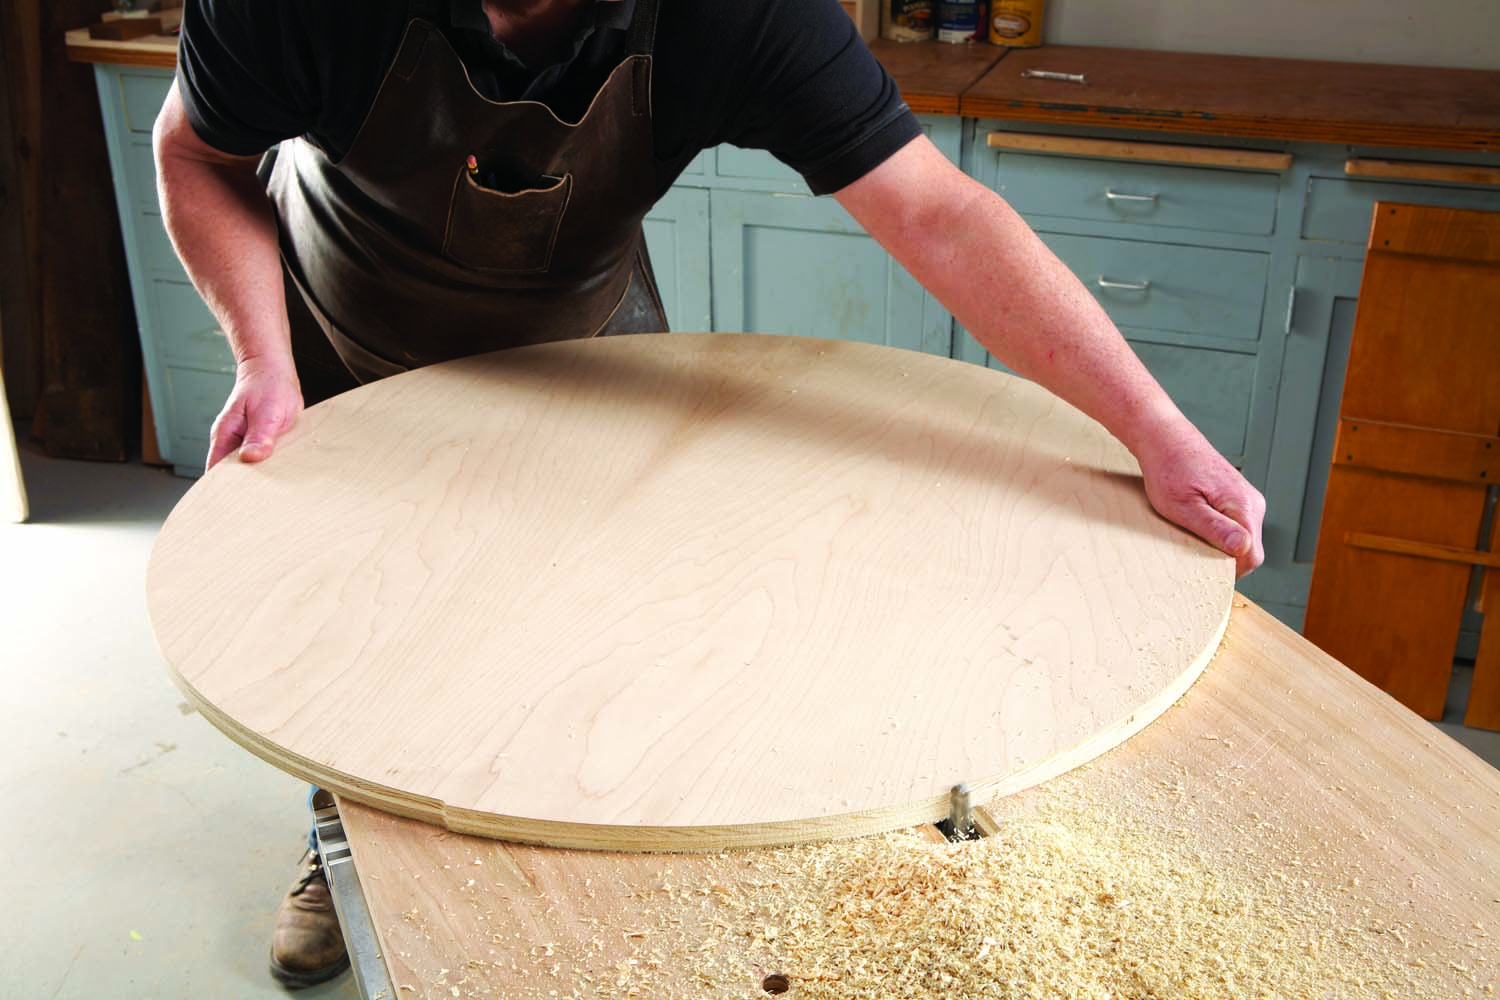
Photo 12. Rout the plywood into a perfect circle using the lower half of the jig. Remove the plywood from the jig and see if it fits inside the clamped-up rim segments.
Drill a shallow 1/8″ dia. hole in the center of the circle, on the underside, to engage the pin in the pivot block. Adjust the position of the pivot block so that the distance from the pin to the inside edge of the router bit equals the radius of your oversize circle. Rout the roughsawn circle into a true circle, then use the adjusting nut in the stationary jig to gradually reduce the diameter of the circle until it fits perfectly inside the rim pieces (Photo 12). Measurement alone isn’t enough. Remove the plywood from the jig between passes—it’s easy to do—and try dropping it into the rim. Creep up on the final diameter by turning the jig’s adjusting nut in very small increments (Photo 13).
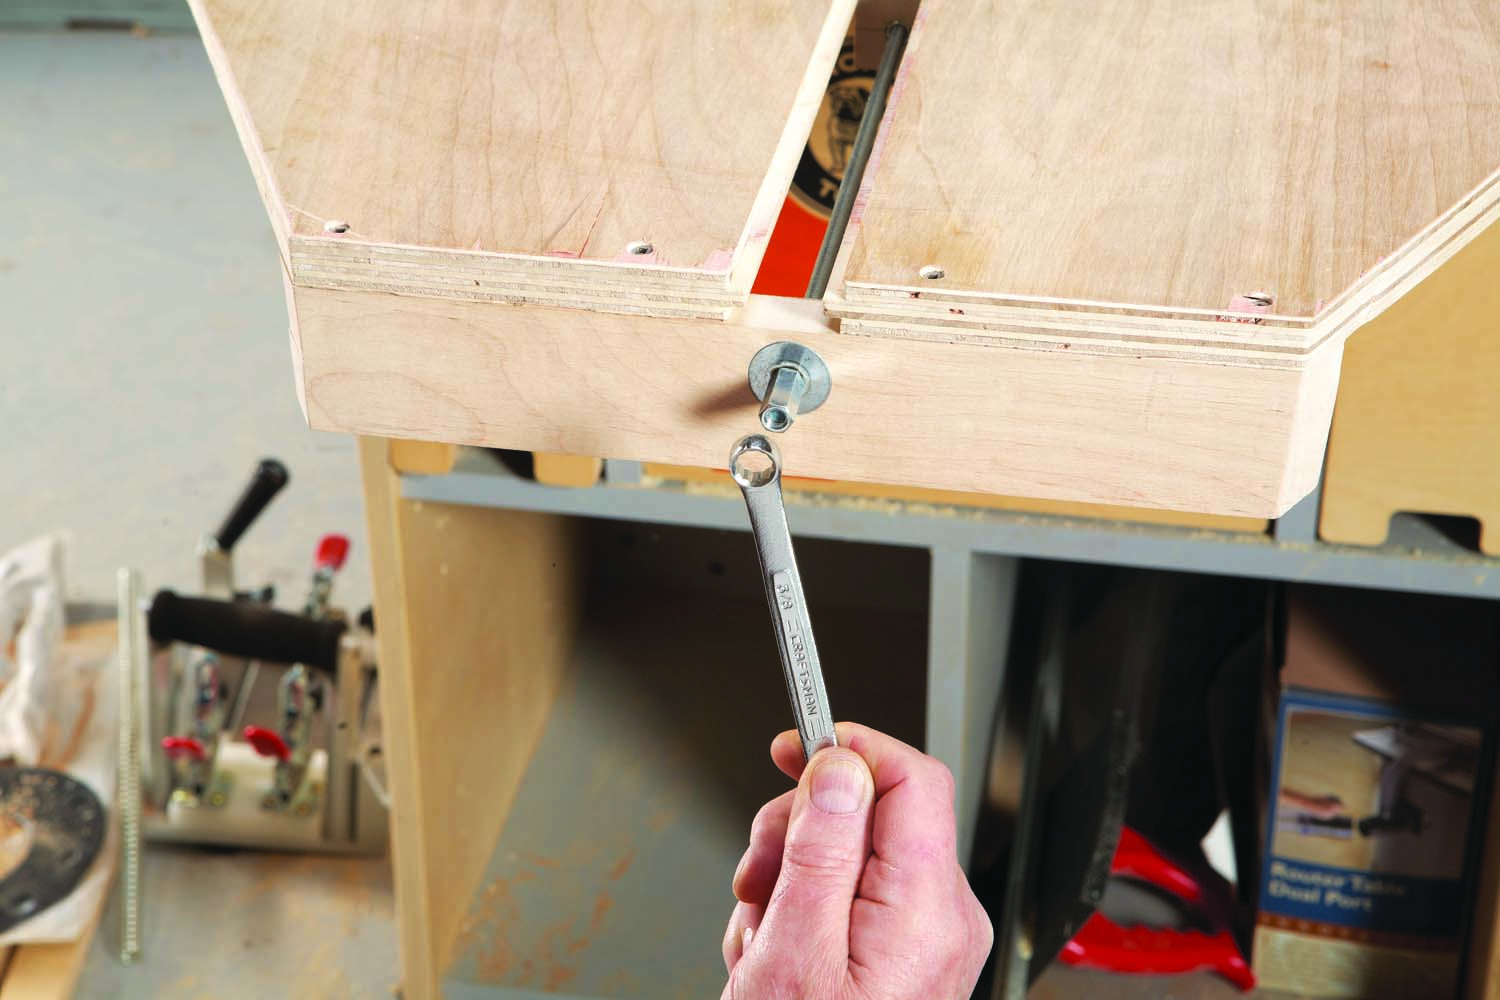
Photo 13. Turn the adjusting nut on the jig to gradually reduce the jig’s cutting radius. Rotating the nut by one o’clock reduces the radius by about .003″. Rout the plywood and adjust the nut a few more times until the fit is perfect.
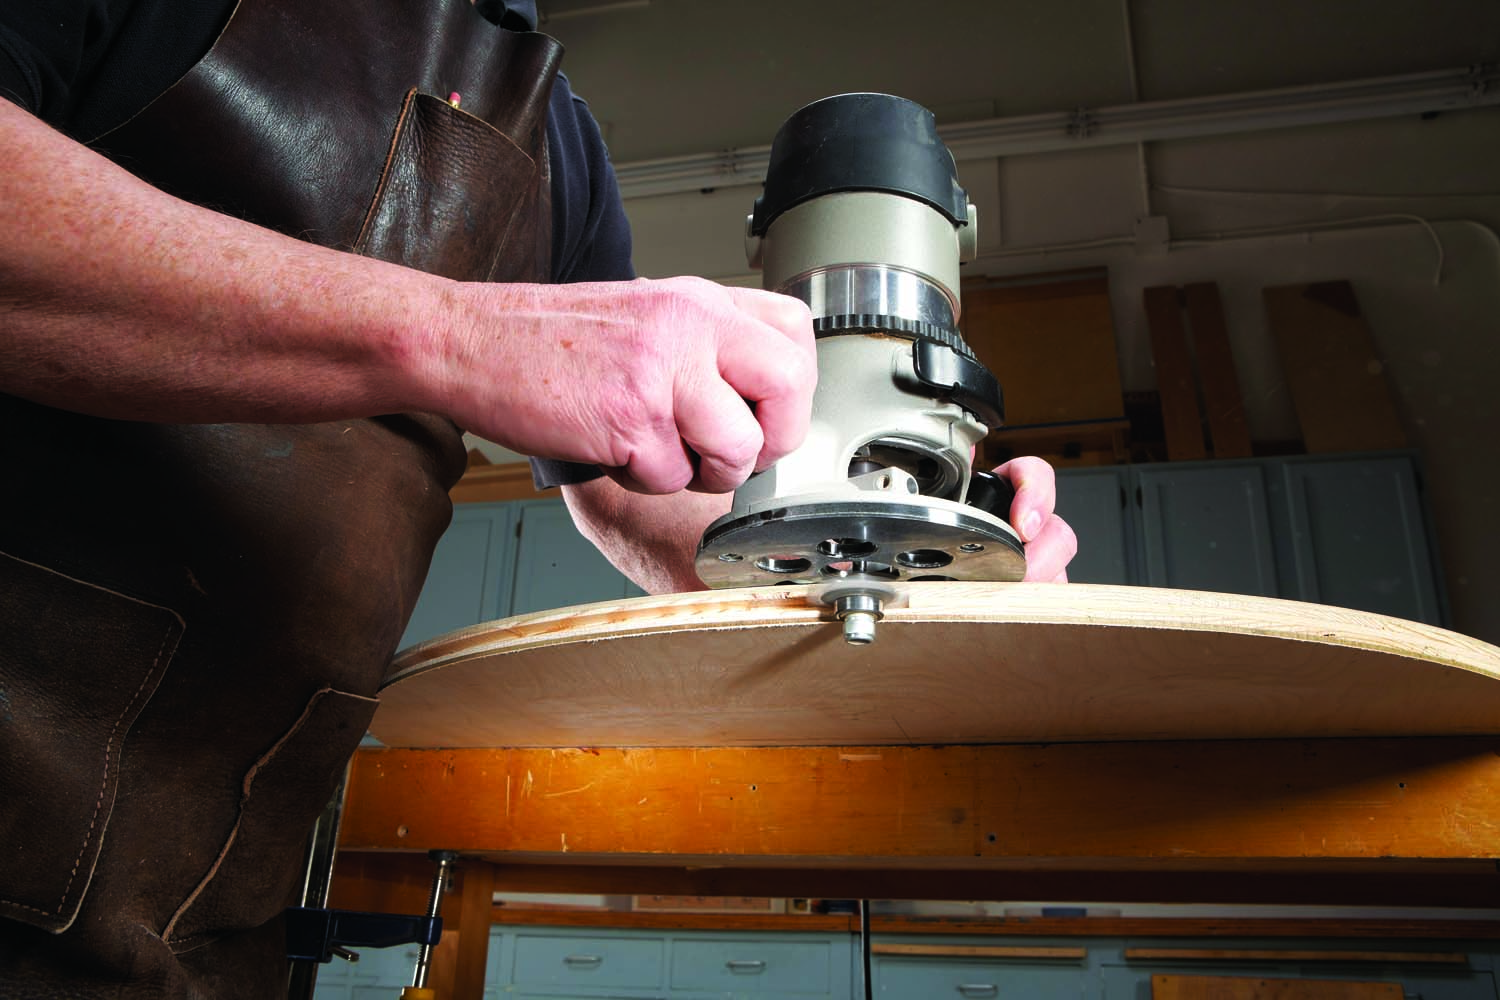
Photo 14. Rout a spline groove all the way around the plywood.
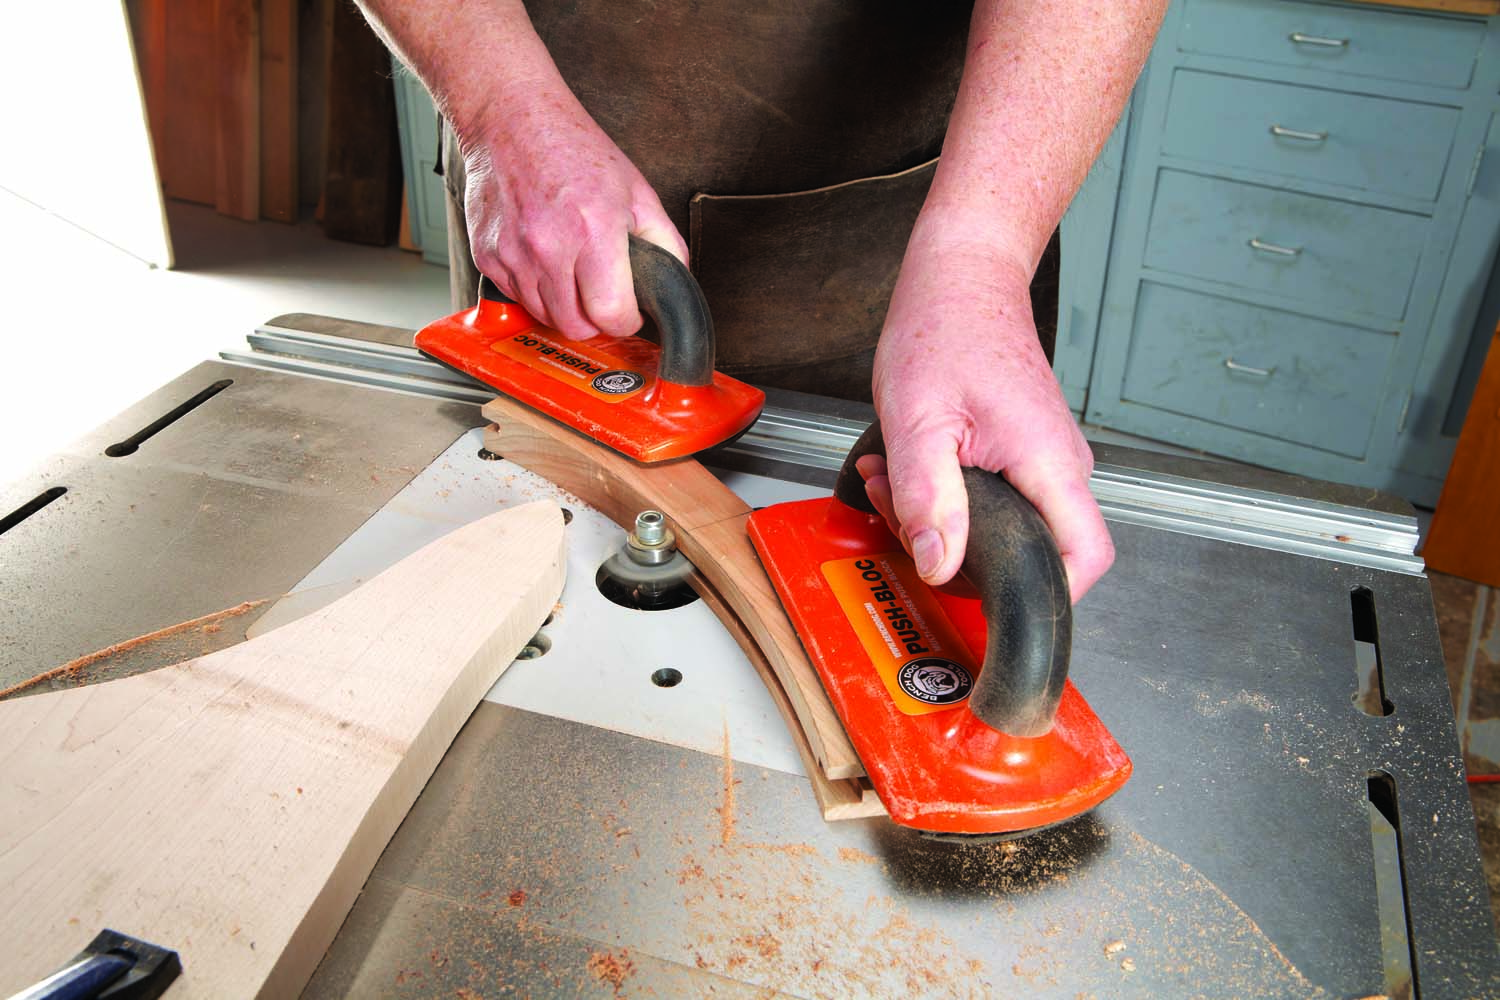
Photo 15. Rout a similar groove around the inside of each segment. The two grooves must be offset by about 1/32″, so the top surface of the rim will stand proud of the plywood.
Rout a groove for spline all the way around the plywood (Photo 14). Rout a similar groove along the inside edges of the rim pieces (Photo 15). Be sure to adjust the bit’s height so the rim pieces will be about 1/32″ proud of the plywood. Make sections of curved spline (Photo 16) and glue them around the plywood (Photo 17).

Photo 16. Draw short pieces of curved spline, using one of the segments as a guide. Cut the spline on the bandsaw.
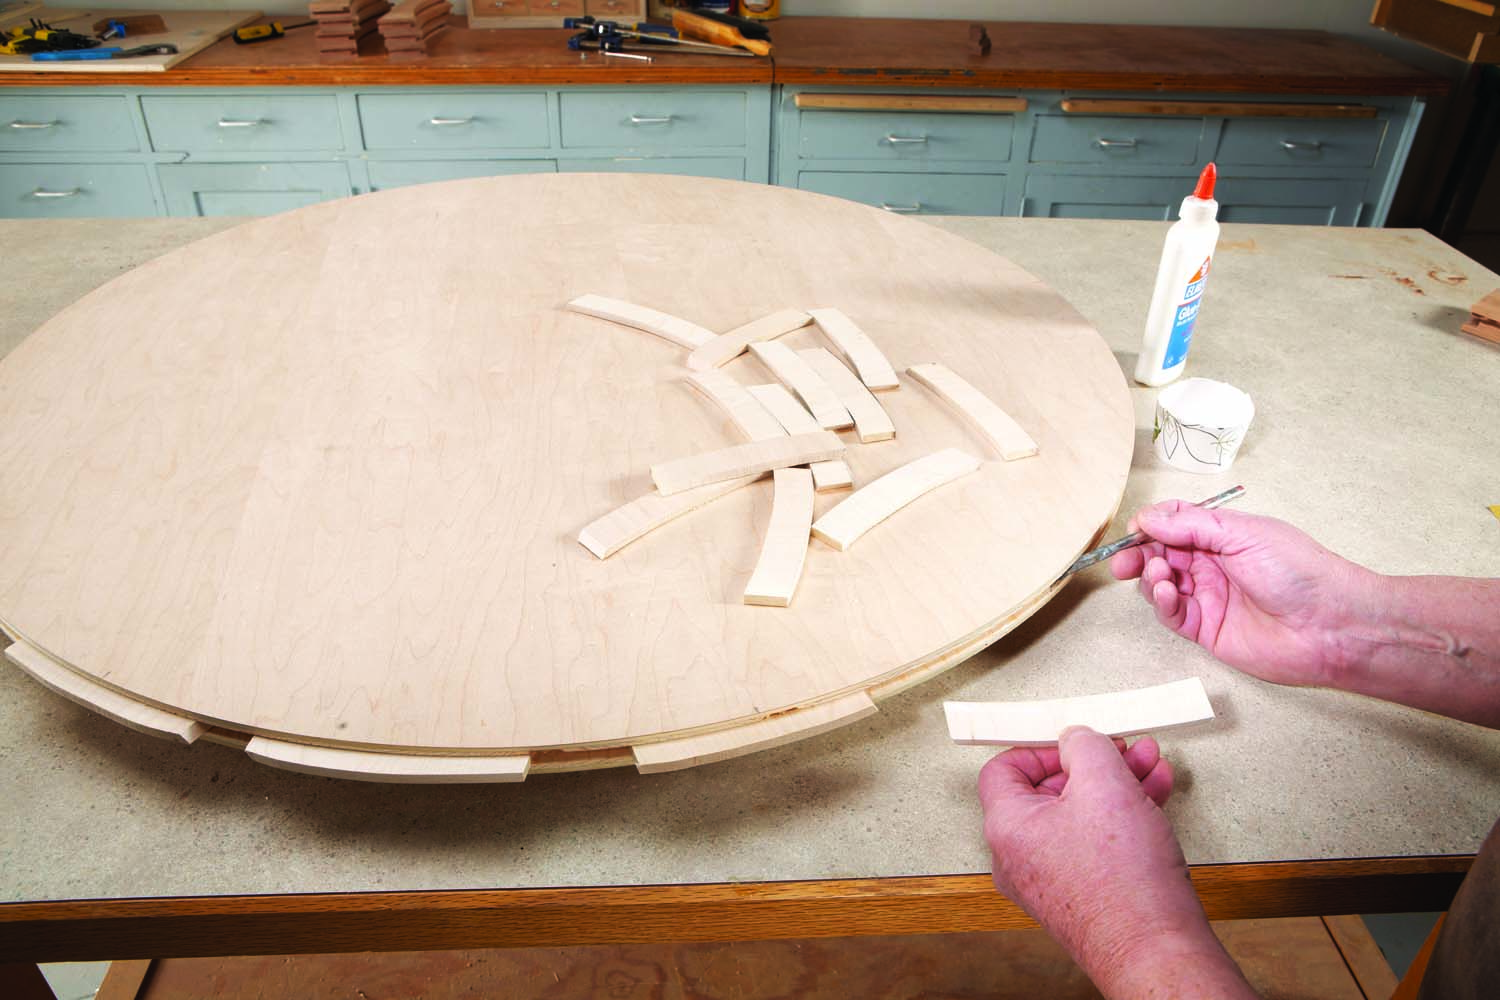
Photo 17. Glue the spline pieces into the top.
The Glue-Up
Gluing up the entire rim in one shot would be ideal, but it’s just about impossible to do without enlisting the help of two or three people. If you just tackle a few pieces at a time, you can glue the rim without any help. I use a relatively slippery glue, such as Elmer’s Glue-All, to make it easier for pieces to slide into position. A glue with a fast tack would make the glue-up more difficult.

Photo 18. Glue just one segment onto the top. Let the glue dry before proceeding.
Start with just one rim piece—let’s call it #1 (Photo 18). Glue spline into both of its ends, then place another rim piece, without glue, on the opposite side of the tabletop. Apply glue to the #1 piece and clamp it to the plywood. Check with a straightedge to make sure that #1 isn’t cocked up or down. Clean off the squeeze-out and let the glue dry.
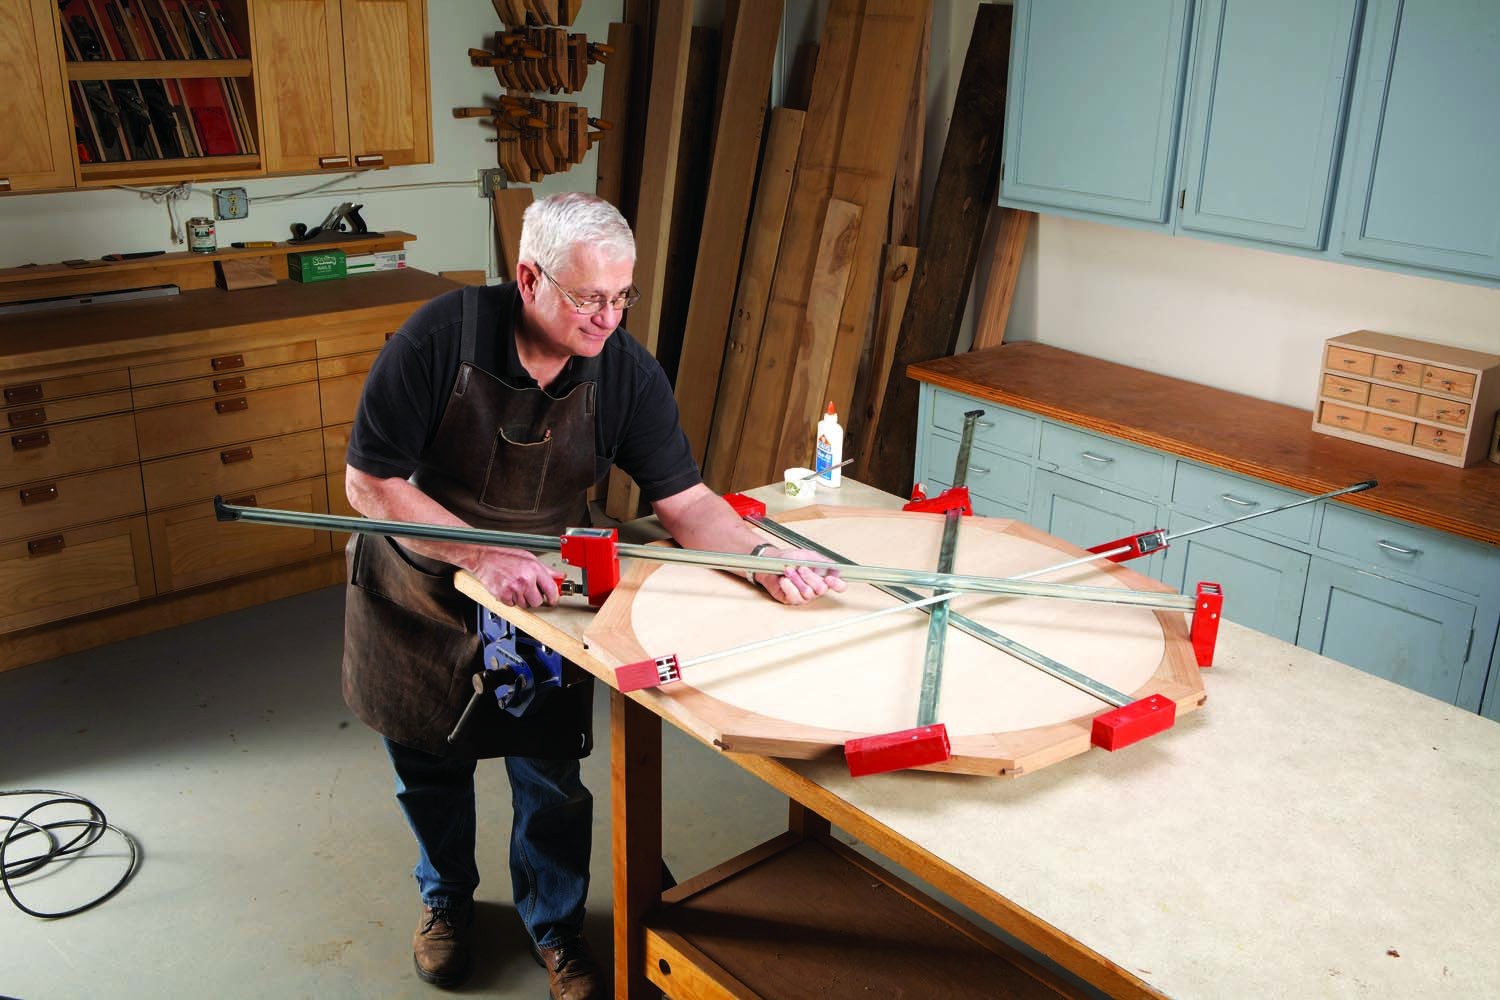
Photo 19. Glue two more segments, butting them up to the ends of the first piece. Add the rest of the segments—without glue—to force the glued pieces into position. Let the glue dry, then add two more, and so on.
From here, glue pieces #2 and #3 on either side of #1. To pull them tight to #1, clamp the rest of the rim pieces around the table, too—without glue, of course (Photo 19). Continue adding pairs of pieces in this fashion, gradually building up the glued portion of the rim, all the way around.
Complete the Top
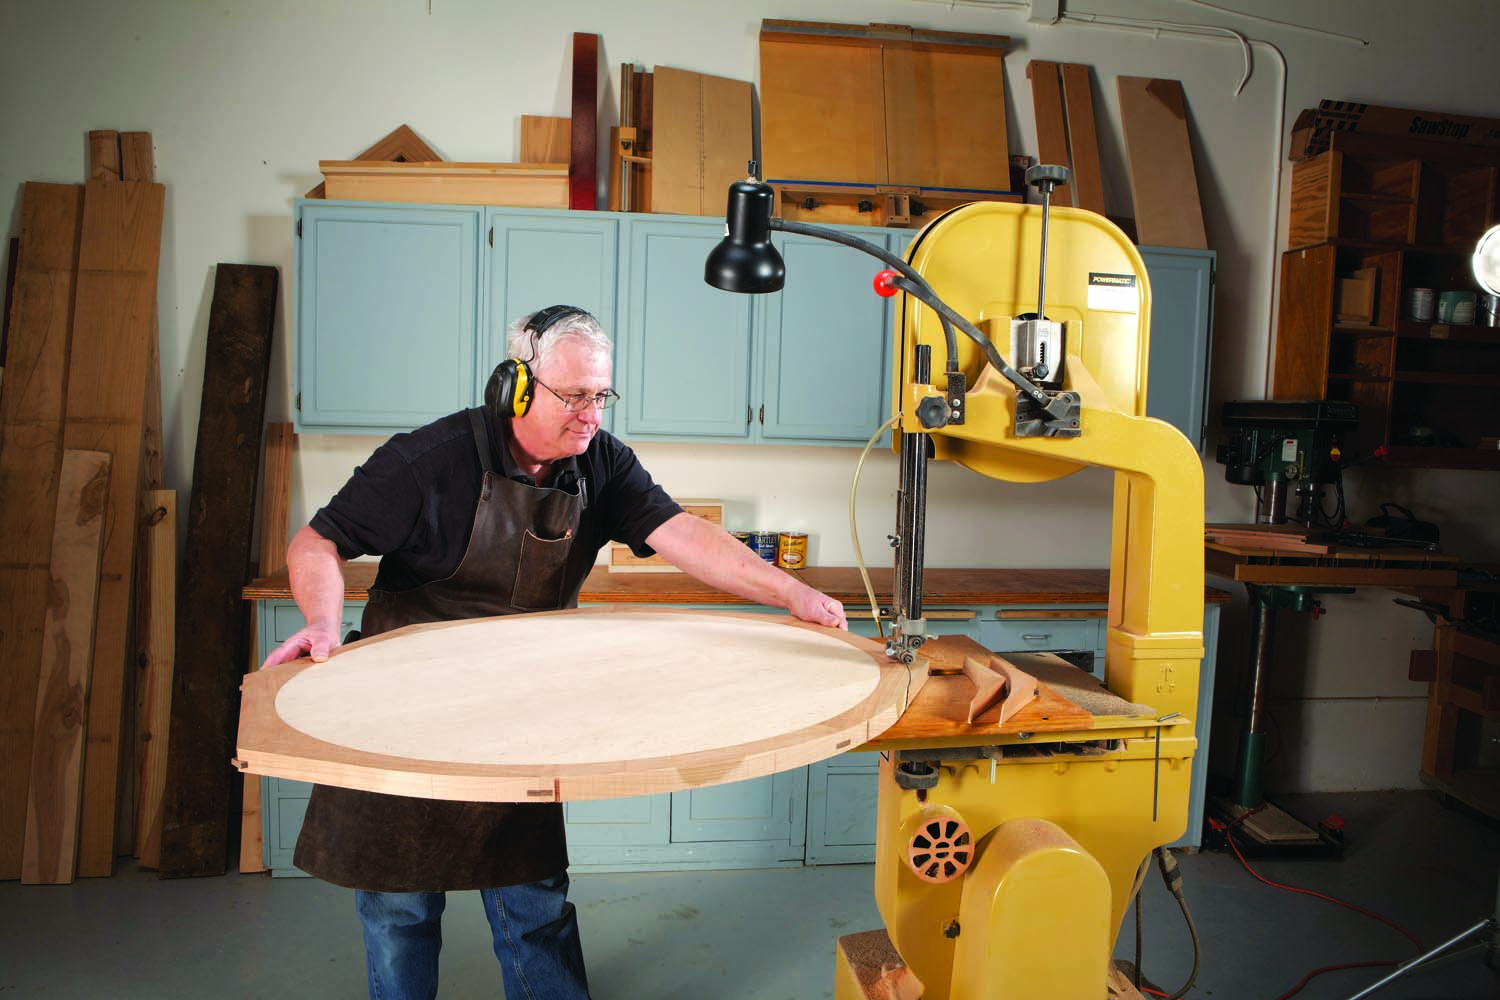
Photo 20. Saw the outer edge of the table. I use a circle-cutting jig for this operation, too. It leaves an edge smooth and even—easy to clean up by just sanding.
When all of the rim pieces are glued, draw the outside diameter of the top and cut off the waste (Photo 20). Clamp the top to a sturdy bench and plane the rim pieces until they’re a paper-thickness proud of the plywood (Photo 21). Scrape or sand them flush.
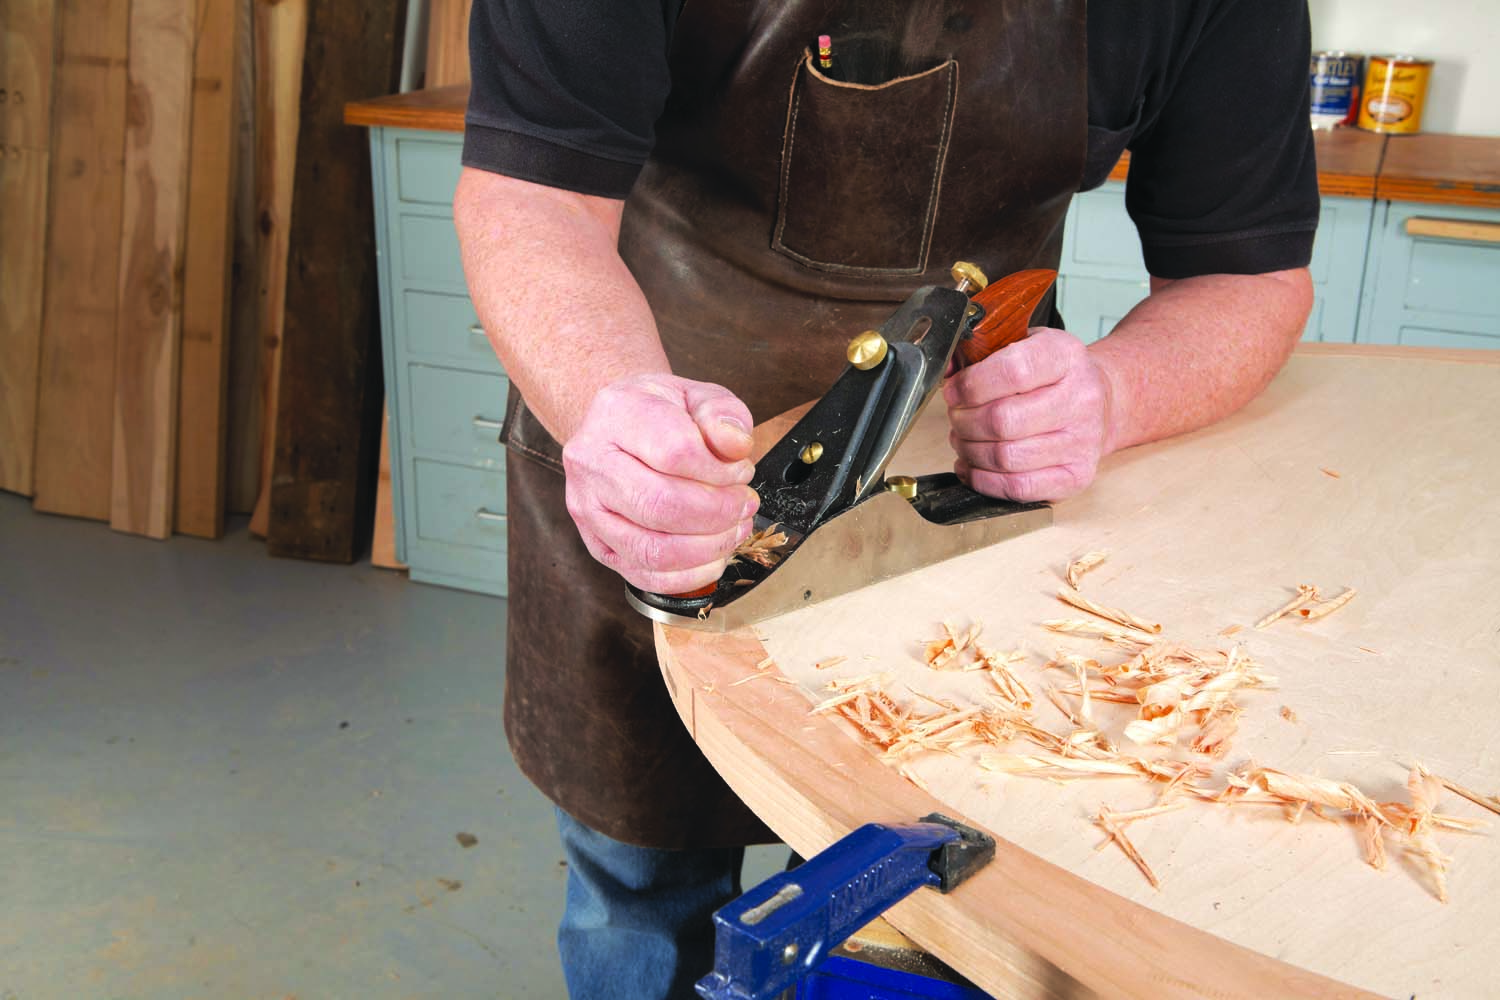
Photo 21. Plane the rim almost flush to the plywood, then scrape or sand it even.
Rout a profile around the top (Photo 22). (I used a 3/8″ roundover bit.) Smooth what’s left of the outside edge of the rim with sandpaper, then rout the profile a second time to remove the bumps. Finally, rout a 1/8″ roundover on the underside of the rim, to soften its edge.
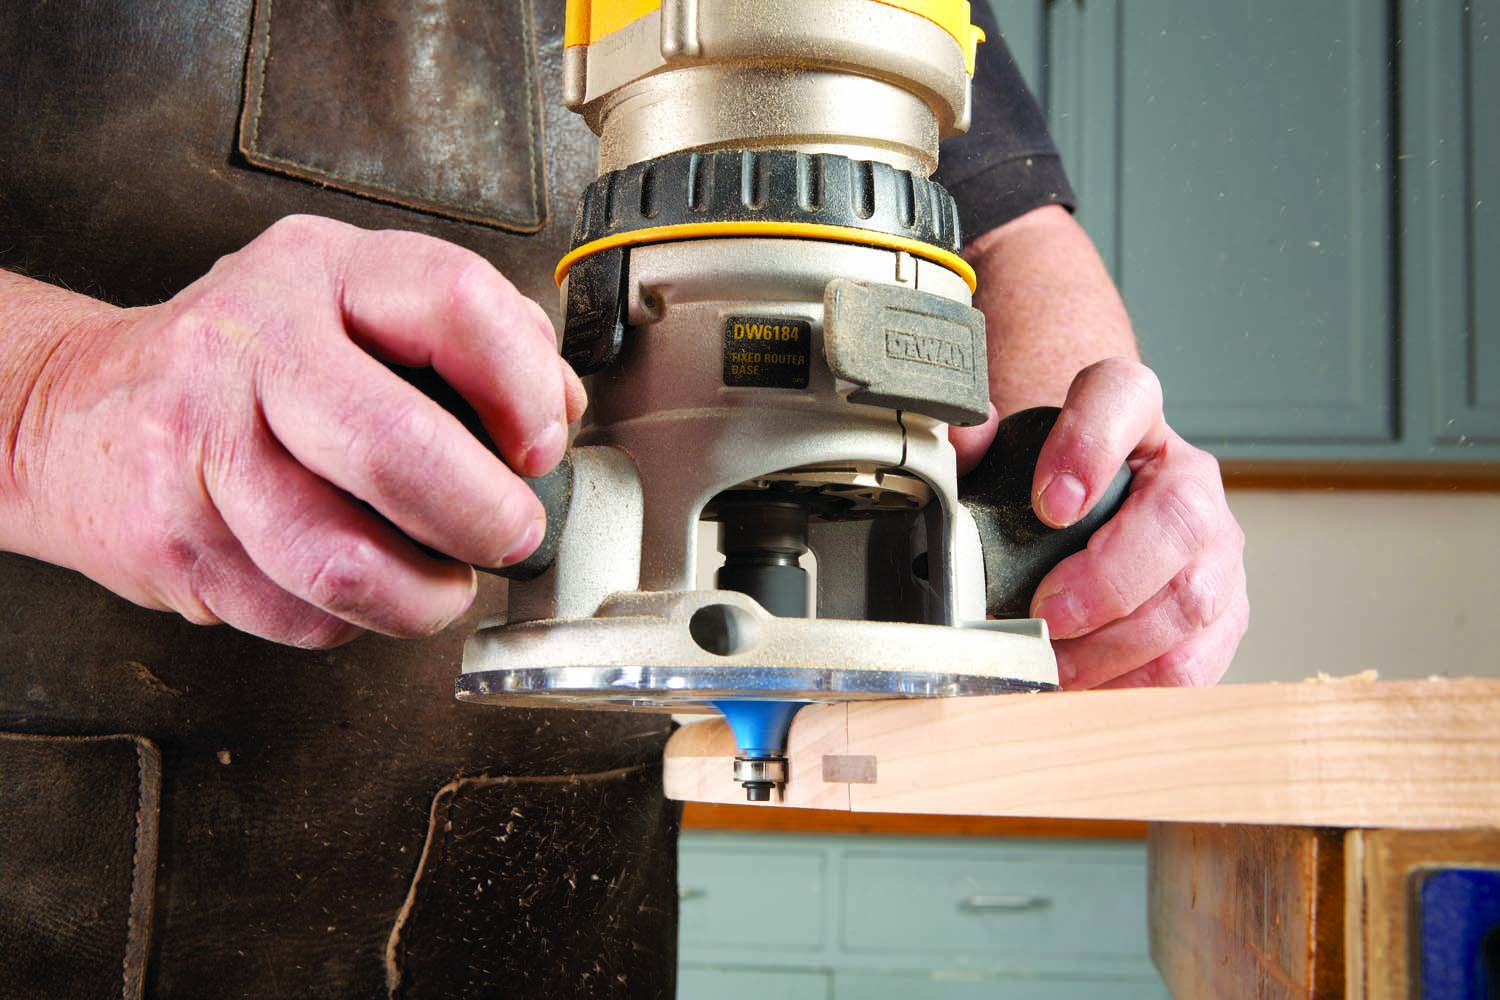
Photo 22. Rout a roundover or other profile around the top of the table. Be sure that the routing doesn’t cut into the splines—after all this hard work, that just wouldn’t look right!
How to Make a Perfect Octagon
Cabinetmakers are known for being fussy, and for good reason. A little sloppiness when making an outdoor project or remodeling the house is usually OK, but when it comes to making a piece of furniture to be proud of, tolerances have to be tight.
Using a tablesaw to make an octagon without any gaps is definitely fussy work. The angles must be so precise that you really can’t measure them. The practical way to test for accuracy, I’ve found, is to actually cut 8 pieces and see how they fit together.
You’ll need a miter gauge that doesn’t wiggle in your saw’s miter slot. Some have adjustable bars—these are ideal, but if yours doesn’t, modify or shim its bar to take out the slop.
Start by setting your miter gauge as close as you can to the correct angle (22-1/2° or 67-1/2°, depending on the model). While I often use a square or a drafting triangle to set my miter gauge, I don’t rely on a commercially-made tool for this job—I make a template. To make one yourself, you’ll need a 12″ x 12″ piece of stiff paper with a square corner (I use poster board), a compass, a straightedge and a utility knife.
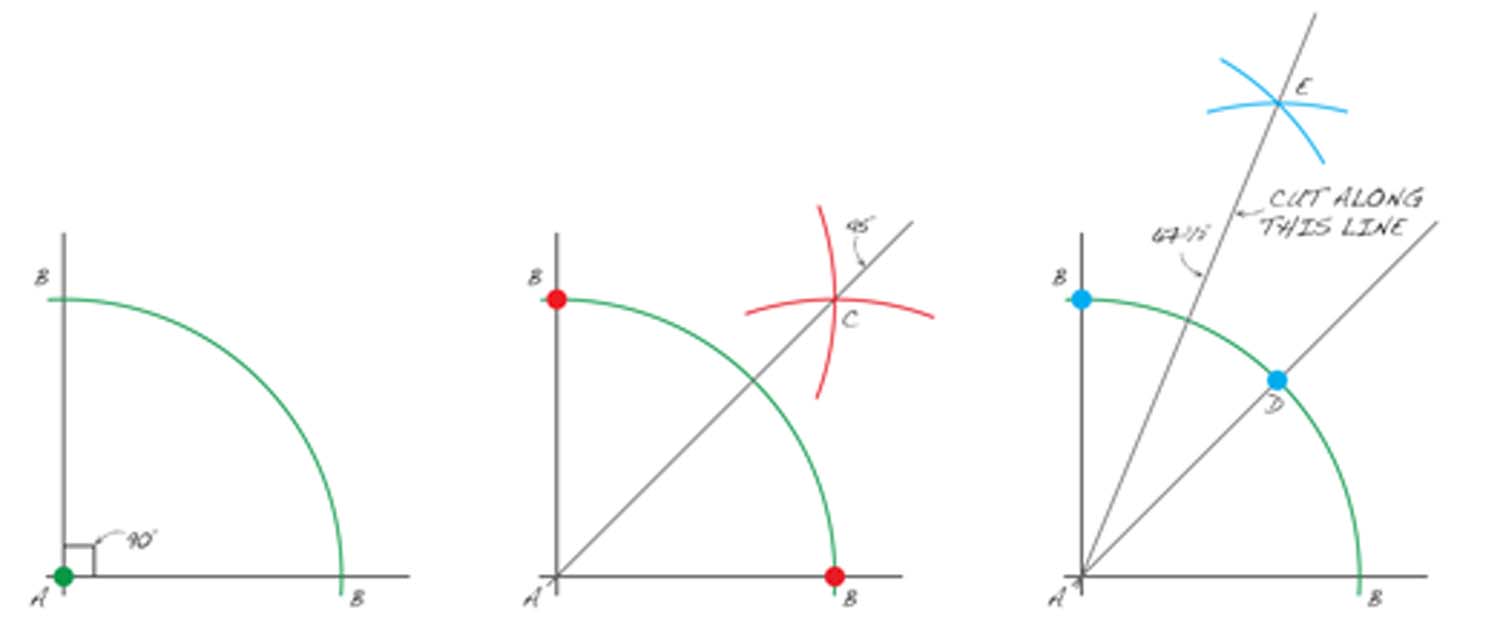
Photo 1. Begin by using simple geometry to draw a 67-1/2° triangle on a stout piece of paper.
Start by drawing a right angle about 1/2″ in from the edge of the paper. Set your compass to about 6″, stab its point into the paper at point A and draw an arc from B to B (Photo 1, step I). Draw two arcs from both points B (step II). Draw a line from A to C, then draw arcs from B and D (step III). Draw a line through E. Cut along the line from A to E, using the straightedge to guide your knife.
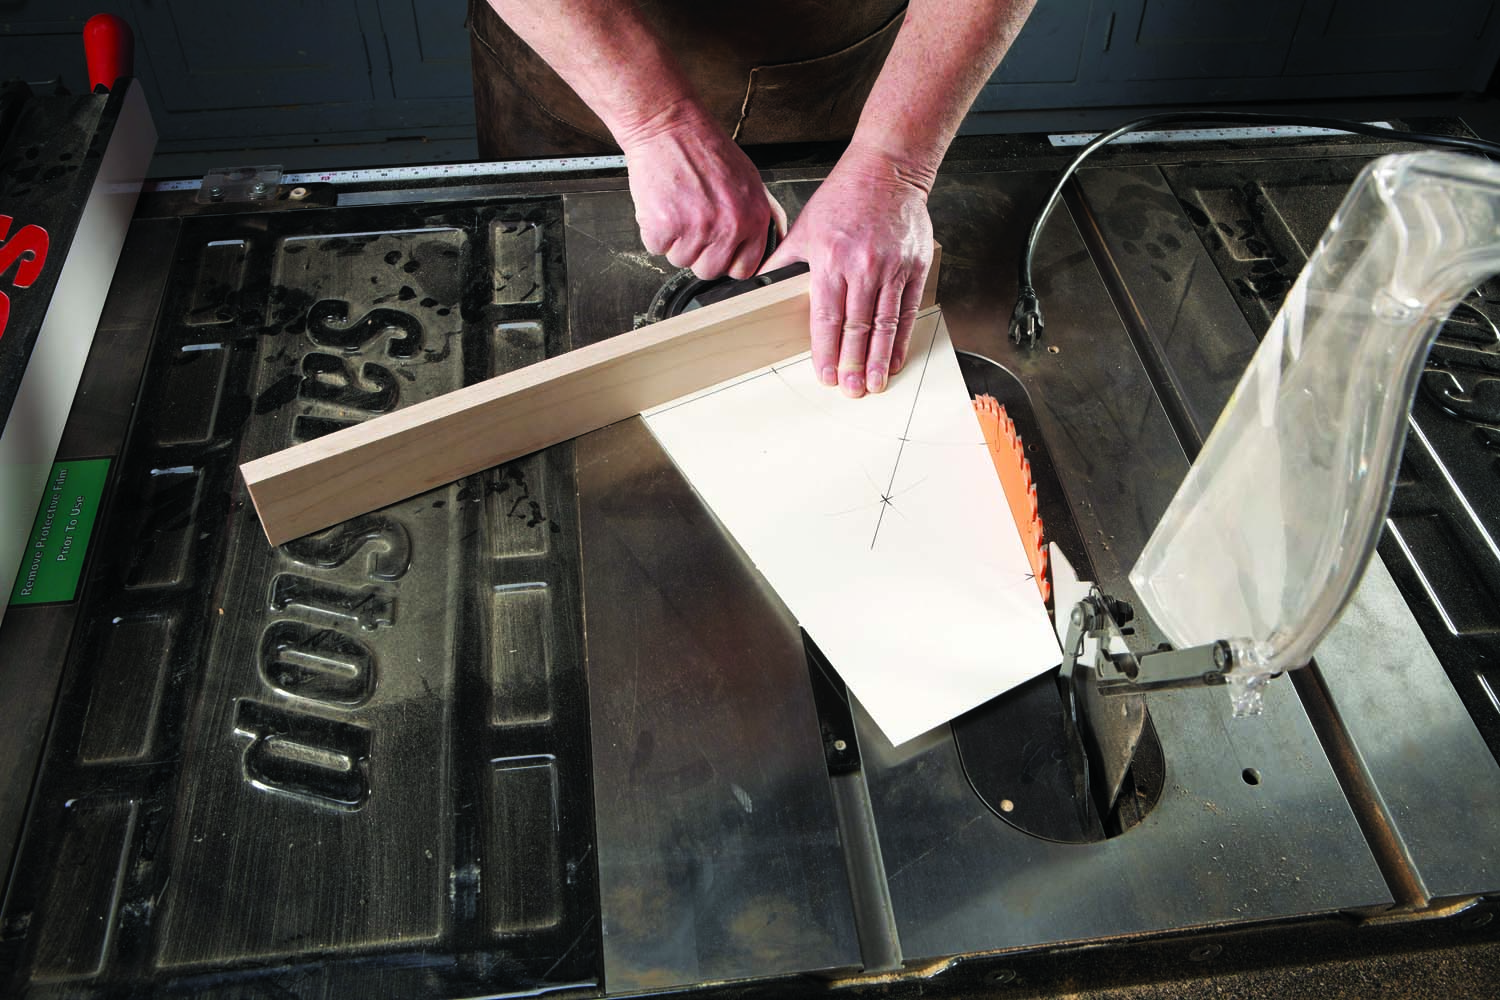
Photo 2. Set your saw’s miter gauge using the triangle. Saw a test set of 8 pieces.
While not perfectly accurate, use this template to set your miter gauge for a trial run (Photo 2). Using square and angled stop blocks, cut 8 pieces exactly the same length. (Of course, these pieces must be flat and have parallel sides. You can either use scrap wood or the pieces you’ll use for your final octagon, providing you’re willing to cut them a bit shorter as you refine the miter gauge’s angle.)
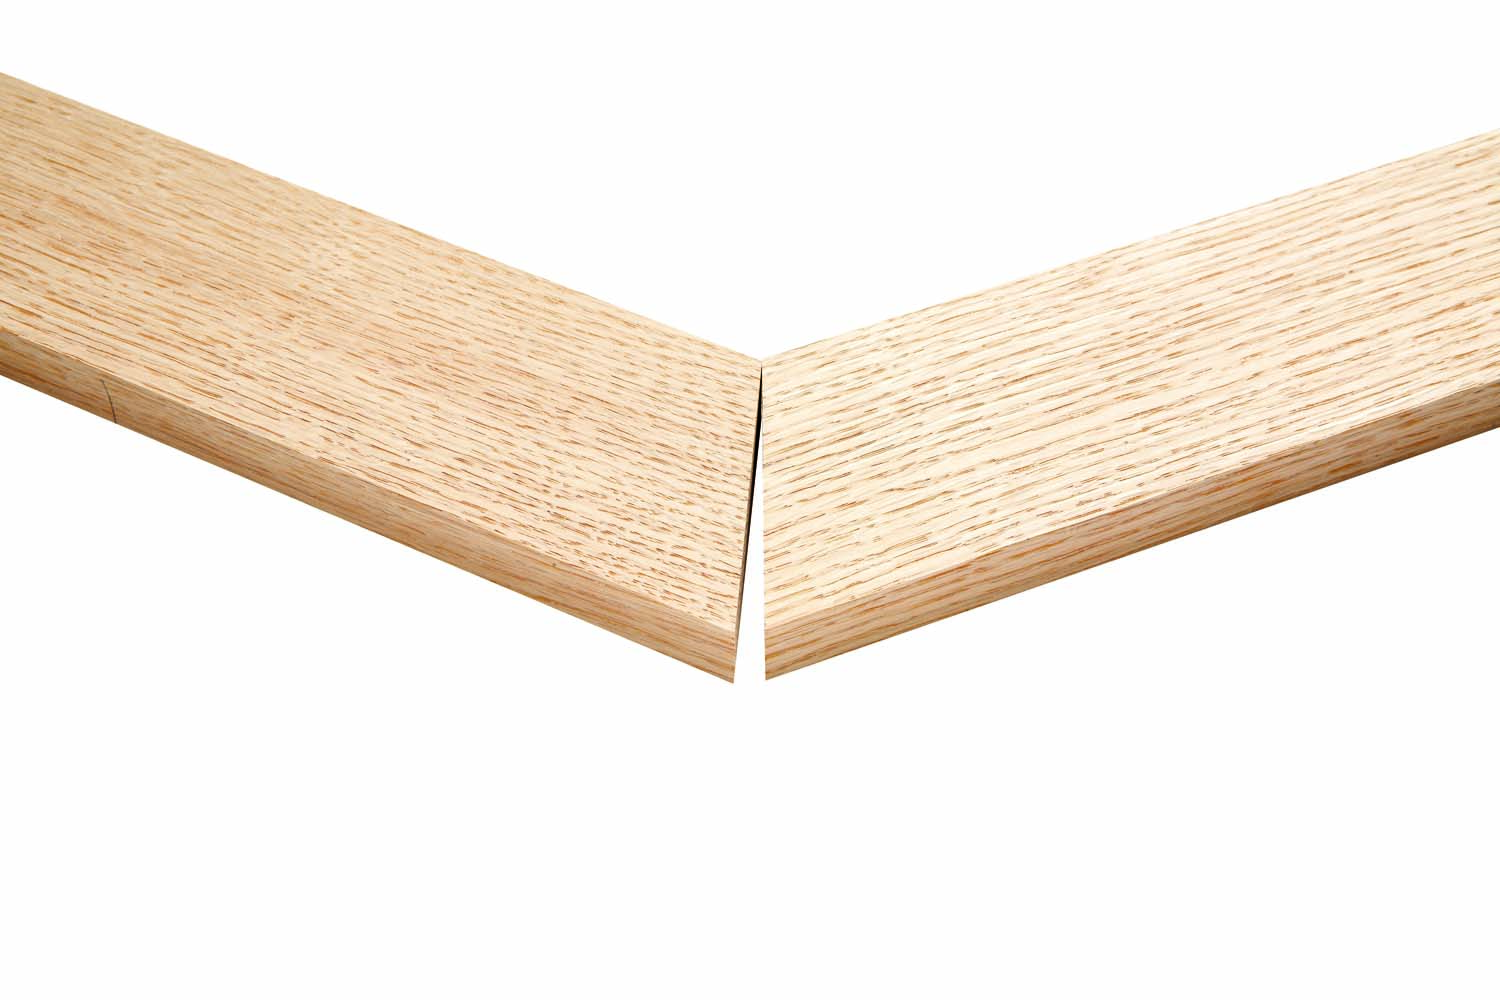
Photo 3. Arrange the 8 pieces in an octagon. Chances are that one or more miters won’t come tight, which means that the miter gauge must be readjusted.
Assemble the pieces into an octagon. (I use a band clamp to keep the corners aligned.) Check to see how tight the miters are. Typically, one or more will be open, which indicates that the miter gauge angle isn’t quite right (Photo 3).
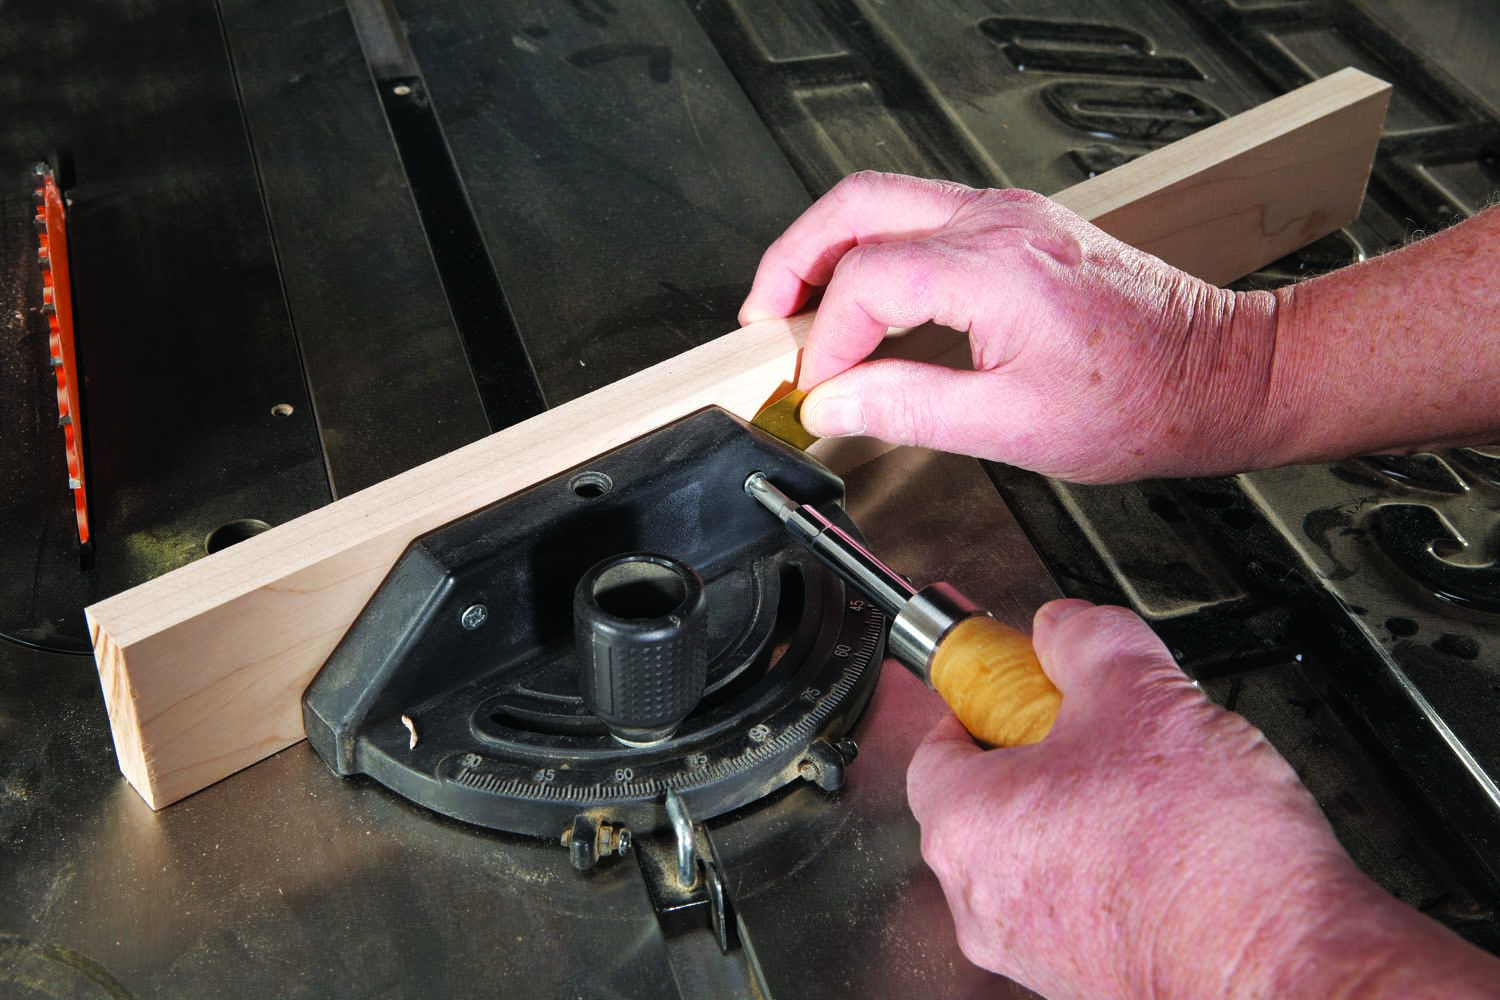
Photo 4. Shim the miter gauge’s fence to slightly alter the cutting angle. Recut all 8 pieces and form them into an octagon once again. Repeat until the miter angle is perfect.
You could alter the angles of one or two pieces to bring the joints tight, but I want the angles of all 8 pieces to be identical, so the pieces can be interchangeable. The best way to adjust the miter gauge is by using shims (Photo 4). You can use brass shim stock or just pieces of paper or tape. The shims need only be a few thousandths of an inch thick.
Re-cut all of the pieces, on both ends, so they’re slightly shorter. Re-assemble them into an octagon and check the miters once again. You may have to add or subtract more shims, but it won’t be long until the miter gauge will be right on the money.
Here are some supplies and tools we find essential in our everyday work around the shop. We may receive a commission from sales referred by our links; however, we have carefully selected these products for their usefulness and quality.


