We may receive a commission when you use our affiliate links. However, this does not impact our recommendations.
Cutting dovetails by hand is supposed to be an orderly, precise process. But when you’re in the thick of it, it’s all too easy to end up with a bench littered with stray tools and precious little free space left over for the actual work.

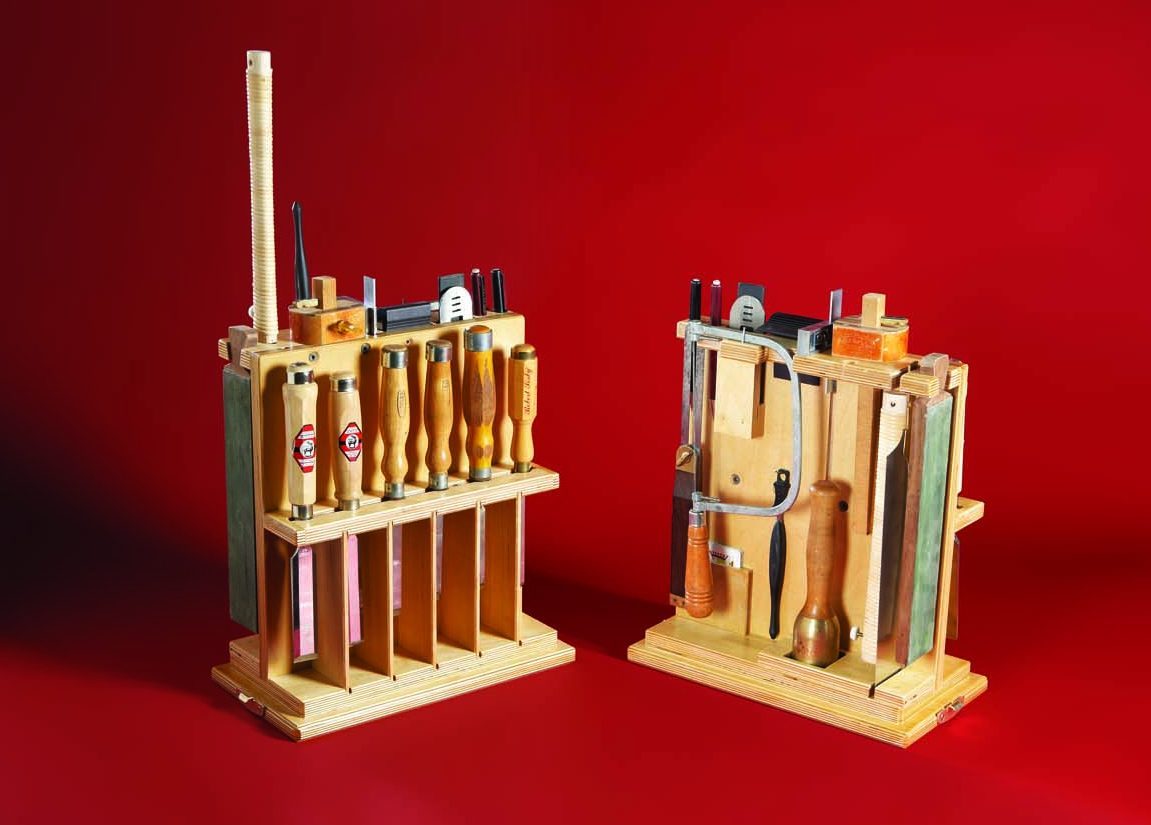
Everything is Close At Hand: The station has a convenient home for every tool you’ll need.
I built this station to keep all my tools in one place, neatly organized and out of the way. When I’m temporarily done with a tool, I place it right back in its home. I can reach every tool from the front of the station—the chisels are in front, while the layout tools are on top.
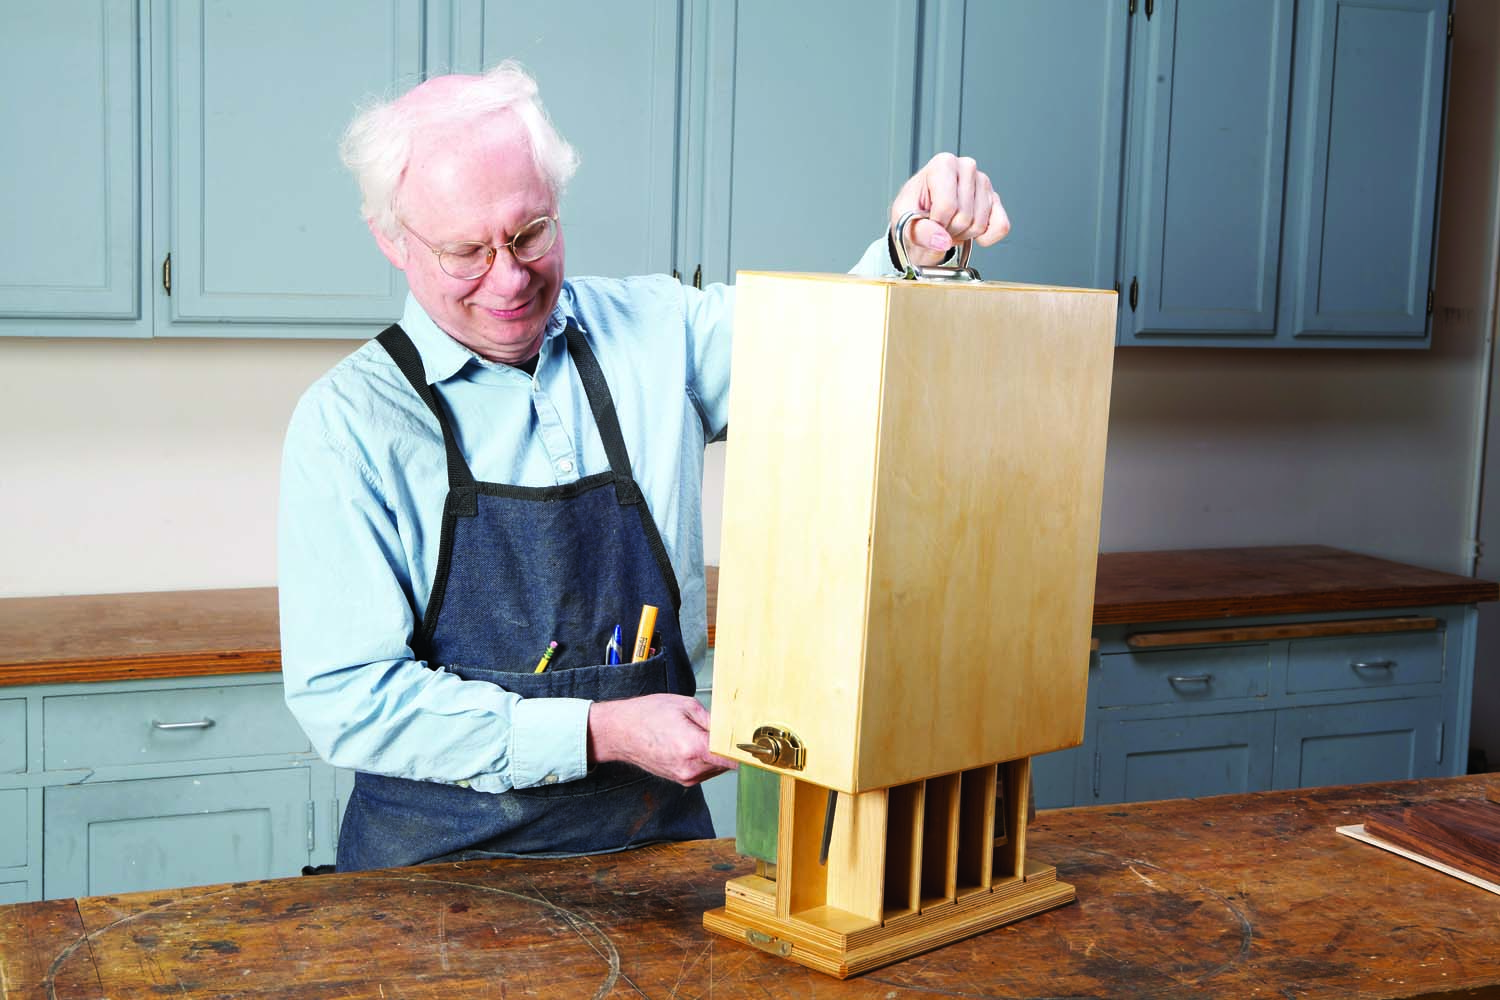
Converts into a Storage Box: Slide a cover over the station to protect your tools and stow them away.
When I’m done with my work, I store some of the tools in back of the station, then slide and lock a cover over the station. It’s a bit extravagant to dedicate a particular set of tools just for dovetailing, since some can be used for many other jobs, but I think it makes practical sense. When I’m ready to chop, the tools are ready, too.
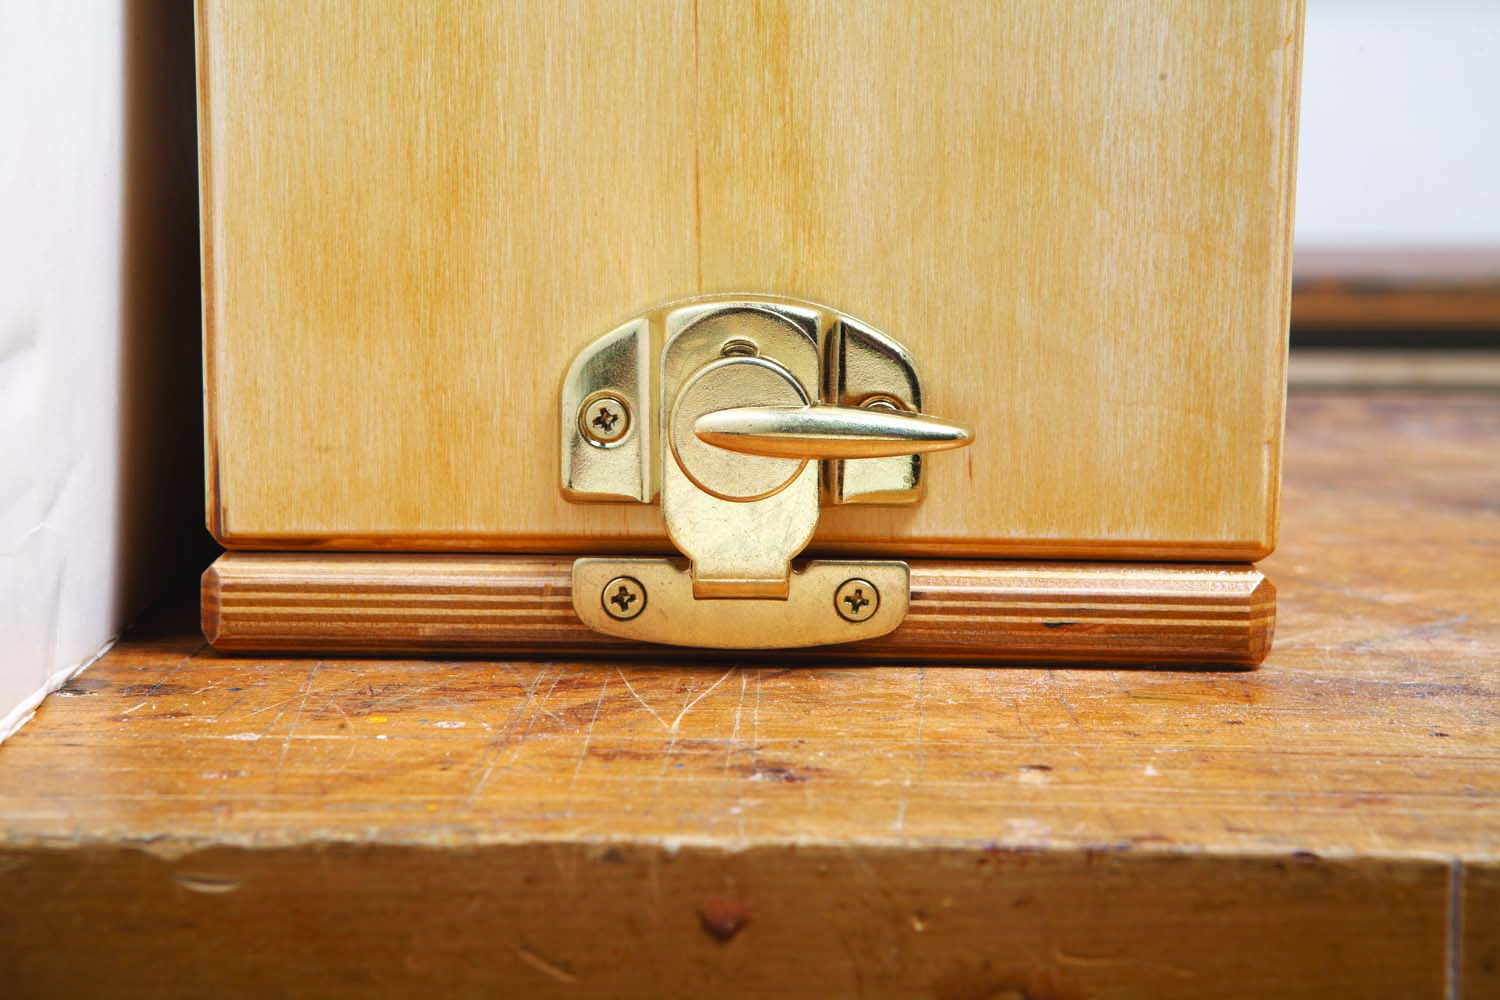
Secure Latches: Sturdy window latches lock the cover in place for transport.
Build two tool racks
Before you begin making this station, take stock of the tools you’ll use for dovetailing. I designed the station to hold my favorites, but you’ll probably need to alter the station’s dimensions or configuration to accommodate your set. Figuring out the most compact arrangement of your tools will take some experimenting. Here’s how to go about it.
Start with the layout tool rack (A). Make this from scrap wood first, so you can modify it as you go or make a fresh start if a completely different arrangement proves to be necessary. Lay out a series of notches or holes to hold your tools (Fig. 02), then cut the notches on the bandsaw (Photo 1).

Photo 1. Begin building the station by designing a rack to fit your layout and cutting tools. Use a bandsaw and miter gauge to cut notches for the tools.
Cut a center panel (B) from scrap wood, too, and fasten the rack to the panel. Clamp the panel in a vise with the rack facing away from you. Place all of your tools in the rack and see if there’s enough space around each one. Ideally, you should be able to remove or replace each tool without disturbing its neighbors. In addition, no tool should stick out beyond the edges of the rack. (If any tools stick out, the station’s cover won’t fit.)
I had to take apart my trial rack and panel a few times in order to arrive at an optimal arrangement. Along the way, I found that I had to saw a short groove in the center panel to accommodate the blade of my small double square. I also sawed a long groove to hold the blade of my Dozuki saw (it comes apart for storage). And I had to deeply countersink the hole for my marking knife—and add a filler (C)—so the knife would stand up straight. If you have any tools that need to hang on the back of the station for storage, such as a dozuki saw’s handle, now’s the time to work out their position. When you’re done, every tool should have a secure home. Here’s the acid test: No tool should fall off when you move the station.
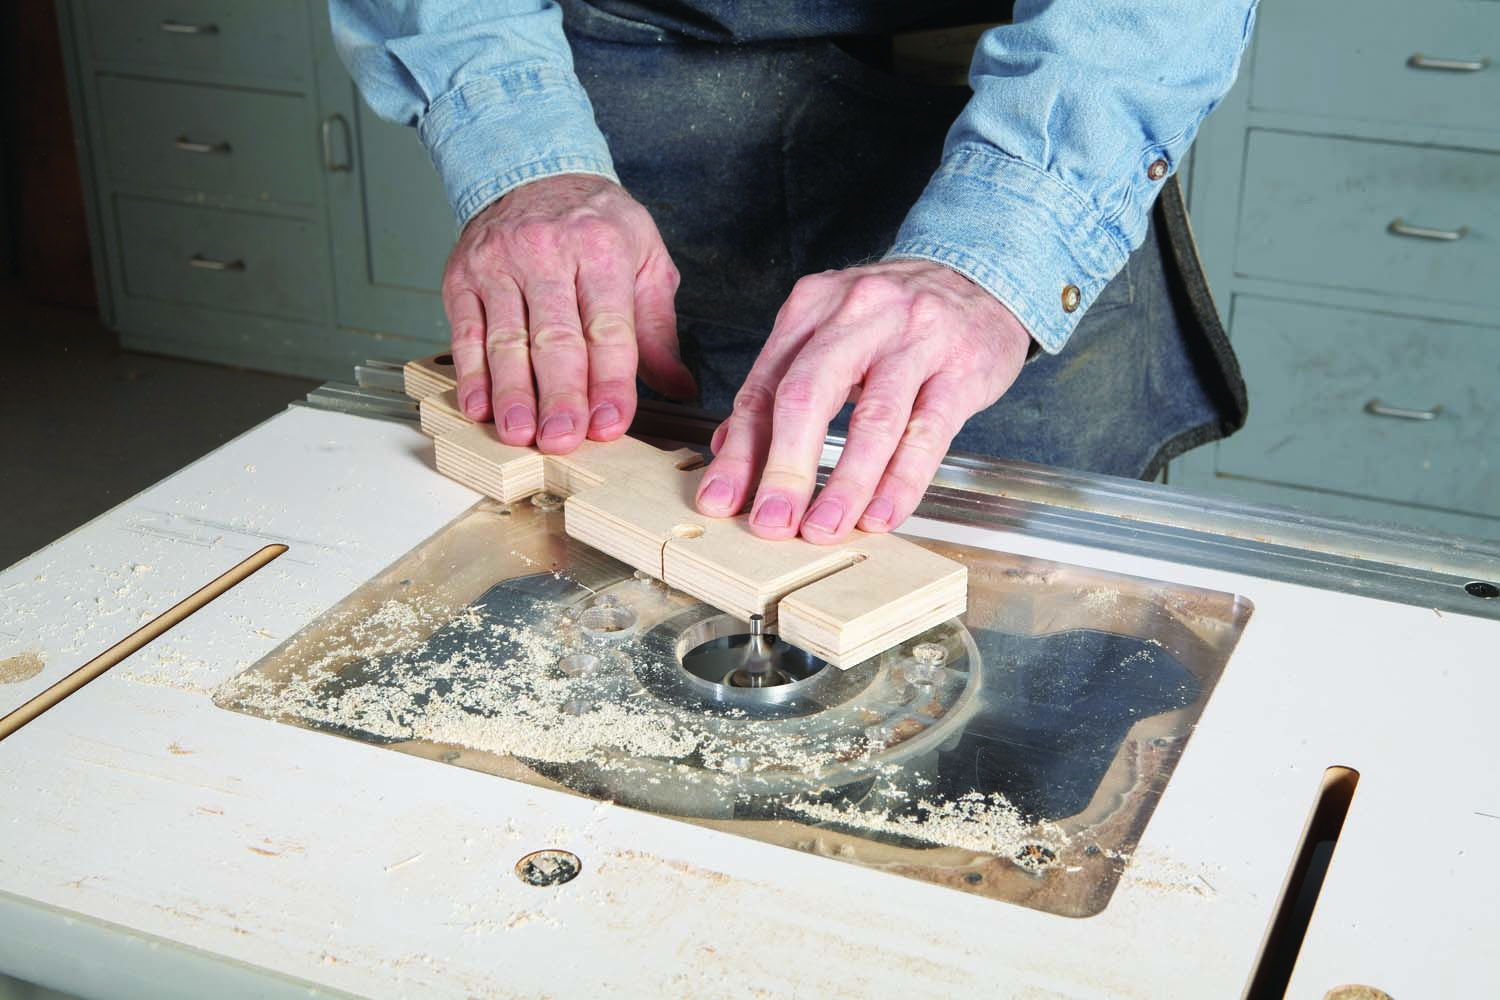
Photo 2. Round over the rack’s edges with a solid-pilot bit. This bit is ideal for getting into narrow cutouts—the pilot is only 3/16” dia.
Once you’ve got your own design worked out, make the actual rack and center panel from Baltic birch plywood. (All the other parts of the station are made from Baltic birch, too.) Round over the exposed edges of the rack on both top and bottom sides (Photo 2). A solid-pilot bit works best to get into tight spots.

A solid-pilot bit.
Next, design the chisel rack (D). I have a large set of chisels to choose from, depending on the size and type of dovetails I’ll be working on, but a compact box can’t hold all of them. That’s OK, because I don’t need the whole set for most projects—just a few will do. After making my layout tool rack, I found that the station’s width would accommodate six chisels spaced comfortably apart. For most jobs, that’s just about right.
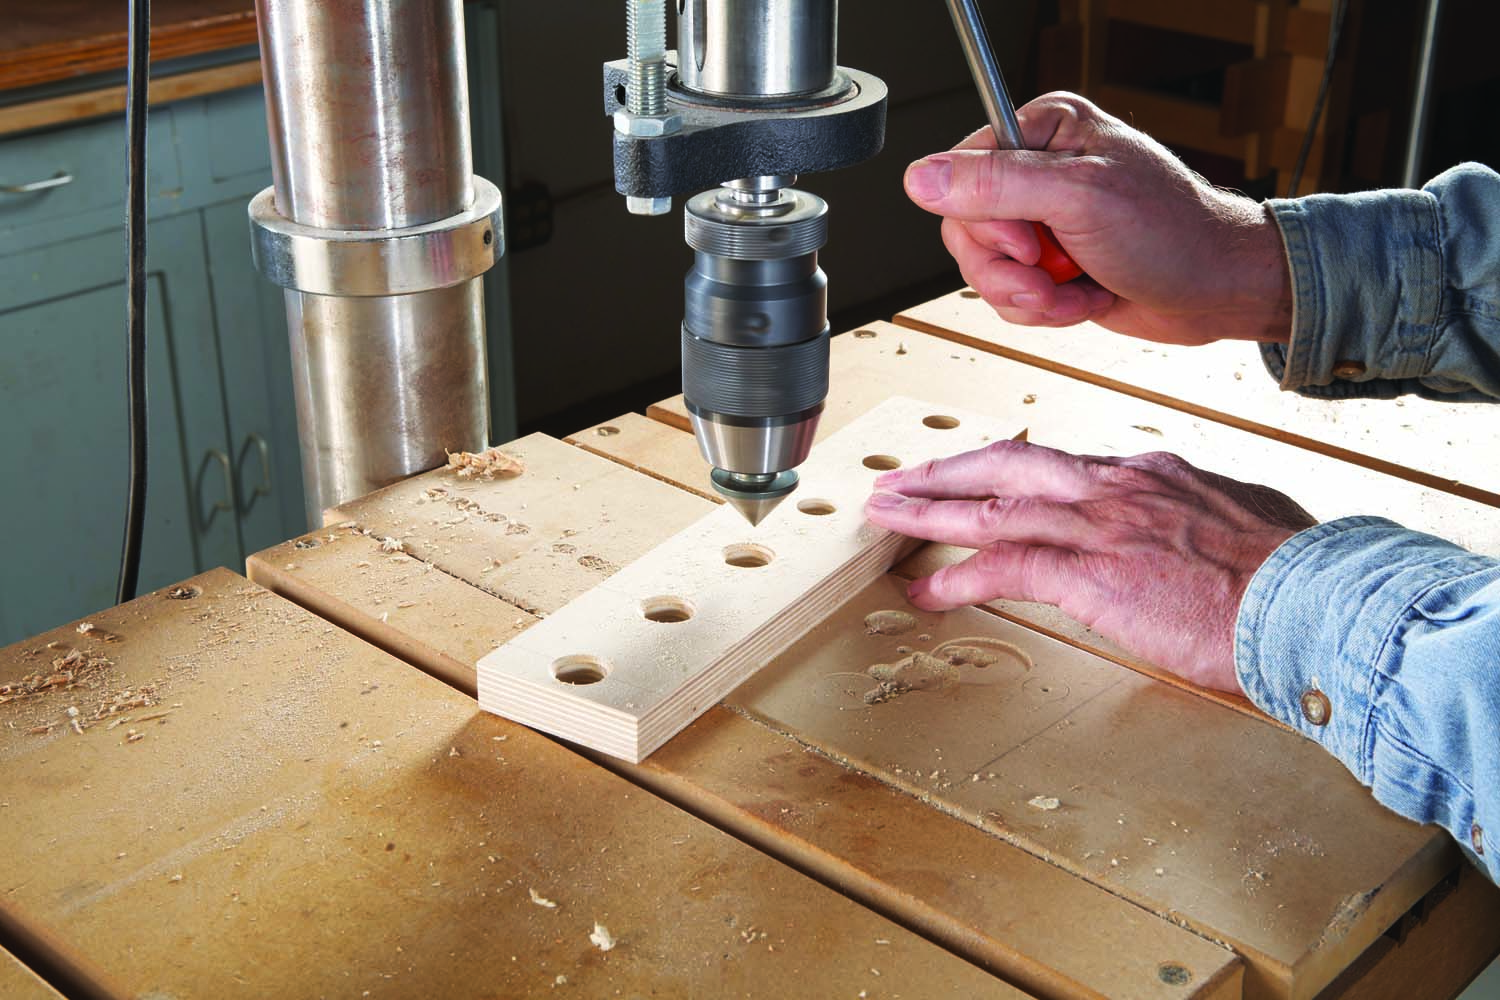
Photo 3. Make a second rack for your chisels by drilling and countersinking holes sized to fit your chisel’s sockets.

Photo 4. Rip the piece 3/16” off the center of the holes. Make this cut from both sides.
I often use wide chisels when dovetailing, and this rack is designed to hold them in any location. To build the rack, drill and countersink holes in a single piece of plywood (Photo 3). (Countersinking isn’t required, but I found that my chisels stood upright more easily if the holes had deeply beveled sides. You’ll need a countersink with an extra-large diameter—see Sources.) Rip the piece of plywood 3/16” off the center of the holes (Photo 4). Make two end caps for the rack (E) and a couple of 3/8” thick spacers, then glue the rack together (Photo 5). Round over its exposed edges, top and bottom.
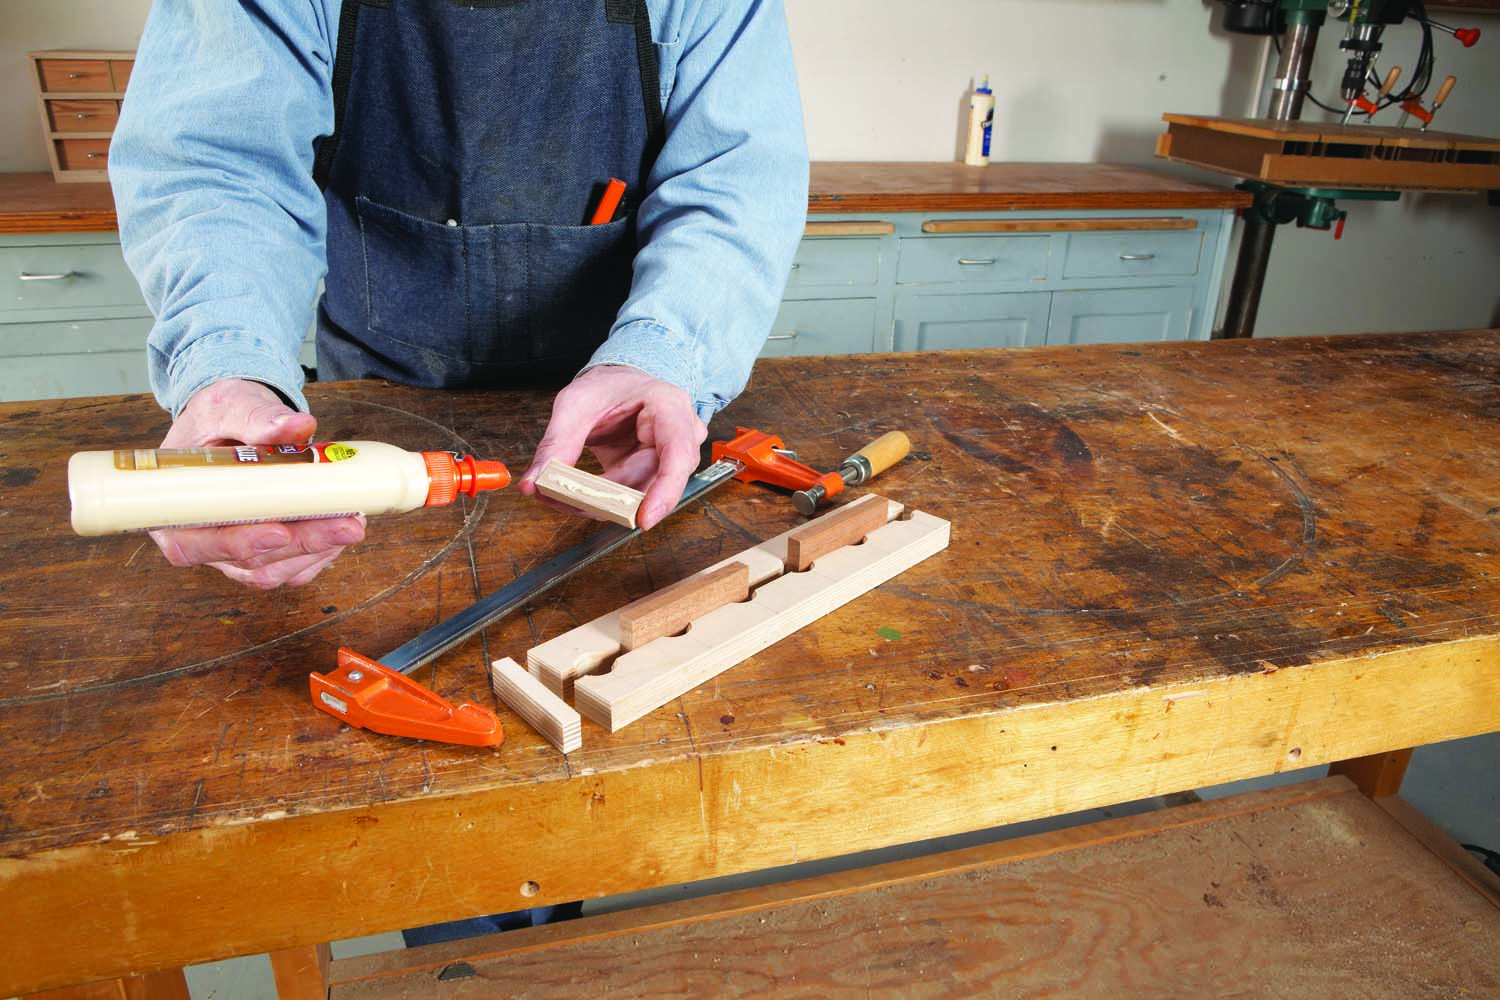
Photo 5. Place 3/8” spacers between the pieces, then glue caps on both ends. The resulting slot between the holes accommodates wide chisels.
Make the station’s base (F), then cut 1/4” x 1/4” dadoes in the chisel rack and base to accommodate dividers (G) for separating the chisels (Photo 6). Make the dividers from solid wood to fit tight in the dadoes.
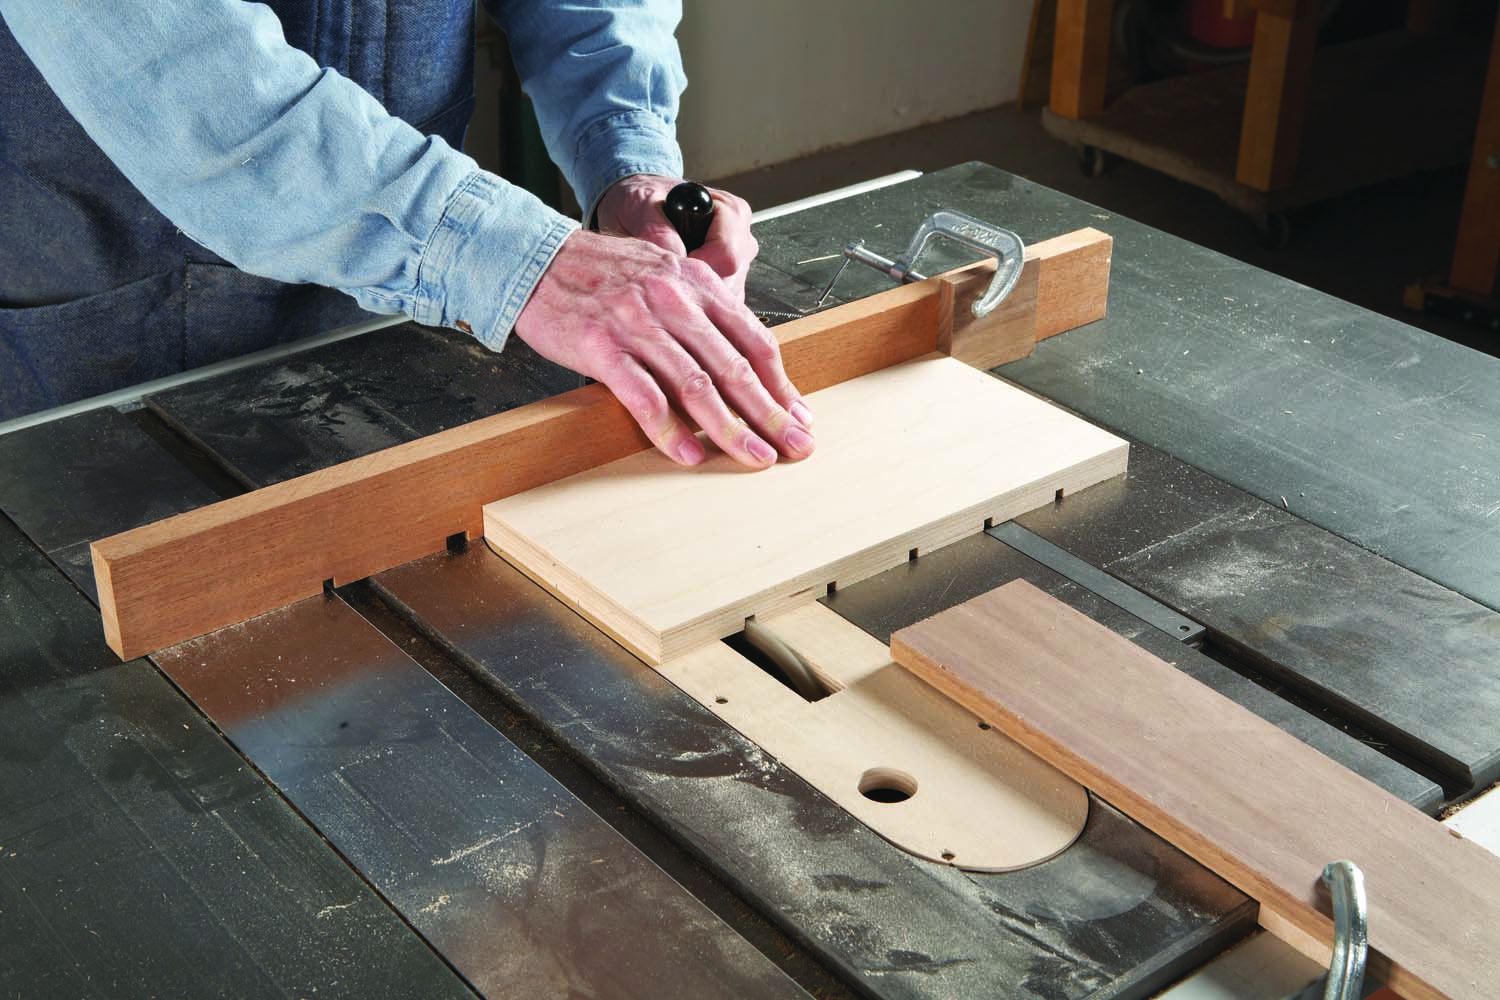
Photo 6. Cut dadoes in the stand’s base and chisel rack to house dividers. Clamp a block to your saw to limit the length of the dadoes.
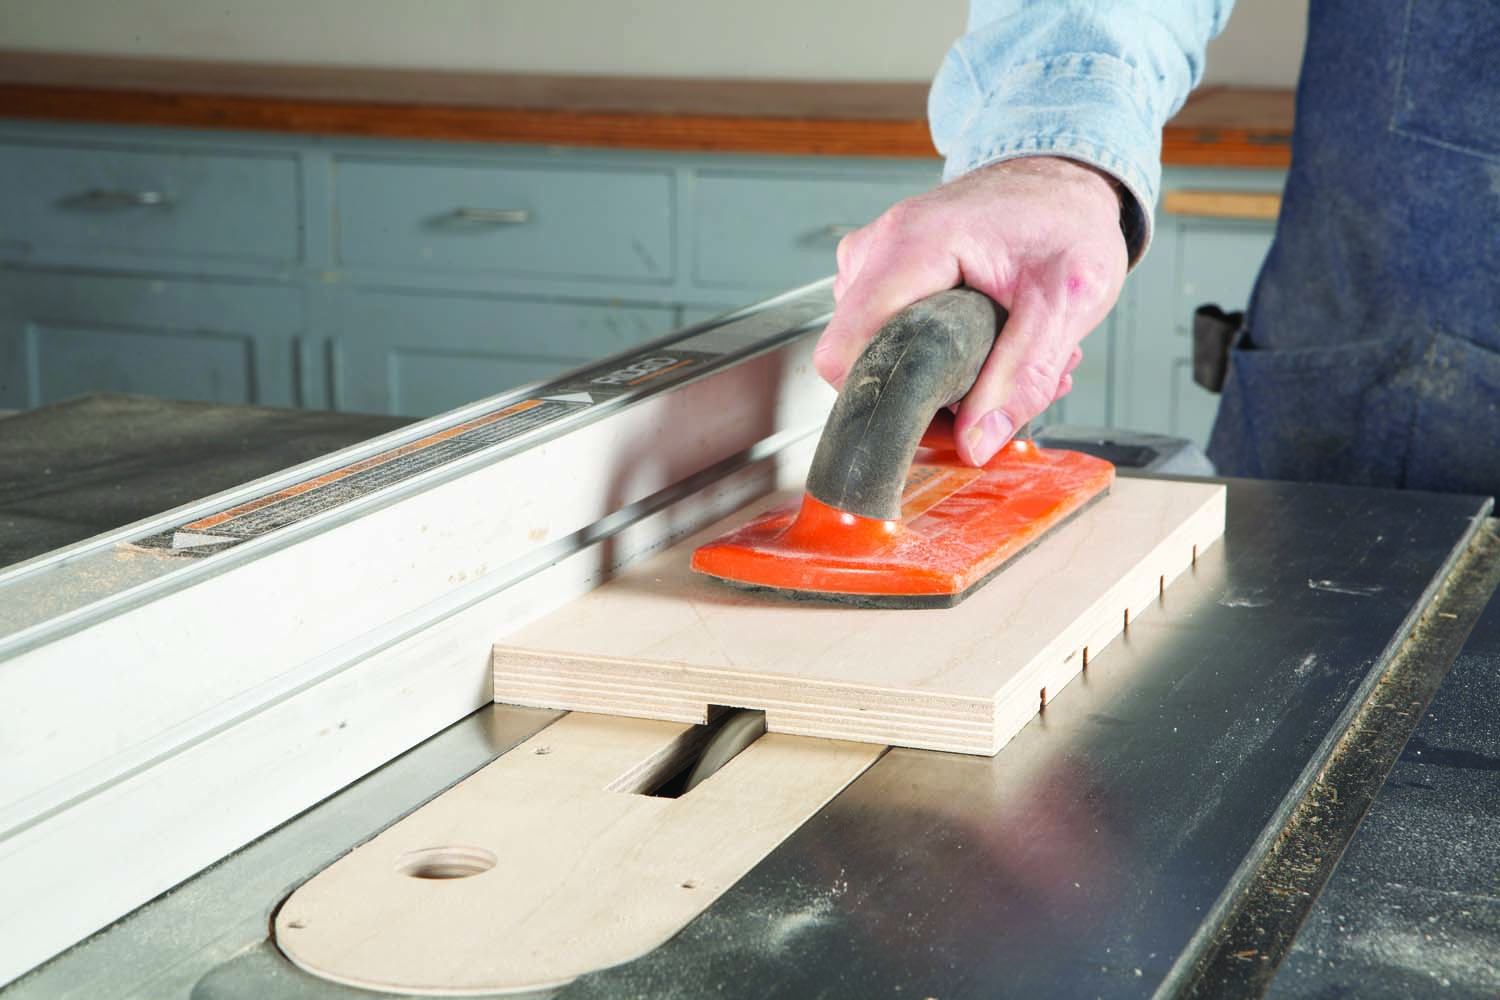
Photo 7. Cut a groove in the base to hold a vertical panel. For a tight fit, make multiple passes from both sides of the base, slightly moving the fence each time to widen the groove.
Leaving the 1/4” dado set in the saw, cut a groove in the base to hold the center panel (Photo 7). To make a strong joint, the groove should be just wide enough for a tight fit. Plus, it should be exactly centered on the base. Both conditions are easy to meet. Start by sawing a groove slightly off center, then spin the base around and saw a second groove. Shift the fence about 1/8” farther away from the blade and repeat the procedure. Continue on in this manner to widen the groove, moving the fence a bit less each time, until the groove fits the panel.
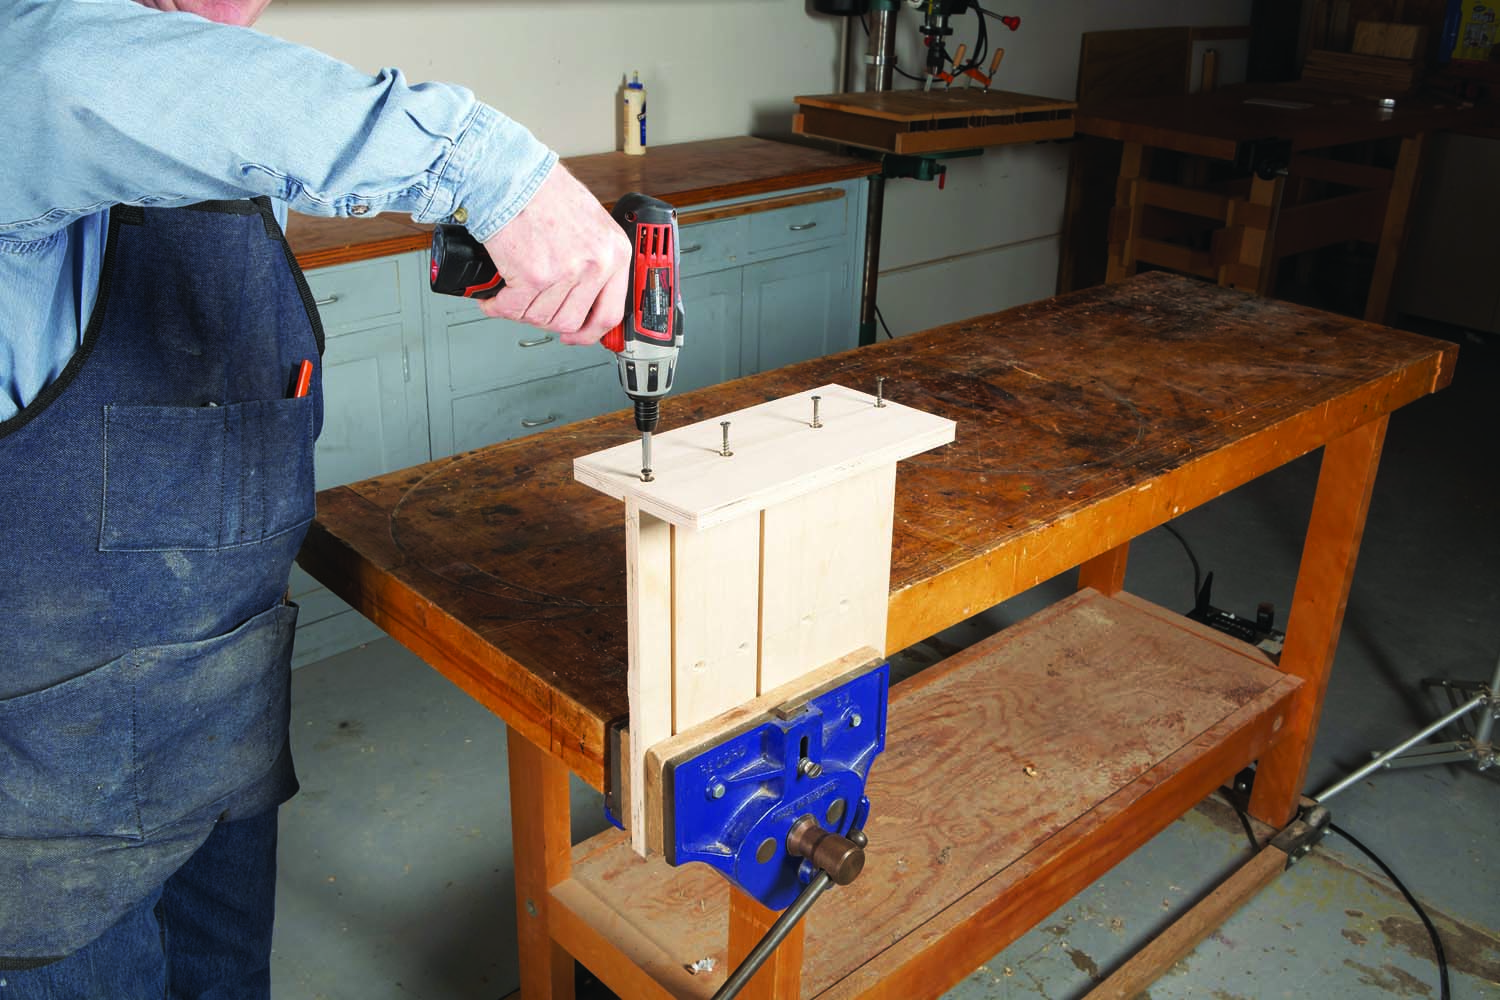
Photo 8. Fasten the base to the panel. Don’t glue it—you may want to disassemble and modify the station later on to store new tools.
Fasten the base to the panel (Photo 8). (Make sure the screw holes are offset from the dadoes in the base.) Fasten the layout tool rack to the panel. Place the dividers in position, then fasten the chisel rack to the base (Photo 9).
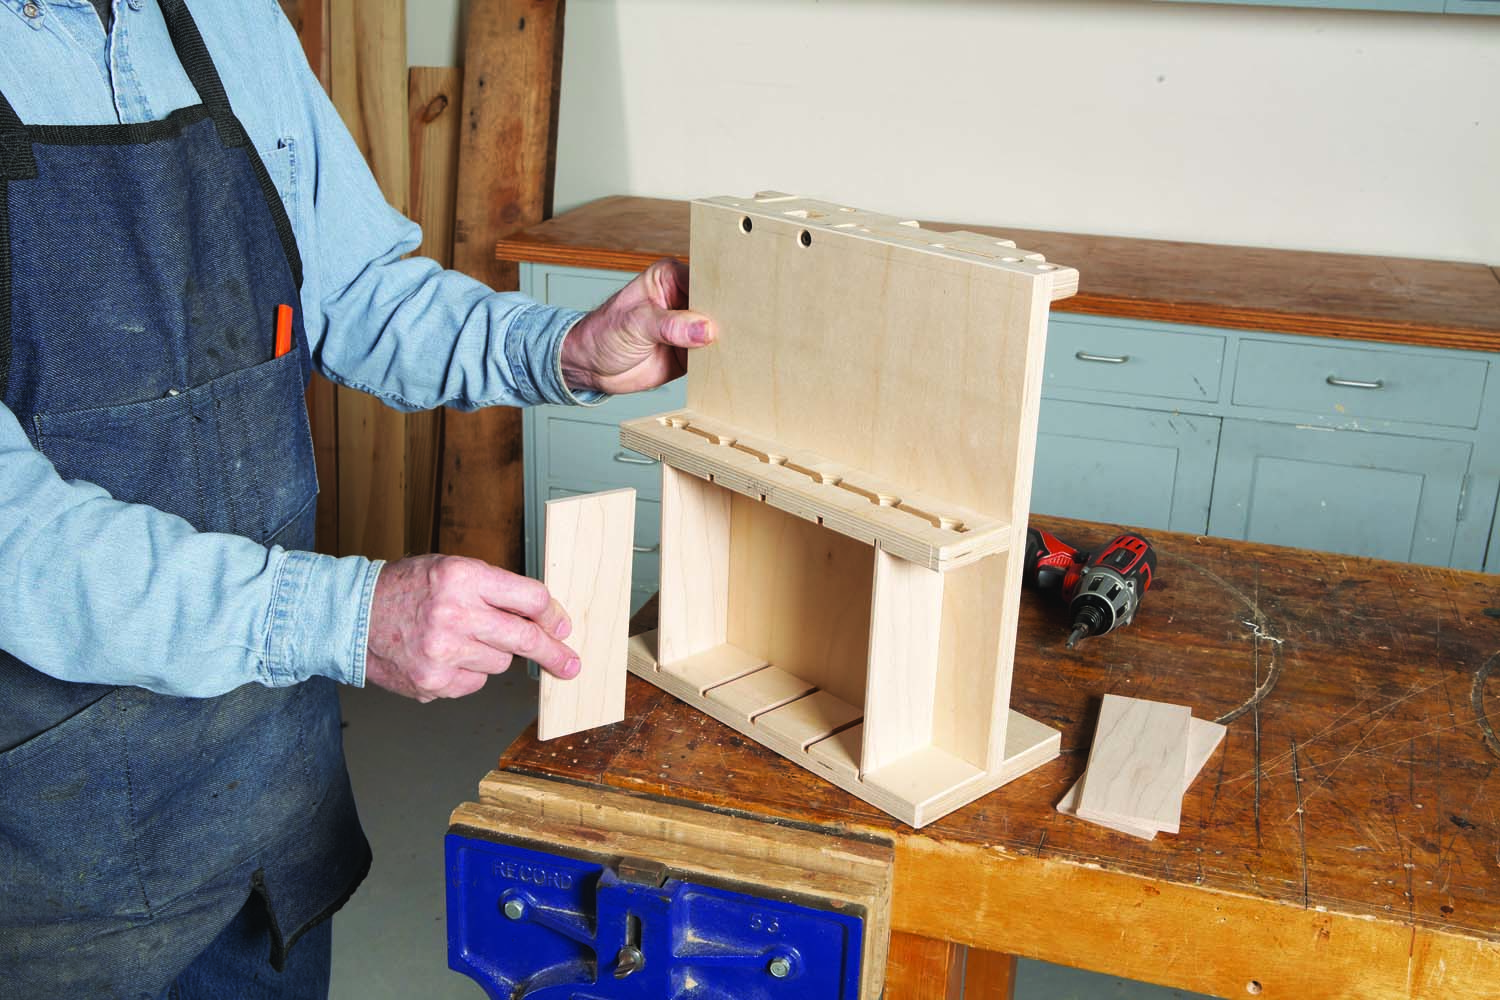
Photo 9. Fasten the layout tool and chisel racks to the panel with screws. Place dividers under the chisel rack to hold it in place.
I made a few additional pieces (H – N) to hold my tools and nailed them in place with short brads. I also hung some tools on finishing nails. After hammering in the nails, I bent them slightly upright with a pair of pliers as insurance that the tools wouldn’t slide off when I moved the station.
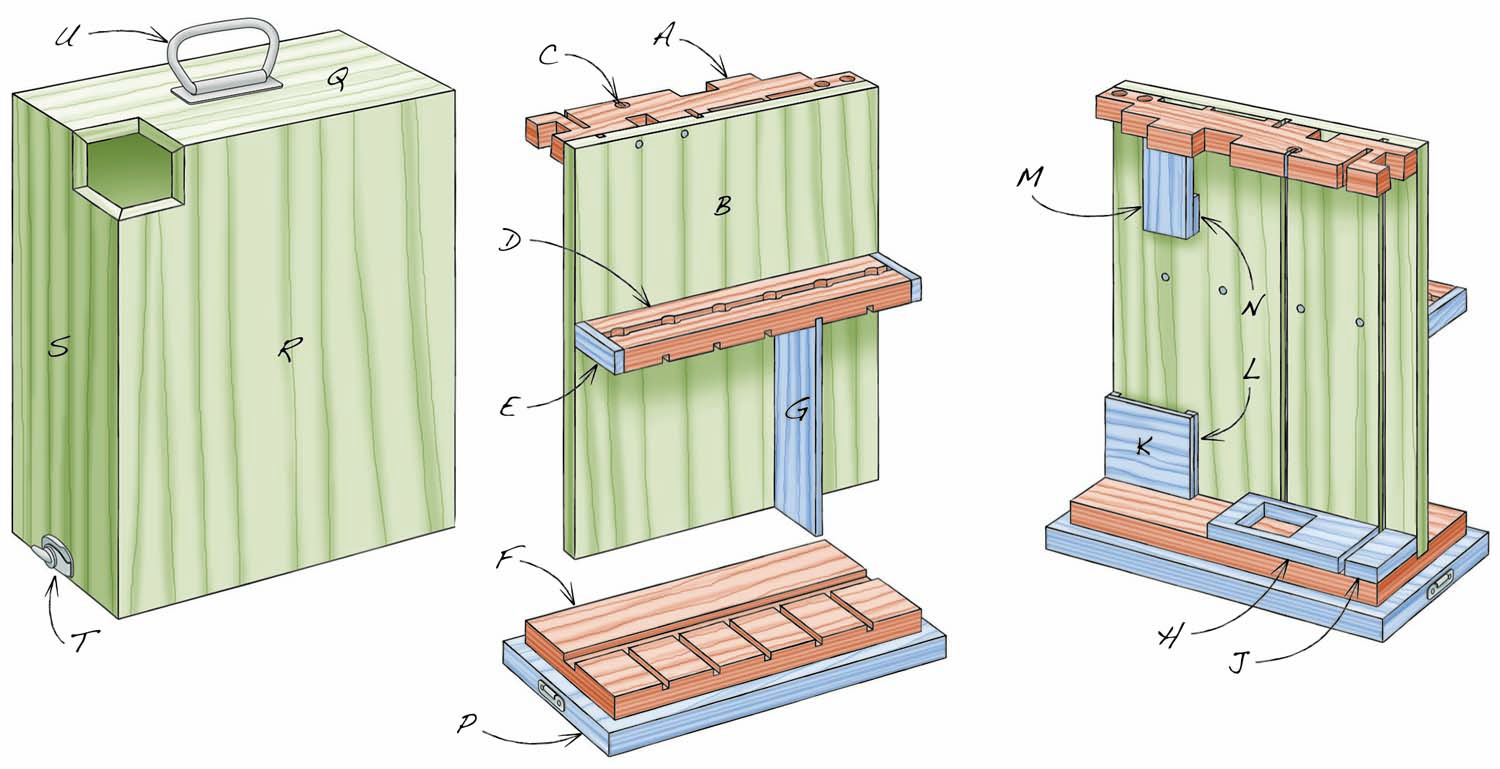
Fig. 01. Exploded View
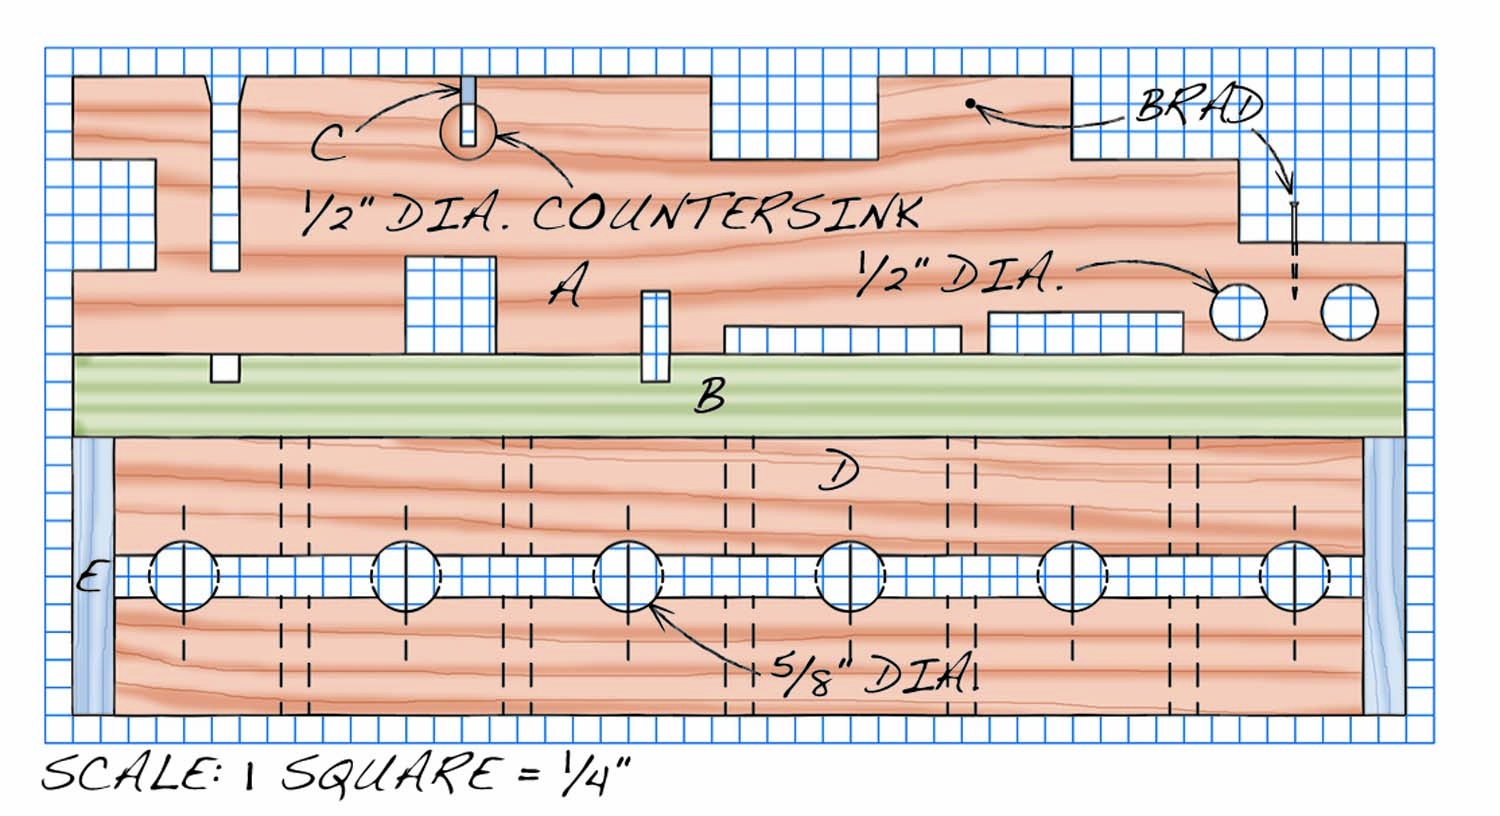
Fig. 02. Layout Tool Rack, Center Panel and Chisel Rack
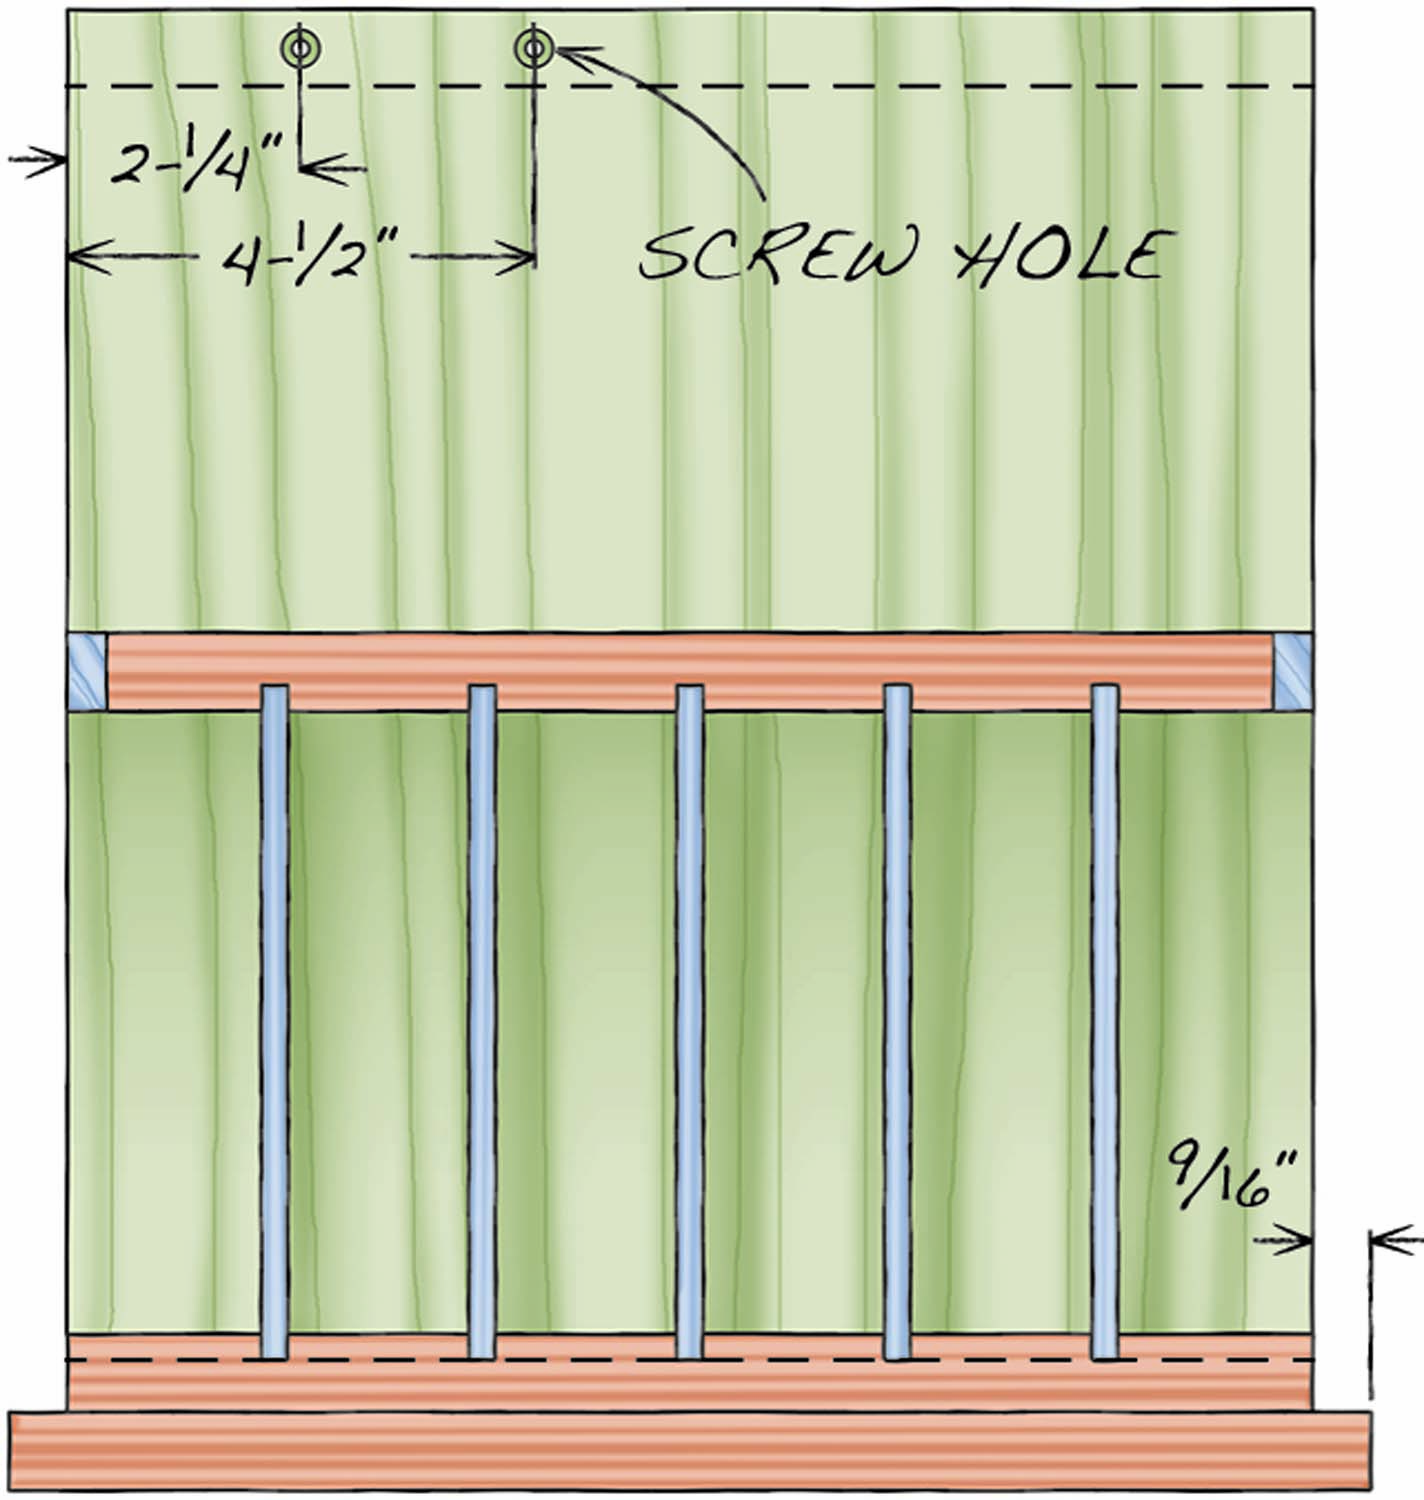
Fig. 03. Front Elevation
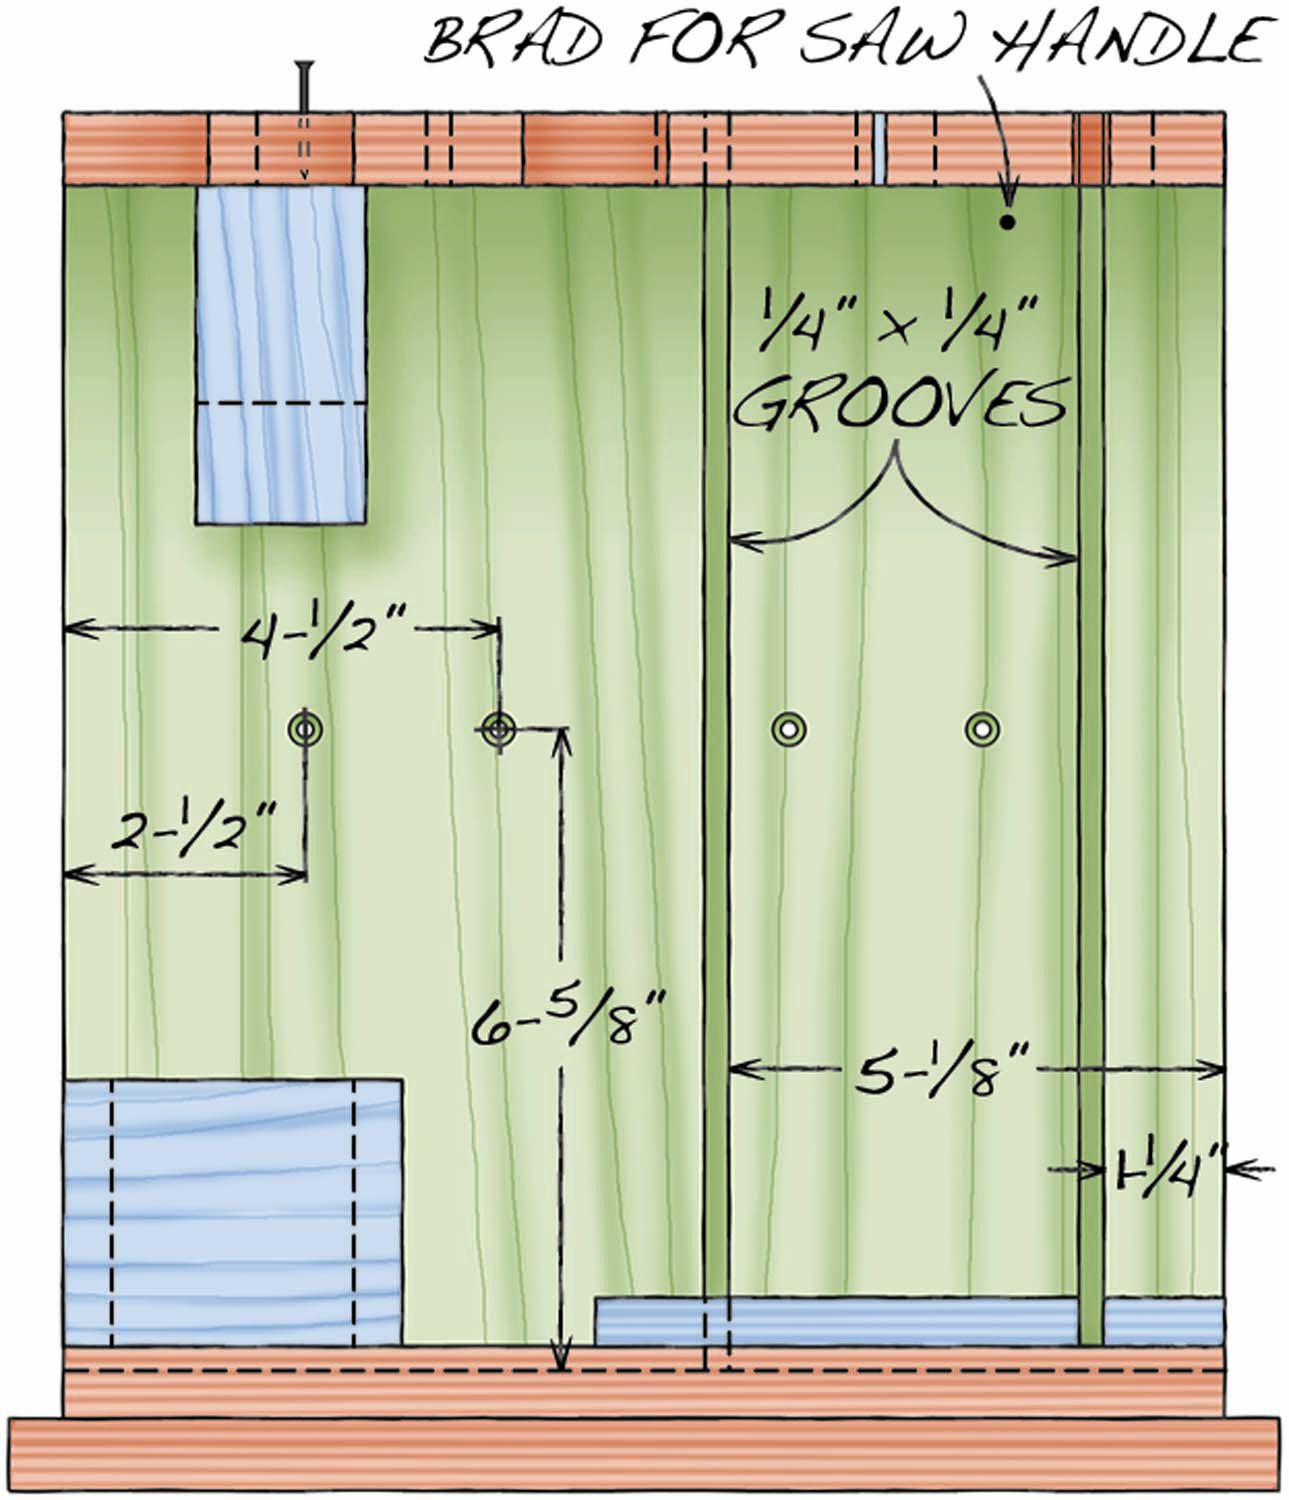
Fig. 04. Back Elevation
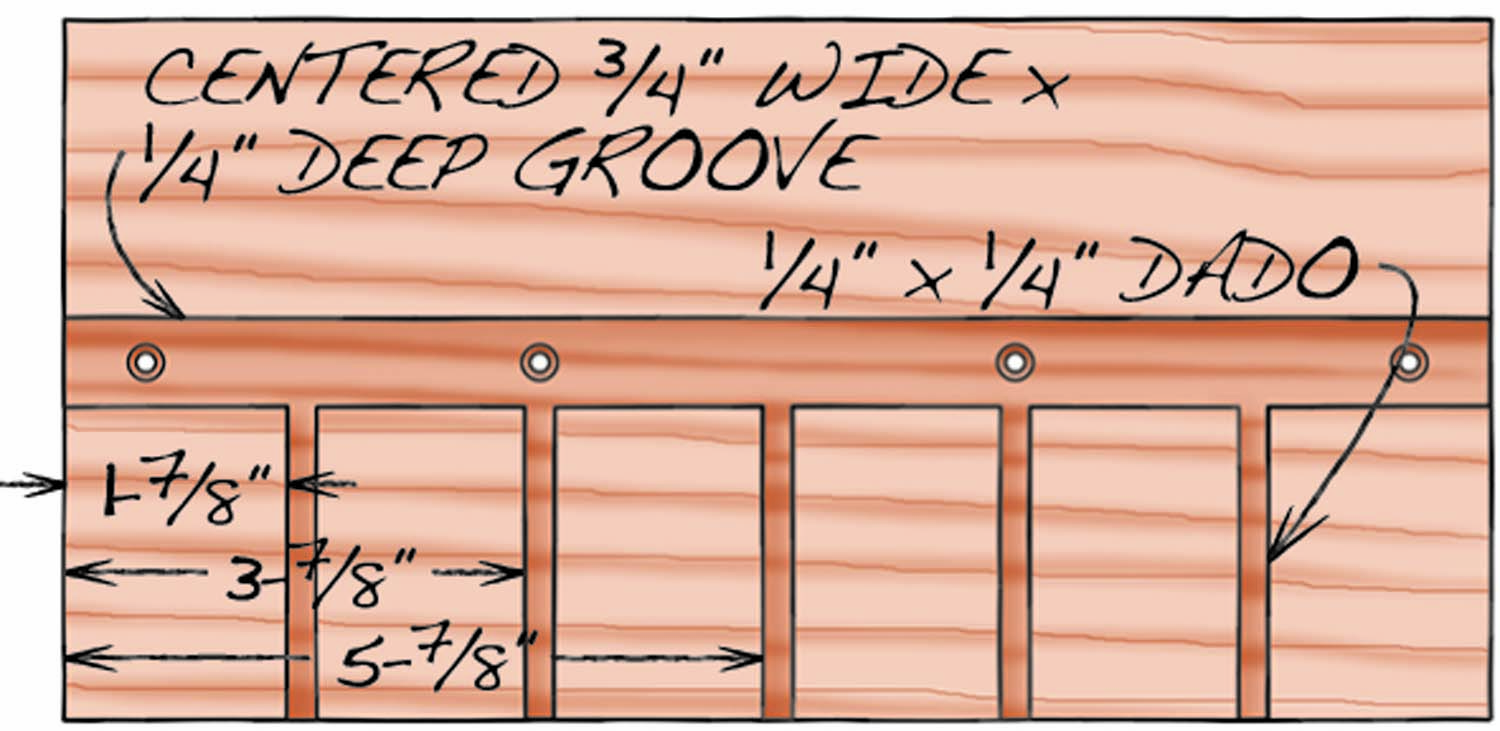
Fig. 05. Plan of Base
Cut List
|
Dovetailing Tool Station |
||||
|
Overall dimensions: 17-3/4″ H x 13-1/8″ W x 7″ D |
||||
|
Section |
Part |
Name |
Qty. |
Th x W x L |
|
Stand |
A |
Layout tool rack |
1 |
3/4″ X 2-1/2″ x 12″ |
|
B |
Center panel |
1 |
3/4″ x 12″ x 13″ |
|
|
C |
Filler |
1 |
1/16″ x 3/16″ x 3/4″ |
|
|
D |
Chisel rack |
2 |
3/4″ x 1-1/16″ x 11-1/4″ (a) |
|
|
E |
End cap |
2 |
3/4″ x 3/8″ x 2-1/2″ |
|
|
F |
Base |
1 |
3/4″ x 5-7/8″ x 12″ |
|
|
G |
Divider |
5 |
1/4″ x 2-1/2″ x 6-1/2″ |
|
|
H |
Mallet block |
1 |
1/2″ x 2-1/2″ x 5″ |
|
|
J |
Sawblade holder |
1 |
1/2″ x 2-1/2″ x 1-1/4″ |
|
|
K |
Shim pocket 1 |
1 |
1/4″ x 3-1/2″ x 2-3/4″ |
|
|
L |
Shim pocket 2 |
2 |
1/4″ x 1/2″ x 2-3/4″ |
|
|
M |
Thin blade 1 |
1 |
1/2″ x 1-3/4″ x 3-1/2″ |
|
|
N |
Thin blade 2 |
1 |
1/2″ x 1-3/4″ x 1-1/4″ |
|
|
Cover |
P |
Bottom |
1 |
3/4″ x 7″ x 13-1/8″ |
|
Q |
Top |
1 |
1/2″ x 7″ x 13-1/8″ |
|
|
R |
Front and back |
2 |
1/2″ x 13-1/8″ x 17″ |
|
|
S |
Side |
2 |
1/2″ x 7″ x 17″ |
|
|
Hardware |
T |
Sash lock |
2 |
|
|
U |
Handle |
1 |
||
|
Note: (a) Start with a single piece 3/4″ x 2-1/2″ x 11-1/4″. |
||||
Make the cover
Saw the cover’s bottom (P), top (Q), front and back (R) and sides (S) to final size. Check these dimensions before you saw, of course. Allow 1/16” clearance between the inside of the cover and the outside of the station’s base, all around. In addition, make sure the cover is tall enough too accommodate all your tools when they’re stowed away.
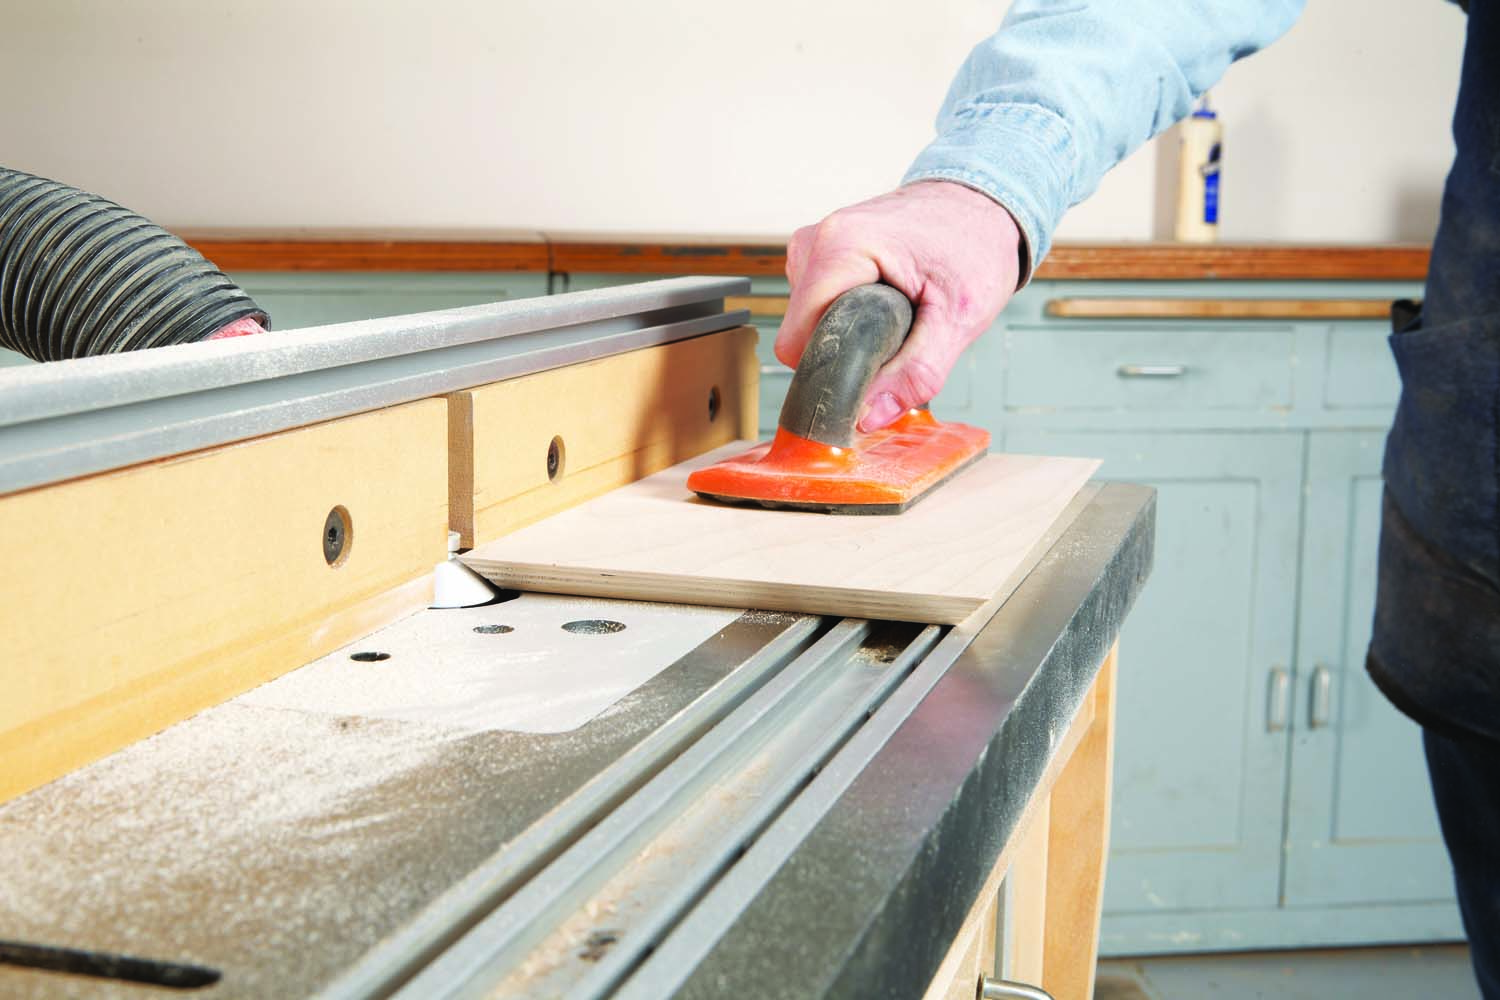
Photo 10. Begin making the station’s cover by routing miters on each of its pieces. The miters shouldn’t come to a point—leave a narrow blunt edge.
Rout miters on the front, back, sides and top pieces using a chamfer bit (Photo 10). Take at least two passes, removing a bit more each time. To guarantee that the panels stay full size (since their dimensions are critical), leave a 1/64” wide blunt edge on the last pass. After you’re done routing, run your fingers over each miter to make sure it’s smooth and free from lumps. This will ensure that your joints fit tight.
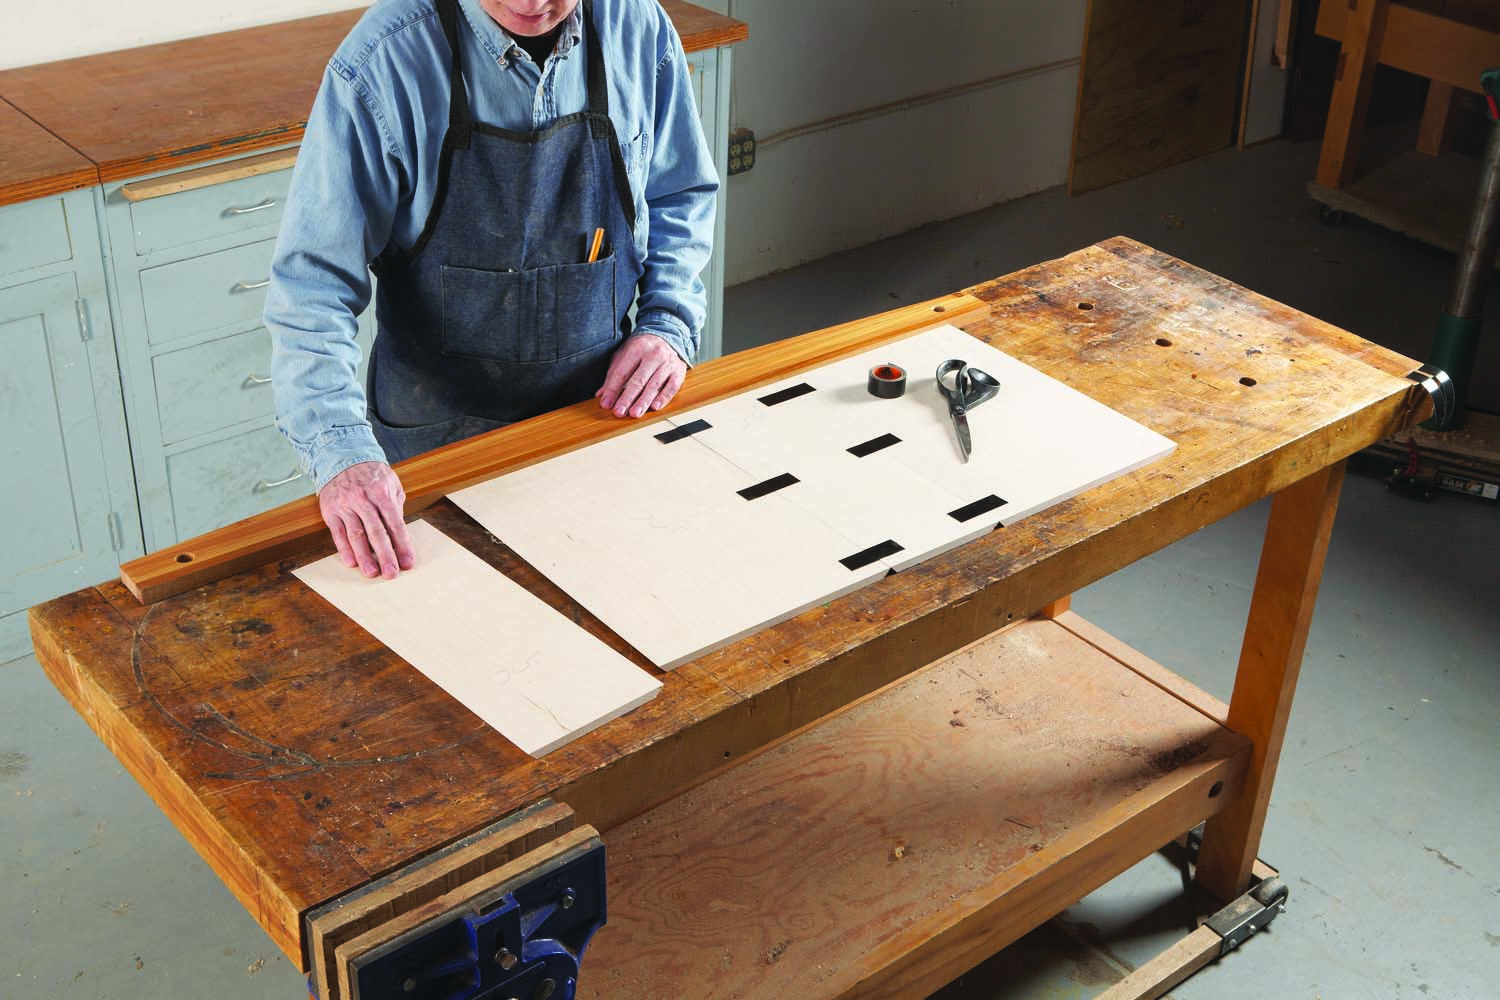
Photo 11. Place the pieces against a straightedge, face up, and join them with tape. Use tape that can stretch a bit.
Gluing a mitered box together isn’t difficult; usually, you don’t need clamps, just tape. Using the “blunt edge” strategy, however, the tape must have a little bit of stretch in it. I used 1” wide Gorilla tape. It stuck well, with just enough stretch, but didn’t yank out the wood’s fibers when I removed it.
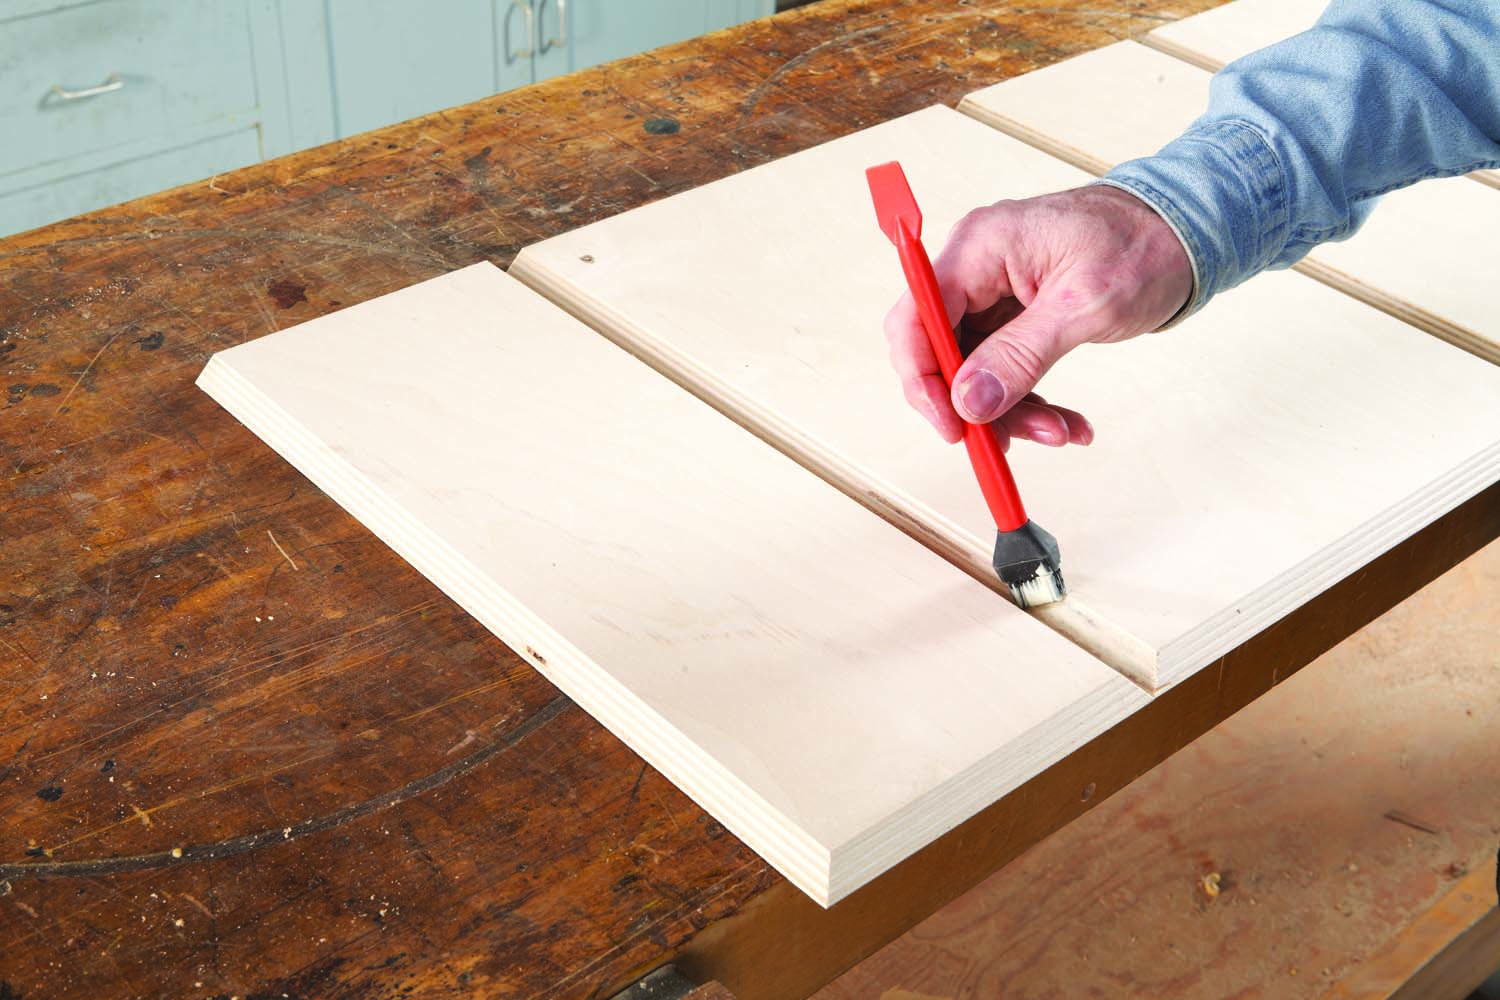
Photo 12. Turn over the pieces and apply glue to the miters.

Photo 13. Fold the pieces into a box. Add band clamps to ensure that the joints come tight.
To prepare the cover for gluing, arrange the front, back and sides in order, face up. Butt the pieces tight together and align them with a straightedge. Join the pieces with 6” long pieces of tape (Photo 11). Turn over the assembly and apply glue (Photo 12). Fold the pieces together and tape the remaining sides (Photo 13). Tape alone should keep the joints tight, but I added a couple of band clamps to make sure the joints came tight. Glue and clamp the top (Photo 14). Rout a 3/16″ wide chamfer all the way around the cover—this will “erase” the blunt edges of the miters. Add two catches, one on each side and a handle. You’re all set!
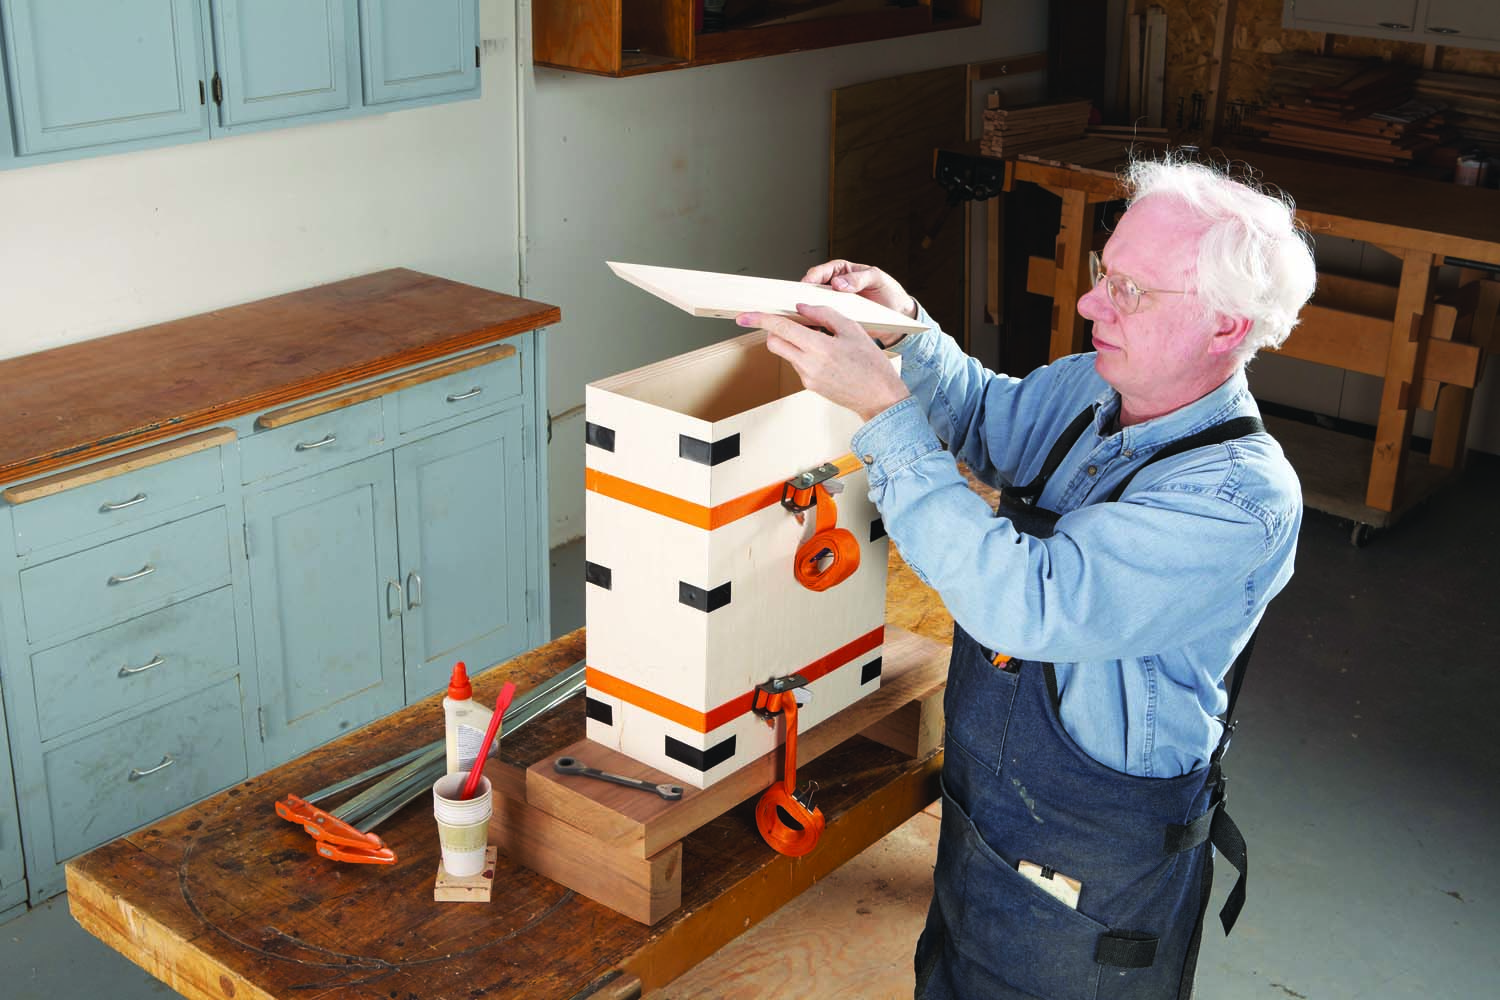
Photo 14. Clamp the cover on the box (its edges are mitered, too). Once the glue is dry, rout a large chamfer around all of the cover’s edges.
Here are some supplies and tools we find essential in our everyday work around the shop. We may receive a commission from sales referred by our links; however, we have carefully selected these products for their usefulness and quality.