


We may receive a commission when you use our affiliate links. However, this does not impact our recommendations.
Designer Enzo Mari gave the world this design (and many others). But are they worth building?
When my grandparents married before World War II, they bought a dining room set that cost several months of my grandfather’s salary as a paper salesman. At that table, Popo and Grandma raised my father and uncle. And our family ate at that table every time we visited my grandparents until they died and the table was sent to who knows where.
Though this behavior might sound crazy now in the age of disposable flat-pack furniture, my grandparents were typical for their day. Before the 1950s, it was common for your furniture to stay with you your entire life. It also was common for it to cost quite a bit.
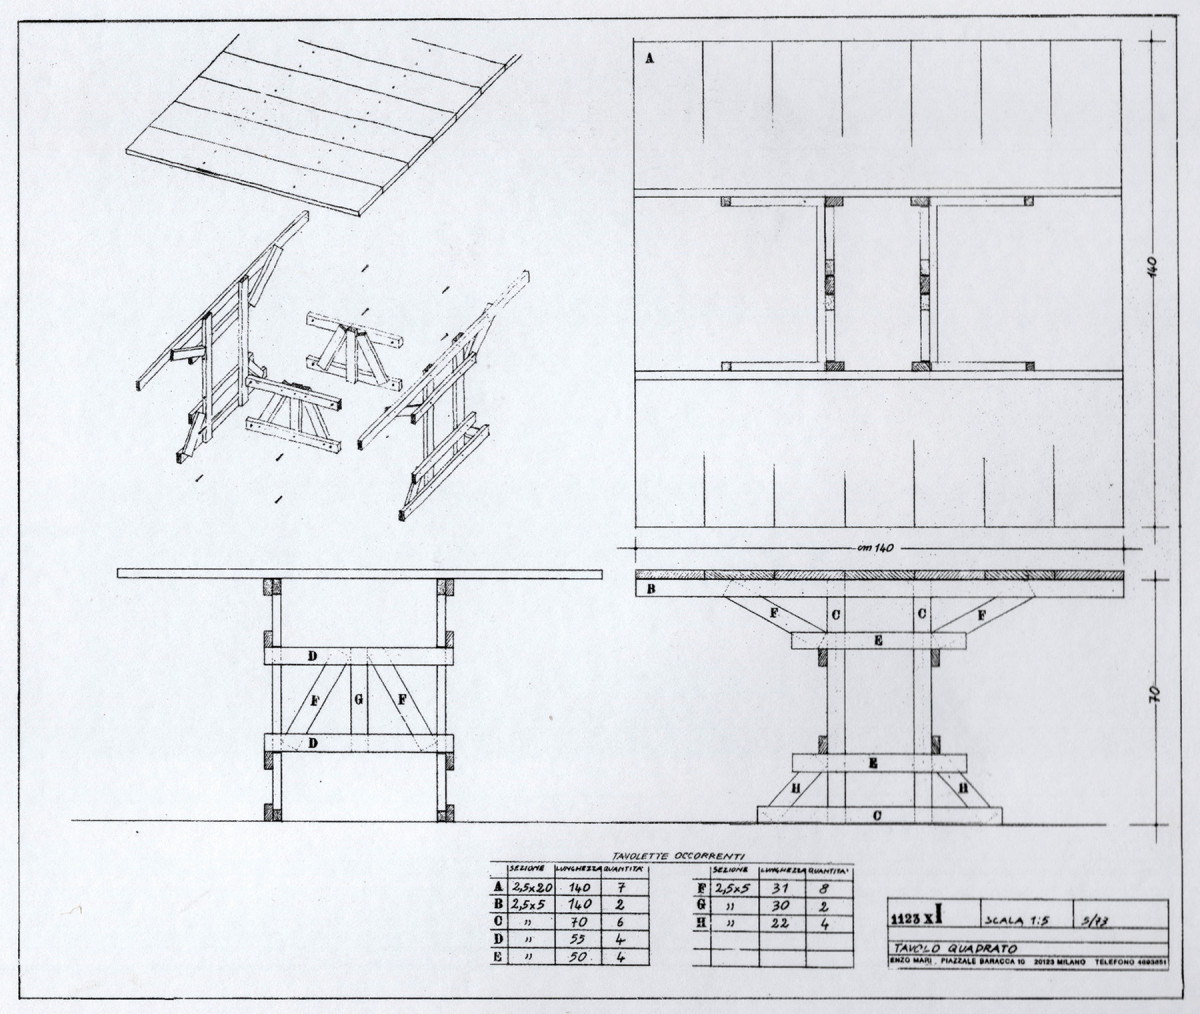
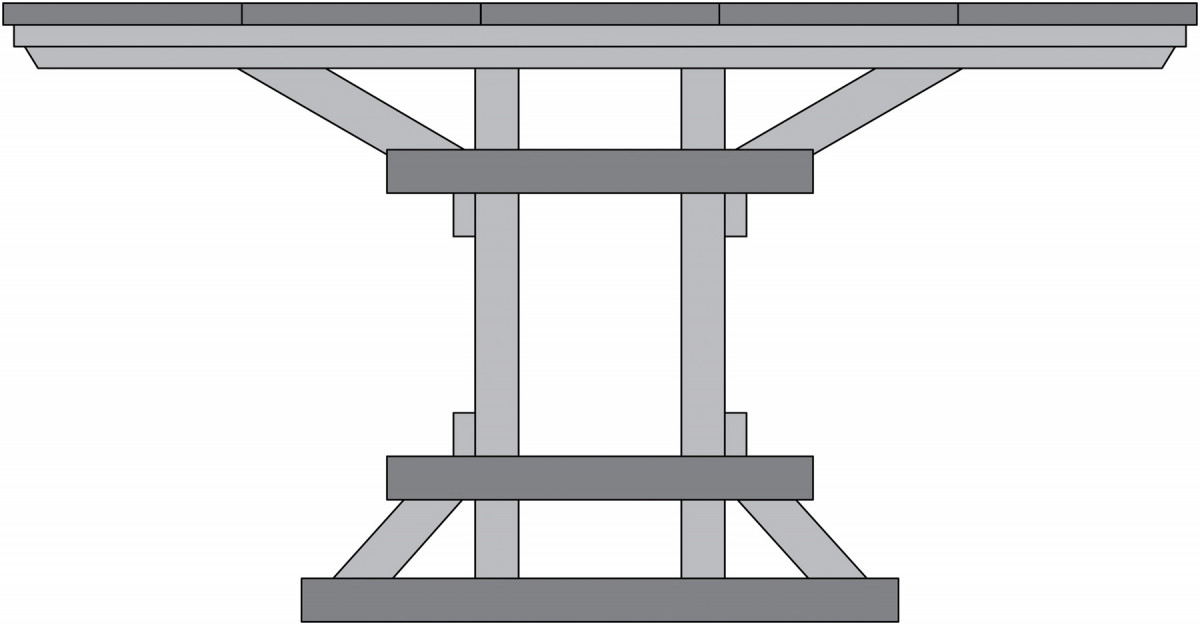
Sorry, Mari. Note the internal bracing in this drawing. Mine are upside down from this. I could easily change it, but I quite like my mistake.
In 1974, Italian designer Enzo Mari observed how furniture was becoming less expensive and less durable. And so, he created an experiment that we can still hear echoes of today. The experiment developed into a book called “Autoprogettazione?” (Corraini), and it was a set of free plans for furniture that could be built using a handsaw and a hammer.
Mari wondered: Would people accept these pieces of utilitarian furniture into their homes? What would the reaction be to a series of sticks that were nailed together but served perfectly well as a bookcase, bed, dining table or chair?
Furthermore, would people who built the pieces learn something from the construction process? Would they gain an appreciation for things that are well-made after having made something themselves?
This, according to Mari, is an important aspect of design: “Design is only design if it communicates knowledge.”
I’ve often wondered about the pieces in “Autoprogettazione?” Could an experienced woodworker learn something from his designs? This year I decided to find out.
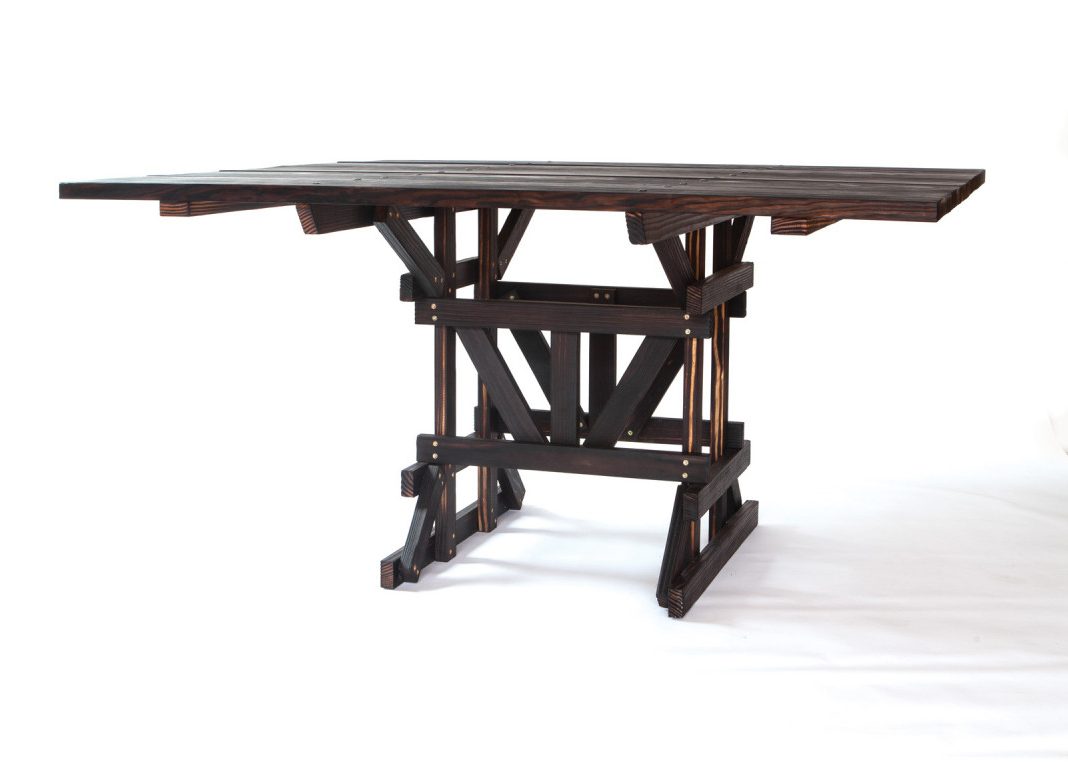
Tavola Quattro
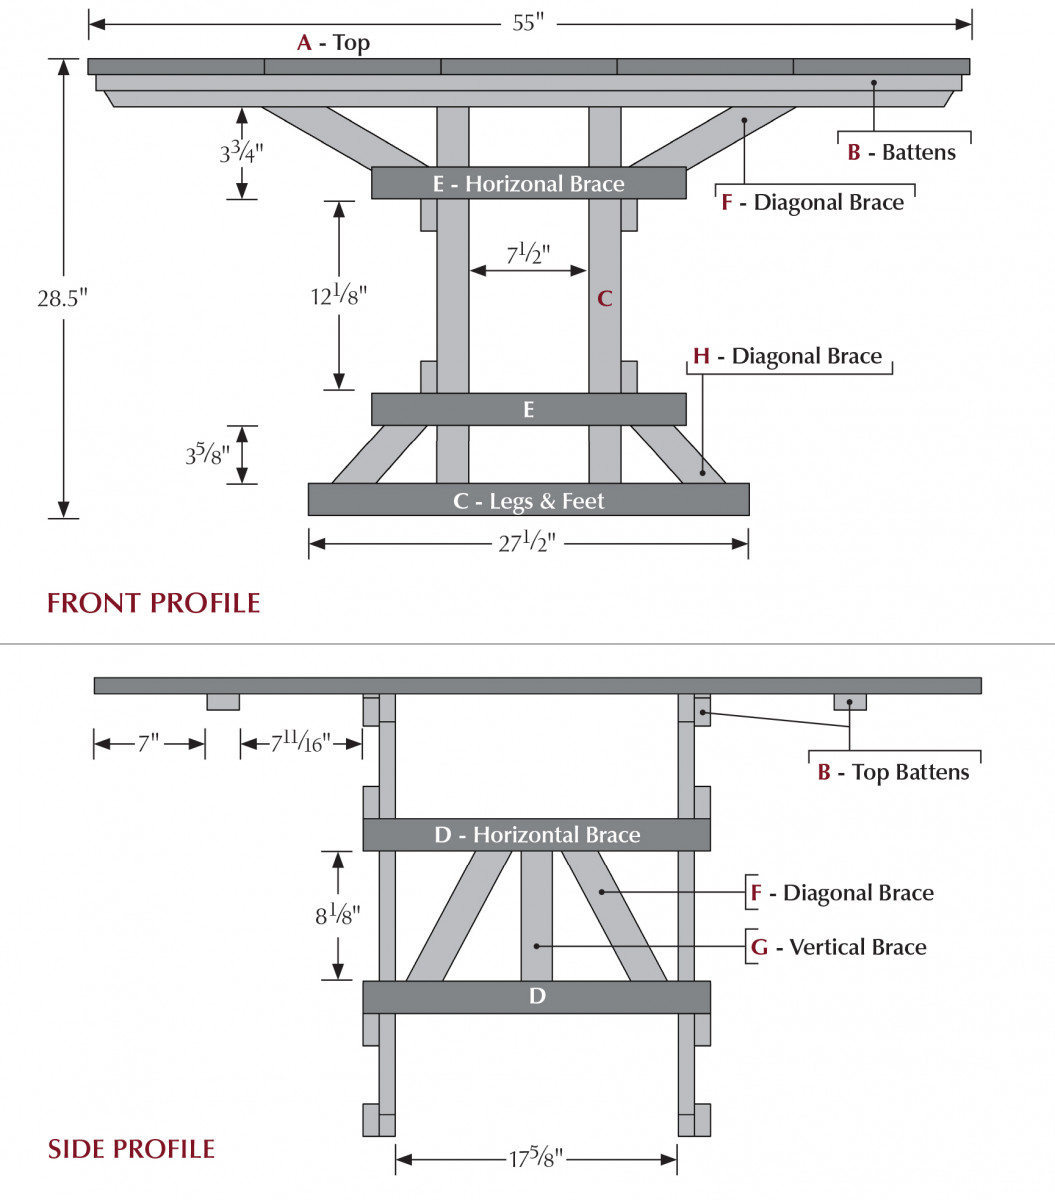
This dining table, called Tavola Quattro, is larger than it looks. With a top that’s 55” square, you can seat eight around it, thanks to the clever base that works like the truss on a bridge. The material required to build it is minimal. If you have a table saw, you can easily cut the material from five 15⁄8” x 111⁄4” x 12′ pieces of construction lumber (total cost: $80). To assemble the table, you can use nails or wood screws. I planed all the pieces down to 1″ thick and used #8 x 15⁄8” screws. If you don’t have a planer, use #8 x 2″ screws. Cost of the screws: $12.
My finish is shou sugi ban, a charred finish popular in Japanese architecture for making building materials fire- and bug-resistant. I charred the wood with a propane torch, brushed off the soot and then applied a finish of linseed oil and beeswax.
In the end, this might just be my fastest time ever for building a dining table for eight; only 10 hours of work. But was it a waste of time?
Parts & Fire
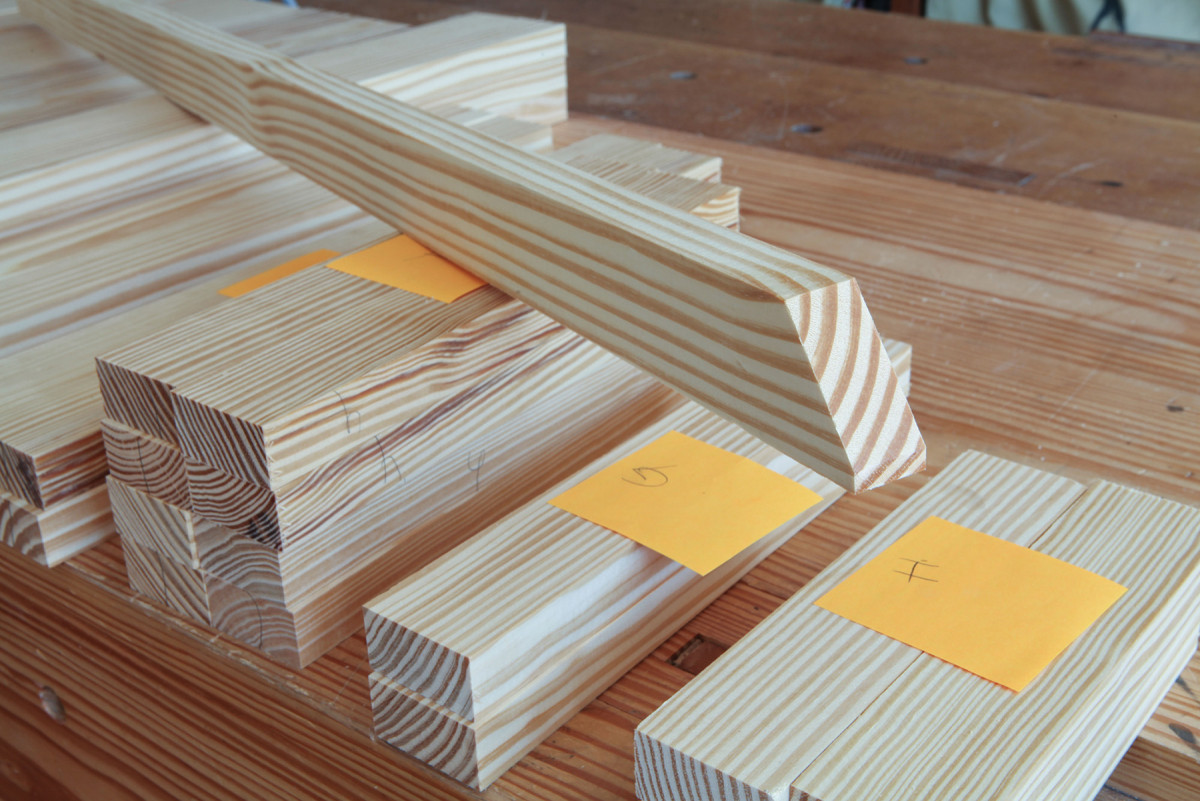
An odd way to work. Normally I wouldn’t cut and finish all my parts before starting a project, but this table is different. It’s more like a factory-built item with standardized and interchangeable parts.
This project is a bit unusual in that it’s best to cut all the pieces to size according to the cutting list, finish them, then assemble the project. Normally it’s best to use a cutting list as a rough road map and make adjustments as you go. For this project, however, cut up all the parts, letter them and stack them in piles.
Flattish. The battens keep the boards of the tabletop in line. They weren’t shown on Mari’s original plans but were present on the pieces built by him and his students. You need them; otherwise the top will behave like a bunch of unruly diving boards.
If you don’t want to use the shou sugi ban finish, apply your finish of choice at this point using varnish, shellac, paint, whatever. Or get out the propane weed burner and prepare for a blast (of heat, that is).
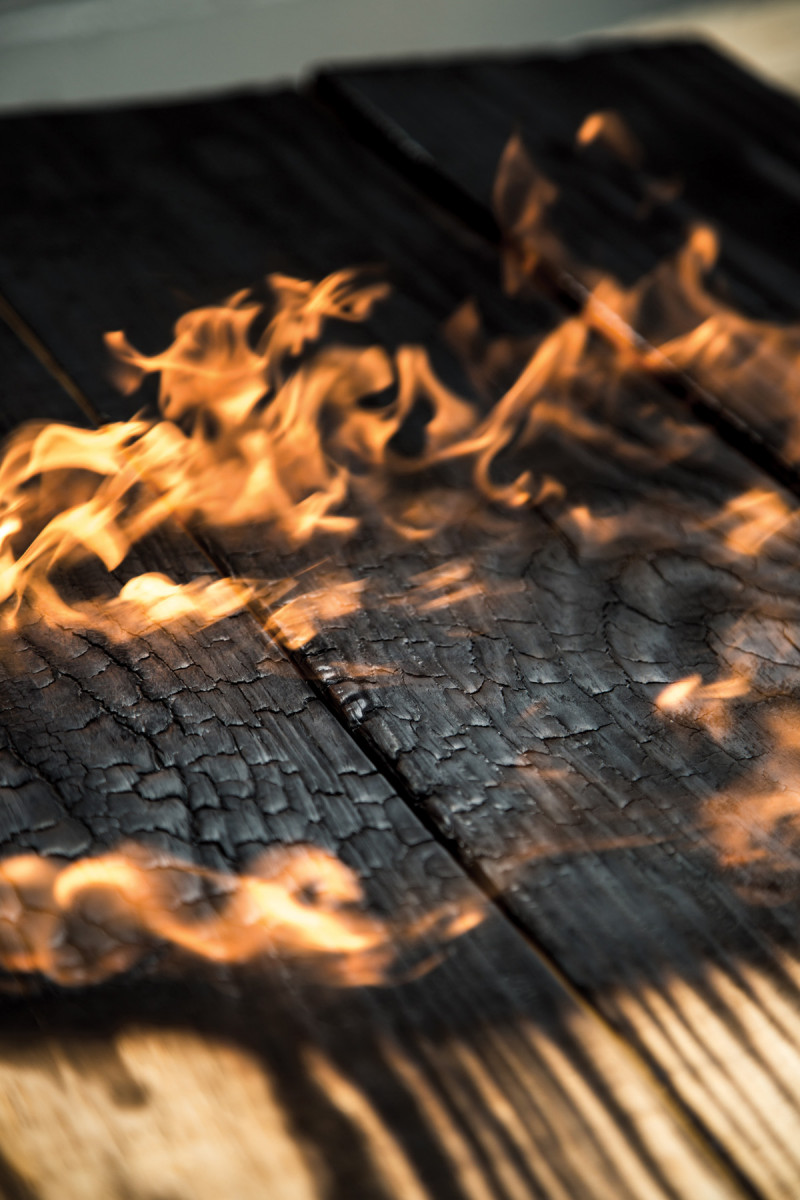
Say hello to my little friend. A propane weed burner, at left, pumps out 500,000 BTUs and gets the job done quickly and inexpensively.
Propane weed burners are cheap tools that typically cost about $35 to $50. They attach to a propane tank such as one that fuels your gas grill, and they work like a flamethrower. The wood doesn’t stand a chance.
Front Profile
I rested my project parts on cinderblocks and blasted them with the propane-fueled flame. Keep a squirt bottle of water (and a fire extinguisher) on hand to douse any flare-ups.
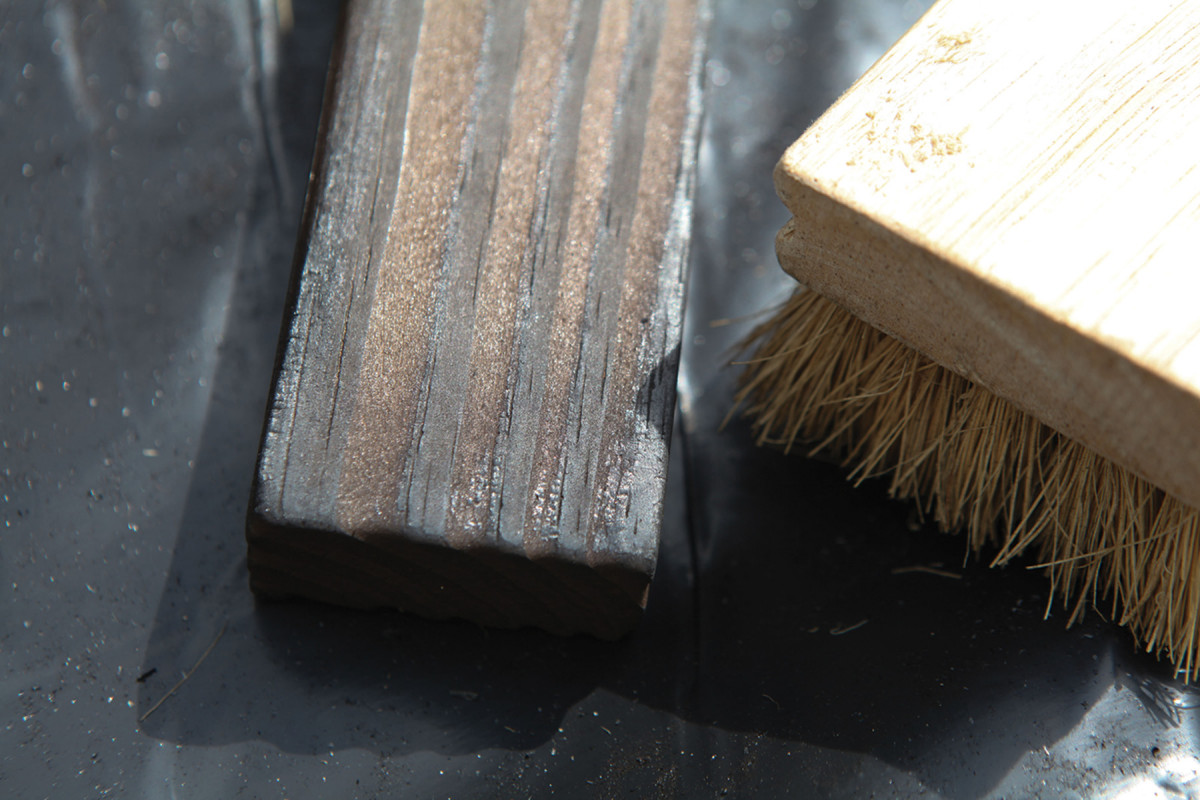
Black but clean. Keep brushing the wood until you can touch its surface without
turning your fingers black. Then apply a topcoat finish to the parts.
Enzo Mari’s Tavola Quattro Cut List
No. Item Dimensions (inches)
t w l
❏ 5 A Top 1 x 11 x 55
❏ 4 B Top battens 1 x 2 x 54
❏ 6 C Legs & feet 1 x 2 x 27 1⁄2
❏ 4 D Horizontal brace 1 x 2 x 21 5⁄8
❏ 4 E Horizontal brace 1 x 2 x 19 5⁄8
❏ 8 F Diagonal brace 1 x 2 x 12 1⁄4
❏ 2 G Vertical brace 1 x 2 x 11 3⁄4
❏ 4 H Diagonal brace 1 x 2 x 8 5⁄8
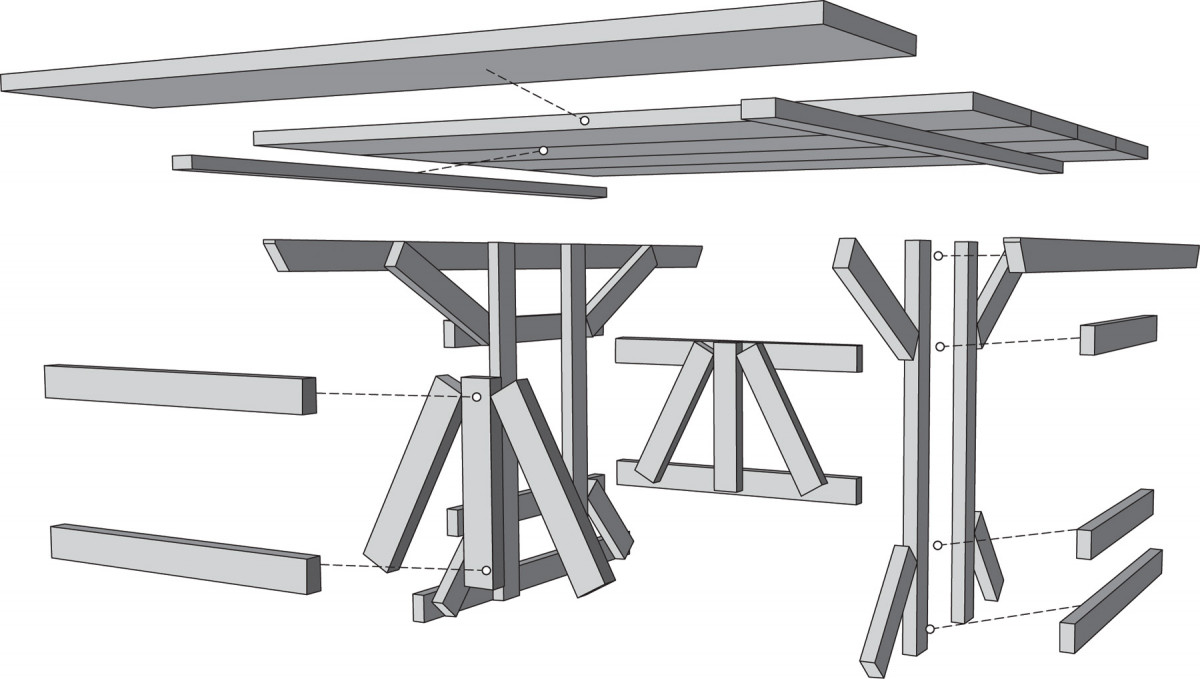
Exploded View
First the Top
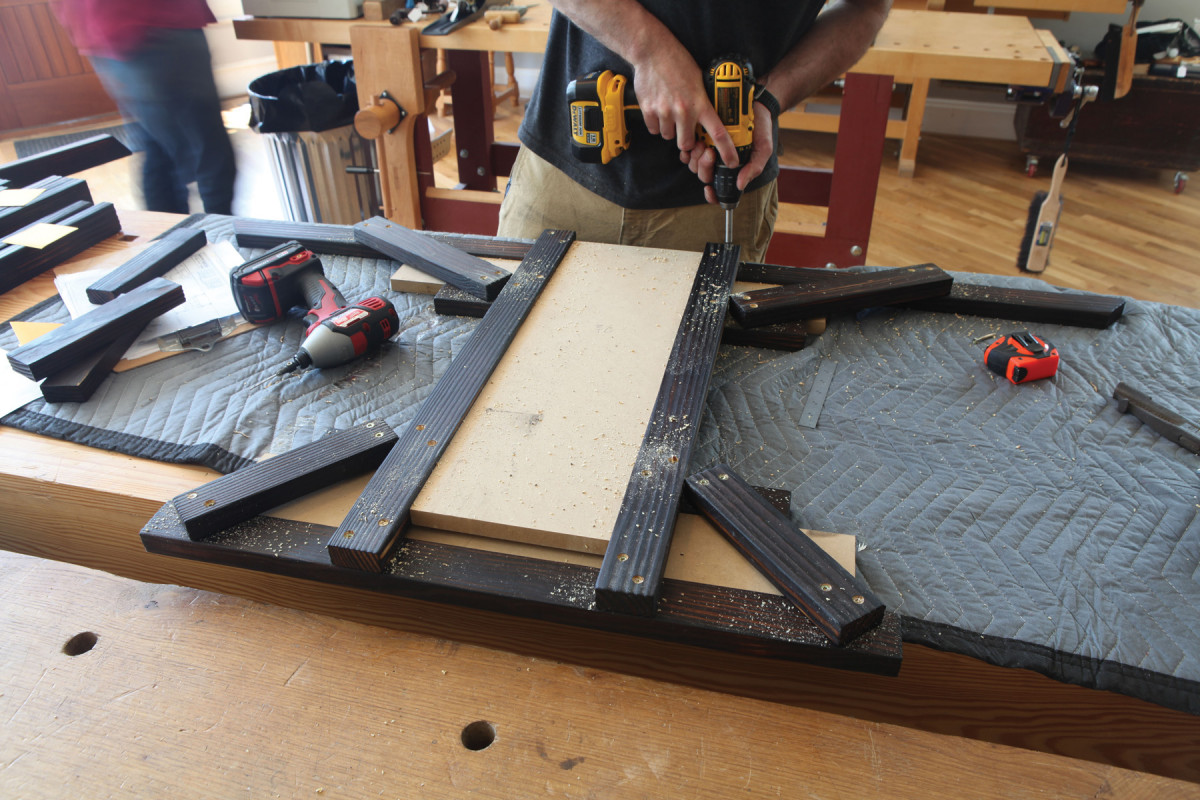
Spacers at work. The MDF spacer jigs allow you to line all your parts up without a lot of measuring. Mostly you are ensuring all the parts are centered on the legs.
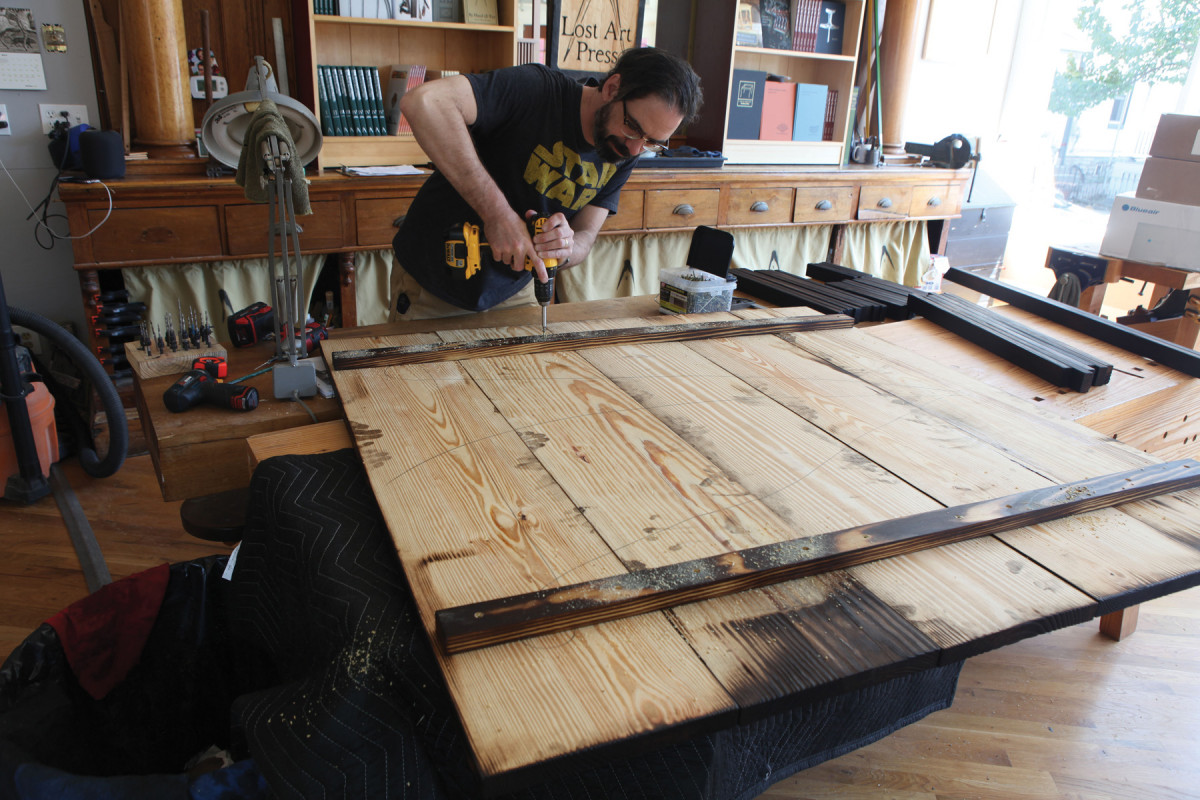
The top is easy to assemble; there are no edge joints. Butt the edges of the boards together, drill clearance and pilot holes through your battens and screw the battens to the underside of the top.
To help accommodate wood movement, I reamed out the clearance holes in the battens a little to allow the screws to pivot when the top boards shrink and expand. Set the top aside and make sure all your other parts are stacked and labeled with the appropriate letters as indicated in the cutting list.
Assemble the Ends of the Base
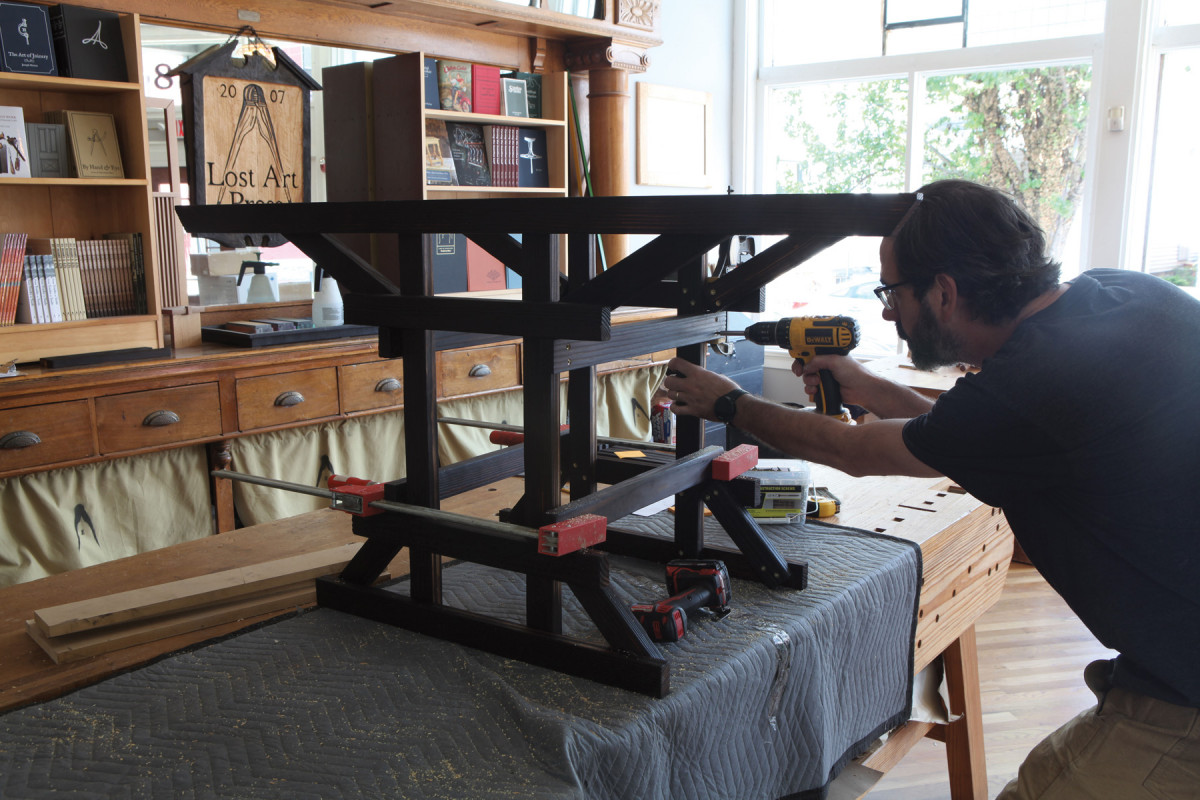
That escalated quickly. The base comes together fast when you screw the four horizontal braces (D) in place. If you don’t have clamps, a helper can do that work as you drive in the screws.
To make the ends easy to assemble, I recommend making four jigs from MDF that will space the parts accurately as you screw them to their neighbors.
Make one spacer jig that is 35⁄8” x 24″. This will go between the foot of the table’s base (C) and the horizontal brace (E). The second spacer jig is 33⁄4” x 24″ and goes between the horizontal brace (E) and a top batten (B). The third spacer is 71⁄2” x 24″ and goes between the legs of the table (C).
Lay the parts on top of one another as shown in the drawings and photos, using the spacer jigs to keep things square. Then screw the foot, braces and top battens to the legs.
After screwing the horizontal and vertical pieces together, add the four diagonal braces (F at the top, and H at the floor). To be effective, these braces need to contact the legs, plus the underside of the top and the feet. This diagonal bracing gives the table base its strength. After building one end assembly, build the second identically.
Connect the Assemblies
 The two end assemblies are joined by four horizontal braces (D), which nest in corners created by the legs and the horizontal braces on the ends (E). To assemble the base, clamp the four braces (D) to the end assemblies. Screw them to the legs.
Now there is some internal bracing to install in the open spaces between the end assemblies. The vertical and diagonal braces here also keep the
base from racking. Use the drawings as a guide. Note that I made a small error in my version of this table. My braces are arranged like the letter “W.” On Mari’s table they are arranged like an “M.” I don’t think it makes a difference.
Add the Top
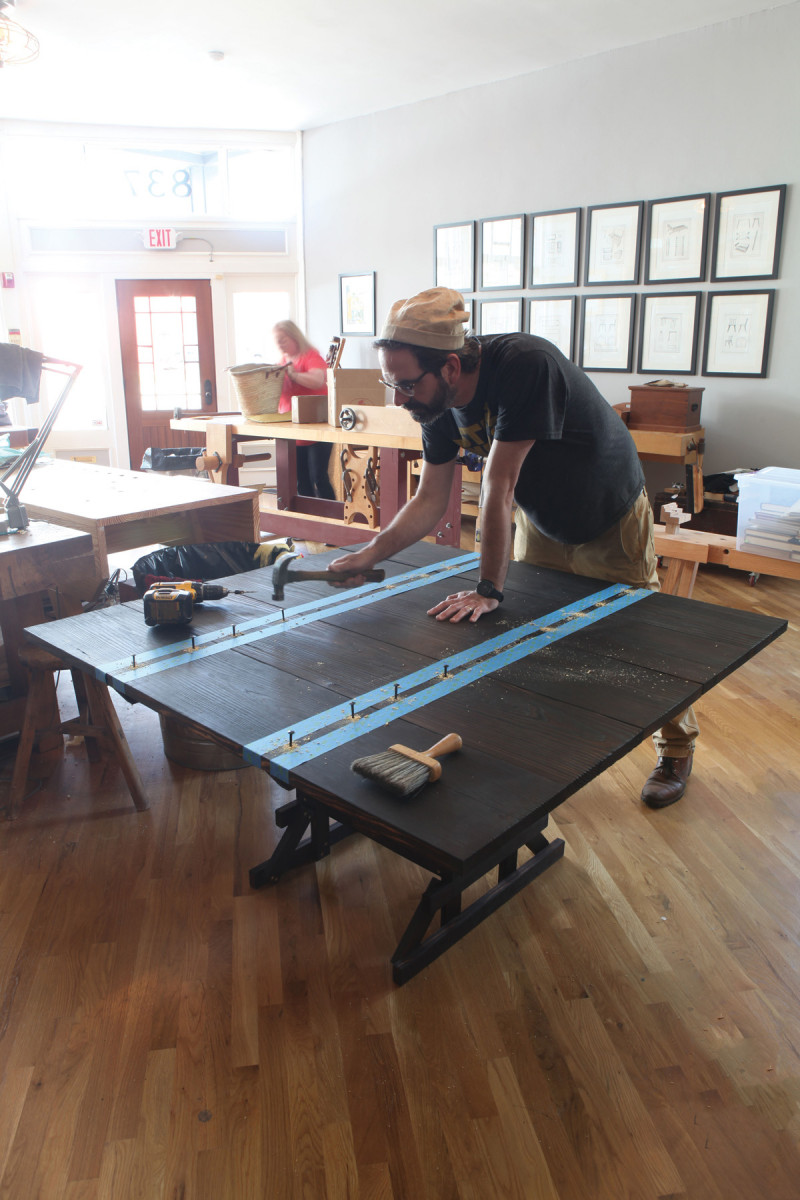
Finish nails. Nails move with the seasons and, when properly installed, hold quite well. Also, I think modern screw heads are ugly. The blue tape helps guide my drilling.
The last step is to attach the top to the assembled base. I opted to use 50mm square-shanked nails made by Rivierre Nails (available from Lee Valley Tools or Lie-Nielsen Tool-works). These nails hold like the dickens and look nice, too. Drill pilot holes and nail the top to the table base below.
And in the End
After I completed the table, I was surprised by how much I liked it, despite the fact that it looked like a popsicle-stick craft-fair item. To my eye, its proportions are excellent. Thanks to IKEA, the table doesn’t look all that strange (though I doubt my grandparents would have liked it). It is shocking how quick and easy it is to build. All the cuts are square. All the joints are quickly installed fasteners.
The biggest question is: Will it last? Are the screws stout enough to prevent the table from swaying (or worse) after a dozen Thanksgivings? There is only one way to find out: It has to be used and abused by a young family.
Mari once said his intention was this for his free furniture plans: “An idea came to me. If someone actually tried to build something, they probably would learn,” he said. “If, for example, they were to buy a table, which is an industrial product, they would check on the prices of that item. And, having constructed something with their own hands, they would understand if a leg was well-made and did not wobble. This person would learn little things.”
I learned a little thing, too. Maybe everything I make doesn’t have to be dovetailed, drawbored and fussed over for weeks. Maybe, just maybe, I can relax a bit at times and build something simple and quick that is worthwhile and useful.
Supplies Needed
- ❏ #8 x 1 5⁄8″ screws (Planer not available? Use #8 x 2″ screws)
- ❏ 50mm square-shank nails (made by Rivierre Nails)
- ❏ Propane weed burner
- ❏ Propane tank
- ❏ Squirt bottle of water
- ❏ Fire extinguisher
- ❏ Stiff bristled brush
- ❏ Topcoat finish (such as Allbäck Linseed Oil Wax)
- ❏ Recommended: MDF for making spacer jigs
Here are some supplies and tools we find essential in our everyday work around the shop. We may receive a commission from sales referred by our links; however, we have carefully selected these products for their usefulness and quality.


Hello Chris
I love the look and design here. Lighting the pieces of a new project on fire is now a recommended technique. Here you have shown its okay to indulge our inner pyromaniacs in a safe and controlled manner. This is a beautiful table, and your work is inspiring.
MDF is my least favorite material to work with. Even with proper dust extraction and ppe, I find the dust to be unbearable. This is likely a result of sensitization from heavy use in the past, nearly all trim in modern houses is made from MDF. Formaldehyde off gas is present in all homes that use unsealed MDF.
I hope to one day operate a shop of my own, and cost permitting not use a single strip of MDF in any of my projects.