We may receive a commission when you use our affiliate links. However, this does not impact our recommendations.
Mortises With a Saw
The mortise in each foot measures 11⁄4″ thick, 2″ wide and 3″ deep. So each foot piece requires a notch that is 5⁄8″ x 2″ x 3″. The mortise in each leg is 3⁄4″ x 3″ x 21⁄2″, so each leg
piece requires a notch that is 3⁄8″ x 3″ x 21⁄2″. With the joinery marked, cut your notches. I used a dado stack in my table saw, which is only one of the many options available. I’ve also done this step with a band saw or a handsaw plus a coping saw. Let your tools be your guide.
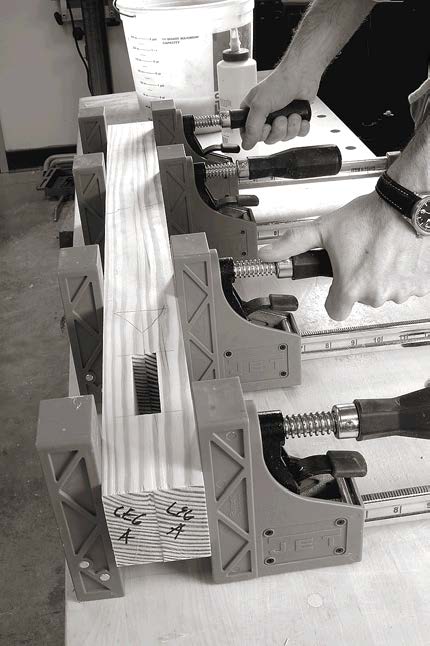
Four clamps were more than enough to glue each leg.
To assemble the legs, feet and braces, apply an even coat of glue to one part and place its mate in position. If your joint is good, it should take only three or four clamps to snug everything up. The glue will allow your parts to slip around as you apply pressure. Do your best to keep the notches lined up for the mortises, though small misalignments (as much as 1⁄16″) can be remedied by wedging during assembly (wedging atones for a variety of sins).
Allow the glue to dry. If you use yellow pine, keep the assemblies in the clamps for five hours. (This was the advice of the technical specialist at Franklin International, which makes Titebond.) Yellow pine’s resin can resist the glue’s absorption. Once the assemblies are liberated from their clamps, you need to square them up and even out any misalignments in the parts. A jointer plane can do this, as can light passes with your powered jointer and planer. (I like to use the jointer plane because it leaves a nicer surface; but then, I really like using jointer planes.)
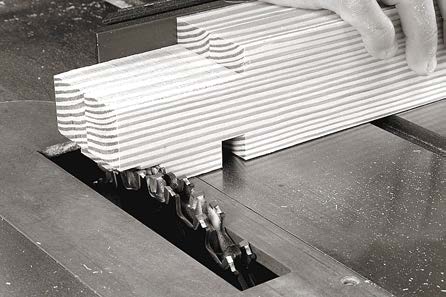
With the dado stack still in the saw from cutting the notches, it was the logical choice to form the tenon.
Now you can cut
the tenon on the end of each leg that will join it to the foot. This is a big tenon – 11⁄4″ x 2″ x 3″. You can cut this using the same tool you used to make the notches: a dado stack in your table saw, a band saw or a handsaw. In the end, you want it to fit snugly where the tenon’s face cheeks meet the mortise walls. The tenon’s edge cheeks can be gappy. Wedges will tighten everything up; so focus on the face cheeks.
A Puzzle Joint at the Top
The point at which the leg joins the brace is a bit of work. There’s a lot going on at this three-way intersection. Not only do you have the leg and brace coming together, but you also have to get the stretcher in there and keep all the joints balanced and strong. You could cheat and lower the location of the table’s stretcher near the floor. But this will weaken the overall strength of the table. Placing the stretcher flush against the tabletop supports your top and tightens up the entire table by giving you that I-beam construction.
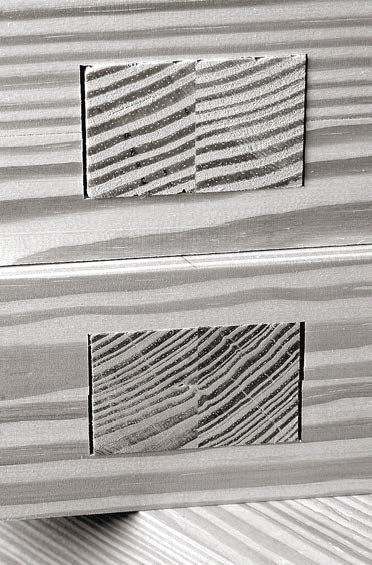
In the end, this is what your joints should look like: The face cheeks of the tenons are tight against the mortise walls; the edge cheeks have a little slop for wedging.
So in the end, it’s worth the extra fuss.
To join the brace and leg, I chose a bridle joint secured with a peg. The female part of this joint is a 1″ x 21⁄2″ x 11⁄2″ notch that’s centered in the top of the leg. The male part of the bridle joint consists of two complementary notches on the sides of the brace and one big notch on the bottom of the brace.
Begin cutting the joint by making the notch in the top of the leg. The band saw is the logical machine for this operation; stay away from the dado stack for this one – you would have to stand the leg on end during the cut, which is quite a dangerous thing to do.
The notches on the brace can be cut on either the band saw, table saw or by hand. I’ve done it all three ways in building the prototype and finished example of this table. The table saw is more accurate, though you have to raise the dado stack up pretty high to make that notch on the bottom of the brace. The band saw and handsaw options are much safer, though they require more hand skill to execute. In the end, I recommend the band saw or handsaw.

Measuring might mess you up here. Instead, lay out this joint by first striking centerlines on the leg and the brace. Line up the parts using a try square and mark the location of the joint on the brace.
When you dry-fit all these joints together, don’t be dismayed if the assembly seems twisted. There is a lot of joinery surfaces coming together in this assembly. Here’s how I deal with the problem: a jointer plane. (Do you sense a pattern?) Dry fit all the parts and then level the joints and remove twist in the assembly by working across the joints with your jointer plane.
With your joints flush and your assemblies flat, take everything apart and add the details of this table that will transform the ends from a simple “H” into something interesting to look at. The first order of business is to cut tapers on the feet and brace. First crosscut the ends of the feet and braces at 23° using a miter saw. Now lay out the tapers using the construction drawing as a guide. You could rig up a tapering jig to make these cuts using your table saw, but it is far simpler to use a band saw and then clean up the cut on your power jointer (or use a jointer plane).
This also is the time to cut the relief on the bottom of each foot. This is easily accomplished on the band saw. The 3⁄8″ x 19″ relief cut creates two pad feet on each foot. After making your cut on the band saw, a little work with a chisel and block plane tidies things up.
Once your tapers are complete, the remaining details are optional. On the prototype trestle table (which is now in my dining room), I moved straight to assembly from here. With the version shown here, I decided to add a few chamfers to dress up the design and add shadow lines, which will appear more graphic with a coat of paint.

The long sole of the jointer plane allows it to true both individual boards and assemblies, such as a door or the ends of this table. Don’t be afraid to work across the grain with this tool; a power sander or smoothing plane will clean up the work later.
The chamfers on the legs are 3⁄16″ x 3⁄16″. You can lay them out and cut them in any way you please: router table, table saw or (my favorite) the chamfer plane. I also cut matching chamfers on the brace where the leg and brace meet.
Kerfs and Wedges Work Together
Wedging a mortise-and-tenon joint locks it permanently together (if that’s your desire). For this table, I decided to cut two kerfs in the tenon and wedge each one. The kerfs are located 1⁄4″ in from the edge cheeks of the tenon and run about three-quarters of the way down to the tenon’s shoulders. Choose a saw based on how much of a gap you need to wedge. A full-size handsaw is best if you have a tight fit. A dovetail saw is best if your fit is sloppy.
Now you need to make some wedges. Look for stock that can take a beating without splitting. Ebony would be a terrible choice. Try white oak or hickory or even ash. We had some jatoba in our offcut pile that was the perfect thickness for this job. I took some small blocks of the stuff and beat it with a hammer to see if it split easily. It resisted my hammer, so I used it for the wedges.
I make my wedges with an 8° taper. It’s a simple thing to do with a little sled I built that has the fence cocked 4° (see the story on wedges in this issue for more details). This method is fast, so make lots of extra wedges: some with fine points, others with blunt ones.
A wedged joint is far more effective if the mortise has a slight trumpet shape. The wedges will spread the tenon at the wider opening, locking the joint permanently. I create this trumpet shape by simply chiseling away a little (say 1⁄16″ to 1⁄8″) from the two ends of the mortise where the tenon exits. You don’t need to be precise about it; just make the mortise wider where the wedges go.
Download the PDF here for drawings and cutlist:
American_Trestle_Table
Here are some supplies and tools we find essential in our everyday work around the shop. We may receive a commission from sales referred by our links; however, we have carefully selected these products for their usefulness and quality.