We may receive a commission when you use our affiliate links. However, this does not impact our recommendations.
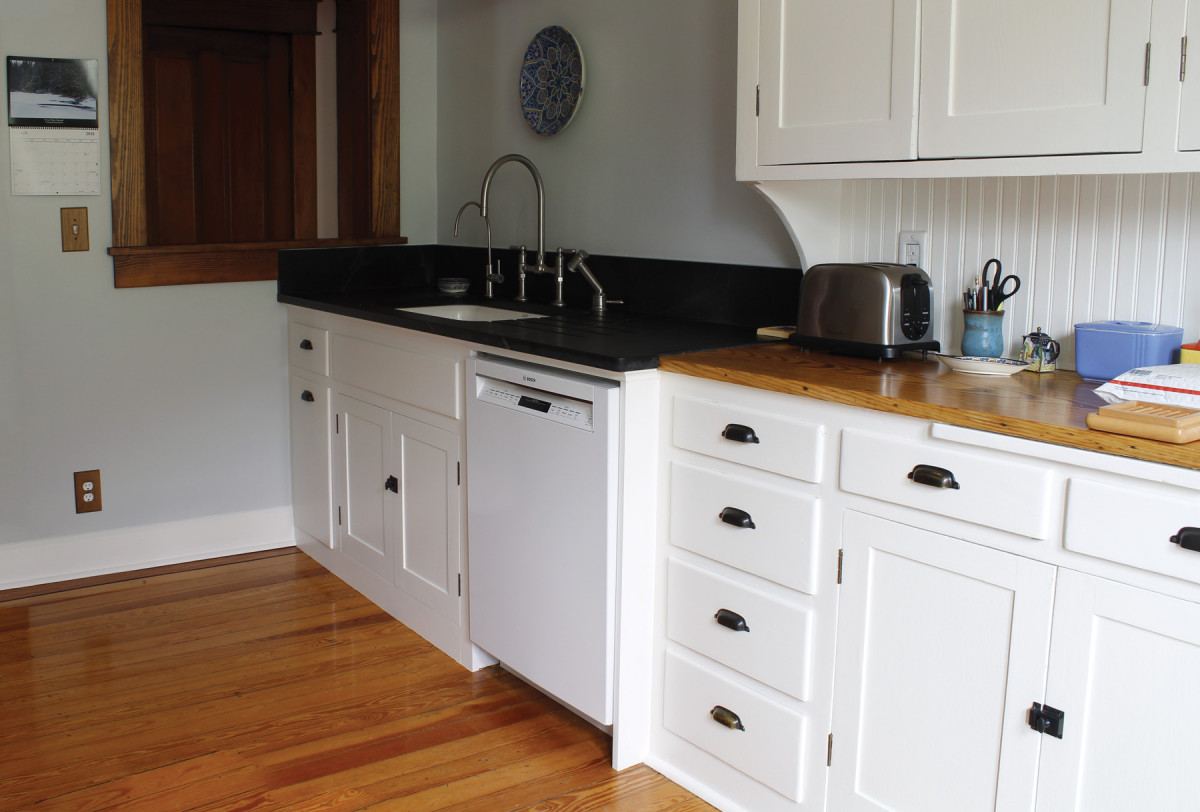
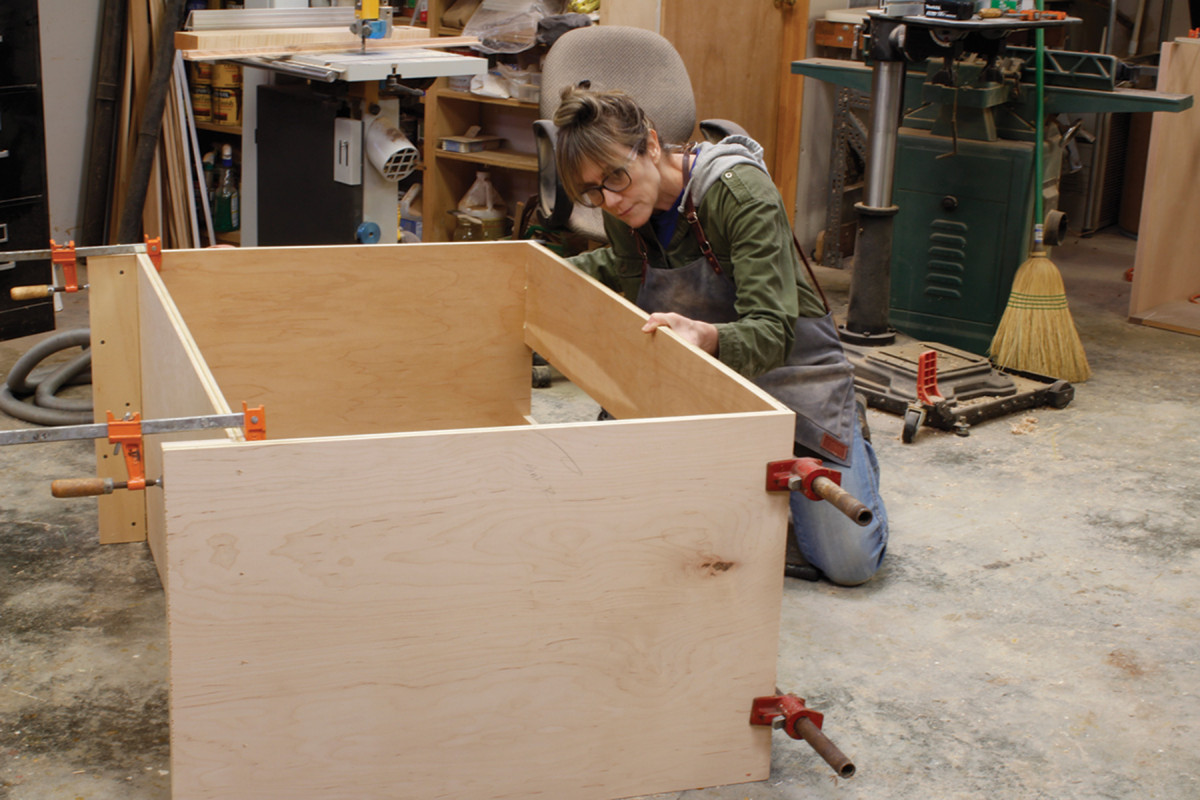
Just like the originals. For a recent job, Hiller built new cabinets, such as the sink base visible here, on details drawn from the surviving original built-in at right.
Use this simple, strong method for constructing kitchen cabinets and other built-ins.
Editor’s note: Nancy Hiller passed away on August 29th, 2022 after a long battle with cancer. In honor of her memory, we will be sharing some of our favorite contributions from her over the years. This article was originally published in the October 2018 issue of Popular Woodworking Magazine.
I am often tempted to say that there are as many ways to build cabinets as there are cabinetmakers. It’s an exaggeration, I know, but it gets at a basic truth about the world of cabinetry and built-ins: There is no single “right” way to build them.
At the first shop where I worked, a custom cabinetmaking business in rural England, we built casework out of melamine-coated particleboard. We joined the sides, tops and bottoms using thin plywood splines, then applied solid wood face frames made with a shaper-cut bridle joint. The face frames were glued onto the cases with more plywood splines. Our doors and drawer fronts were inset, and we hung the doors on solid-drawn brass butt hinges mortised only into the door, then simply screwed onto the inside edge of the face frame.
At the next shop, also a rural English operation, we made casework out of solid pine floorboards. The first step was to glue and clamp the tongue-and-groove material in long lengths, then flatten them on a stroke sander and saw the parts to size. We housed the cabinet floors in dados. Although I can’t recall which type of joinery we used for the tops, I know we weren’t using biscuits; I didn’t encounter a biscuit joiner until I moved back to the United States. We applied face frames with a simple butt joint and glue. All of our doors were inset, hung on solid-drawn brass butts; our drawers ran on traditional wooden runners, and we dovetailed our drawers by hand.
Much of my current carcase-building technique comes from what I learned at a contemporary furniture business in Vermont. There, we built casework from beautifully veneered MDF, joining the parts with biscuits and Twinthread screws. It was amazingly quick and simple. Doors were full overlay, hung on European hinges; a novelty for me. Drawers, too, were full overlay and ran on Accuride ball bearing slides.
In the 23 years since I started my own business, I have selectively adopted new materials and methods. The method I use most often for built-in cabinetry combines simplicity and strength for the basic casework with materials and techniques that owe more to the world of furniture than that of contemporary commercial cabinetmaking. The technique I will describe here is a hybrid that draws on what I learned at the different shops where I have worked. I have chosen materials and methods that make sense for my business, given my clientele and the styles in which I specialize.
Preliminaries
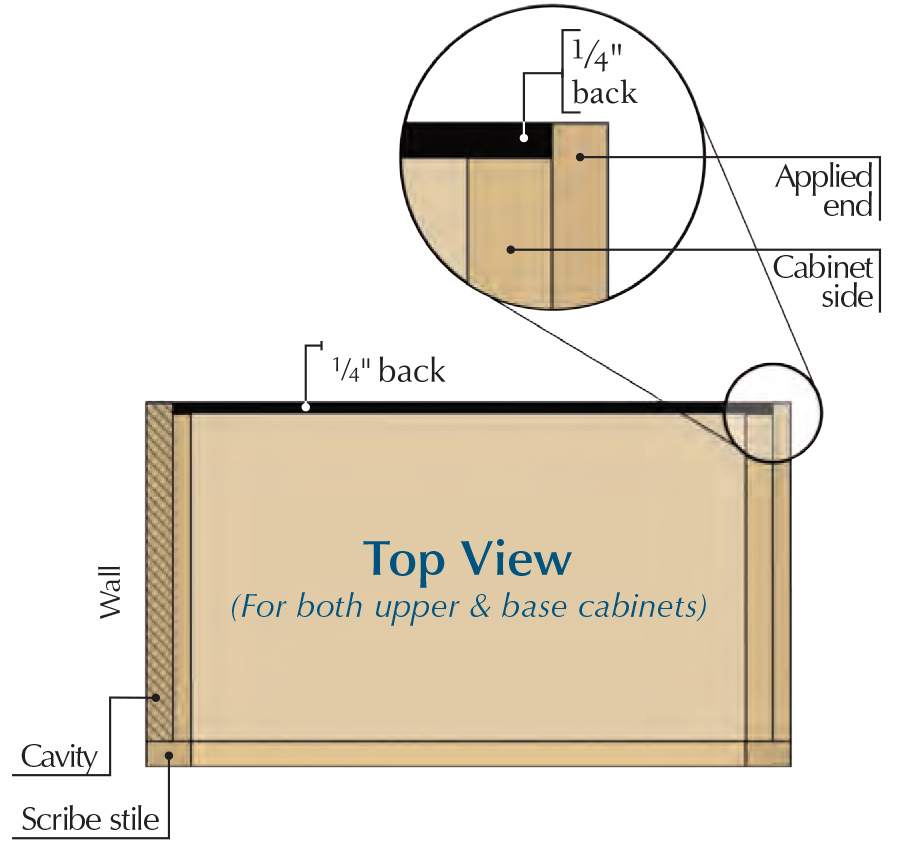
When designing built-in cabinets, you need to think about installation – and take into account certain features of the cabinets’ future context. I’m not referring to aesthetic features alone – timber species, hardware, how the various cabinet components will interrelate (will the doors be inset or overlay?), or style (slab doors or frame-and-panel?). I’m also referring to how the cabinets will literally intersect with the walls, floors, and ceilings, which are rarely square, level, or plumb. There are many ways of handling these points of intersection, and each has distinct period and other cultural connotations.
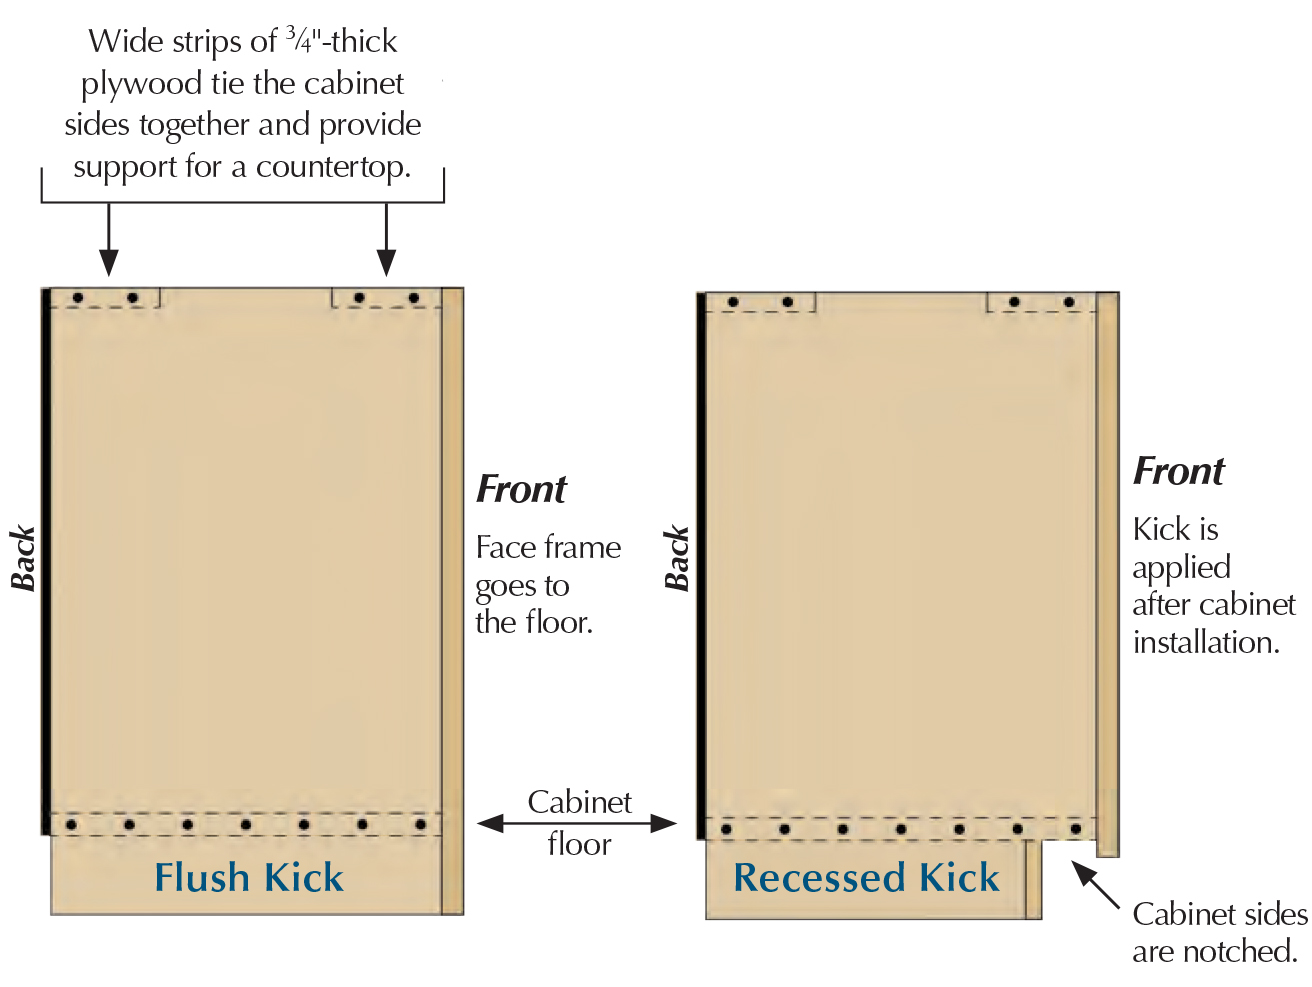
For example, many built-ins from the early 20th century were made with flush kicks – the bottom rail of their face frames extended all the way down to the floor. By the 1930s the recessed kick had become nearly ubiquitous – no surprise, considering how much easier it is to install than a flush kick that has to sit on an uneven floor.
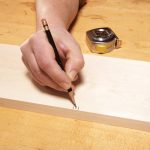
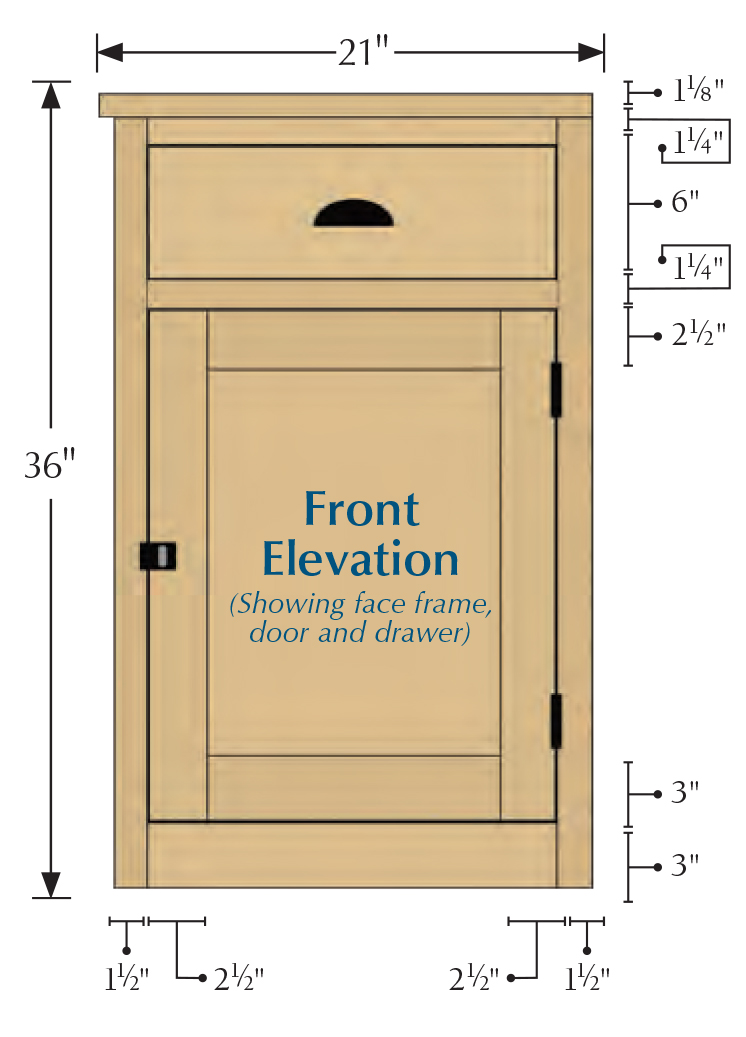
The cabinet I’m building in this article was designed for the kitchen of a 1912 house. I planned to scribe (saw and plane) it to the floor and to the wall at its left; that’s why the face frame protrudes beyond the cabinet’s left side.
Unless you’re running a production facility where you build things in multiples to standard sizes, you should take the building work in stages. That way you’ll have a chance to adjust the different parts to fit what you’ve made so far, instead of finding that your face frame is 1/16” too narrow or you cut the recess for your kick ¼” too high. Some people start with face frames then build their carcases to fit. I work the other way around. Once the basic cases have been assembled, I move on to faces.
Upper Cabinets


Base Cabinets
Shelf-Spacing Considerations
• There is no point in putting shelf support holes too close to the cabinet floor or top (or in cases where there will be drawers above the shelf compartment, too close to the drawers) where there would not be enough room to store anything on the shelves. Think about what the shelves will need to hold and plan their spacing accordingly. If the bottom of the cabinet will be holding flower vases that are 12″ tall, there may not be any point putting shelf support holes lower than about 13″ above the cabinet floor.
• Holes at the back of the cabinet should be about 1“ forward from the back edge to allow enough space for fingers when inserting and removing supports.
• Holes near the front of the cabinet should be positioned close enough to the front edge of the shelves that they prevent the shelves from tipping when someone is putting an object away or taking it out. At the same time, take any lipping at the front edge of the shelf into account. In general it’s a good idea to center the front shelf support holes about 5⁄8″ on center behind the back face of a shelf lipping that hangs below the underside of the shelf.
• Consider how much adjustability is really necessary for the shelves in a given cabinet. For cabinets that will store shorter items such as juice glasses and dishware, closer spacing may be warranted; I often lay these out at 1 1⁄4″ on center. For cabinets storing large items such as tall jars of dry goods, 2″ on center may be more practical. The point is to allow as much versatility in positioning the shelves as may be needed while avoiding the visual busyness of too many holes.
Let’s Get Going
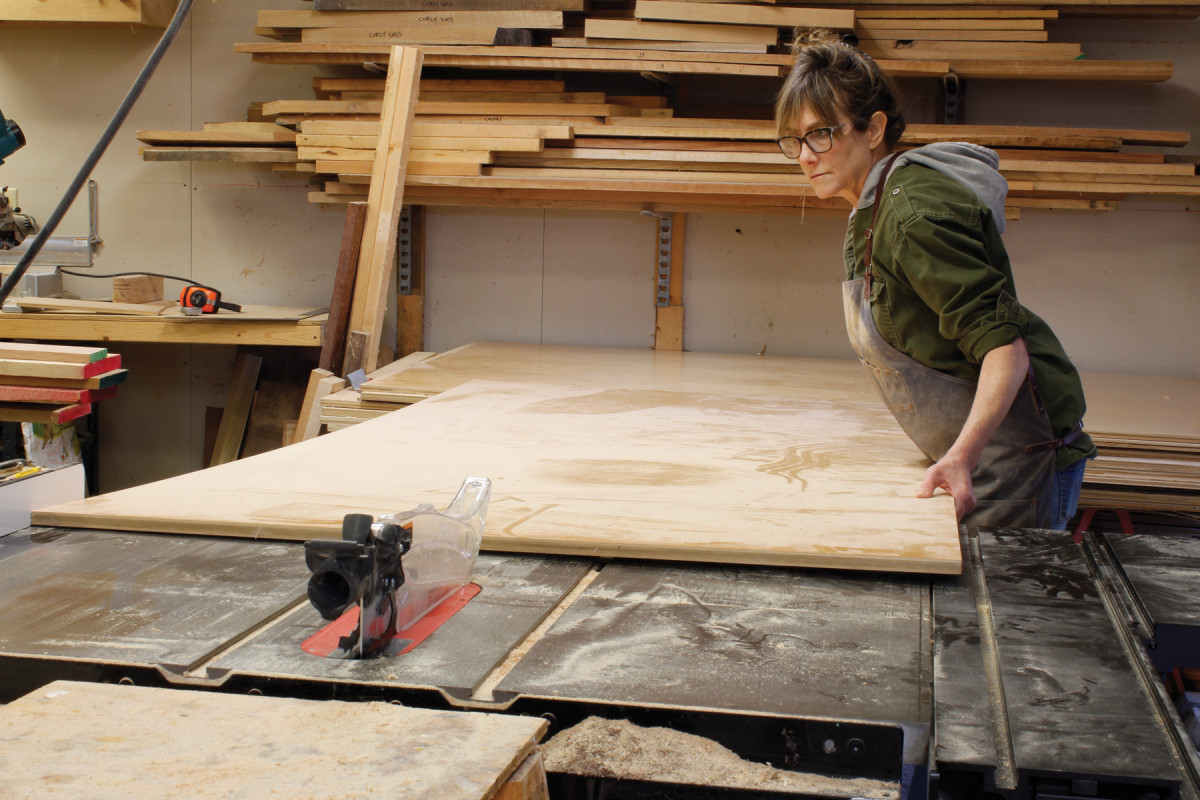
Rip first. I store my plywood on sturdy sawhorses near the table saw so that I can pull one end of a sheet over to the edge of the saw, adjust it against the fence and rip.
So you have your scale elevations at hand and have made a cutting list based on them. My typical material for kitchen casework is 3⁄4” maple-faced veneer-core plywood, prefinished on one side. The prefinished side goes to the cabinet interior; it saves a lot of time, which helps make my work affordable. That said, some jobs call for painted interiors or other finish treatments, so I always choose the sheet material to suit the job. (See Shelf-Spacing Considerations, above) The next step is to cut your basic parts (sides, tops and cabinet floors) to size. Because I’m building each job to genuinely custom dimensions, some base cabinets may not be designed to end up 24″ deep or 36″ high. (For example, I love a 38″-high counter. It should go without saying that the carcase height must be adjusted to allow for the thickness of whichever counter material you’ll be using.) And even if most of the uppers in a kitchen job will be 12″ deep, one may be a 5″-deep spice cabinet, while another may be 16″ deep.
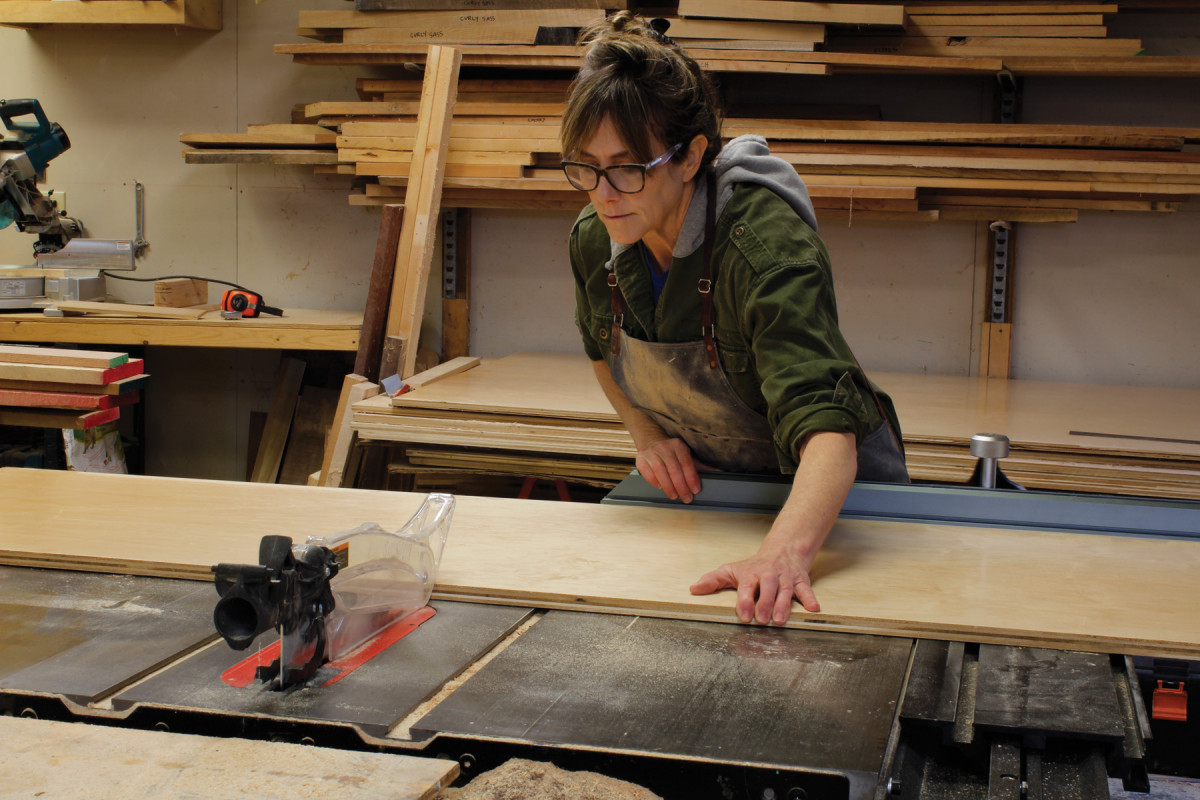
Be there and be square. A sliding table set at 90° makes it easy to cut the first end of each casework part square. You can then cut multiple parts to the same length by crosscutting with the rip fence.
Rip all of the sides and floors to width. The edges and corners of sheet goods may not be square, and they often have minor damage. It’s ideal to make the first rip slightly over-width, then turn it around and rip the other edge to the size you require. That way you’ll have two square, clean edges for joinery.
After ripping, cut the parts to length. There are various ways to do this. Aside from cutting each part accurately to length, it’s important to cut the ends square. You can do this with a track saw if you have one. Alternatively you can use a straightedge and a pattern-cutting bit to rout one end square, then crosscut on a table saw, running that end along the fence. (The same technique will work with a radial arm saw for the second cut, which trims the piece to length.) My current method is to crosscut one end of each piece using a slider on my table saw, then crosscut it to length using the rip fence. Be sure you add an identifying mark (for example: upper 1, left side) to each part as you cut it.
My method for joining cabinet floors to sides may not be refined, but it’s quick, simple and strong. I use a spacer made from scrap 3⁄4” plywood to position the floor and support it. Twinthread screws run in through the cabinet sides will fasten the whole
thing together.
But First…
Your elevations will determine how high the kick needs to be and whether it will be flush or recessed. Calculate the height of the space that will be beneath the cabinet floor and rip spacers from scrap plywood to this width, then cut them to length. If your kick will be flush, the spacer should be a hair under the width of the cabinet sides in length; if the kick will be recessed, the spacer should be a hair under the width of the cutout portion at the bottom of each cabinet side. Next, predrill for the screws that will tie the sides together with the floor.
Move on Up
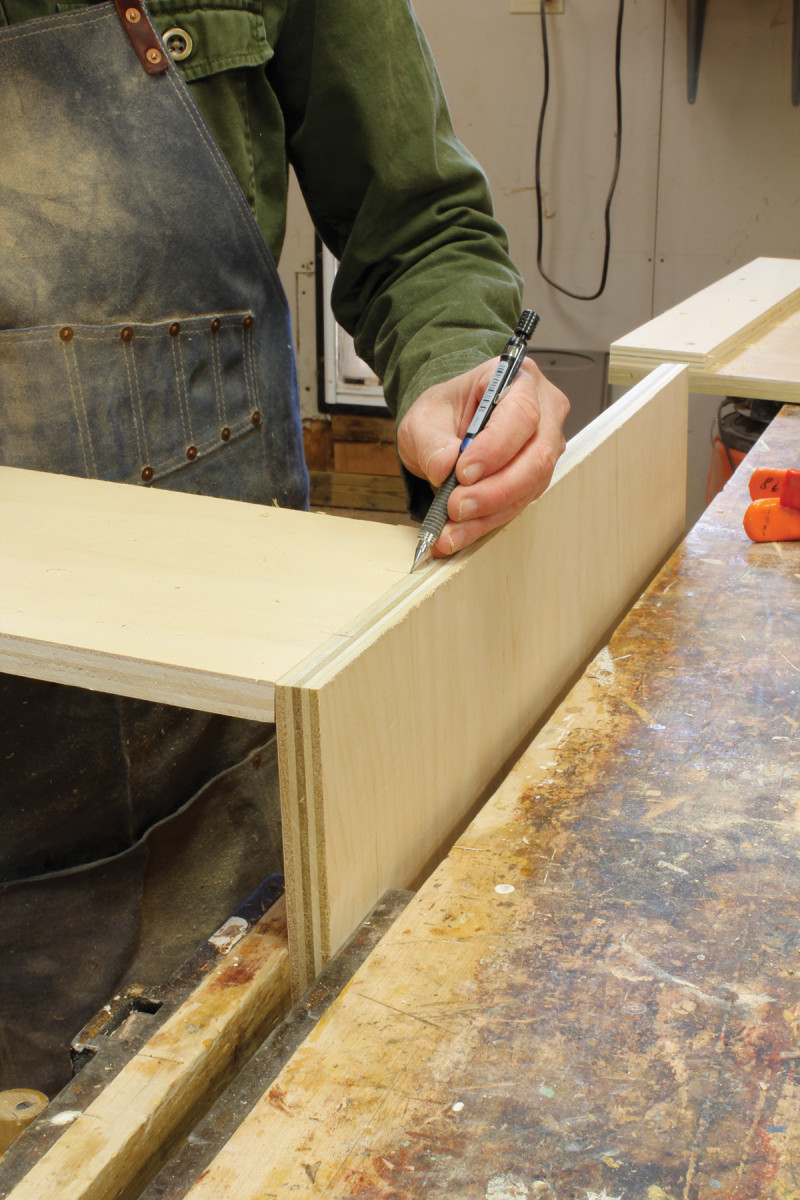
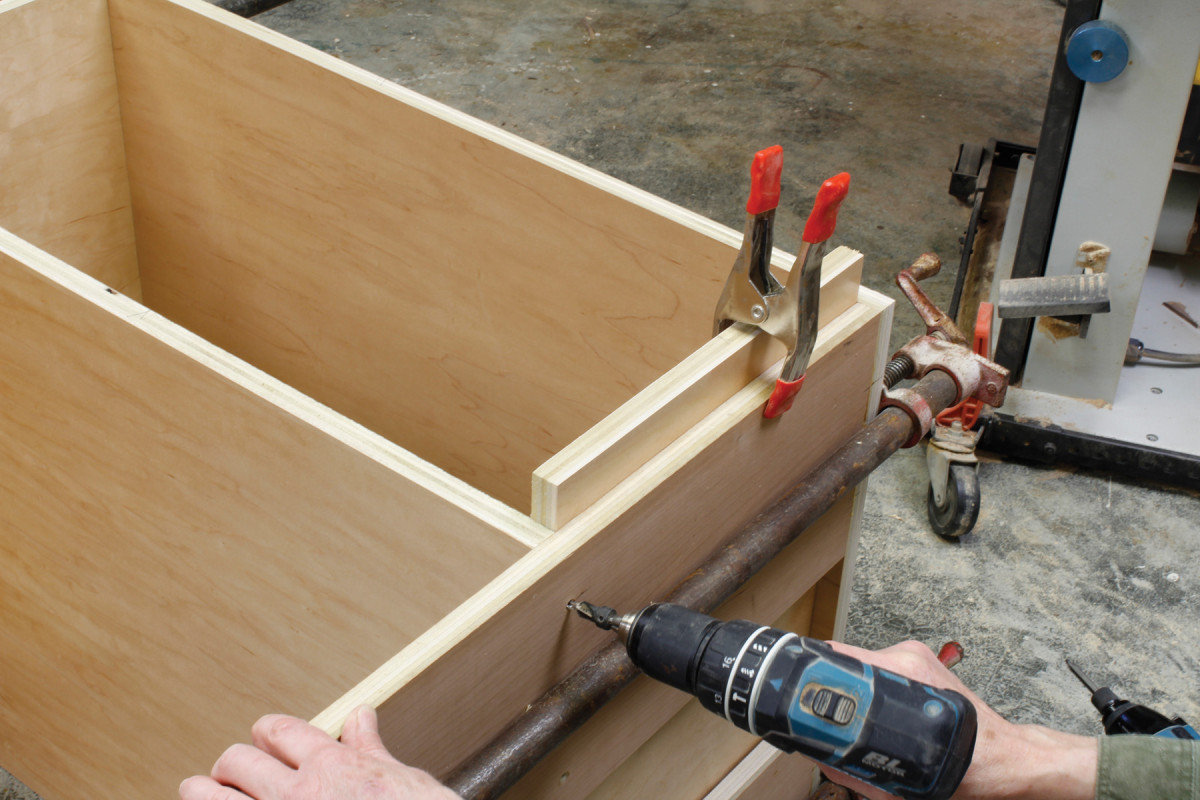
Top joint. In most cases you can simply hold the strip in place and mark the center line for each biscuit from the strip to the cabinet side.
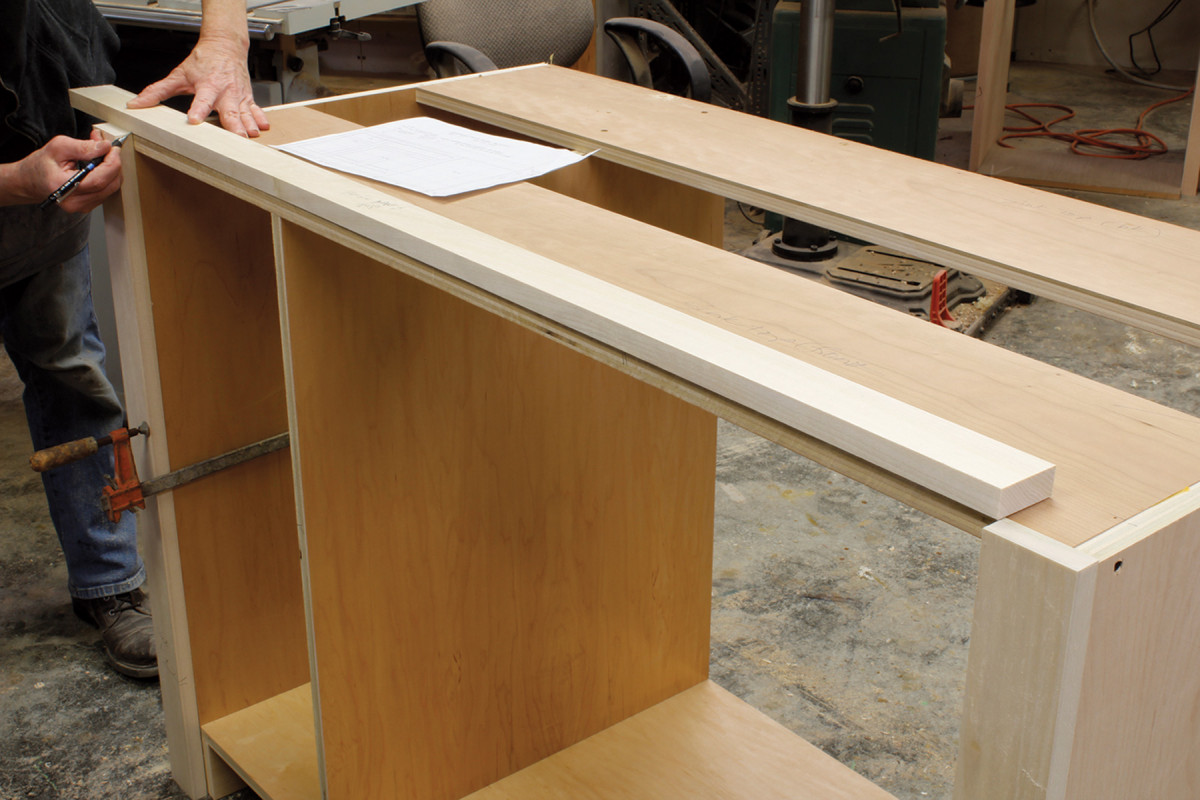
Most base cabinets do not need a solid plywood top. A strip several inches wide at the front and back offers plenty of material to tie the sides together and support a counter. Using less material lightens the weight of these substantial cabinets while minimizing waste. Sink bases, in particular, do not need a solid top; the vast majority of a sink base’s top will be cut out to accommodate the sink. For narrow cabinets (those 18″ or less wide) it’s usually quicker to go ahead and make a solid plywood top, following the same directions as those for a strip top.
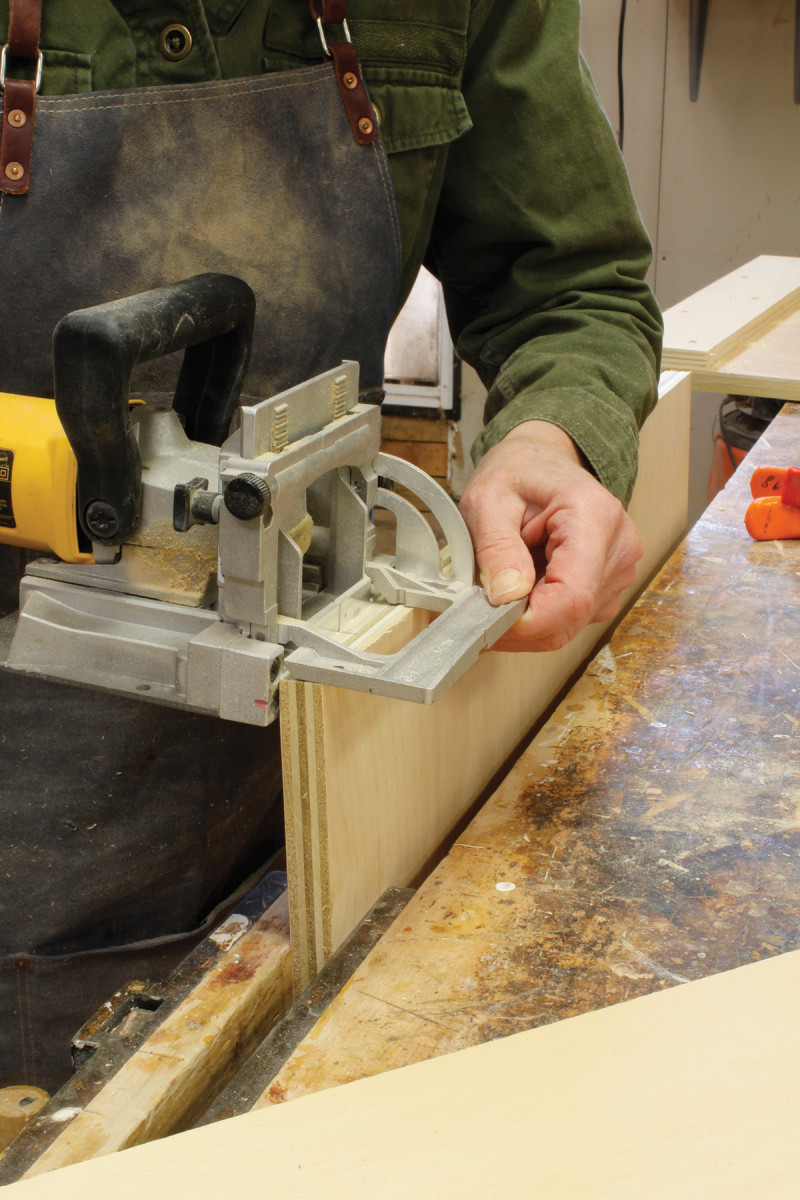
Steady on. For safety and accuracy, clamp the cabinet side in your vise and hold the biscuit jointer firmly against the fence to make a square cut.
The strips for a particular cabinet will be the same length as the floor for that cabinet, so cut them to length at the same time. The sides of the cabinet will be joined to these strips with Twinthread screws, but I also use biscuits, for increased strength as well as a positive means of locating the parts during assembly. Mark each strip with the cabinet name or number and “front” or “back,” so you’ll be able to identify quickly which end is right and left, and which long edge faces forward. It is a good idea to have at least two biscuits in each strip to help prevent the strips from twisting during assembly.
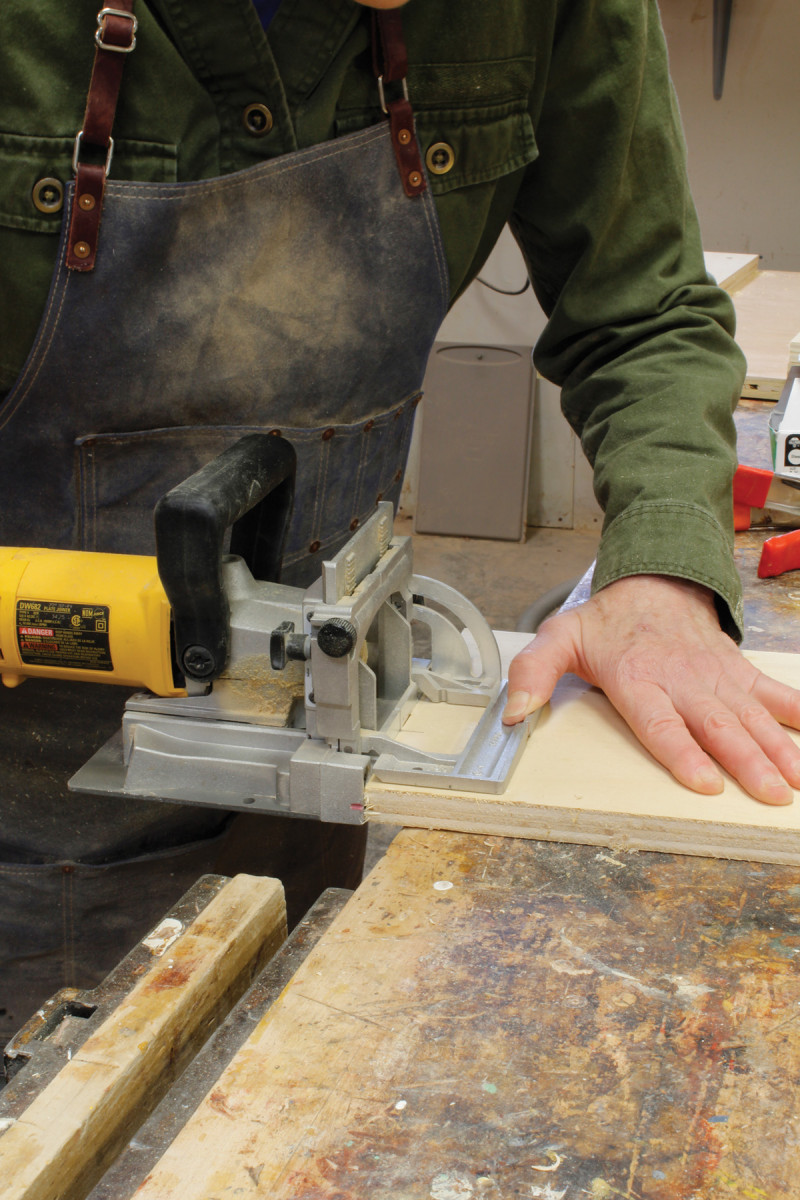
Flat and firm. Clamp the top (whether it’s solid or strips) to your bench and hold the biscuit joiner firmly in place, then make the cut.
If you have ever found yourself on hands and knees, searching for that custard pan in the very back of a base cabinet, you’ll understand why most base cabinets today are made with drawers or pullout trays on full-extension mechanical slides instead of with shelves concealed by doors. I rarely put shelves in base cabinets, but I do use them in upper cabinets and in shallow base units such as bookshelves.
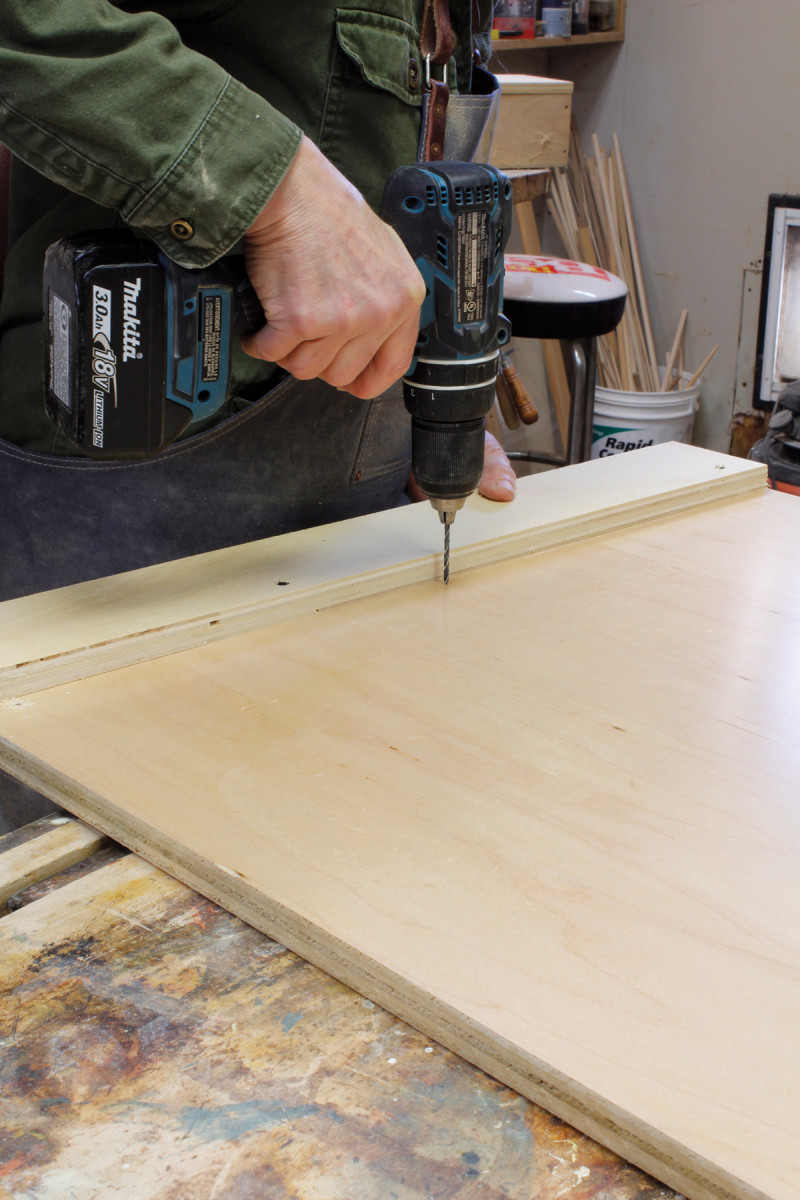
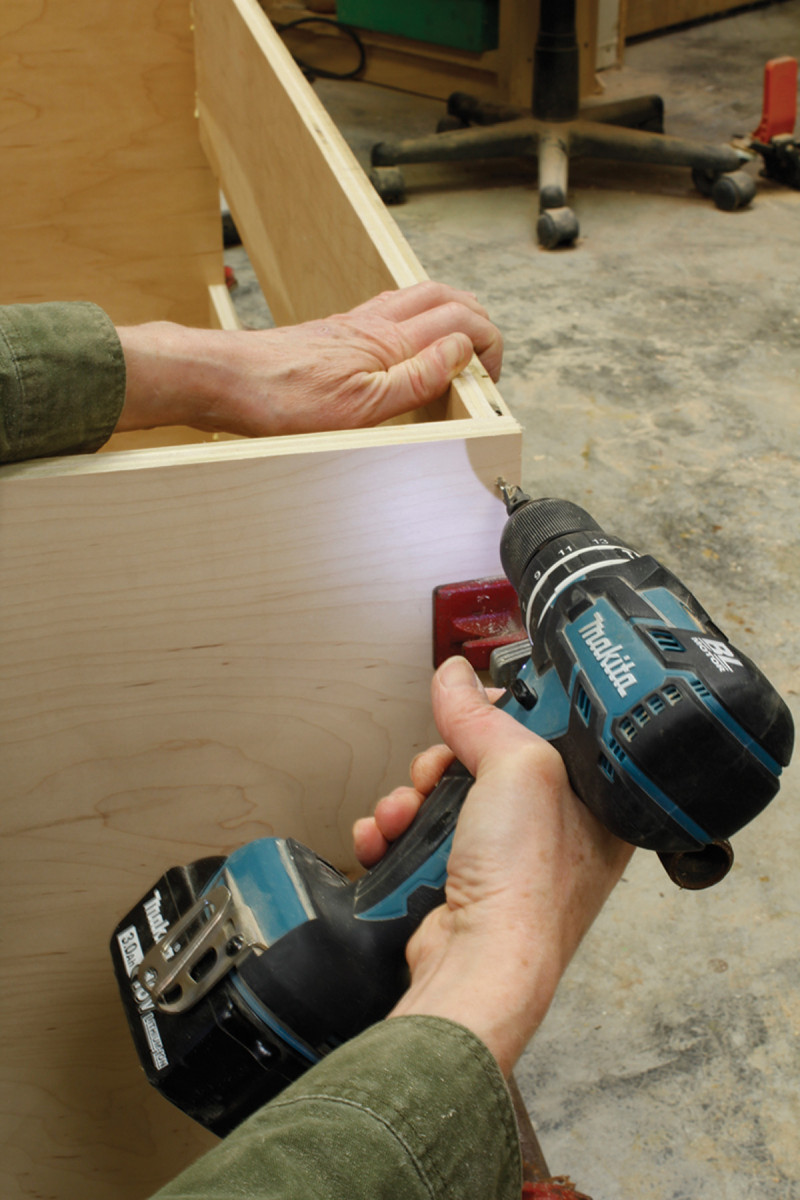
Predrill. Even though the screws will be run in from the outside of the cabinet, I predrill from the inside, because that way I don’t need to measure for the holes’ positions. The spacer tells me where the holes should be: 3⁄8″ on center above its top edge. Then I flip the side over and countersink. Five or six screws are usually ample for a 24″-deep base cabinet.
When a cabinet will have adjustable shelves, I usually use 1⁄4” pin-style supports, which are unobtrusive, extremely strong (I have used them to store large shelves of LPs) and fast. Now is the time to drill shelf support holes, because you can clamp the cabinet sides together and mark them at the same time. Lay out the positions with a long square.
Assembly Time
Simple and strong. Clamp the spacer in place at the bottom of the cabinet side and attach with 11⁄4″ Twinthread screws. Four or five are plenty for each side of a typical base cabinet. You can predrill and countersink or use an impact driver, as I did here.
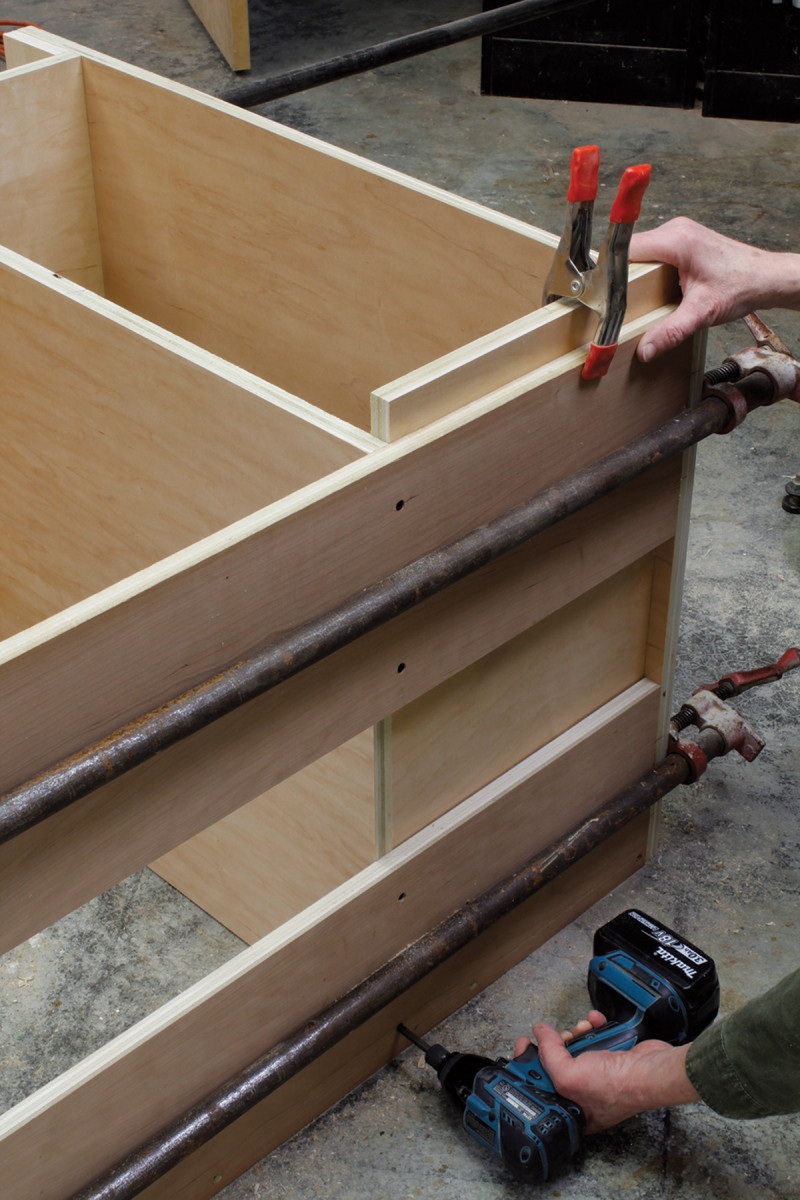
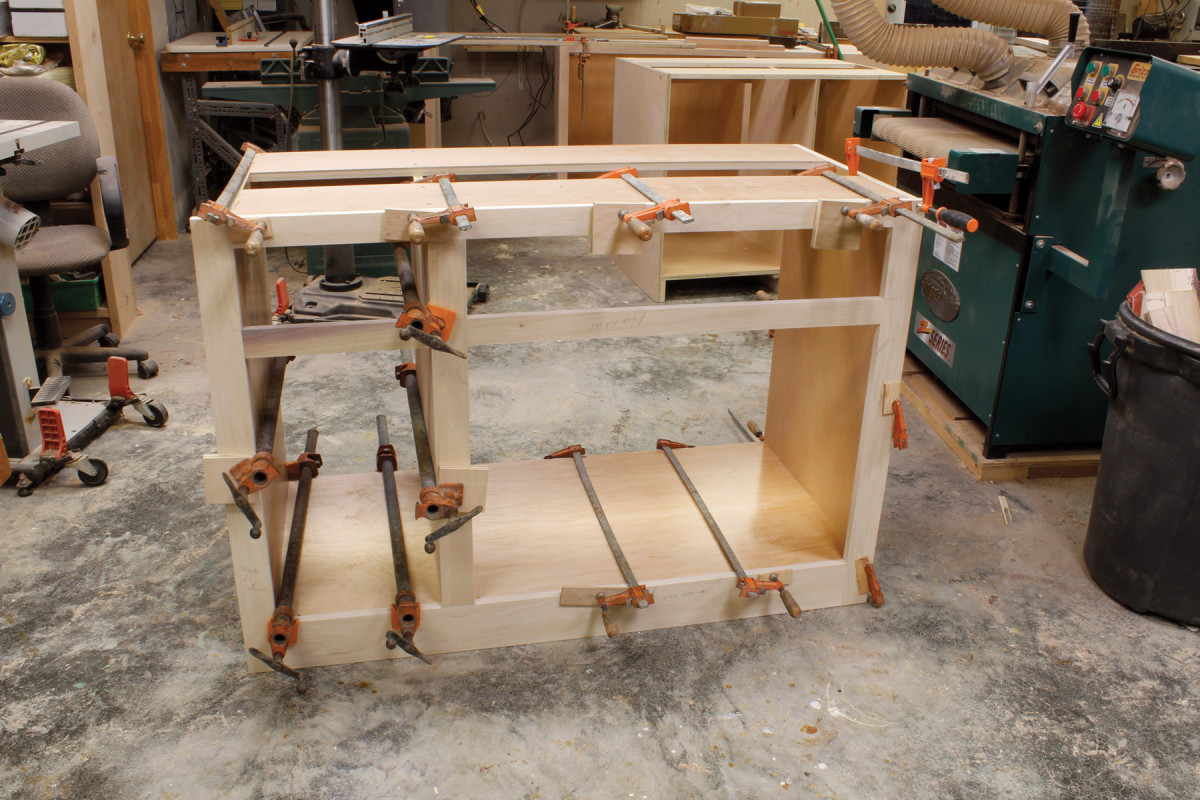
With the basic carcase joints cut and shelf support holes drilled, you’re ready to glue up the cabinets. Run a bead of glue along the top edge of each floor spacer then stand the sides on the floor, front edge facing up. (You can lean each side against a workbench, stationary machine or sturdy trash can to hold it temporarily.)
Maximize the efficacy of glue. Make sure the bottom face of the cabinet floor is tight against the top edge of the spacers; the bead of glue along the spacers’ top edge will contribute to the cabinet’s strength, especially if you are using plywood that’s pre- finished only on the interior face and so offers few opportunities for gluing.
Set the cabinet floor in place between the sides and clamp loosely. Depending on the size of the assembly and whether you have a helper, it may be more practical to hold the floor and sides together by clamping the floor to the bottom spacers instead of clamping across the cabinet’s width. At this point the clamp is just to hold the parts together while you insert the top (or top strips); there will be time to adjust the fit and get things square.
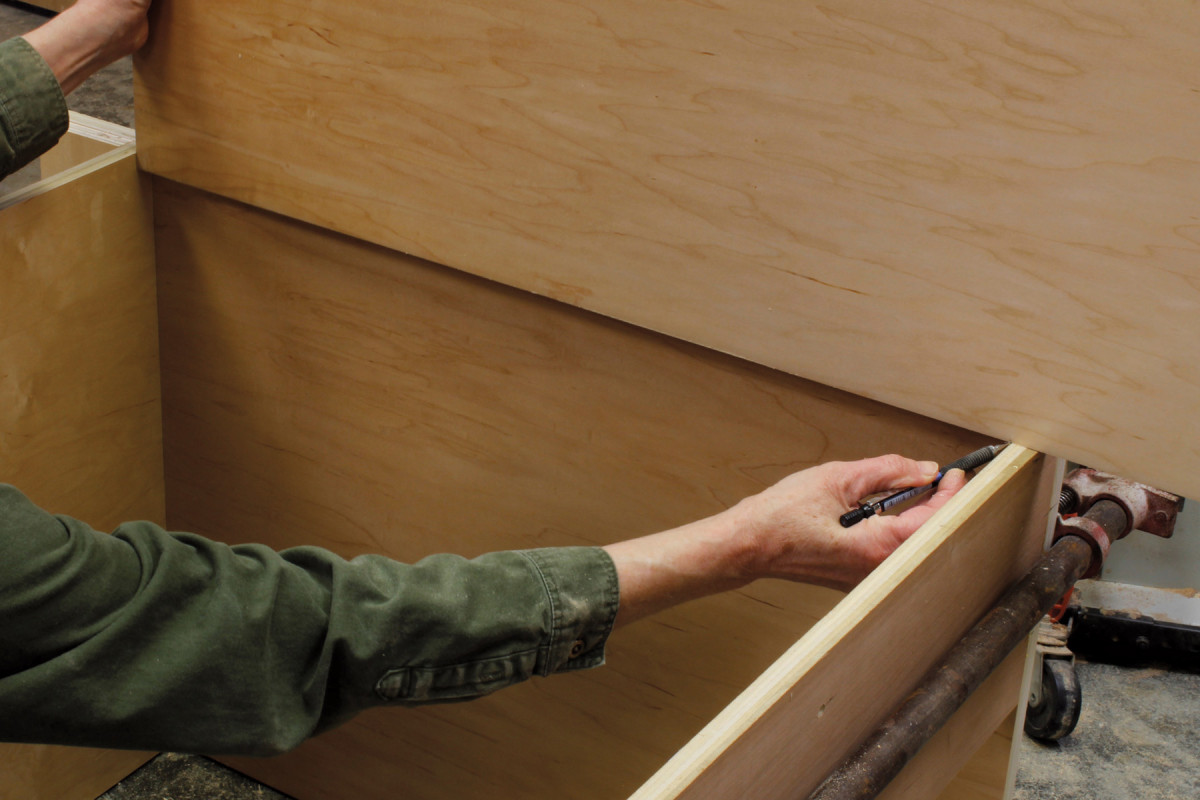
Glue guide. Apply a bead of glue to the top edge of the spacer and where the biscuits will go. Don’t waste your time or glue on the prefinished sur- faces; it won’t bond to them.
Maximize the efficacy of glue. Make sure the bottom face of the cabinet floor is tight against the top edge of the spacers; the bead of glue along the spacers’ top edge will contribute to the cabinet’s strength, especially if you are using plywood that’s prefinished only on the interior face and so offers limited opportunities for gluing. Now apply glue to the biscuit slots for the top (or top strips), insert the biscuits and set the top in place. Apply a couple of clamps to hold the assembly together while you adjust the fit.
Adjust clamps and square up. I find light clamps useful in holding the floor against the spacers while getting things adjusted. Here I am tightening the clamps at the top, having flushed up the front and back edges. Next I will move to the cabinet floor, tapping the back down firmly onto the bottom spacer before I insert a clamp under the back edge to tighten everything up.
After squaring the cabinet, sight across the top edges to check for winding. Shim at the bottom as necessary to remove twist, then drill and screw. Let the cabinet sit until the glue has set, per the glue manufacturer’s instructions.
Vertical Dividers
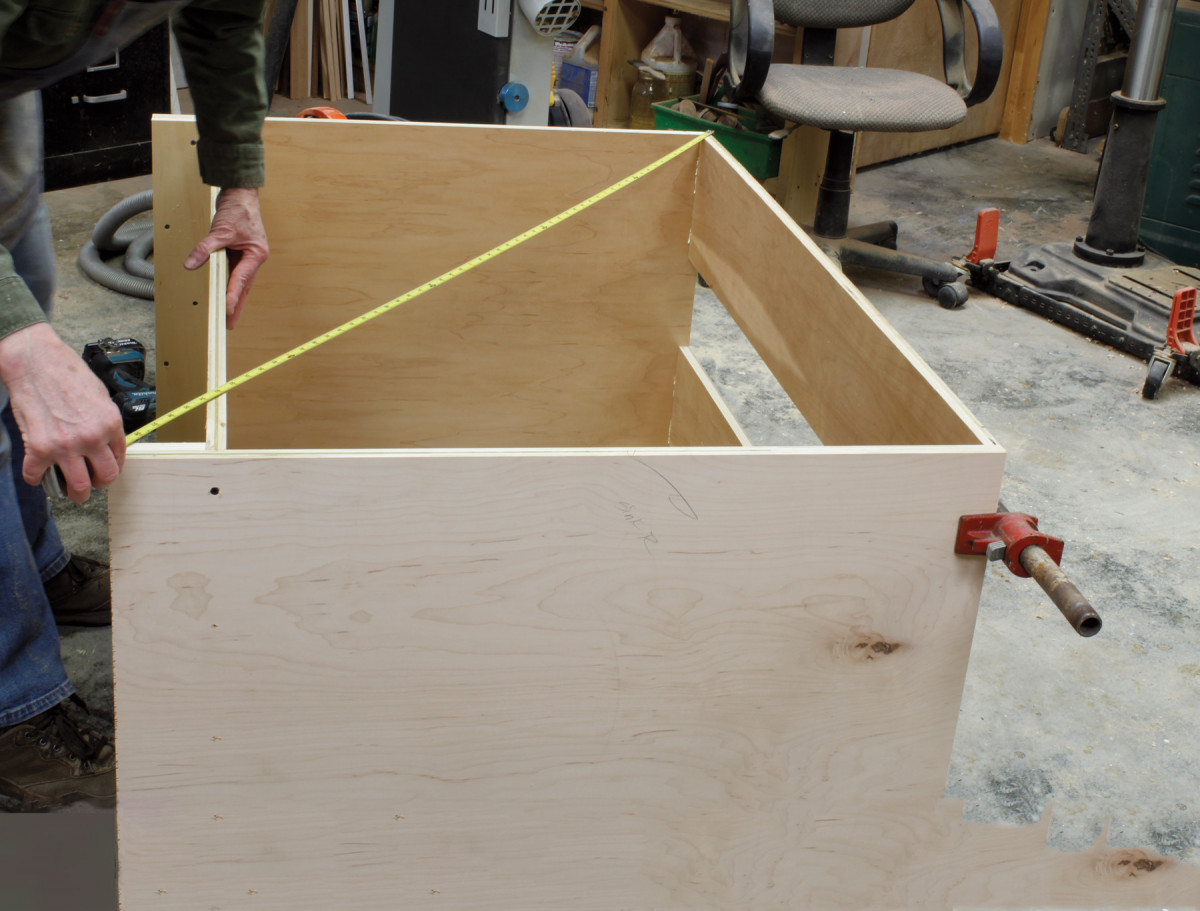
A screw can help. If you are working alone on a relatively large assembly, it’s sometimes helpful to insert one screw at each side before the carcase is fully squared up to keep the parts joined together. You can remove that screw if necessary, then redrill and replace it once the cabinet is squared. The carcase is square when the diagonals are equal.
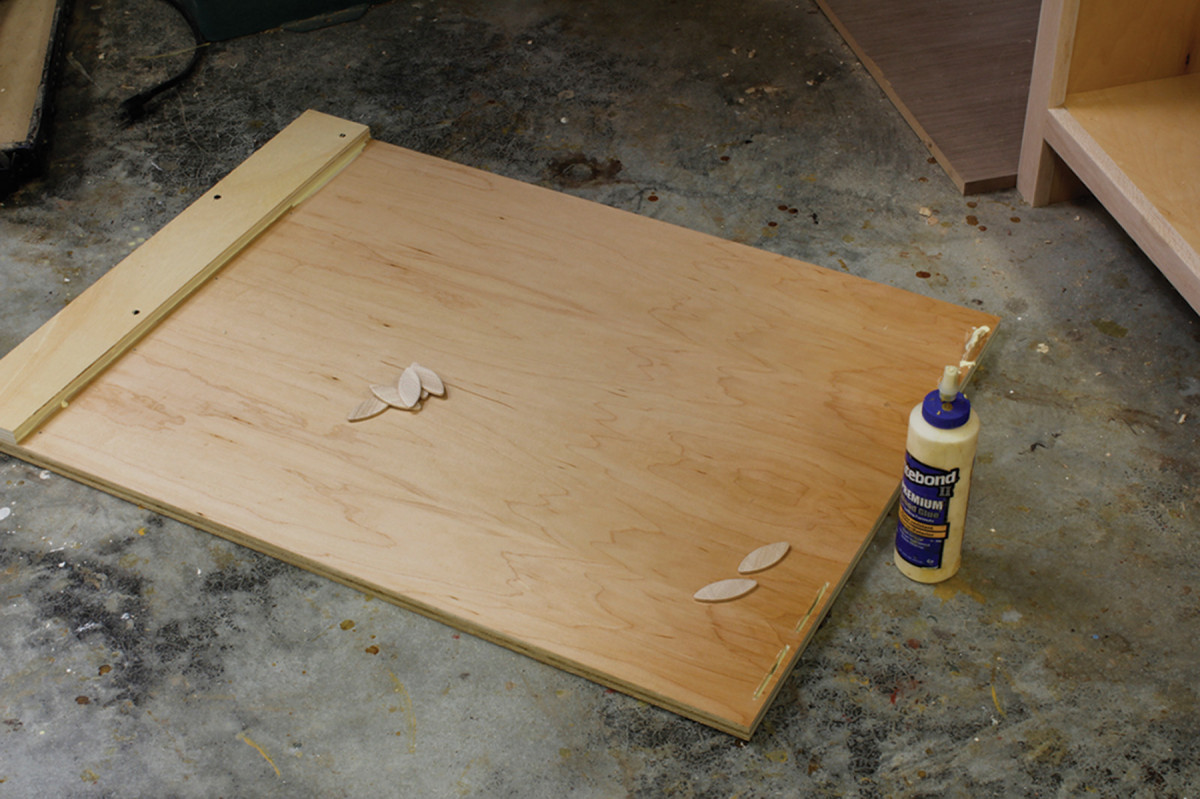
Plywood that is prefinished on both sides comes into its own for vertical dividers. I measure for dividers at this point and fasten them in place with screws.
Instead of using a tape measure, I cut a couple of pieces of scrap plywood (one for the bottom, the other for the top) to the distance between the divider and the nearest cabinet side. Clamp the scrap in place and you have an instant way to predrill the screw holes, 3⁄8” on center from the edge of the scrap. This method also makes locating the divider a snap when you’re ready to screw it in place.
Drill, then screw. Predrill for the screws using a bit just smaller than the shank of your screws. Countersink to prevent breakout. Insert screws with a driver.
Of course, you cannot insert that divider until you’ve cut it. Don’t precut dividers to size; cut them to fit. Otherwise you may find that your divider is too small. The most accurate way to determine a divider’s length is by setting one end in place and marking the other.
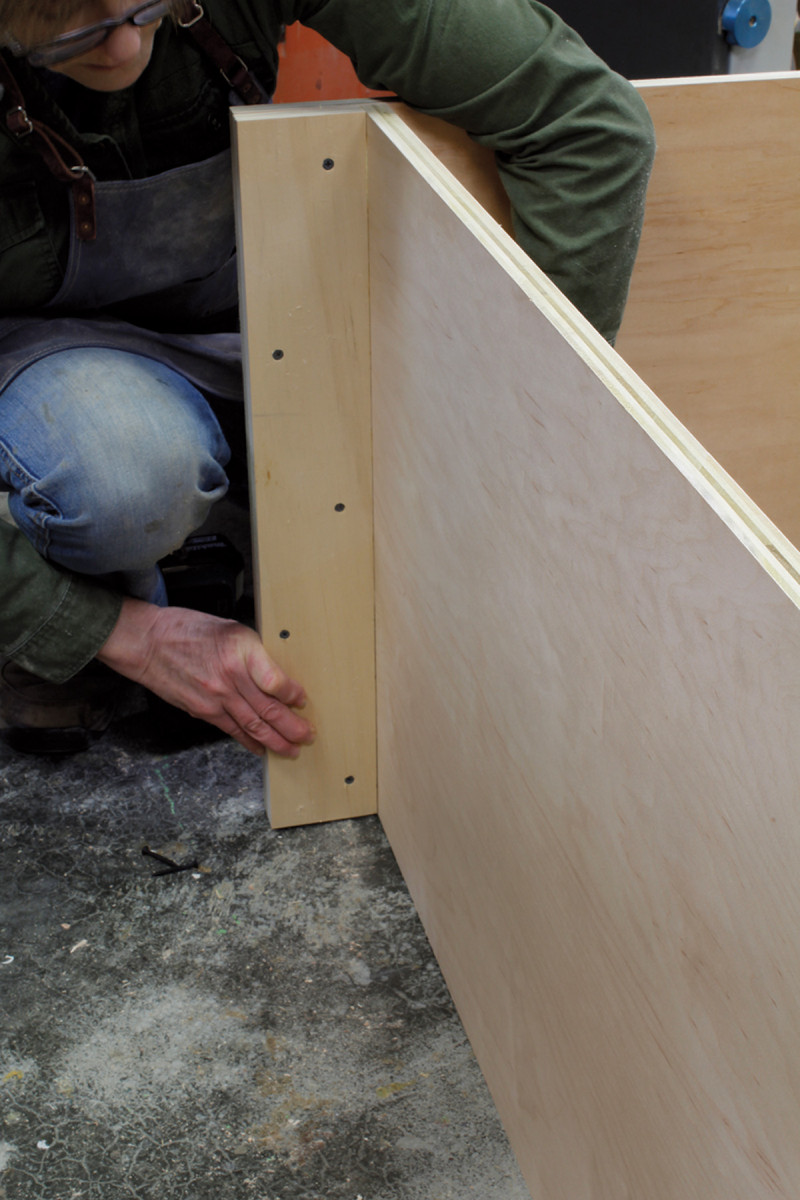
Wide cabinets should have support feet below or near vertical dividers to prevent sag. Make these from strips of 3⁄4” plywood cut to the same height as the spacers supporting the cabinet sides. Screw a batten on each side of the foot through which you can fasten to the underside of the cabinet floor.
Face Frames
Direct measure. Determine the length of dividers by holding one end against the cabinet floor, then marking the other. Because it’s typical for floors and tops of wide cabinets to sag or bow, measure for dividers at the nearest end. That way your divider will even up the height of the cabinet near the center.
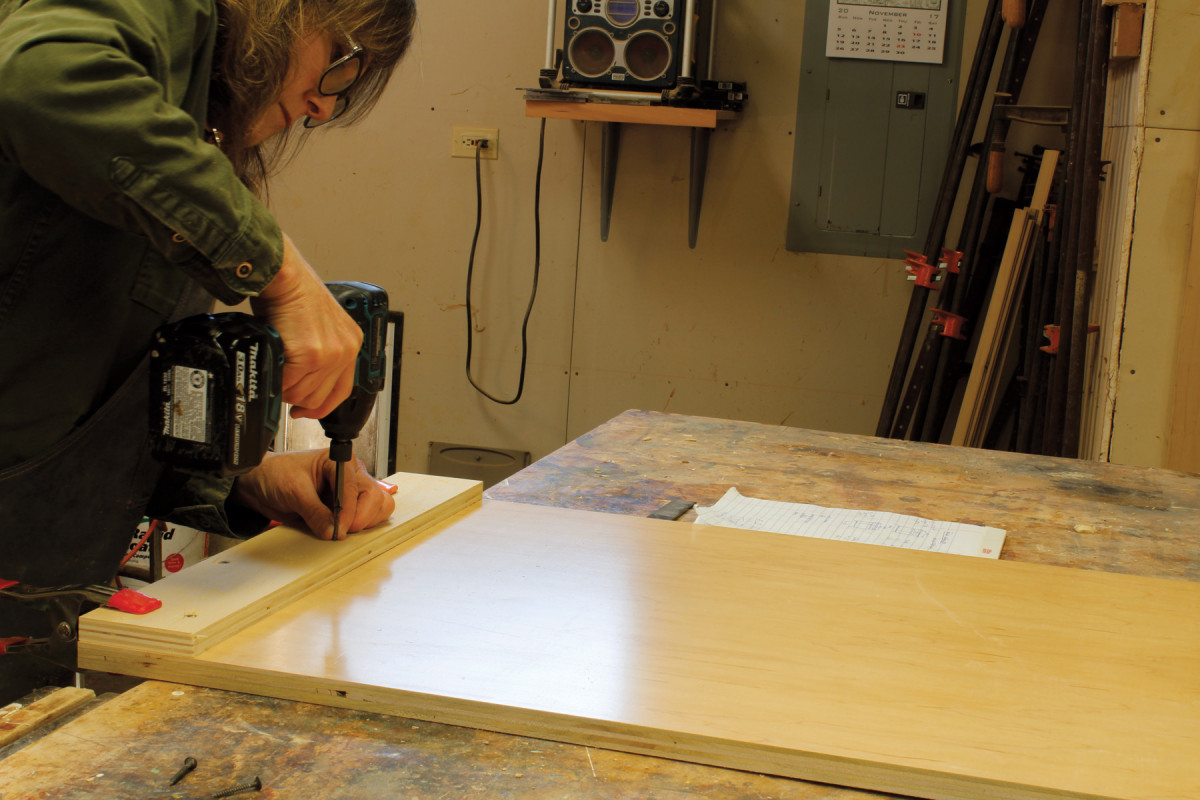
After using several kinds of joinery for kitchen-cabinet face frames, I now regard a pocket screw jig as my go-to. Pocket screws are quick, simple and strong. If you make a mistake, you can often remove the screws and replace a part.
Spacers for the win. Use a piece of scrap plywood to lay out holes for vertical dividers and locate them for fastening. Then rely on the scrap to locate the divider while you drill pilot holes with a countersink/drill bit and screw it in place.
Mill the stock for your face frames to thickness and width but do not cut anything to length until the cabinets are assembled. Direct measurement is the quickest, most accurate way to go: Start with stiles, setting a squared end on your shop floor for face frames with stiles that go to the floor; for cabinets with fully recessed kicks, start at the top and mark the location of the cabinet floor’s underside, then add 1⁄2” (or however much you want the face frame to hang down, which will hide the joint between the cabinet and an applied kick). Clamp the stiles in place, then hold one end of the top rail against one stile and mark the position of the other. Repeat with the bottom rail.
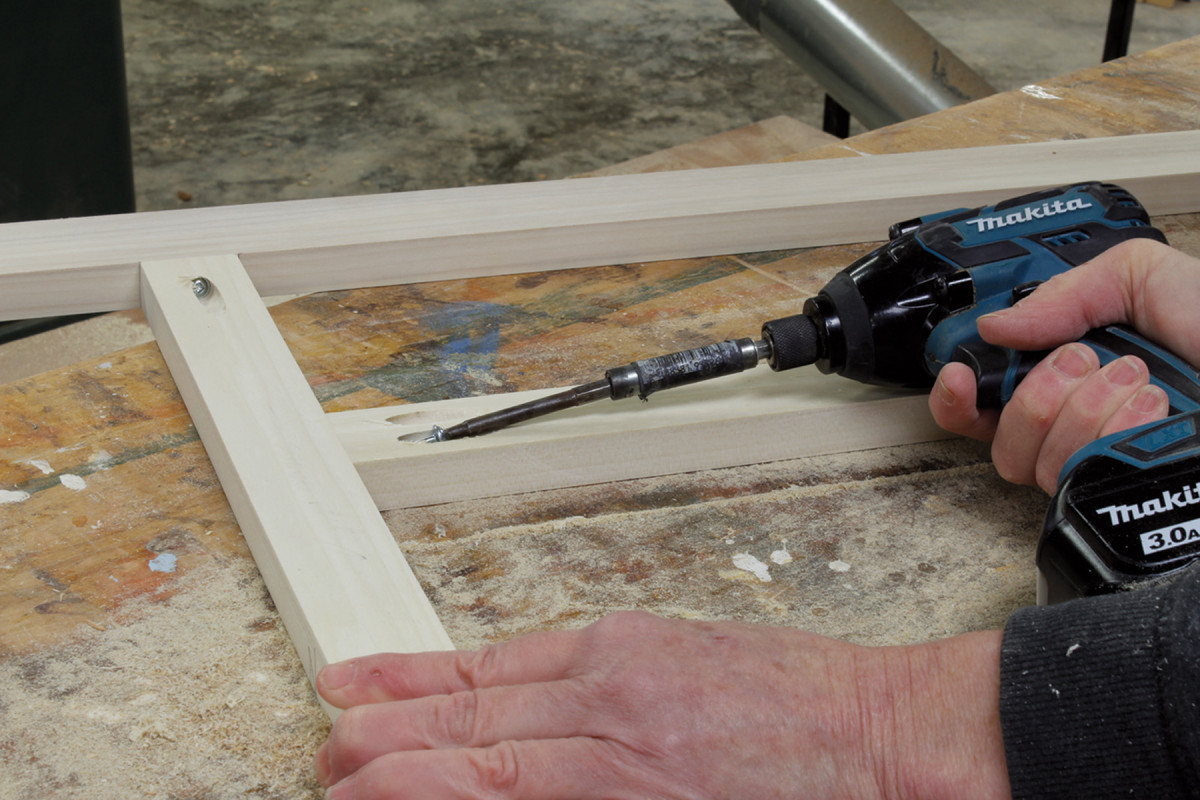
For vertical dividers, wait until you have the main part of the face frame screwed together so that the spacing of all the parts is locked in. Then continue with direct measuring. Hold one squared end of the divider stile in place and mark the other, then cut. Hold the skeleton face frame against the cabinet and transfer the position of the divider onto the edge of the top and bottom rails. Drill pocket screw holes at the ends of the stile and insert the stile.
Drawer Rails

Intermediate support. A batten screwed to each side of the foot allows you to attach it to the cabinet’s underside. I stagger the battens, putting one toward the front, the other toward the back, so that I can screw into them from the opposite side of the support foot.
Even if your drawers will slide on mechanical runners, you may wish to install drawer rails for a more traditional look (at least for built-ins from the late-19th through the mid-20th century). With the vertical divider in place, repeat the same steps to size and install these rails.
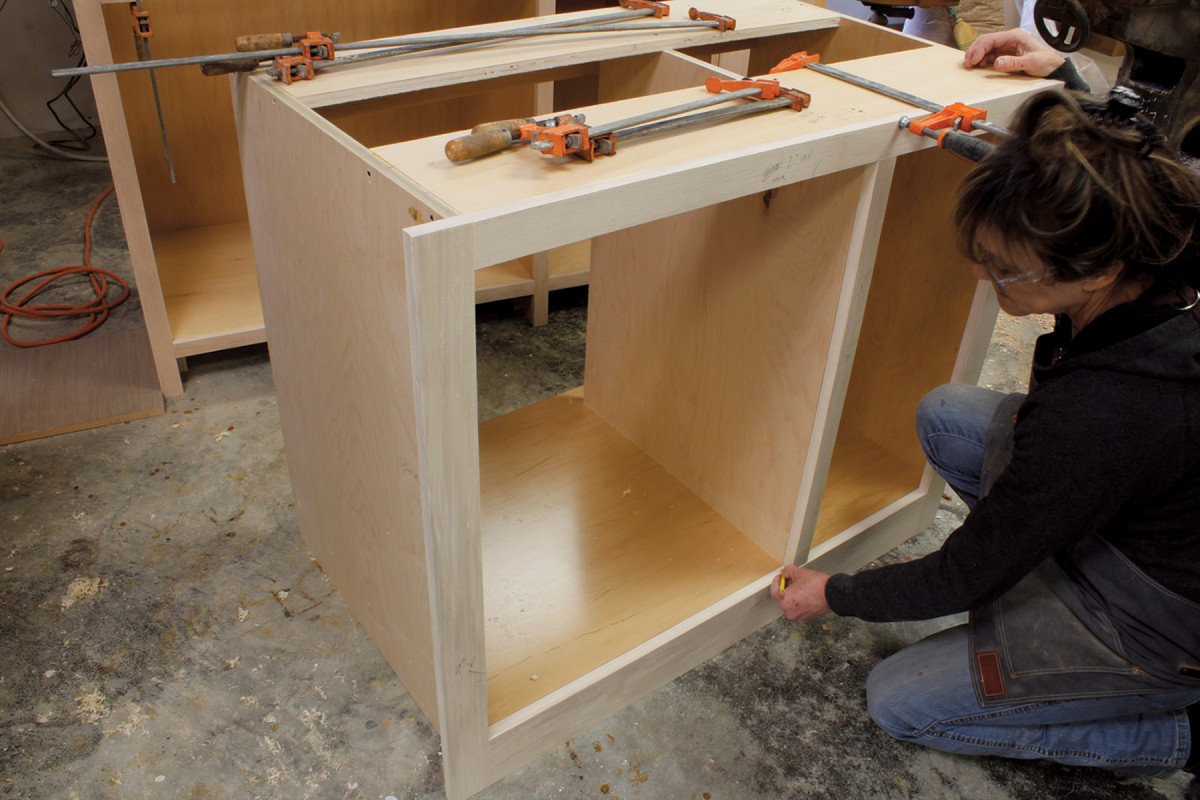
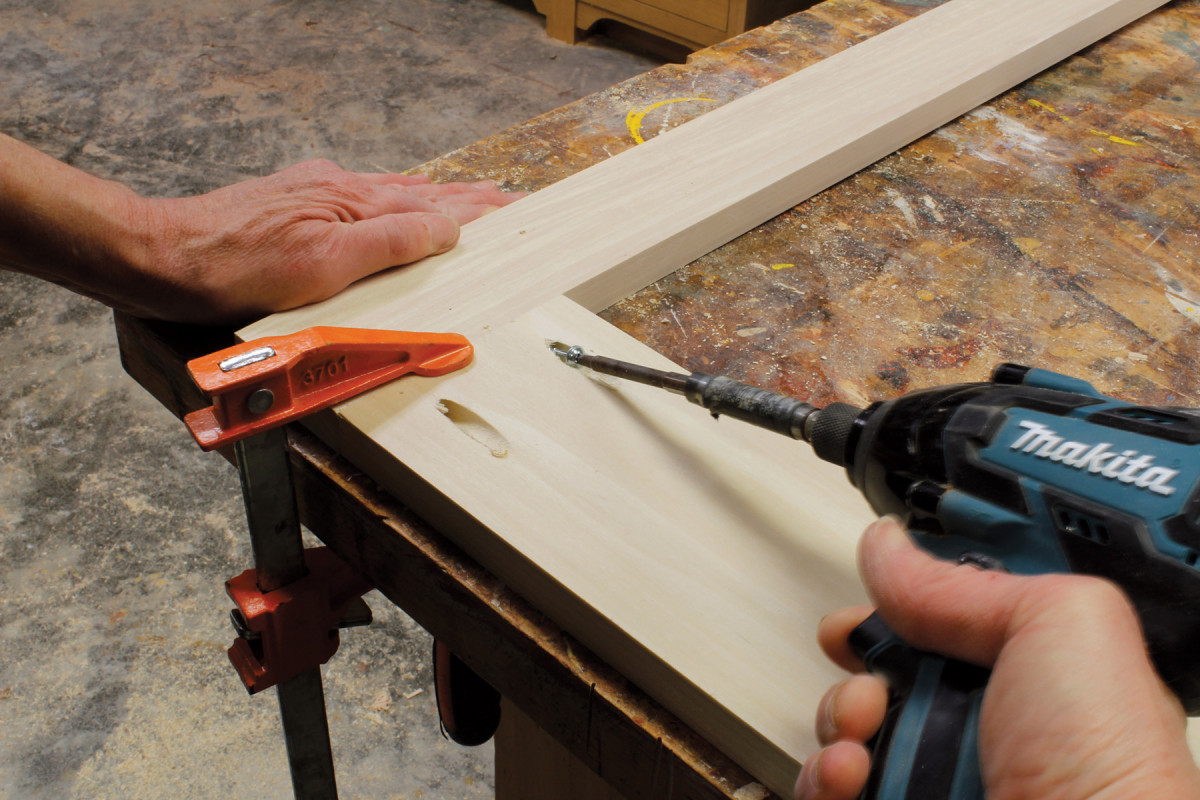
When you have completely assembled your face frame, give a light sanding to the inside edges (this is much easier to do before the frame is glued against a prefinished surface that you would not want to mar). Brush glue onto the front edges of the carcase, spreading it over the surface and apply the face frame. Make sure that the top edge of the bottom rail is flush with the floor of the cabinet; do the same with any critical inside or outside edges. Then clamp.
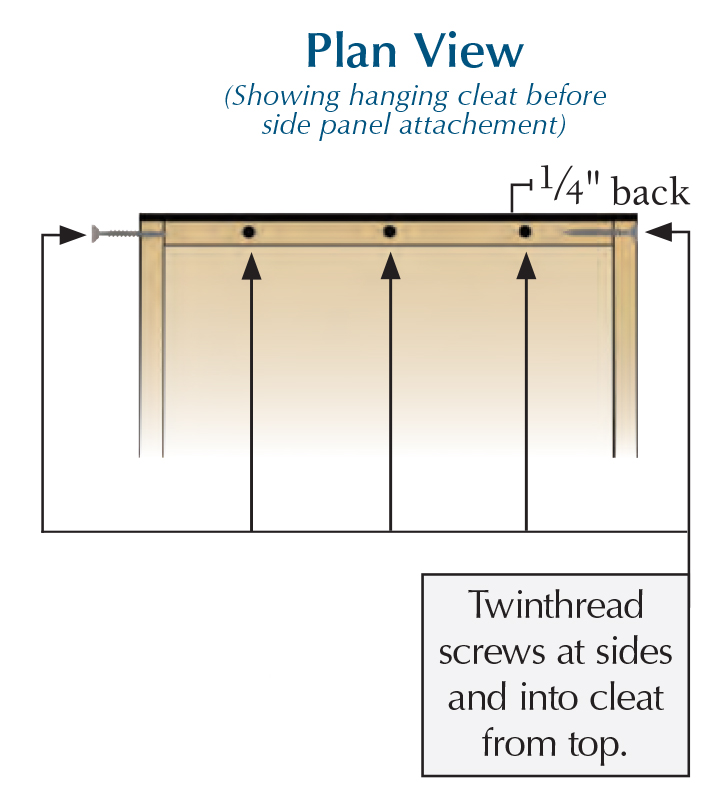
Hanging Cleats
Direct measure again. For vertical dividers, wait until you have the main part of the face frame screwed together. Clamp (without glue) to the carcase.
Next I usually tackle the hanging cleats, through which the cabinets will be screwed to the wall. Then I cut the backs.After these steps, the structure of the cabinet will be finished and I can turn to the fun parts – doors and drawers, both of which deserve their own articles and have been covered amply elsewhere.
Hold one squared end of the divider stile in place and mark the other, then cut.
For safety, the attachment cleat must be firmly fastened to the carcase, otherwise a cabinet could be separated from the cleat and fall off the wall, with potentially fatal results. I make a sturdy cleat from solid wood or 3⁄4“-thick veneer-core plywood and attach it to the carcase with Twinthread screws run through the top and sides. The cleat becomes part of the cabinet structure, not only supporting the weight of cabinet and contents from beneath the top, but also resisting the kind of leverage (such as that imposed when a child leans on an open cabinet door – please, please teach your children not to do this!) that could pull the cabinet sides away from the cleat if gravity alone were holding the cabinet in place.
It should go without saying that a cabinet designed to store pantry goods, appliances or dishware must be attached to the wall through studs or heavy-duty blocking, not just fastened to a wall with molly bolts or drywall anchors.
Backs
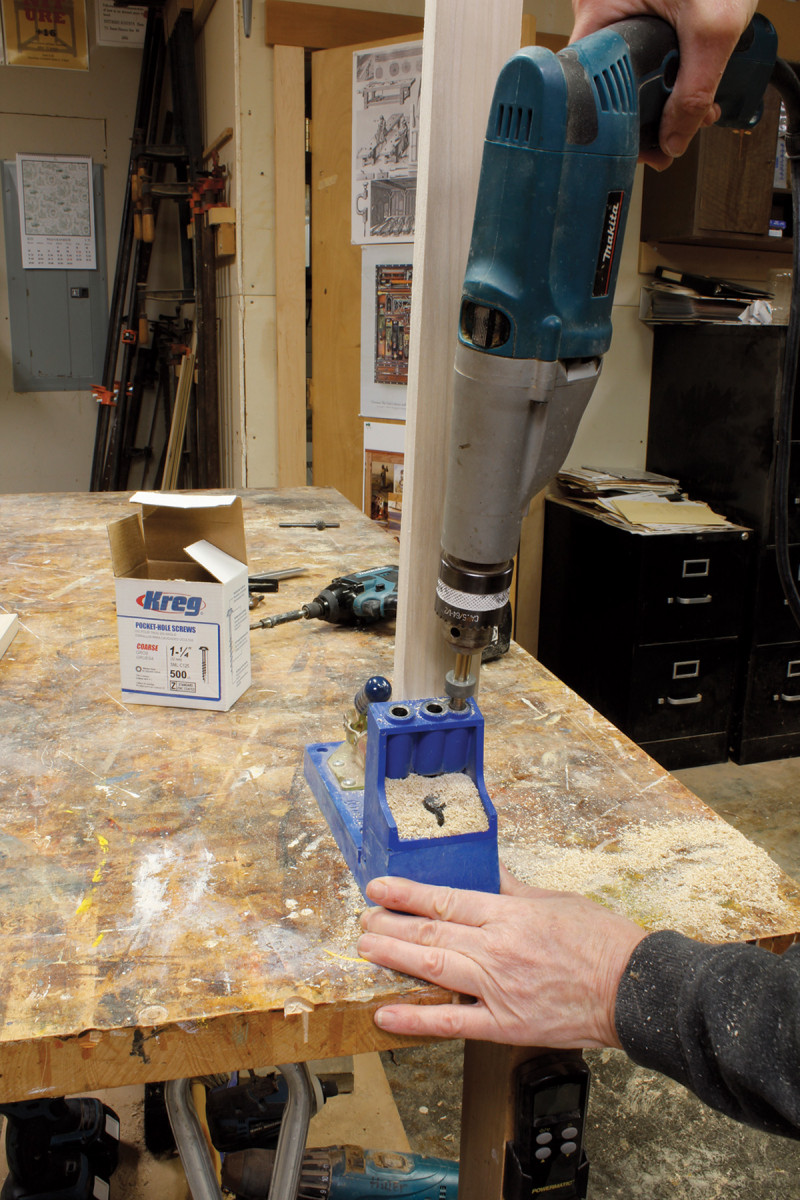
Pocket the difference. A pocket screw jig makes strong face-frame joints quickly.
Many people think backs are optional for built-ins, but backs are almost always worth incorporating. A good back will help a carcase resist racking, in addition to giving a more finished interior look.
You can buy a special clamp to hold the rails and stiles in place, but I simply clamp the parts together on my bench, making sure they’re square.
Generally, for kitchen cabinets I simply apply a back cut from ¼”-thick veneer-core maple plywood, prefinished on one side. The prefinished side goes toward the interior. Measure the width of the carcase and cut the back to that width, then measure the height from the underside of the cabinet floor to the top of the cabinet and cut the back to that dimension. Fasten the back to the cabinet with #6 1″ or 11⁄4” Twinthread screws after drilling countersunk pilot holes.
Shelves
Let’s face it. Clamp position is important. Put the clamps where they will do the most good. For joints that will be seen from the inside of the cabinet, such as the one between the cabinet floor and the bottom rail of the face frame, put the clamp inside. Sometimes, such as when the face frame is flush with an outside face that will be a finished end (see the right end of the cabinet), it’s preferable to put the clamp on the exterior. Cauls protect the face frame.
In most cases, kitchen cabinets will be far more functional if made with shelves that are adjustable, rather than fixed, allowing you to customize placement so as to utilize the available space efficiently. I generally make shelves from the same 3⁄4“-thick veneer-core plywood as the carcase and add a solid front lipping to finish the edge and increase rigidity.
For shelves, as with vertical dividers, it’s nice to use stock that is prefinished on both sides if you have it available. Resist the urge to make your shelves a perfect fit. They need to have a gap of about 1⁄32” to 1⁄16” on each end in order to be easily adjustable.
Kicks
If your cabinets have a flush kick, as does the one in this article, you’re home free – at least until it’s time to scribe the kick to fit the floor. If your kicks are recessed, mill them to thickness but leave them over-width and over-length until your cabinets are installed. Then cut them to fit.
Finished End Panels and Trim
Just for looks. Cabinets made with mechanical drawer slides don’t need rails to hold runners and kickers, but if you’re after a period look, you may want to consider including them.
The basic cabinetmaking method above will work well for cabinets that are trapped by walls at both ends. But it’s also designed to allow for finished end panels. I find it more efficient in many cases to build and install the cabinets, whether uppers or bases, then carefully fit and apply finished ends. Regardless of whether the finished ends will be frame-and-panel construction, solid wood sides, or sheet goods custom-veneered to match the cabinets, I cut them roughly to size in the shop, then scribe them to fit on site. The end panels will cover the 1⁄4” back, which would otherwise be exposed.
Likewise, crown moulding and other applied trim goes on after the cabinets have been installed. That way you can cut it to fit the room.
Here are some supplies and tools we find essential in our everyday work around the shop. We may receive a commission from sales referred by our links; however, we have carefully selected these products for their usefulness and quality.