We may receive a commission when you use our affiliate links. However, this does not impact our recommendations.
Accurately set up for and safely make these versatile curved shapes.
It was the 1970s. I was a young, lost woodworker out cruising the West Coast in search of inspiration, mentors, cool old tools and furniture to study. I found legendary furniture maker Art Carpenter at his studio in Bolinas, Calif. He showed me two things. One was the first and loudest router table I ever saw: a router hanging under a piece of plywood perched atop a 55-gallon drum. He also showed me how to cut coves on the table saw. What the heck was this? Curved shapes cut on a table saw? I was mesmerized by this bit of woodworking wizardry.
Video: Watch the author demonstrate his technique.
Most people think of the table saw as a machine capable of cutting only in a straight line. Shove miles of wood through it to rip lumber to width, break down sheets of plywood, crosscut boards to length or make the occasional miter or angled cut. Noisy, loud, brutish. What is amazing to discover is that the saw can also make curved shapes if you know how to approach it.
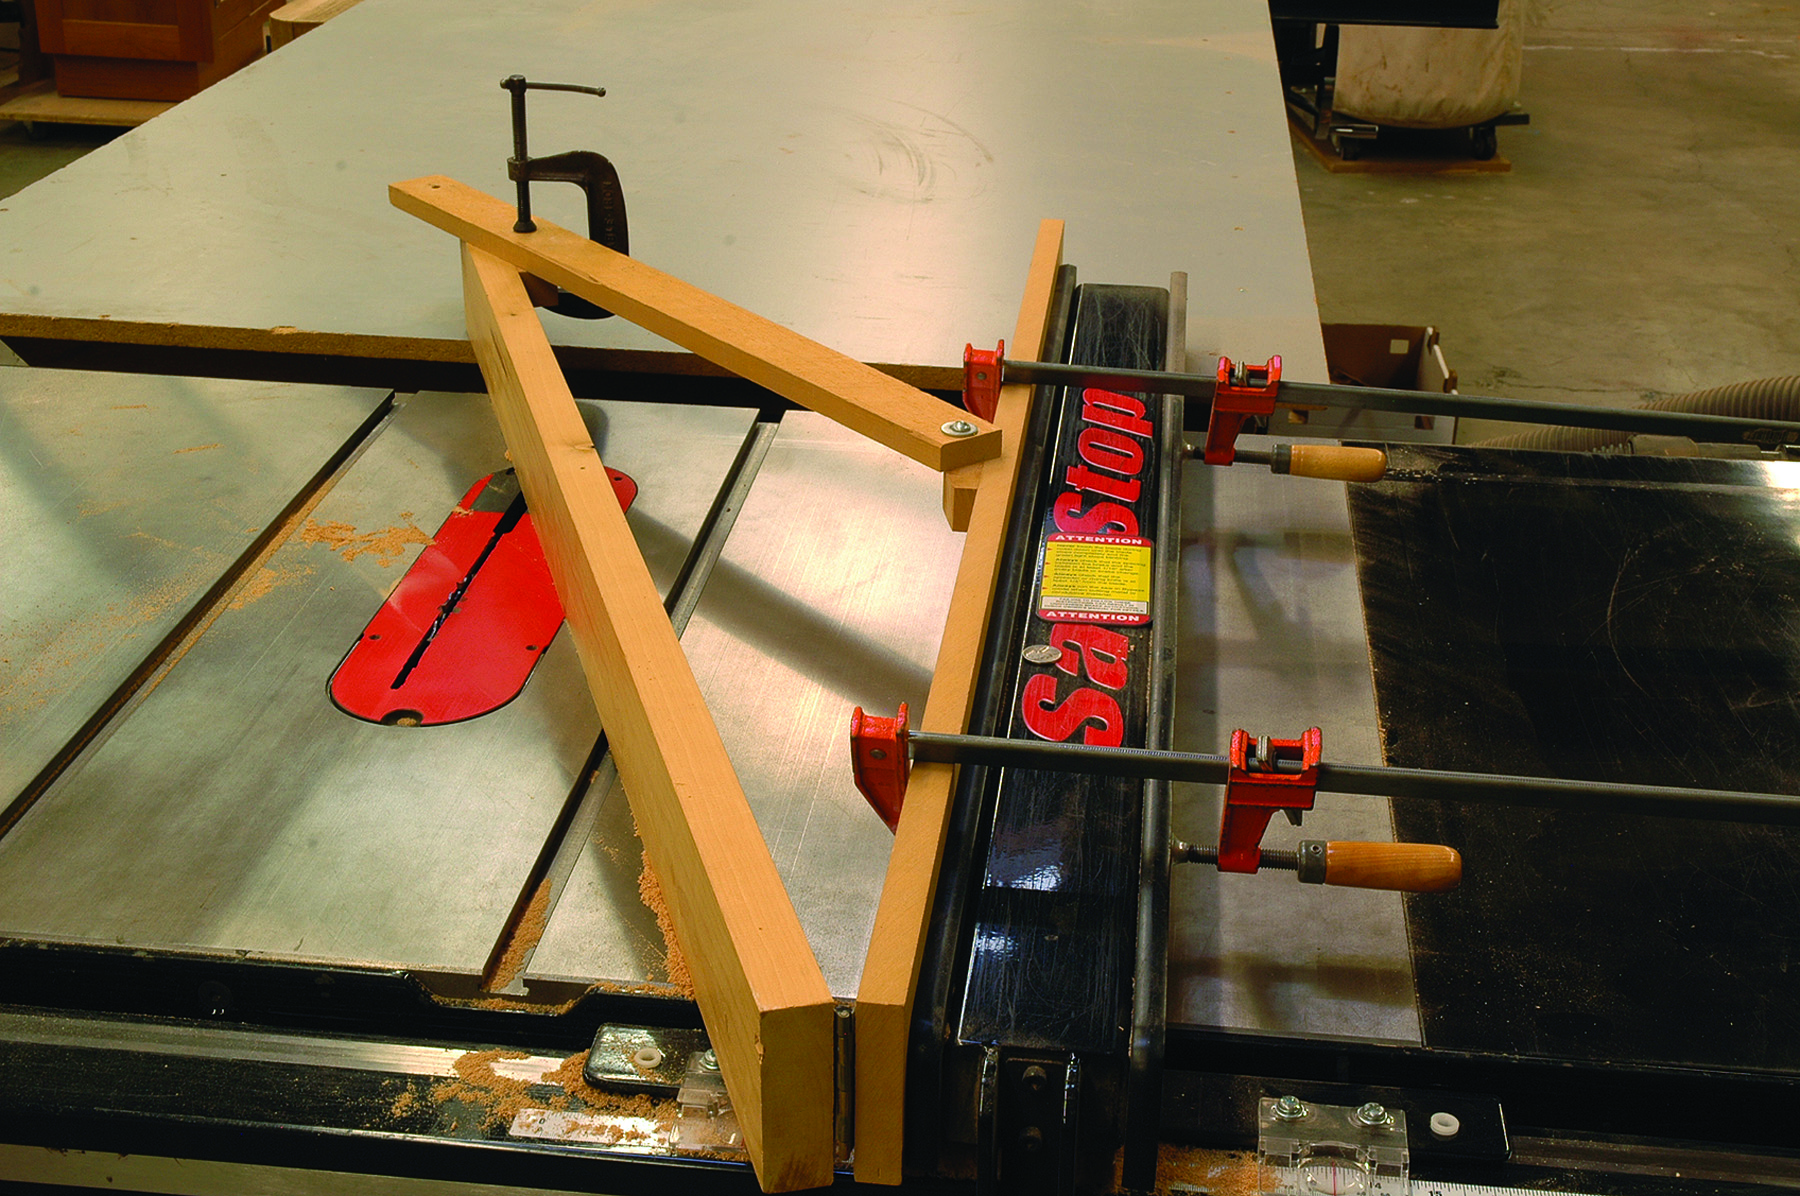
Table saw coves. The table saw can make coved shapes in endless sizes and varieties. It can even make parabolic shapes when the blade is tilted and an auxiliary fence is set at an angle to the blade.
Blade Geometry
Let’s consider blade geometry first. You make a normal rip cut on the saw with the stock pushed straight into the blade. You cut a groove on the table saw with the grain but not through the full thickness of a board. Now imagine coming at the saw blade not straight on as usual, but at an angle with the blade set just barely sticking out of the table. If you can, imagine coming in at 90˚ to the blade. Keep imagining that, after raising the blade in a series of passes that take small cuts, you’ll finish with the blade raised to its full height. A frightening thought, really – and one you shouldn’t try.
But if you could make this cut, you would produce a profile that matched the arc of the blade projecting above the saw table. Well, back off this 90˚ angle and imagine your wood approaching the blade running against an auxiliary fence. You’ll make a series of passes with the stock and raise the blade ever so slightly each time. This is how you make a cove cut. The shape you get depends entirely upon the angle that you set your auxiliary fence to the blade and the angle or tilt of the blade itself.
Finding & Marking Out the Angle
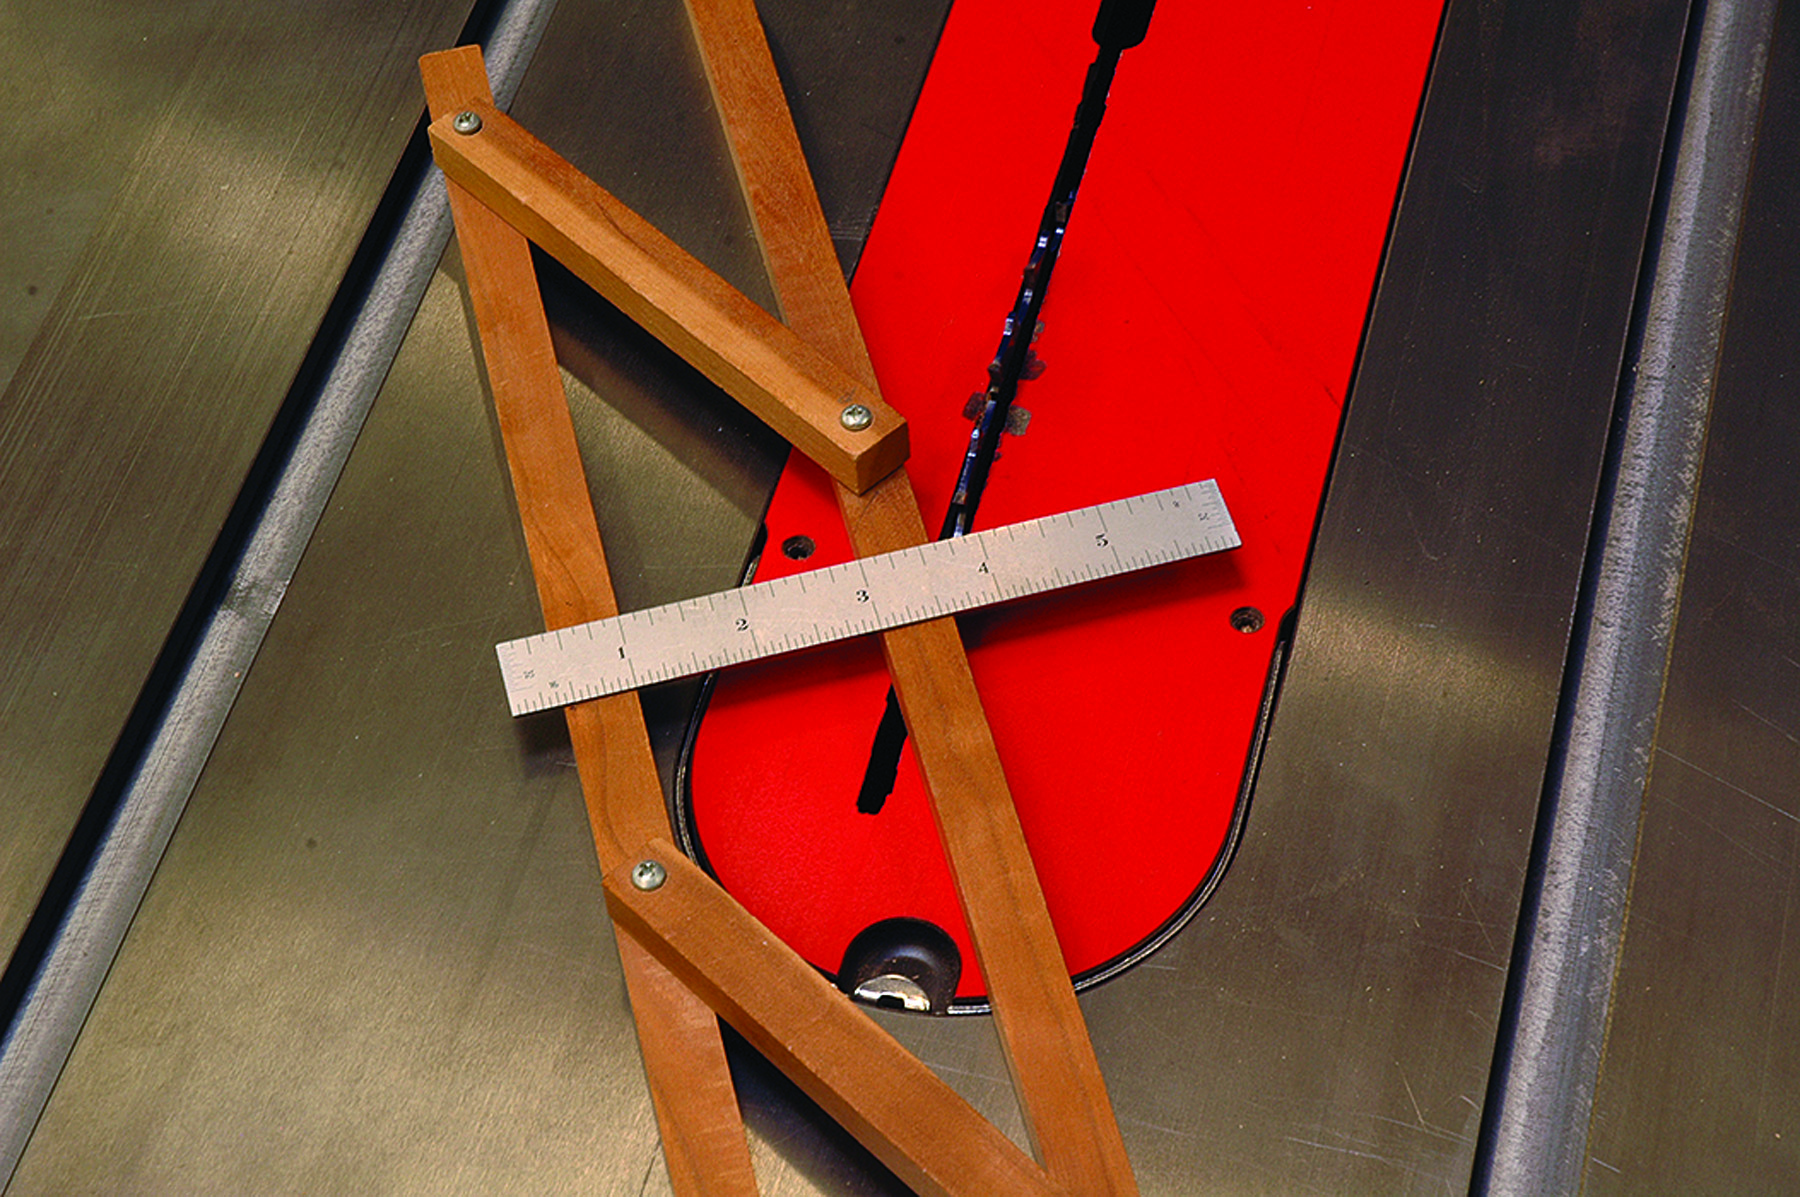
Open arms. Use the parallel arms to set the width of the cove cut. After setting the blade height to the final depth of cut, use a 6″ rule to set the arms to the desired width of the cove.
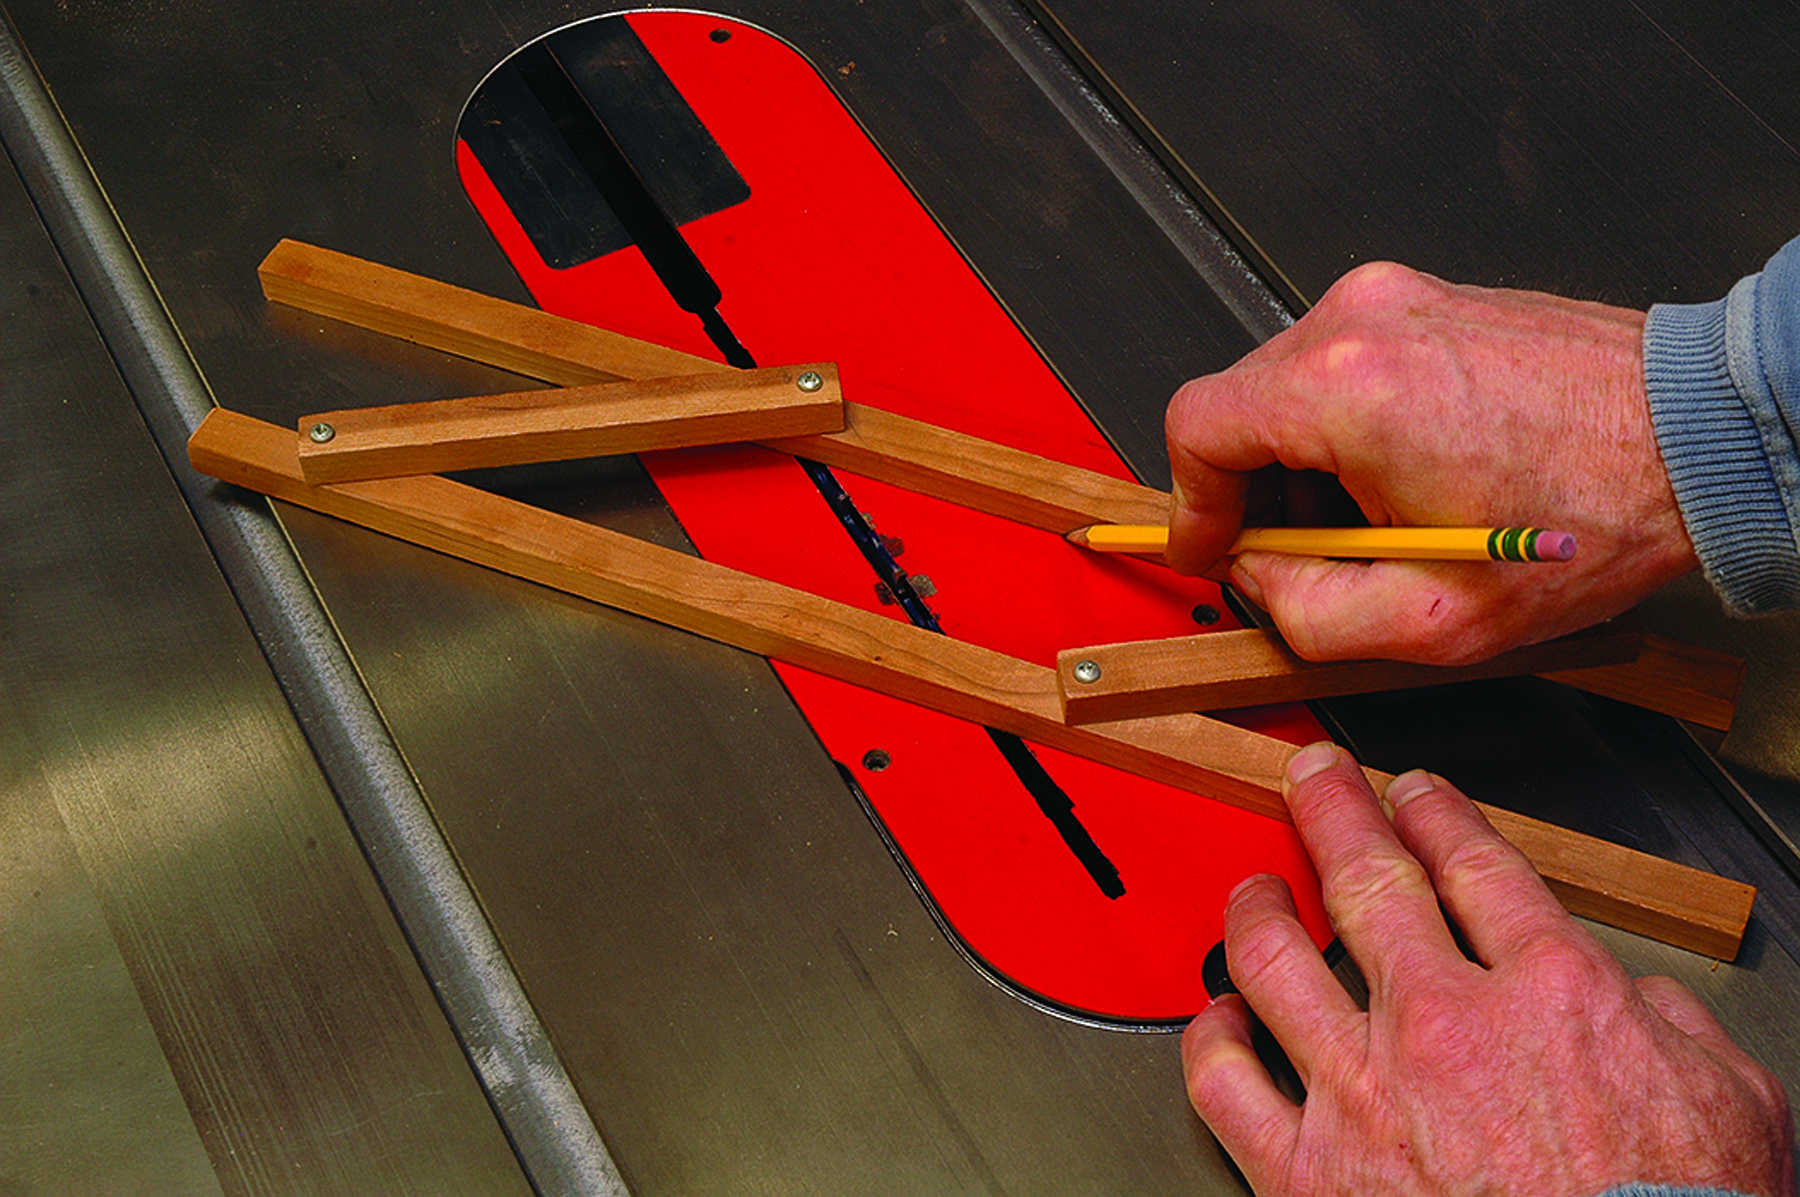
Mark the angle. The correct cove angle is achieved when the long sides of the parallel arms touch both the front and back of the saw blade. Mark that angle on the throat plate for reference.
Set up the Cove Cut
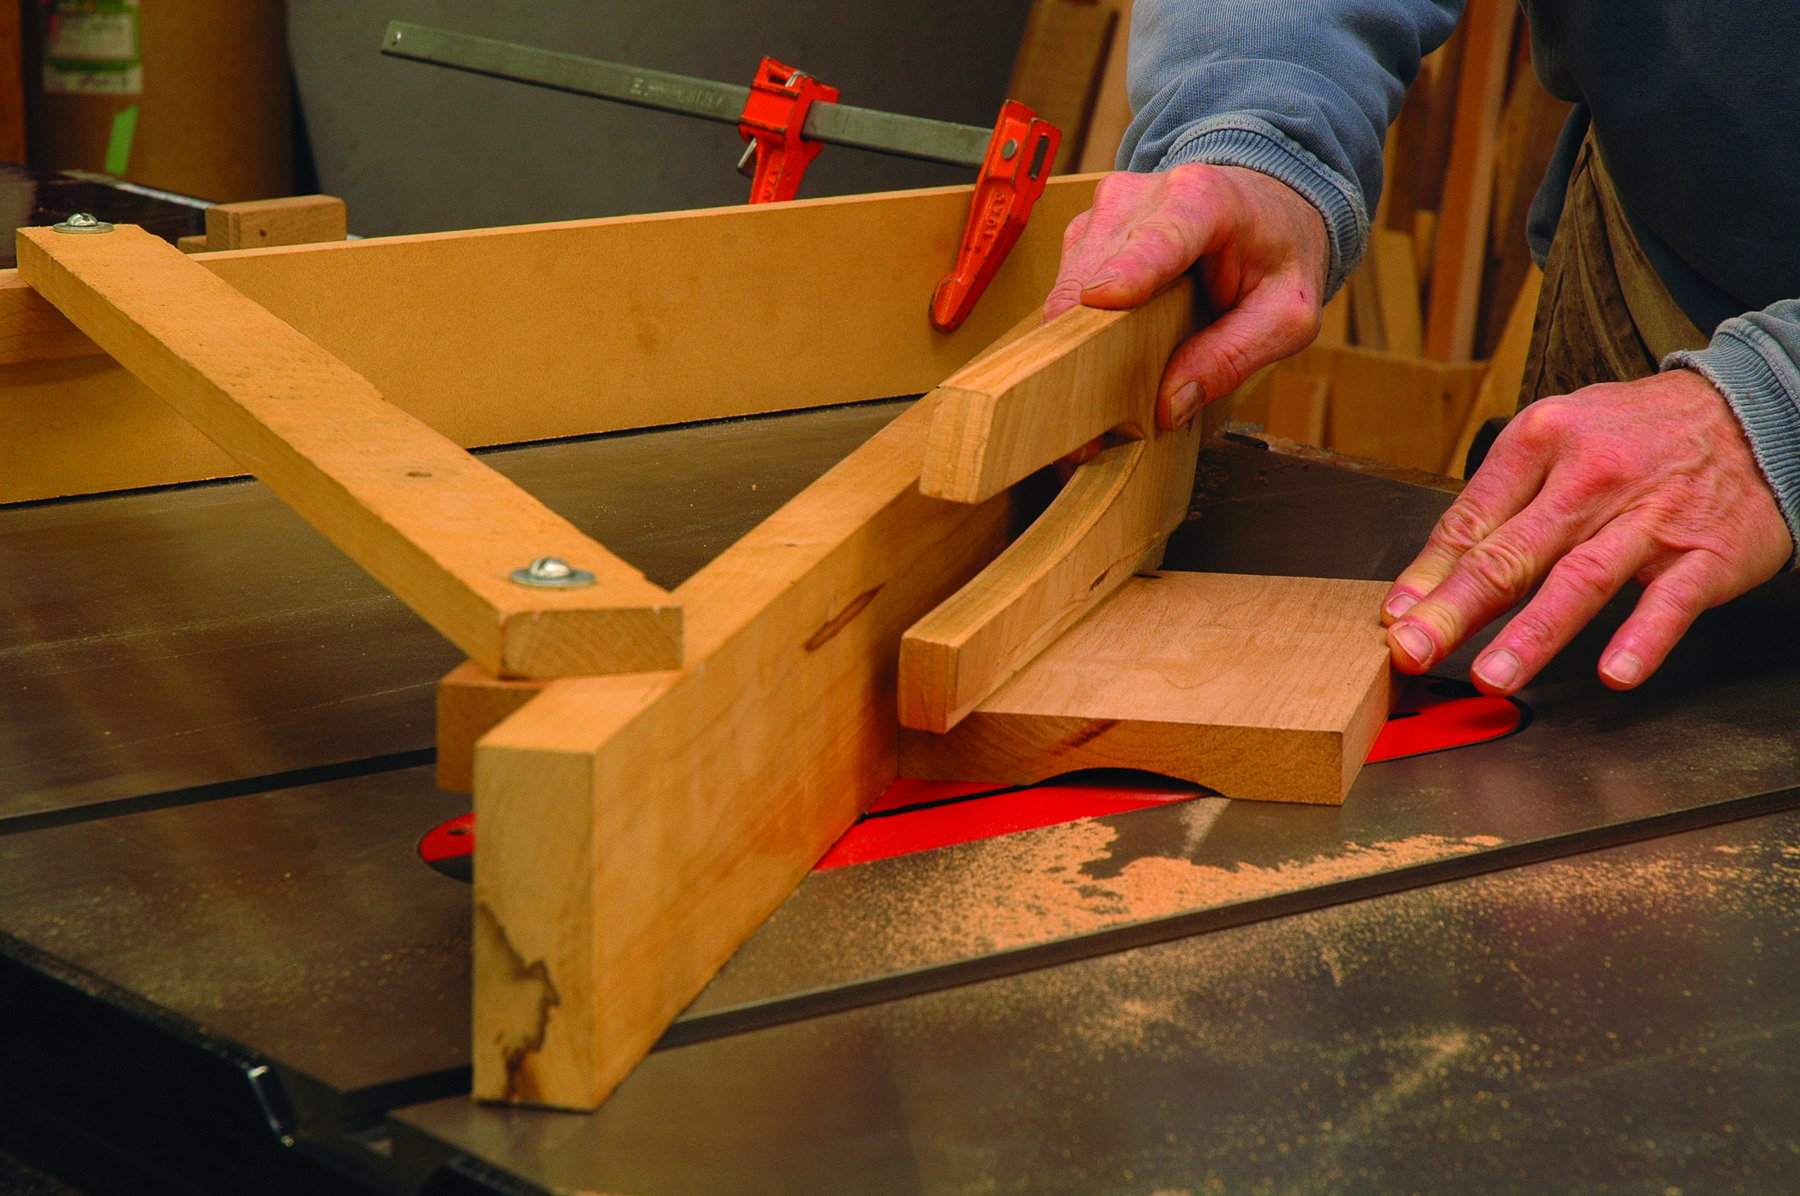
Your first task is like many woodworking jobs; you can’t move forward until you make a jig. This one, made from scrap wood, is simple to build. Make up a set of adjustable parallel arms that open to a width of about 6″. The width you set with these parallel arms helps you find the correct feed angle to the blade. I make my parallel arms from two straight ½”-square sticks about 16″ long. These are fastened to two 6″ arms. The arms must open and close easily and remain parallel when adjusted.
Next, determine the width and the depth of the cove you want to make. Open your parallel arms to this width and raise the blade to your final height. Now use the parallel arms to set the width of the cove cut. Place the parallel arms on the table straddling the blade. Rotate the blade slowly, with the saw unplugged of course, and set one arm close to the tooth coming from below the table at the rear of the blade. It should just nick the rear arm. Then rotate the blade and move the parallel arms until a tooth at the front of the blade diving down into the table just touches the front arm.
During this setup procedure, make sure the arms stay locked-in at the desired width. Use a pencil to mark out the angle of the parallel arms on the throat insert or just onto the saw table. This is the correct angle to set your fence for the cove you want to cut.
Cove-cutting Fence
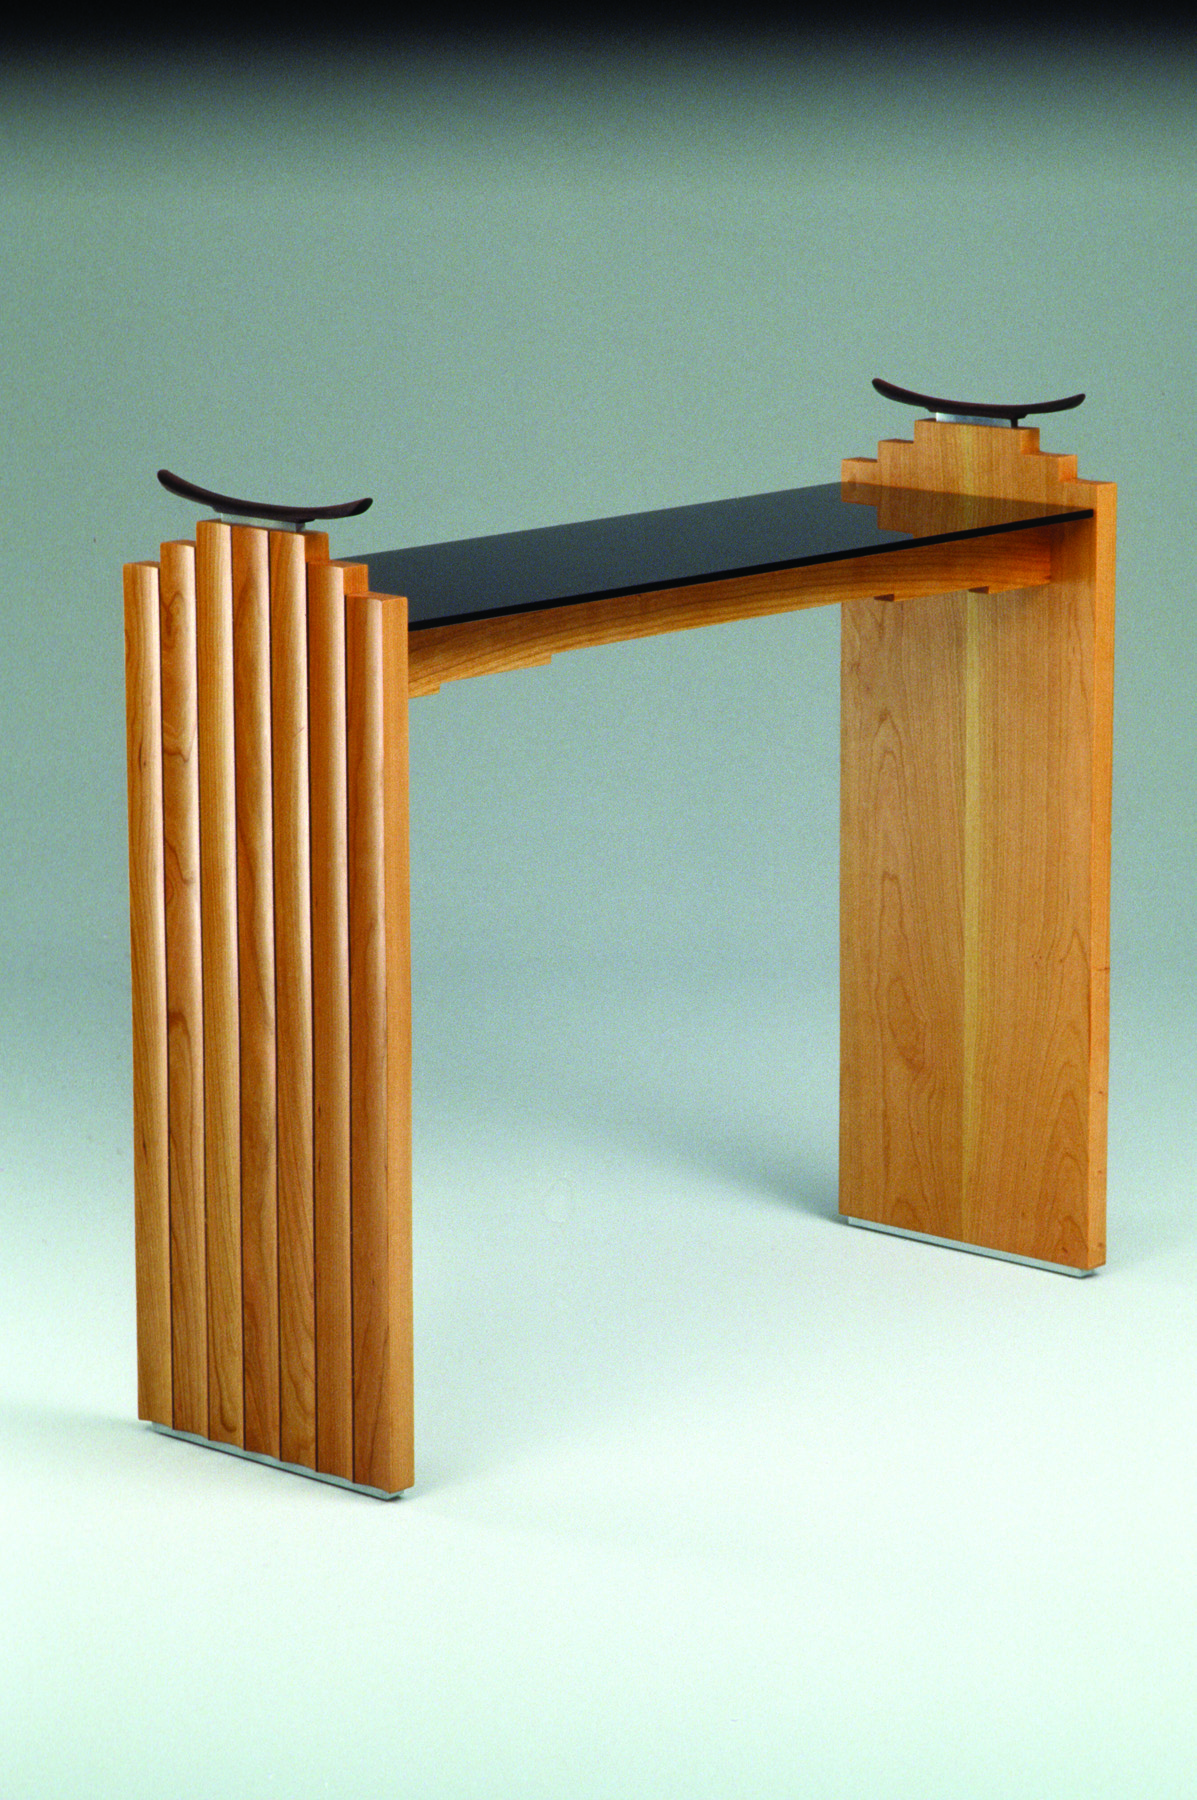
Multiple coves. My table design calls for multiple 2″-wide coves equally spaced across the width of the end panels.
Most folks clamp a long board at the angle they want across the top of the table saw to use as a fence for their cove cuts. But you can have trouble clamping to some saw tables because of the casting ribs below the table surface. Plus, when you need to make multiple cove cuts side-by-side, it’s hard to guarantee they’ll be parallel. I once needed to do this for the custom table shown below. It features cove cuts every 2″ across the full width of the table’s end panels. To solve the problem I made an adjustable cove-cutting fence or jig (see below). I made each cove cut then repositioned the table saw fence for the next cove. My angle remained constant for each cut.
Adjustable Coving Fence
My simple but effective coving fence has one adjustable arm hinged to another arm. These arms function like some tapering jigs except that the arms open away from instead of toward you. A stick screwed into the fixed arm can be clamped to the other arm to lock the angle in place. I find my cove cut angle, mark it on the saw table insert, adjust my coving fence, lock it in place with a spacer screwed or clamped on, then clamp the whole assembly to my regular table saw fence. This coving fence is usable for all the cove cuts I have ever wanted.
Simple Cove Cuts
There are some important things to pay attention to when making cove cuts. Use a flat-top-grind blade if you have one, because it will result in finer saw marks. Have push sticks at the ready for all your cuts. To make the series of cuts, push the stock along the fence and into the blade.
Start with a tiny cut – about 1⁄32” deep – to get the feel of it. Depending on your saw and the depth of your final cove, you may find your cut off center. On some newer table saws the blade rises straight up through the table. If your saw works like this and your initial cut isn’t where you want it, make an adjustment to your fence position. If your saw blade rotates forward as it is raised, you’ll have to rely on your initial setup unless it looks wildly off. After your first pass, raise the blade another 1⁄32“. Continue making these small adjustments and taking passes until you reach the desired depth of cove.
Keep in mind that you build up a lot of heat with the sawdust that gets trapped in the cove and you put a lot of stress on the blade by coming at it sideways, so take your time. Also, by slowing the feed rate your cut will be smoother. Do yourself a favor and go slow; otherwise, you’ll cause yourself extra work later to clean up the saw marks.
Remove Saw Marks
This is the juncture of this marvelous exercise in geometry and ingenuity where all the cleverness comes crashing back to reality: cleanup. The saw marks left behind are onerous and many. There is a ton of work to do in removing them and there’s no sander I know of that can do it with the precision to match the profile you just produced with your cuts.
If you have the time to make a dedicated handplane, that’s the best choice. I would make one with a high-angle blade to use like a scraping plane, much like a violin bow maker uses. This high-angle round-bottomed plane cleans up coving marks working in any direction. Because of its scraping cut, there is less danger of tear-out.
If you don’t have a round-bottomed plane, you have two other options. One is to take out that goose-necked scraper you never use and sharpen it. The process is the same as sharpening a straight-edged scraper except that you’re constantly working around the tool’s curved edges. Polish the faces, file the edges by holding the scraper against a file held in a vise, then turn over a burr with a burnisher.
Work the scraper both with and across the grain to remove the saw marks. You’ll start to generate some heat while scraping; use the whole edge of the tool so you don’t burn your fingers.
The second option is hand-sanding. The best approach is to make a curved sanding pad from thick, rigid foam insulation. Place a piece of #60- or #80-grit sandpaper down in the cove and run your insulation against it until you create the cove shape. Then wrap your sandpaper around that pad and go to work. How hard the chore is depends on the hardness of your wood, the amount that you have to sand and your supply of elbow grease. Clean up your coarse sanding marks with progressively finer grits up to #220. Lastly, raise the grain with a damp cloth then clean up the resulting fuzz with another light sanding of #220 grit. Don’t skip this step – it’s worth it.
Clean Up
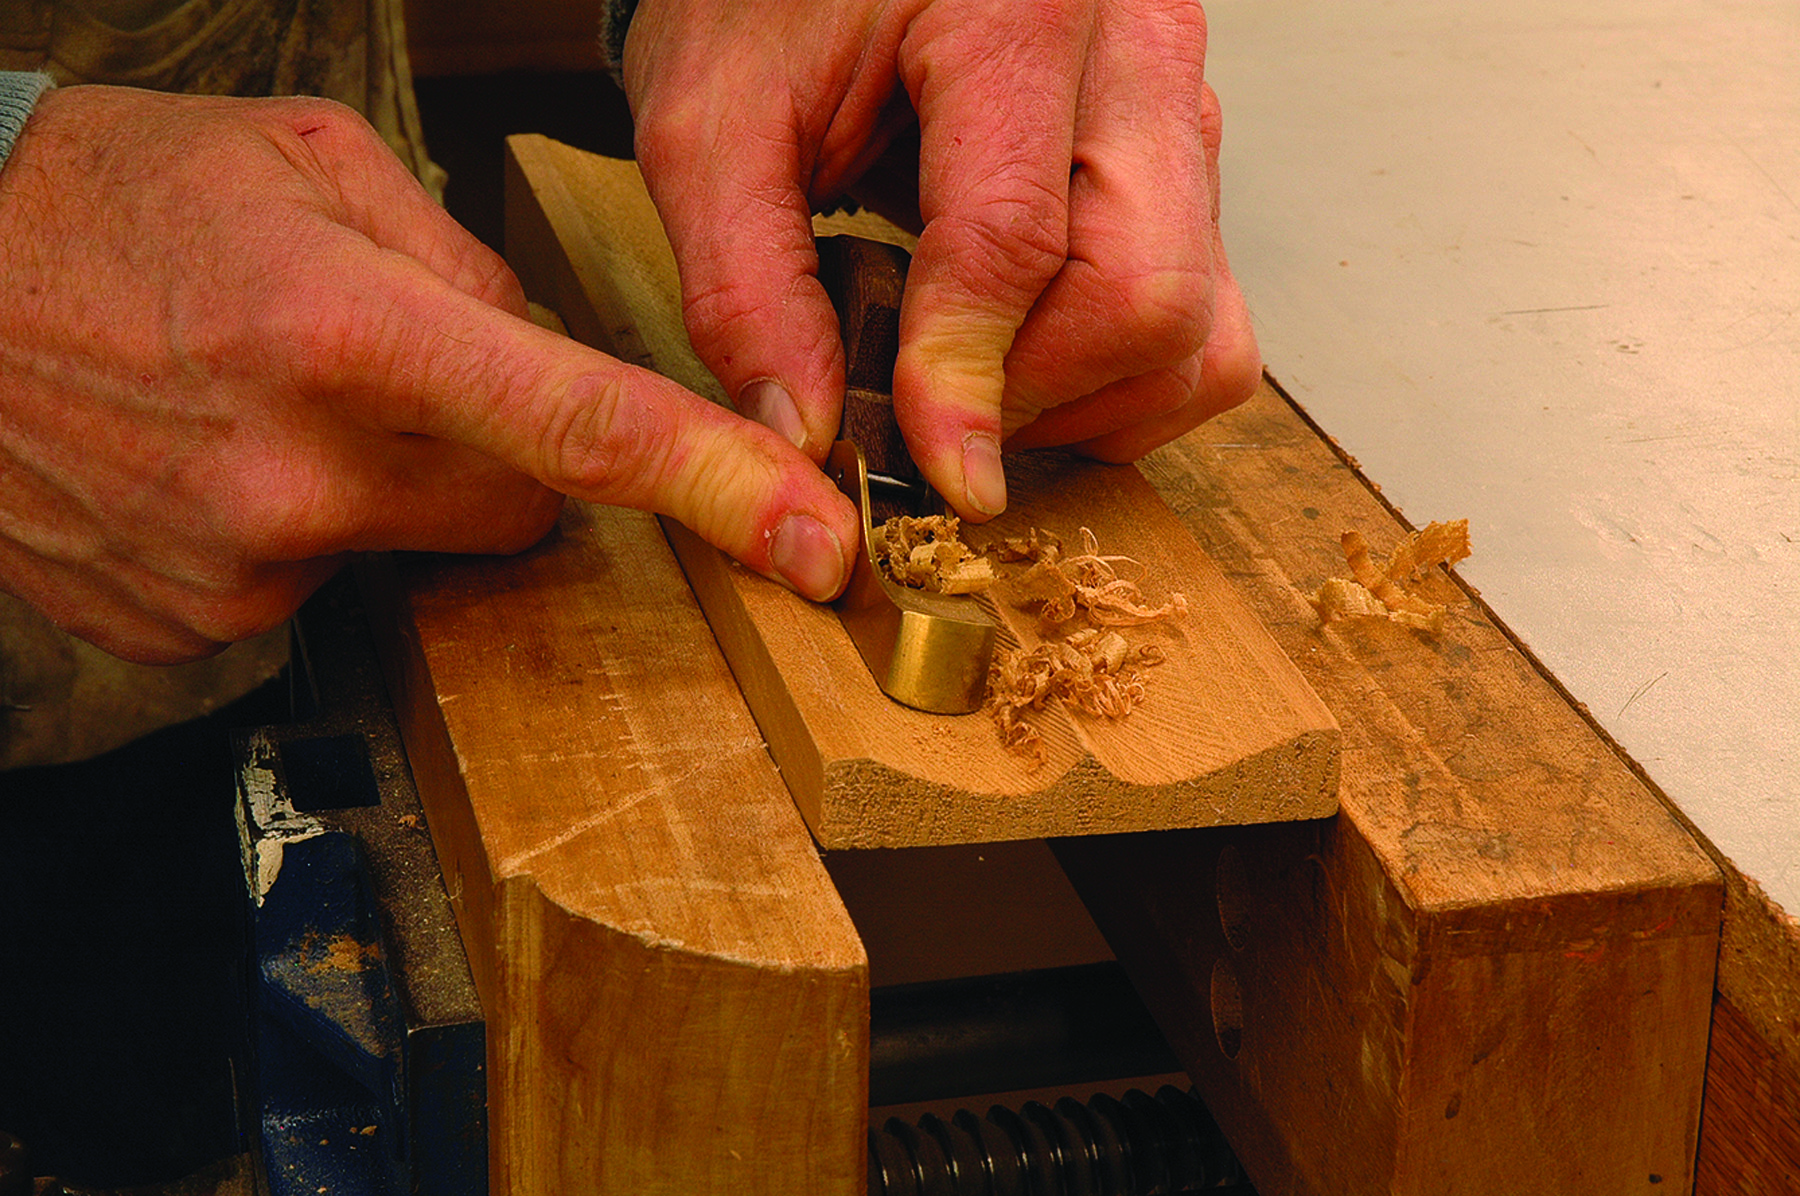
Round bottoms. This round-bottomed plane has a high blade angle, so it can work in any direction to clean up saw marks. Because of its scraping cut, there is less danger of tear-out.
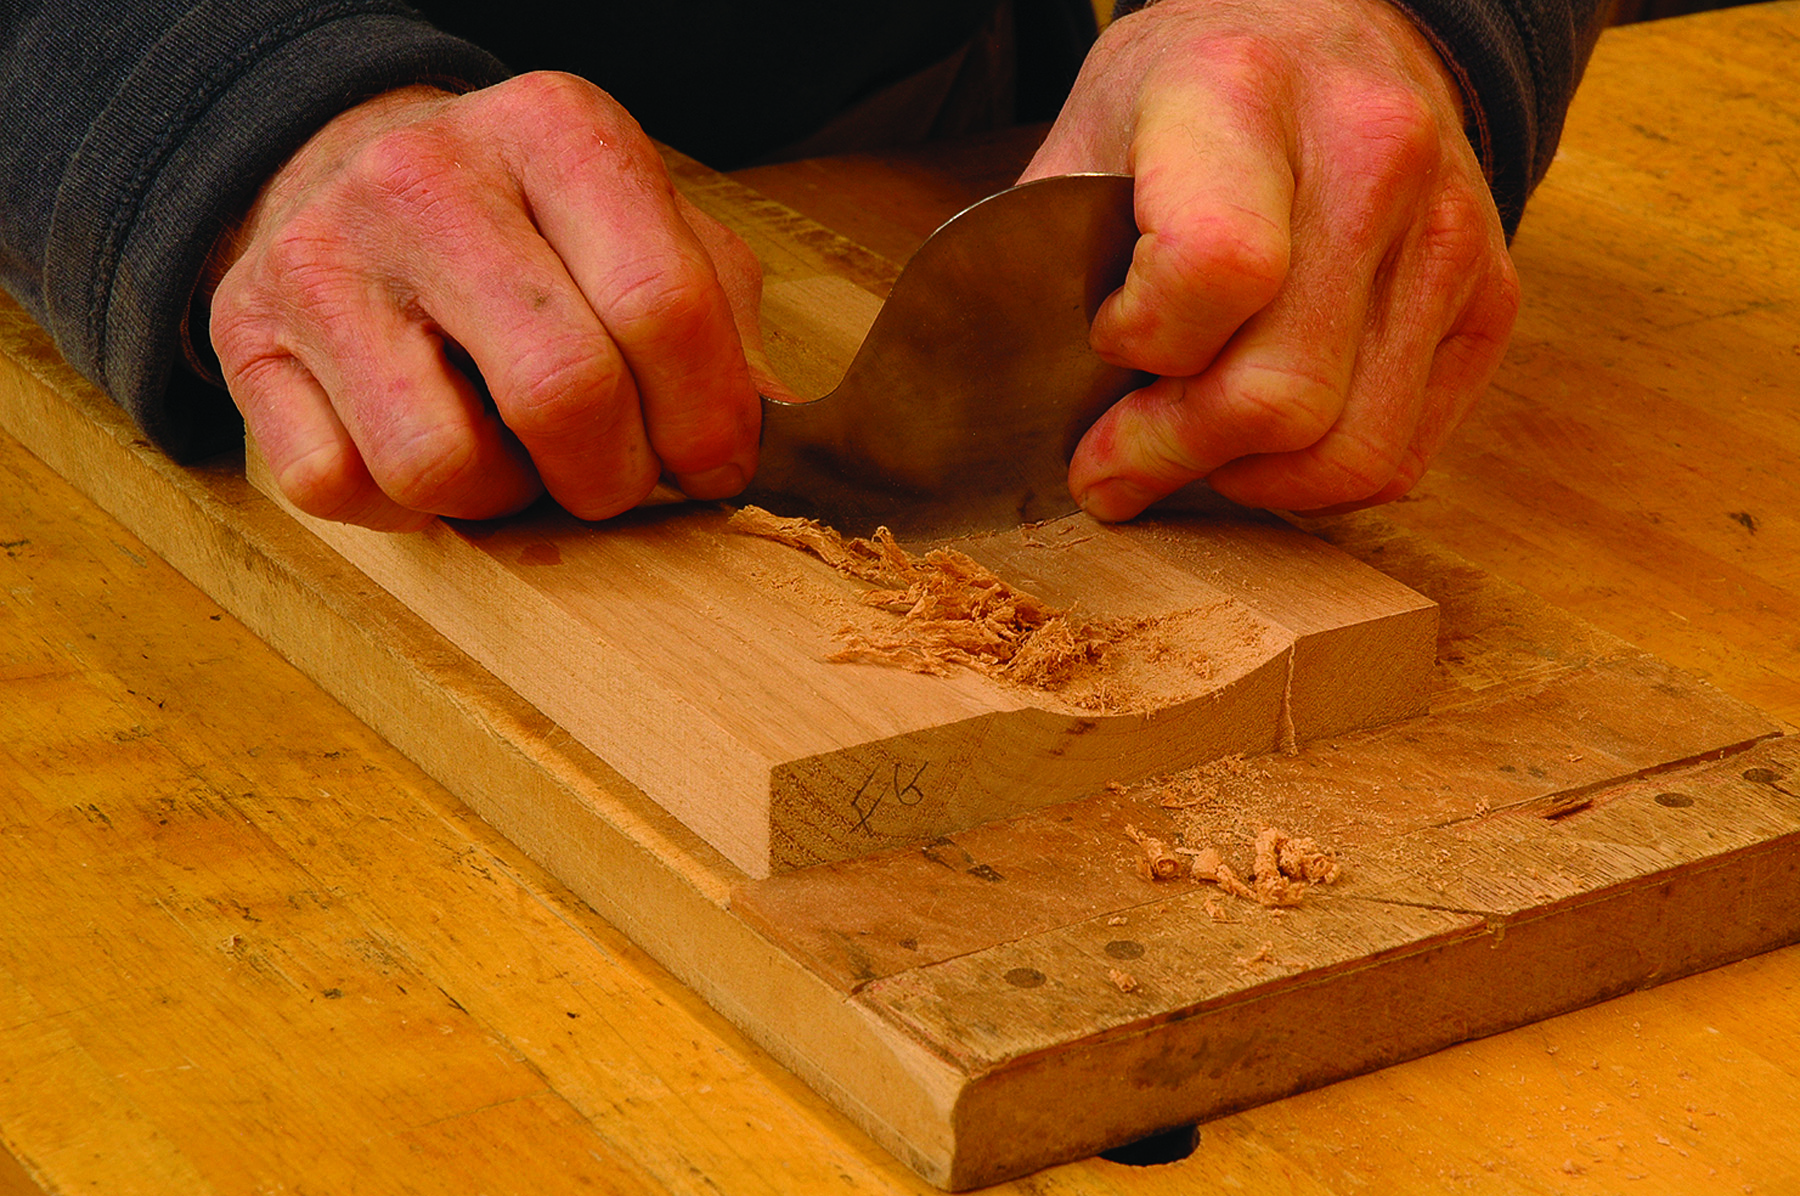
Good for the goose. A properly sharpened goose-neck scraper can effectively remove the many pesky saw marks left behind from the table saw blade. The shape of the scraper provides many curved shapes to fit the cove you’re cleaning up.
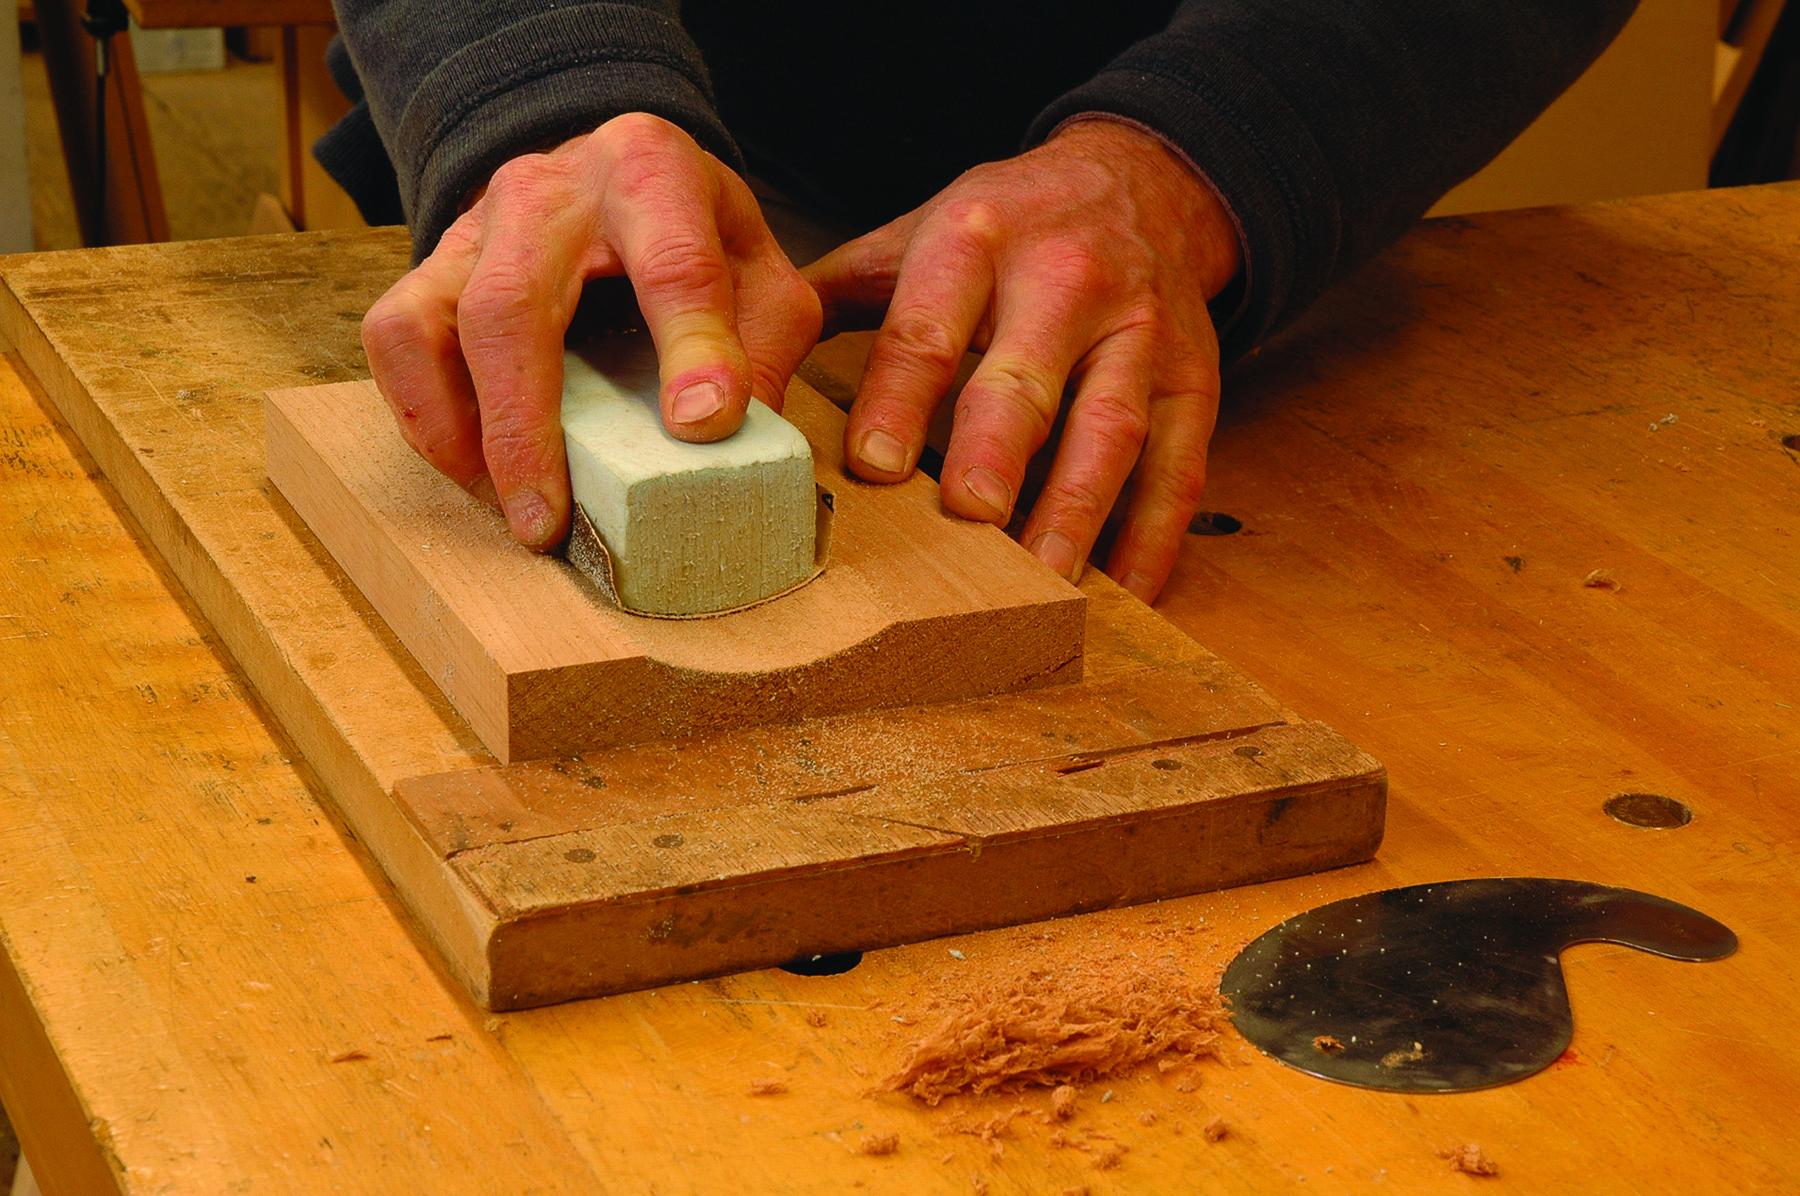
Sand if you must. You can easily make a custom sanding block from thick insulating foam. The shape is made by fitting coarse sandpaper face-up in your cove, then rubbing the foam over it until it conforms to the curve. Then use the foam as you would any sanding block.
Compound Cove Cuts

No matter what shape. Here are just a few examples of cove cuts made on the table saw. The two top left-most pieces were cut using an angled fence and the saw blade tilted off 90º.
We have just started to unlock the possibilities of the cove cut. Consider what happens when you change the blade angle from 0° and come at your workpiece from an angle of 5° to 10°. Then, you’ll no longer have cuts that are close to the arc of a circle. With changes in the blade angle, you’ll get cuts are more parabolic in shape and produce some surprising results.
The other interesting thing to consider is how the blade makes these cuts – two cuts are actually being made. First you cut the shape on the front of the blade, and as you move through the cut, the back of the blade makes a second cut. This technique produces a little ridge (that you’ll want to sand down) near the middle of the resulting cove.
A cove can be used on drawer fronts, cabinet panels or table parts. You can make drawer pulls with a cove shape in them or create a variety of interesting mouldings. It’s geometry and woodworking and it’s fascinating. Give it a try, and expand the usefulness of your table saw.
Here are some supplies and tools we find essential in our everyday work around the shop. We may receive a commission from sales referred by our links; however, we have carefully selected these products for their usefulness and quality.