


We may receive a commission when you use our affiliate links. However, this does not impact our recommendations.

Last month I posted an entry on a portable workbench top that had poked its head up in Australia and Europe. The version from Denmark inspired me to build it. But I haven’t gotten around to that project yet (thanks to a crop of Roorkhee chairs I’m finishing this week).
But reader Andrew Volk had the time, skills and inclination to build it based on the photos and measurements from the September blog entry. Here are the photos and details provided by Andrew. I hope to build mine before the end of the year and I hope Popular Woodworking Magazine will consider it for the magazine (fingers crossed).
— Christopher Schwarz
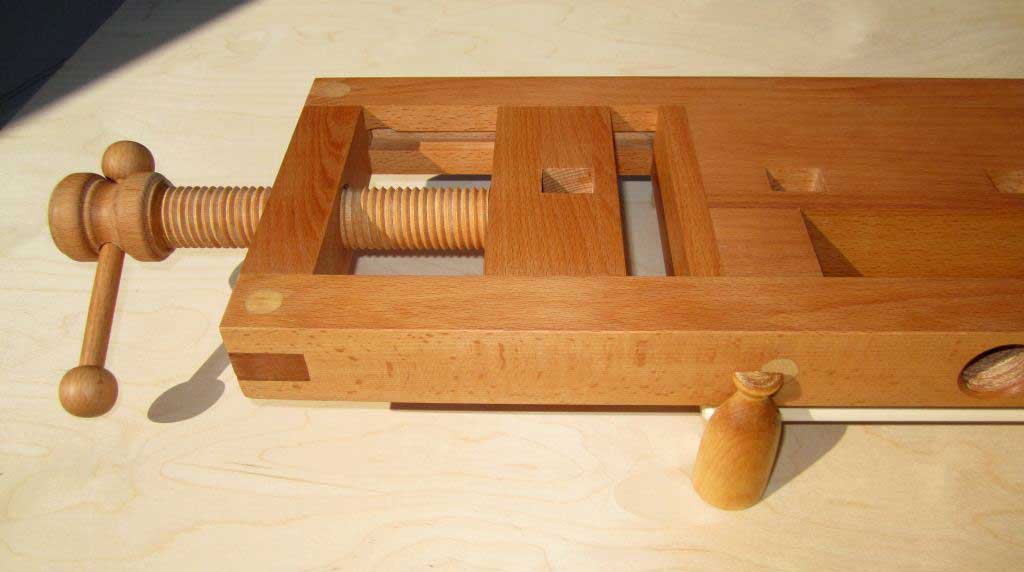
When I read your blog of Sept. 11 on the Milkman’s Workbench, I was inspired. Something about that little bench spoke to me, so I immediately copied out the dimensions and photos and got to work building my own version. The filled-in section above the wagon vise didn’t make sense to me, so I made the vise the width of the bench. This centered the screw on the wagon vise block and with the dog holes down the center of the width of the bench. This also makes the skirt around the bench symmetrical.
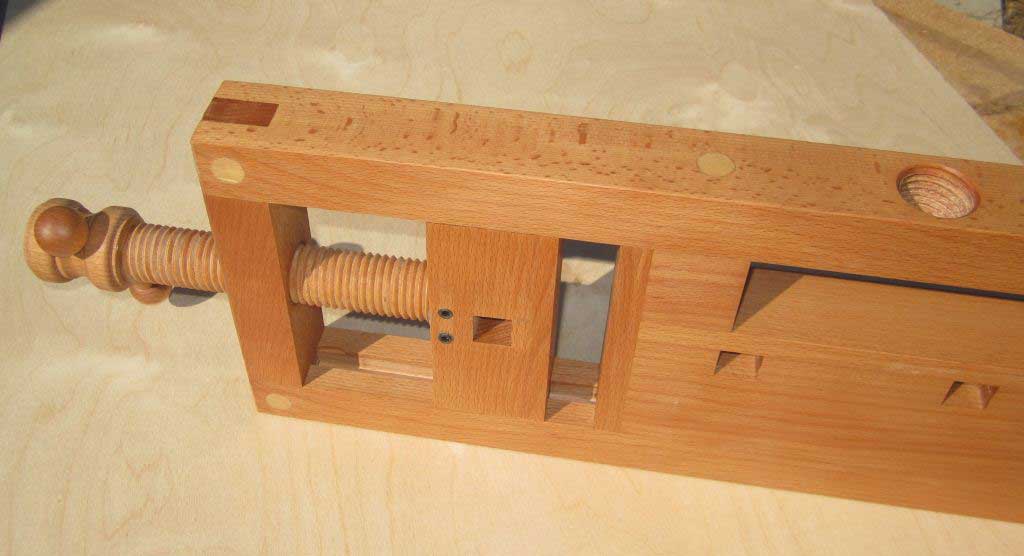
My bench body is entirely of beech. I found a great quartersawn 8/4 piece that was a bit less than 5” wide. I used about 6’ of it for the bench. The screws are maple, as are the pegs. The screw heads are beech, as are the handles. I turned the screw shaft, heads and handles. The threading was by a Beale tapping and threading set. The dogs are 3/4” square instead of 1/2”, and the holes on the wagon vise and bench are tipped by a few degrees toward each other for grip. The dog holes were cut using a router template on the edge of the bench and a capping strip was glued on afterward to close the hole. The hole on the wagon vise was cut on a table saw with a special setup that cut the slot with the tipped angle. The hole was closed by a piece cut off the wagon face to keep the grain matched across it.
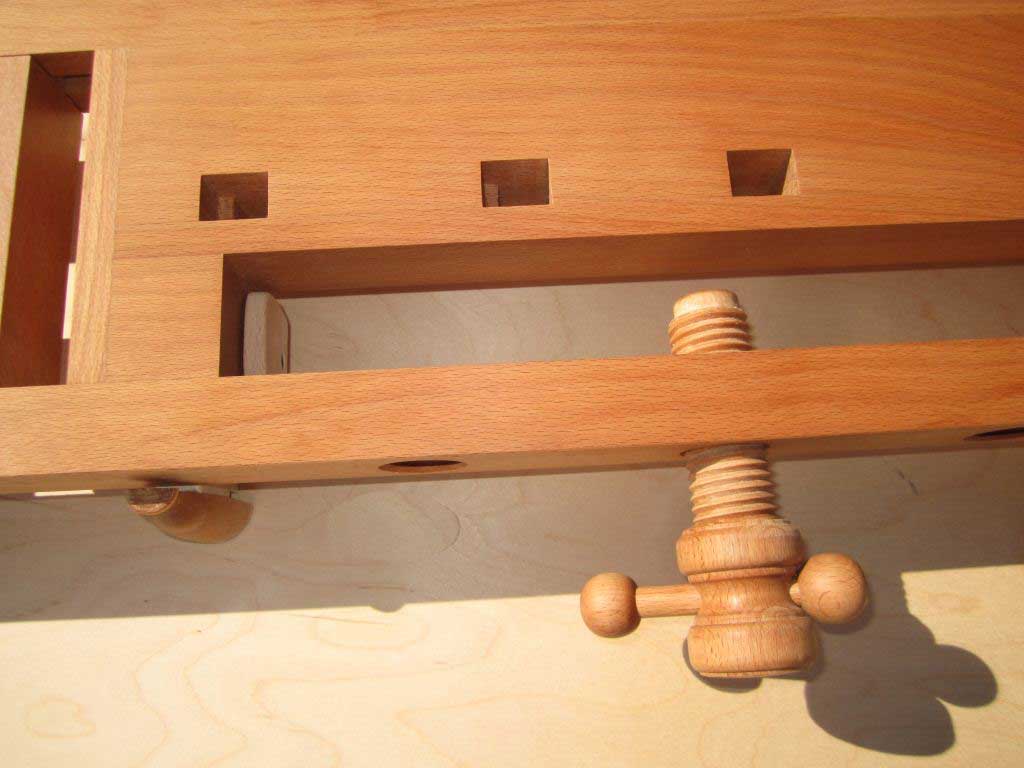
There was no detail on how the wagon vise was attached to its screw, so I cut a tenon on the end of the screw to give a shoulder for a steel washer as a bearing surface. I also cut a groove in the tenon. A hole slightly larger than the tenon diameter is drilled into the back face of the wagon block. Two 1/4” holes are drilled from the bottom of the wagon, intersecting the edges of the tenon hole. Two 1/4” steel rods are inserted after the screw is in place. (The rods are made loose enough to fall out on their own so they can be removed to release the wagon vise screw. I secured them in place with short setscrews tapped into the same hole.) I epoxied a brass ring (part of a plumbing fitting) on the end of the tenon for strength. The rods bear in the tenon groove as the screw is pulled back, pulling the wagon vise back. The shoulder of the tenon bears against the washer to push the wagon vise closed.
As there was no information on a stand for the bench, and as I really didn’t have a use for it in mind when I decided to build it, I decided to make a “milk bottle” stand on which to display it. (I enjoy a bit of whimsy now and again.) However, I do have a 3-year-old grandson. While he is a bit young now for the type of woodworking this would allow, I will keep it for him later.
— Andrew Volk


Speaking of Workbenches: We have a lot of books and DVDs on the topic in ShopWoodworking – including downloads of my first two books on the topic at a special price. Plus a DVD that follows me as a I build an 18th-century Roubo bench by hand.
Here are some supplies and tools we find essential in our everyday work around the shop. We may receive a commission from sales referred by our links; however, we have carefully selected these products for their usefulness and quality.


Hi folks,
How can I lubricate the wooden threads?
Any suggestion?
I appreciate it
Gus
I made my version of this a few years back to be used with my Workmate as a base.
http://tinyurl.com/9fb6oc8
click around for more pictures.
Very nice indeed.
I am sorry that I forgot to write how the end screw was attached to the wagon vise. It is originally mounted with a small U shaped piece that is inserted in the bottom of the moving part of vise. And then locking a small turned down section of the screw. (I am sorry for the lack of technical terms, but I don’t know the names in English).
Beautiful job. My compliments on your photography, as well. So many folks make gorgeous projects, but just don’t have the knowledge of how to take a good shot with good lighting and sharp focus. You’ve got talent for both!
Beautiful job. I’d like to here comments on how practical this little bench actually is to use.
Sweet. I like the stubby little tommy bars on the vise screws.