


We may receive a commission when you use our affiliate links. However, this does not impact our recommendations.
There comes a time in every project with doors and drawers called “pull-gatory,” when the struggle of sticking something onto the front of the beautiful piece you’ve just made grinds progress to a halt. I’ve been there a few times, and I’m there now with a little wall cabinet that I’m in the process of finishing. Time to think about drawer pulls.
When I get to this point, I try any number of things (brass, square pegs, finger holes), but most often, I go back to the books. Having gone to The Krenov School (formerly College of the Redwoods), the books I most often turn to are those by the old man, James Krenov. Krenov made a lifetime of building cabinets, with all manner of doors and drawers; those books are a good source for pull perusing.
So today, I went through the paces of carving a new pair of pulls from some beautiful lilac wood (Syringa vulgaris) that I picked up from an arborist back in Maine. I hold onto small scraps of beautiful wood for exactly this purpose – I have a little box labeled “pull wood.” And while I went through the motions, I figured I’d share a little step-by-step of this process – carving a drawer pull by hand, Krenov style.

First, pick out your little piece of wood, and sketch a basic profile view on a flat face. This sketch should be rough, but needs to incorporate two things – a basic overall size for the pull itself, and the small round tenon that will mount it in the drawer front. Here, I drew a pull roughly 3/4″ x 3/4″, with a 1/4″-diameter round tenon that will be about 3/8″ long.
For knife carving, it’s nice to use very straight-grained wood – it will make the knife work easier if the fibers are oriented predictably. Even better would be a bit of dense green wood – this lilac carves even sweeter when freshly cut. Stray away from ring-porous or lightweight woods here – with such a small object, a dense wood that doesn’t split easily will make your life a lot easier. Rosewoods, boxwood, maple, cherry, apple or other fine-grained hardwoods will work beautifully.
 Next, cut out the outline. I did so at a bandsaw, but this could just as easily be done by hand with a bow saw (or really any saw – none of these faces are staying flat for long, so the roughness of the cut at this point is unimportant).
You can see why I love this lilac wood – it has a beautiful creamy sapwood and dramatically striped heartwood. A piece like this isn’t all that common, though – the lilac bush rarely gets all that big, and needs to have a largeish diameter before this inner coloration comes through. That said, the bush is so common that if you know an arborist or gardener, you’ll likely know a good place to get some. Always be on the lookout for small interesting bits of wood – making pulls is a great excuse for holding onto small scraps.

Now, it’s time to start getting rid of some of that wood. As you can see in my first photo, I prefer a curved taper in the thickness, which comes naturally with the knife work (and mirrors the shape of the finger nicely). Large amounts of material can be hogged out with a bench chisel, and then the curves are carved with a small knife.
The tool kit for this kind of work can be really minimal – in fact, the only tool you really need for this work is a knife. I use a small detail knife that I copied from an example of one of Krenov’s, but there are plenty of great knives out there – Ron Hock makes beautiful knives that are similar to those Krenov used, and the variety of slöjd knives that spoon carvers use are also great here.


Before you get too far into shaping, you’ll want to mark out the round tenon that you’re going to leave at the back of the tenon. This doesn’t have to be too accurate, yet – we’re going to leave extra width all around for now, and I’ll show you a nice trick to getting a perfectly round tenon.
So for now, just pencil out the dimension roughly square on the tenon end. I drilled a hole in some dense hard maple to use as a tester. It’ll come in handy later, too, so find some scrap maple (or something else relatively dense) and use that as a gauge.

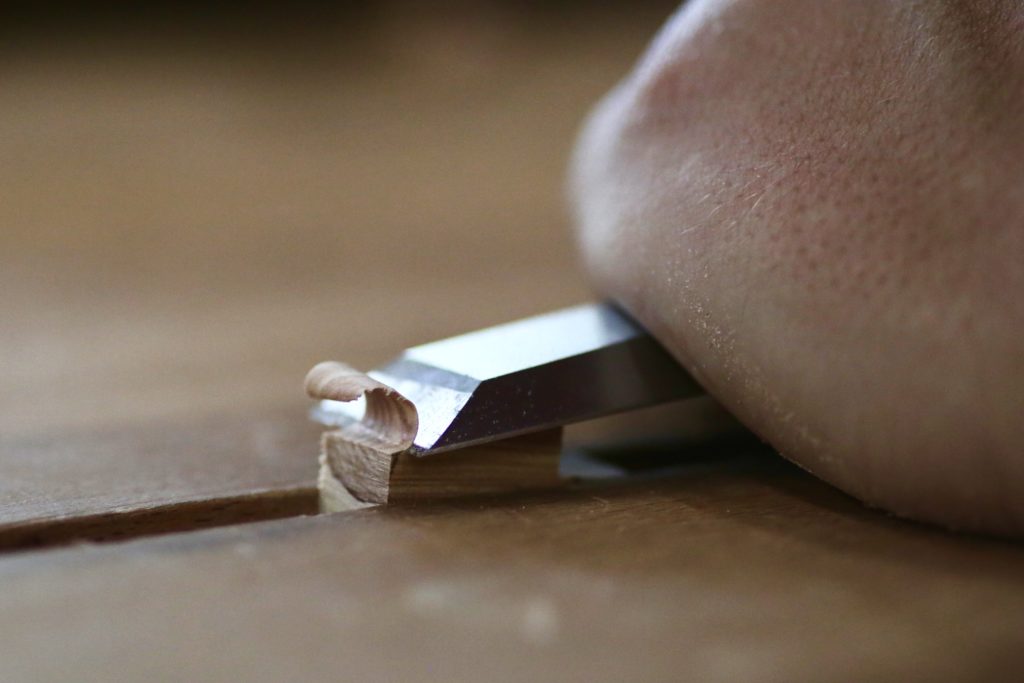
Now, start carving the tenon down, first into a square, and then an octagon, and so on, until you’ve got an oversized, round-ish tenon on the back. When making these cuts, first use the knife to score across the grain at the pull-side of the tenon, and then carve towards that. If you don’t score the wood with the first few cuts on the top and bottom of the pull, you risk paring away at your pull.

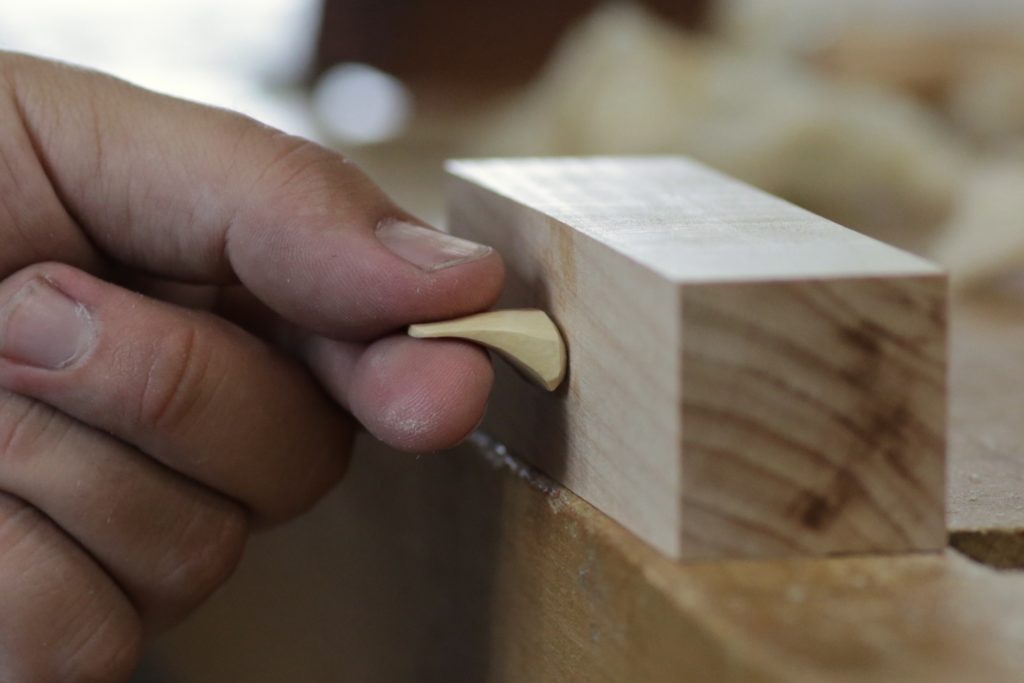
Now, that test hole in a dense wood comes into play. bevel the end of the round tenon you’ve roughed out, and start working it into the test hole, turning and pushing with some considerate force. If it doesn’t go at all, take a little (just a hair) off all around, and try again. Make sure these cuts are along the length of the tenon, and that the tenon’s sides are staying parallel – if anything, err towards the side of making it thicker towards the pull.
Once the tenon starts going, you can use the burnished surface to let you know where to remove wood. Taking very light cuts, pare down towards the pull, removing the wood in front of the now round and burnished tenon. Slowly, the pull will keep going deeper into the gauge, and rounding the tenon as it goes. With some care, you’ll end up with a perfect friction fit that hardly needs glue. If it is especially tight, a very light sanding should loosen it up.

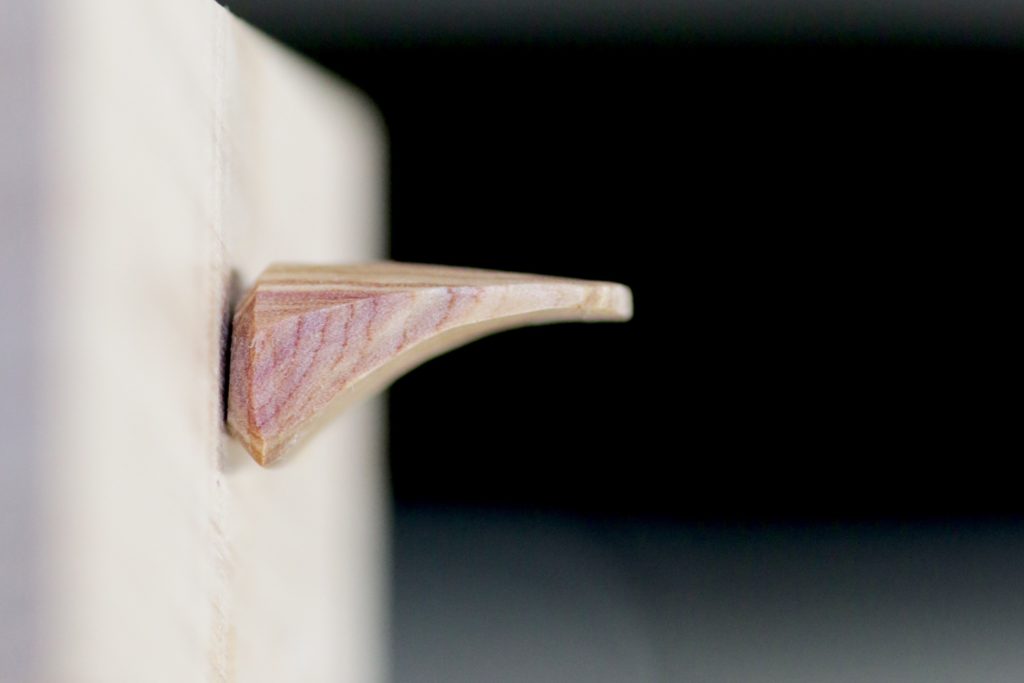
Once the tenon is going all the way home, check and see that the back of the pull is sitting flush on the surface of the gauge. I use a sharp chisel to pare away the end grain where it’s high, and to get a nice flat surface. You can see in the photos that I bevel the back of the pull, before the flat – this has the effect of raising the pull off of the surface of the drawer or door font, which makes it a bit easier to grab hold of.
It’s also time to do the final carving on the pull surfaces. I wait until after the tenon is done because that process usually involves a lot of handling, and the wood gets a little dingy (I should probably start wearing white gloves when doing this kind of work because my hands always seem to be pretty dirty when I’m in the shop). I finished my surfaces with the knife, but fine files, rasps, a scraper or sandpaper can all help you get there. What’s important (at least to me and the old man) is the feel of the pull – it should sit nicely between the forefinger and thumb, and I think the knife facets add a tactile feel that’s inviting.

Last, but not least, is applying a bit of finish to the pull. The block of maple can also help with this task – I put the pull about halfway into the hole, and finish the pull like that. This gives you full access to the surfaces of the pull without needing to touch any of the surfaces – little things like this can be hard to get finish on without touching the wet surfaces.
I used a light cut of shellac, again in keeping with Krenov’s style, but matching the finish of your project is a good idea. Treat the pull like any other object – apply light coats, and sand or burnish any raised grain before the next coat. I like using a light cut of shellac here because it barely builds a film – in the end, it feels like a piece of wood. Just right.

And we’re done! Now, all I have to do to install these pulls is drill a shallow 1/4″-deep hole in the drawer front. There are also things that can be done to the drawer front to accommodate this style of pull – a shallow dishing or recess looks good. Either way, this should get you out of “Pull-gatory,” at least for now.
Now, should I center the hole, or offset it…. There’s always something else to stall on.
For more on Krenov’s style and his work, his books are a must read. I’d start with “A Cabinetmaker’s Notebook” and then move on from there – these are essential reads, in my book, for any furnituremaker.
For some knife work and technique, there are two great items in our store – the “Whittling Handbook” is a good place for some whimsical hand work and technique, and “The Art of Spoon Carving” is a great, in-depth video, presented by Jarrod Stone-Dahl, a master of the craft.


