


We may receive a commission when you use our affiliate links. However, this does not impact our recommendations.

If you design furniture or work a lot with curved parts, it’s difficult to function without a “drawing bow.” This simple jig – a stick and a string – allows you to lay out precise and large curves with only two hands.
Before I could afford a commercial one (Lee Valley Tools makes an excellent one that I recommended in my 2017 Anarchist’s Gift Guide), I made my own. While I love my commercial drawing bow because it is indestructible, I also like my homemade version because it can be adjusted with one hand.
Here’s how to make one in about 15 minutes.
A Quick Project
Find a scrap of oak or ash that has dead-straight grain through its thickness and width. For past drawing bows, I’d started with rived stock. But sawn stock is fine if the grain is arrow-straight (the grain in this one is a tad wonky). If the grain isn’t straight, you’ll get lumpy curves or the bow will break. Saw out a piece that is 1/8” x 3/4” x 48” – this size will accommodate most furniture work.
Then get a string – almost any string will do. In this case I used a string pulled out of an old hooded sweatshirt. Drill a hole in one end of the drawing bow that is the same diameter as the string – in my case, .020”. Thread the string through the hole and tie a knot in the string to secure it.

At the other end of the bow, make a keyhole-like notch to grasp and hold the string. First drill the same-diameter hole as earlier. Then saw a slot about 3/4” long that extends down the length of the bow. I used a coping saw. Then open the slot with a piece of coarse sandpaper until the slot looks like a “V.”
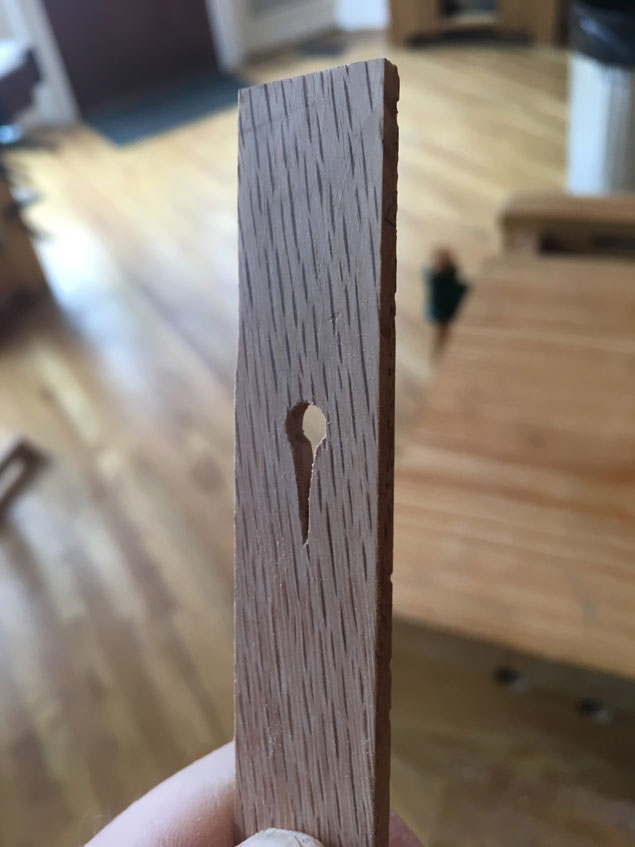
Thread the other end of the string through the hole and knot its end to keep it secured to the bow.
To use the bow, bend the stick to the curvature you want, then pull the string down into the “V”-notch to pinch the string and hold the shape. Pull the string out of the “V” to release the bow.
— Christopher Schwarz
Here are some supplies and tools we find essential in our everyday work around the shop. We may receive a commission from sales referred by our links; however, we have carefully selected these products for their usefulness and quality.


It was gonna be nice if it was a video. I still get it wrong somewhere.
Sure beats my awkward trying to slightly bend a long metal ruler and pray that I’ll grow a 3rd hand to trace the line.
Tough crowd.
I hate these kind of bows. I’ve never used one that would give a fair curve, they’ve always given me curves like the one in your picture, flat on the ends and exaggerated in the middle. Or vise versa.
I’ve gone to drawing a curve that I like on the computer and printing it on several pages of paper and taping them together. I use the program BigPrint which lets me scale the drawing to my dimension.
Seth Rolland taught me a great variation on this: if you want a varying-radius curve, taper the stick so it’s thinner at the knot end.
For REALLY LONG curves, pex plumbing pipe is brilliant. The stuff does not like to kink.
Everytime (3 ) I have tried to make a drawing bow like you describe I find that the wood will twist as I put it under tension. Is this due to the grain?
I’m sure this is heresy but could I suggest plastic instead if wood? Sorry.
Unless you’ve got very straight grain, even timber you can sometimes get a hard spot which districts the curve. With something like lexan you tend to get an even bend. This might not matter in short bows for furniture. It becomes more of an issue in long battens for lofting boats.