


We may receive a commission when you use our affiliate links. However, this does not impact our recommendations.
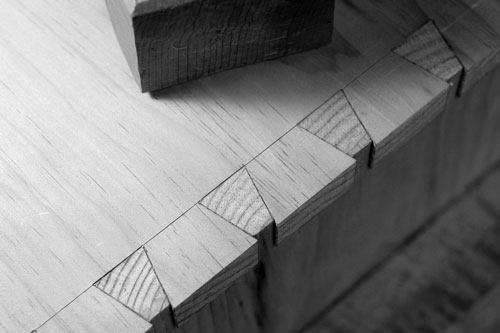
Last weekend I built a dovetailed campaign-style officer’s trunk for the San Diego Fine Woodworkers Association and several of the members were shocked when I drove the carcase dovetails together.
What was shocking to them was how tight my fit was between the tails and pins; it required a few hard whacks with a dead-blow mallet to seat the tails into the pins.
The members asked me a lot of good questions about why I do things this way, and here is my rationale.
I consider the dovetail a self-clamping joint. When well-made, a good joint won’t require clamping in most cases. (When you are learning to cut the joint, clamps are a good thing.) Years ago, I decided to make my dovetails a little on the tight side after reading a lot about early workshop practice.
For starters, iron clamps were expensive (still are), and when you read inventories of shops, you don’t encounter racks of clamps on the lists. Joseph Moxon’s “The Art of Joinery” (1768) makes no mention of clamps in his book on the craft. The English word for clamps, “cramps,” was in use in the 17th century, but it usually was a piece of iron that would be applied to a structure to keep it together.
That’s not evidence enough, but it is an important point to consider when thinking about the traditional shop – woodworkers didn’t have as many clamps as we did.
In looking at early accounts of dovetailing, clamping is not mentioned as part of assembling dovetailed carcases. In “The Joiner and Cabinet Maker” (circa 1830), the work is driven together with a mallet – plus a piece of scrap to protect the joint. No clamps are mentioned in the process, though clamps appear in other parts of the book and are used to pull up mortised-and-tenoned frames.
Charles H. Hayward also makes no mention of clamps in his landmark “Woodwork Joints” (1950). He says assembly is done with “light taps” of a hammer and a scrap of wood that protects the joint from the hammer blows.
Ian Kirby in “The Complete Dovetail” (1999), mentions using clamps, though he uses them to pull the joint tight only and then releases them.
So I set out to tune my sawing so that I wouldn’t need clamps to hold my carcases together. I did this by leaving an extra thou or two of waste wood when I cut the second half of the joint. This little extra wood provides the compression that relieves me of using clamps in most cases.
Of course, if the wood splits, the joint is too tight.
This technique is one of the many little tricks (such as rub joints and drawboring) that I’ve employed in my shop to reduce the need to buy acres of clamps. I’m not suggesting that you throw away your clamps or stop clamping your dovetails – that’s your call.
But if you are short on clamps, this is a good technique to learn.
— Christopher Schwarz
P.S. One last note: This technique works best with hide glue. Hide glue (liquid or hot) acts as a lubricant. Yellow or white glue (which is mostly water) swells your components and makes a tight fit even tighter. So beware.
Here are some supplies and tools we find essential in our everyday work around the shop. We may receive a commission from sales referred by our links; however, we have carefully selected these products for their usefulness and quality.


Clamps also were as likely to be a board-and-wedge apparatus (as illustrated by Aldren Watson) as anything — barely worth mentioning but highly effective as clamps especially over relatively long distances as in carcase work.
So, dovetails for-clamps-needed carcass work, draw boring for no-clamps-needed mortise & tenons, how about no-clamps-needed panel glue-ups? Any ideas?
Without knowing the forces involved, this is all very theoretical. But something every good dovetailer knows intuitively.
Someday I’ll make a set of dovetails like that. I’m new to woodworking and decided to start practicing these joints by cutting one everyday. I’ve got a lot of scrap lying around, so there’s plenty of material to practice on. The first one turned out about the way I expected. Gappy and rough, but it went together pretty well.
My family’s Hungarian, so I figured I’d try the Frank Klausz method today and do pins first. Yeaahh….didn’t work out so well. But I’ve got the “casualties” above my workbench, at eye level, to remind me to pay attention to what I’m doing 😀
Great article Chris. When I see clamps galore I think that someone does a heck of a lot of work or needs a lot of joint adjusting. Mentioned by others, knowledge of the species allows finesse for a perfect fit. Patience and time make for a joint that’s fine.
My question is…..
If the joint is this tight, how does one take it apart after dry fitting it in order to glue the joint and pound it home again?
I want thank Chris for the terrific seminar he put on this past weekend for the San Diego Fine Woodworkers Association. I think our seminars get better every year but this year Chris really raised the bar. Terrific job Chris and once again our heartfelt thanks.
As a side note about the SDFWA seminar, we typically auction off the project our speaker builds during the weekend with the proceeds going to the Wounded Warrior program. The caveat being the winner must finish the work and bring it to the next meeting. This year the chest Chris built was won by a teenager who travelled from LA (about 110 miles) with his father (not a woodworker) to attend the seminar. Chris spent quality one on one time with the young man instructing him on installing the brass hardware and finishing the chest. Just to be sure that he would be able to do the work properly, Chris gave him his router plane.
In my great uncle’s shop, where I learned the trade, we pounded them together with the side of our clenched fists. Some said you ought to have to drive them together with your hat. gluing was never a problem because we used hot hide glue, and you only had to hold the joint together for a minute and it was set. And carcase joinery was apprentices’ work.
Great discussion, I was raised being told you can never have enough clamps, but I find the few I have to be sufficient (perhaps using dovetailed wedged or drawbored joinery is the reason.) In this instance (from a force vector perspective) clamps are only tightening an end grain joint and won’t be doing much whether the joint is tight or gappy, unless you use the clamp as a spreader to force the angled surfaces to contact (and will probably introduce some bad variation)
Thanks Rob, I saw Chris build the chest and felt certain body parts tighten as he banged them home. I tried that a few years ago with a white oak stool and heard the split in time to stop….repair the split and adjust the tail so it went together. But it left an impression on me. The project I’m building now is (very old) paduak that will be a toy chest much like the chest Chris built. I intend to try his method….but I’ll practice on smaller boxes until I get it down pat.
Chris, I (for one) very much appreciate your discussion of ‘why/how’ you arrived at most of your ideas and methods of craftsmanship.
Don
Chris,
Overall, I agree, but a few things I would add:
1. The fitting tolerances vary with the compressibility of the wood species, as well all know. Pine is different from cherry, which is different from oak. The practical tolerances must be learned from experience, usually including a bit of trial and error. I really adjust my mindset according to the wood at hand.
2. I also like to use a dead blow mallet for final assembly. However, in some cases the last tiny gap at the baseline won’t close without clamping. There seems to be a sort of rebound effect. A quick squish with clamps closes that down, nice and neat.
3. For a dovetailed carcase assembly, clamps also can play another role – to tweak the final precise squareness of the box. It’s not necessary in theory but it sure helps in practice.
4. I incorporate some variance in the tolerances across a wide row of dovetails. I make very sure the outer tails are not too tight so as to avoid splitting. While partial dry fitting, I check the outside edges of the board (the outermost pins) with a small straightedge to make sure they are not deviating. On the other hand, I know the inner tails can be a bit tighter and still avoid splitting, so I take advantage of that.
Rob