


We may receive a commission when you use our affiliate links. However, this does not impact our recommendations.
These appliances add accuracy and consistency to your handplane work
There was a time, before the introduction of power tools, when the handplane was the very icon of woodworking. Nowadays of course, woodworking is often represented by the table saw and the electric router (among many other power tools). But as more and more woodworkers rediscover the pleasure – not to mention the economies, increased possibilities and safety – of incorporating various hand tools and techniques into their woodworking practices, there is a renewed interest in traditional woodworking.
Today’s amateur woodworker is presented with a growing array of ever-better designed hand tools that often rival the products of such legendary firms as Norris, Preston and even early Stanley products. There is also an increasing amount of information about how to restore, fettle and sharpen these tools.
But whether you buy a brand-new handplane, an expensive model from the beginning of the 20th century, an antique wooden tool or even a lesser- quality modern item, learning how to condition and prepare the tool itself is only half the equation. The other half is the technique of using the tool. The best-conditioned and most expensive plane in the world may well produce nothing but frustration if you remain ignorant of how best to use it.
Additional Reading: What’s A Shooting Board, and Why Do You Need One?
Check out more articles like this: Hand Tools
E-learning: Mastering Hand Tools with Christopher Schwarz
The Missing Half
It used to be commonly understood that the term “hand-tool use” is rarely synonymous with the term “freehand use.” Except perhaps for carvers, most traditional woodworkers would no more consider using a handplane freehand than would today’s woodworkers consider using a table saw or other power tool without some form of fence or guide. Indeed, these things are invariably built into the power tool itself.
But the vast majority of handplanes – and there is an enormous range of handplanes – need some external form of guidance if consistency and accuracy are to be achieved.
While some planes, including fillisters and moulding planes, are equipped with a fence and even a depth stop, there is seldom little else that is built in to guarantee accuracy.
This is especially the case with the most common tools: the so-called bench planes. These are the planes used for dimensioning, flattening, squaring and even final finishing of the workpiece. They include jack planes, fore planes and jointer planes, in all their varieties.
Accurate Edges
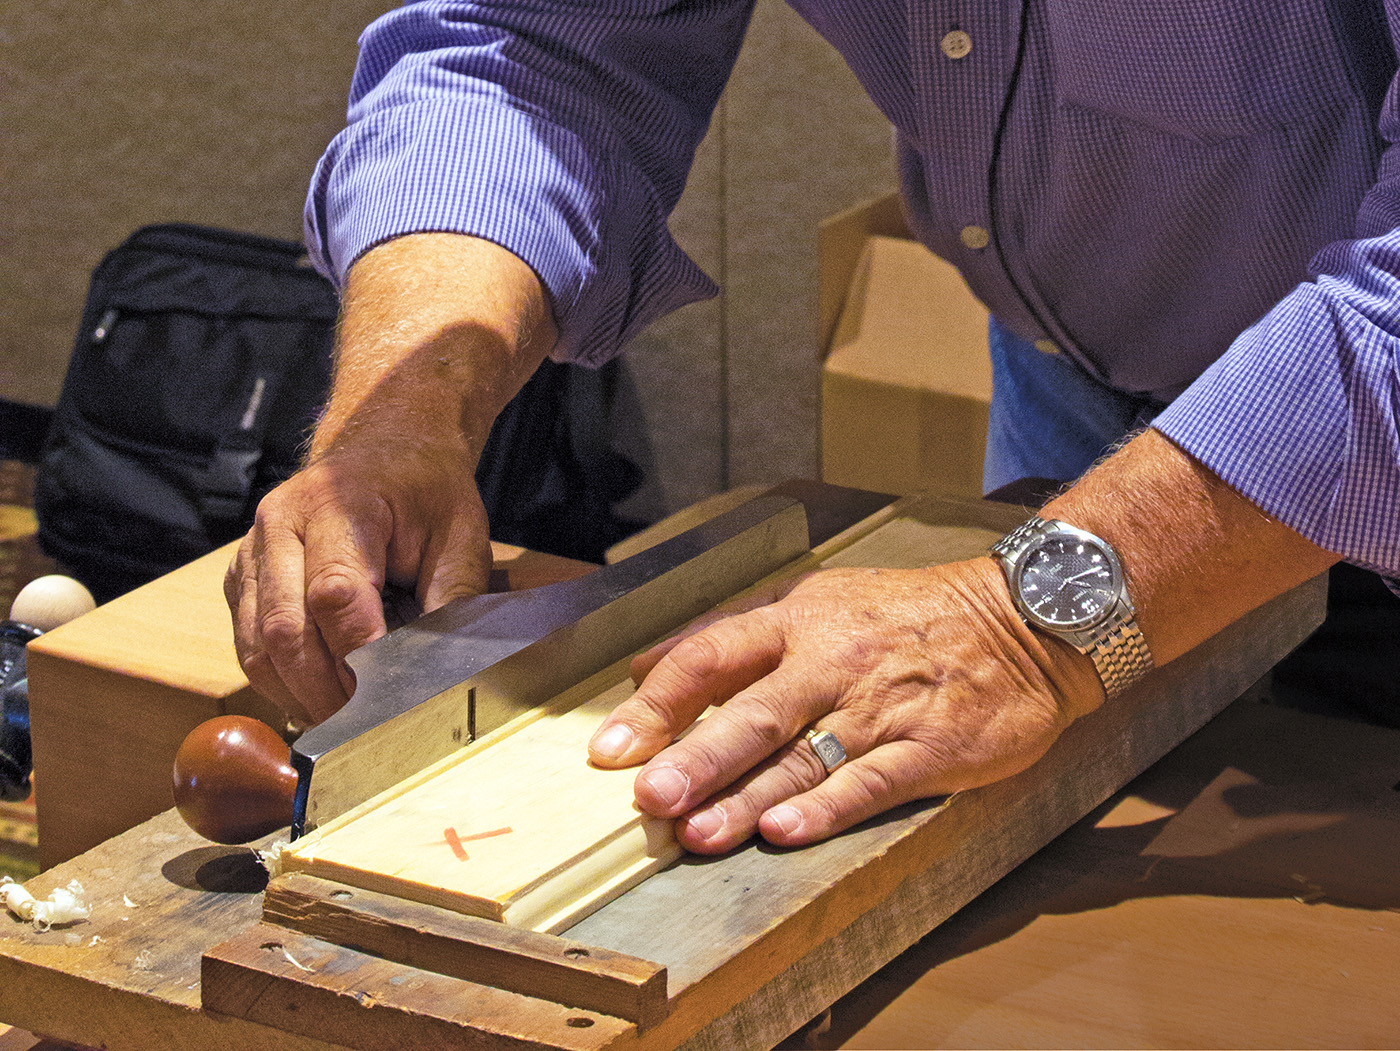
When it comes to preparing edges, the essential adjunct to all these planes is some form of shooting board. That this device is often unfamiliar to many woodworkers is because, apart from a few relatively rare (and now very expensive collector’s items such as the Stanley Chute Board), these items were invariably user-made rather than manufactured and store-bought.
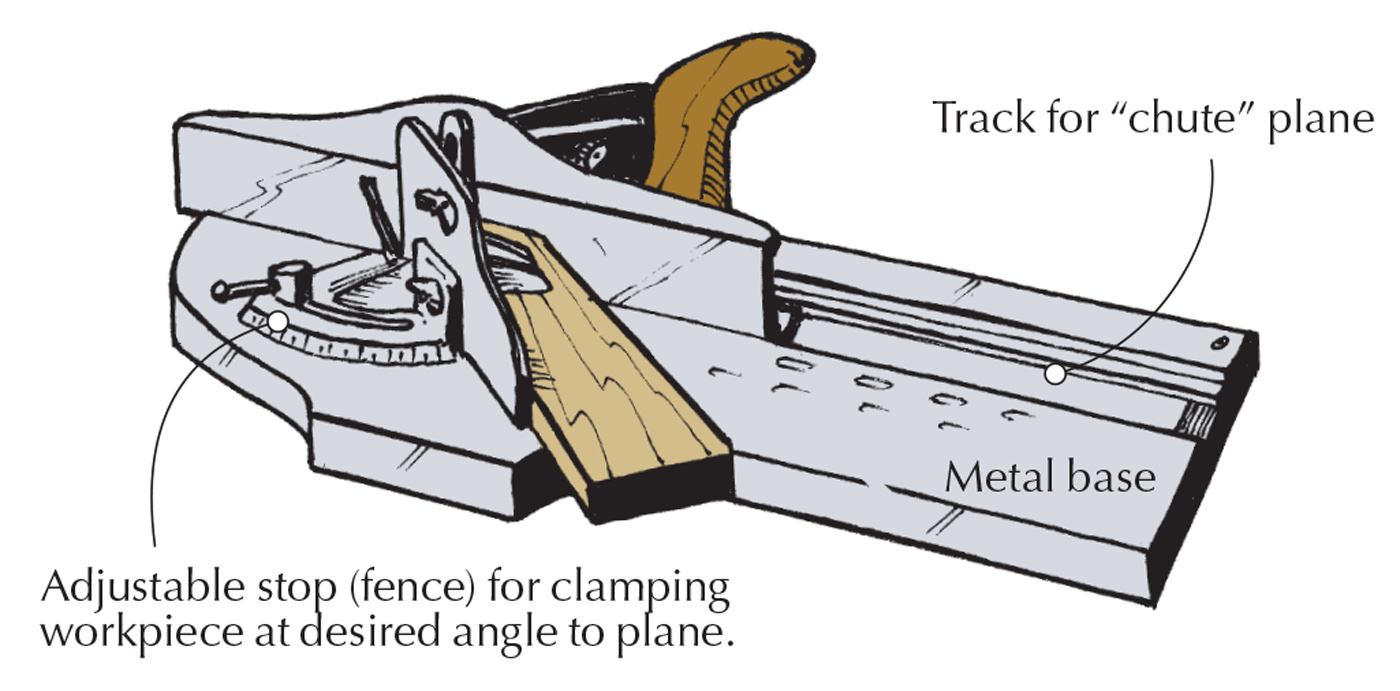
Stanley shooting board. The No. 52 (which included the plane and cast iron shooting board) was offered from 1909-1943. If you can find a set today in good shape, it is likely to cost upward of $1,000. However, the setup does an excellent job of squaring edges.
The good news is that making your own shooting board and learning how to use it is far from difficult.
If you secure a workpiece in the vise with the edge to be planed uppermost, you can easily run a plane along this edge. But, depending on the thickness of the edge, you may find it difficult to maintain the plane at a perfect 90° angle to the face of the board. On the other hand, if you place the board flat on its face and use the plane on its side – assuming the side of the plane is perfectly square to its sole and the surface of the bench is perfectly flat – the edge can theoretically be planed perfectly square to the face of the board.
There are, however, two problems with the latter method. First, the board needs to be secured by stops or clamps; and second, most bench planes have irons that do not extend to the outside corners of the sole. Using the plane on its side directly against the edge to be planed means that it is impossible to plane the entire width of the edge.
The shooting board solves both these problems, for it is really nothing more than a jig for holding any given workpiece both securely enough and high enough so that the tool can be used on its side to plane the edge at a consistently accurate angle.
Basic Shooting Board
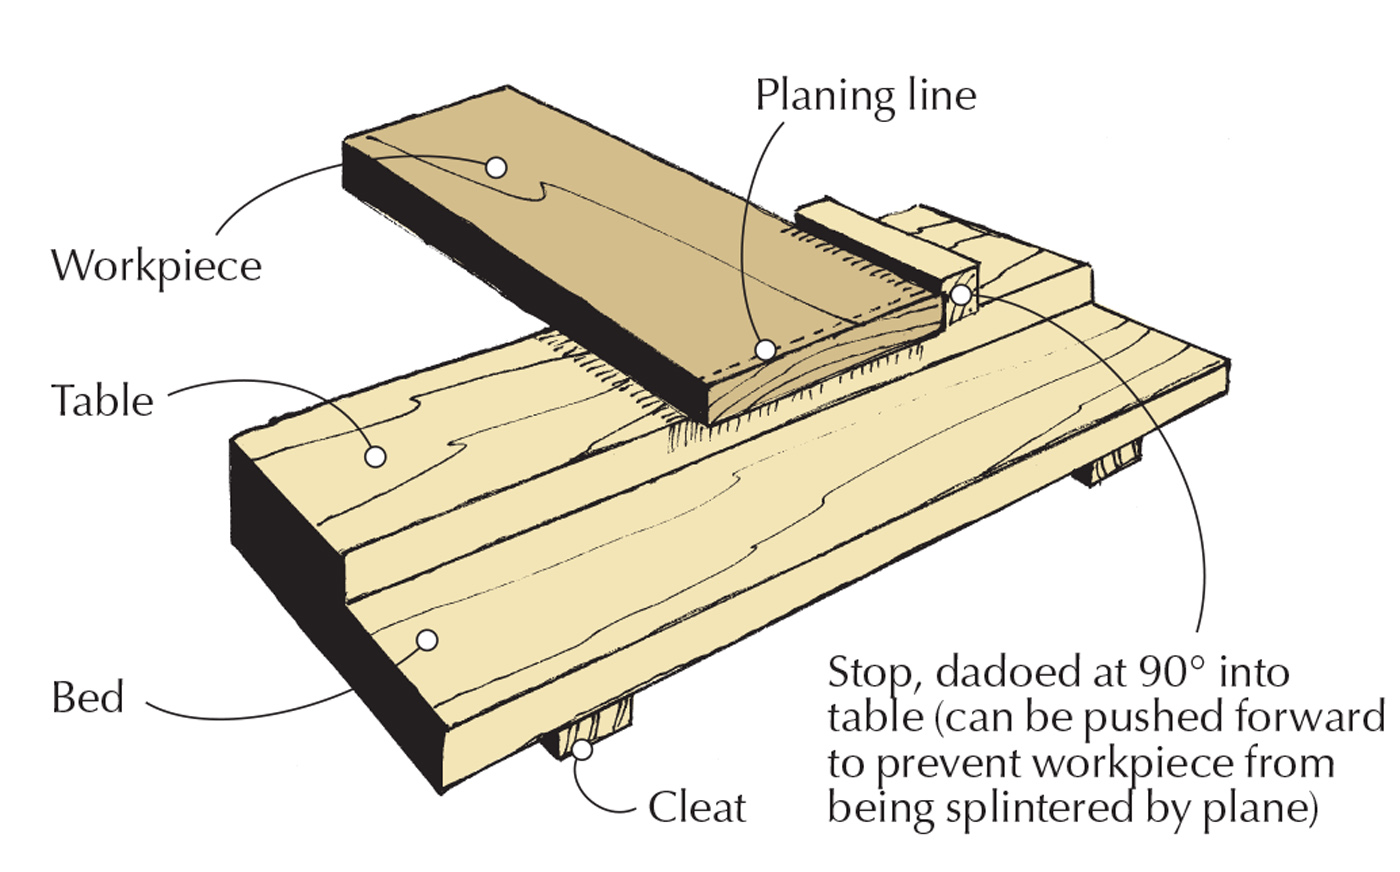
The simplest form of shooting board consists of three pieces: a base on which the plane runs on its side; a table where the workpiece rests to raise it so the plane’s iron engages the workpiece’s entire edge; and a stop fixed to the table against which the workpiece is held.

Basic shooting board. This simplest of appliances allows you to plane perfect 90° edges every time.
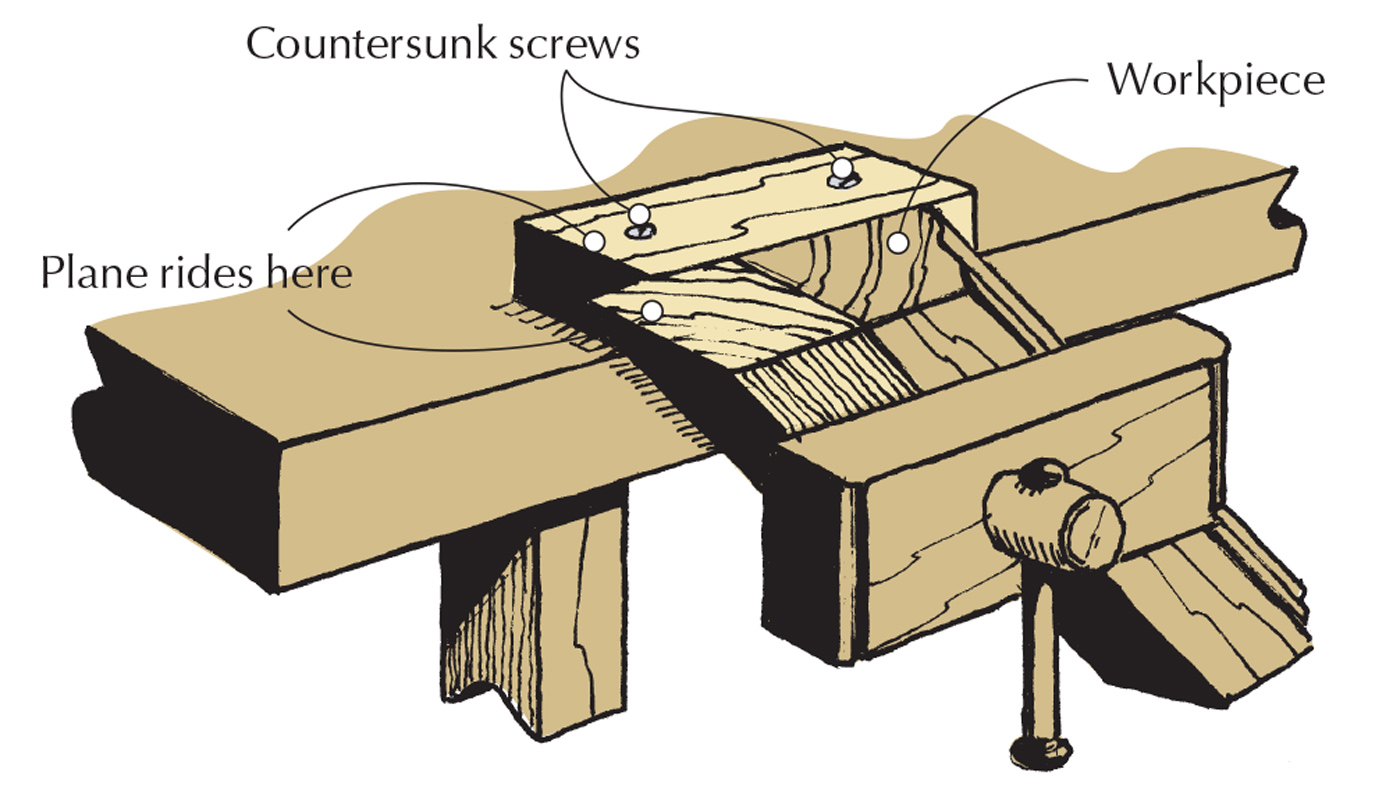
Unless the shooting board is made from some form of stable plywood or particleboard, it is usual to fix transverse cleats to the bottom of the base to keep it perfectly flat.
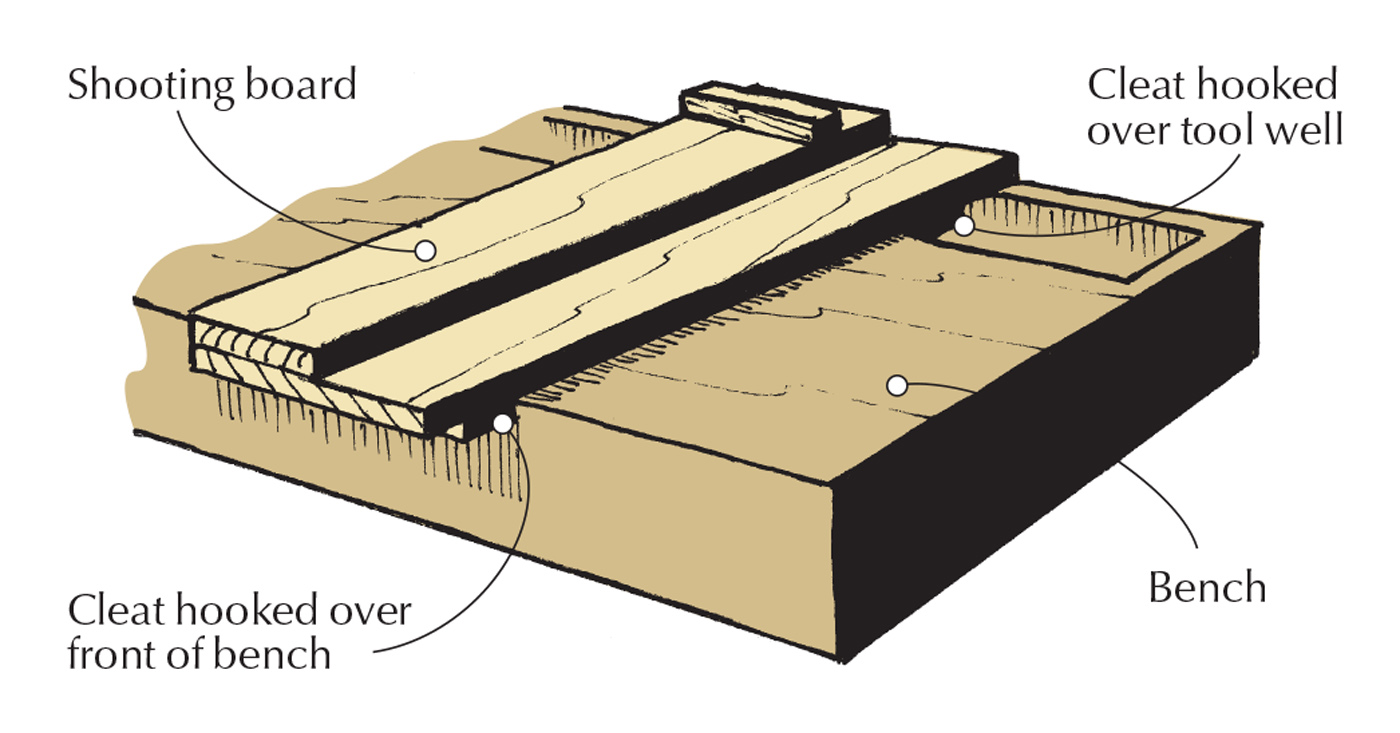
Cleats. A cleat at the near end acts as a bench hook; a second cleat, at the far end, drops into the tool well. (You could skip the far cleat if you build the shooting board from a stable materials, such as plywood.)
These cleats, if carefully positioned, can also be used to secure the board on the bench, either by being hooked over the front of the bench (and possibly also over the edge of a tool well), or by being held between bench dogs.
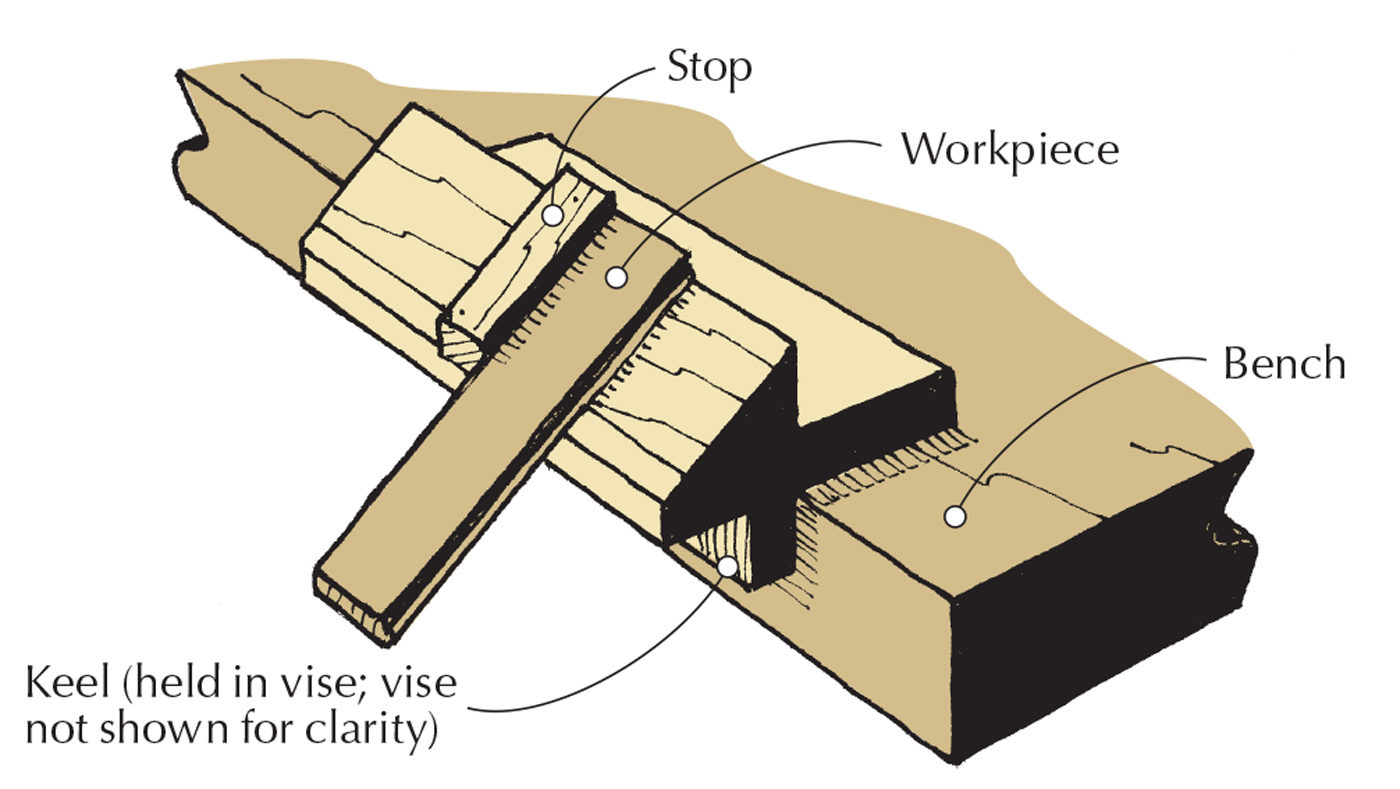
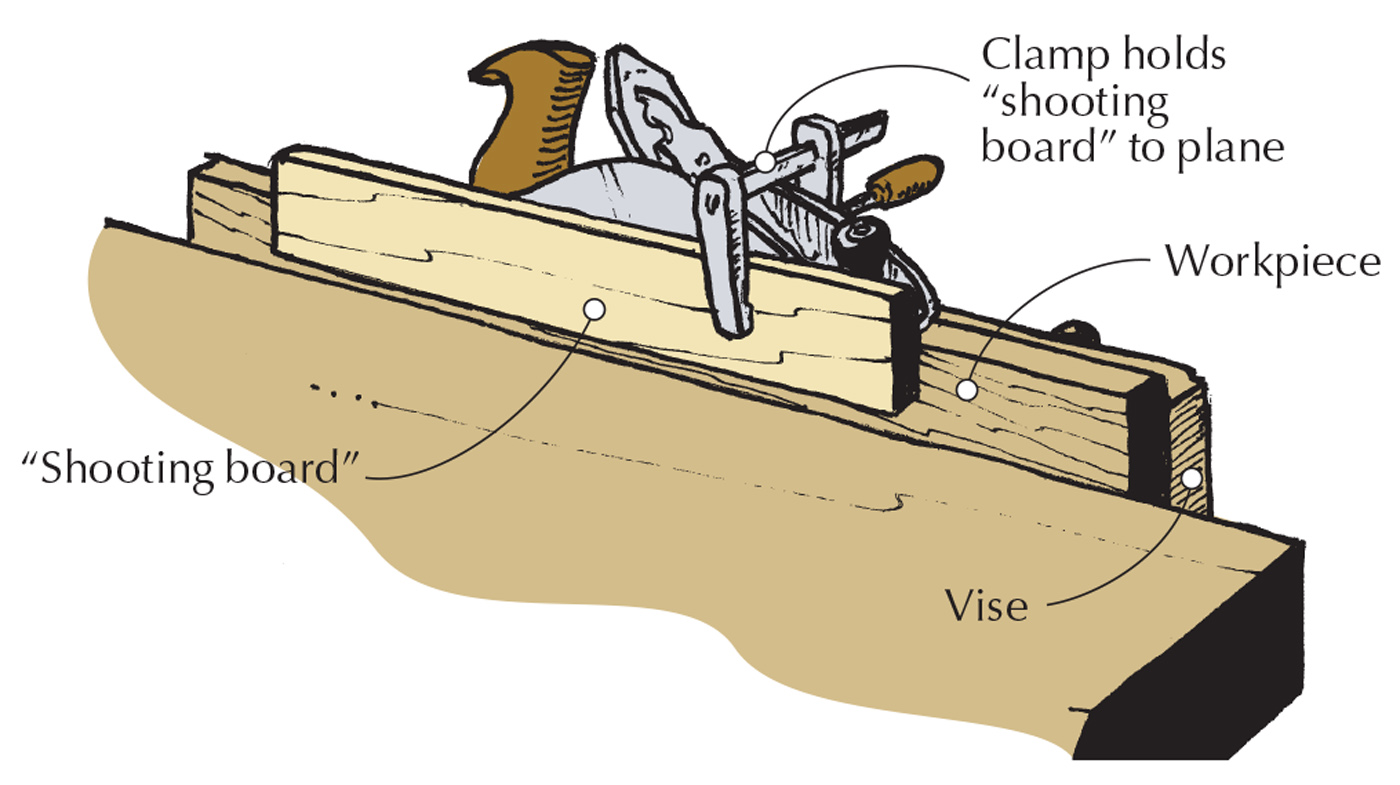
An alternative method is to add to the underside of the base a longitudinal keel that can be held in the vise (although cleats may still be advisable to keep the board from warping).
The stop (the piece against which you hold the workpiece) can simply be nailed in place or wedged into a deep dado cut in the top of the shooting board base. (The latter method is, in my opinion, better because it allows you to move the stop over as its end becomes worn or damaged.)
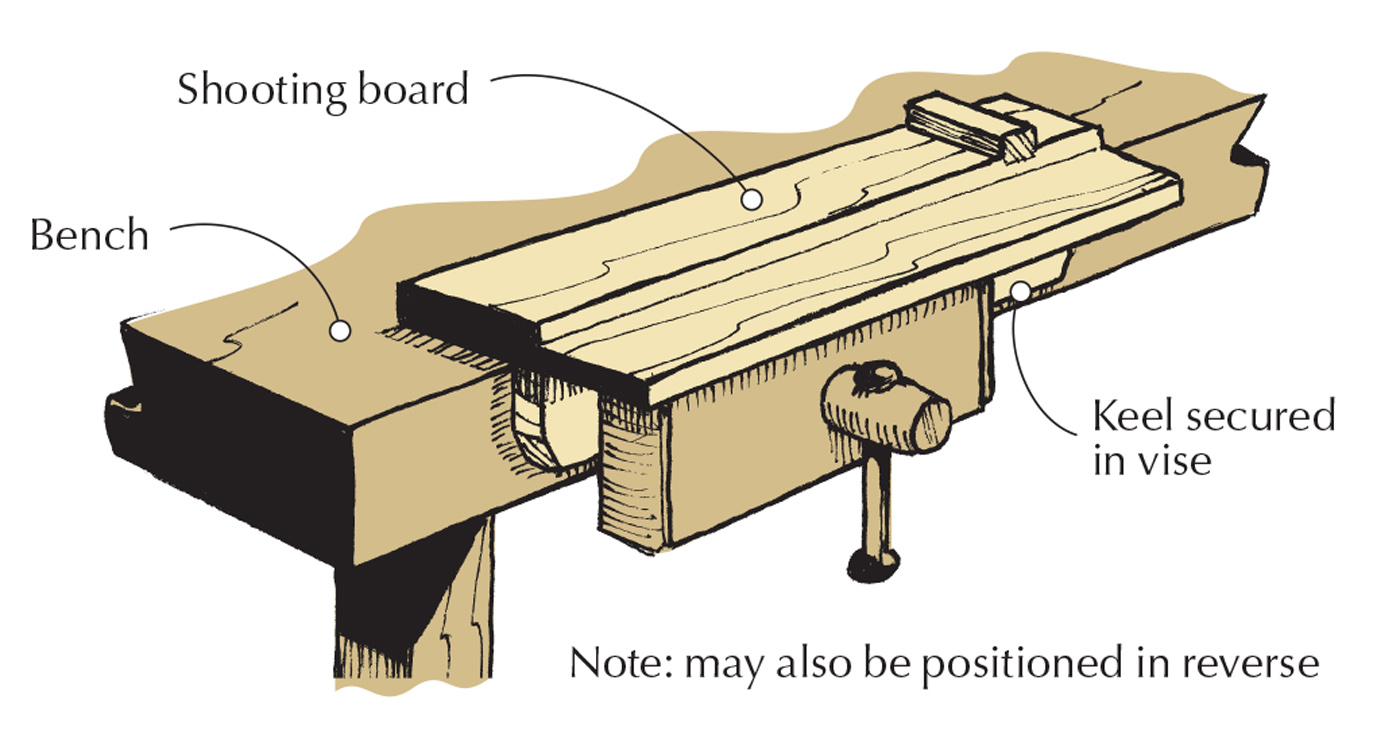
Keel. A keel attached on the underside of the shooting board can be secured in a vise.
Either way, make sure the stop is fixed at 90° to the table so the workpiece registers against it accurately for trimming ends square.
It is important that when planing you hold the workpiece so its edge overhangs the table a little; the plane is never used so that it bears against the edge of the table. Rather, it is worked to a line marked on the workpiece. Nevertheless, it is good practice to plane a small dust groove on the bottom edge of the table where it contacts the bed to prevent any build-up from forcing the plane away from the work.
No matter how carefully you make the shooting board, it cannot do its job if your plane’s sole is not perfectly perpendicular to the side on which it is run.
Most right-handed woodworkers prefer to use a plane on its right side, so the stop and table are fixed to the left side of the shooting board’s bed. If you are left-handed, reverse the positions and run the plane on its left side.
Stop. To trim ends dead square, the stop must be affixed at 90° to the straight edge of the table.
In the days when plane bodies were all wood, care had to be taken when periodically shooting the sole of the plane so it remained perfectly square to the sides. (You cannot plane anything flatter than the flatness of a plane’s sole.)
This is not hard to do with a wooden plane, but metal-bodied planes present a different problem. Better-made planes may well have square soles, but if it is necessary to flatten the sole, be sure to maintain perpendicularity with the sides – particularly for the side that will run on the board.
Once you understand the principles behind a simple shooting board used to achieve a perfectly square edge, consider the following varieties.
Angled Edges
You may need to plane edges at angles other than 90°. You can do this easily with a basic shooting board simply by altering the angle of the table on which the workpiece rests. The simplest way to do this is to place appropriately angled wedges under the workpiece. Alternatively, temporarily tack a narrow strip to the back of the table.
Miters. A stop with 45° angles on either side allows you to easily plane both inside and outside miters.
A slightly more involved method, but one that will give you more choice and security in the long run, is to hinge the front edge of the table to its bed. Include some form of thumbscrew-fixed height-adjustment to the back edge to keep the angle from changing in use.
Angled Ends
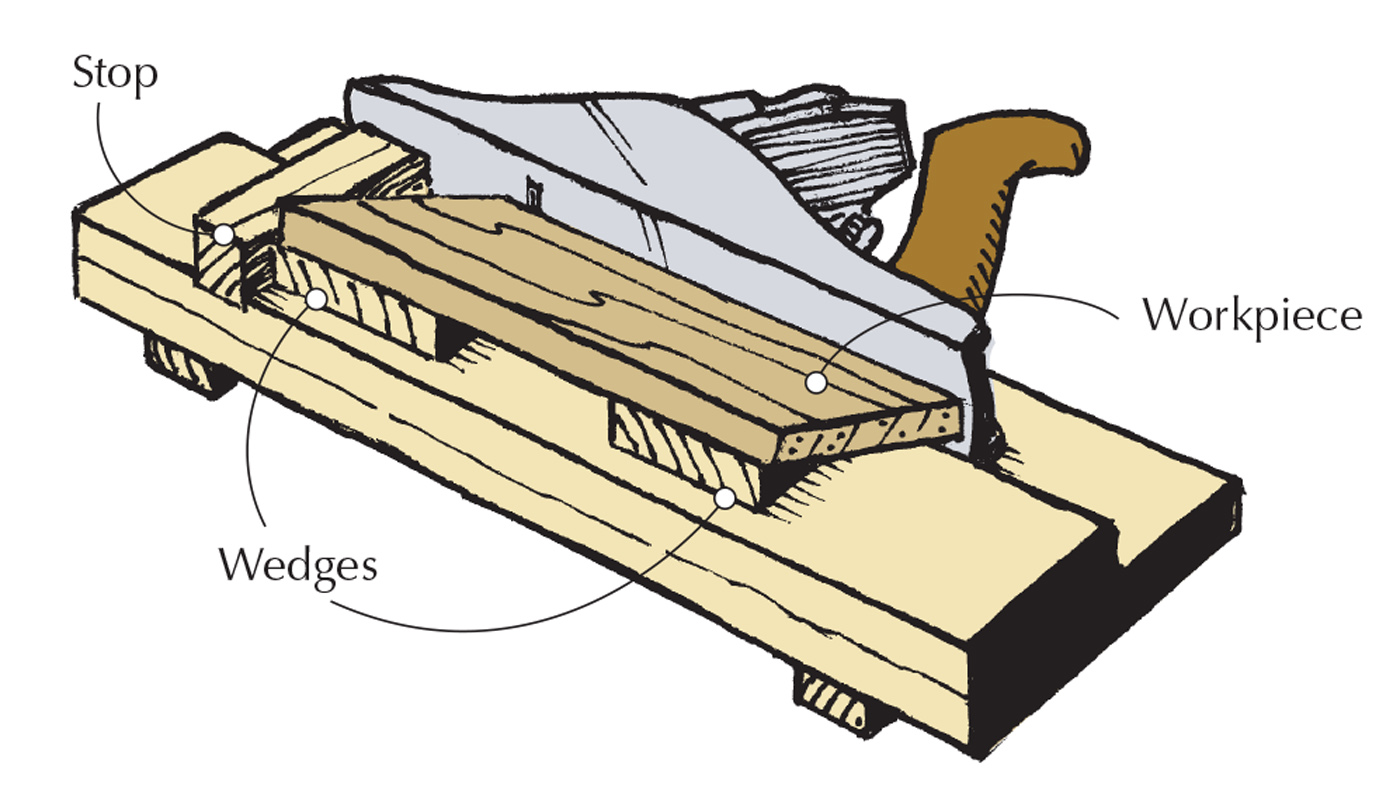
Off 90°. A basic shooting board can be used to plane edges at angles other than 90°; simply insert wedges of the needed angle under your workpiece.
While a perfectly square stop is useful for shooting the end of a workpiece at 90° to its length, other angles may sometimes be required. These can be easily achieved with the use of an auxiliary wedge-shaped piece inserted between the stop and the workpiece. Furthermore, if used in combination with any of the previous methods for shooting angled edges, the shooting board can be turned into a device for accurately planing the ends of mitered and splayed work.
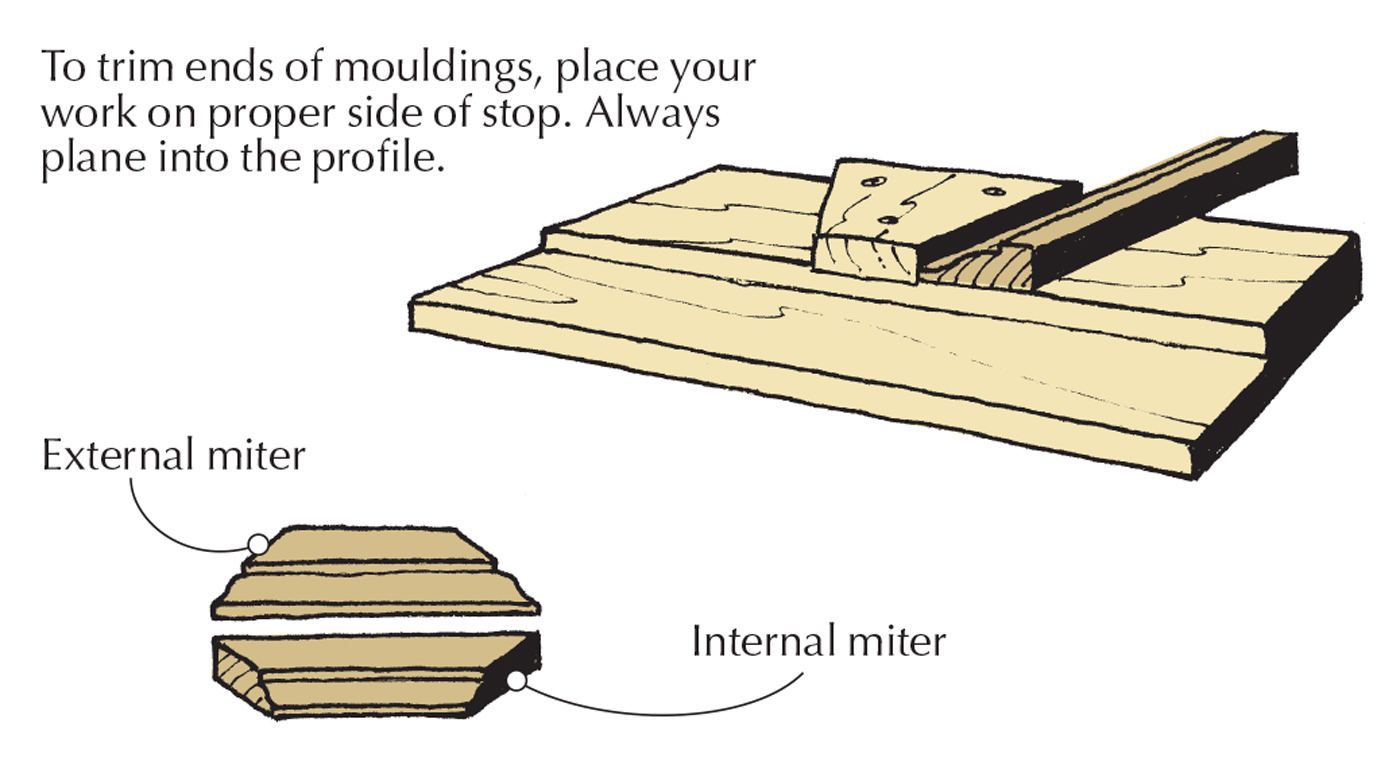
Miters
Trimming miters freehand is risky. If you have to trim relatively narrow mitered pieces such as moulding, make a shooting board that consists of a bed and a table as before, but fix a stop, cut at 45° on both sides, in the center of the table’s length. That way, you will be able to plane into internal and external miters without risk of splintering the ends.
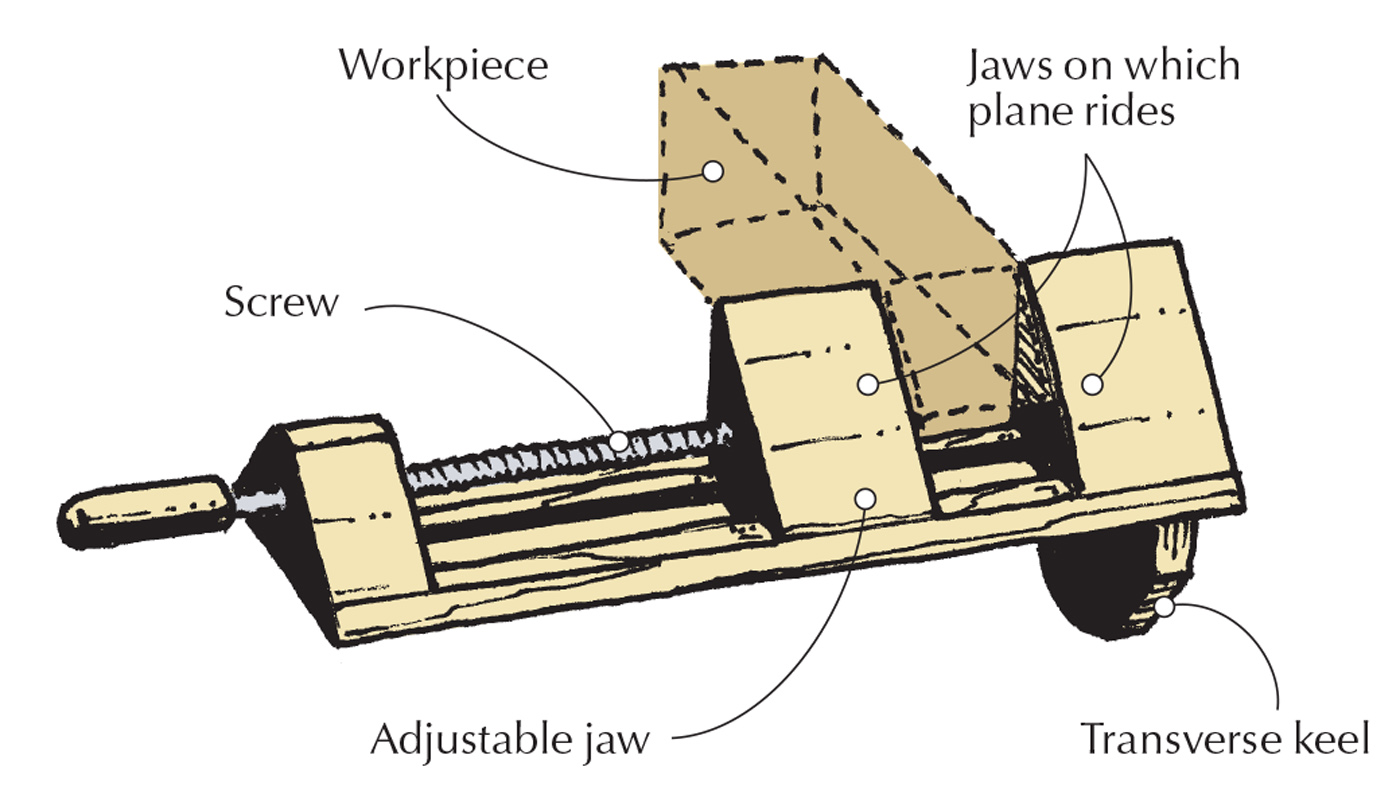
Donkey’s ear. This specialty appliance for shooting tall, narrow miters has a bed fixed at 45°.
When you need to trim tall narrow miters, such as those at the ends of skirting, moulded baseboards, cornices or plinths, you need the quaintly named donkey’s ear shooting board. It is essentially the same as a regular shooting board except that the table is at a fixed 45° angle and the stop is placed in the center of its length.
Because such pieces to be trimmed are frequently quite long, the shooting board must be used close to the front edge of the bench. This typically means that it will be held by a longitudinal keel in the face vise.
Miter Shooting Block
Miter block. A miter block (shown here in the left-handed orientation) was once a common commercially available appliance.
Although by definition not strictly a shooting board, any discussion of the topic would be incomplete without mention of the miter shooting block.
Shop-made. With little ingenuity (and less fuss), you can easily make a simple miter block in your shop.
This device is used for miters that are both long and wide. Its utility is derived from the broad area of support for the plane that is used to trim the workpiece (and those surfaces are commonly protected by a thin card glued to their surfaces in case the plane’s iron should inadvertently travel over these parts). Once commonly manufactured in both left-and right-handed varieties, a simpler version can easily be made.
Last Thoughts
Lacking any form of shooting board, you can use a simple bench hook for trimming end grain. It will provide the two essentials: a stop for the work and an elevated edge for a plane used on its side directly on the bench.
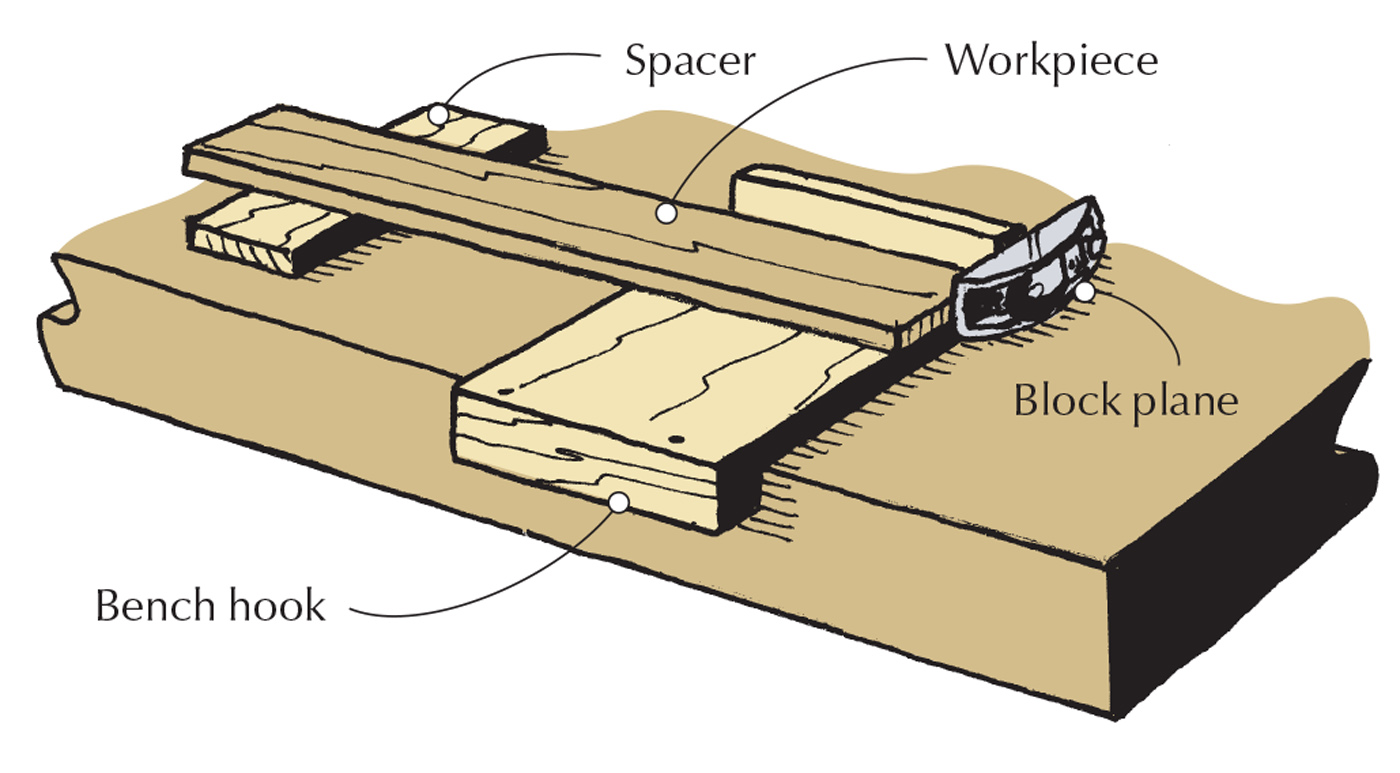
Bench hook. As long as your workbench is flat, you can use a bench hook to hold a workpiece as you shoot the end square.
Most bench hooks are relatively small, typically no more than 12″ x 12″, so the length of the workpiece that can be shot is short indeed. But using a pair of bench hooks, or even one bench hook and a spacer, is an easy way to trim the end of any board square and true.
And finally, what can you do when the workpiece is too long to be used with a shooting board? (There is, after all, a practical limit to the length you can make a shooting board.)
Fence. If you don’t have a shooting board of sufficient size to hold the work, attach a fence to the plane to hold it at the desired angle.
To paraphrase an old proverb, “if you can’t take the work to a shooting board, take the shooting board to the work.’’ Clamp a thick and rabbeted fence to the side of your plane and hold this fence tightly against the workpiece (secured in a vise). This produces the same effect of keeping the sole of the plane at a consistent angle to the edge being shot. And of course, this fence can also be angled to work on edges other than those at 90°.


