


We may receive a commission when you use our affiliate links. However, this does not impact our recommendations.
 For the August 2012 issue of Popular Woodworking Magazine, I built a reproduction of a Gustav Stickley No. 74 Book Rack. It’s a great piece in a couple of ways: It is useful and nice looking, and it is also a great introduction to making through-tenon keyed joints, one of the hallmarks of Arts & Crafts period furniture.
Early Craftsman pieces were fumed with ammonia to develop their characteristic color, but later pieces were stained and finished with early versions of modern stains and lacquer. In truth, there isn’t much difference in appearance between the two types of finishes, and a more predictable and consistent finish can be achieved with stain. Predictability and consistency are the problems with fuming. Fuming depends on a chemical reaction between tannins in the wood and the ammonia, so variations in the chemical composition from one board to another lead to different colors.
If you fume, you’ll likely need to touch something up with aniline dye, or layer on colored shellac to even out the color. It isn’t that difficult to do, but it takes some patience and a practiced touch. The top coat used over the fumed oak also plays a big role in the final appearance. When you’re finished fuming the wood is a dirty, greenish gray and the first time you do it, you will think you ruined it. Garnet or amber shellac make it a nice warm brown.
 My favorite finishing method looks authentic and is easy to apply, but it takes a few days. Each step doesn’t take too long, but each step needs to dry overnight. This isn’t a “Christmas Eve” finish. As always, experiment on some scraps to get the color you want before committing the entire workpiece.
Prior to staining, I hand-sand everything with #150-grit Abranet. I use a pad that hooks up to a vacuum, but regular sandpaper also works. Quartersawn white oak takes stain well, but it is possible to make it too smooth and polished. When that happens, the stain just sits on top of the wood and won’t color evenly. After sanding, I dampen the surfaces with distilled water, wait overnight, then sand again with #220-grit paper.
 The first step is to stain the wood with an oil-based stain. Almost any stain with “walnut” in the name will come close to an authentic color. I look for something that is only a stain; if the label mentions “stain and finish in one,” I choose something else. I flood on the stain, wait about 15 minutes, wipe off the excess and leave it to dry until the next day.
Following the stain, I apply one coat of Watco Danish Oil. There are different colors available, and again, the walnut tones give an appropriate color. I flood the surface with oil, and use a synthetic steel wool pad to work it in. I let it soak in for 15 minutes, wipe dry and come back a day later.
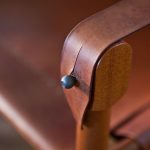
 The stain and the oil work together to highlight the wood figure with an even tone overall. In authentic Craftsman pieces, the grain doesn’t “pop,” that is, there isn’t a drastic difference between the flakes and rays and the surrounding surface. I follow the oil with a coat or two of shellac.
Amber shellac for the first coat will warm up the color and give it an old look. I thin the shellac from the can, if it’s a new can I use about half shellac, half denatured alcohol. If it’s a can I’ve used before, it likely has had thinned shellac poured back into it, so I thin it less the next time. I use a good brush and judge how thin the shellac ought to be by how it feels as it goes on.
If you’re concerned about durability, you can top coat the shellac with lacquer or varnish. I think shellac is more durable than a lot of people would have you believe, unless you’re in the habit of sloshing alcohol around your furniture. I usually just apply paste wax – clear wax most of the time or the stinky dark wax if the color is a bit too light. If the shellac is too shiny, I’ll take an abrasive pad to it before waxing, but most of the time I use the abrasive pad to apply the wax. After it dries I buff it with a cotton rag for a satin sheen.
If you like Arts & Crafts style furniture, my book “Great Book of Shop Drawings for Craftsman Furniture” will be available late in the summer of 2012. In the meantime, this compilation of articles from Popular Woodworking Magazine is full of great projects.
Here are some supplies and tools we find essential in our everyday work around the shop. We may receive a commission from sales referred by our links; however, we have carefully selected these products for their usefulness and quality.


Quick question Mr. Lang. Instead of using an amber shellac, what would you think of adding a Transtint amber dye directly to a brushing laquer? I use Old Master’s brushing laquer, and it just goes on so well that I just couldn’t bear to use a shellac.
That certainly is a beautiful piece of stickley furniture. I was wondering where I could get a float that is long enough to trim my tenons. The finishing sure beats fumed ammonia.
I’ll be dealing with some quarter sawn white oak in an upcoming project, and the wife has asked me to highlight the ray flecks in the oak while still achieving the brown tones associated with mission furniture in the surrounding wood. Can anyone suggest a method of finishing that will accomplish this?
Thanks!
Very nice color. I’ve build a couple pieces from your measured drawings books, and I follow a very similar finishing process, though my first step has been VanDyck crystals (which are made from walnut shells) dissolved in water. This seems to stain the medullary rays better than oil. I follow that with the Watco Danish Oil (Walnut) then proceed as you do with amber shellac and possibly poly-varnish, depending on the likelihood of alcoholic beverage contact.
Beautiful finish, Bob. Thanks for the thorough write-up.
Bob,
I am building A&C style furniture to refurnish my Ohio bungalow and I have had great luck with your finishing process found in “Popular Woodworking’s Arts & Crafts Furniture 25 Projects for Every Room in Your Home”. Particularly the process listed in the A&C Bookcase by Kara Gebhart-Uhl. I have a lot of requests from people on Lumberjocks.com wanting to know what I used. The Golden Amber Maple aniline dye makes the ray flecks jump off the board and the Heavy-bodied glaze fills in the voids in the grain. Combined it gives your A&C projects that look everyone expects to find in this style of furniture. Thanks so much for this formula it has made my life so much easier.