


We may receive a commission when you use our affiliate links. However, this does not impact our recommendations.

Marquetry creates images using inlaid pieces of wood. By utilizing different species and grain patterns, you can create a realistic looking image, crafted by your own hand.
Careful layout and precise cutting are the keys to getting a beautiful marquetry panel.
It’s difficult to describe the excitement I feel when I start a new double-bevel marquetry project. The ability to conjure up a picture from nothing and then turn it into a reality in wood is quite thrilling! One of my favorite Einstein quotes states: “Imagination is more important than knowledge. For knowledge is limited, whereas imagination embraces the entire world, stimulating progress, giving birth to evolution.” Being able to visualize something in your mind is a gift not everybody has.
In our store: Learn more about veneer and marquetry with Pictures in Wood Collection: Parquetry, Marquetry & Veneer.
More veneer techniques: Make a Book-Matched Veneer Door Panel
Also from David J Marks: How to Create Patina Finishes
Idea First
I’ve taught marquetry classes for well over 20 years, and the first thing I do is bring out a series of books with images to help people come up with new ideas and imagine the art they want to create. I like Dover publications because they contain royalty-free artwork that can be copied. I also encourage students to draw their own designs if they can. Personally, I like to sketch my own designs and often start with an image I have found online or in a book, then piece it together with my own drawing.
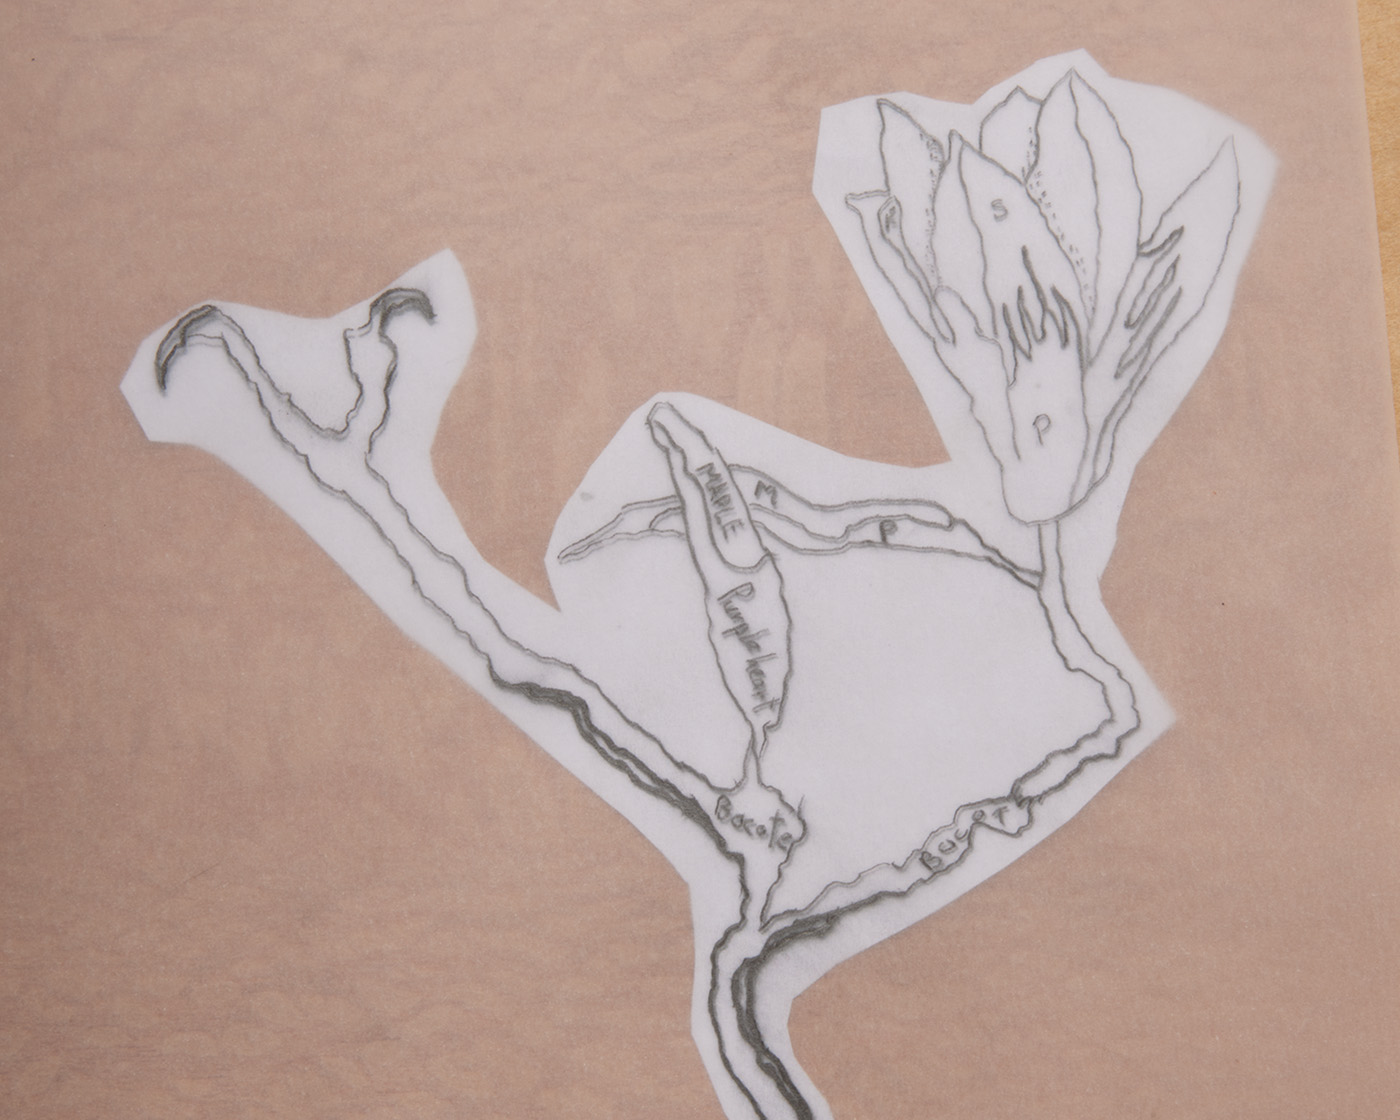
1 Start with a sketch of your image. I create several photo copies and label each part with the species I plan on using.
Mechanics Next
Once you have an idea or an image, we can get into the mechanics of double-bevel marquetry.
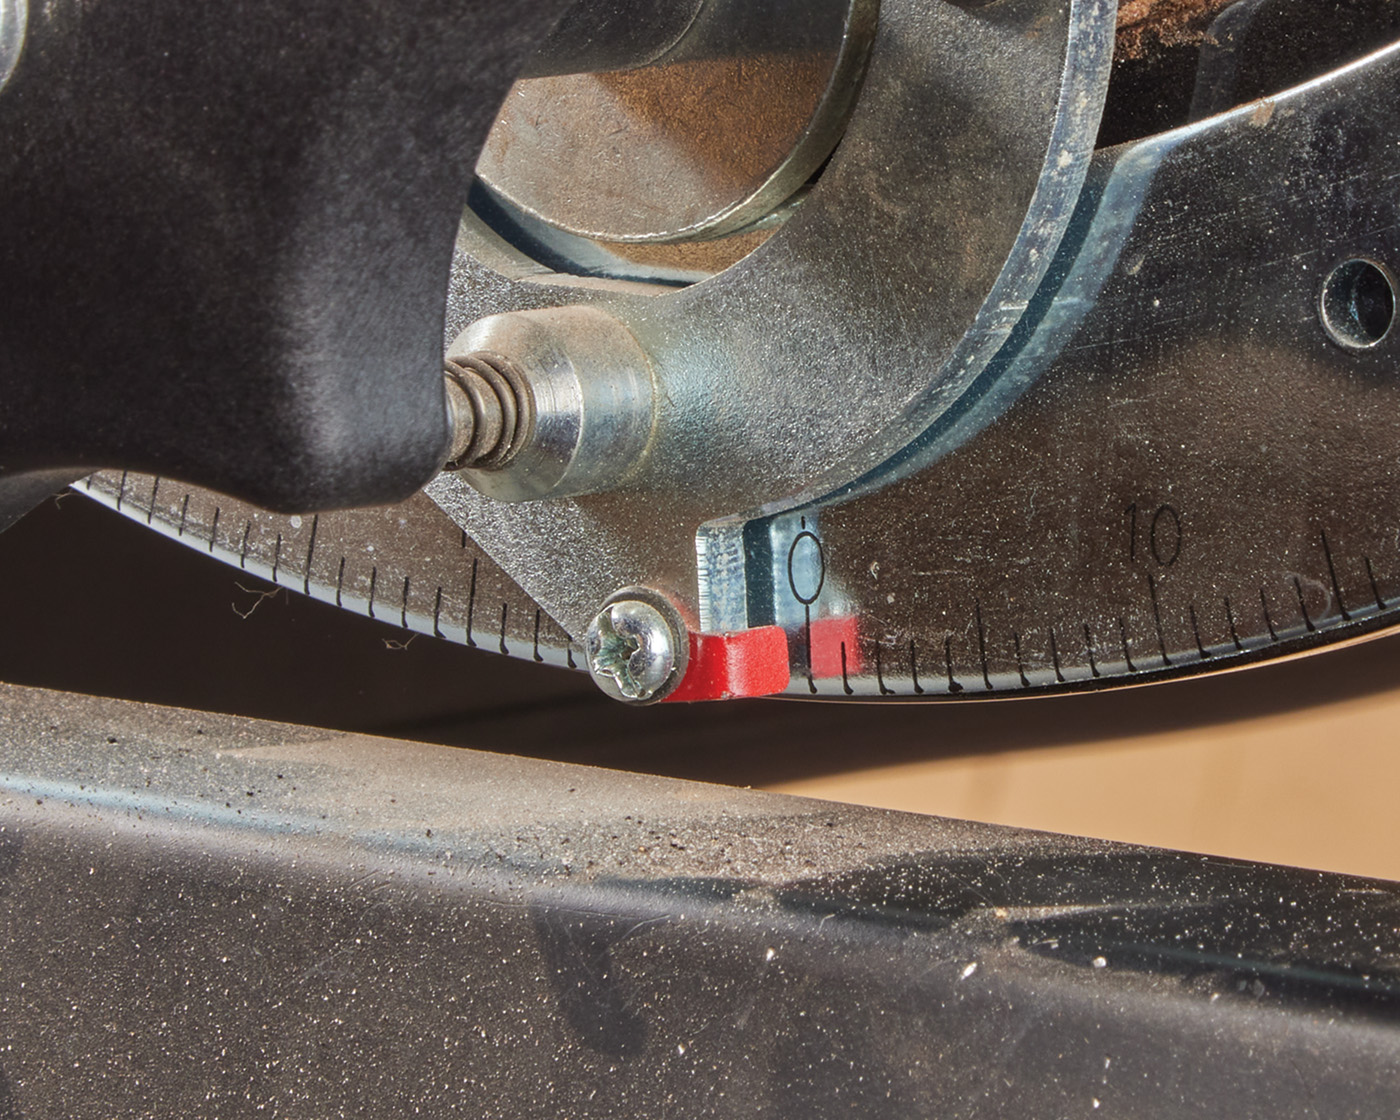
The technique is fairly straightforward. It consists of a background veneer onto which the design is drawn, and an insert veneer that is held in place underneath with masking tape. When the scroll saw is tilted down to the left at the appropriate angle (6° is what I use for 1/16“ thick veneers), the blade cuts through both pieces simultaneously. The kerf of the blade is then filled by the wedge-shaped insert underneath. The end result is a perfect fit with no gaps—which is why I love this method.
Picture a dovetail joint and how the pins fill the sockets, or, better yet, cones that stack into each other.
My saw is an Excalibur with a 30“ bed. On this model, the table remains horizontal while the arm tilts. This is a great feature for larger panels, which can be difficult to control on a tilting table. Just remember to visualize the table tilting down to the left—which means the arm will tilt to the right—creating the same effect.
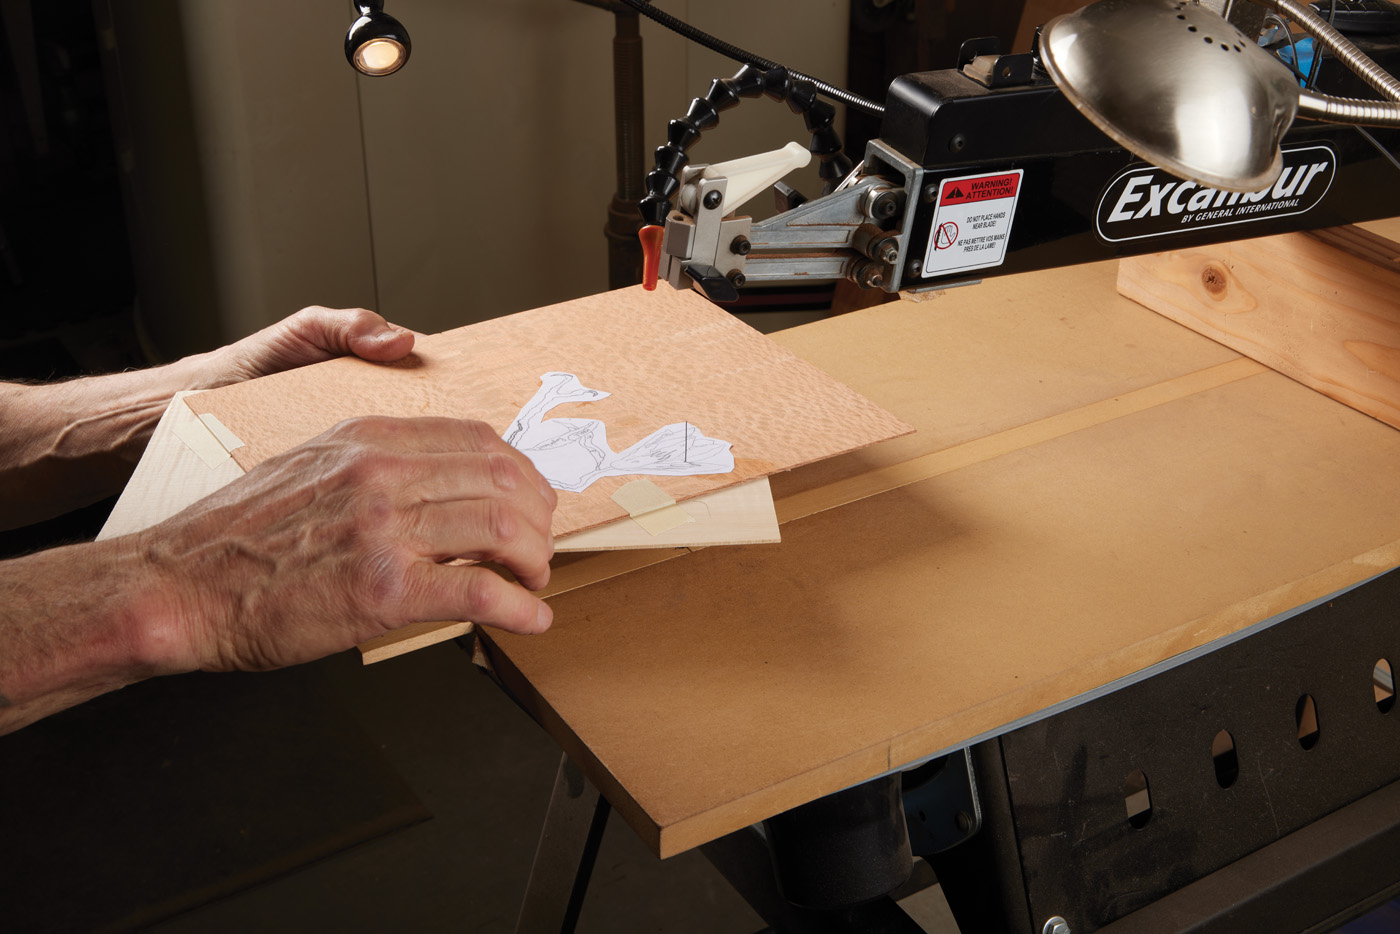
To illustrate: in the following photos you can see that I selected Lacewood (aka Australian Silky Oak) as my background veneer. I cut my own veneers on the bandsaw to net 1/16“ thickness after drum sanding. Next, using photocopies of my drawing, I cut out and glue the image onto the background veneer. I always do test cuts on scrap veneer to confirm my numbers, and I keep coming back to 6° for my 1/16“ thick veneers. That number creates a nice snug fit with just enough room for glue.
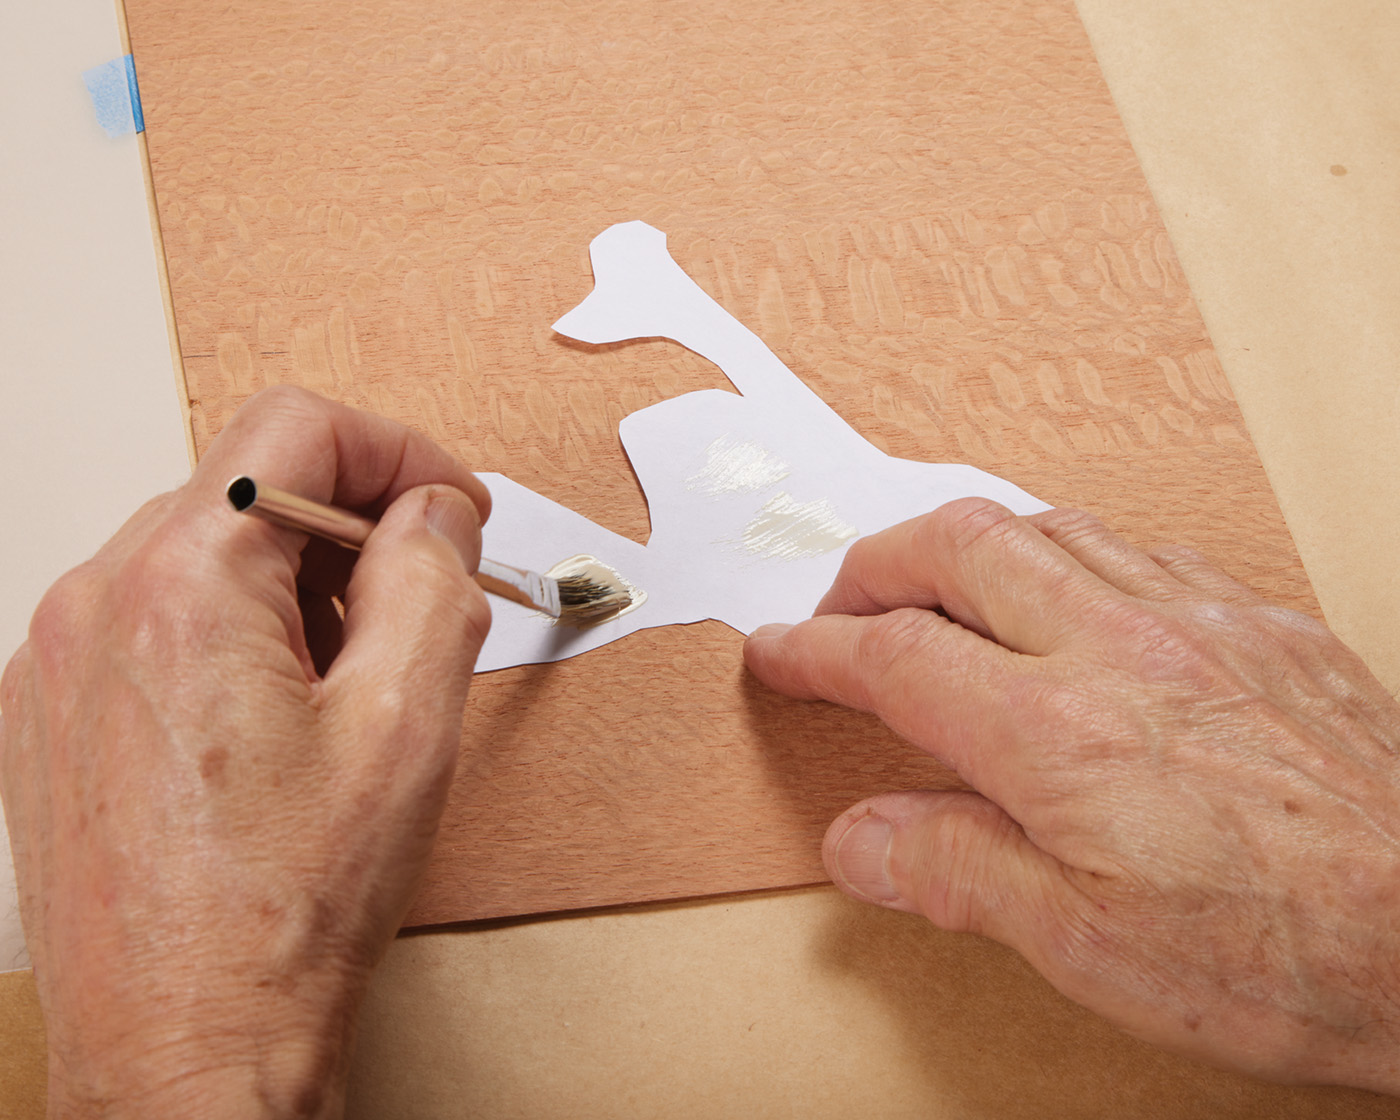
2 Apply the sketch to your base veneer, using PVA glue.
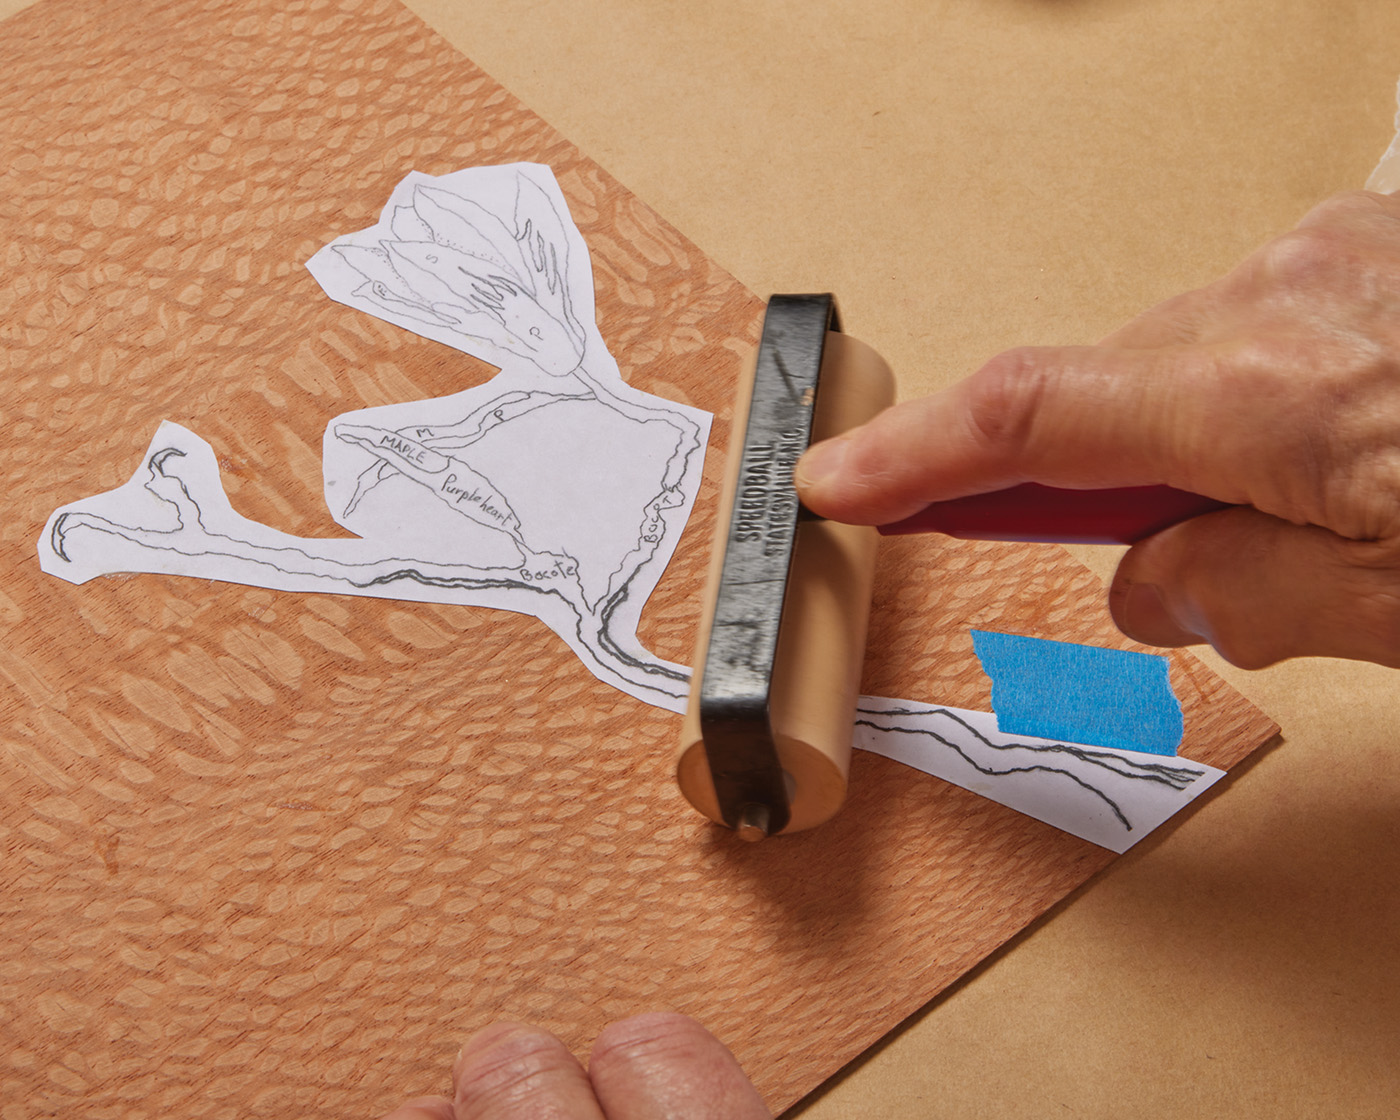
3 Brush a thin layer on, then press the paper flat using a roller.
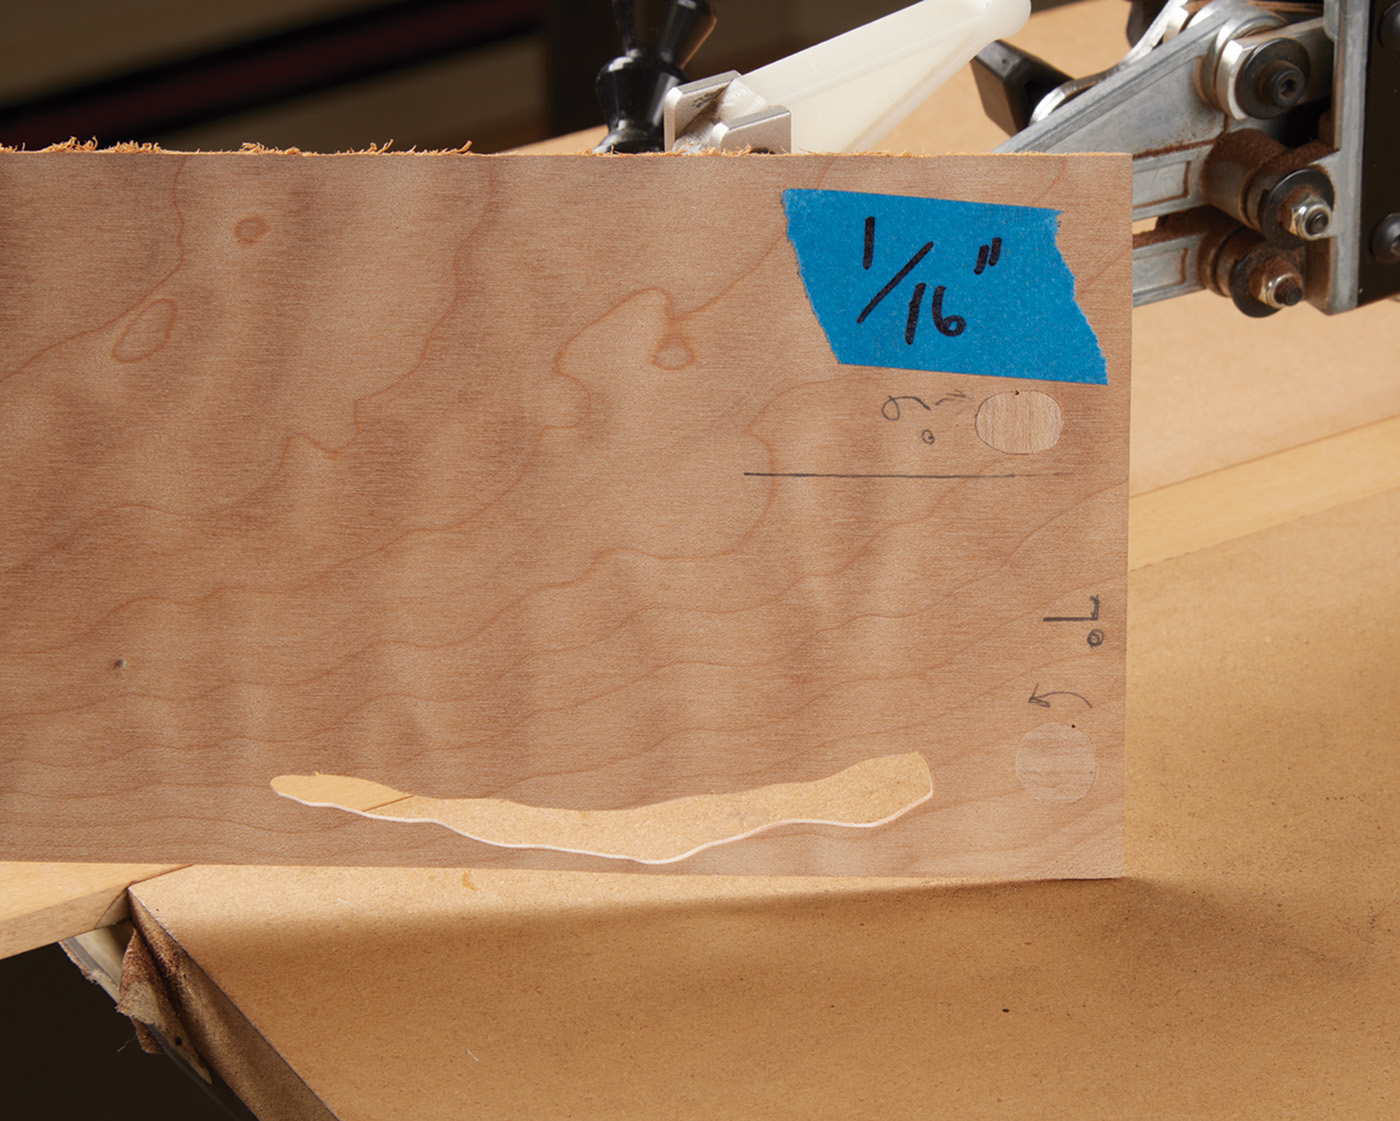
4 The veneer that I am using is sawn at the bandsaw, then ran through the drum sander. This leaves it at a precise thickness.
I use 2/0 and 3/0 scroll saw blades made for wood veneer, though sometimes I’ll go with jeweler’s blades in the same size for finer cuts. They cut more slowly due to the finer tooth pattern (designed for soft metals), but they excel at delicate detail work. For piercing cuts, I like #70 to #74 drill bits. They’re small but large enough to accept the blades. To speed up the process, I keep several drills ready, labeled with the bit size on a piece of tape.
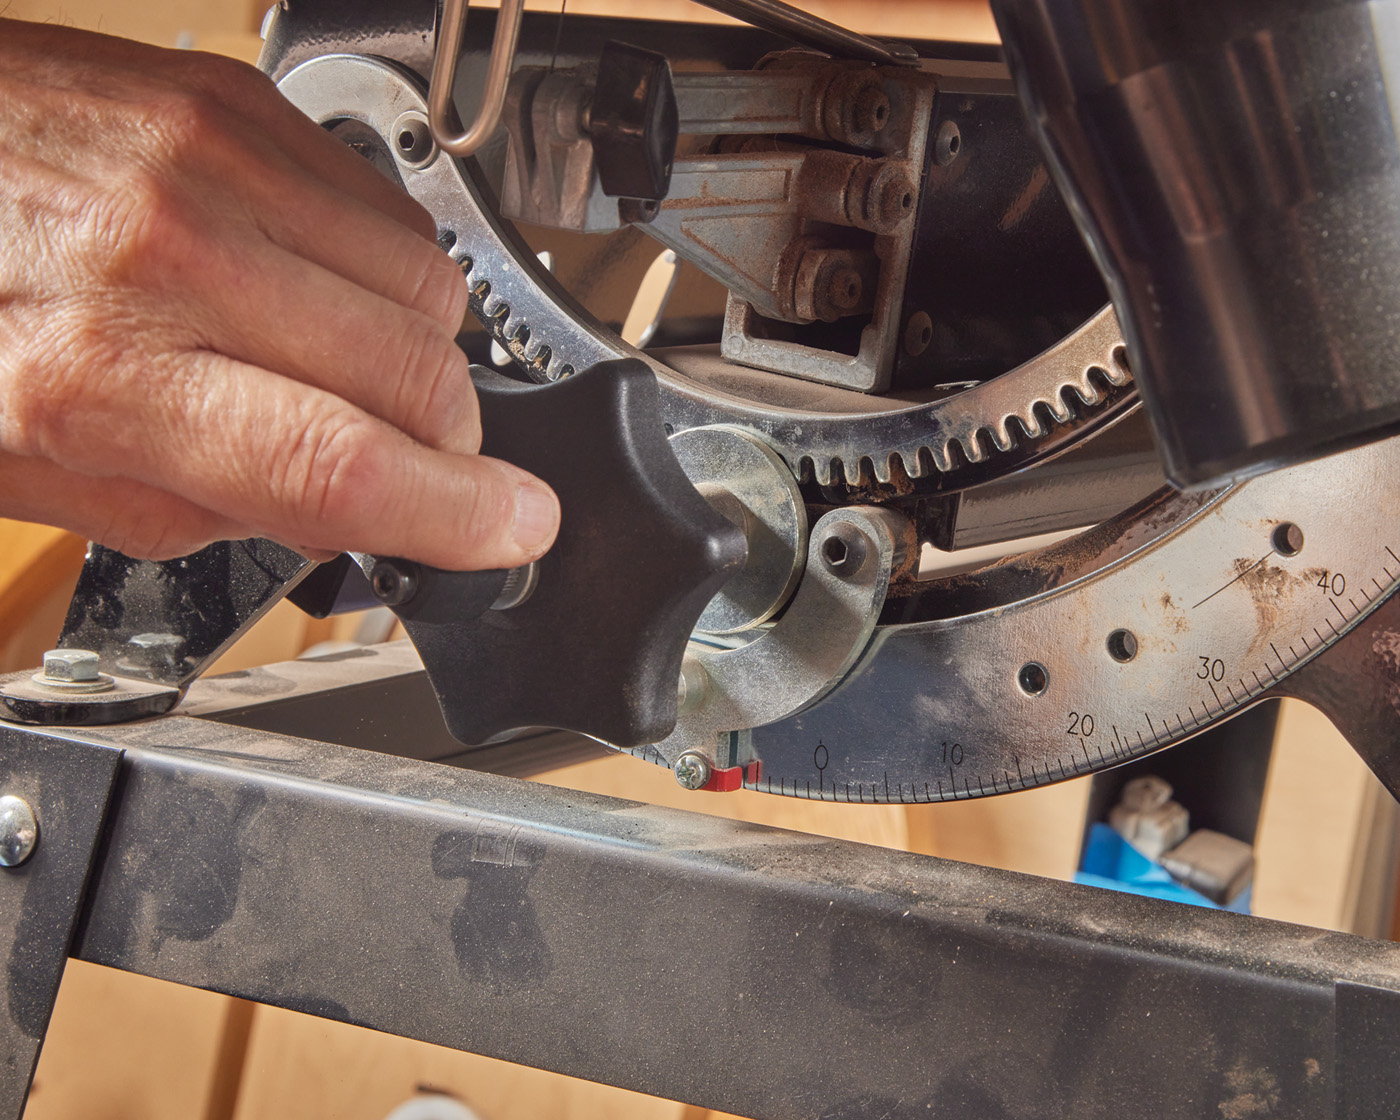
5 The key to double-bevel marquetry is setting your scroll saw to cut at an angle. Here, it’s 6°.
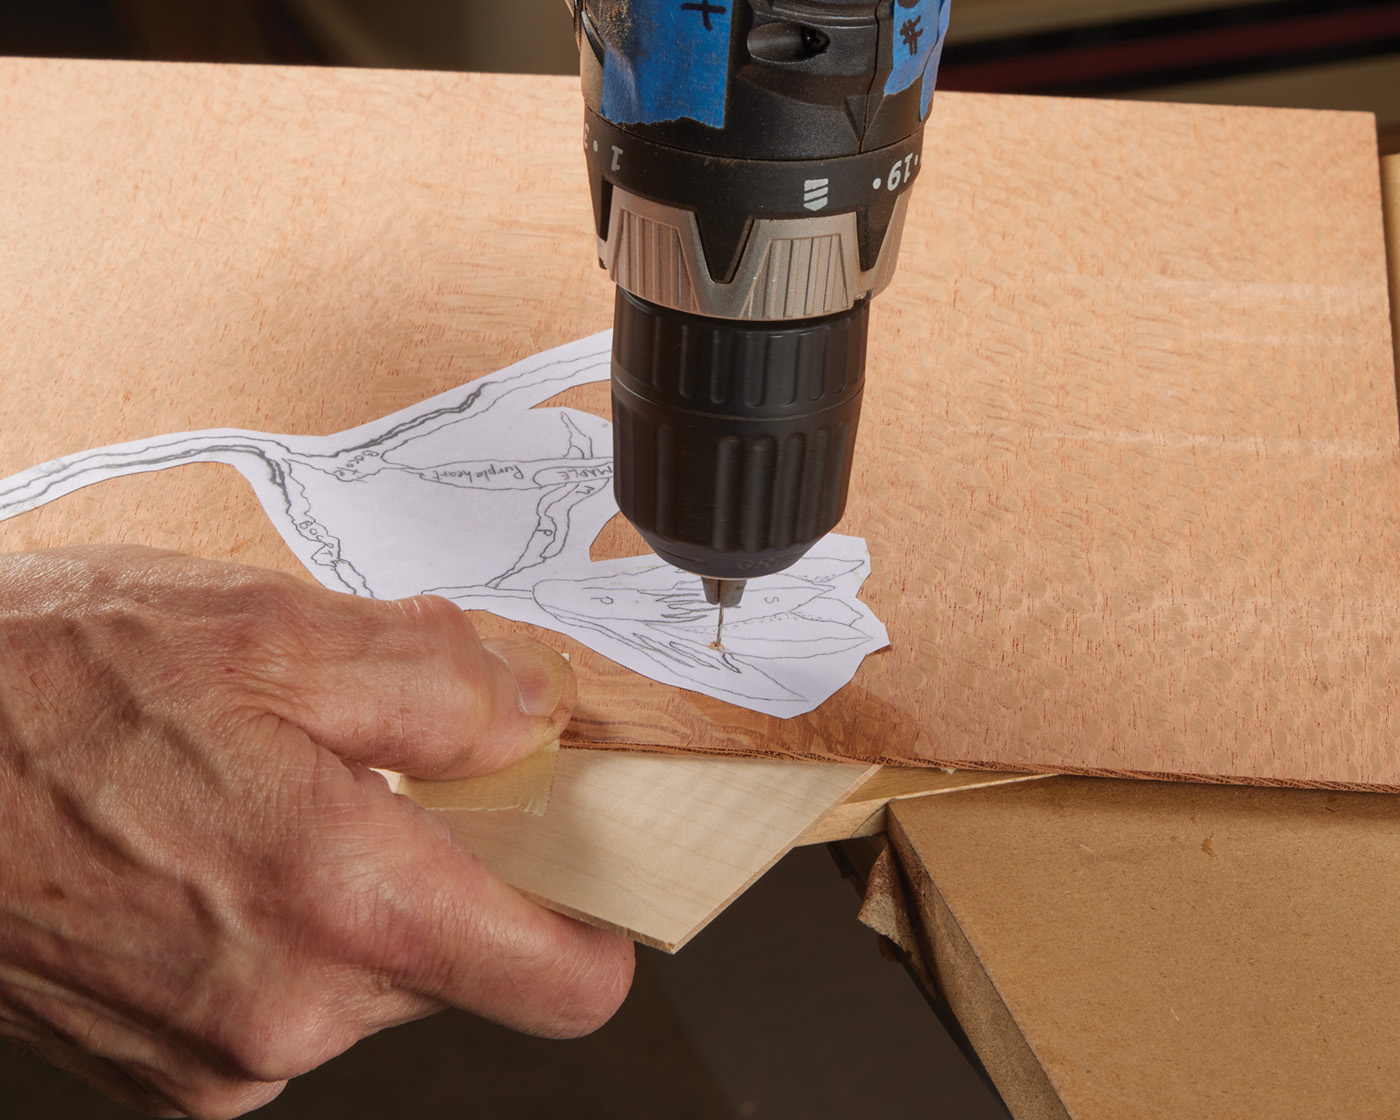
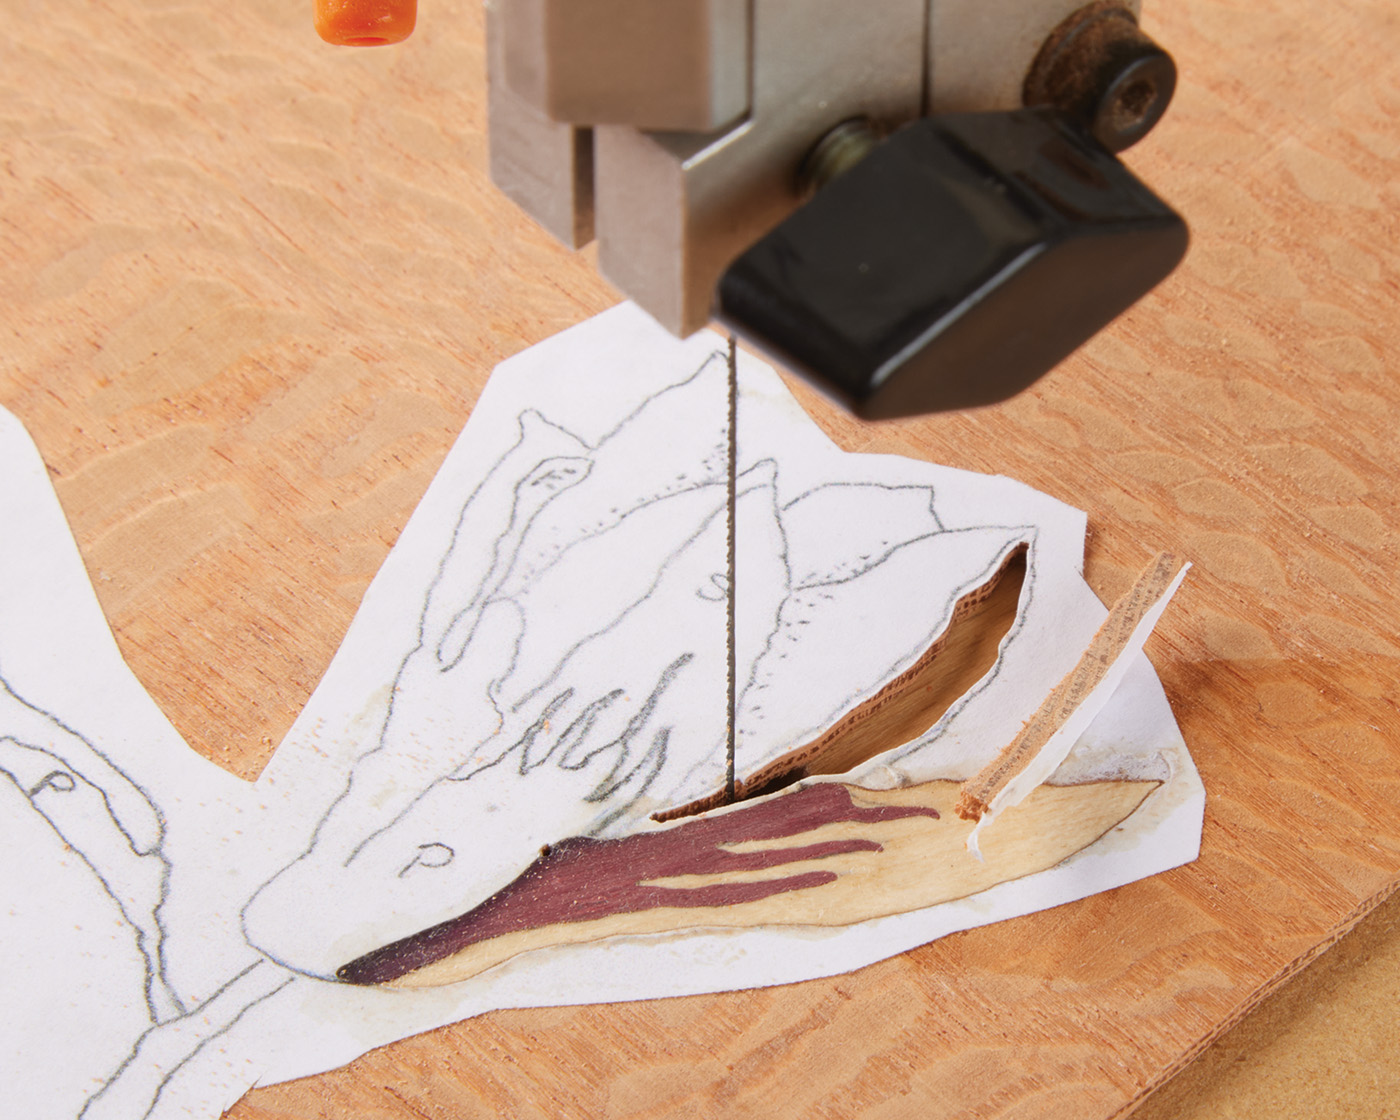
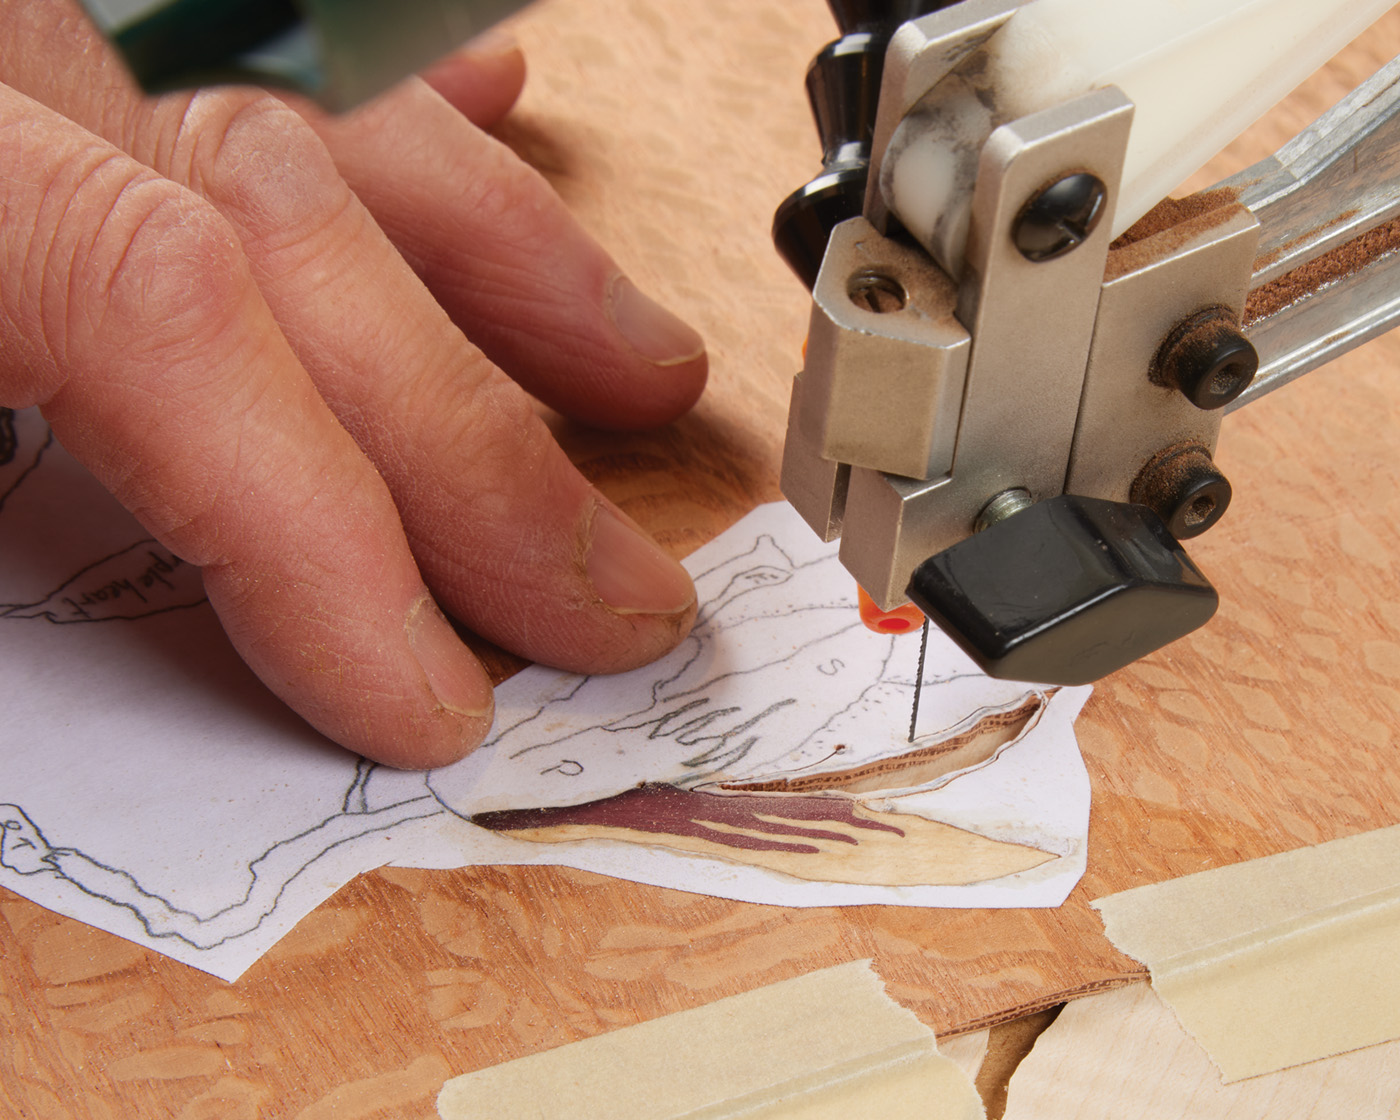
6 After taping the base veneer and the inlay veneer together, pierce a starting hole, just outside your working area.
7 Thread it over the blade.
Carefully place the insert veneer underneath so that it aligns within the drawing area and secure it with masking tape. Use as many pieces as you need—they’ll act as temporary clamps. Burnish the tape into the edges with your fingernail to make sure it grips solidly and nothing moves.
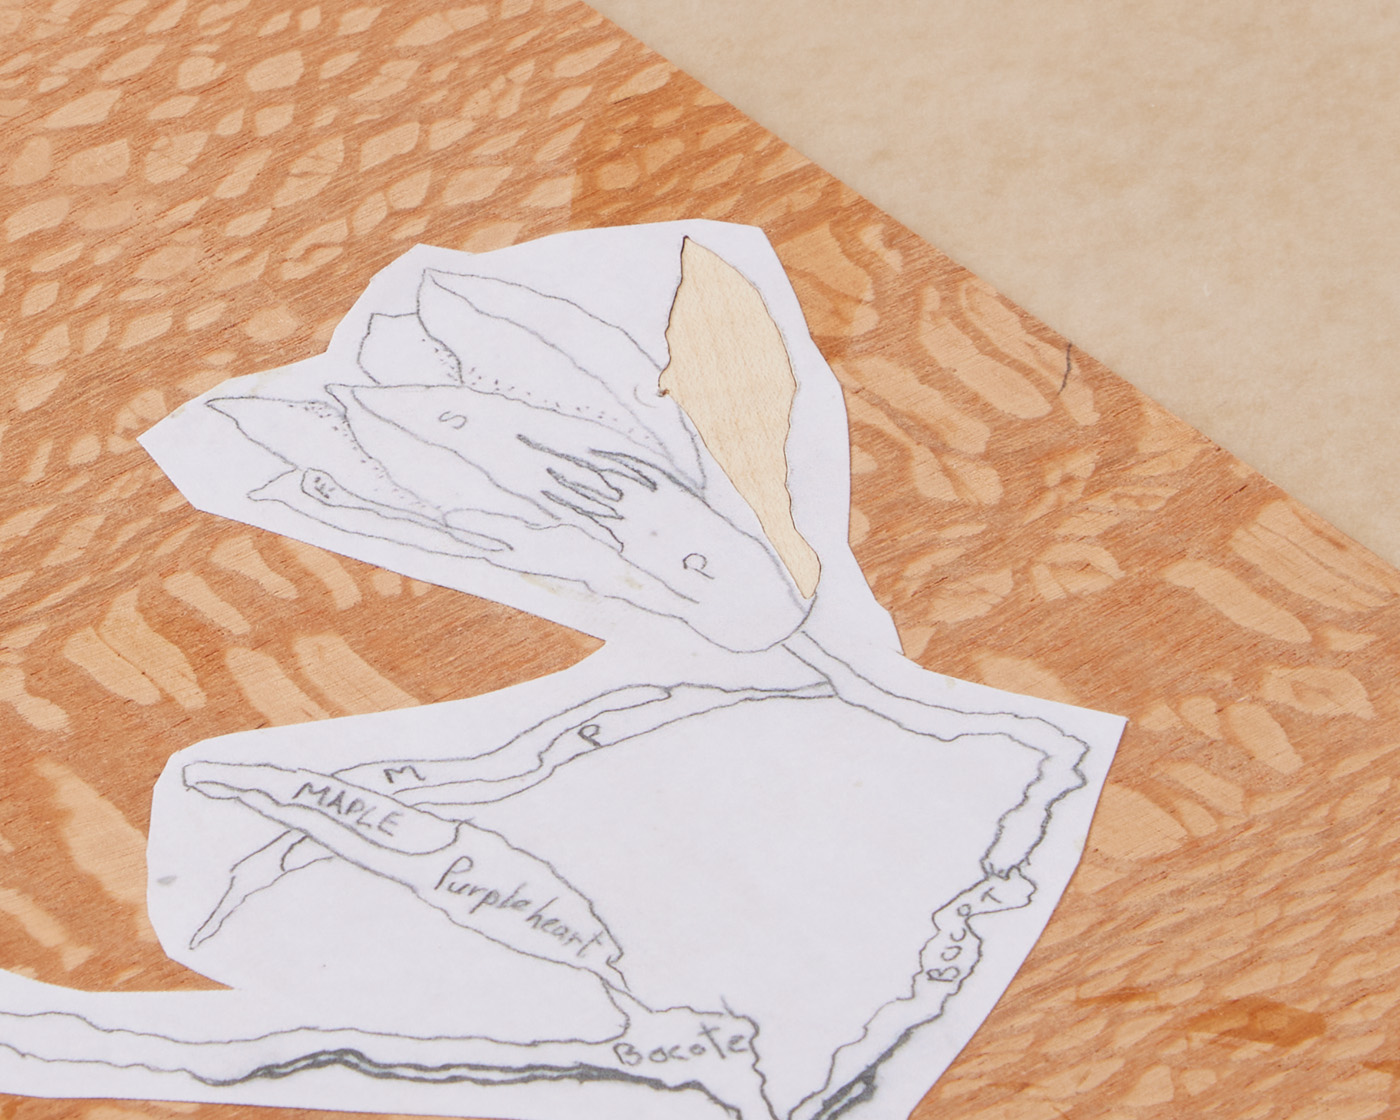
In this case, I selected quilted maple for the leaves. I’m 73 years old and my eyes aren’t as good as they used to be, so I like to use magnifying glasses. Drill an entry hole on the line at a 6° angle. Flip the piece over and draw a chalk or pencil circle around it to help your eyes locate it. I like to insert a box cutter blade, lightly rotate it, and ease the edges to make threading the saw blade easier. Then, thread the blade from the bottom up and secure it in the top clamp. Begin cutting on the left-hand side and move counterclockwise. This can confuse beginners: if you look at the wood, it rotates clockwise, but if you watch the blade, it’s cutting counterclockwise. I recommend practicing by drawing and cutting out a simple circle first.

8 Saw along your line, working counter-clockwise.
Once you understand the concept and train your brain to visualize a circle, working through irregular shapes like leaves and branches becomes much easier.
Cut & Glue as You Go
The steps involve cutting and gluing as you go. If you just keep cutting without gluing the pieces in, the background will start to look like Swiss cheese and become too fragile—things will break.
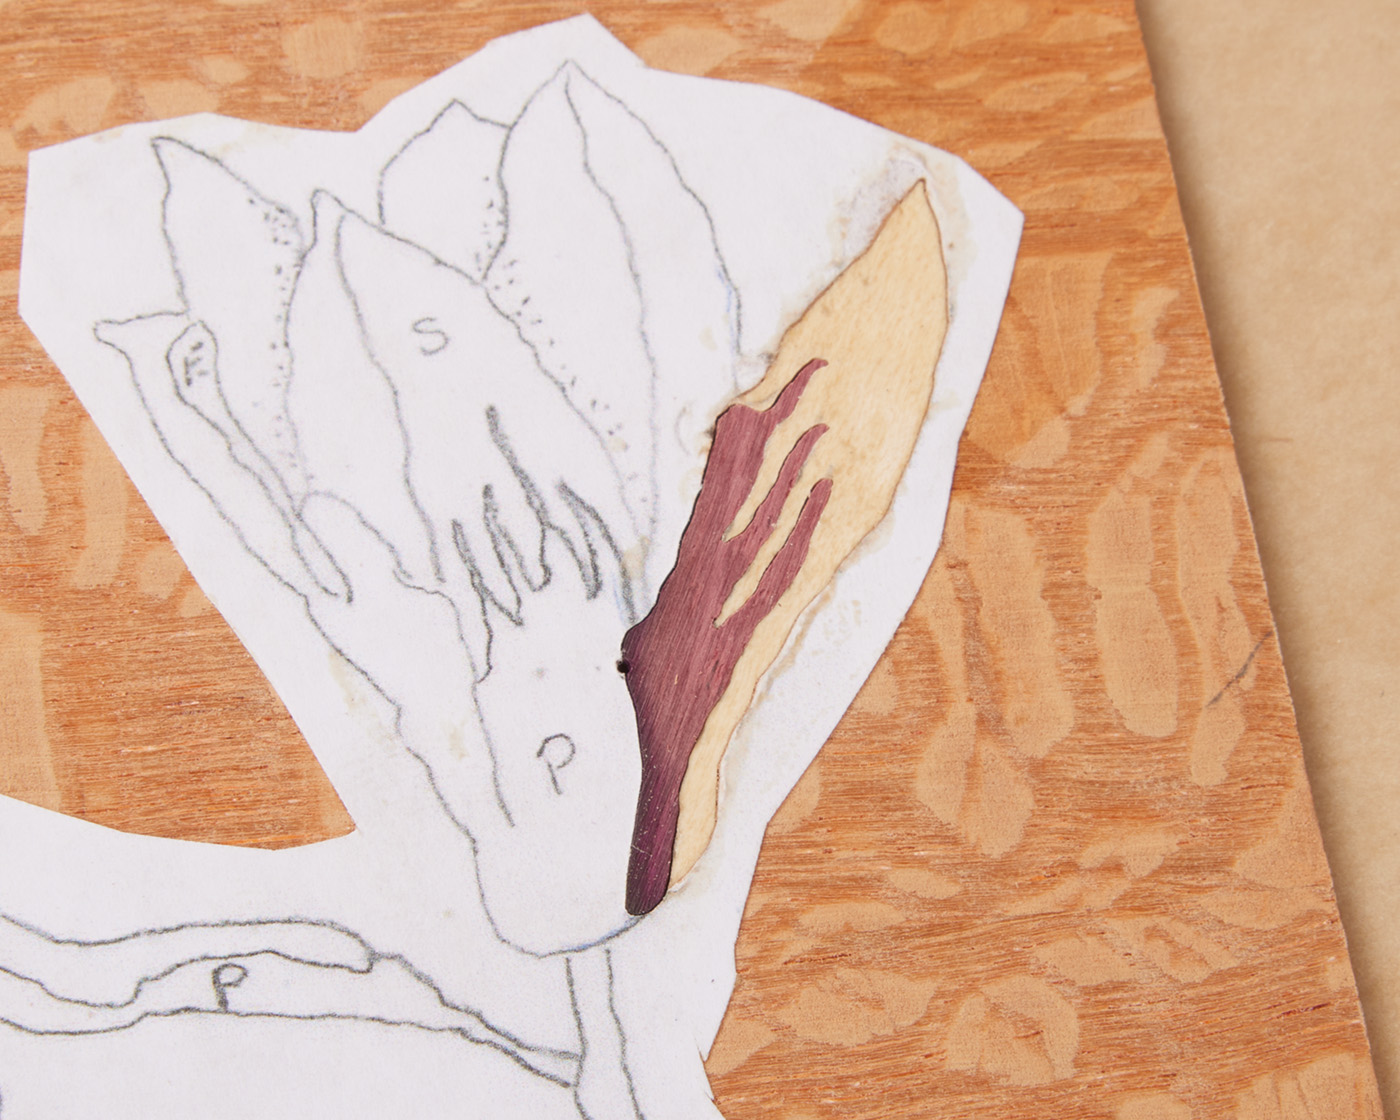
9 After finishing the cut, the beveled edge of the quilted maple piece should pop right into the base veneer.
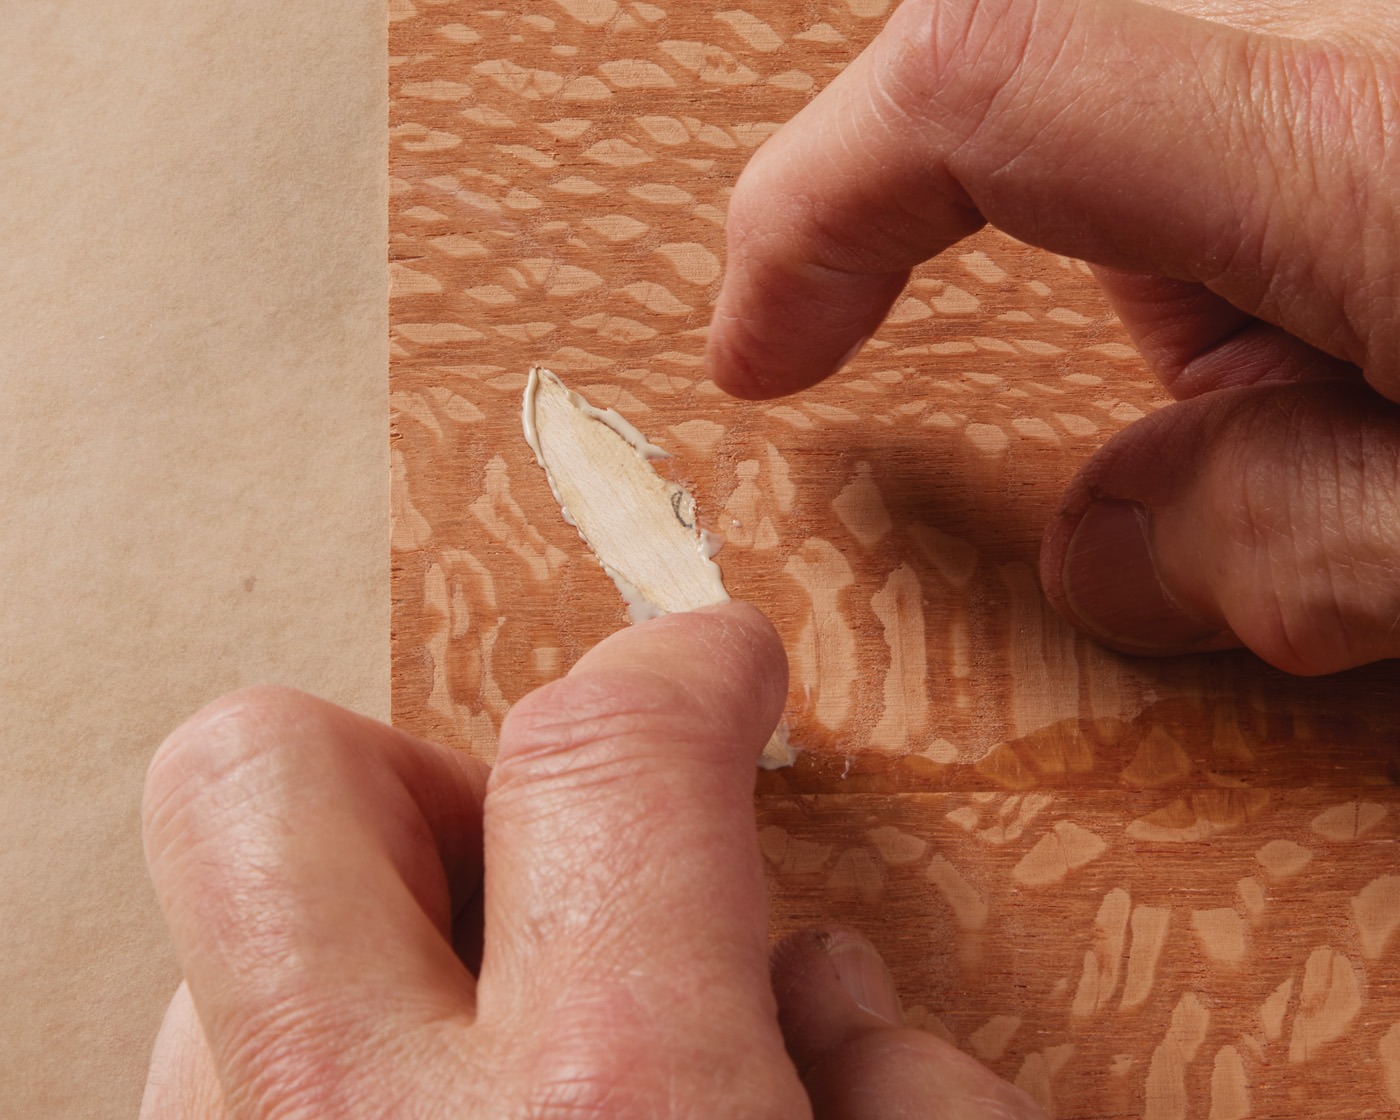
10 It can be glued in place with yellow glue.
I like to use Titebond III because it’s the right consistency (not as thick as Titebond II) and it’s waterproof, which prevents raised glue lines later. After gluing in a piece, I secure it with masking tape, wipe away excess glue, and move on to the next cut.
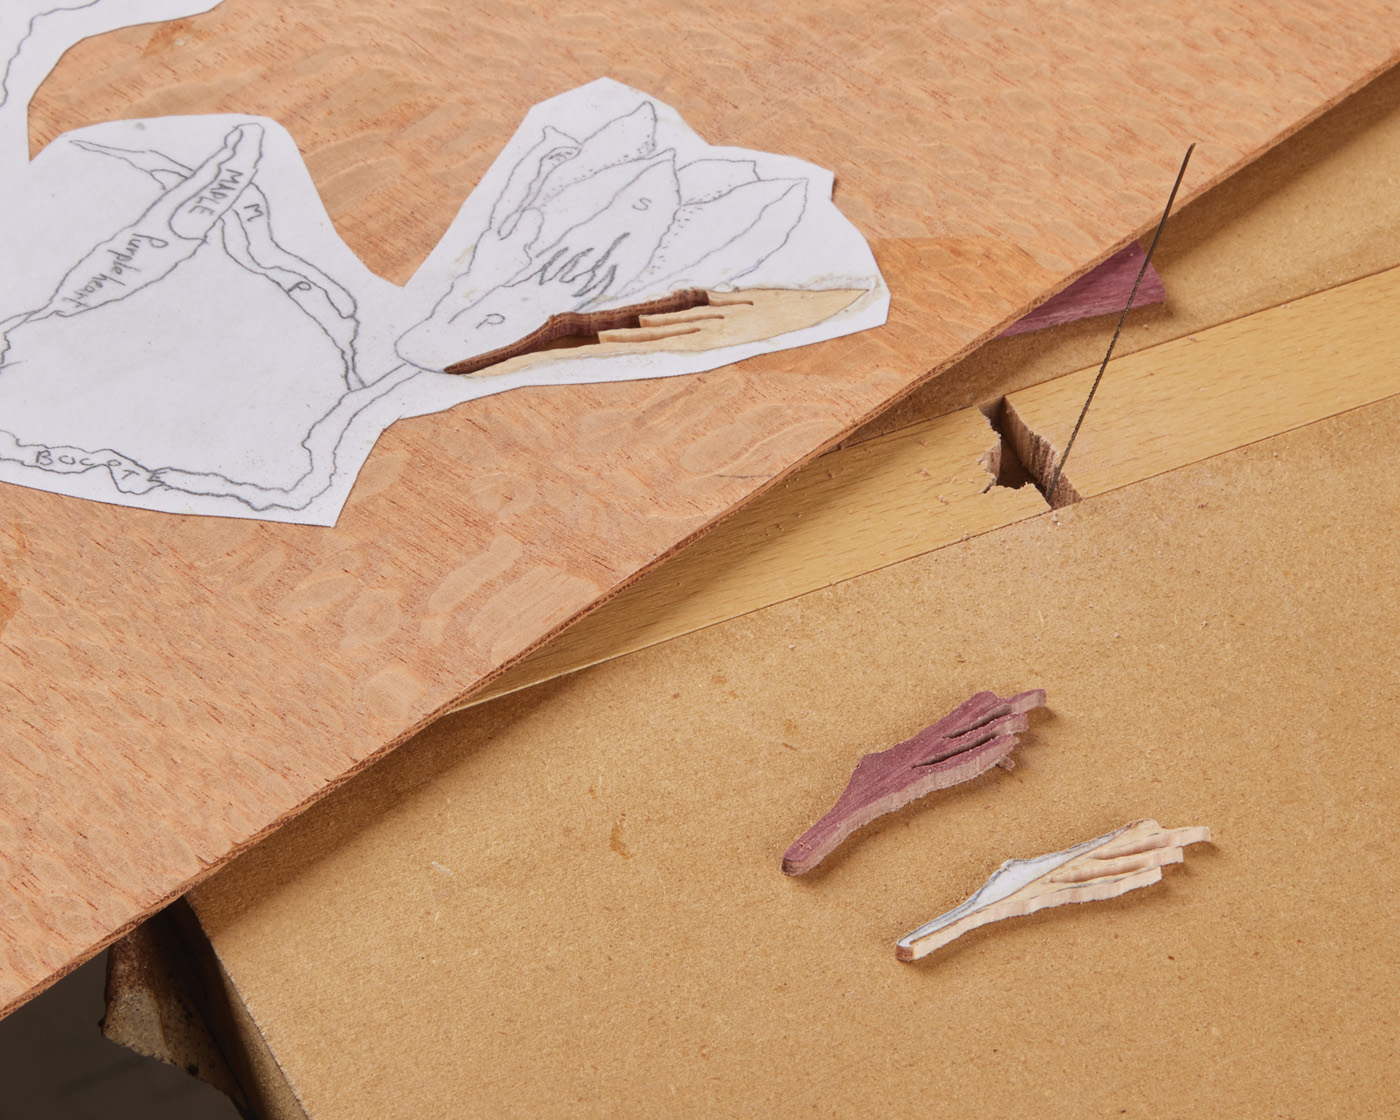
This is an overlapping process, which helps disguise entry holes. For example, if you cut a leaf, you can drill the entry hole where the branch will later go, knowing that the branch will cover it.
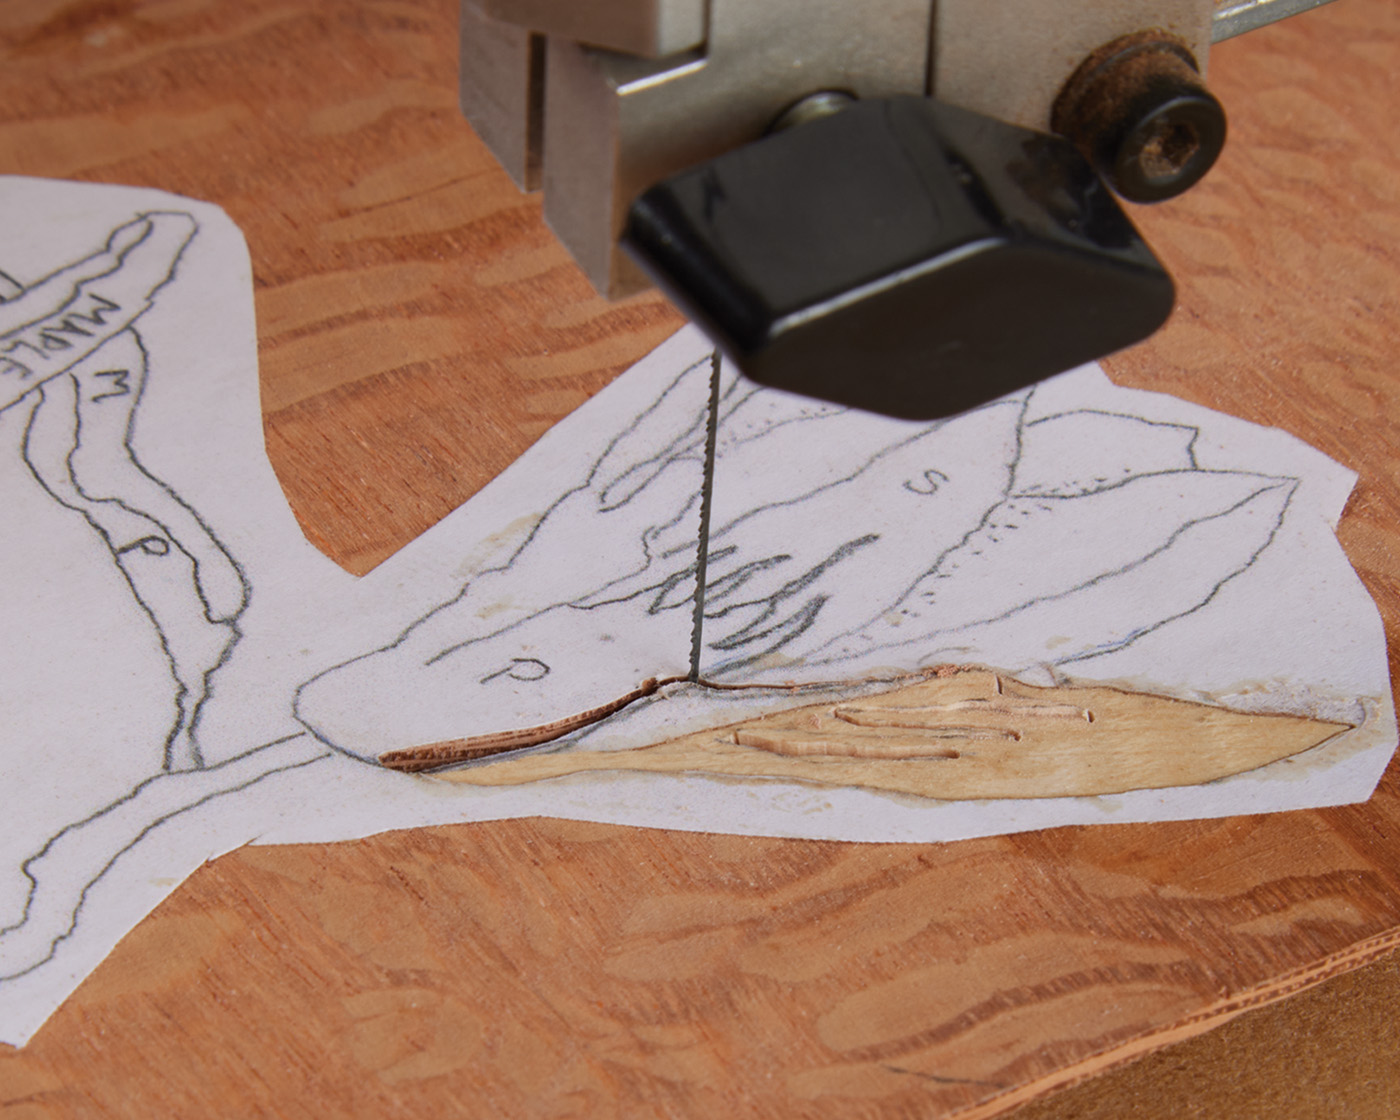
11 As each part overlaps the previous, you’ll notice you’re cutting away some of the previously applied veneer (below).
12
Make sure to cut a little oversized when bordering areas. Then, when you cut the neighboring piece, come back to your original lines so everything fits tightly. Try to intersect your entry hole by splitting it down the middle—it helps the hole disappear. Another option is to use a slightly larger drill bit in an area you know will later be covered by an adjacent piece.
Sand Shading
Sand shading is another important technique in marquetry because it creates shadows and adds three-dimensionality. Kiln-dried fine sand works best. I’ve purchased 30-mesh sandbox sand, though you could use something finer.
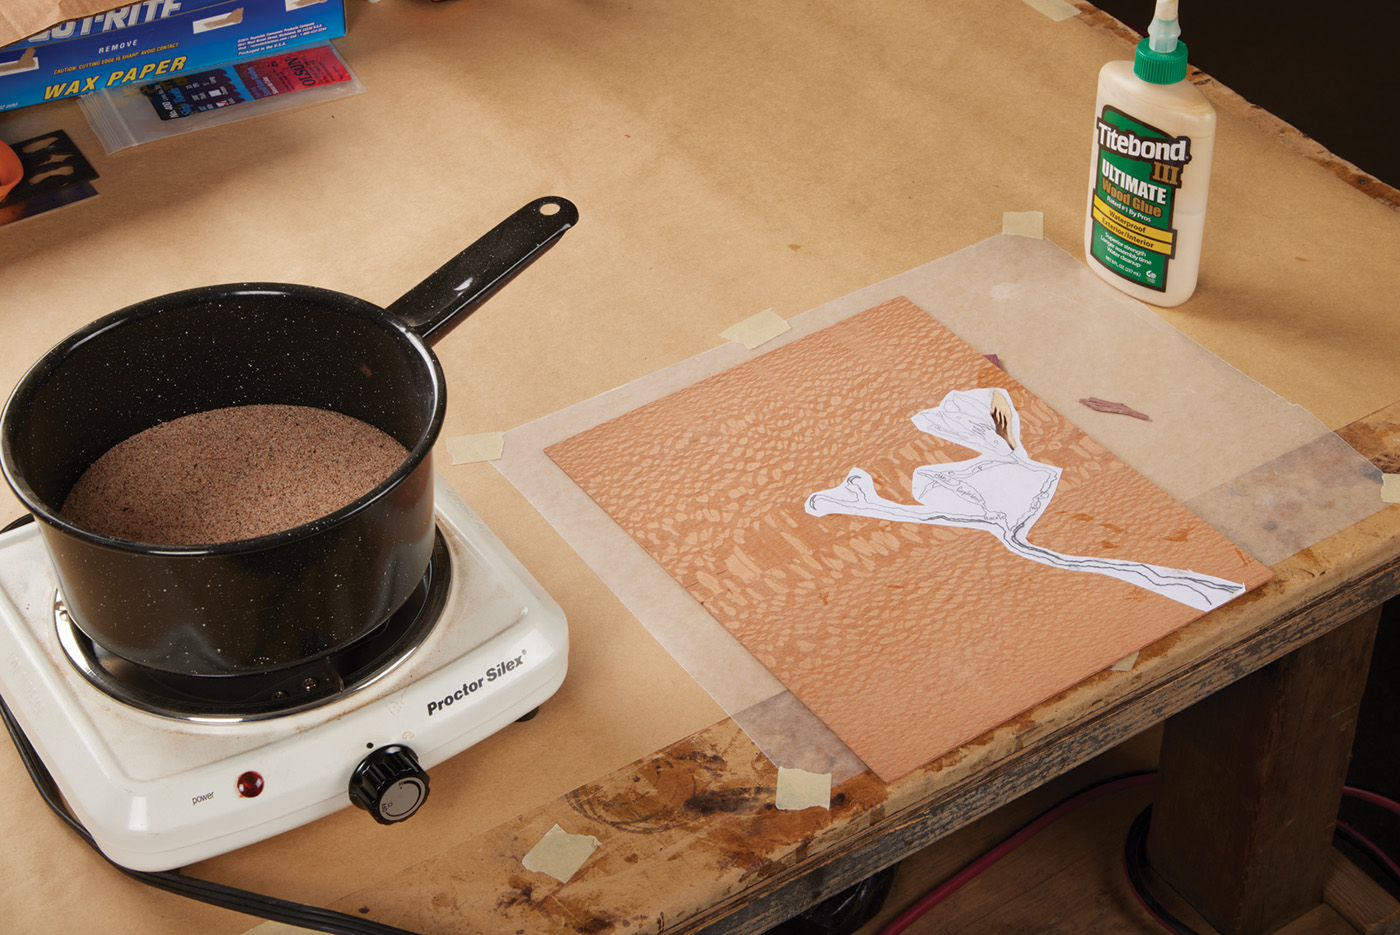
13 Heat up sand over an electric hot plate.
Note: an electric hot plate must be rated at least 1000 watts or the sand won’t get hot enough to burn the wood.

14 Use tweezers to gently brush the part through the hot sand.
15 The result is a shadow line where the sand has burned the wood.
I imagine a light source, then decide where shadows fall based on direction. I use a pencil to mark areas I plan to burn later. Using a ladle to scoop the hot sand and pliers or tweezers to hold small pieces is helpful.
16 The shaded piece is installed.
Wow Factors
One of the wow factors in double-bevel marquetry is cutting thin lines that end in a point. CNC machines can’t do this—their router bits leave rounded tips.
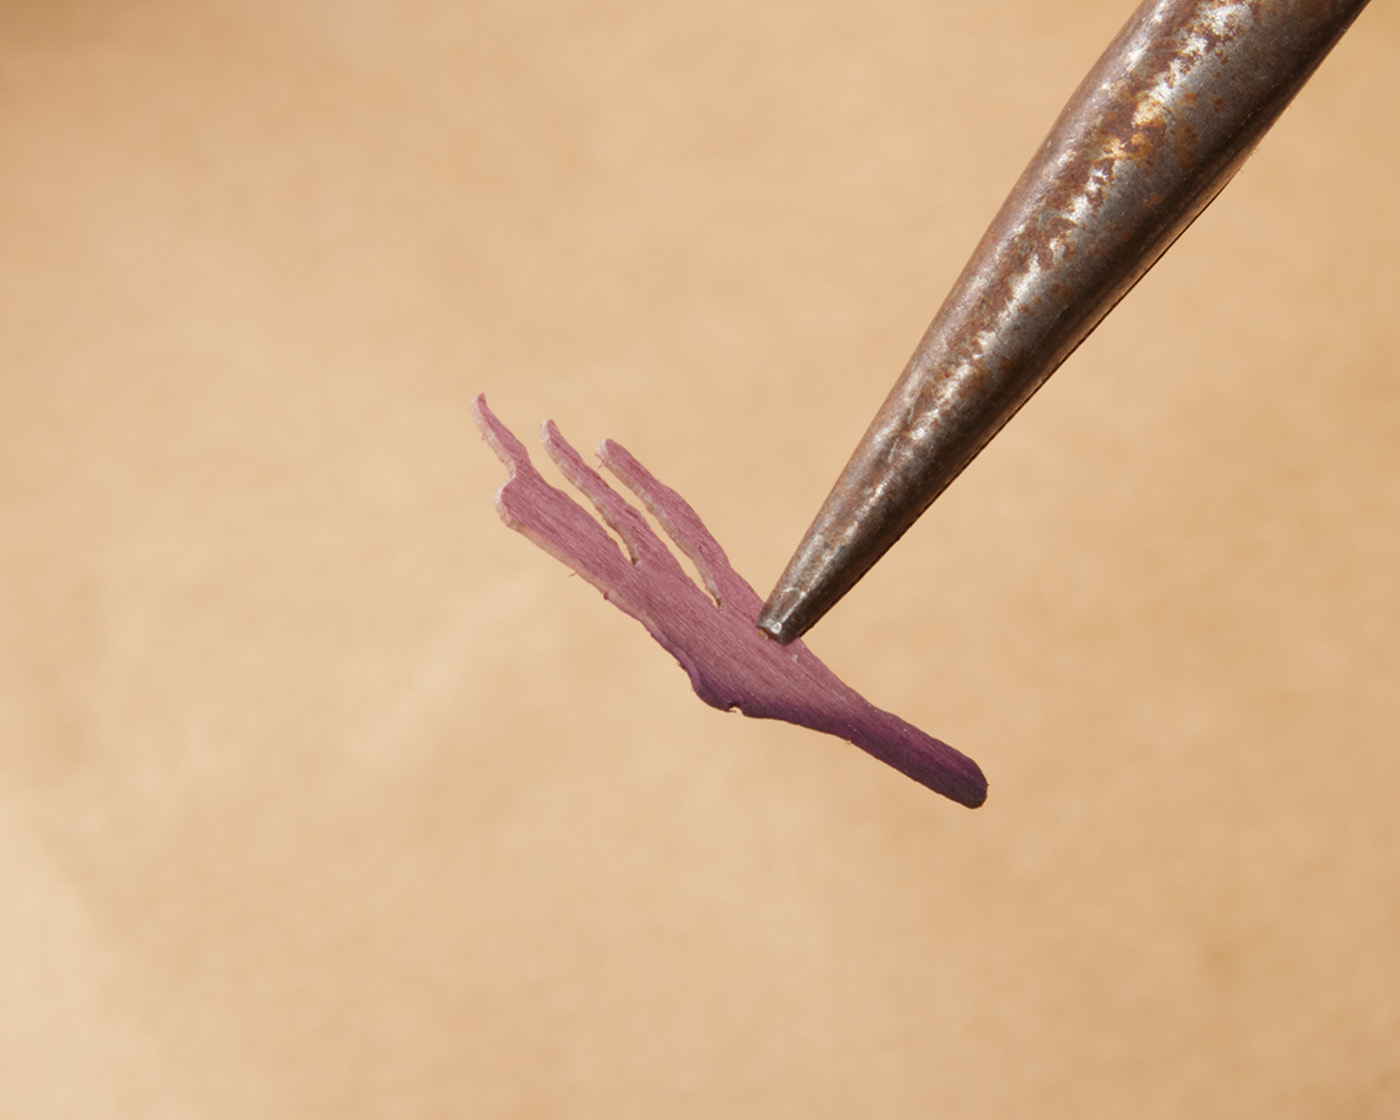
With double-bevel marquetry, each piece is cut on a tilted table. The result: pieces that are thinner at the top and wider at the bottom. Because each insert is essentially a wedge, you can cut surprisingly thin lines that are stronger than they look, then glue them carefully back in place.
You’ll want a scroll saw with EVS (electronic variable speed). I use a Foredom foot pedal, which also allows variable speed. The combination works well—I can make very tight turns by slowing down and pivoting the wood off the back of the blade. This lets me cut sharp corners that end in true points.
Discovery Process
Much of marquetry for me is a discovery process—not just following a blueprint. I constantly change my design if I become inspired by new ideas, colors, or grain patterns. The mind is like a parachute: it only works when open.
One of the most important techniques is the window technique. Let’s say you’re trying to figure out which grain pattern or color section works best. Reset the saw table to zero, drill a hole inside your boundary lines, and cut shy of the edges by about 1/16“. As your skills develop, you can get within1 /32“. This opens a “window,” letting you slide different veneers behind it until you find the best fit.
17 Setting the saw to 90°, and cutting just inside the line of your work area creates a window.
18 You can use this to line up the grain with a piece underneath the main work area.
19 This allows you to be deliberate when choosing the best grain for the part at hand. Just remember to reset the saw to 6° before cutting the actual part.
Wood can be deceptive—a grain pattern that looks perfect might be too large in scale once you view it in a small section.
Final Tips
Marquetry is a veneering technique. Once your artwork is complete and ready to mount to a substrate (veneer-quality plywood or MDF), prepare a backing veneer and glue both simultaneously to prevent warping. Failure to add a backing veneer will result in a panel that cups and bends over time.
My go-to glue for veneering is Unibond 800. It’s a liquid resin mixed with a powdered catalyst, and because it contains no water, it won’t swell the veneer. It can be mixed for a fast or slow set. I prefer the slow set, which gives me 30 minutes or more for a relaxed glue-up.
Lastly, remember to relax, enjoy the process—and most of all, have fun!


