


We may receive a commission when you use our affiliate links. However, this does not impact our recommendations.
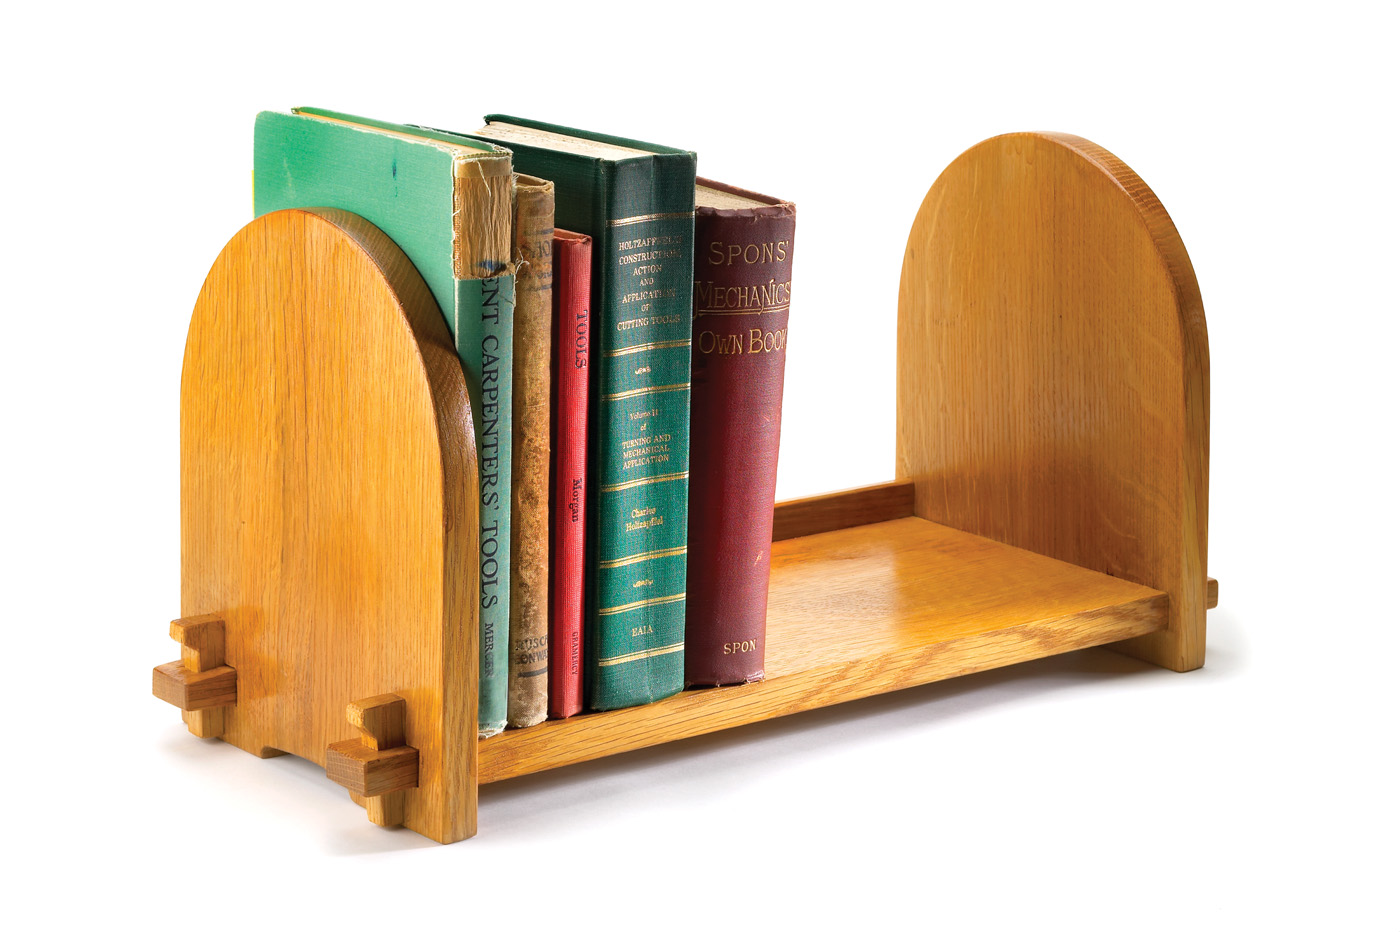
Machine precision, hand-worked details. This bookrack features tusk tenons. Blended techniques make it simple to build.
Hand and power tools work together to make signature Arts & Crafts joints.
The dividing line between hand-tool woodworking and machine-tool woodworking doesn’t exist for me. Although I’m not fond of noise and dust, I have an appreciation for what machines can do – make work faster and repeatable. I also know there are times when the right tool for the job is powered by what my grandfather called elbow grease.
This small bookrack can be made entirely by using hand tools, or entirely by using machines. I used both, and as we go through the steps of making it, you will find out why.
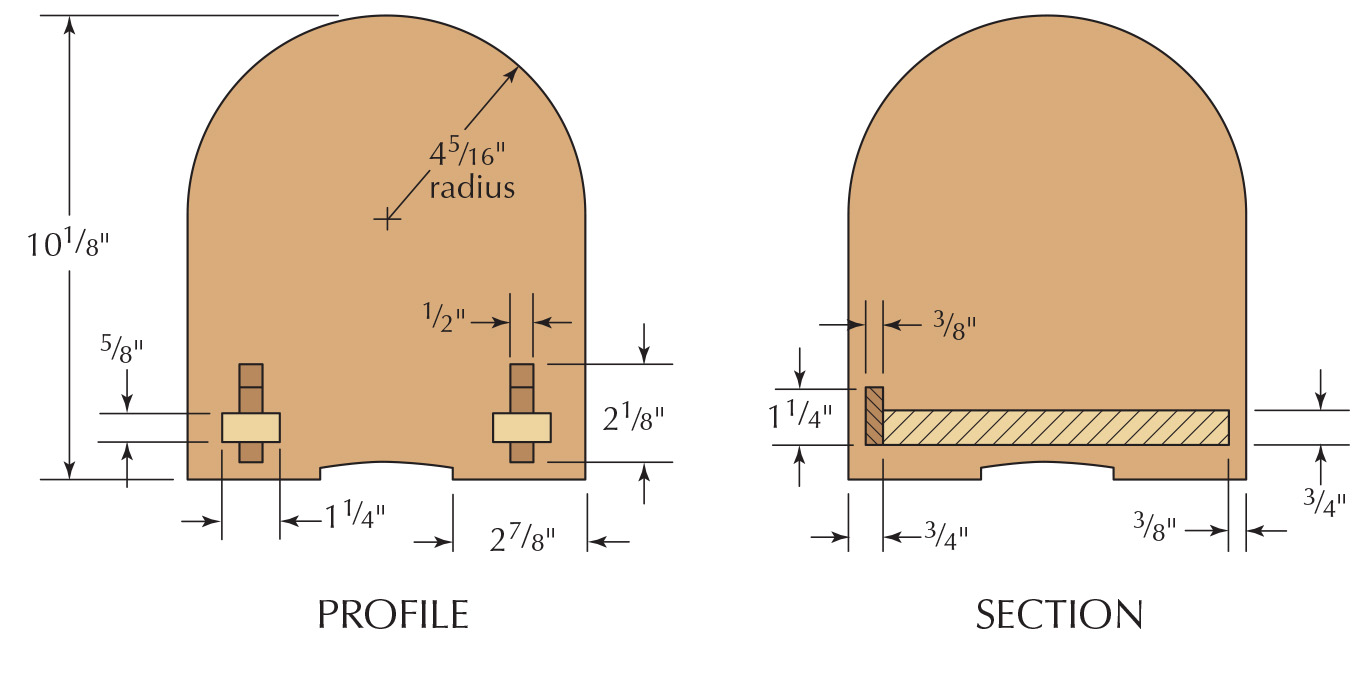
The key elements in this project are the through tenons that connect the shelf to the ends. I based the design on an early 20th century example from the Roycroft community. It’s an ideal way to learn this method of joinery – it only takes a few board feet of material and each of the steps is an opportunity to improve your skills.
A project like this is enjoyable if the parts go together with a minimum amount of fuss. That means that the mortises and tenons need to be in the right places, and at the right sizes.
I used a pair of templates and a router with a flush-trimming bit to locate and size the joints. This way, the work of getting things to fit has to be done only once, when making the templates. Work on the real parts goes quickly and if I want to make this piece again, or make a batch of them, I’m well on my way before I even begin building.
The patterns are made from 1⁄2” Baltic birch plywood. MDF would also work, but the plywood’s edges hold up better over time. You can enlarge the drawing or you can download a full-size version at the link below and print it yourself. Before cutting the outer shape, lay out and make the mortises.
There are many possible ways to make the mortises. I used a 5⁄8“-diameter straight bit in a plunge router, guided by the router’s fence. With the pattern blank firmly clamped to my bench I plunged the router within my layout lines to make the cut.
Online Extra: Download a full-size pattern in pdf format of the Arts & Crafts Bookrack.
More Shelves: Sign up for our newsletter and download FREE bookcase plans.
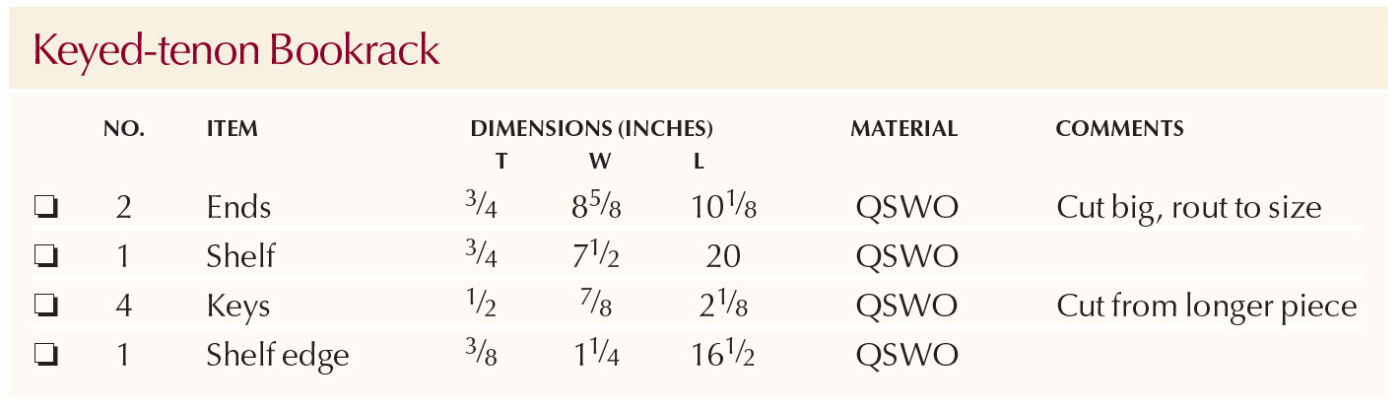
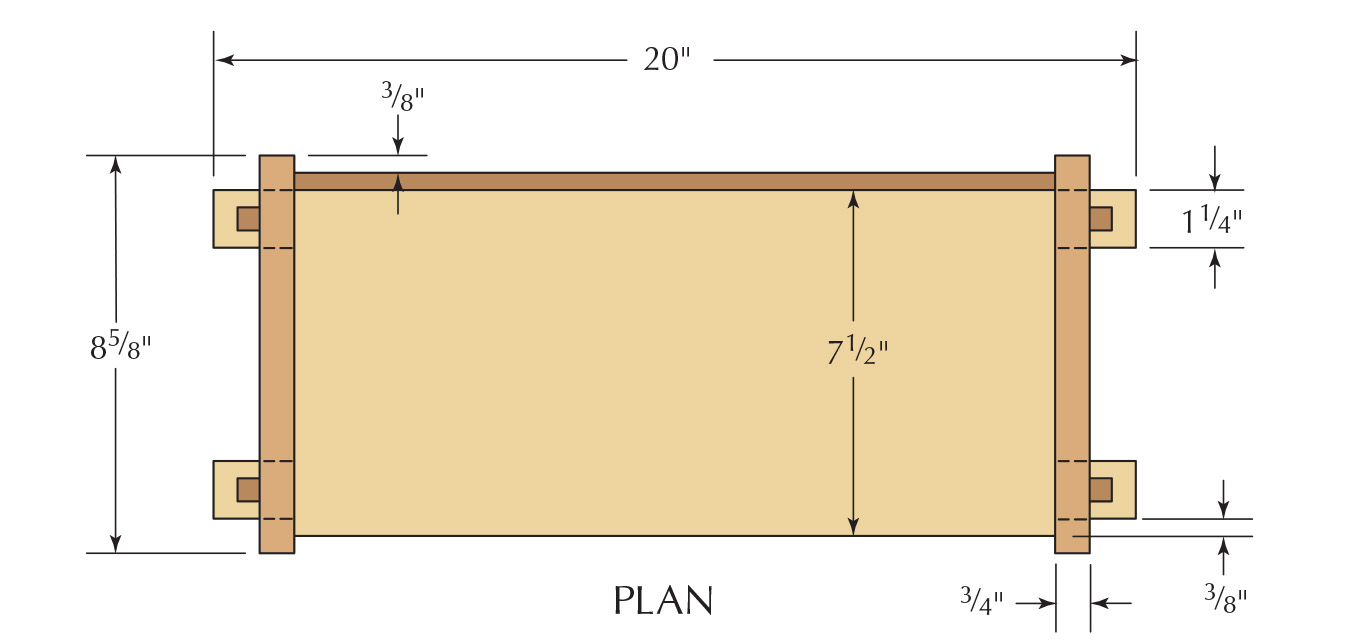
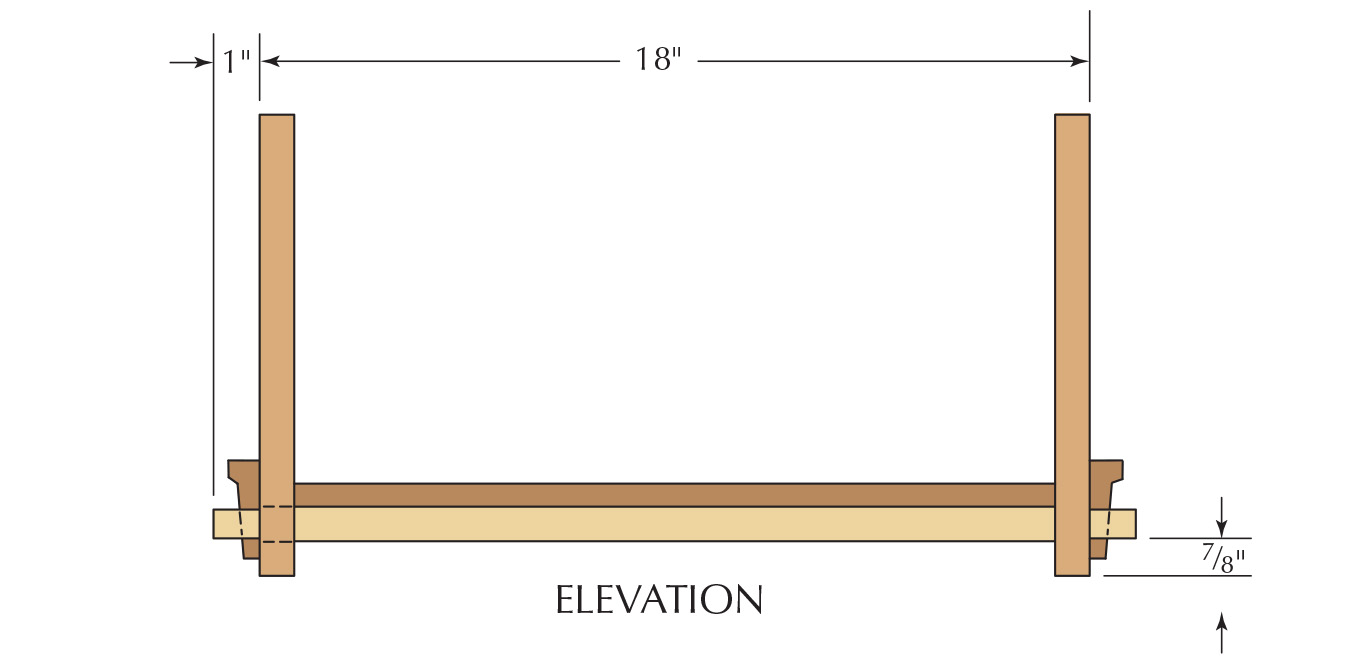
Keyed-tenon Bookrack Cut List and Diagrams
 Make the Templates
The advantage of the router is that it removes a lot of material quickly, making smooth mortises with parallel sides. The disadvantage is that it can’t make a mortise with square ends. But two hand tools – the chisel and the rasp – solve this problem quickly. First on the template and then on the real parts.
Because I had to square the rounded ends of the mortise slots by hand, I didn’t bother setting any stops for the ends of the mortises. I did it by eye, starting and stopping about 1⁄16” inside the lines.
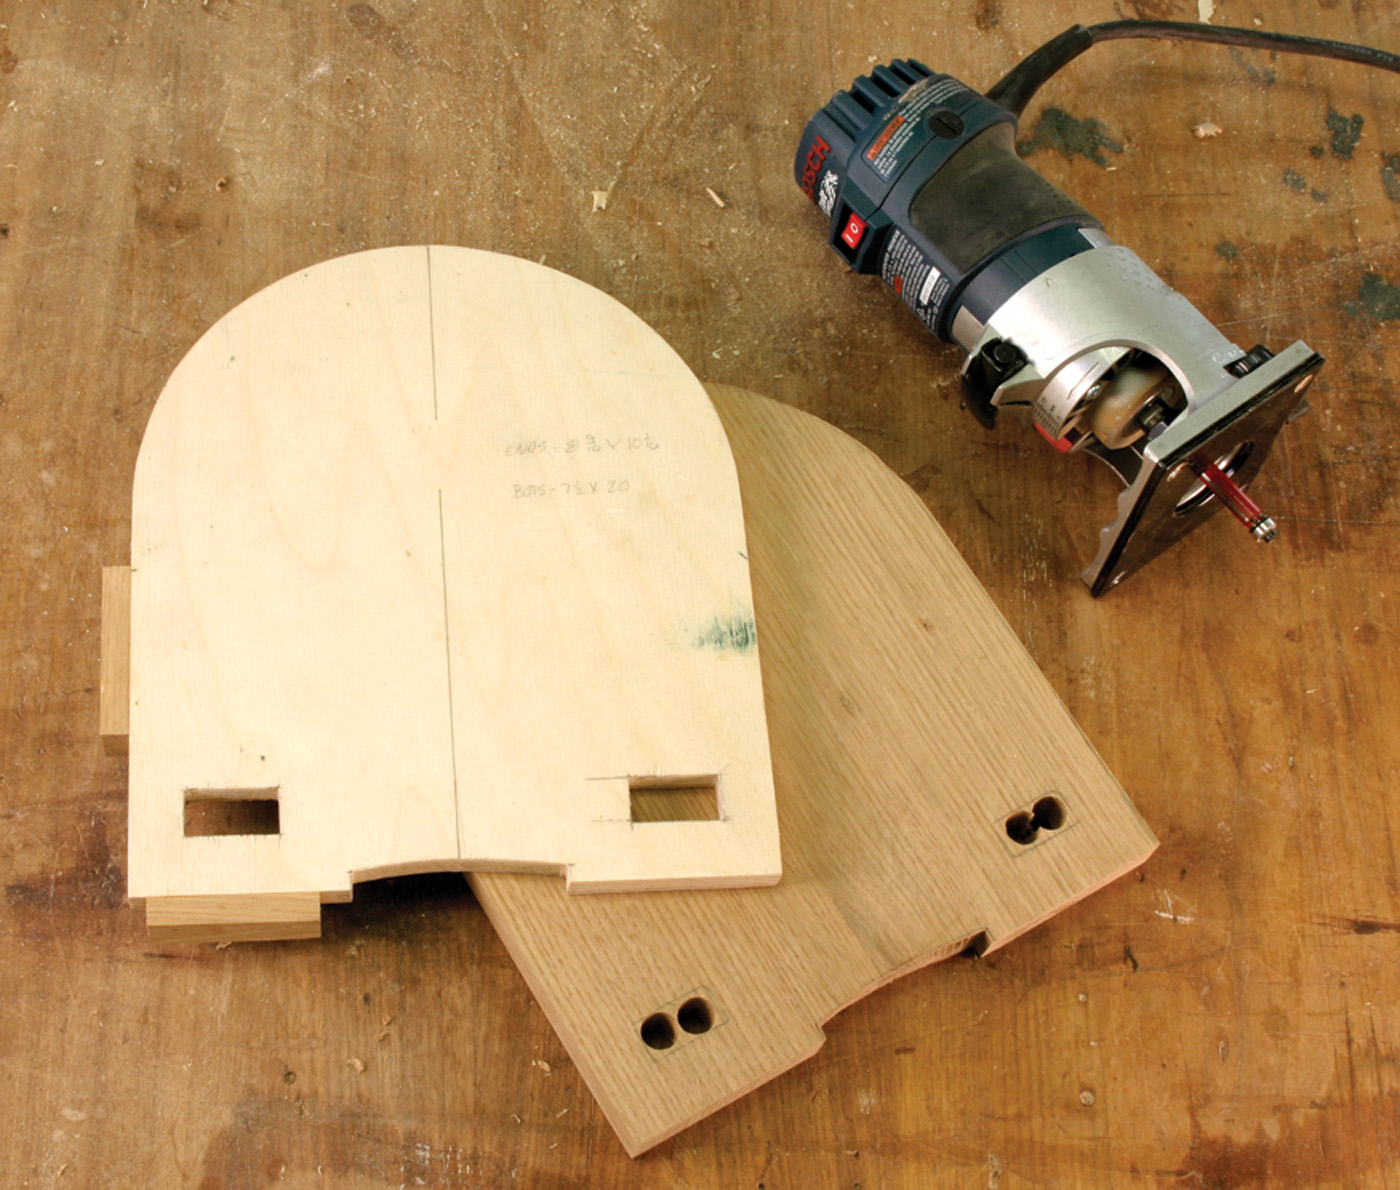
Form and function. The first template generates the shape of the ends and the through mortises. The oak blank below it is cut 1⁄16″ oversize, and the holes minimize the work for the router bit.
After chopping away most of the waste in the corners with the chisel, finish the mortises with a rasp. With those done, cut the outer shape of the pattern with the band saw or jigsaw, and smooth the perimeter with the rasp before adding the stops as seen in the photo above. A dab of glue and a couple 23-gauge pins hold the stops in place.
The shelf template is made from the template for the ends. Line up one edge of the shelf pattern blank to the end of one of the mortises in the other template and transfer mortise locations. The 3⁄8” offset in the shelf pattern allows space for the edge that will be added to the back of the shelf after the bookrack is assembled.
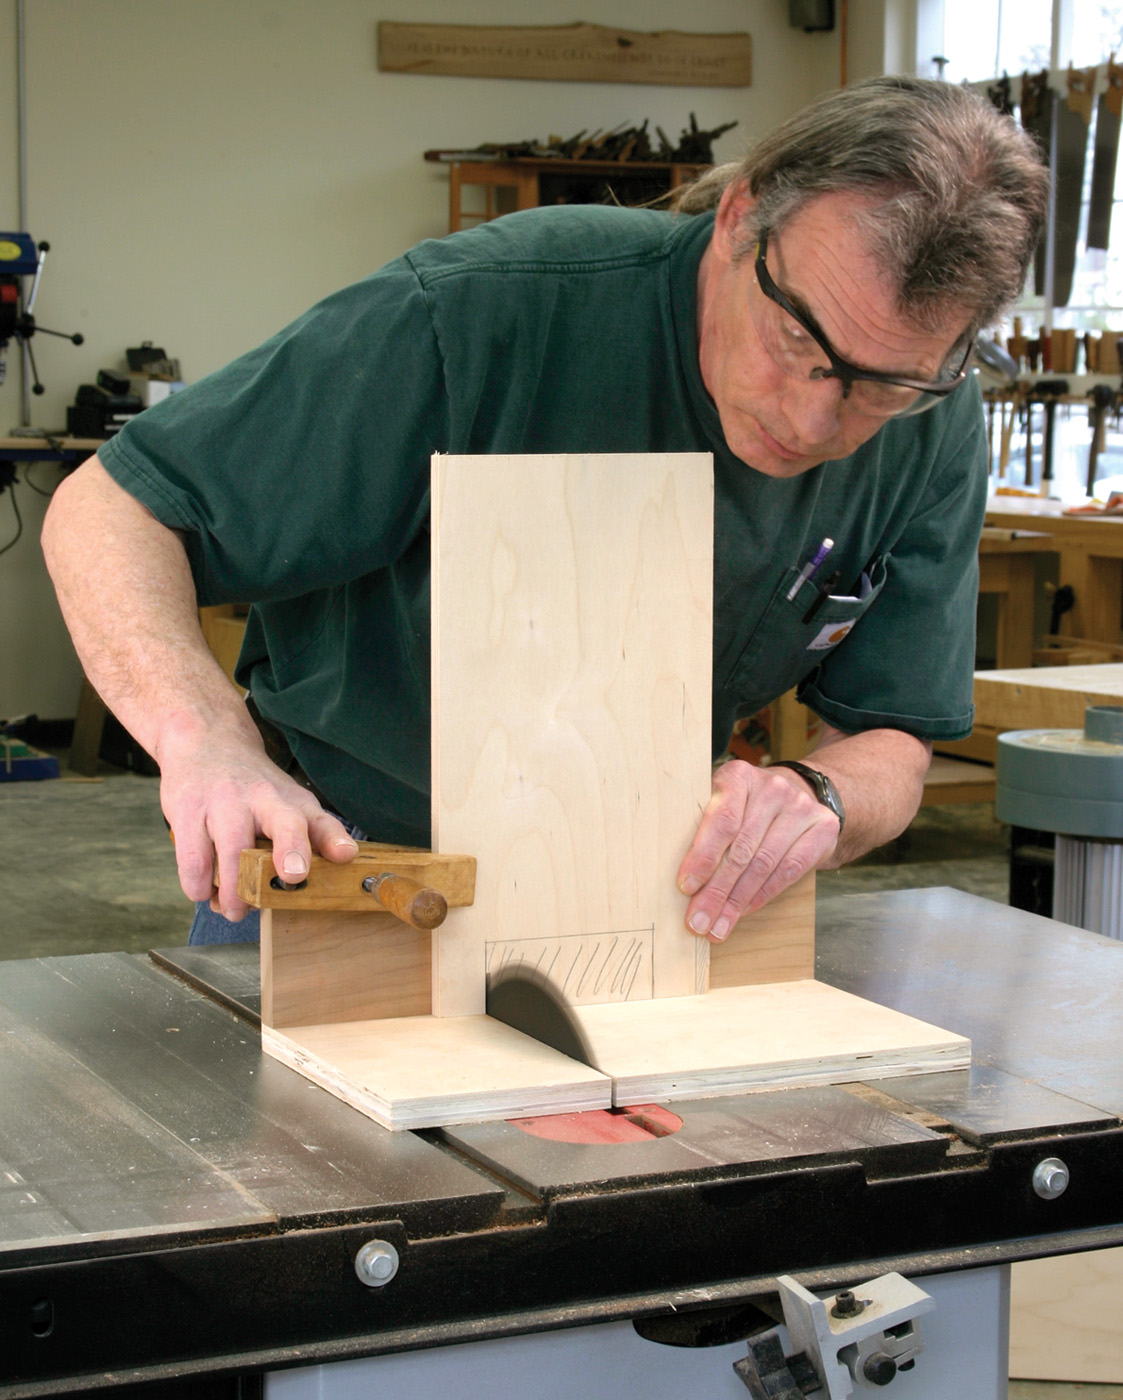
Guided by the kerf. One precise cut establishes the size of the tenon. This L-shaped jig attached to the miter gauge is simple and safe.
Make the cuts that define the edges of the tenons on the table saw, as seen in the photo above. To do this, screw a couple pieces of scrap together in an “L” shape and attach that to the miter gauge of the table saw. This provides a reference for where the blade will be during the cut.
Clamp the shelf pattern to the miter gauge attachment to hold it in position and to keep your hands a safe distance from the blade during the cut.
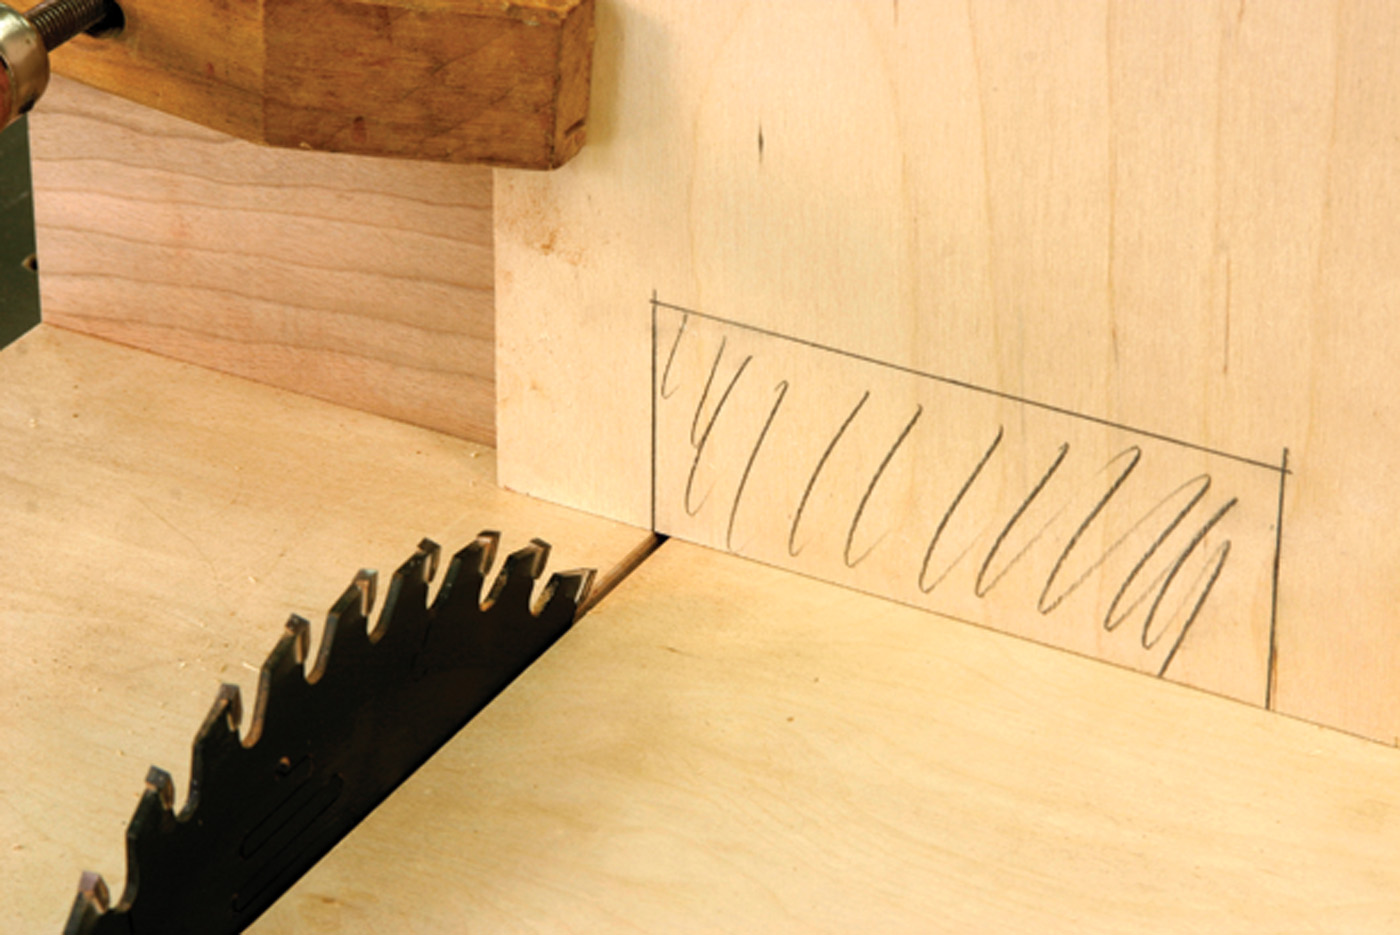
Nothing to chance. The saw kerf in the horizontal part of the jig shows exactly where the blade will cut. With the layout line at the kerf line, clamp the piece to the jig.
To remove the waste between the tenons, make a rough cut on the waste side of the layout lines at the band saw then clamp a straight piece of plywood directly on the line. Then, with a flush-cutting bit in a router, trim the pattern back to the line and clean up the corners with a chisel. The goal at this point is to get the tenons on the shelf pattern to fit in width in the mortises of the end pattern, as seen below.
Get this right and success will follow. Take time to fit the tenons in the shelf template to the mortises in the end pattern. When the parts are routed to the templates, the joints will work.
When pattern-trimming mortises in solid wood parts like this, I always use the smallest diameter router bit available. This minimizes the curved waste left in the inside corners. I use the patterns to trace the shapes on the wood. I keep close to, but just outside the lines to reduce the material the router will remove. Then I cut all the parts to rough sizes.
Good Reason to Go Backward
Hogging off a lot of solid wood is an invitation to chipping or tearing out the solid wood, particularly on the curves. Clamp the patterns and the parts securely to your bench and make the first pass moving the router counterclockwise around the outside of the pattern. Climb cutting in this way helps to reduce chipping and tear-out. Drill two holes at the mortise locations to allow the bearing on the bit to reach the pattern below.
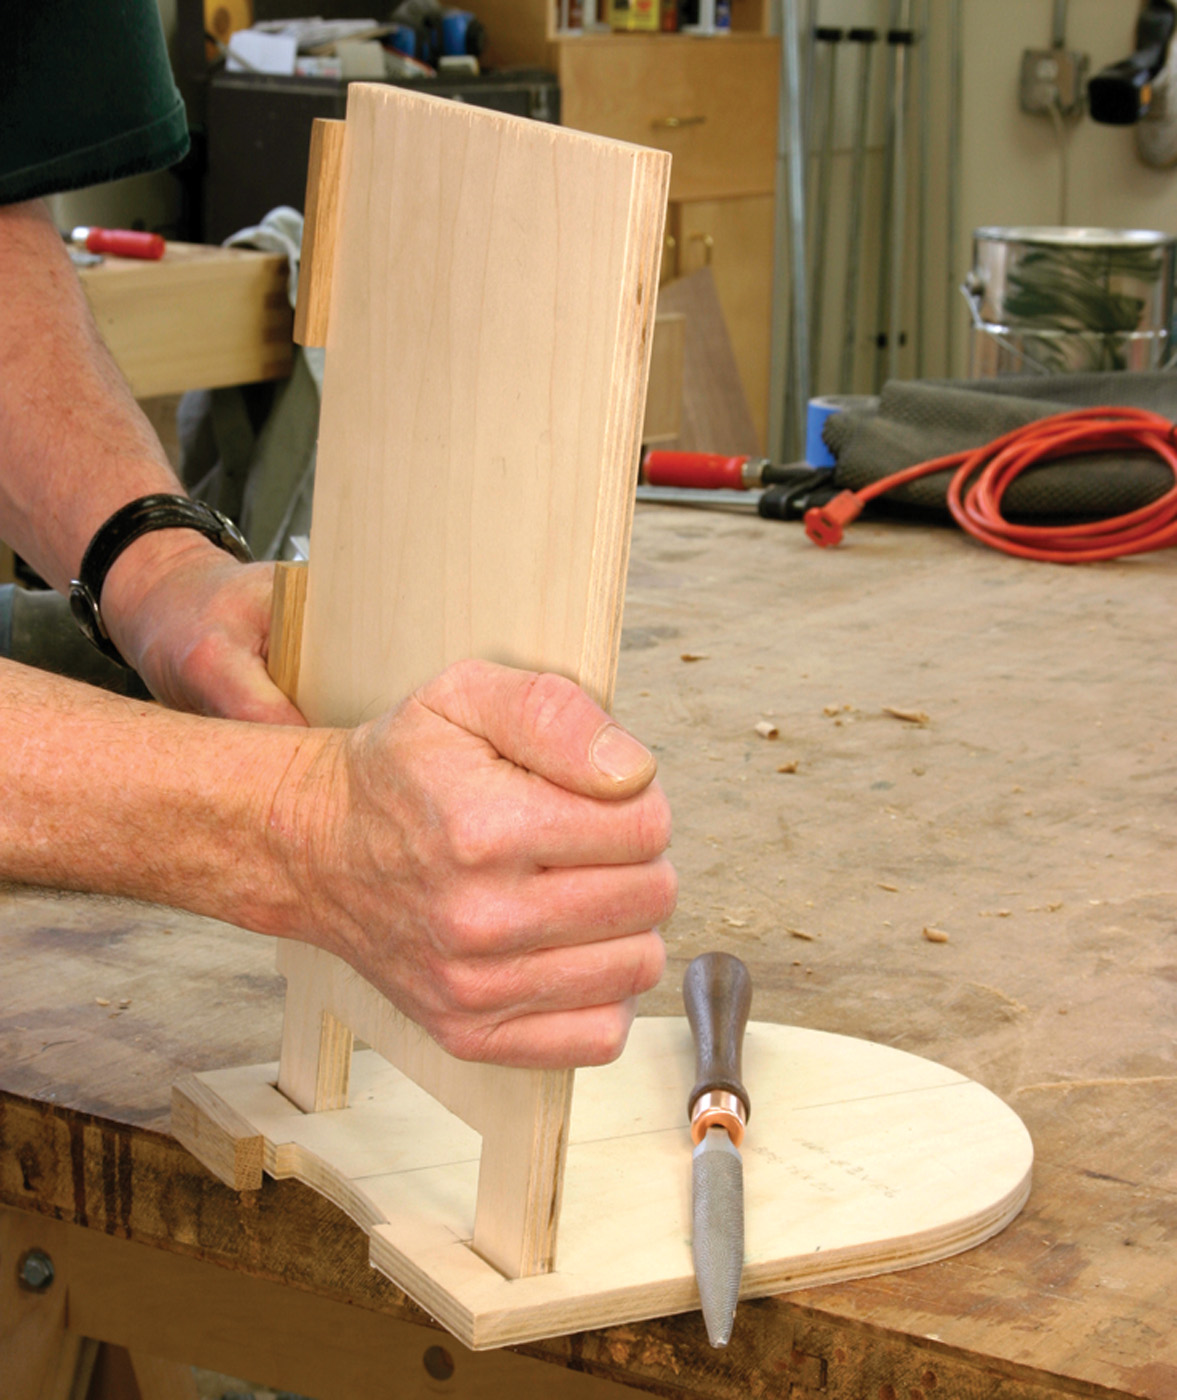
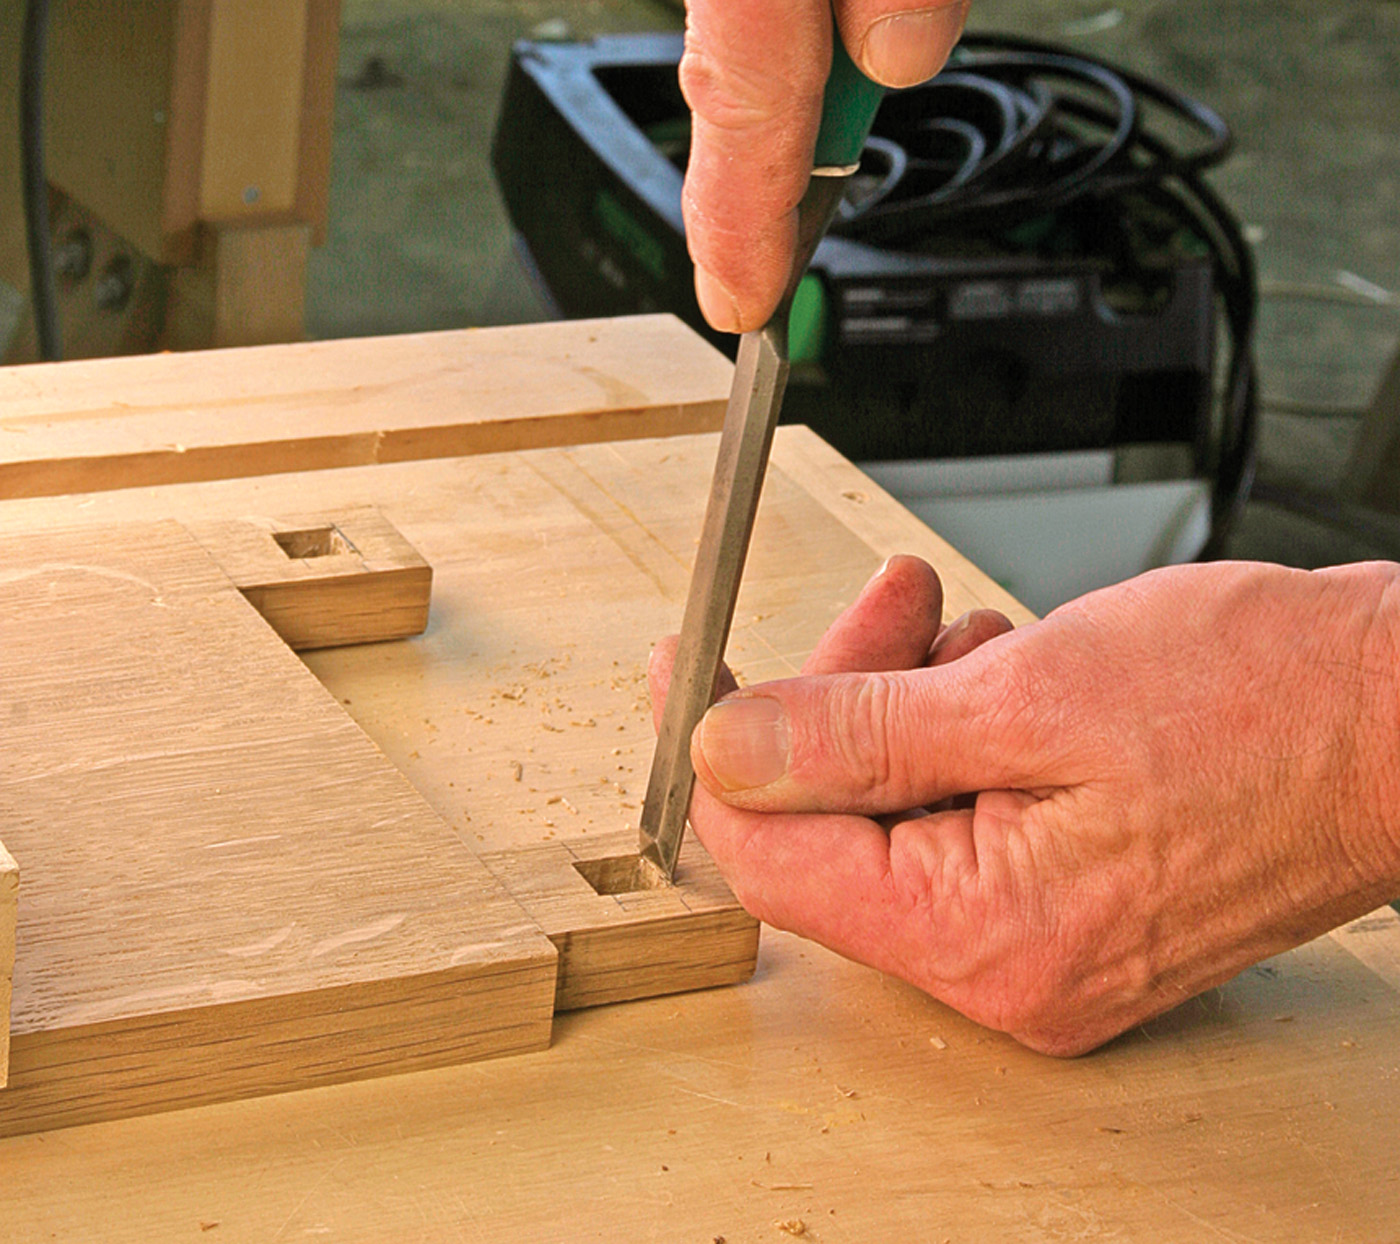
After routing the mortises, the corners have to be squared. I use a chisel and put the back against the end-grain edge of the straight part of the mortise. Holding the chisel flush, swing the corner down to establish a straight line.
Built-in guidance system. The flat area of the routed mortise acts as a guide for the back of the chisel. Rest the back against the cut and swing the edge of the chisel down to the corner.
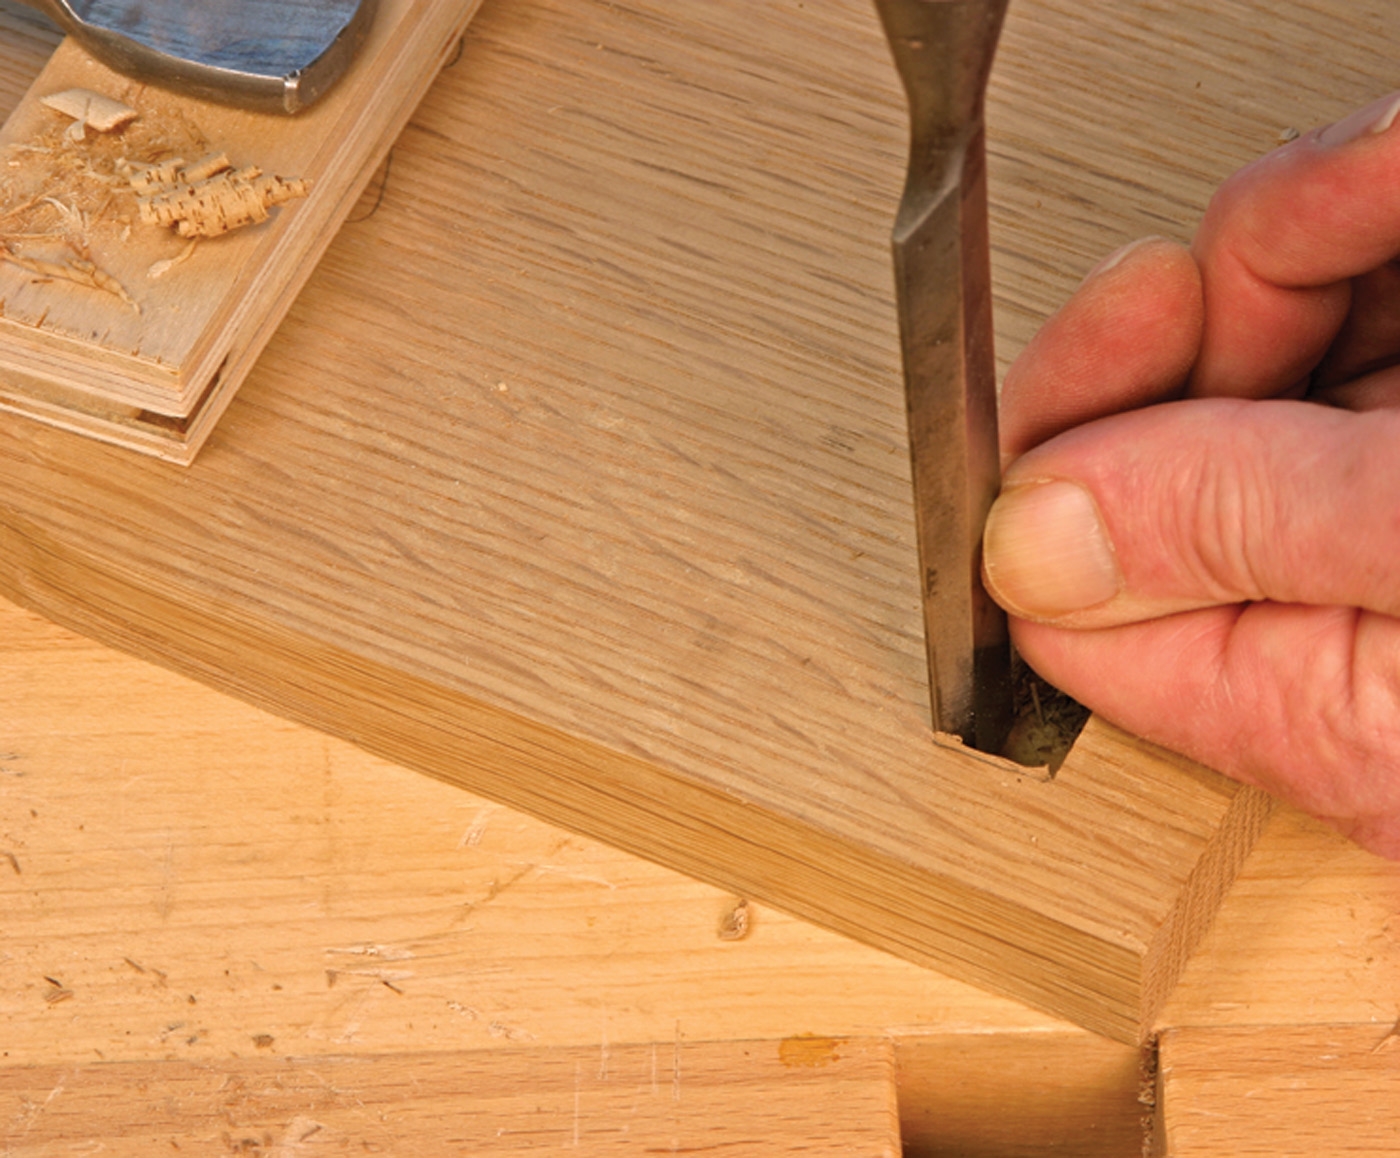
Turn the chisel 90˚ to set the perpendicular line at the end of the mortise. Then, go back to the end-grain side and force the chisel down as far as possible, cutting across the grain. After cutting the two opposite end-grain faces, make paring cuts with the grain.
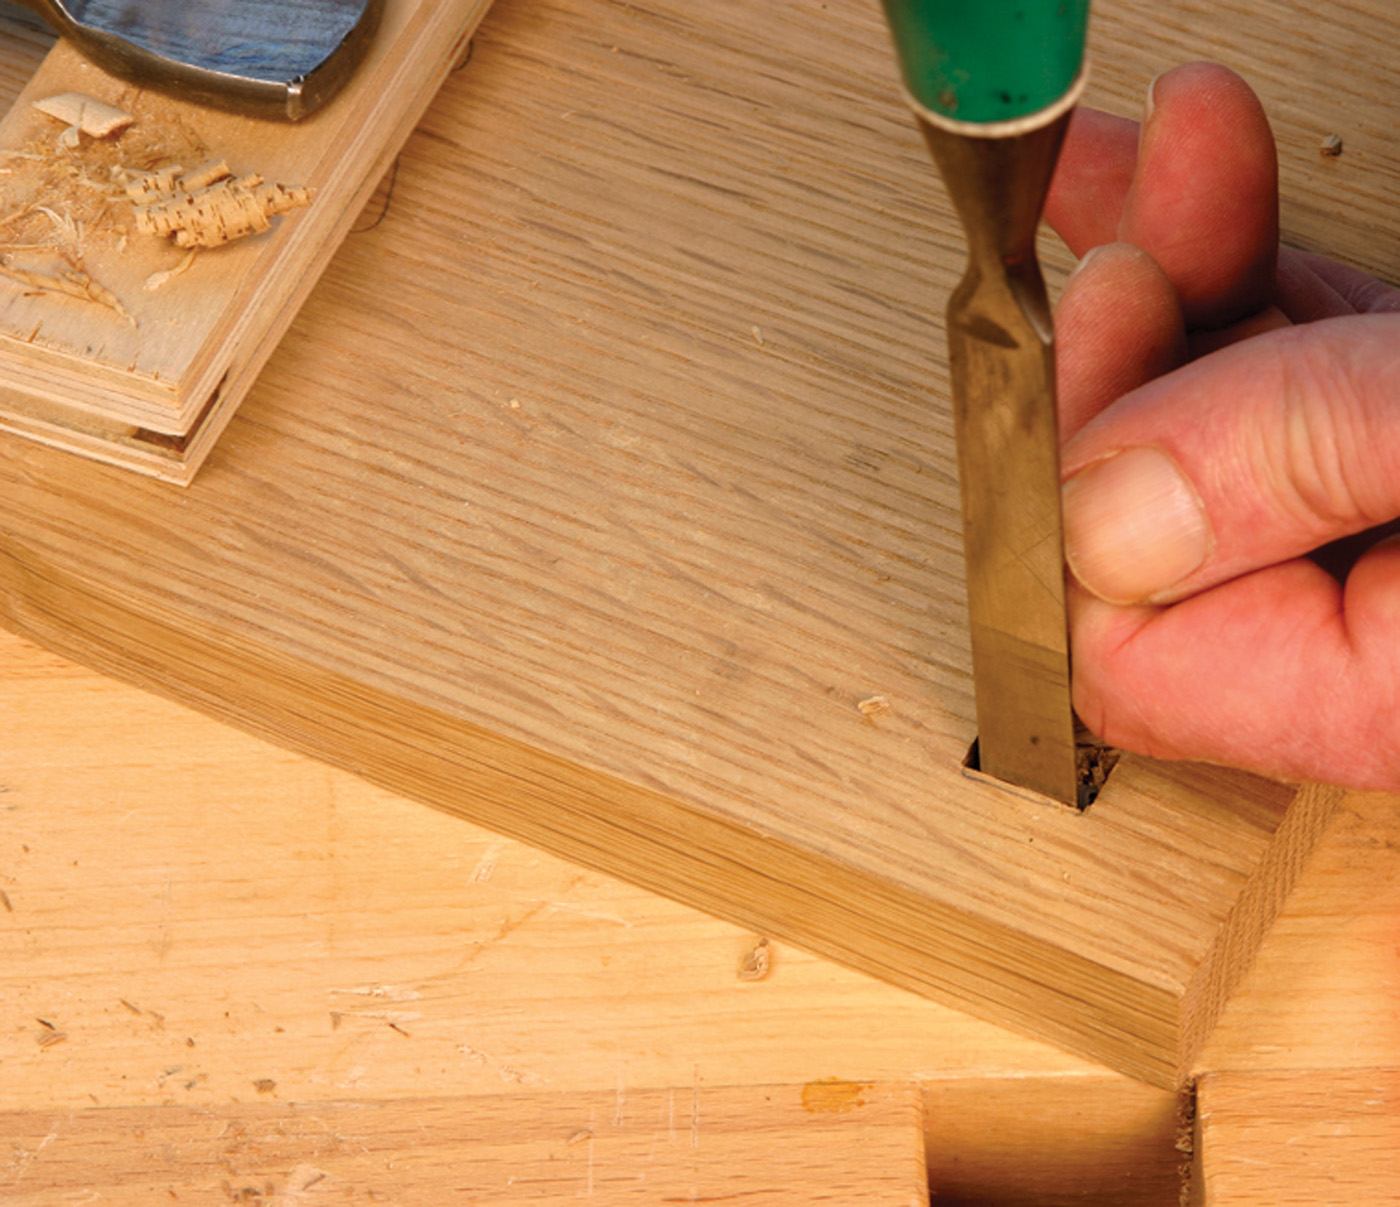
This shallow line will guide the tool in the next step of making the cut. With the edge of the chisel in the line, push straight down. Clean up both end-grain surfaces of the mortise and then finish the cut on the ends. The long-grain cuts tend to split, so shave off a little at a time. A few strokes with a rasp will finish the mortises.
The tenons will fit in the width of the mortise – or at least be very close – from the template. To get them to fit in thickness, and to establish a shoulder on the inside of the joint, trim half the difference in thickness off each cheek of the tenon, using the jig shown below.
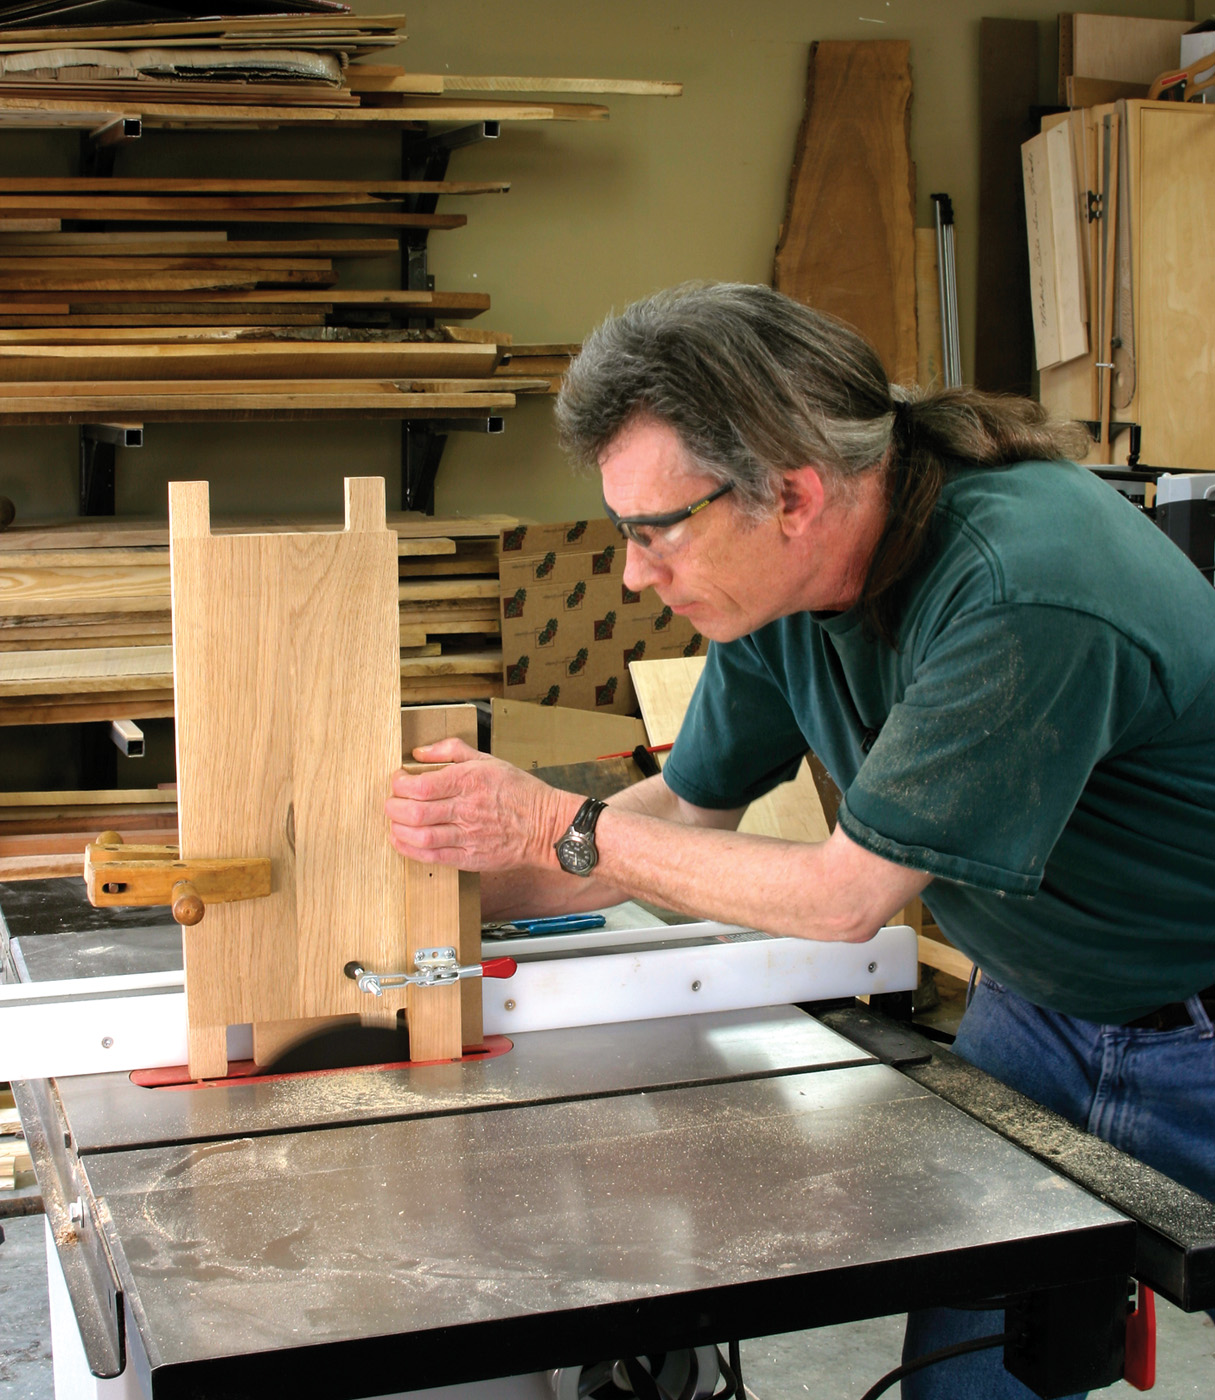
Cutting the shoulders. Use the tenoning jig to make the shoulder cuts on the through tenons. The clamp on the far end holds the workpiece to the jig.
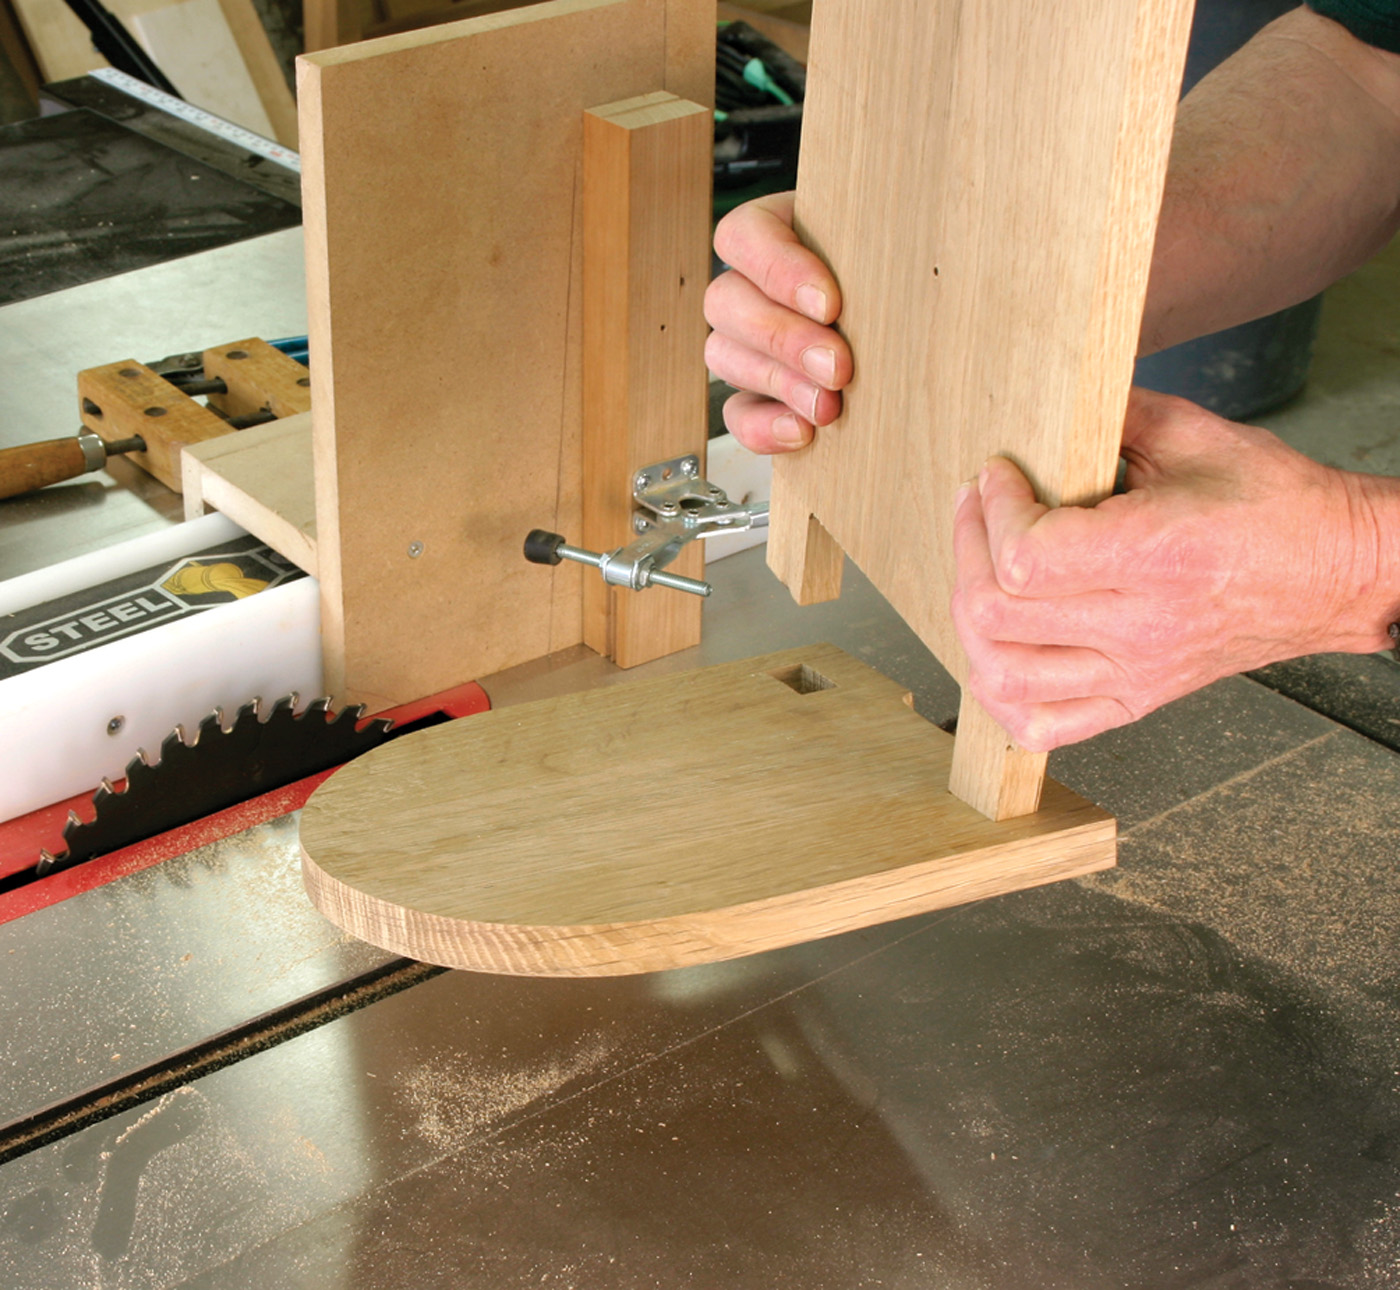
Testing the fit. Fine adjustments of the saw’s fence allow a good fit. The tenon can be pushed in with hand pressure, and the mortised end can be lifted without falling.
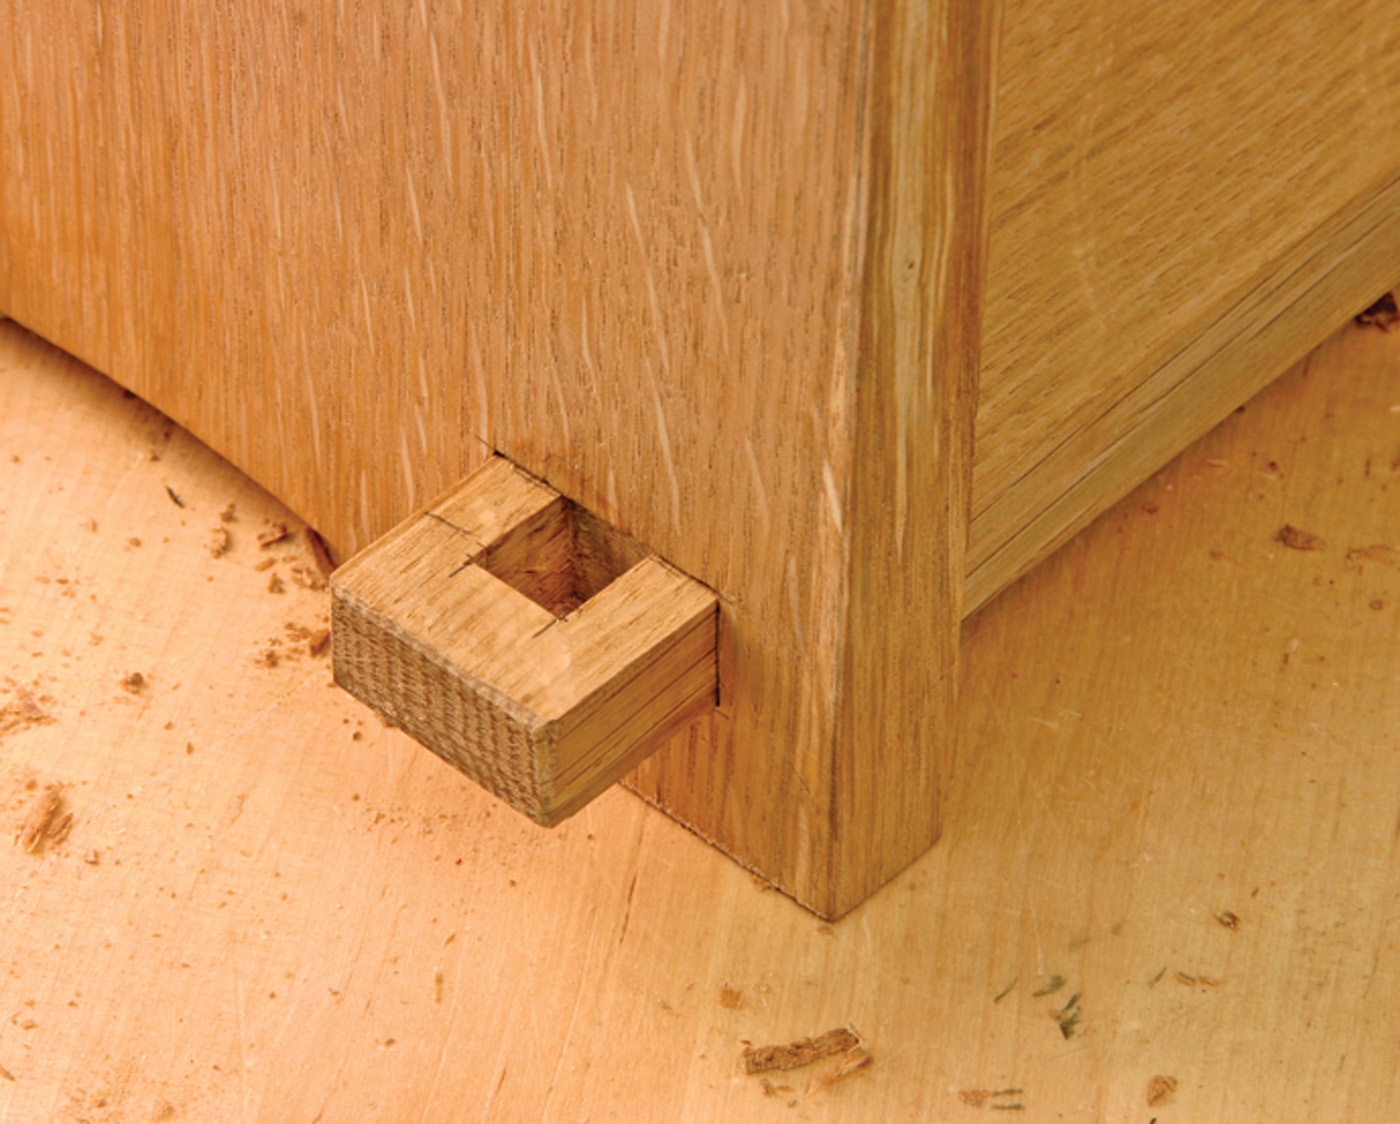
Before fitting the tenons, chamfer the ends. This makes starting the tenons in the mortises easier, and it prevents the tenon from doing any damage on the way out of the other side of the mortise. Start the ends in the mortises and push down. If they stop, look to see which face of the tenon should be trimmed.

Insurance before fitting. Chamfering the ends of the through tenons before fitting them makes them easier to start in the mortises and prevents damage on the way out of the other side.
Tight But Not Too Tight
This loosens the joint just enough to get it almost all the way home with hand pressure. A few taps with a dead-blow mallet seats the shoulder of the joint. Mark a pencil line where the cheek of the tenon meets the face of the end piece. After all the work of putting the joint together, it’s time to take it apart again to make the small mortises for the tusks.
The tusks pull the tenon into the mortise by bearing on the face of the mortised end. Locating the back of the mortise just behind the face ensures this. After offsetting the pencil line on the tenon 1⁄16” back, mark out a square, centered mortise and cut it with one stroke of a 1⁄2” chisel on the hollow-chisel mortiser. A block of scrap under the tenon holds it above the machine’s table and prevents the back side from tearing out as the chisel exits. This mortise could, of course, be made by drilling a 3⁄8” or 7⁄16” hole and squaring the corners with a chisel if a mortising machine isn’t available.
Taking Aim on the Angle
The outer edge of the mortise is sloped about 1⁄16” in the thickness of the tenon to match the angle on the tusks. This wedging action locks the joint together and if the tusks loosens from wood shrinkage, gravity or a tap on top will tighten the joint.
Just a bit behind. The back edge of the second through mortise is back from the face of the end 1⁄16″. The tusk will then be able to pull the joint tight.
Holding the back of the chisel against the long-grain sides of the small mortise, swing the edge of the chisel down to nick the corners at the layout line.
Then, place the edge of the chisel on the line and push straight down. Don’t push hard – just enough to make an incision along the pencil line. The edge of the chisel will fit in this slit; tilt the handle of the chisel toward you. Looking down the handle, aim for the edge at the bottom of the mortise. With the chisel in position, a few taps with a mallet make the slanted cut on the inside of the mortise.
Eyeing the angle. Set the chisel on the line and lean the chisel back until the edge is in line with the bottom of the mortise. Strike the chisel with a mallet to complete the cut.
To make the tusks, mill some scrap slightly thicker than the 1⁄2” mortise and about 7⁄8” wide. Make lengths that are roughly two tusks long plus 1″, and plane the tusks until they fit the mortise in width. Lay out two tusks, cut them to shape on the band saw then drive one end into the mortise.
The excess length on the tusks gives some room to fiddle with the fit of the angled tusks in the slanted mortise. A rasp followed by a card scraper removes the band-saw marks on the tusks. When the fit is good, mark the bottom of the tusks 1⁄4” up from the bottom of the end and 3⁄4” above the top cheek of the tenon.
Then mark the final outline of the tusks, trim them with the band saw and finish shaping with a rasp. When all four tusks fit, take the entire piece apart one last time to scrape and sand the surfaces. Sand the wide surfaces and exposed edges, but stay away from the through tenons and parts of the tusks that fit in the small mortises.
To Glue or Not to Glue
The original version of the bookrack was shipped in a flat carton, and assembled by the purchaser. Glue is an option, but not a necessity, to hold the tusk joints together. I don’t bother with it – the joints are surprisingly strong on their own.
After final assembly, the exposed parts of the tenons and tusks are scraped and sanded. While quartersawn white oak is tough to cut, it is easy to sand. I generally go over the entire piece with a card scraper and only sand with #150 or #180 grit.
The back edge of the shelf is the last piece attached. After cutting it to size and sanding it, run a bead of glue along the edge of the shelf, and hold the edge to the shelf with a few clamps, then let the glue dry overnight. The next morning, off go the clamps and on goes the finish.
I usually put a darker finish on pieces like this, but every now and then I like to see a piece without any added color. On this shelf, I used two coats of amber shellac. After letting the shellac dry thoroughly, scuff it with a Scotch-Brite pad and apply a coat of paste wax.


