We may receive a commission when you use our affiliate links. However, this does not impact our recommendations.
And here’s to you Monsieur Roubo. Few workbench designs are as bullet-proof or as simple as those of A.J. Roubo, an 18th-century cabinetmaker who also was a fine writer.
An 18th-century French workbench is quite possibly the most perfect design ever put to paper.
In the 18th century it was common for the workrooms and living areas of a home to share the same space. A workbench, for example, would not be out of place in the front room of the house.
This small historical fact has me concocting a plan, which I haven’t yet shared with my family.
My workshop at home is in a walkout basement. I’ve done what I can to make it pleasant, but it’s isolated from the rest of the house. This is on purpose: My planer and jointer sound like air-raid sirens.
During the brutal stock-preparation phase of a project, my shop is perfect. I can run machinery all day and bother no one. But when I get into the joinery of a project, I long for a shop with beams of natural light, wooden floors and a close connection to the day-to-day of my household.
In other words, I want to claim some space upstairs as a bench room.
Hold tight: This story isn’t just about me. It’s about you, too. A furniture-grade workbench is a great idea for apartment dwellers, or people who need to set up a shop in a spare bedroom of their house. It’s also a fine idea for people like me who plan (read: plan to grovel for permission) to do some woodworking in a living area of their home.
Lucky for all of us, one of the best-looking workbench designs is also the simplest to build and most useful, no matter if you have a love affair with your plunge router or your router plane.
Thank You, Monsieur Roubu
During the last five years I’ve built (or helped build) more than a dozen workbenches based on the 18th-century designs of André J. Roubo, a French cabinetmaker and writer. And after five years of working on Roubo’s bench I think it is an ideal bench with almost none of the downsides or limitations I’ve found on other forms.
Its advantages are numerous. Here are a few.
- Its simple design makes it easy and quick to build, even for beginners.
- The thick slab top has no aprons around it, making it easy to clamp anything anywhere on it (this feature cannot be overstated).
- The front legs and stretchers are flush to the front edge of the benchtop, making it easy to work on the edges of long boards or assemblies, such as doors.
- Its massive parts make it heavy and stout. This bench will not rack or move as you work.
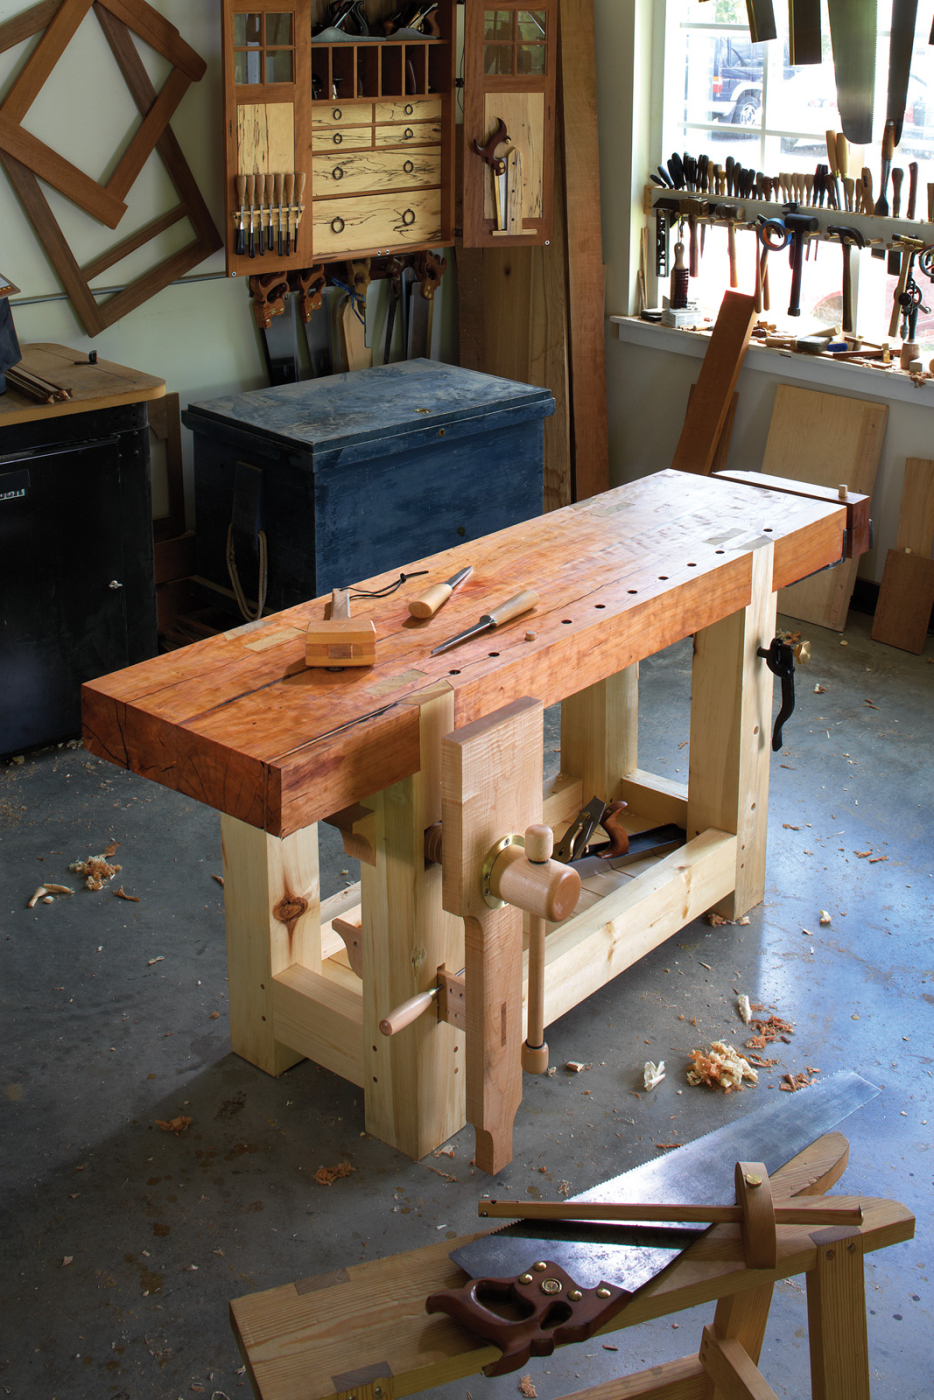
But what about its looks? The first Roubo-style workbench I built was out of Southern yellow pine. I think it looks great, but an 8′-long pine behemoth might be best suited to the workbench underworld. And it is probably too big for most living areas.
So I decided to go back to the original text for inspiration. You see, the original bench published in plate 11 of “L’Art du Menuisier” shows a bench that has beautiful exposed joinery – through-dovetails and through-tenons in the top. And it has a single piece of wood for its top – something that George Nakashima would love (if it had a bit of bark on it).
In other words, the original Roubo bench has a lot in common with furniture of the Arts & Crafts movement (thanks to its exposed joints), Shaker (with its lack of ornamentation) and even contemporary styles (thanks to the clean lines and use of a single-board top). This bench looks like a lot of furniture that contemporary woodworkers enjoy building and will look at home in the home (if you’re lucky) or in the shop.
About the Raw Materials
The biggest challenge with this bench is finding the right raw materials, particularly for the top. I was looking for a single slab that was 5“ thick, 20“ wide and at least 6′ long. That’s a tall order. Here are some leads if you’d like to follow suit: Haunt the “building materials” section of Craigslist.com. Old construction beams seem to come up for sale there on a regular basis. These can be cheap, but you are going to have to scrounge a bit.
You can find a local sawyer (we use a network maintained by Wood-mizer.com). Of course, drying a wet slab that size will take time or some serious work in a kiln. The third option is to find a specialty lumber source, such as Bark House in Spruce Pine, N.C., (barkhouse.com), which specializes in selling big slabs of kiln-dried lumber and shipping them all over the country.
Almost any species will do for a workbench. Maple or ash would be my first choices, but almost every species is stiff enough and heavy enough to serve as a benchtop when you are dealing with 4“– to 5“-thick boards. I ended up with two slabs of cherry that were donated by housewright Ron Herman of Columbus, Ohio. They had some punky areas and some checks, but I was convinced I could make them into a good-looking top.

Face your edge. If you are edge jointing two massive slabs into one benchtop, you need to treat the edge of each board more like it is a face. That means checking the surface to ensure it’s flat across its width and length. Take your time.
For the undercarriage, almost anything will do, as long as it will look nice with the top. I used construction-grade 2×6 white pine for the stretchers and 6×6 mystery wood for the legs. I built the project almost entirely with hand tools (except for a couple long rips). This was for fun. Your definition of fun may vary. All of the techniques here easily translate to a power-tool shop, so don’t be put off by the joinery; just fire up your band saw.
One other thing to note: You don’t need a workbench to build a bench. This entire bench was built on sawhorses without the assistance of any of the benches or vises in our shop.
I began the project by dressing the two rough cherry slabs so I could join their edges to make my benchtop. That’s where we’ll pick up the story.
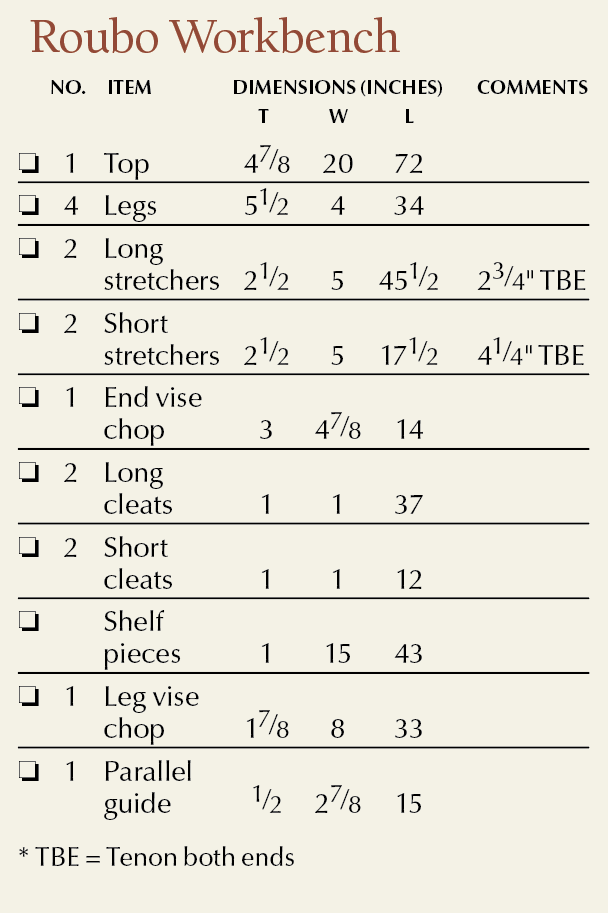
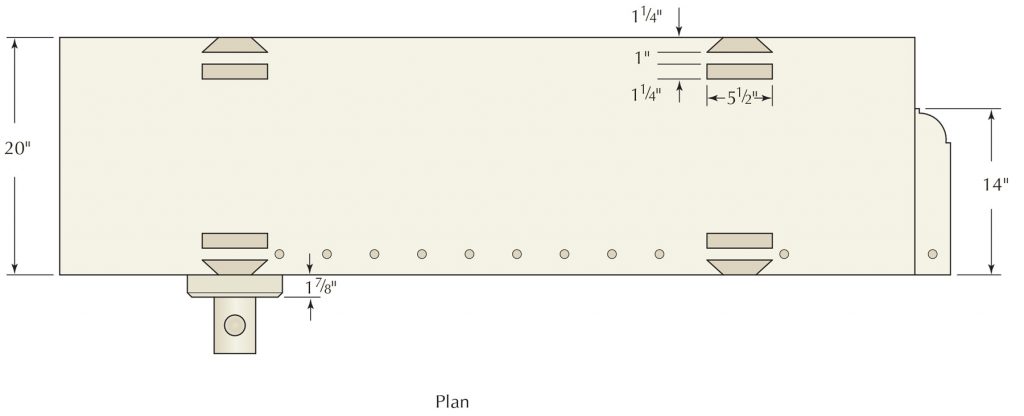
Cutlist and Diagrams
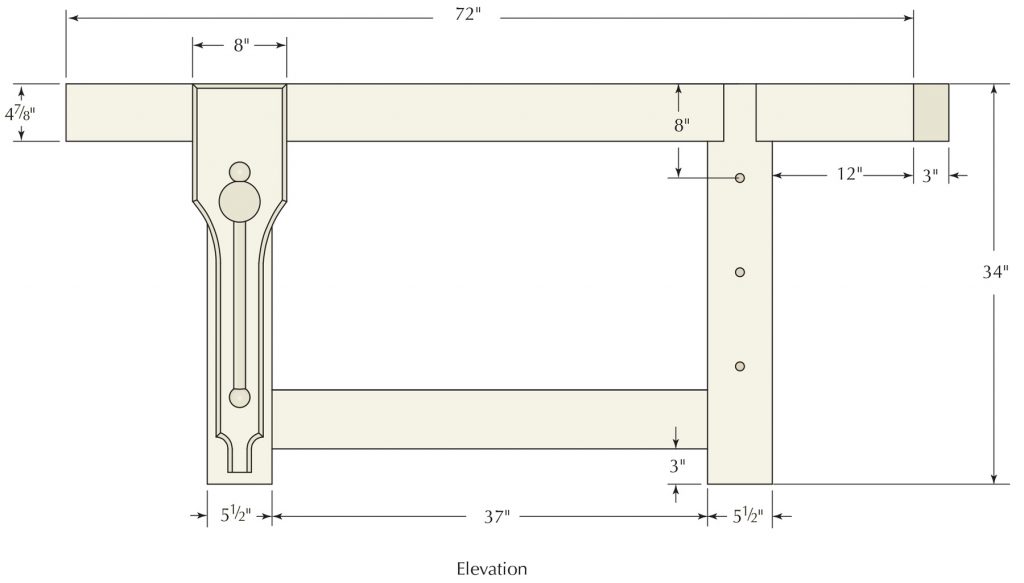


Lower Leg Detail
Take the Tool to the Work
The length and the width of your top will determine the rest of the design of the bench. Here are a couple pointers: Make your benchtop as long as feasible, but it doesn’t have to be wide (in fact, wide workbenches are a liability in many cases). A 20″-wide bench is plenty big and stable in my experience.

One out of one editors agree. This is a bad idea. Even with my coarsest ripsaw, this slab was too much. After 20 minutes of sweating, I ripped the edge on my band saw. The correct tools for this job are a pitsaw, a pit and a good strong friend.
My benchtop required one seam down its middle. To dress the edges I removed the sawmill marks with a jack plane, then dressed each edge with a jointer plane. Running these edges over the powered jointer would be a two-man job. You can do this by hand by yourself.

Straight up. You can save a ton of work for yourself by checking the slab to ensure it will be flat when it’s glued up. A wooden straightedge is ideal for this operation.
Once you get the two edges flat, rest them on top of each other. Look for gaps at the seam and use a straightedge to ensure they create a flat slab. Glue up the top and let it sit overnight no matter what brand of glue you use. You want the glue to reach maximum strength and you want most of the water in the glue to evaporate (if you use a water-based glue).
With the slab joined, dress its outside edges – again handplanes are less effort here than humping this slab over your machines by yourself. After you dress the first edge, make the second one nearly parallel. Then cut the benchtop to length. I used a 7-point crosscut handsaw. It was work, but was fairly quick work.

More than one way to cut a board. Handsaws are designed to be held in a variety of positions, including this one. This position uses different muscles than when you are cutting with the teeth facing the floor. Trying different positions will prevent you from tiring out as quickly.
With the top cut to finished size, dress the benchtop and underside so they are reasonably flat and parallel. Do a good job here because this will be the working surface you’ll be using to make the remainder of your bench. Flatness now will prevent struggles later.
Begin flattening the top using traversing strokes across the grain with your jack plane. Follow that up with diagonal strokes with a jointer plane. Or, for the super-lucky, run the slab through your wide-belt sander. No matter how you do it, don’t forget to check the top for twist.

Accuracy on the cheap. I use aluminum angle as winding sticks. These parts are cheap, super-accurate and don’t lose their truth unless you abuse them. Paint the ends of one of them black to make the twist easier to see.
Before you get into the legs, it’s best to first install your end vise on your top. That way you can use that vise to cut all the joints on the legs. I installed a vintage quick-release vise and added to it a big wooden chop, which will support wide panels on the benchtop.

Small and simple. I used a 7″ vintage quick-release vise as my end vise. You can use almost anything, perhaps even a vise you now have.

For looks alone. I added a square ovolo shape to the end of my vise chop. It doesn’t have a pur- pose, except to make the bench look more like a piece of furniture. Cut the shoulders of the ovolo with a backsaw. Use a bowsaw to cut the curve and clean it up with rasps and files.
In addition to the vise, you also should drill the dog holes in the top that line up with the end vise. Place the holes close to the front edge if you use joinery planes with fences (such as rabbet or plow planes). I placed the center of the holes 1 3⁄4“ from the front edge. Space them closely and evenly – and don’t forget to note where the though-dovetails and through-tenons will be. You don’t want to put a hole where the joint will go. I spaced my holes on 4“ centers. If you can get yours a little closer (say 3“) then you’ll be golden.
The Magical Mystery Legs
I have no idea what species of wood these legs are. I found them in the back of my home center labeled as 6×6 timbers. They were a bit wet and had a few green streaks like poplar. But they were stringy, tough and difficult to plane. In any case, they were cheap and look pretty good – plus I didn’t have to glue up any stock to make the thick legs, which is a nice bonus.
Cut them to rough length (about 1“ over-long) with your crosscut handsaw. The length of your legs determines the height of your workbench. There are many ways to determine your ideal workbench height. My favorite technique is to measure from the floor up to where your pinky joint meets your hand. For me, that measurement is about 34“.
If you use hand tools, I would err on the side of a bench that’s a little too low rather than too high. Low benches are ideal for handplaning and let you use your leg muscles as much as your arm muscles. Dress the legs with your jack and jointer planes. Then prepare to lay out the joinery.
The joints in the legs and top are unusual – each leg has a sliding dovetail and a tenon. Why did Roubo use a sliding dovetail and not a twin-tenon? I don’t know. But based on building the bench, my guess is that the sliding dovetail is easier to cut and prevents that part of the joint from twisting because of the sloped walls.
I spent a couple days (yes, you read that right), poring over Roubo’s drawings and the translated French text to lay out the joints so they were balanced and looked like the joints shown in the 18th-century text. I won’t bore you with the details (like I bored my spouse), so here’s what you need to know:
The sliding dovetail and tenon are each 1 1⁄4“ thick, with 1“ between them. The remainder of the joint is a shoulder on the inside face of the leg. The dovetail is sloped at 13⁄4“ to 1“ (about 30°). That’s steep, but it looks right compared to Roubo’s drawings and other early French benches I’ve examined.
Lay out the joints. Be sure to make them about 1⁄8“ overlong so you can cut them flush with the benchtop after assembly. Then fetch your biggest tenon saw and a large ripsaw.

Big, but not big enough. Use a tenon saw to define as much of the cheek as possible by using diagonal cuts. (Or just do it on a well-tuned band saw.) When you cannot go any deeper with your tenon saw, it’s time to break out the big boy.
Begin by cutting the inside cheek to get warmed up – it’s easiest to fix this joint if you go off line. Begin with your tenon saw (mine is a 16“ model with about 10 points). First kerf in the top of the joint in the end grain about 1⁄8“ deep. Then cut the cheek diagonally on one side. Turn the leg around and cut diagonally again. Then remove the “V”-shaped waste between.

Connect two. After sawing cheeks across the entire width of the legs, this is easy work. Take your time. Fixing a wandering dovetail slope is no fun.
When the top of your joint hits the saw’s back, switch to a rip-filed handsaw to finish the job. Now do the other cheek of the tenon the same way. Then follow up with the inside cheek of the dovetail.

Connect two. After sawing cheeks across the entire width of the legs, this is easy work. Take your time. Fixing a wandering dovetail slope is no fun.
Now cut the dovetail slopes on the outside corners of each leg. Begin with the tenon saw and finish up with the ripsaw. The technique for cutting the dovetail is similar to cutting the tenon. Kerf in the end grain a bit. Then work diagonally down both edges and remove the stuff between the diagonal cuts.

Heavy metal. A heavy mallet (this one is 2 lbs.) will make the work go faster. Here I’m almost halfway through the second side and the waste is starting to come loose. Pry it out as soon as it’s feasible.
I tried a variety of ways to remove the waste between the dovetail and tenon. The fastest way was to use a mortising chisel. Sawing it out with a bowsaw – even a coarse one – was slower. To bash out the waste, treat it like you are removing waste between dovetails. Chisel straight down near your baseline. Then chisel in diagonally about 1 1⁄2“ away from that first cut to meet your first cut. Pop out this “V”-shaped piece of waste. Continue until you are halfway through. Flip the leg over and repeat the process on the second side.
Clean up the bottom of the canyon between the tenon and dovetail. A paring chisel makes short work of flattening the bottom.
Then cut the shoulders of the legs. You have three shoulders to cut: Two are up front at the base of the dovetail and the third is at the inside of the leg. I used a crosscut sash saw to make this cut. A smaller carcase saw also would do, but it is slower.

Trace, don’t measure. Every leg will be a bit different. So trace the joint layout onto the top to get a real idea of the waste you need to remove.
The Difficult Females
The through-mortises are some work. Because you are unlikely to have (or want) a 1 1⁄4“-wide mortising chisel, you should take a page from our friends the timber framers. Bore out the majority of the waste to excavate the mortise. Then clean up the walls with a mortising chisel (at the ends) then chisel along the walls.

Boring work. Usually I use “boring” as a pun here. This is seriously boring work. A drill press would have been a welcome machine here – though how I would have put this benchtop on the drill press’s table is beyond me. I’d probably move the drill press over to the benchtop and swing the table out of the way.
This job is a good excuse to buy a big brace. While most cabinetmakers will choose a brace with an 8“ or 10“ sweep, I would recommend a 12“ or 14“ sweep. You will gain more mechanical advantage. Sadly, my 12“ brace went missing, so I gained a workout.
Sharpen the biggest auger you have and mark the flutes so you’ll bore about halfway through the top. Clear the holes of waste, then use a mortising chisel to bash out the ends of the mortise (this is the hard and exacting part). Then use a wide paring chisel to split the remainder of the waste from the walls. This is easy stuff.

Side-splitting fun. Remove as much of the waste as possible by splitting it off the sides. The wood splits easily along the grain. Knowing the wood’s weakness is always a big advantage.
Flip the bench over and bore through the other side. Then clean up the mortise on the underside and ensure the two cavities meet and have flat walls that are coplanar. (Humps in your mortise walls are common and troubling. Check your work with a combination square.)
Luckily, the dovetail socket is easy work compared to the mortise. Define the walls of the socket using a backsaw (I used a sash saw). Then take your crosscut handsaw and make several kerfs in the waste. Pop the waste out with a stout chisel and clean the floor of the socket with a router plane and a wide paring chisel.

The diagonal drill. Think of this like a big angled tenon cheek. Kerf in the top of the joint about 1⁄8″ deep. Then saw diagonally down until you hit your baseline and the far corner of the bench- top. Then go to the other side of the benchtop and work down the other side.

Don’t be shy. Make a few kerfs in the waste then split the bulk of the waste out of the dovetail. Stay about 1⁄8″ away from the baseline to avoid splitting away wood you want to keep.

Router plane reverie. If I could write a love poem to my router plane, I would. It makes tough jobs such as this quite easy. Note you might have to remove the depth adjuster wheel on your tool to reach this depth.

Something for the corners. Your router plane won’t reach into the tight inside corners. So use a paring chisel. Use the flat floor established by your router plane and pare out the junk.
A Cheat – But Not What You Think
I made my stretchers using 2×6 material from the home center. After I dressed the stock (it was twisty) it ended up at 1 1⁄4” thick. To make life easier I decided to make the tenons on the stretchers by laminating two 2x6s face-to-face. The long one would be the tenons. The short one would be the shoulders between the legs.
A bit of truth here: It’s unlikely my legs are perfectly square or their faces are parallel to one another. But if you discard your measuring systems, you’ll be OK.

How high? Who cares. I’ve clamped two battens to my legs and rested the stretcher on them. Now I’m marking the shape of the shoulders directly on the stretcher.
What’s critical here is that each stretcher fit perfectly between its legs and end up 3” from the floor. That 3“ is the perfect gap for your foot, which you’ll find handy (footy, actually) when planing across the grain.
So I figured out where the stretchers should intersect the legs and cut two battens to length (21 1⁄8“ long in this case). I clamped these battens to my legs and rested the stretcher on the battens and marked my stretchers’ finished length directly from the legs. These shoulder lines were not square, but that’s no big deal if you cut them with a handsaw.

Almost an instant tenon. Leave the tenons way overlong. They’ll be mitered to size after you excavate your mortises.
After I cut these pieces to length with a handsaw I confirmed that they fit between their legs. Then I laminated them each to a longer section of 2×6. As a result the stretchers won’t have a shoulder at the back (this is called a bare-faced tenon), but that is no big deal in a bench.
Mortises That Meet
When you make mortises that meet inside a leg, there is a tendency to have the inside corner of the joint split when you make the second mortise intersect the first. Does it matter? Probably not much. But I want every bit of wood in there that I can have.

Mortise without the mess. Here I’m boring out the intersecting mortise, which is deeper than the first mortise. The result is cleaner mortise walls and more surface area for gluing.
So I use an old English trick for intersecting mortises. Make your first mortise shallow so it will just kiss the second (deeper) mortise. This prevents the inside corner from breaking off.

Again, please don’t measure. Hand-cut mortises and tenons are best done by direct comparison. Show the tenon to the mortise (or the mortise to the tenon) and mark what you need.
The mortises in the legs are smaller than those in the top, but the procedure is the same. Bore out most of the waste. Bash out the ends. Pare the long-grain walls. You should be pretty good at this by now.
Now miter the ends of your tenons. The tenons don’t have to touch – you won’t get any points if they do. Then show the mitered tenon to the mortise to mark out the location of the edge cheeks. Saw out the edge cheeks and shoulders. Then fit each tenon.

High and dry. When the bench parts finally go together, the result is remarkably stout, even without glue.
Mallet Time
Do a dry fit of all your parts to ensure that not only will the individual joints go together, but that all the joints will go together at the same time. While you could assemble the base and then (if you got lucky) bang the benchtop in place, I think it’s better to assemble the whole thing at once.

Mortise holes first. The 3⁄8″ holes pass entirely through the legs and mortises. Be sure to stagger the holes if you are going to peg all four stretchers. Otherwise the pegs will collide.
To hold the joints together I used drawbored pegs (to pull the shoulders tight to the legs) and a slow-setting, flexible epoxy as insurance. You probably could get away without glue. But if you can afford the glue, I see no disadvantage to it.

Mark the tenon. Use the same 3⁄8″ bit for boring the holes to mark their center points on the tenons. Then disassemble the joint.
With the bench pieces fit, mark where your 3⁄8“-diameter pegs will go on the legs. I placed them about 1“ from the shoulder of the tenon.
Drawboring is simple: You drill a 3⁄8“ hole through the mortise, assemble the joint, then mark where that hole intersects the tenon. Disassemble the joint, move the centerpoint of the hole about 1⁄16“ or 3⁄32“ closer to the shoulder and drill the 3⁄8“ hole through the tenon.

Move the bore. Shift the centerpoint toward the shoulder of the tenon. When building benches in softwood this can be about 3⁄32″ without (much) danger.
When you drive the peg in, the offset holes will pull the shoulder tight against the leg. If you have drawbore pins, these metal pins will deform the holes a bit. And they let you test-fit the joint before glue or a peg gets involved in the equation.
A Pause Before Assembly
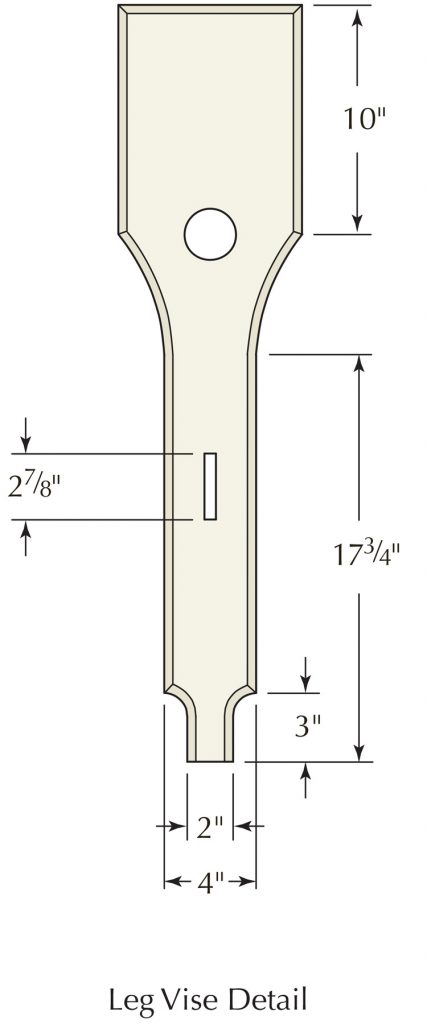
If you are going to install a leg vise, now is the time to bore the hole for the vise screw and the mortise for the parallel guide. This is no different than any of the other mortises in the project, so details here would be redundant.
There are a couple design considerations: Make the center of your vise screw about 10“ or so from the top of your workbench. This will allow you to clamp 12“-wide stock in the leg vise with ease. Also, you have a lot of flexibility as to where you put the parallel guide. I’ve put it at the floor (for maximum leverage) and above the stretchers (for minimum stooping). There isn’t a noticeable difference in leverage when you move the parallel guide up, so I’d put it above the stretcher. It’s easier to reach that way.
Another design detail: Keep your mortise for your parallel guide fairly close in size to the guide without rubbing or binding (yes, this takes fiddling). A close fit reduces the amount of racking that the vise’s chop will do left and right. Trust me on this.
Big Finish
When I assemble something, I don’t take chances. If I can clamp it, I will. And if I can glue it, I will (unless it will cause wood-movement problems). So I used some slow-setting epoxy, which has a practical open time of several hours. I applied glue to all the joints, knocked everything together then applied the clamps to get things as tight as possible.

Clamps and drawbores. This might seem like wearing both a belt and suspenders, but it will reduce the number of splintered pegs.
Then I drove in the 3⁄8“ white oak pegs. A couple details of these pegs: The best way to get them is to make them yourself. Rive them and drive them through a dowel plate. Whittle one end so it looks like a pencil. Apply some paraffin to lubricate the pin and knock it home. The paraffin is another timber-frame trick that works well. Since I started using it I’ve had far fewer exploding pegs.

And wedges, too. Roubo specifies that you should wedge the tenons that protrude through the top. I declare this joint bomb-proof.
After driving your pegs, wedge the through-tenons through the top. I used wedges that have a 4° point. For directions on how to make these wedges using a handsaw or band saw, check out this article. Once the glue sets up, remove the clamps and saw the wedges and tops of the tenons flush to the benchtop.
True up the top again, just like you did at the beginning of the project. Then you can turn your attention to the face vise.
I’m a Leg Man
Leg vises are awesome. You can customize them for your work. You can build them in a day. They have tremendous holding power. And they don’t have the parallel bars that iron vises use. So you have more clamping real estate.
Why have they almost vanished? Beats me. Most people who try them love them.
The vises have three parts: The chop, which you make and which grips the work; the vise screw (usually a purchased item), which moves the chop in and out; and the parallel guide, which you make that pivots the chop against your work.
The parallel guide is the thing that trips up most people who are new to leg vises. The parallel guide is attached to the chop and moves in and out of a mortise in the leg. A pin pierces the parallel guide in one of its many holes. When the pin contacts the leg, the chop pivots toward the benchtop and clamps your work.

Here’s the setup. Here you can see the paral- lel guide right before I’m about to install it in the chop. And you can see the hole I chopped out for the vise screw. It’s simpler than it sounds.
Once you make your chop, you’ll need to make an orifice for the vise screw and a mortise for the parallel guide. The parallel guide is wedged into the chop and is pierced by two rows of 3⁄8“ holes that are on 1“ centers. And the two rows are offset by 1⁄2“.
I know, all this sounds complicated. It’s not. I built my first leg vise years ago without ever having used one. Within 30 seconds I had mastered it. You will, too.
A Place for Planes
You need a shelf. Let me repeat that: You really need a shelf. You’ll put your bench planes there, plus parts and tools that you need later on in a project. Build the shelf; you’ll be glad you did.
The shelf takes just a couple hours to build by hand (less if you slay electrons in your shop). Begin by fastening a 1×1 cleat to the bottom inside edge of the four stretchers. I used glue and cut nails. Then you’ll nail shiplapped shelf boards to these cleats to create the nesting place for your bench planes.

One setup for the shelf. My shelf boards are 1″ thick. I set my plow plane to make a 1⁄2″-wide x 3⁄8″-deep rabbet. A minute of work on each edge made the perfect joint.
To make the shiplapped boards, use a plow plane to make the rabbets on the long edges. This is easy work in pine. I went the extra step and beaded one long edge to dress up the boards. The two boards on the end will need to be notched at the corners to fit around the legs. You know what to do.
Nail the shelf boards in place with about 1⁄16“ gap between each. A single nail in the middle of the width of each board is best. This will prevent your good work from splitting.
A Simpler Finish
Finishes on workbenches should be functional, not flashy. You need a finish that is easy to renew, resists glue and stains and doesn’t make the bench too slick. Slick benches stink.
The answer is so easy. Mix equal parts boiled linseed oil (to resist glue), varnish (to resist spills) and paint thinner (to make it easy to apply). Shake up the amber liquid and rag it on. Three coats is all you need. When it is dry, you can get to work.
What is work? Well, one of the inspirations for this bench came from the Pottery Barn catalog. I am a bit cowed to admit this. The catalog featured a fake workbench sold to be used as a wet bar. I thought: What if a real workbench were used as a wet bar, a sideboard or a table behind a couch?
You see, some people allow their workshop furniture to be made of ugly plywood, screws and crude joints. Me, I just cannot build that way. When I invest my time in something, I want it to be both beautiful and functional (thank you Gustav Stickley for that line).
So whether this bench goes in the dankest dungeon or in your living room, I think you should do your best to ensure that all your work is ready for the front room of your house.
This article originally appeared in the August 2010 issue of Popular Woodworking Magazine as “The Return of Roubo.”
Extra: Check out the Sketchup model for the Roubo Workbench.
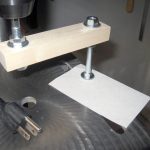
Watch: See a video demonstrating how to make 4° wedges.
Read: A detailed article on how to flatten a workbench’s top.
Here are some supplies and tools we find essential in our everyday work around the shop. We may receive a commission from sales referred by our links; however, we have carefully selected these products for their usefulness and quality.