We may receive a commission when you use our affiliate links. However, this does not impact our recommendations.
Tablesaw Box Joints
A shop-made jig with micro-adjust guarantees perfect joints.
By Tim Johnson
Box joints are the savvy woodworker’s alternative to dovetails. Strong, great-looking and quickly made, box joints are an especially good choice when you have a large number of items to produce. To make them, you need your tablesaw, a miter gauge, a dado set and a simple shop-made jig (Fig. A, below). I’ll show you how to build the jig and use its micro-adjust system to dial in perfect-fitting box joints.
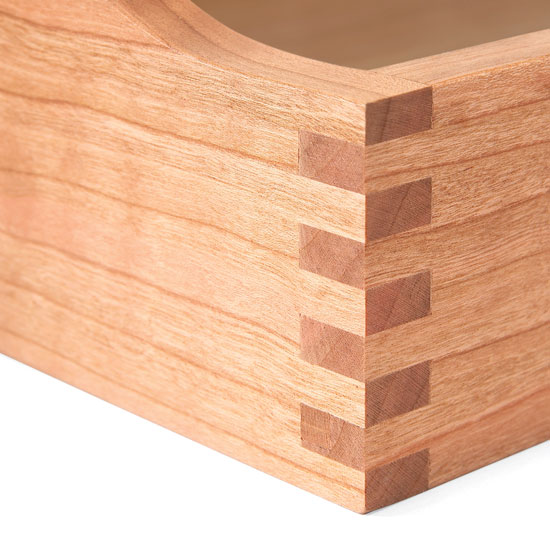
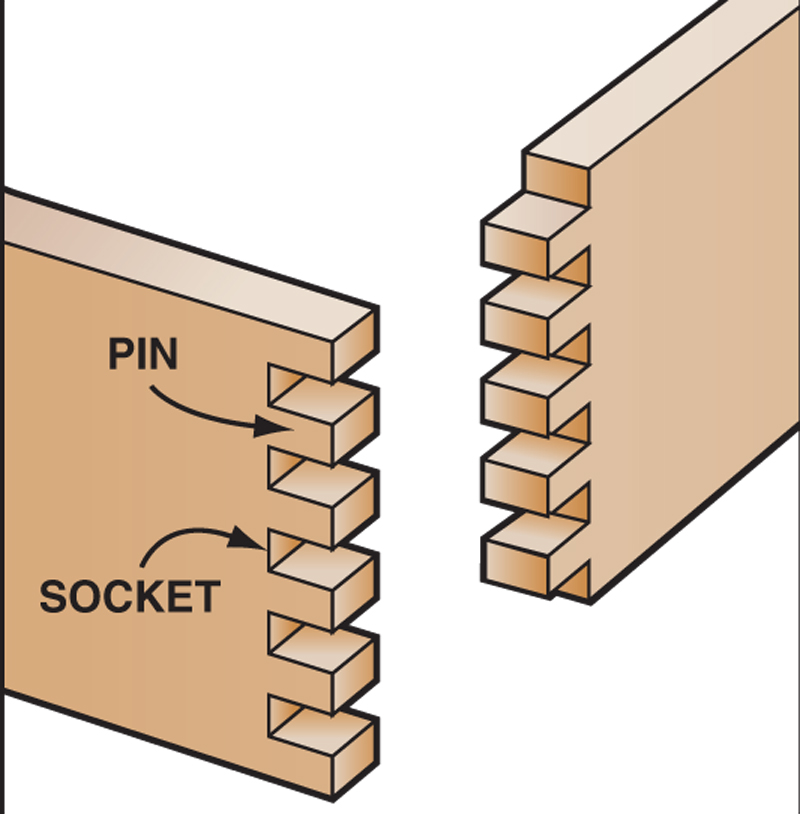
Box joints have alternating pins and sockets. To fit together, one piece has pins where the mating piece has sockets (Fig. B, page, 70). The challenge is to cut pins and sockets that are virtually the same size, with paper-thin tolerances for fitting the joint. Fortunately, the jig can make paper-thin adjustments. It also automatically positions both pieces so their pins and sockets are correctly offset.
Design Details
Pins and sockets can be wide or narrow to suit your project. To size
them appropriately, you merely adjust the width of the dado set. For
example, to cut 1/4-in.-wide pins and sockets, use a 1/4-in.-wide dado
set. The blade’s height determines the length of the pins and sockets.
This length matches the thickness of your box pieces. Flat-bottomed
dadoes are a must for good-looking joints.
It’s best to start with your box pieces oversize and trim them to
final width after you cut and fit the joints. Box joints usually turn
out to be wider than the sum of the pin and socket widths because of the
fit-tolerance between each pin and socket. Starting oversize allows you
to compensate.
| 1. Set the blade height using a piece from your project. Place the piece on the jig’s carriage and raise the blade.A scrap piece held on top tells you when the blade is exactly even with the workpiece. Before moving on to the next step, make sure the miter gauge bar slides smoothly without any side-to-side play. | Click any image to view a larger version. |
| 2. Clamp the adjustable fence temporarily to the carriage and cut a slot through both pieces. After cutting, thickness-plane a 12-in.-long piece to exactly fit the slots’ width. Cut this piece into three keys. Trim one key to two-thirds the size of the slot’s height. |  |
| 3. Use three hardwood keys to position the adjustable fence on the carriage. Glue one key in the fence slot. Fit the second key in the carriage slot and sandwich the spacer key in between. Securely clamp the fence to the carriage while butting the three keys snugly together. Drill pilot holes and fasten the fence. Remove the clamps and the two temporary keys. |  |
| 4. Micro-adjust blocks allow you to fine-tune the jig by paper-thin amounts. Attach one block to the carriage base. Butt the second block against the first, with two pieces of paper between them. Fasten this block to the adjustable fence. The space between the carriage block and the key must be wider than your workpiece. | 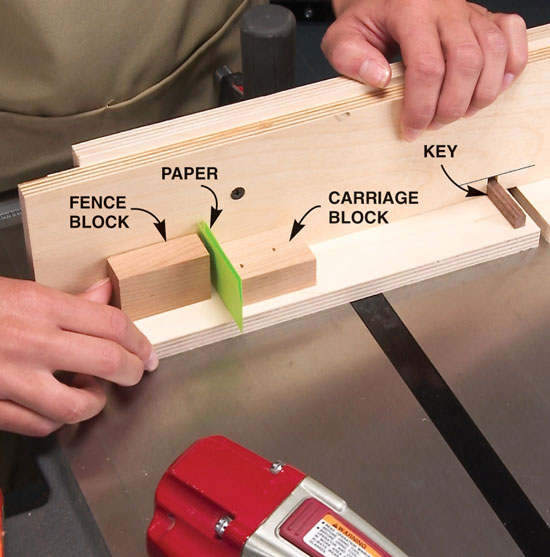 |
| 5. Cut and fit a test joint. Butt the bottom edge of your first workpiece against the key. Cutting the first socket creates a full pin at the bottom. I think box joints look best when the end pieces have full pins at the top and the bottom, so I always start with an end piece. |  |
| 6. Cut the rest of the sockets by repositioning the workpiece. Hook the socket you’ve just cut over the key to cut the next socket, and so on. The key indexes the workpiece, so the sockets are evenly spaced and the pins are all the same width. Always make sure the end of the workpiece is firmly seated on the carriage before you cut. | 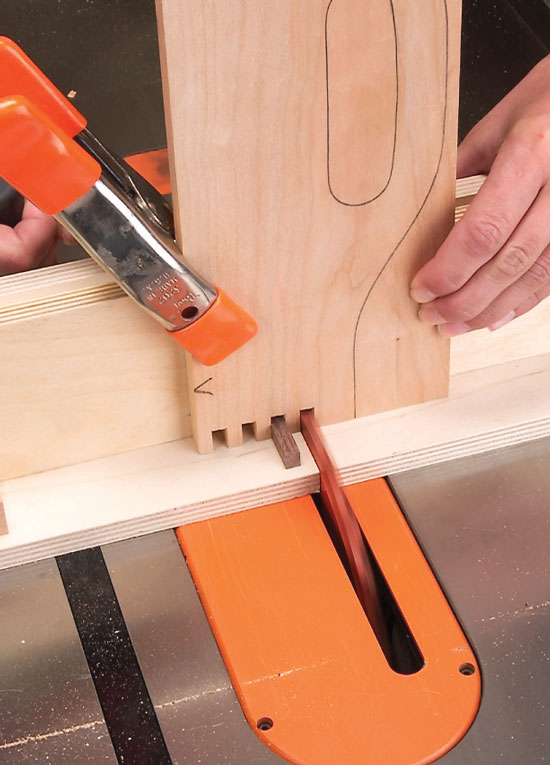 |
| 7. Cut sockets in a side piece. The setup is different, because the sides have sockets instead of pins on the top and bottom edges. Flip the end piece over and hook it on the key. It now acts as a fence to perfectly position the side piece. Orient the side piece so its bottom edge faces the end piece. Cut the first socket. Remove the end piece and cut the remaining sockets in the side piece. |  |
| 8. Test-fit the joint. The pins and sockets should slip together easily, without binding, but also without gaps. A dry fit that requires firm pressure is too tight; the pieces will be tough to assemble after glue is applied, because the glue causes slight swelling. The fit shown here is too loose by a paper thickness; glue won’t swell the fibers enough to close these gaps. |  |
| 9. Dial in a perfect fit with the micro-adjust system. First, remove the fence screws. If the joint is too tight, remove a piece of paper from between the blocks. If the joint is too loose, add a piece. Butt the blocks back together and clamp the adjustable fence to the carriage. Drill new pilot holes and reattach the fence. Remove the clamps, cut another test joint and check the fit. |  |
| 10. Check the socket depth. The ends of your test joint should be flush. If the sockets are too deep, the pins will protrude. Protruding pins make the joint difficult to draw tightly together for gluing. Recessed pins indicate sockets that are too shallow. Recessed pins allow glue to puddle, making cleanup after gluing more difficult. Adjust the blade height as necessary. |  |
| 11. Beware of blow-out. Lowering the blade to make your joint flush creates a problem. It leaves the slot in your jig’s fence too tall, so it won’t fully support the back of the workpiece. When you cut the slots, the blade is likely to blow out the unsupported wood. On half of your box joints, this side will face out. This problem also occurs if you want to reuse your jig to make box joints in thinner stock. | 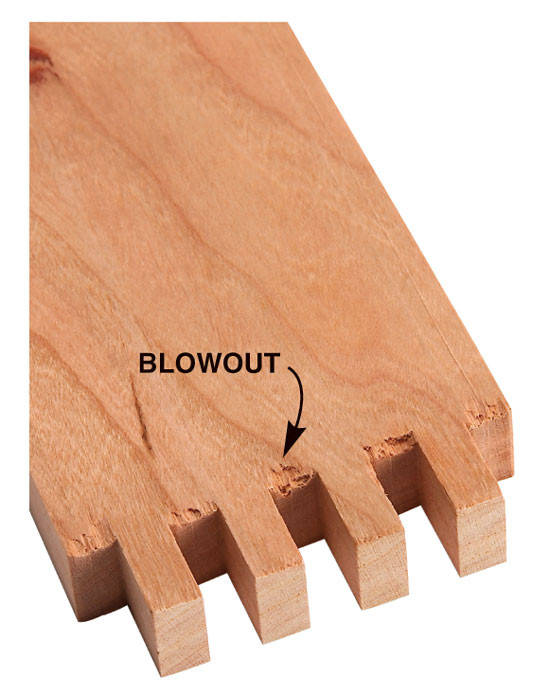 |
| 12. Install a subfence to prevent blowout. If you’ve lowered the blade, simply screw on a fresh board and cut a new slot. Before you fasten this fence, cut an oversize slot to fit over the key. Now your jig is tuned and ready to cut perfect-fitting box joints. | 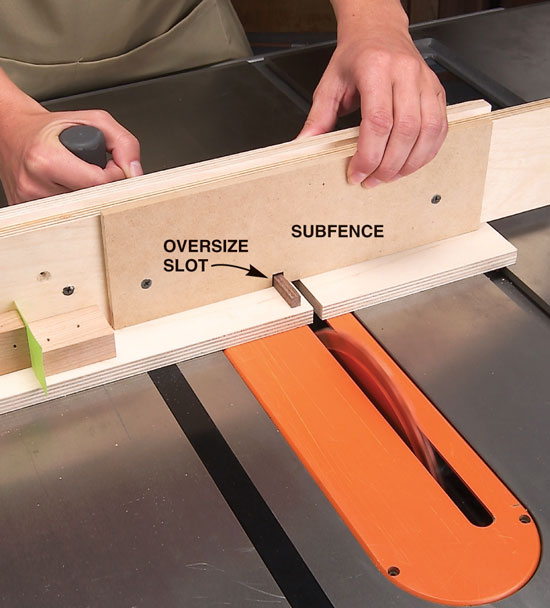 |
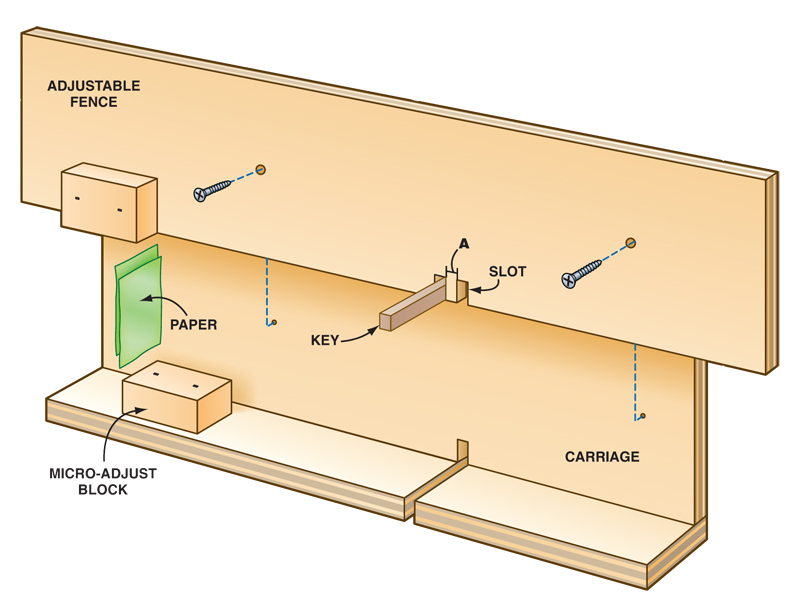
| The jig has two parts. The carriage is attached to your miter gauge. The adjustable fence is attached to the carriage. One micro-adjust block is attached to each part. These blocks butt together, separated by two pieces of paper.To cut a perfect joint, the key, the slot and the space between them (A) must all be the same width. Trim the key’s height to fill about two-thirds of the slot. After you’ve cut the slots and installed When using the jig, always orient the |
Fig. A: Box Joint Jig
Fig. Box Joint Detail
|
This story originally appeared in American Woodworker September 2005, issue #116.
|
Here are some supplies and tools we find essential in our everyday work around the shop. We may receive a commission from sales referred by our links; however, we have carefully selected these products for their usefulness and quality.