|
Walk into a typical small cabinet
shop, and you’re likely to find
simple, functional cabinets made of
inexpensive sheet goods. Not that these
pros couldn’t make furniture-grade
cabinets for their shop if they wanted,
but when there are customers waiting
and bills to pay, shop cabinets get built
fast, cheap and solid.
These cabinets are right out of this
tradition. They’re fast to build, so you
can move on to building real furniture
for your home. They’re sturdy and
flexible, so you can adapt them to all
sorts of storage needs, even heavy tools
and hardware. And best of all, they’re
cheap.
All the material and hardware should
be available at your local home center.
Multi-purpose cabinets
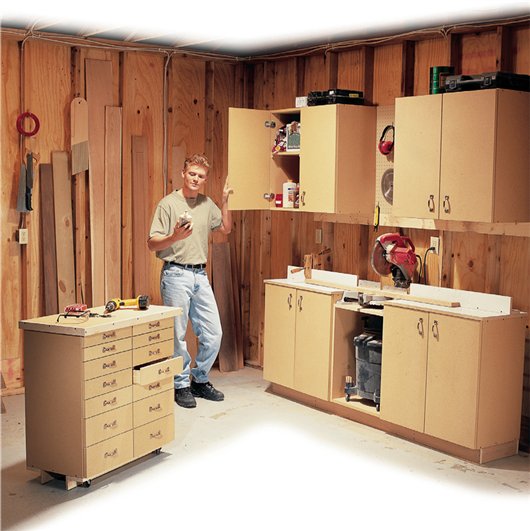
These basic cabinets can be used on
the wall, on the floor, on wheels, backto-
back—any way you want. As you
can see, we used them as the foundation
for several basic pieces of shop furniture.
The drawers range in size from
a bit more than 1-in. deep, for small
tools, to almost 6-in. deep for heavy
stuff. The drawer design is so simple
you can easily modify the dimensions
and customize the sizes.
You can also use these cabinets as
outfeed support for your tablesaw.
With a 3/4-in. top and casters or a
base underneath, the total height of the
cabinet will be 34 in., a common height
for tablesaws.
Materials
We made our cabinets out of
medium-density fiberboard (MDF)
because it’s strong and inexpensive.
MDF paints like a dream, but you
could also use a clear finish or no
finish at all on these cabinets.
Although MDF comes in 49-in.
x 97-in. sheets, the cabinets are
designed so you could also use fir or
birch plywood in normal 4×8 sheets
without changing any dimensions.
MDF is not a perfect material,
however. It’s heavy, for one thing,
so get help if you’re going to install
these cabinets on a wall. Attach
them very securely to studs using
3-in. drywall screws. The drawer
unit should not be hung from a wall
at all. It’s simply too heavy.
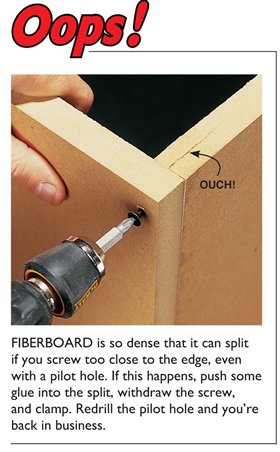
The other drawback to MDF
is that it only holds screws well
when they are correctly installed.
The screws can’t be too close to an
edge, or they’ll split the material (see
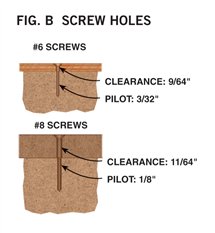
Oops!, at right). You must drill good
pilot and clearance holes (Fig. B) or
the screws will snap or fail to hold.
And finally, coarse-thread utility or
deck screws will hold better than
fine-thread drywall screws.
Oops!

Modifying the design
We have designed these cabinets
so you get the most number
of cabinets from the least amount
of material. However, it is easy to
modify the dimensions to suit your
needs. You can put more shelves in
the cabinets, more drawers in the
drawer unit, or turn the drawers
into trays. Don’t make the cabinets
more than about 32-in. wide, however,
because MDF sags under its
own weight.
You may want to use a different
material altogether. You could go
upscale by choosing birch plywood
with solid-wood edging. Or make the
cabinets white and easy to clean with
melamine-covered particleboard.
Tools and supplies
We’ve come up with a building
process for these cabinets that
makes handling the sheet material
as easy as possible. The first step,
whether you’re making one cabinet
or a dozen, with drawers or without,
is to rip each full sheet into
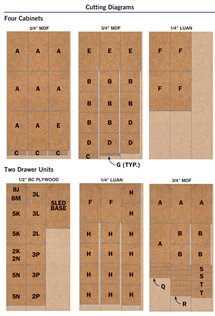
three long pieces (see Cutting Diagrams, below) These more manageable
pieces can then be crosscut and
ripped narrower, as needed.
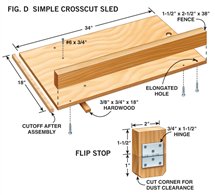
An easy way to crosscut sheet
material accurately is with a crosscut
sled on your tablesaw. You can
build a full-featured sled, but we’ve
included a simpler design here that’ll
work just fine.
In the tool department, very little
is required. You’ll need a tablesaw,
a drill, four 18-in. capacity clamps
and a quick-change driver/countersink
attachment for your drill
(Photo 3). In addition, because MDF
is extremely dusty stuff to cut, we
strongly recommend wearing a good
dust mask and having a dust collector
on your saw.
This is the kind of project where
air tools excel, so if you can get your
hands on them, you’ll save a lot of
time. A brad nailer speeds up building
the drawer boxes (Photo 8), and
can eliminate clamps during assembly
of the cabinets (Photo 4). A narrow
crown stapler does a fast and
effective job of holding the backs on
the cabinets and the bottoms on the
drawers.
Construction overview
The first thing to consider is how
many and what type of cabinets
you want. We suggest you build the
basic shop cabinets in multiples of
four or eight. This makes the most
efficient use of your materials (see
Cutting Diagrams).
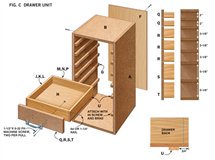
The drawer units are best made
in multiples of two. You’ll be able to
make seven drawers in each cabinet
with only one sheet of 1/4-in. plywood.
If you’re only building four
of the basic cabinets, there will be
plenty of 1/4-in. plywood left over
for additional drawers, but if you’re
building eight, you’ll have to buy
more. No matter how many drawers
you make, one sheet of 1/2-in. plywood
is plenty for two cabinets full
of drawers, and a crosscut sled.
Building the cabinets
If you’re going to build the simple
crosscut sled at right, the first
thing to do is rip your 1/2-in. plywood
into three strips: two 14-3/4-
in. wide and one at 18-in. wide.
Crosscut the 18-in. strip using a
circular saw, a jig saw or a tablesaw.
Then proceed with the building
steps for the simple crosscut sled
given at right.
The basic building steps for the
cabinets are shown in Photos 3
through 11. Begin by ripping your
MDF into 15-1/2-in.-wide strips.
Then crosscut to give you the sides
(A), the doors (E) and the tops and
bottoms (B). Rip the shelves (D)
to width and cut the nailers and
cleats out of the remaining material.
Check all the parts to be sure
they’re square and that all parts of
a given size are within 1/16-in. of
each other.
The cabinet assembly process is
pretty fail-safe, because you clamp
the pieces together first to get all the
edges lined up, and no glue is used.
Even after you’ve screwed pieces together, they can be taken apart and redone if you’ve made
a mistake.
Building the drawer units
The drawer units start with a case that’s the same as the
basic cabinet, except it doesn’t have a door, shelf or nailer.
With the cabinet boxes made, install the cleats that support the drawers (Photo 7). Build the drawer boxes next. Use
glue on all the joints, because the nails aren’t enough on
their own. Attach the drawer fronts (Photo 10), the pulls
(Photo 11) and that’s it.
A Simple Crosscut Sled
This sled makes it much easier to accurately cut large pieces
of sheet stock and pieces that are too wide and awkward
for your miter gauge. With only three pieces, it shouldn’t
take you more than an hour or so to build. We’ve included a
simple stop, which makes it much easier to cut multiple parts
to the same length.
Begin by cutting out the three pieces for the sled. Make
sure the strip that goes into your miter gauge slot has a snugsliding
fit. Screw the strip to the sled so the sled overhangs
the tablesaw blade by about 1 in. and is square to the back
edge of the sled. Attach the fence so it’s also square to the
back edge of the sled. Screw the fence through the elongated
slot, so it has a little adjustability. Run the sled through the
saw to trim it even with the saw blade (Photo 1, below). Test cut a
12 to 16-in.-wide piece of plywood (Photo 2, below) and check the
cut for square. Adjust the fence position until your cut is
perfectly square. Fasten the fence permanently with a couple
more screws.
The stop can be flipped out of the way for the first cut on
a board, then flipped down and used for the final cut.

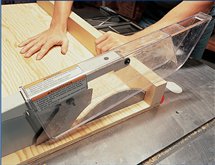
1. Build the sled wide enough so that your
first cut trims off the end of the sled. That
way, the end of the sled will line up perfectly
with the blade.

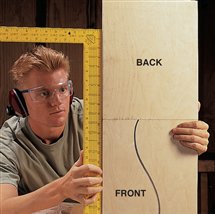
2. Test for a perfect cut by
cutting a wide piece of plywood,
flipping one half over, and butting the
pieces together. The edges should be
perfectly straight.
Hardware

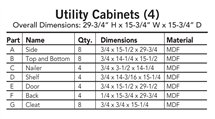
Utility Cabinets (4)

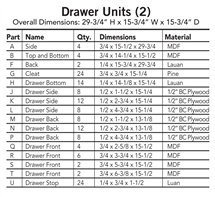
Drawer Units (2)

Cutting Diagrams

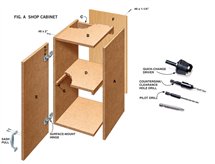
Fig. A: Shop Cabinet

Fig. B: Screw Holes

Fig. C: Drawer Unit

Fig. D: Simple Crosscut Sled

This story originally appeared in American Woodworker June 2001, issue #87.

|
|
Click any image to view a larger version.

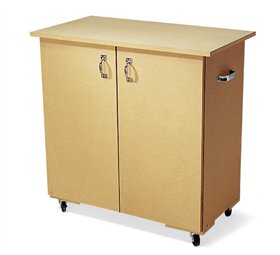
Rolling shop carts are
always handy. This one uses two
cabinets, and is the same height as
our tablesaw. You could also use
four or six cabinets for a larger
rolling assembly table or an outfeed
table.

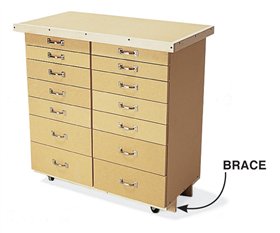
A rolling tool chest is
made from two drawer units, with a
top and casters. Because this chest
will carry a lot of weight, reinforce
the bottom with braces.

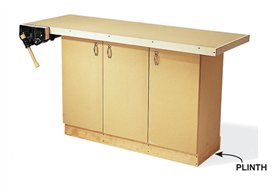
Support a workbench
with two or three
cabinets. This bench has a
plinth to raise the cabinets
up off the floor, and a top of
MDF edged with hardwood.

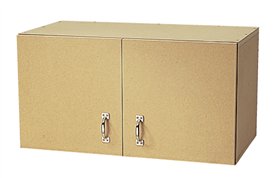
A wide cabinet is easily
made from one of the basic
cabinets. Flip the cabinet sideways,
cut a new, longer nailer, and use
double doors in front.

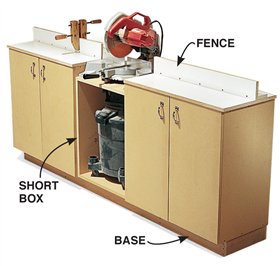
A miter saw stand is built from
four or six cabinets with a shorter box in
the middle to support the saw. A narrower
base ties all the units together and provides
a toe space.

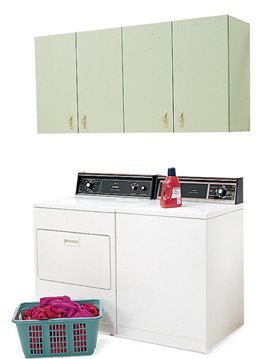
Make extras for the laundry room,
garage, or wherever you need utility storage.

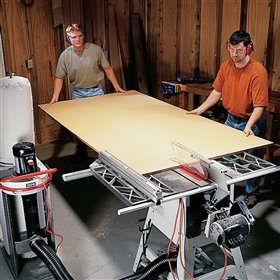
1. Rip the sheet material first,
to get it to a manageable size. The
MDF is heavy and produces tons of
fine dust when cut, so have a helper
and some dust control handy.

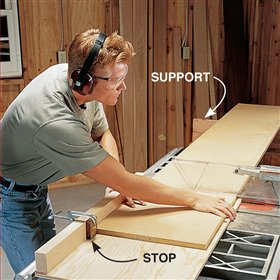
2. Crosscut the strips of MDF.
A simple shop-made sled makes it
easier to get accurate cuts on these
large pieces, although you’ll need to
support the far end. A hinged stop
on the sled allows you to flip the
stop up for the first cut, then flip it
down for the final cut. The result:
every piece is accurate and identical.

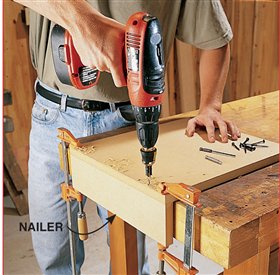
3. Join the top and the nailer with utility (drywall-type)
screws and no glue. Clamp
the pieces to get the alignment
perfect, then drill the pilot hole
and countersink. A quick-change
unit and combination bit makes
this operation go quickly.

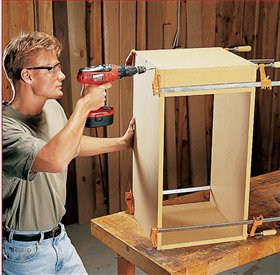
4. Join the rest of the box the
same way, using clamps to get parts
aligned. These joints are plenty
strong with just screws, so no messy
glue cleanup is required. Plus, if you
ever want to modify the cabinet, it
will come apart neatly.

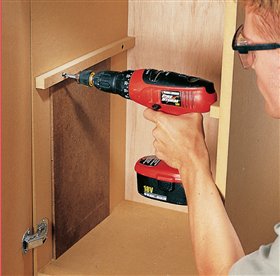
5. Attach cleats for the shelves, using a piece of scrap
to align them. This may not be the
prettiest shelf support in the world,
but it’s strong, cheap and completely
adjustable.

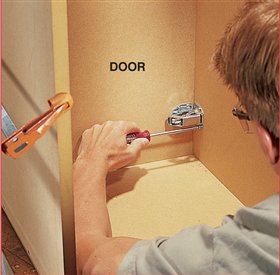
6. Hang the door from inside the
cabinet. This is a pretty weird-looking
way to do it, but it works great!
Simply attach the hinges to the door,
then clamp the door to the cabinet
box so it’s aligned all the way
around, and then screw the hinges
to the inside of the cabinet. Finally,
screw on the back of the cabinet.

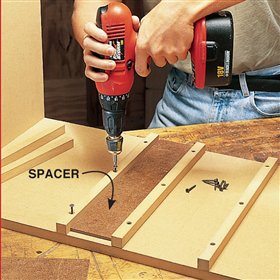
7. Attach drawer cleats, using
a spacer to get them square and the
same distance from the bottom of
the side. Start at the bottom, and as
you move up the side, rip the spacer
to a narrower width, as needed.

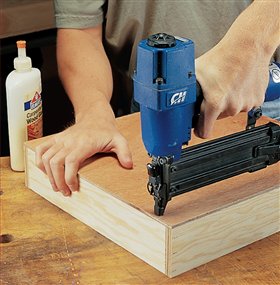
8. Drawer boxes are made from
1/2-in. plywood, held together with
nails and glue. You can simply hammer
them in, but a brad nailer makes
this part of the project go much
faster. The 1/4-in. plywood bottom
is glued and nailed directly to the
bottom of the drawer.

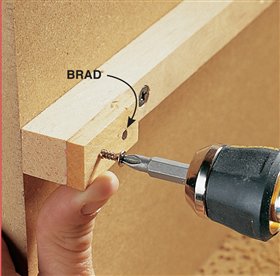
9. Drawer stops, one on the
drawer and one on the cleat, prevent
the drawers from falling onto
your toes if they’re pulled out all the
way. Remove the front stops if you
prefer to be able to pull the drawer
out to use as a tray.

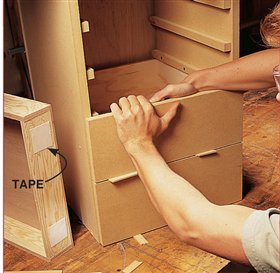
10. Attach the drawer fronts
to the drawer boxes while they’re in
the cabinet. Use double-faced tape
to hold each front in place, once you
have it perfectly aligned.

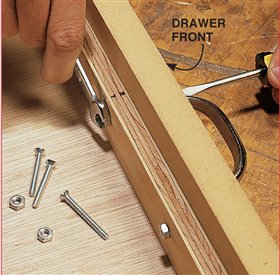
11. Bolt on the pulls so they hold
the drawer front to the drawer box
securely. Center each handle on the
drawer front.

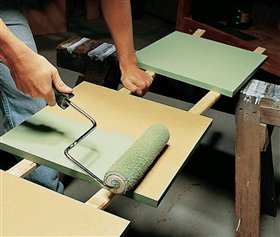
Tip: Paint before you assemble. If you want to paint your cabinets, save yourself
some work by painting the parts before assembly.
The paint might get a little scuffed while you’re
building, but all it’ll need is a final coat and some
work on the screw holes.
|


