We may receive a commission when you use our affiliate links. However, this does not impact our recommendations.

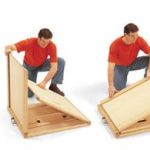
The legs and stretcher are held together with an edge-lap joint. The legs are notched through the mortise-and-tenon joint. . .
Now set your table saw fence to 5/8″, set the blade height to match the lengths of the tenon and run the leg upright to define the cheeks. Set the fence for 21-3/16″ and cut the other cheeks. Check the fit on your joints and make any necessary adjustments.
Shaping the Legs
With the leg pieces dry-assembled, transfer the leg shape from the scaled template on the next page to the legs. Then use your band saw to cut the legs to shape and sand the edges. I’ve found an oscillating spindle sander works well for this task, but if you can’t spend the money, a drum sander attachment for your drill press is an economical option.

. . .and a mating notch is cut in the stretcher .
Glue up the legs, and while the glue is drying, cut out the stretcher. The stretcher fits over the legs using an edge lap joint, interlocking the legs and the stretcher. Cut two 7/8″-wide x 13/16″ notches, 2-3/8″ in from either end of the stretcher. The band saw works fairly well for this, with a little chisel clean up. When the glue is dry, cut the duplicate notches in the center of the cross braces, cutting into the through-tenon on the leg. Check the fit and make any necessary adjustment. When the fit is good, add a screw to the joints to make it a little stronger.
Make the Drawer

The edge lap joint isn’t the strongest in the world, so I decided to add a screw to help out a little bit.
The drawer is made with traditional dovetail joinery. I used hand-cut half-blind dovetails on the drawer front and sides, and through-dovetails on the back. The drawer bottom fits into a 1/8″-deep x 3/16″ groove in the sides and back, held up 3/16″ from the bottom of the sides. Another 3/16″- deep x 1/4″-wide groove is cut on the outside of the drawer sides, 3/16″ down from the top edge to serve as part of the drawer runner.
Attaching the Legs and Drawer
The drawer is hung on the legs using two drawer runners screwed to the inside of each leg. Adjust the location of the runners to allow the drawer to slide freely. Conveniently, this table design allows you to adjust the drawer’s fit before the top is attached. Use screws and elongated holes drilled in the top cross braces to attach the top to the legs.
After everything fits well, remove the top and sand all the pieces in preparation for finishing. I used a water-base aniline dye (Moser’s Dark Antique Cherry, Woodworker’s Supply, 800-645-9292) to color the piece. I then followed the dye with a ragged-on coat of boiled linseed oil, a coat of clear shellac to seal the oil and then a final top coat of clear lacquer.

When attaching the top to the leg assembly, use elongated holes drilled in the cross braces to allow for wood movement due to changes in humidity.
You may not be looking to drum up word of mouth about your woodworking to help your business, by I guarantee this piece will stir up word of mouth about your skills among your friends and family. PW
Click here to download the PDF for this article.
Glen Huey is contributing editor for Popular Woodworking.
Here are some supplies and tools we find essential in our everyday work around the shop. We may receive a commission from sales referred by our links; however, we have carefully selected these products for their usefulness and quality.