


We may receive a commission when you use our affiliate links. However, this does not impact our recommendations.
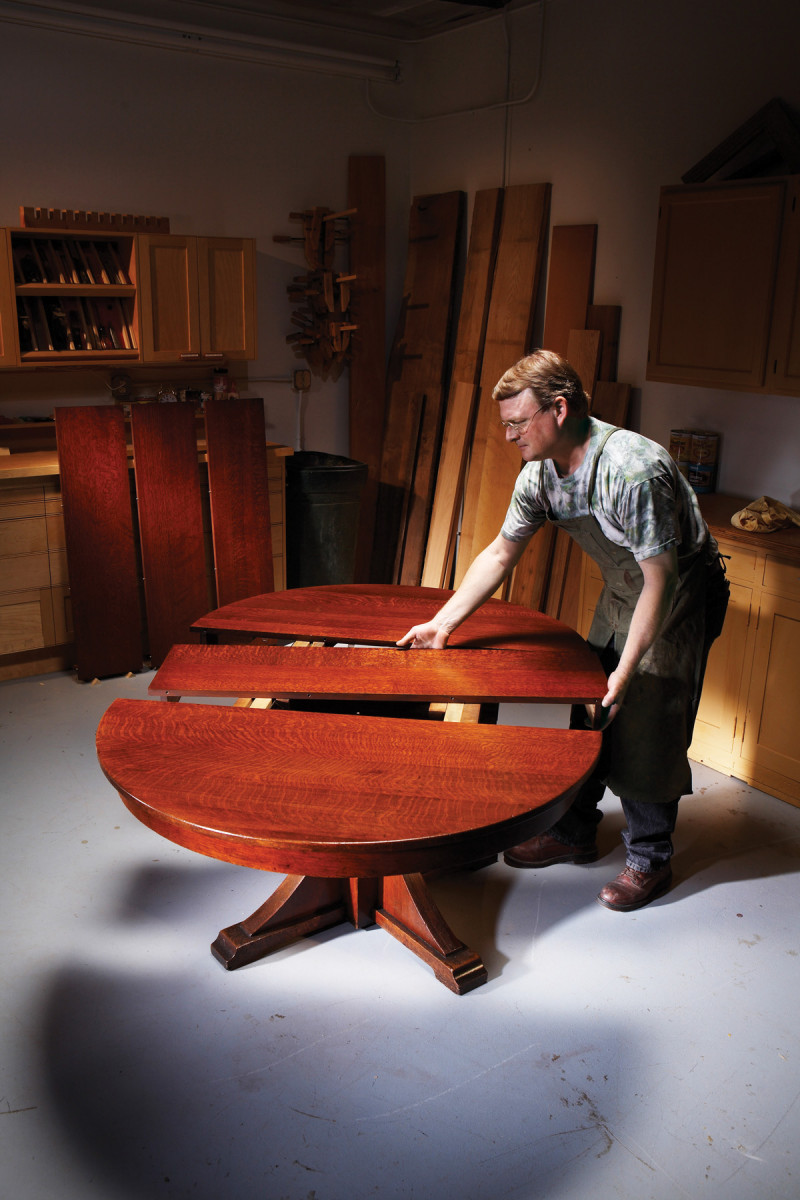
Thoughtful finishing and new leaves prepare this classic for the next 100 years.
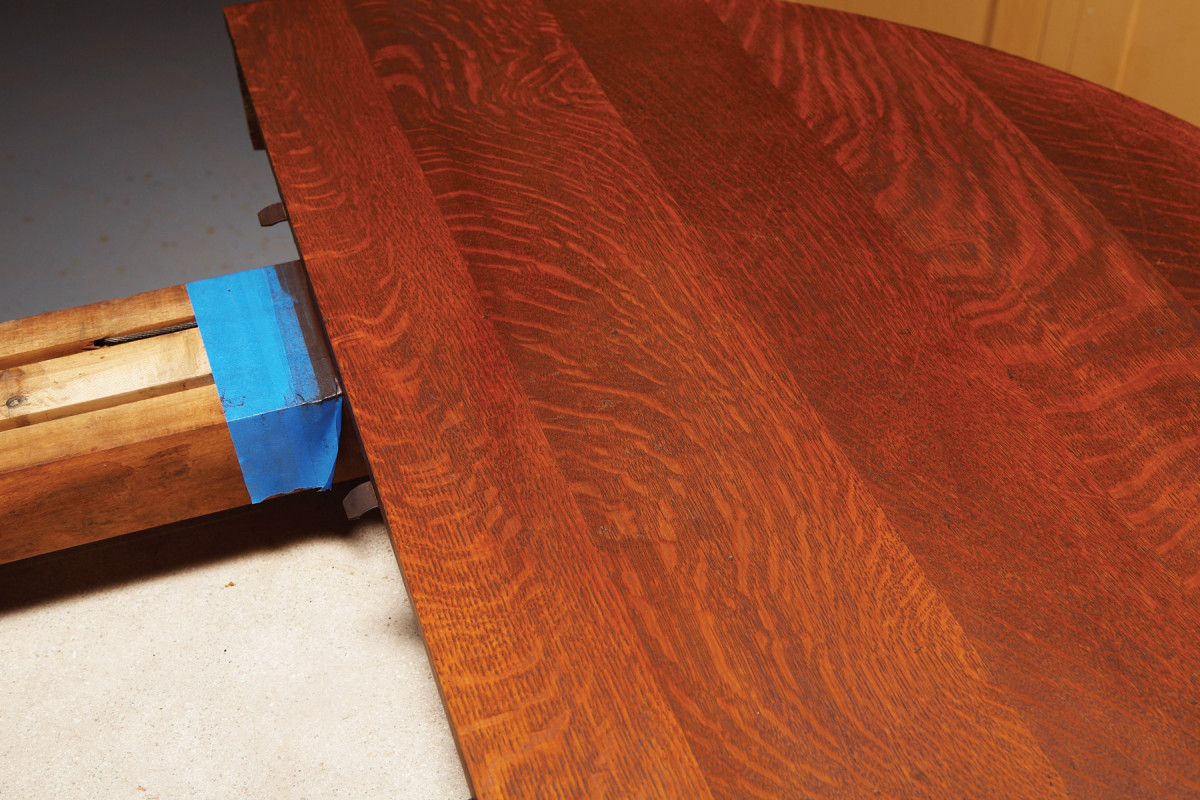
This old table looks like a prime candidate for refinishing. Scrub off the old finish, sand out all the dings and scratches, spray on a catalyzed lacquer finish and it would look brand new. But in my opinion, doing this would rob the table of its history. Lovers of antique furniture value an original finish in part because of the witness it bears. In its present condition this table does that – it tells a story 100 years old. But let’s face it. As it is, the table is an eyesore.
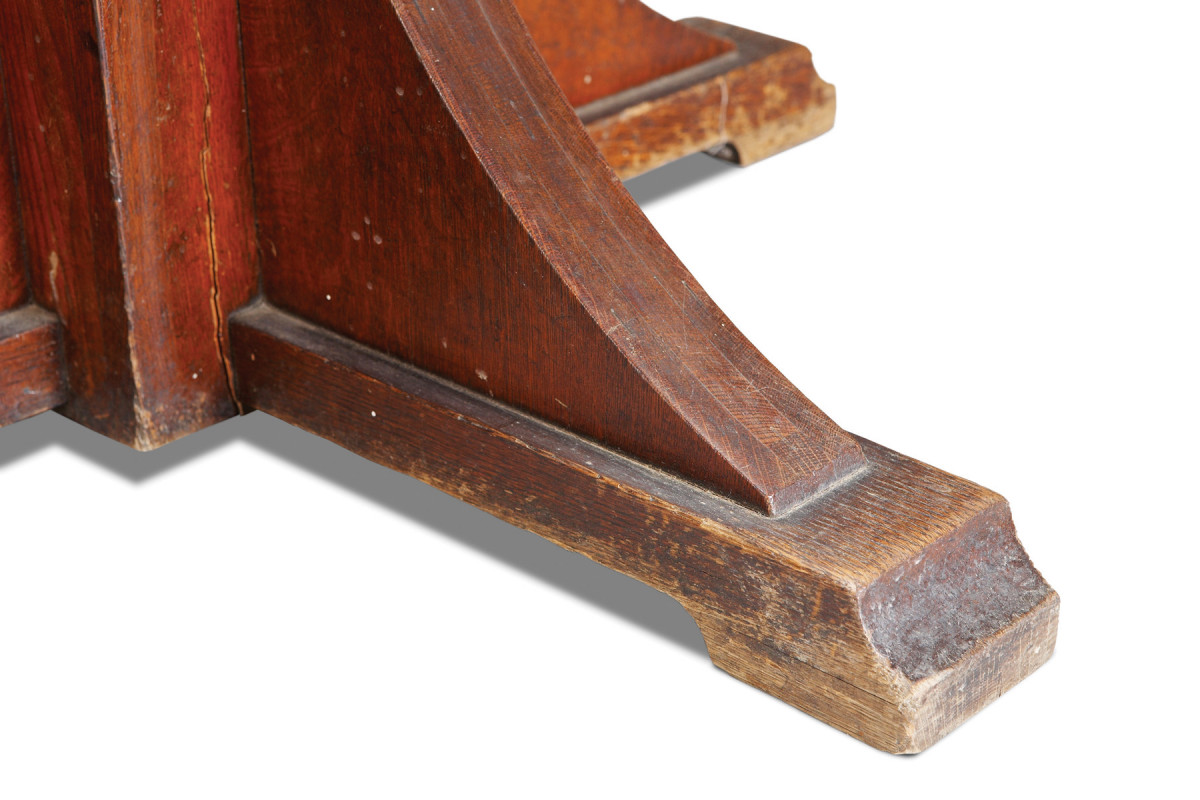
The pedestal’s original shellac finish is dirty and has worn away in areas near the floor. But overall, it’s in good condition for its age and can be restored without stripping.
That’s the conundrum of working with antique furniture. In some cases, the original finish adds real historic, aesthetic, and monetary value. But in pieces like this, saving all of the original finish makes no sense; the poor condition of the top’s finish actually devalues the piece.
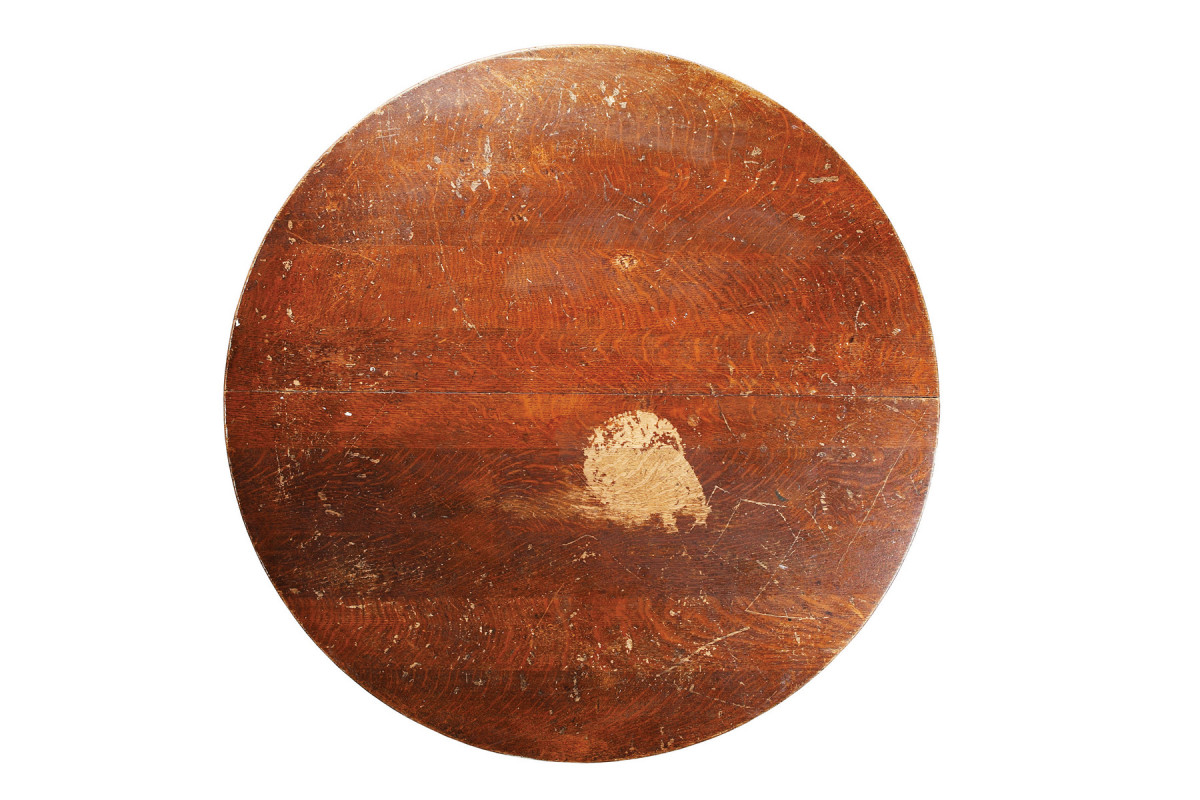
The top’s original shellac finish is so heavily worn and badly damaged that it can’t be restored. The original leaves are missing, also, so new ones have to be built. One challenge is to replicate the pedestal’s restored finish. Another challenge is to make the new leaves match the old top.
Sentencing these pieces to the stripper’s tank, the first step in most refinishing today, isn’t the best approach, either. I believe that most owners of antique furniture want to be good stewards of their pieces, which includes maintaining the furniture for future generations. Sometimes that means preserving the original finish; sometimes it means refinishing. In the case of this old table, it means a little of both.
Devise a Plan
1. The first step is to make repairs. Carefully protect the old finish by removing glue squeeze-out promptly and gently, using a dampened cloth. Here I’m gluing a crack in the pedestal’s center post.
To plan the table’s restoration, I have to analyze its current condition. My goal is to retain as much of this table’s original condition as possible, while restoring its viability for everyday use. The first step is to determine the nature of the original finish. Simple tests show that it dissolves quickly in alcohol and contains most of the color. Based on these qualities and the table’s age, my educated guess is that the original finish is tinted shellac.
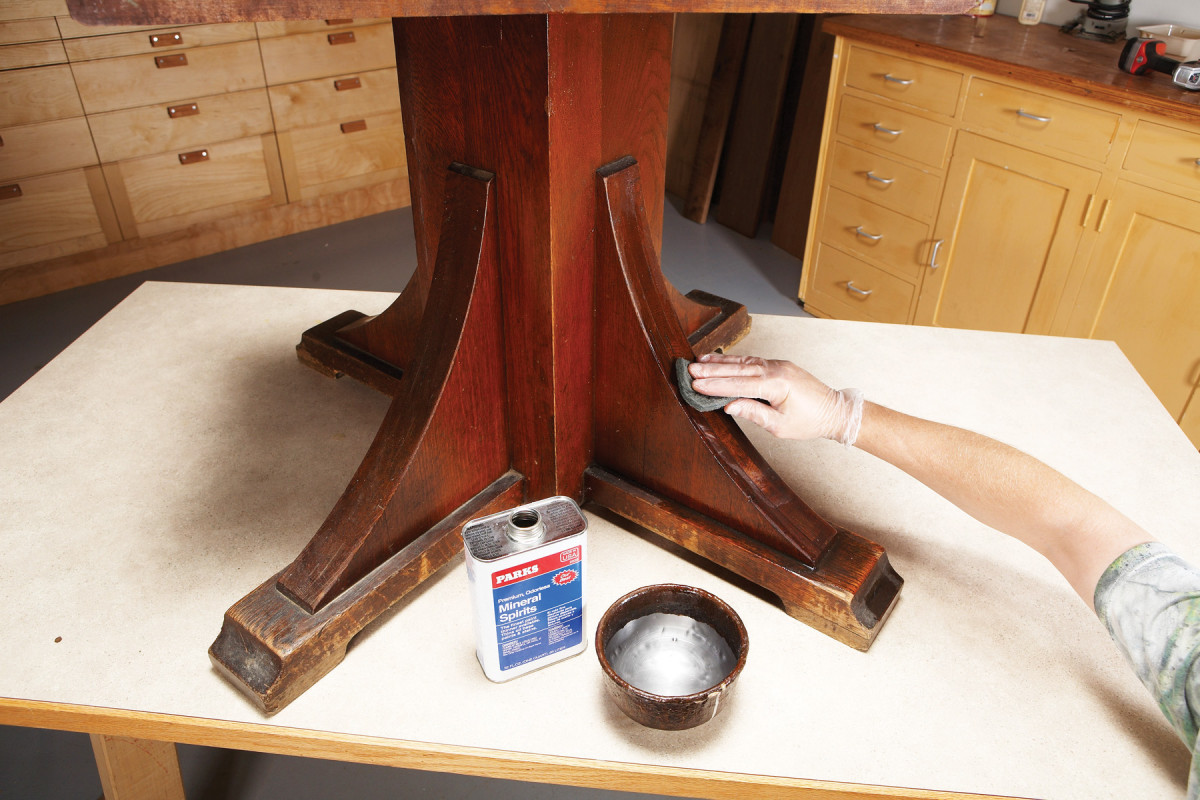
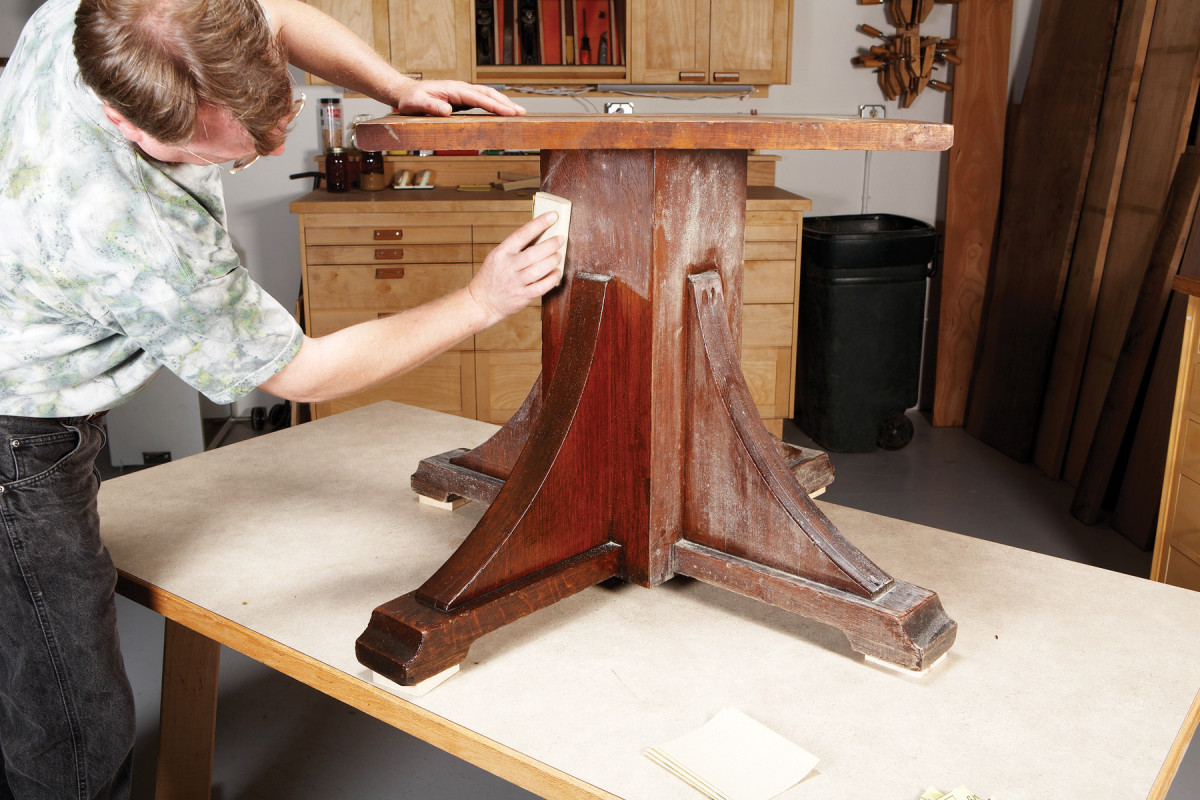
2. Gently clean the finish with steel wool and mineral spirits to remove old furniture polish, wax and grease. The new finish coats won’t adhere properly if these contaminants remain on the surface.
Next, I want to find examples of the original finish that are still in good condition. Protected areas are the best place to look. On this table, the pedestal’s original finish is dirty and oxidized, but it’s 90-percent intact and definitely restorable. The same is true of the finish on the top’s apron.
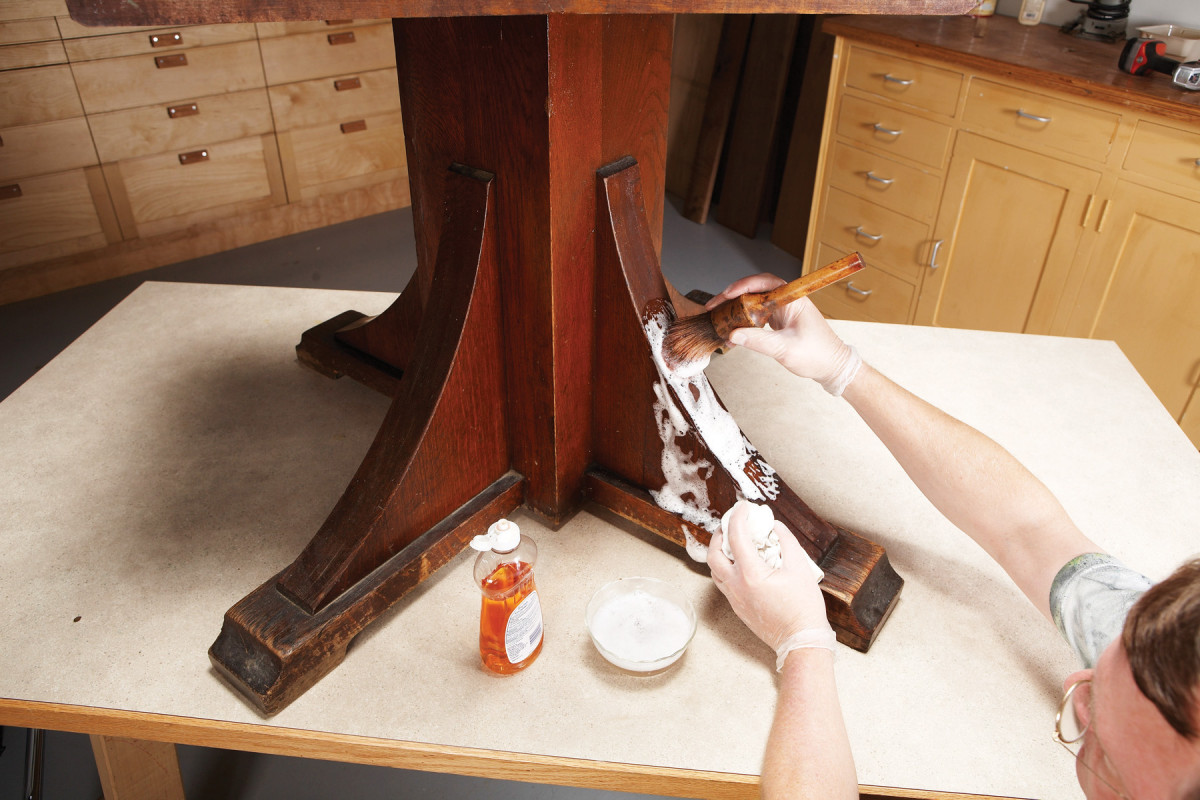
3. Scrub the surface with mild dish soap to remove watersoluble dirt and grime. A round sash brush (see Sources) is gentler than an abrasive pad and gets into corners and crevices more effectively. Wipe frequently with a cotton cloth so the surface doesn’t stay wet for long periods.
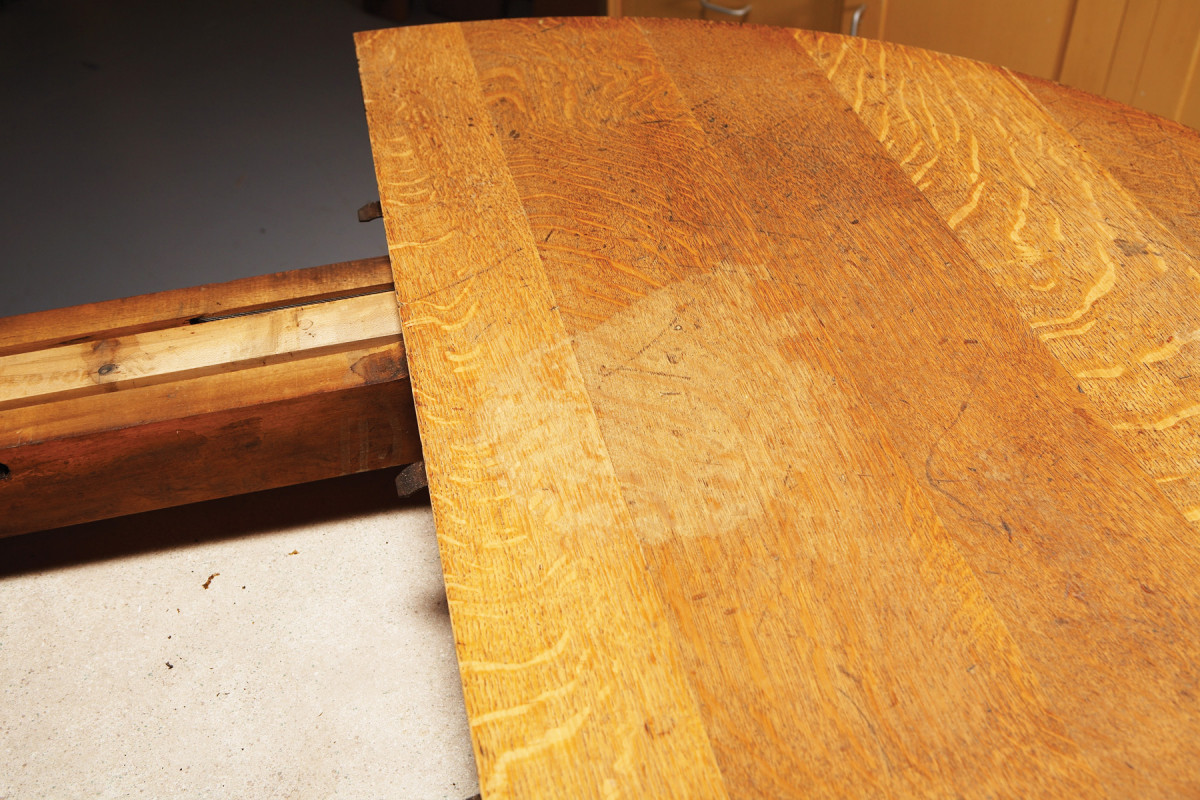
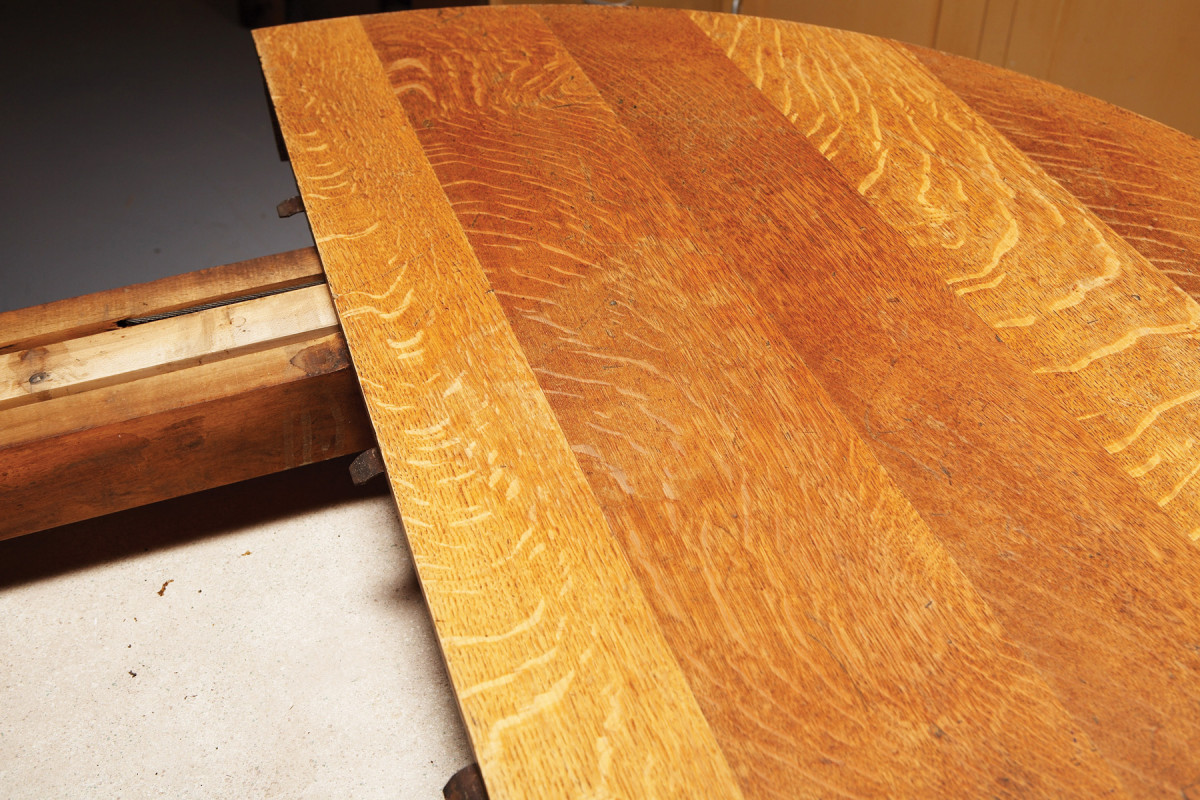
The top itself, on the other hand, poses numerous challenges. Its original finish is beyond repair, and unfortunately, I’ve determined that most of the original color will be lost when the finish is removed. Areas on the top where the finish has been long-gone are likely to be discolored. On the other hand, the wood surface contains character marks from 100 years of use that I want to save: pockmarks, nicks and scratches will help the new finish look authentic. And of course, the original leaves are missing.
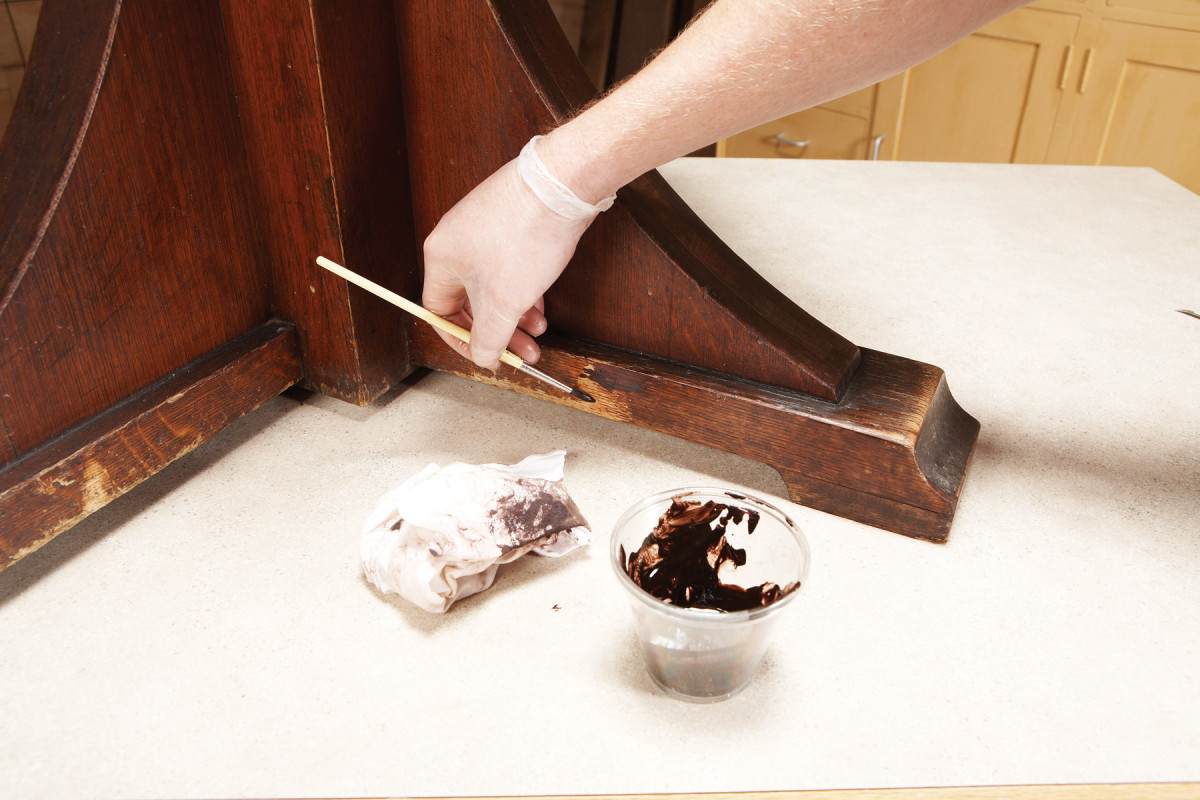
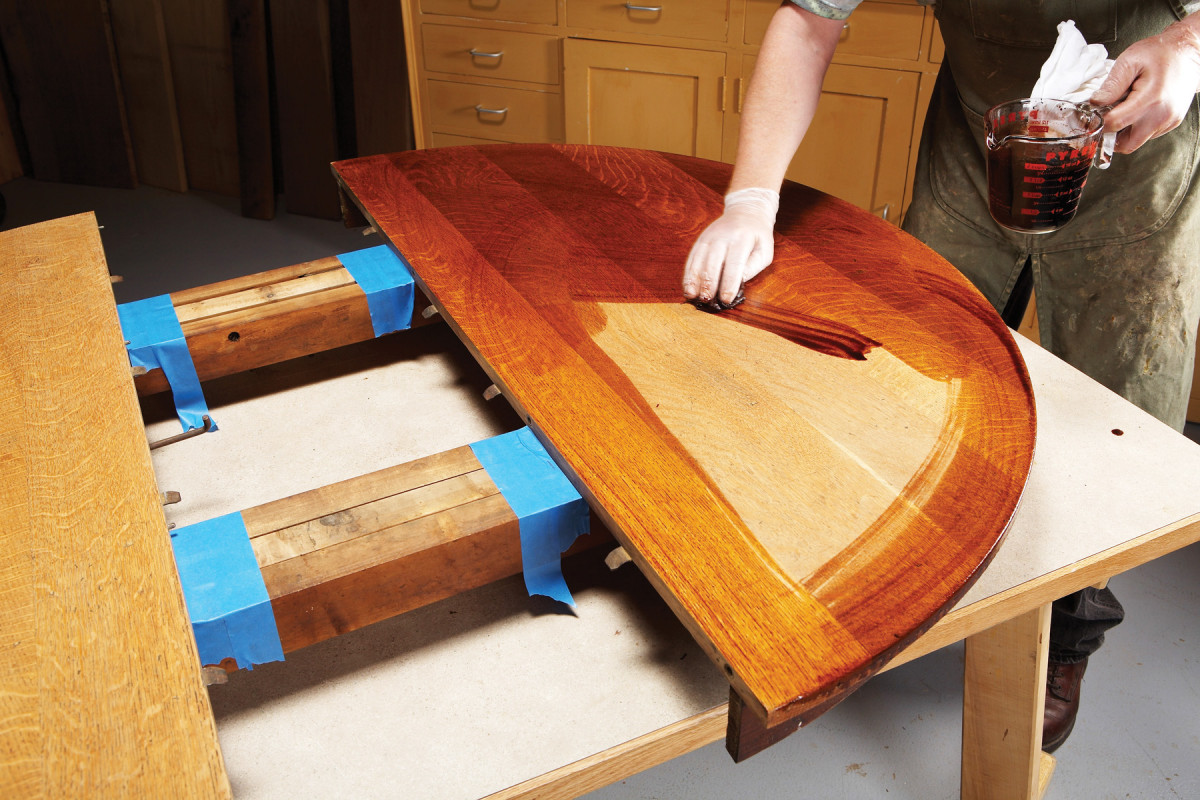
4. Color the areas of missing finish with glaze. Make your own glaze by mixing artists oil in glazing medium (see Sources). Brush on the glaze and then wipe it to blend with the existing finish.
Here’s my restoration plan. First, I’ll bring back the rich color and depth of the pedestal’s original tinted shellac finish. Then I’ll use its restored appearance to guide my work on the top.
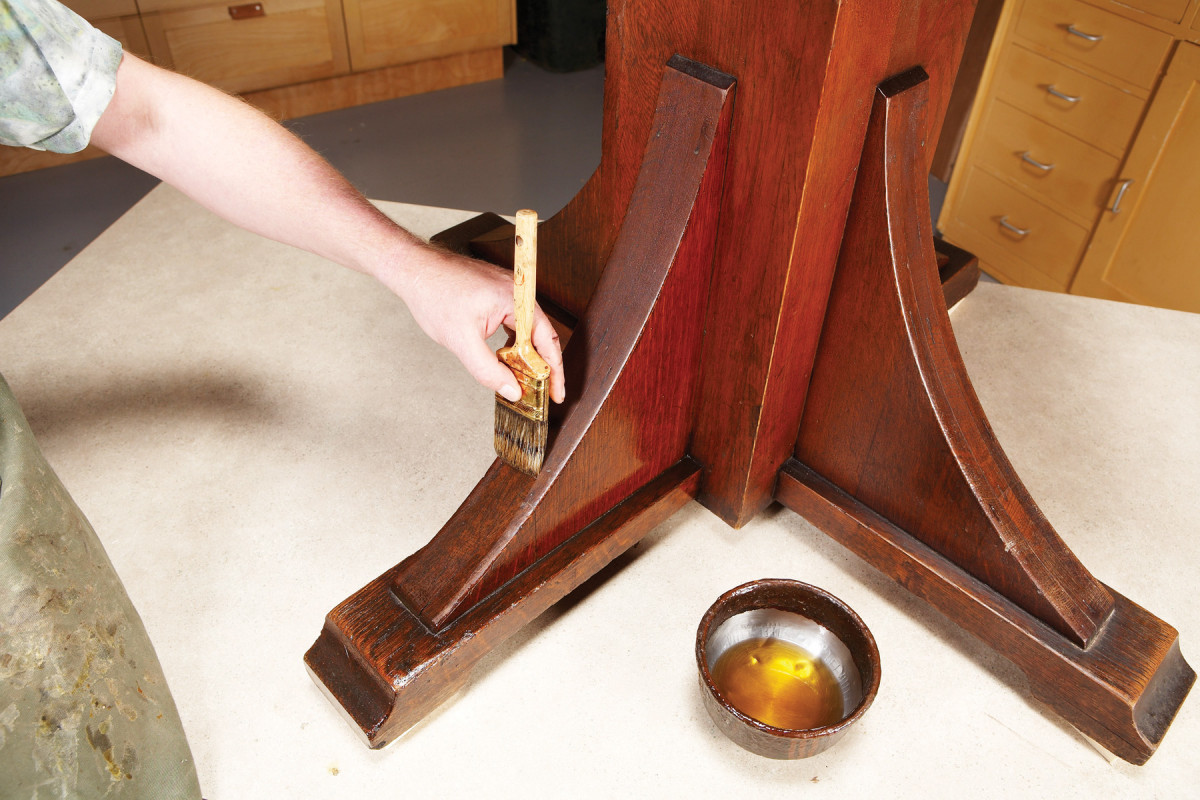
5. Brush on two coats of fresh dewaxed shellac to rejuvenate the original shellac finish and form a level coat that’s thick enough to sand. This process restores the original color and richness.
By working gently and carefully while I remove the top’s deteriorated finish, I’ll leave as much of the old patina and original wood surface as I can. I’ll treat the top chemically, if necessary, to minimize discoloration. I’ll build new leaves, using the same species of wood as the top, quartersawn white oak, so they’ll have similar figure and texture. Then I’ll create a new finish that will match the restored finish on the pedestal. This new finish will have greater resistance to heat and water than the original shellac finish, so it will stand up to daily use for years to come. I’ll tweak the color of this finish to make the new leaves match the 100-year-old top.
Restore the Pedestal
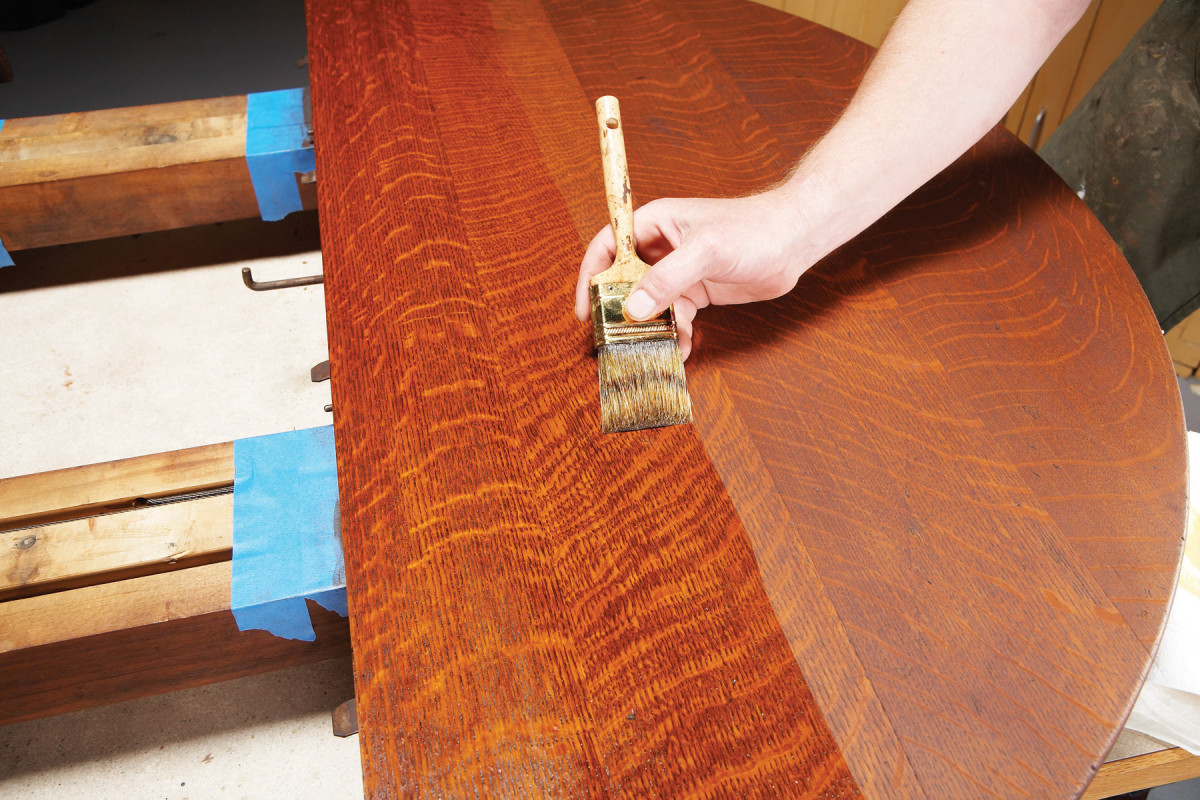
6. Sand with 400-grit paper to smooth the shellac. By scuffing the surface, this step also prepares the pedestal for the topcoat.
The pedestal requires minor repair (Photo 1). I usually complete repairs before I restore a finish. Cleaning the old finish is a two-step process (Photos 2 and 3). Next, replace the missing color with glaze (Photo 4). Make your own glaze by mixing artists oil in glazing medium. When the glaze is thoroughly dry, rejuvenate the old shellac by brushing on two coats of fresh dewaxed shellac (Photo 5 and Sources). Wait 45 minutes between coats; sanding isn’t necessary. Let the second coat dry thoroughly. Then sand lightly (Photo 6).
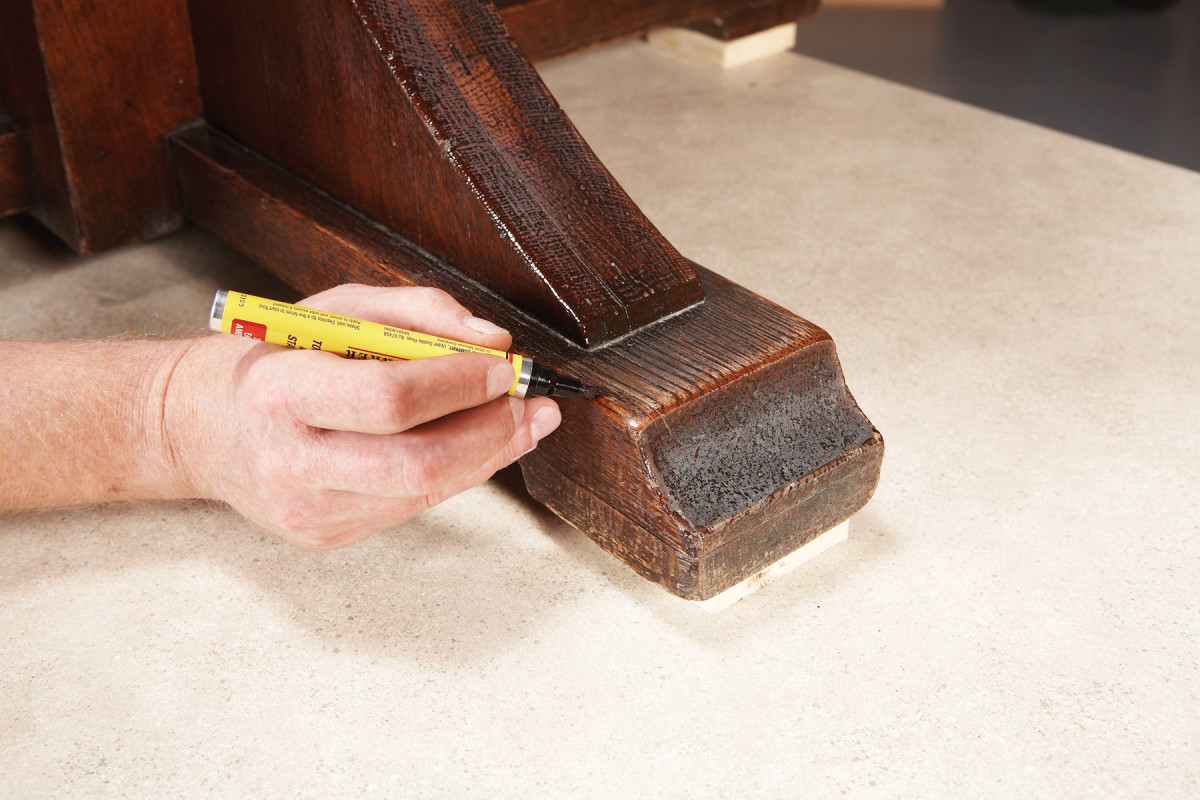
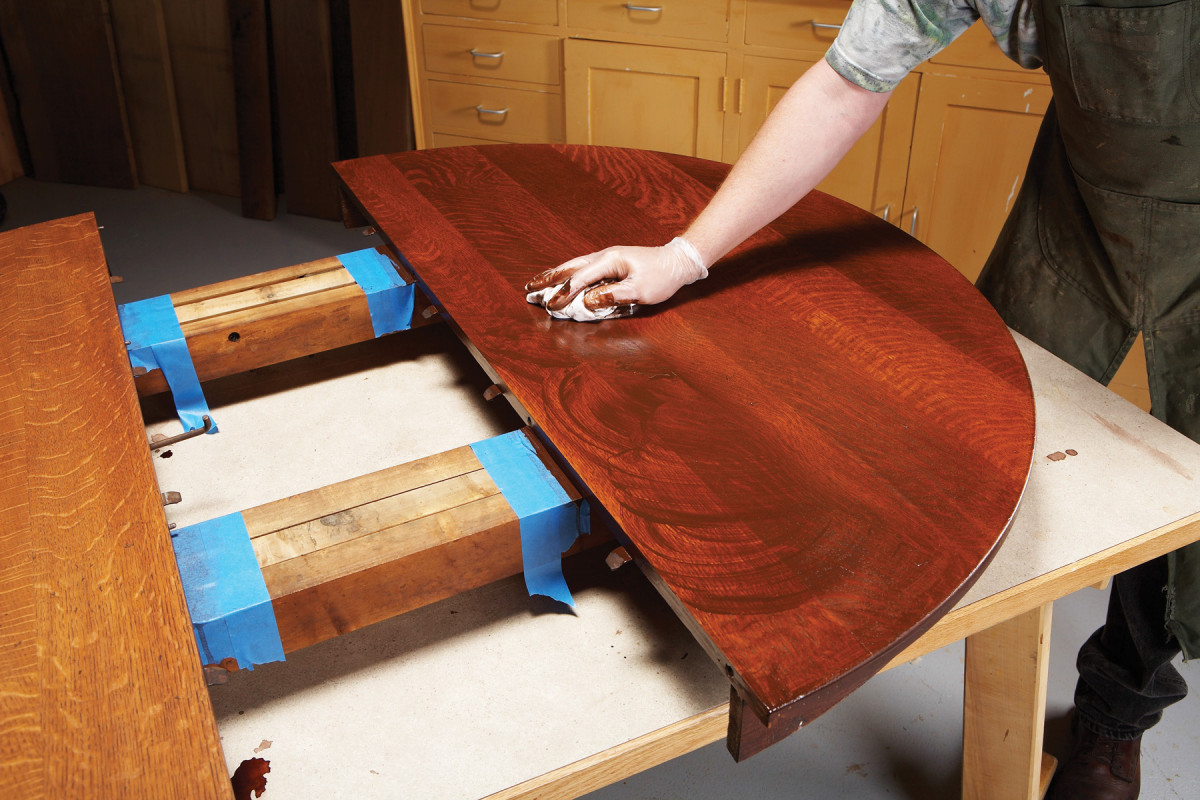
7. Color sand-throughs with a touch-up pen. The color soaks into raw wood, but wipes off finished areas. Even with careful sanding, sand-thoughs are almost inevitable.
Remove all the sanding dust and touch up spots of missing finish or sand-though with a touch up pen (Photo 7). Use the same procedure to restore the finish on the apron.
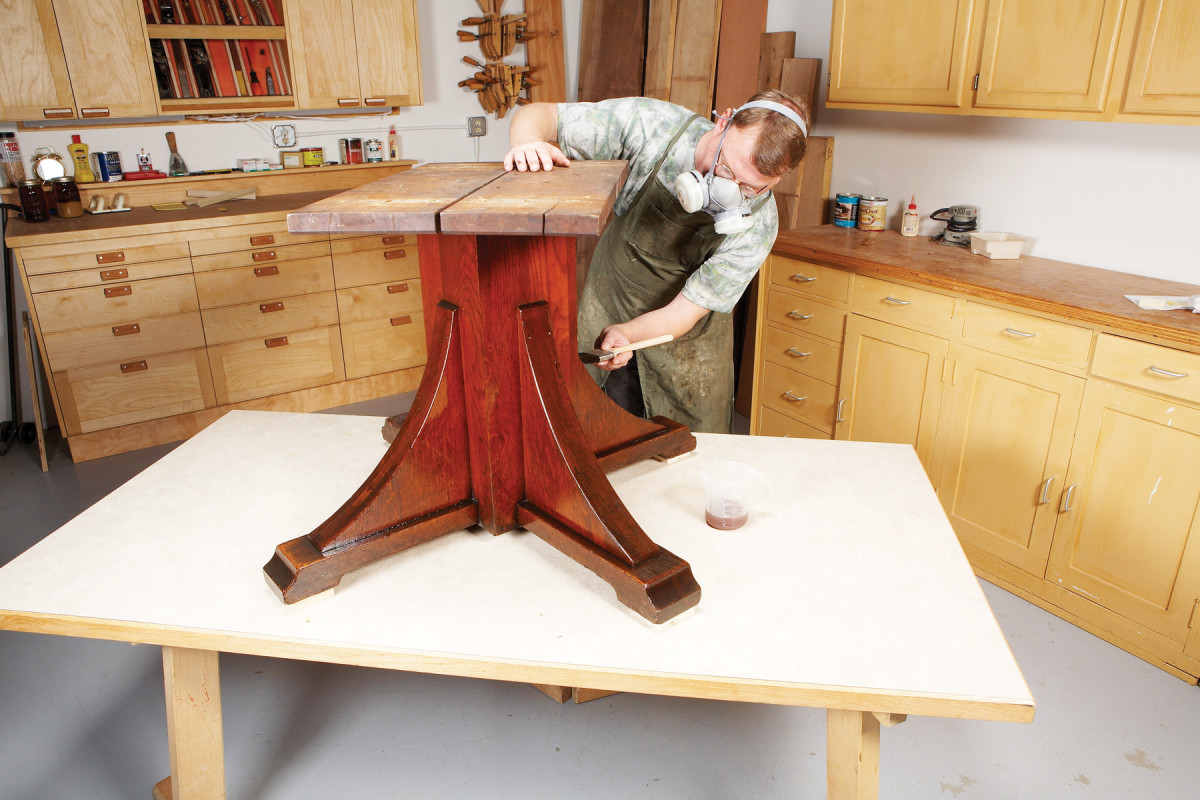
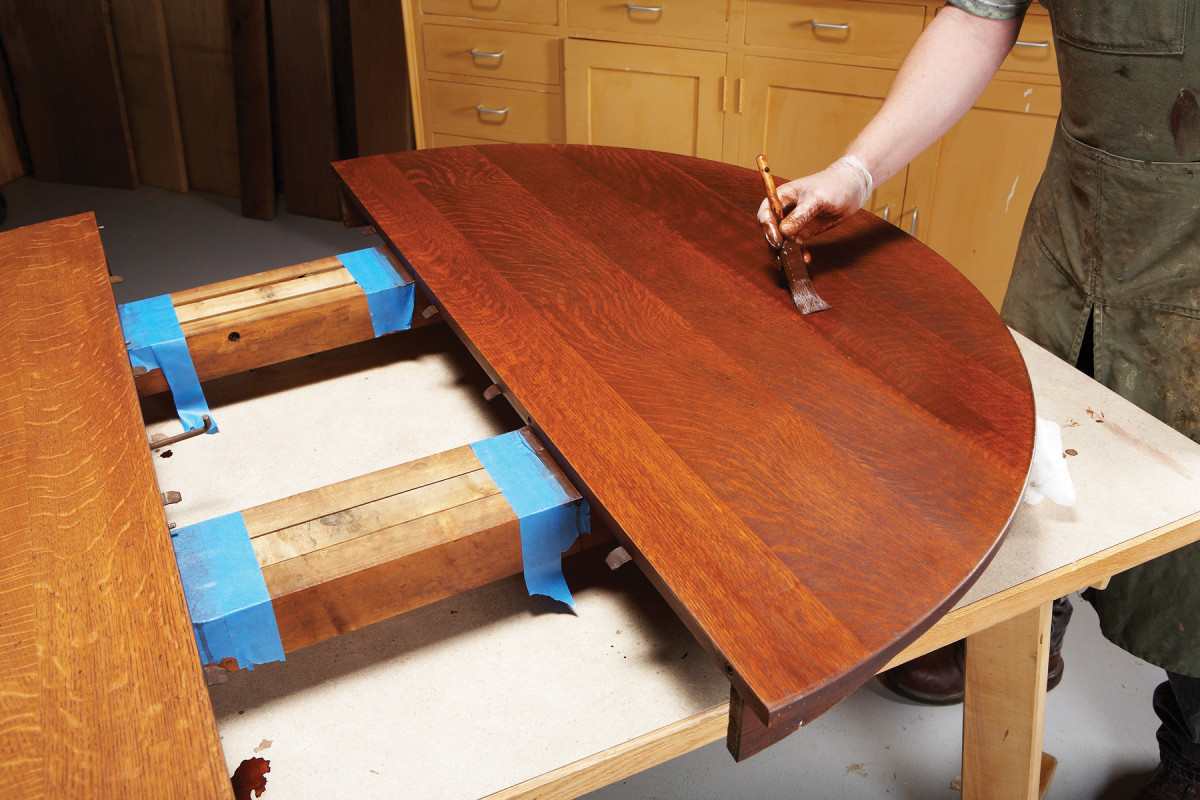
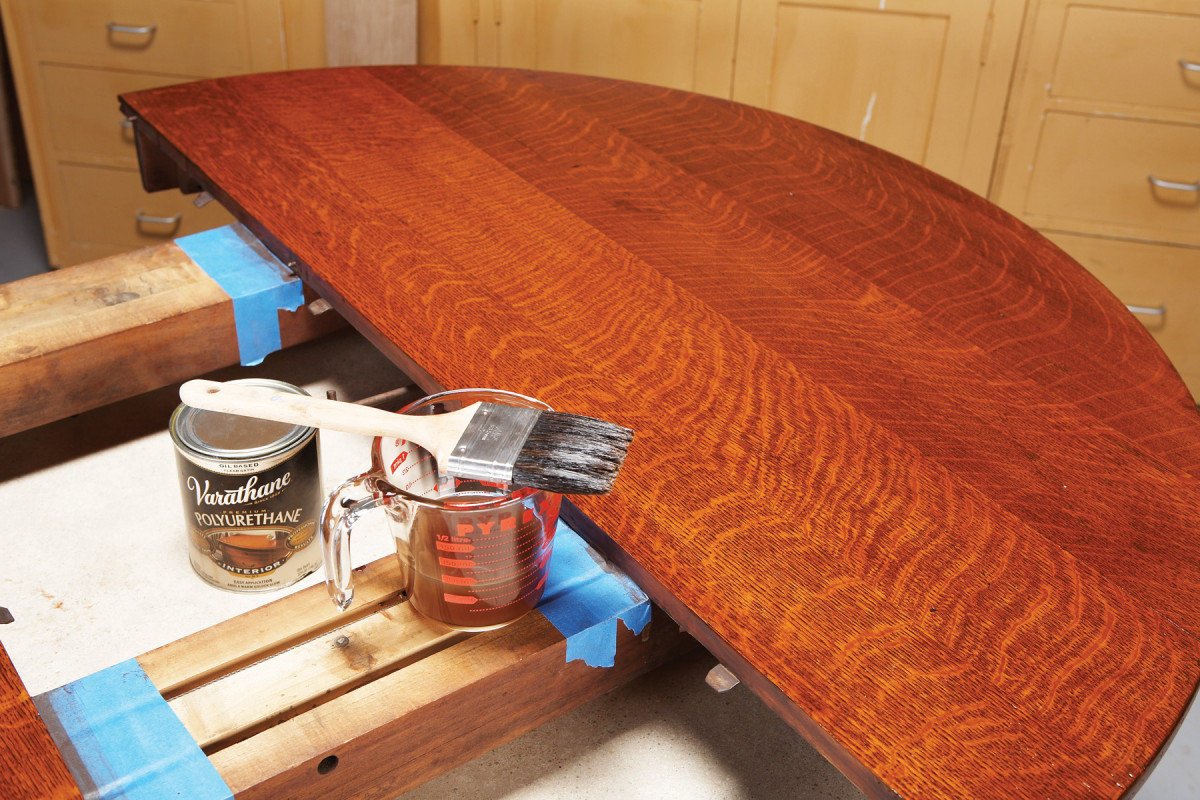
8. Apply two coats of satin polyurethane. This final step is optional, because the restored shellac finish is durable enough for the pedestal. Polyurethane gives the pedestal a sheen that will match the new finish planned for the top.
The final step, topcoating with polyurethane, is optional (Photo 8). For purists, polyurethane compromises the original finish. For pragmatists, it helps to make the pedestal’s appearance match the top.
Build the Leaves
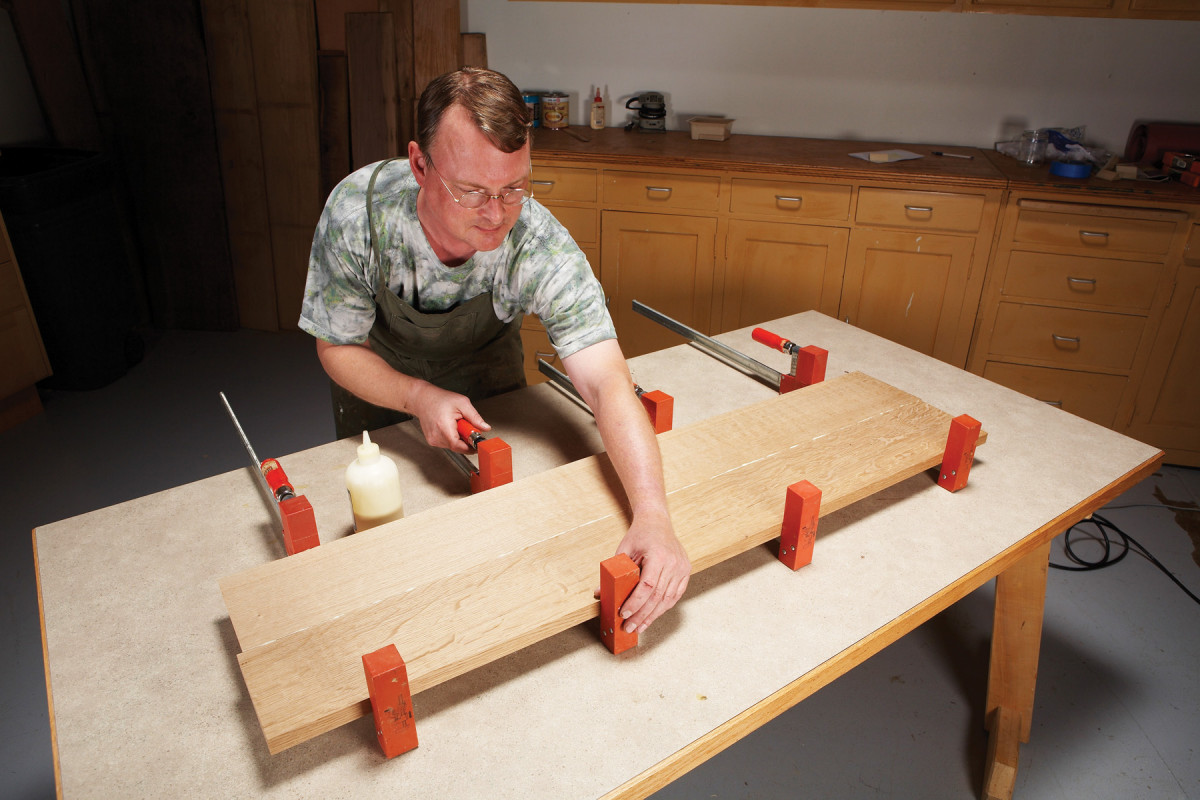
9. Building new leaves is the first step in restoring the top. Glue the leaf blanks together, using boards similar in width and figure to the boards on the tabletop.
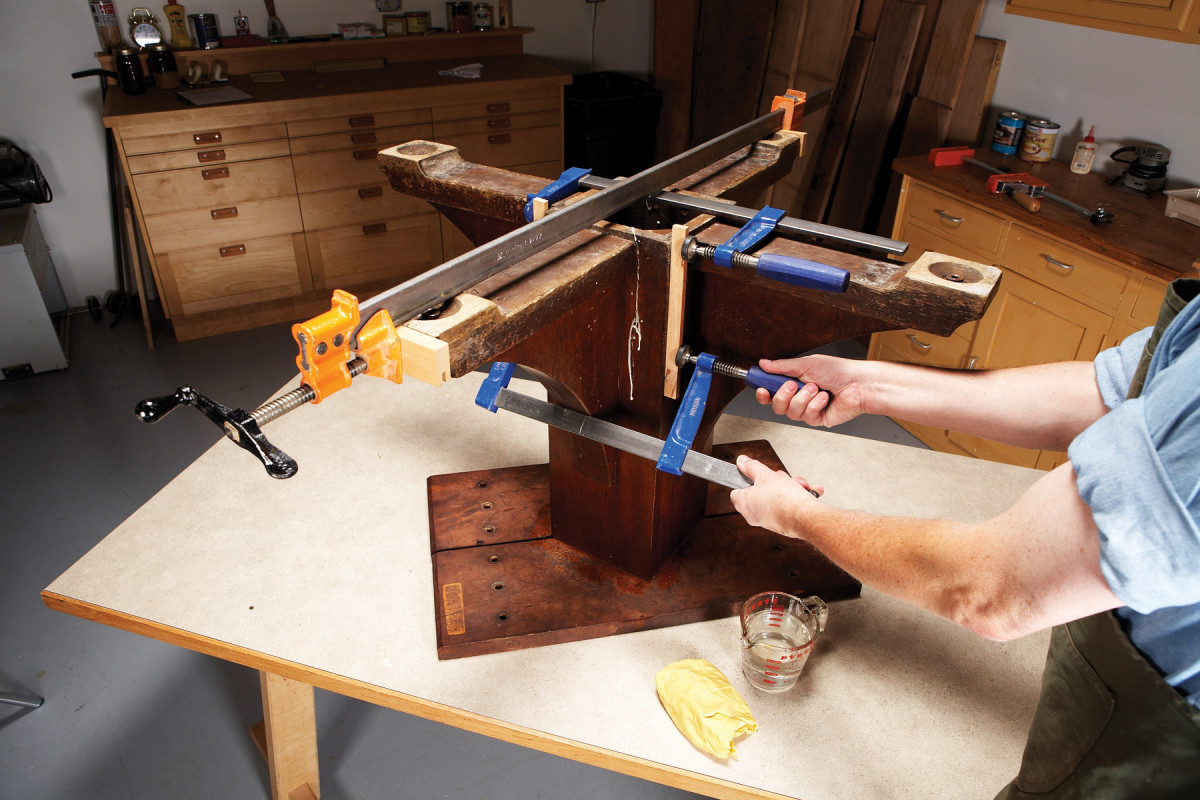
This table expands to 96 inches, allowing the addition of four twelve-in.-wide leaves. The new leaves must be the same thickness as the top after they’ve been finish-sanded. The best strategy is to glue the leaves together about 1/8-in. oversize in thickness and at least one inch oversize in length (Photo 9). Plane them again after gluing, allowing enough material to sand them to final thickness.
10. Stack the leaf blanks on the table to locate the alignment pins. Extend these marks across the top face of each blank to locate the pin holes on the opposite edge.
To fit in the table, the leaves’ pins and holes must align with the original ones in the top (Photo 10). Determine the original pins’ vertical location on the edge: usually they’re centered between the top and bottom faces. Drill the pin holes in the leaves, using a doweling jig, and install the pins.
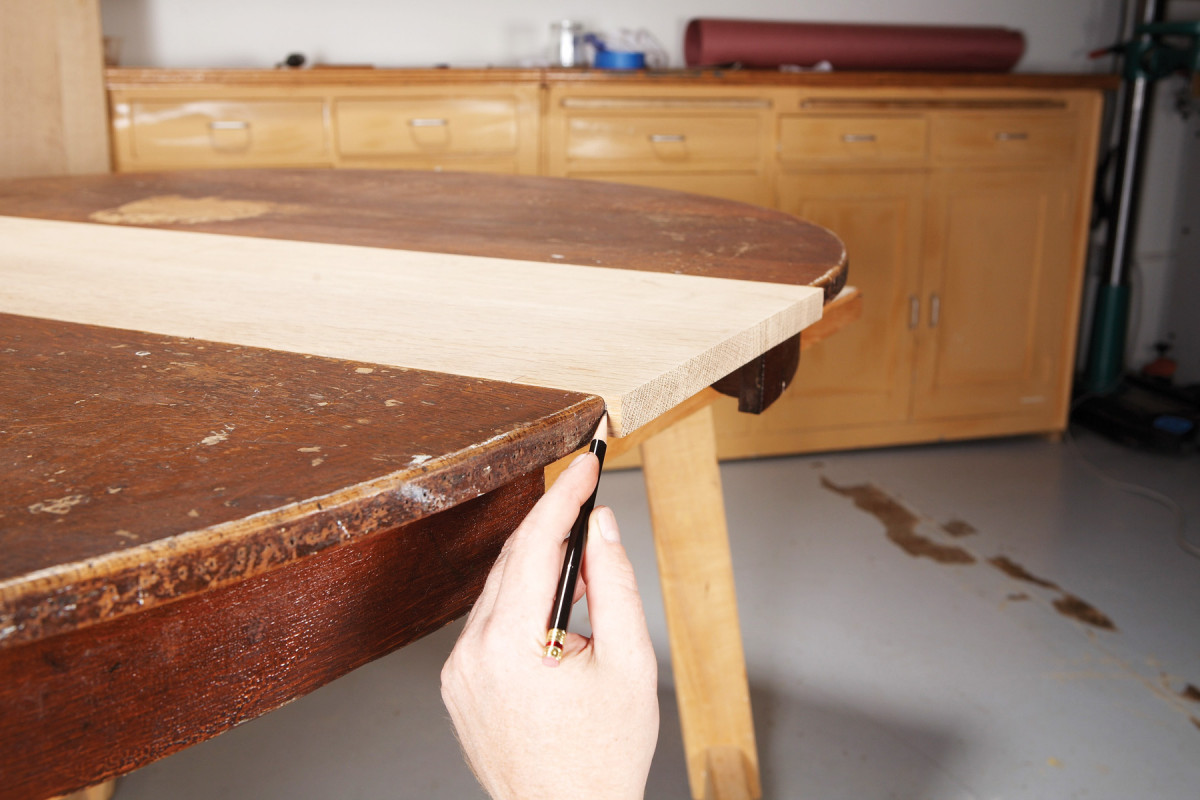
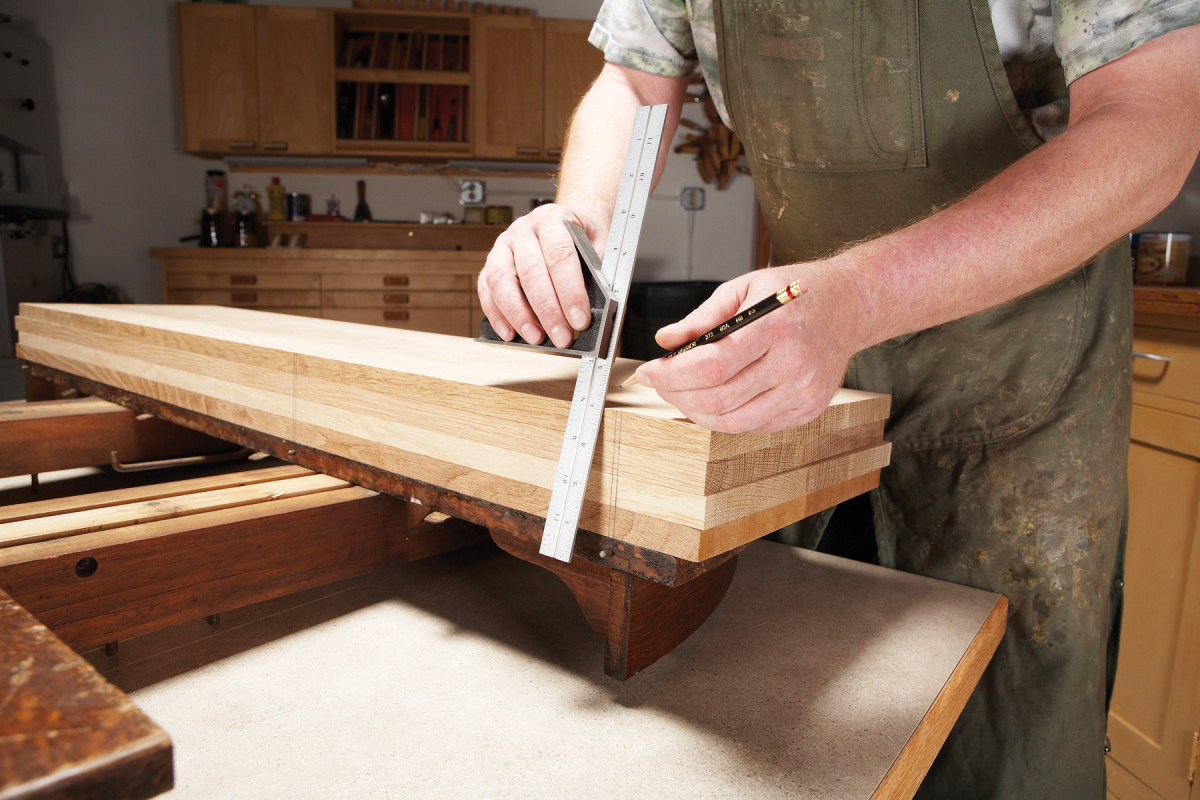
11. Install each leaf blank in the top to mark it for cutting to length.
Cut the leaves to final length (Photo 11). Install the leaf aprons after drilling counterbored holes for the mounting screws (Photo 12).
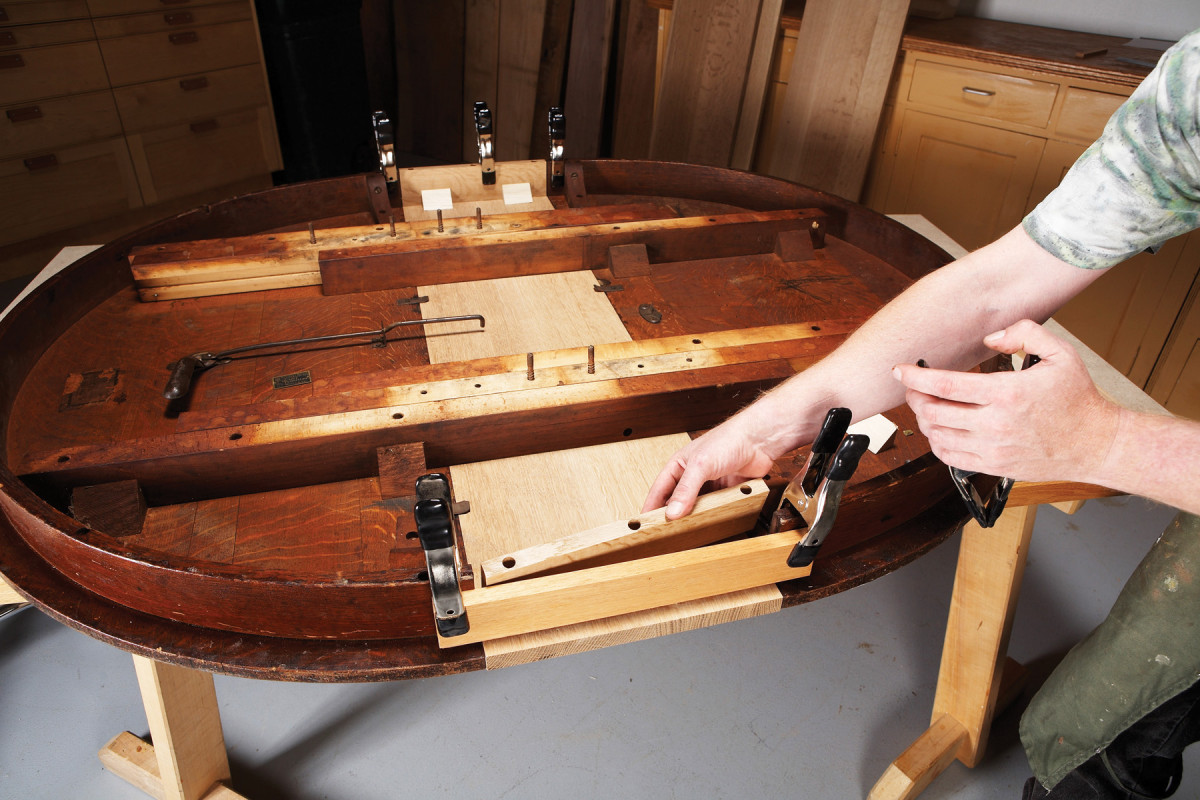
12. Install the leaf aprons with the top upside down. Clamp a board to the table aprons to ensure the leaf apron is flush. Center the apron on the leaf, clamp it in position and fasten it with screws and glue blocks.
Center each apron on the leaf: the aprons are 1/16-in. shorter than the leaf’s width, to allow seasonal movement without binding.
Remove the Top’s Old Finish
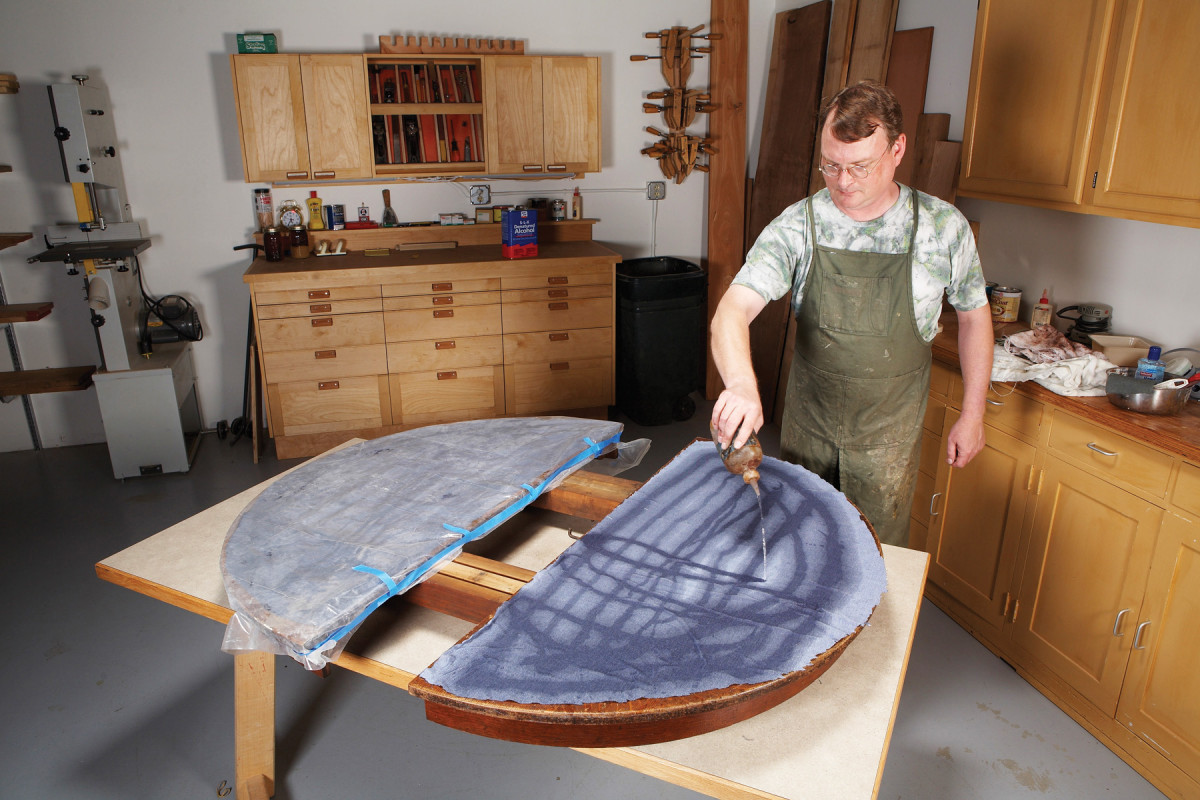
13. Remove the top’s old finish. Cover the top with cloth cut to fit and saturate its surface with alcohol. Cover the saturated cloth with plastic, tape the edges and let it sit until the old finish has liquefied.
Because the old finish is shellac, I can use a simple technique that minimizes the use of solvents (Photo 13). It also preserves as much of the original patina and character as possible. Cut an old cotton sheet to fit the top. Position each piece and then saturate them with alcohol, using a small squirt bottle to distribute the alcohol evenly (alcohol has low toxicity, but it is highly flammable, so be careful). Use only enough alcohol to wet the cloth. Excess alcohol just makes a mess—adding more later is always an option. Cover the saturated cloth with plastic to keep the alcohol from evaporating.
14. Fold back the covering in stages to remove the finish. This method simultaneously divides the job into manageable sections and keeps all of the old finish liquefied.
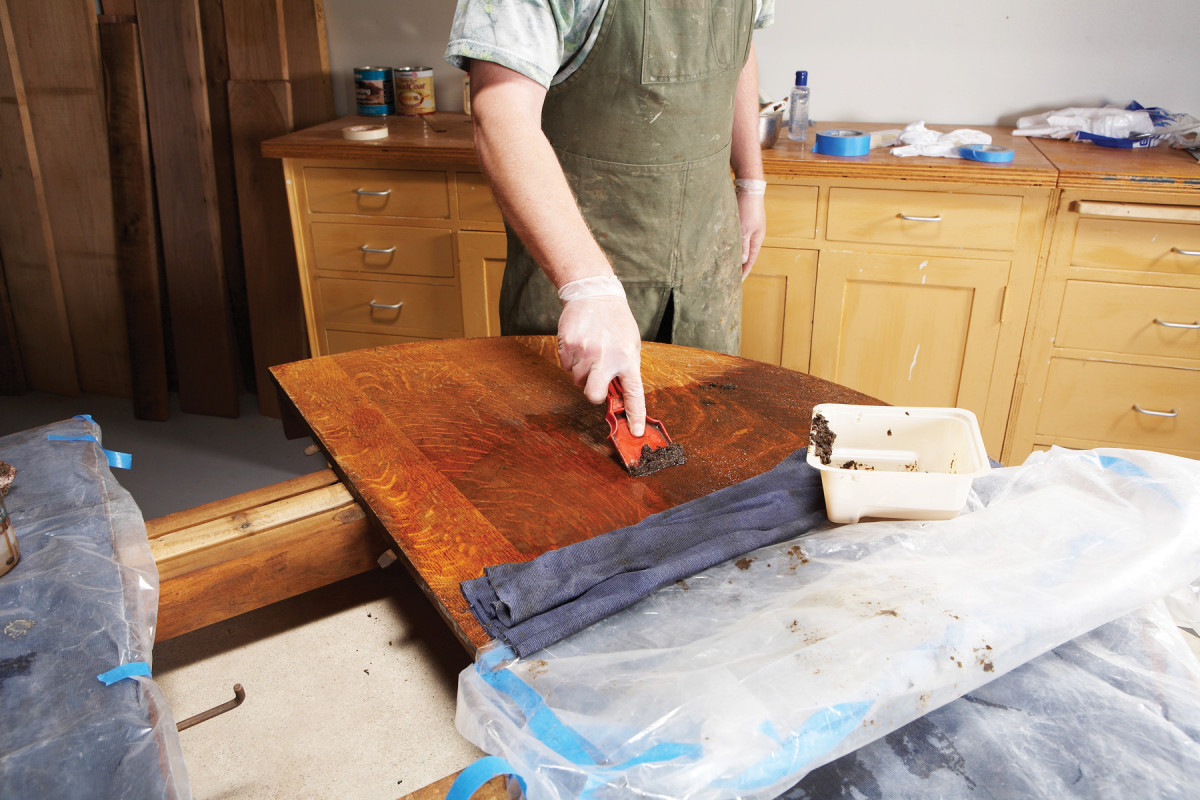
After about fifteen minutes, peel back one end of the plastic and cloth. You should see liquefied shellac (if you don’t, just re-cover the surface and wait a bit longer). The trick here is to expose about 12-in. of the top at a time. Begin removing finish with a plastic putty knife (Photo 14).
15. Remove the remaining shellac. Add more alcohol as necessary, to keep the surface wet. A gray-colored nylon abrasive pad won’t scratch the wood surface.
The only residue from this process is the old shellac, which is non-toxic. When most of the finish is gone, gently scrub with a nylon scrub pad dampened in alcohol (Photo 15). Unlike steel wool, nylon pads don’t leave behind tiny bits of steel (they can cause black marks on the wood). Squirt on more alcohol as needed. Then rinse with a clean cloth and alcohol. When the first area is clean, peel back another 12-in. or so and continue.
After you’ve completed half of the table, examine the surface under good light and wash with alcohol as needed. Then give it a final overall rinse and scrub with alcohol and clean rags—this should produce a very consistent surface. Repeat the process on the other half of the top.
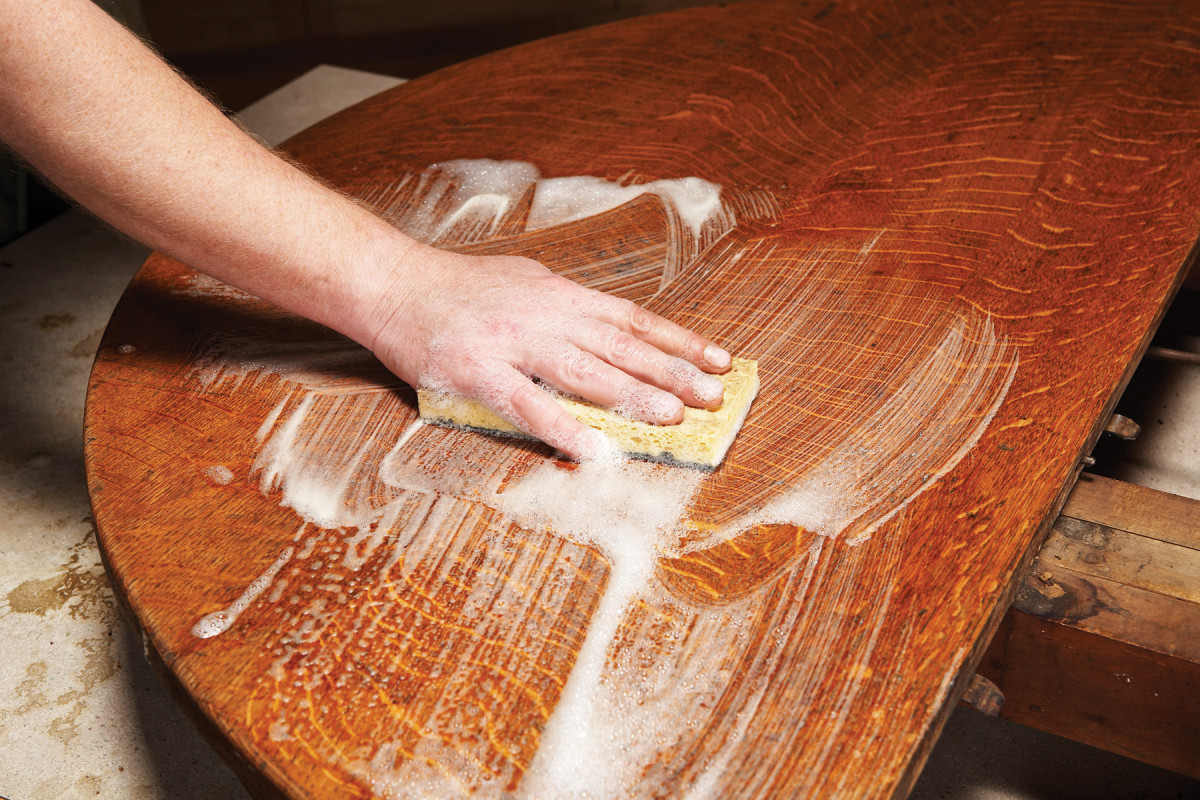
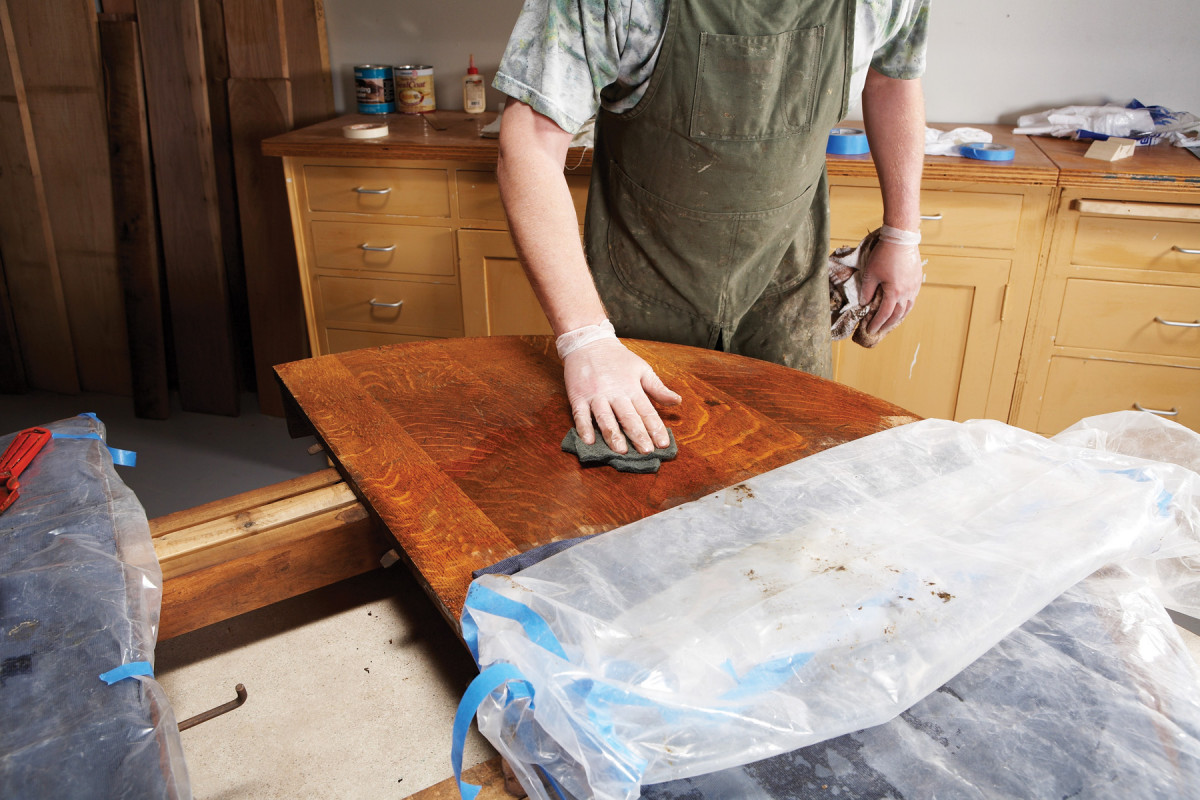
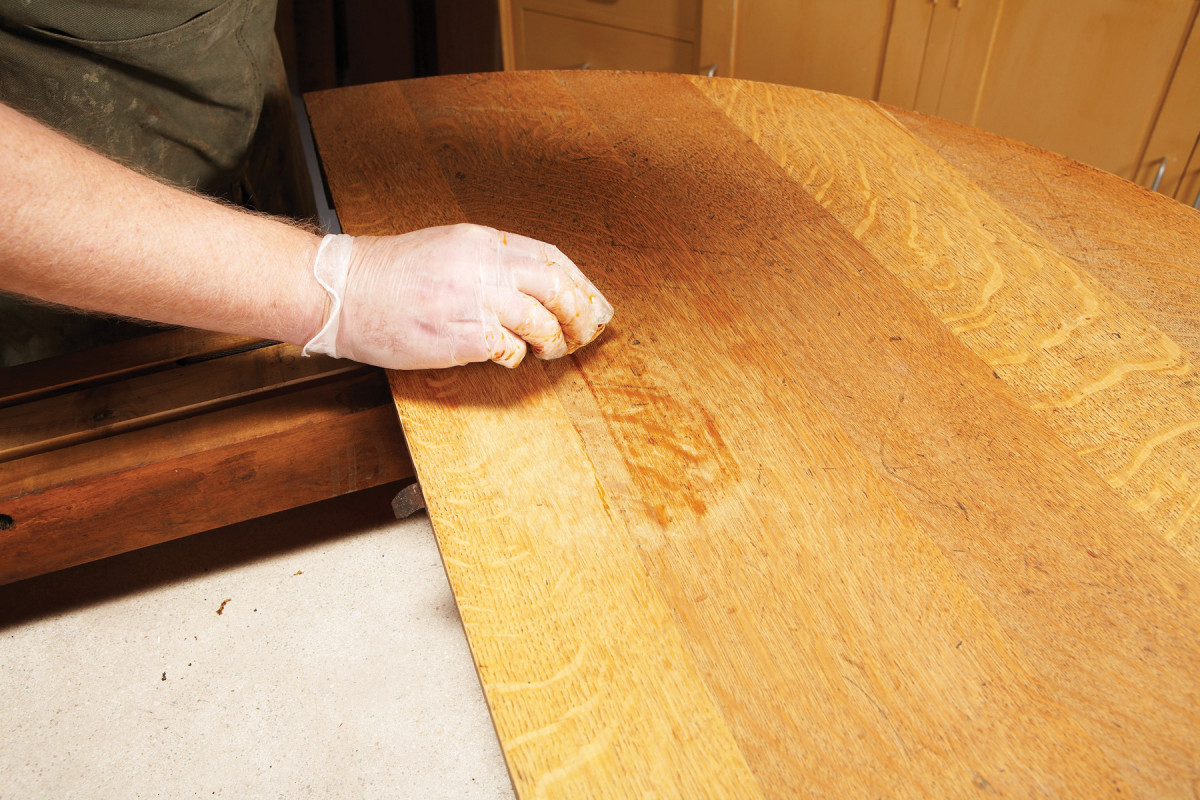
16. Gently scrub the stripped surface with mild dish soap and water. This step removes water-soluble dirt and crime that has lodged in areas where the finish has failed.
Wash both halves of the top with mild dish soap and water (Photo 16). The surfaces should be consistently porous. Spots where water “beads up” instead of soaking may indicate residual finish, as may spots where the surface remains light-colored. When the top is evenly porous, rinse it off and let it dry.
Decide About Sanding
Examine the surfaces to determine if sanding is necessary. Many pieces need little or none at all. Whether or not you sand depends on your restoration goals. Sanding may remove grayed areas and other unsightly marks. But sanding may also eliminate character marks you want to save. The danger is that sanding a little can lead to sanding a lot. Focusing on an imperfection can cause a problem area to become larger.
This top showed several grayed spots where finish had been missing, so I decided to try removing them with light sanding. I used 180-grit paper on a felt block to minimize the effect on the character marks. The results were a wash—neither the character marks nor the gray spots disappeared.
When grayish discolorations persist, I use oxalic acid. Oxalic acid is bleach that only changes the color of oxidized (grayed or blackened) wood (see “Dealing with Discoloration,” at left).
Match New Wood to Old
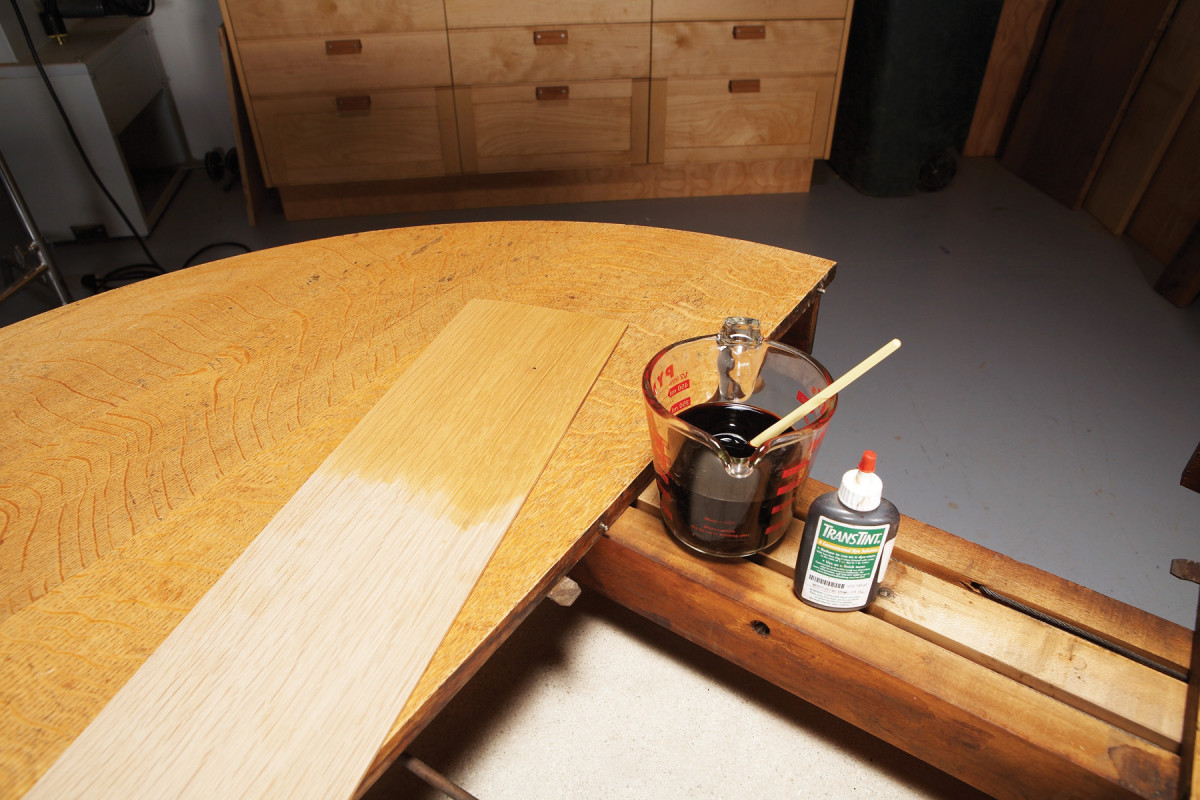
17. Use dye to tint the new oak leaves to match the top’s aged color (see “Recipes”, page 54). Use a sample board made from the same lumber as the leaves to test the color.
Matching the new leaves to the old top requires only one step: adding color. As white oak ages, it acquires warm yellow and tan tones (“golden oak” wood stains are usually variations of this color). Water-soluble dye is the best choice for this step. It colors more uniformly than stain and doesn’t seal the wood. Using a test board, mix dye to match the color of the top (Photo 17). Then dye all the leaves to give them that “golden oak” glow. Every color-matching situation is different, of course, so you may to adjust my recipe or create your own. You may even have to use different- colored dyes.
Create the New Finish
18. Recreate the original dark color in stages. First, apply dark brown dye. Now that the leaves have the same aged color as the top, you can use the same process on them.
I’ll use a multi-step process to create a new finish that matches the appearance of the pedestal’s restored finish. By adding color gradually, this process provides maximum flexibility and control, so I can zero in on an accurate color match. I make test boards for every step and compare the color of each step with the pedestal, to make sure I stay on track. As the leaves have the same ground color as the top, they can be finished at the same time.
19. Deepen the color with glaze applied directly onto the dyed surface. Glaze is artists oil color thinned for wiping. Brush the glaze on; then wipe it off.
A close look at the pedestal’s deep, rich color reveals varying shades of dark tones. To give the top and leaves the same appearance, the color must be applied in layers. First, dye the surfaces to match the lightest shade of the pedestal’s dark color (Photo 18). Then apply a glaze mixed to match the darker shades (Photo 19).
20. Minimize color differences by applying a second coat of glaze to light-colored boards. Make sure the first coat has thoroughly dried, first.
Make your own glaze by mixing artists oil color in glazing medium. If some boards appear lighter in color, apply a second coat of glaze (Photo 20).
21. Brush on a coat of amber dewaxed shellac. This step is key to matching the top to the pedestal, because the pedestal’s original finish coats are amber shellac.
The final coloring step, two coats of amber shellac (2-lb. cut), adds tone that’s essential to re-creating the aged look and color (Photo 21).
22. Add durability by applying topcoats of polyurethane. Polyurethane provides better resistance to heat and moisture than shellac does.
The final steps are the same as on the pedestal. First, apply one coat of dewaxed shellac to assure that the polyurethane topcoats adhere. Sand this surface with 400 grit paper by hand, using a soft block. Next, apply two coats of oil-based satin polyurethane (Photo 22). Sand with 400 grit between coats. When the finish is thoroughly dry, gently rub with the surface with #0000 steel wool and soapy water to remove dust nibs. Now the table is ready for another 100 years.
Recipes
- Touch-up glaze for the pedestal’s original dark color: Winsor & Newton Artists’ Oil: Mix burnt umber, Vandyke brown, and black in glaze medium.
- Sand-through Colors: Sharpie dark and medium dark touch-up markers
- Ground color for leaves: TransTint dye: 30 drops golden brown dissolved in 3/4 cup water.
- Medium tones for top and leaves: TransTint dye: 50 drops dark walnut, 50 drops dark Mission brown, and 80 drops red mahogany dissolved in 3/4 cup water.
- Dark tones for top and leaves: Winsor & Newton Artists’ Oil: Mix burnt umber, burnt sienna, and ivory black artists oil color in glaze medium.
Dealing with Discoloration
A.
Areas where an original finish has been completely lost (Photo A) can show significant discoloration after the remaining finish is removed (Photo B).
B.
Minimizing this discoloration requires additional steps. Brushing the top with a solution of oxalic acid removes the gray color that resulted from the unfinished area’s longterm exposure to air and water.
C.
The effect is often almost immediately noticable, while the surface is still damp (Photo C). This treatment also removes unsightly black water spots from the rest of the top. Oxalic acid crystals are available at hardware and paint stores. Mix one ounce of crystals in a pint of hot water and brush it on the surface and let it dry.
D.
If necessary, apply the oxalic solution a second time. When the gray color is gone, rinse the surface thoroughly with a solution of vinegar and water. Oxalic acid is poisonous, so don’t sniff the crytals and wear gloves when you apply the solution.
E.
Tone the discolored spot by applying dye that matches the color of the surrounding wood (Photo D). Adding color with dye and glaze makes the spot virtually disappear (Photo E).
Here are some supplies and tools we find essential in our everyday work around the shop. We may receive a commission from sales referred by our links; however, we have carefully selected these products for their usefulness and quality.


