


We may receive a commission when you use our affiliate links. However, this does not impact our recommendations.
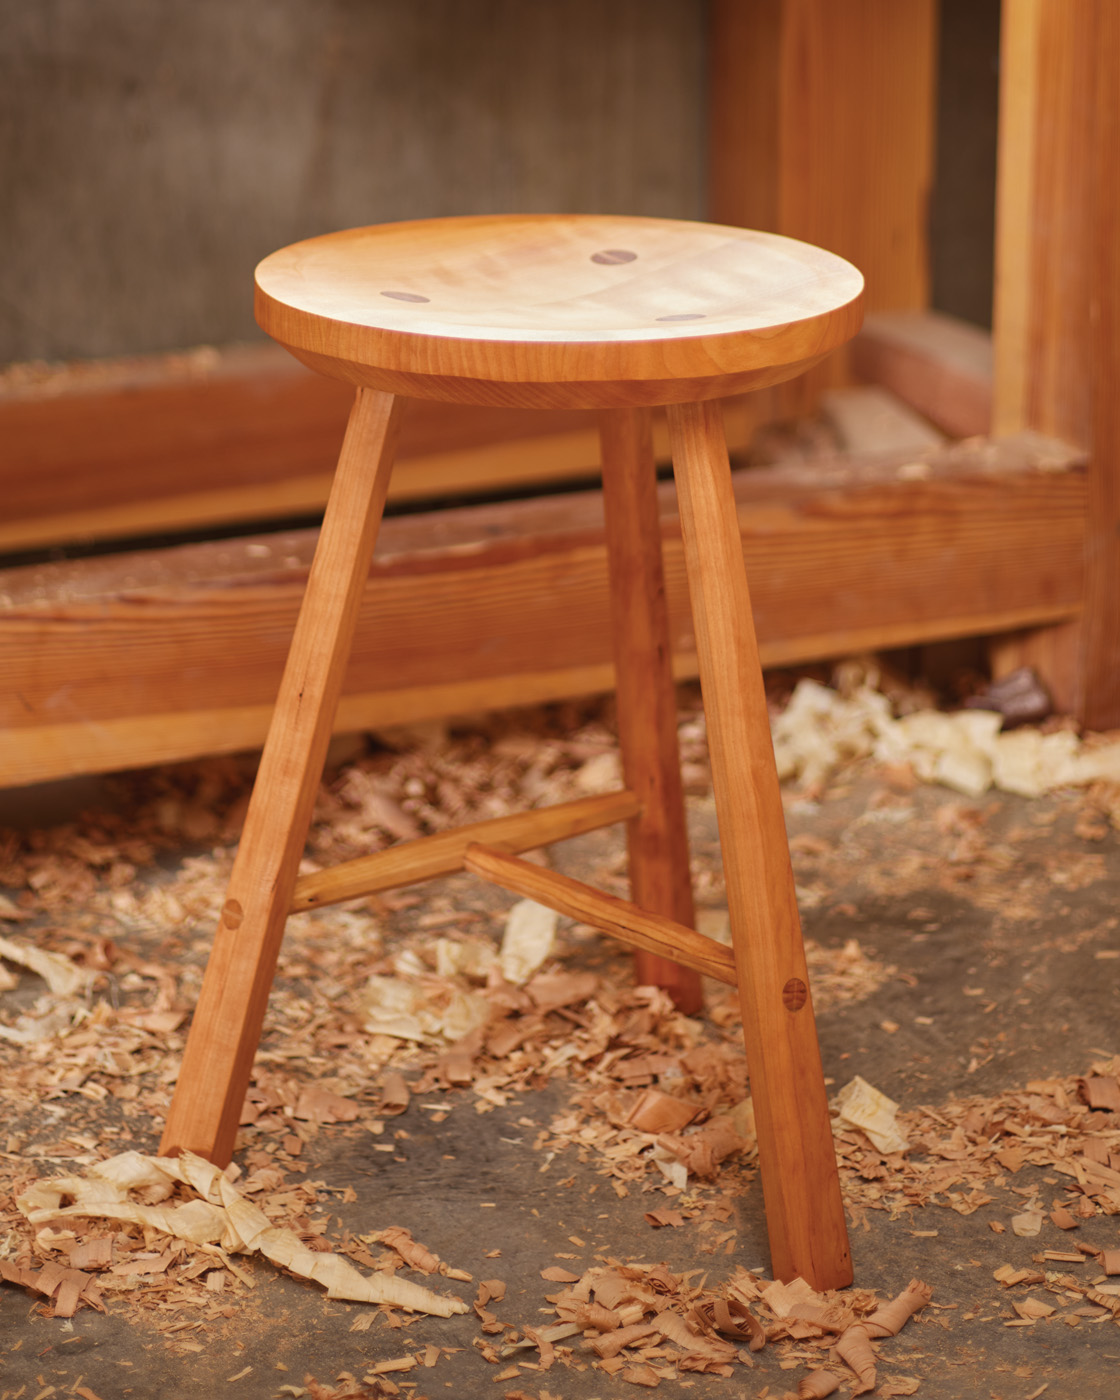
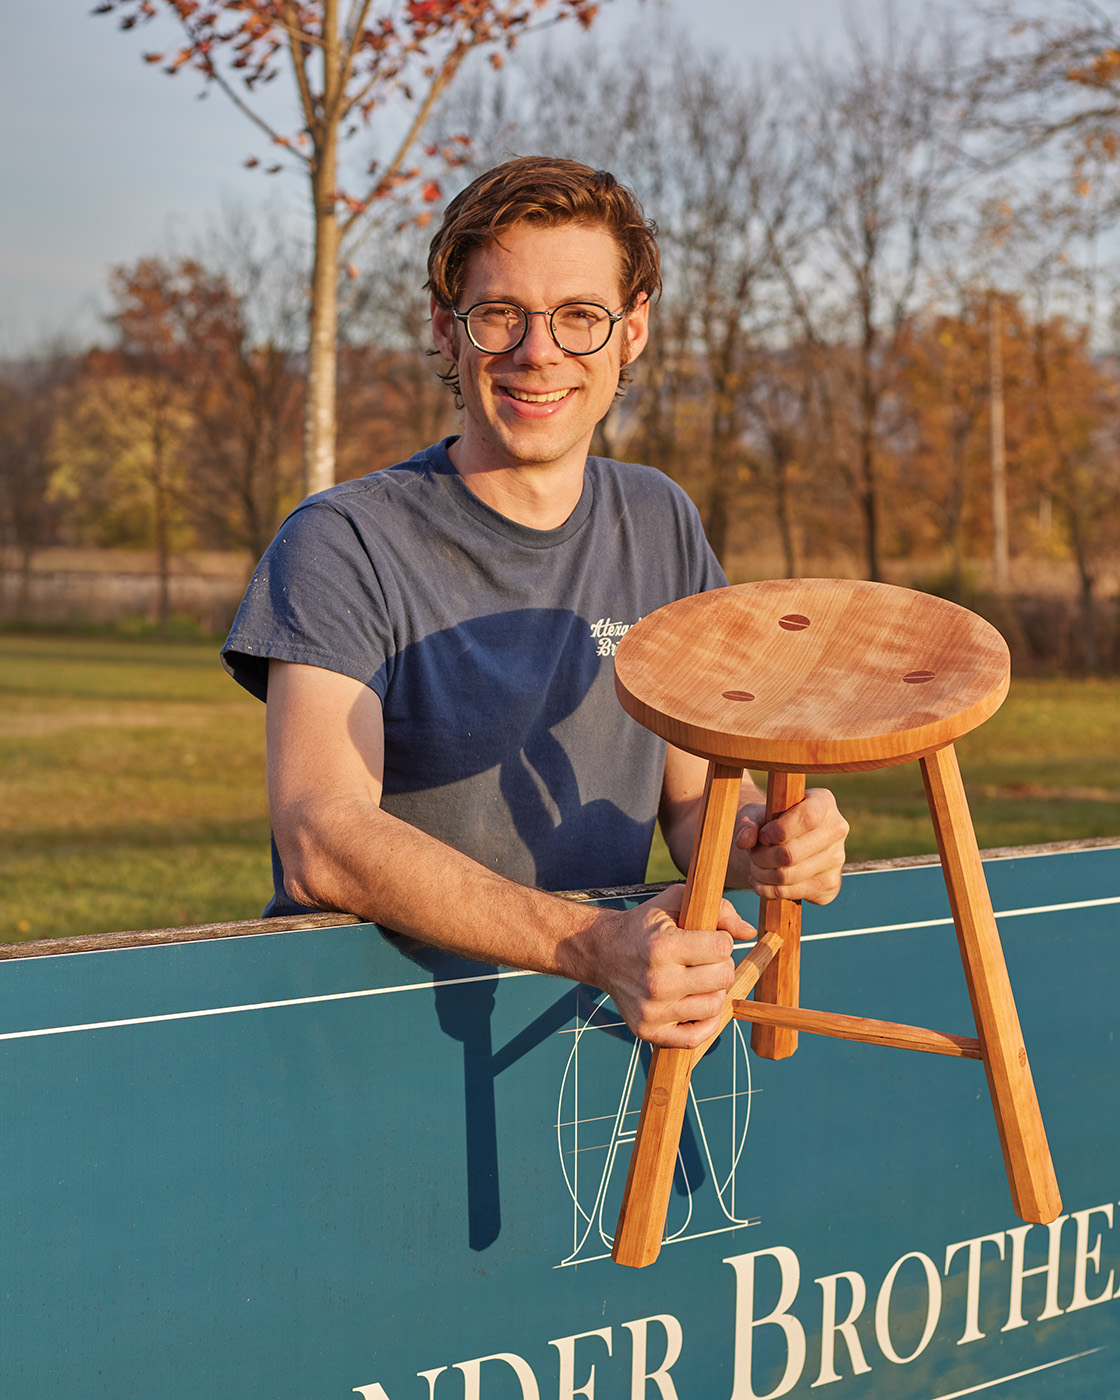
This stool is a simple little seat that combines traditional chair building techniques and good woodworking.
When it comes to furniture, one of the most basic things is a place to sit down. However, building chairs is intimidating for many woodworkers. With all the angles and curves to get right, it can seem a bit complicated. So let’s scale that back to a chair with no back, shall we? Well, that would be a stool. And if you take away a leg, it becomes a three-legged stool. Let’s start there.
When choosing a species, anything reasonably strong will do. Some common choices would be Oak of any type. Ash, elm, cherry, walnut, and maple work too. The piece for your seat its only requirement is that it’s tough, as the legs in a stool act as wedges, so you just don’t want it to split. As long as the seat is free of voids and cracks, you should be fine, and crooked, gnarly grain is likely all the better to prevent it from splitting. For the legs and stretchers, you want as straight as a grain as possible with no runout. If you follow the growth rings from one end of the part to the other, you want them to go end to end without running off the side of the part.
More on chairmaking: Learning to Build a Welsh Stick Chair
Full-scale plans: Available for purchase from the Alexander Bros website.
Material kit: Get everything you need to make the hearth stool in a handy kit.
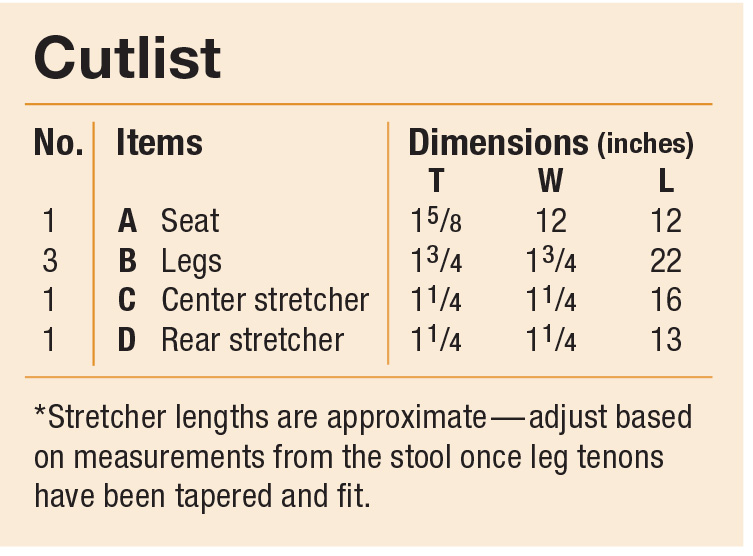
Cutlist and Diagrams
 The Seat
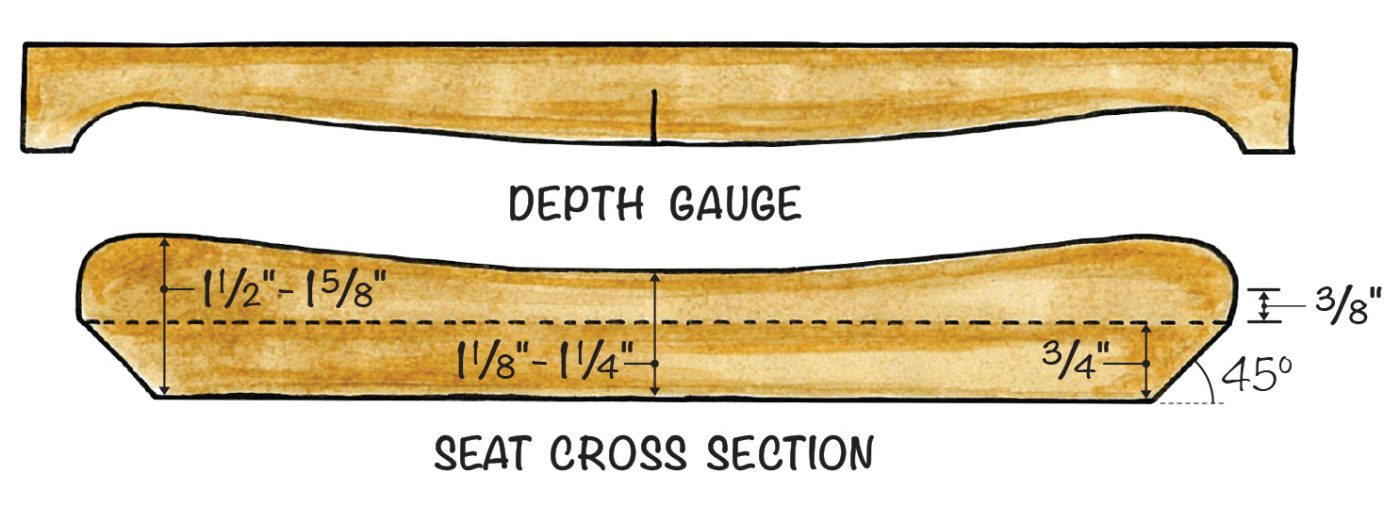
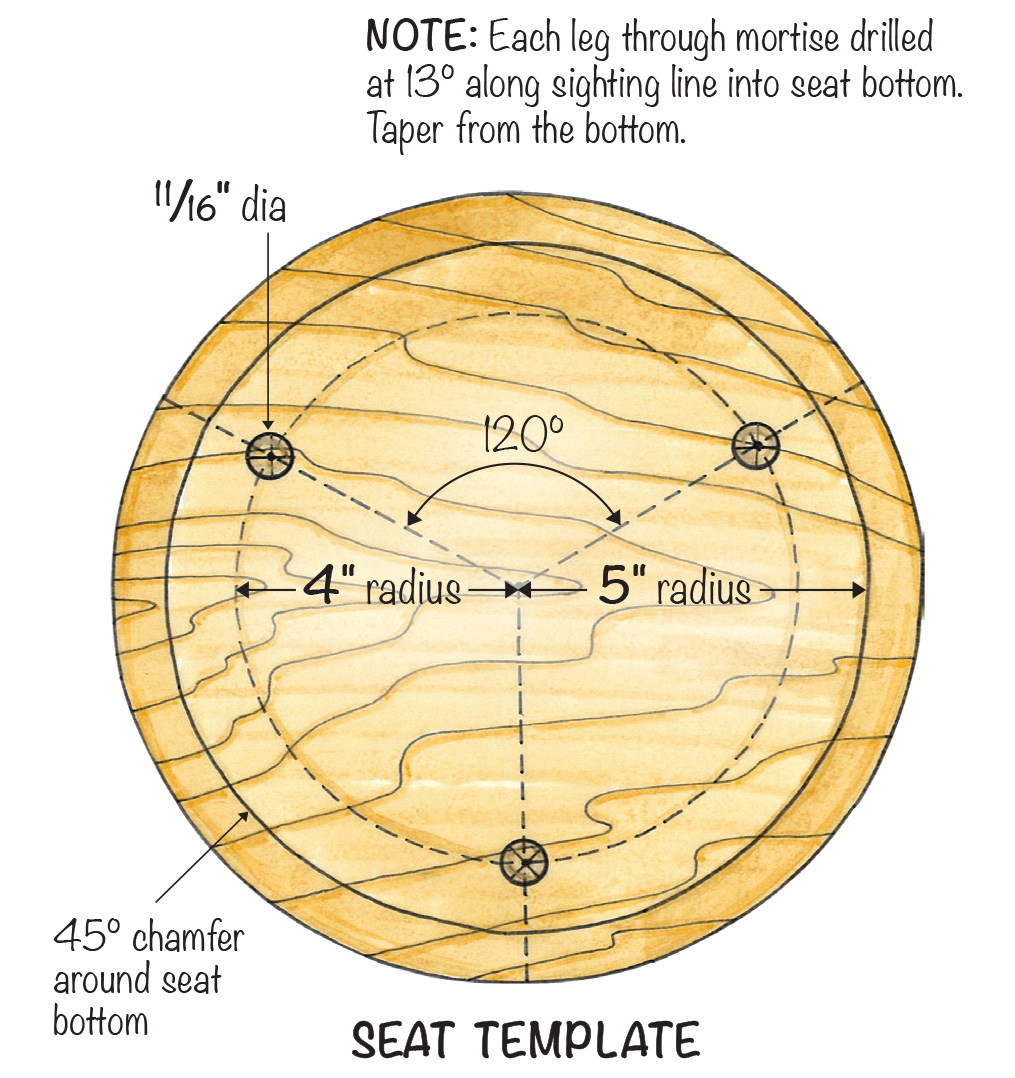
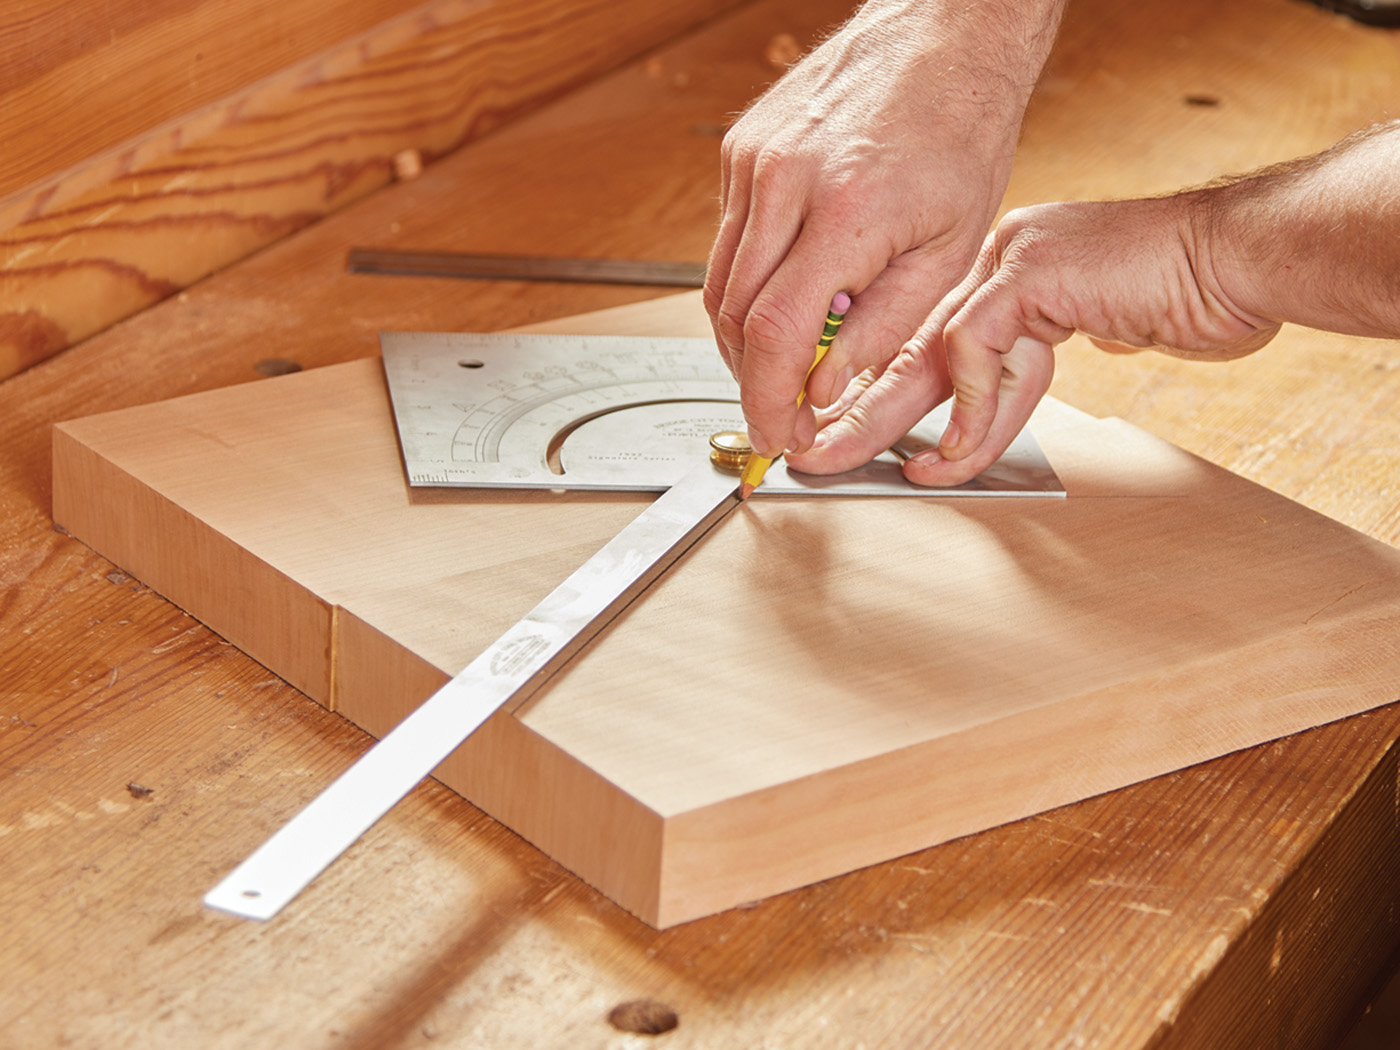
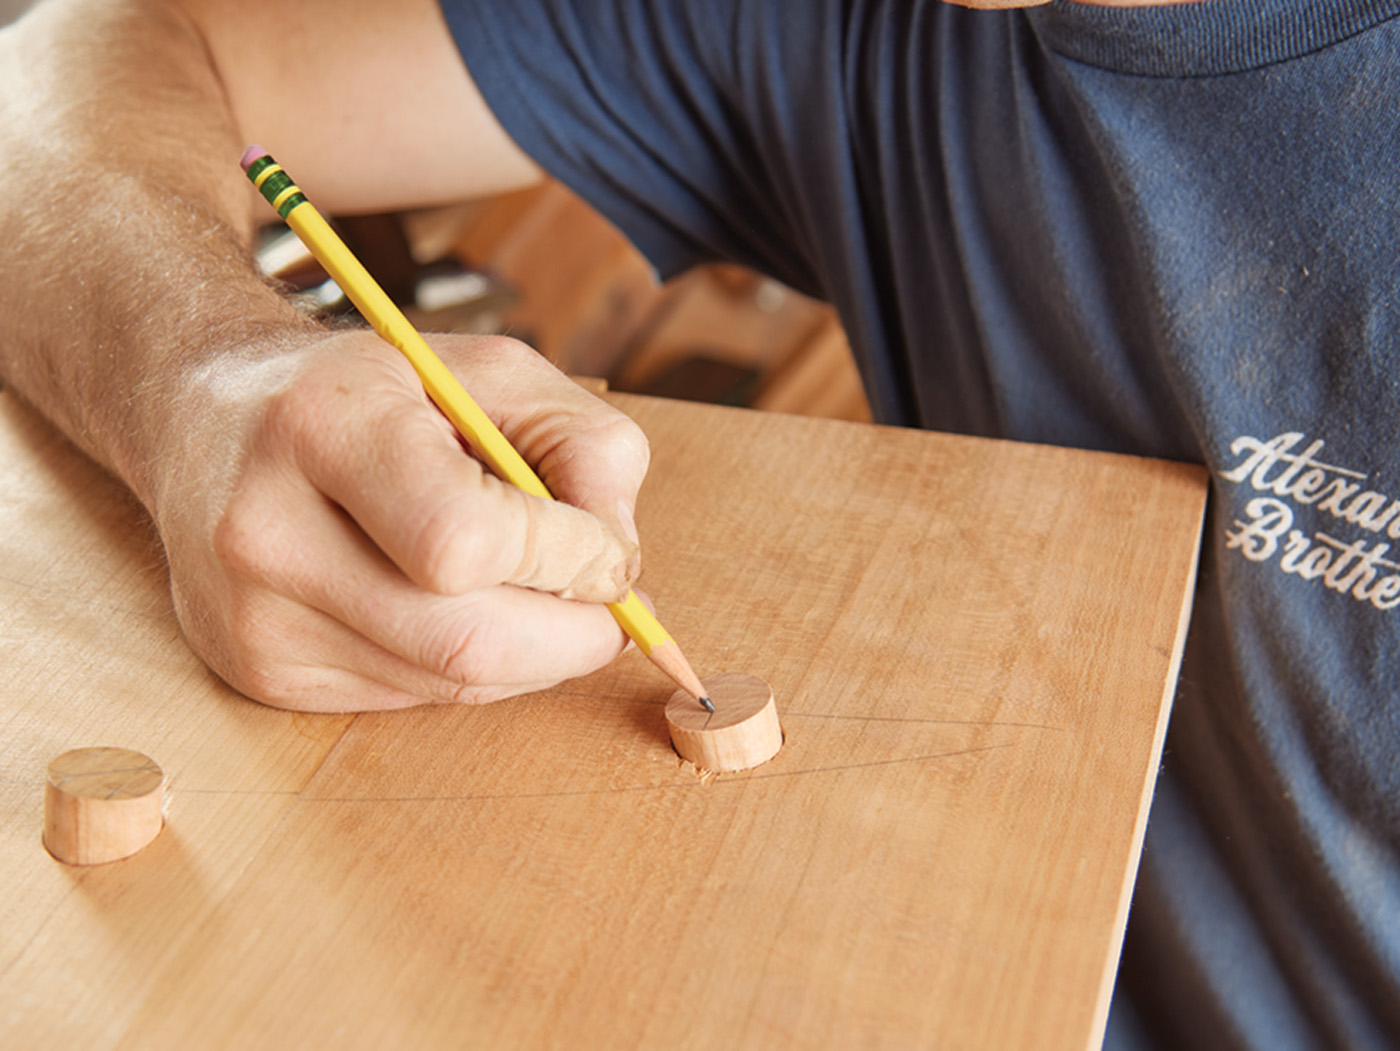
Starting with the seat, you want to first mark the center by drawing intersecting lines from corner to corner. I do this on both sides of the blank. Then you must decide which is the top and bottom faces. I prefer to make the top the bark side of the tree as it will give a more pleasing grain pattern when dished. Once that is decided, set your compass to 5-3/4“ and draw an 11-1/2“ circle on the bottom face using the center point we marked. This is the outside of the seat. We will then draw two more circles, one with the compass set to 5“ and one with it set to 4“.
1 The seat starts by marking the center. Using a straight edge, cross the corners to locate the center.
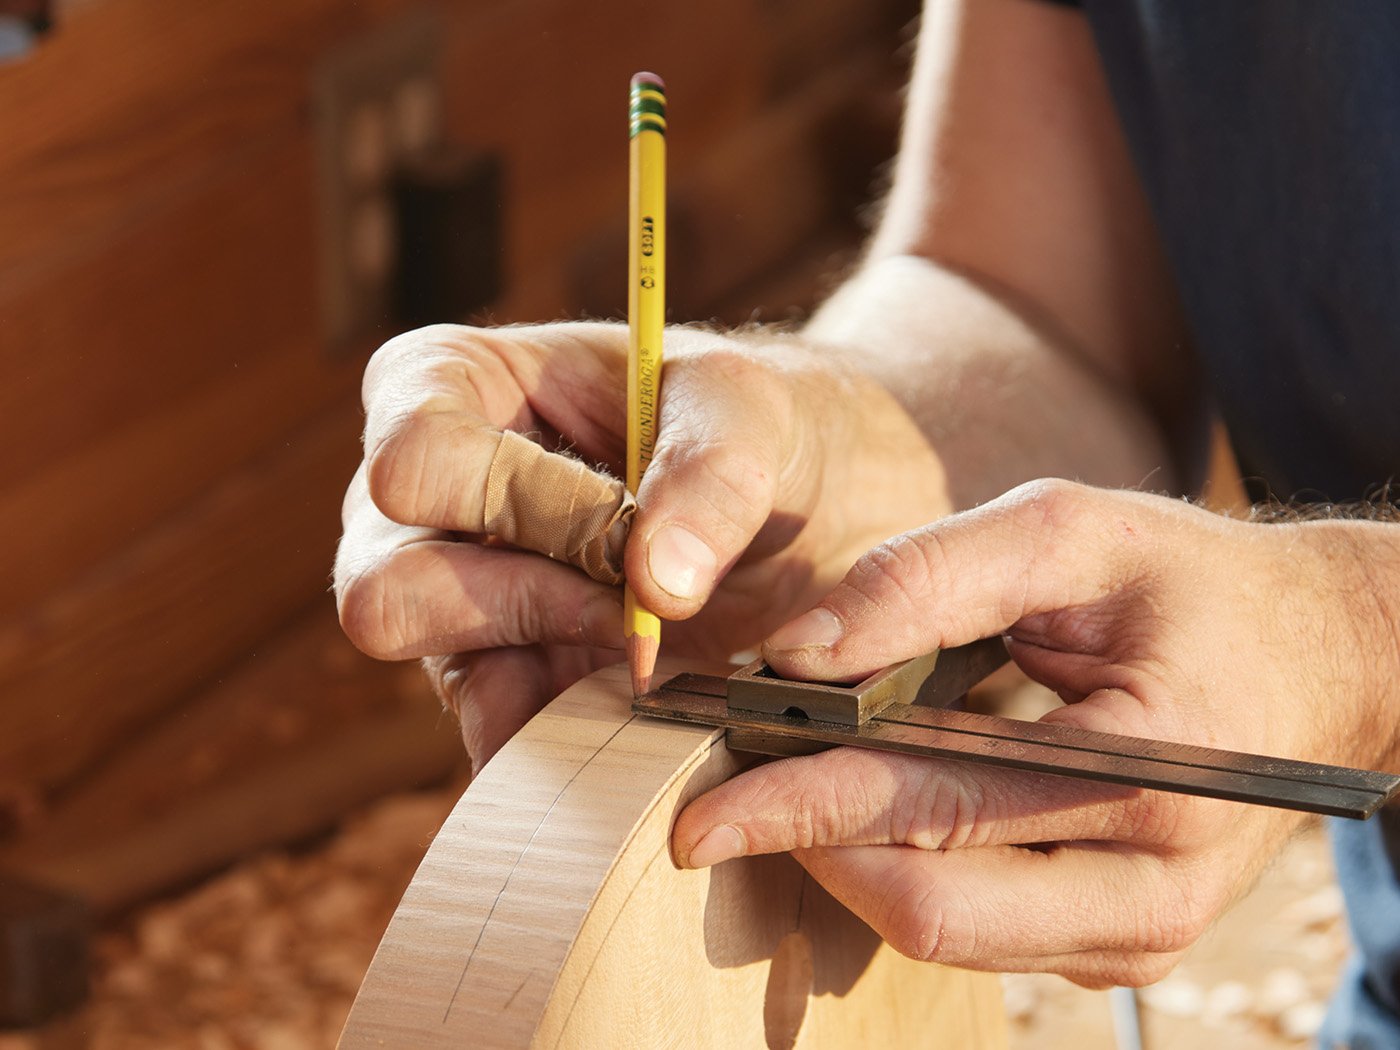
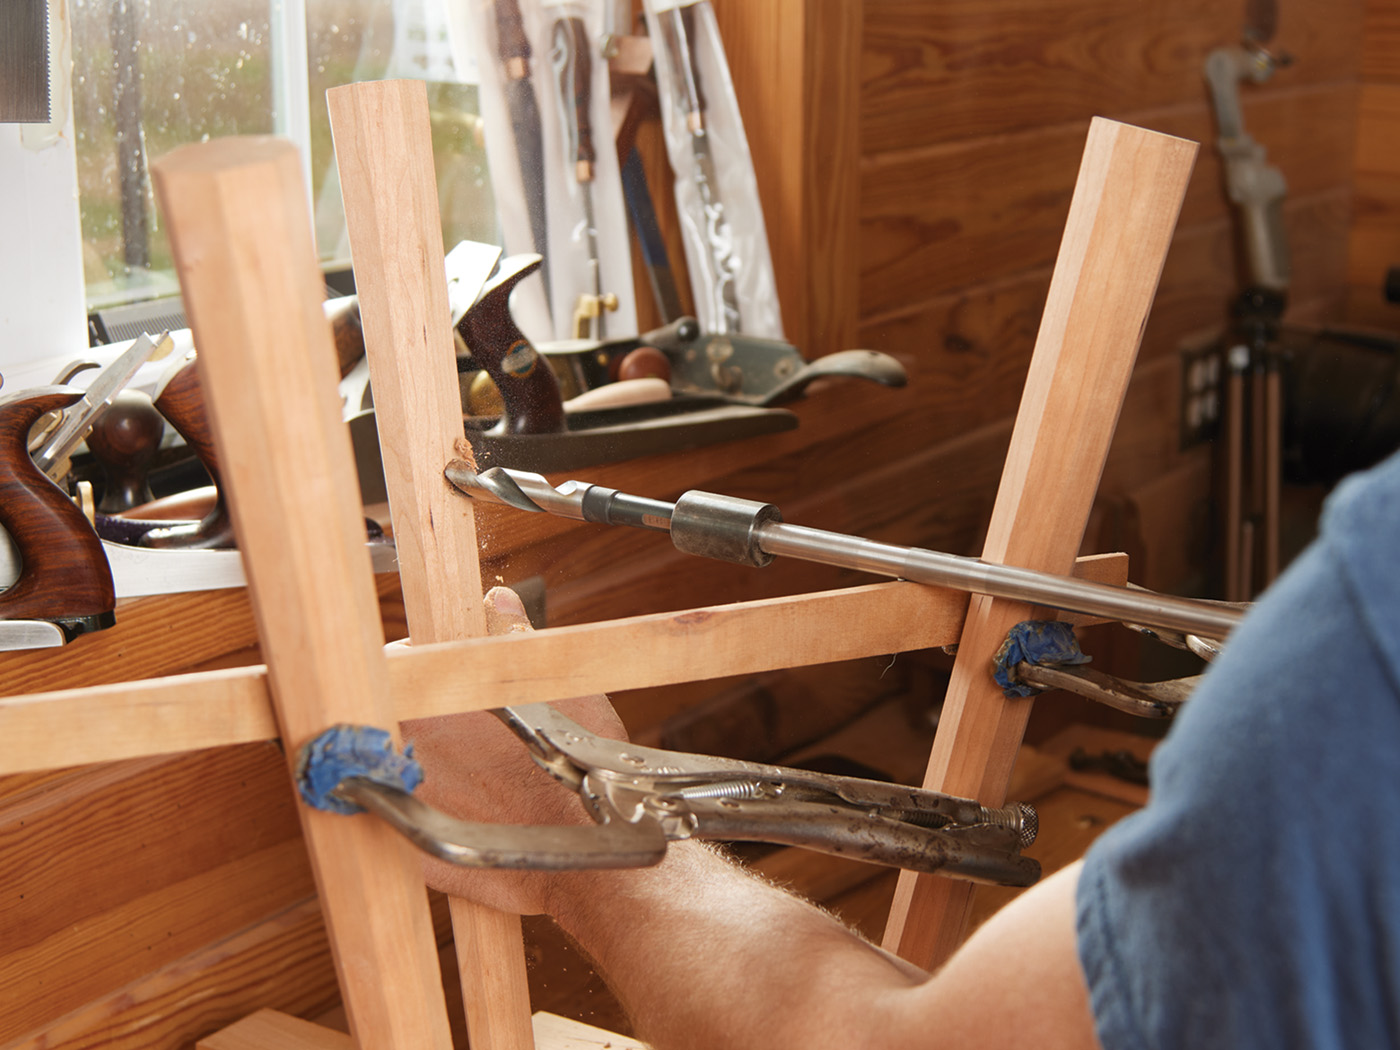
Next, you will mark the sightlines. These lines help guide you as you drill the leg mortises. Taking a ruler or straight edge, draw a line from the center point to the outside edge, intersecting all of the circles you previously drew. Then, using a protractor, lay out two or more lines radiating from the center 120° from this first line. Where these three lines intersect the circle you drew with the compass set at 4“ is the center point to drill for the leg mortises.
2 Use a compass or angle finder to divide the bottom of the seat into three parts, and mark those angles.
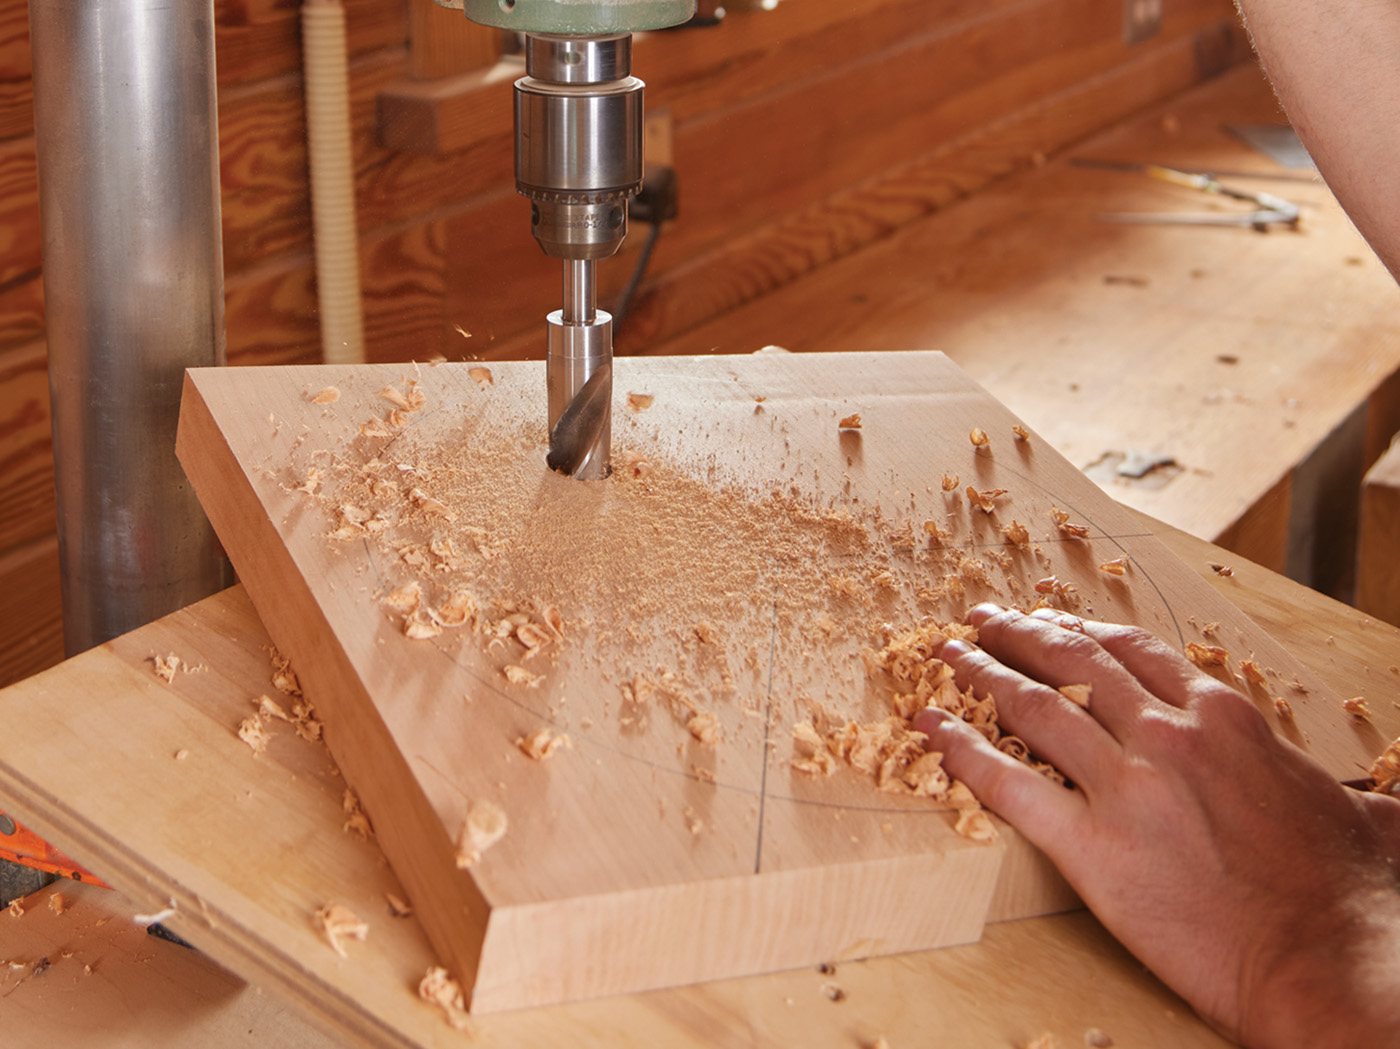
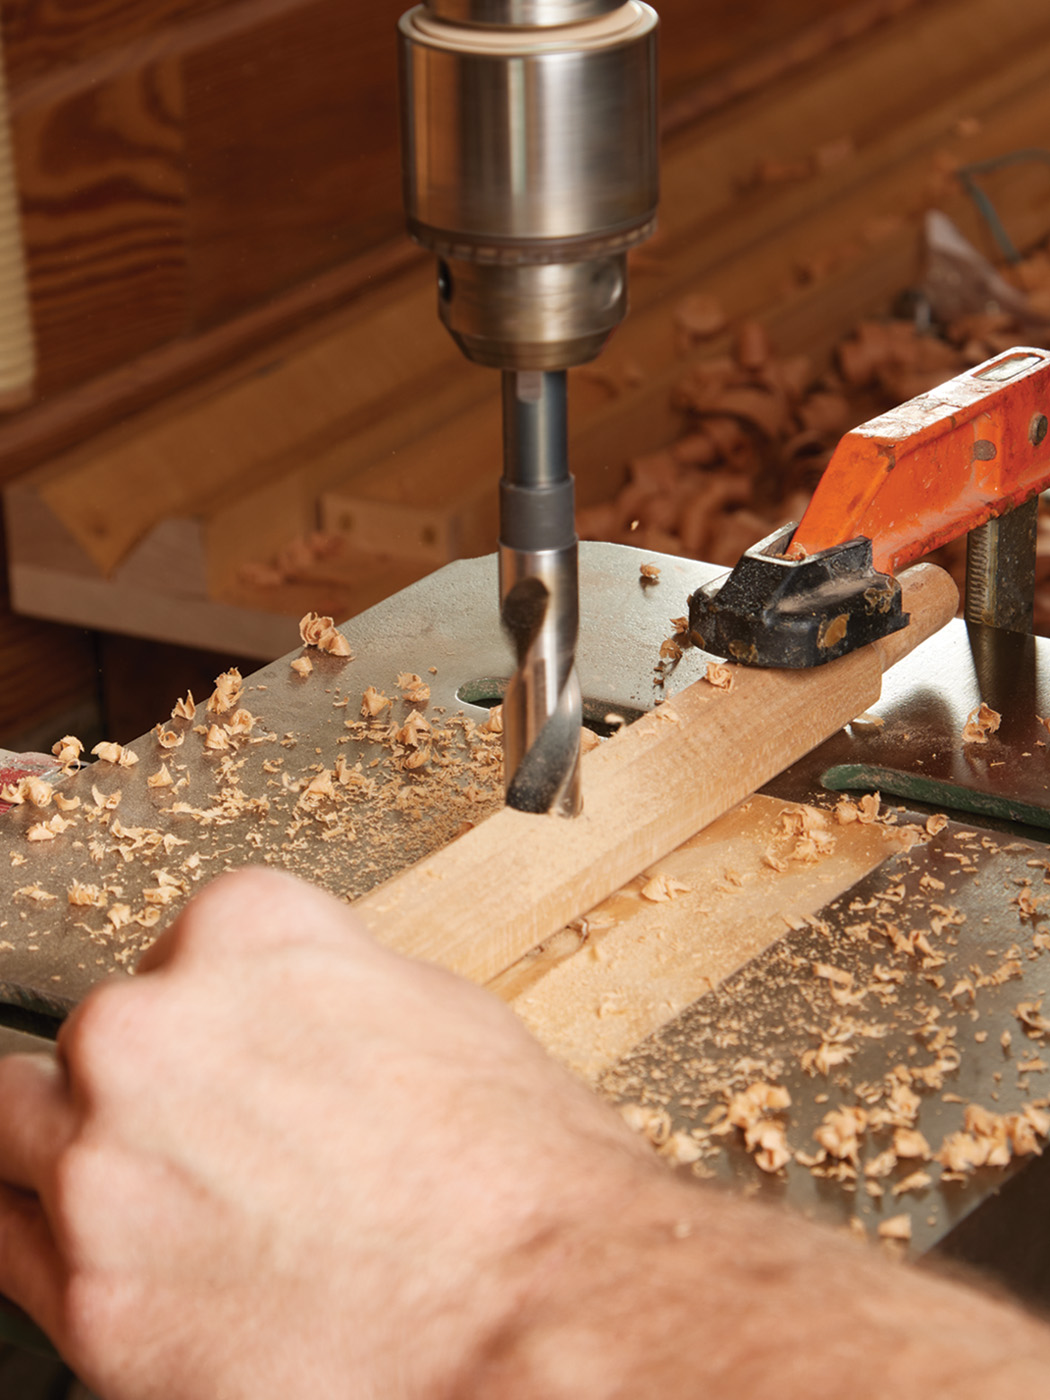
3 Drill mortises for the legs by using an inclined drill press table.
Once these layout lines are done, it is time to drill the leg mortises. I recommend using a drill press with a tilting table. First, set the table to 13° relative to the bit. Then, using a 1“ bit, you will position your sightline for each mortise in line with the line of the sight of the bit when you are facing the drill press and drill each mortise through the seat.
Now you will carve the top of the seat. At this point, the only marks on the top side of the seat are the center point marks. Before carving, you will set the compass to 5-3/4“ and mark the outside diameter of 11-1/2“. For this stool, I left a simple 1” wide flat facet before the dished carving started. Set your compass to 4-3/4“ and mark a second circle to define the edge of that facet.
Now that those layout lines are done, you will make a depth reference, so you know how deep to carve. Using a 1/4“ bit, drill a 3/8“ deep hole on the center mark. Then, using your tools of choice, be that a scorp, travisher, gouge, or grinder, carve the dished portion of the seat, stopping at the bottom of the depth hole and using the line drawn with the compass set to 4-3/4“ as your guides. I shoot for a perfect inverted dome shape, then finish it up with sanding.
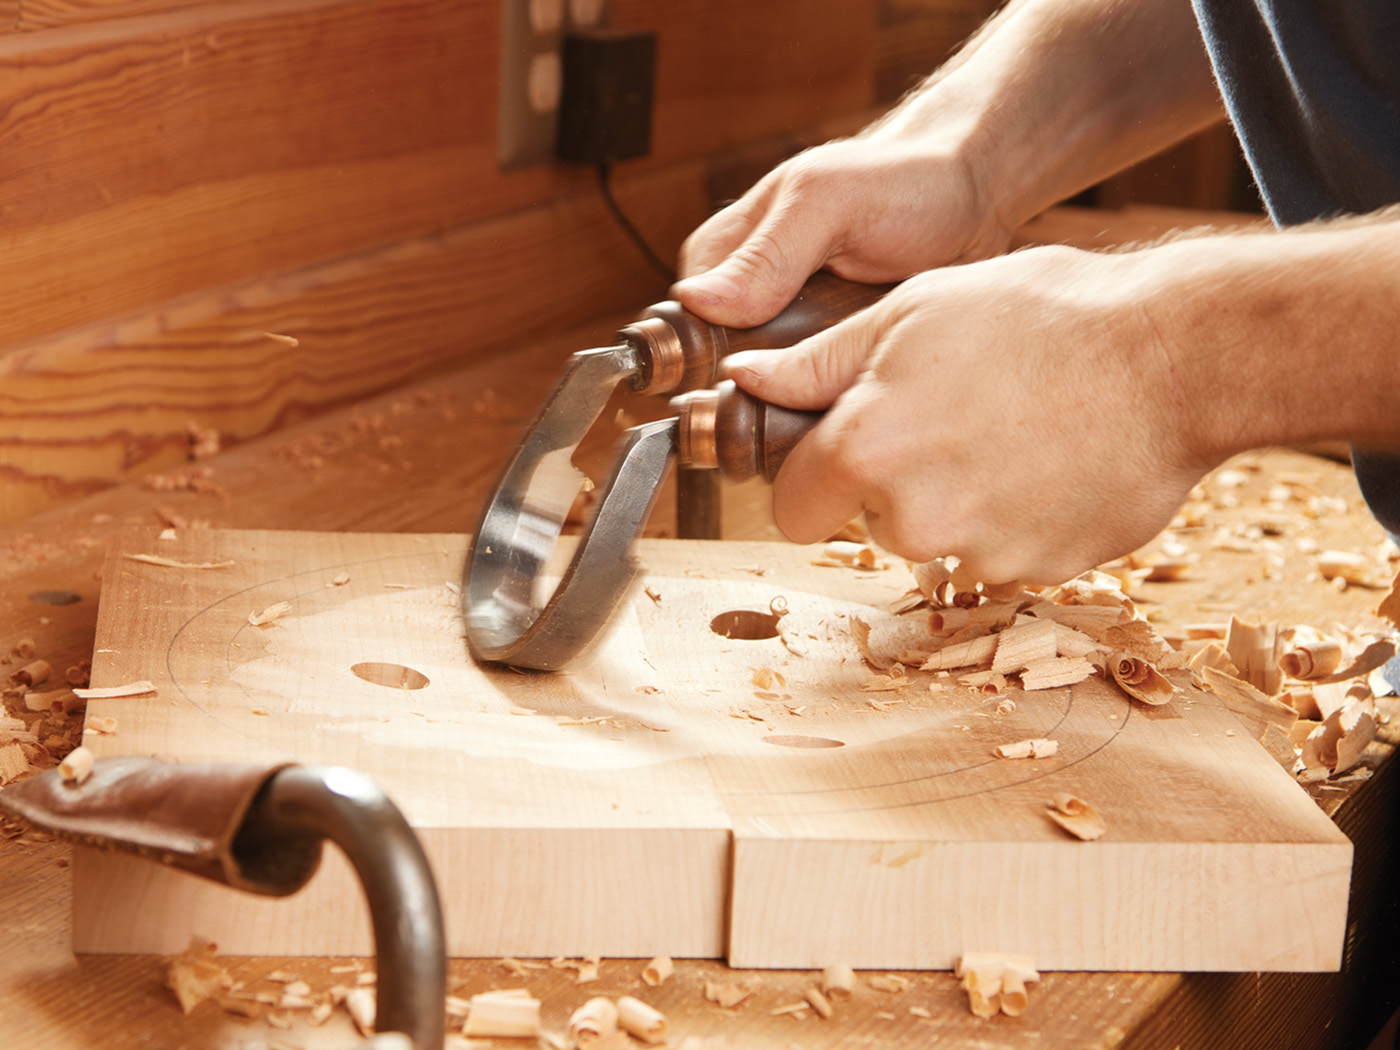
4 On the top of the seat, start to shape a dish with a scorp.
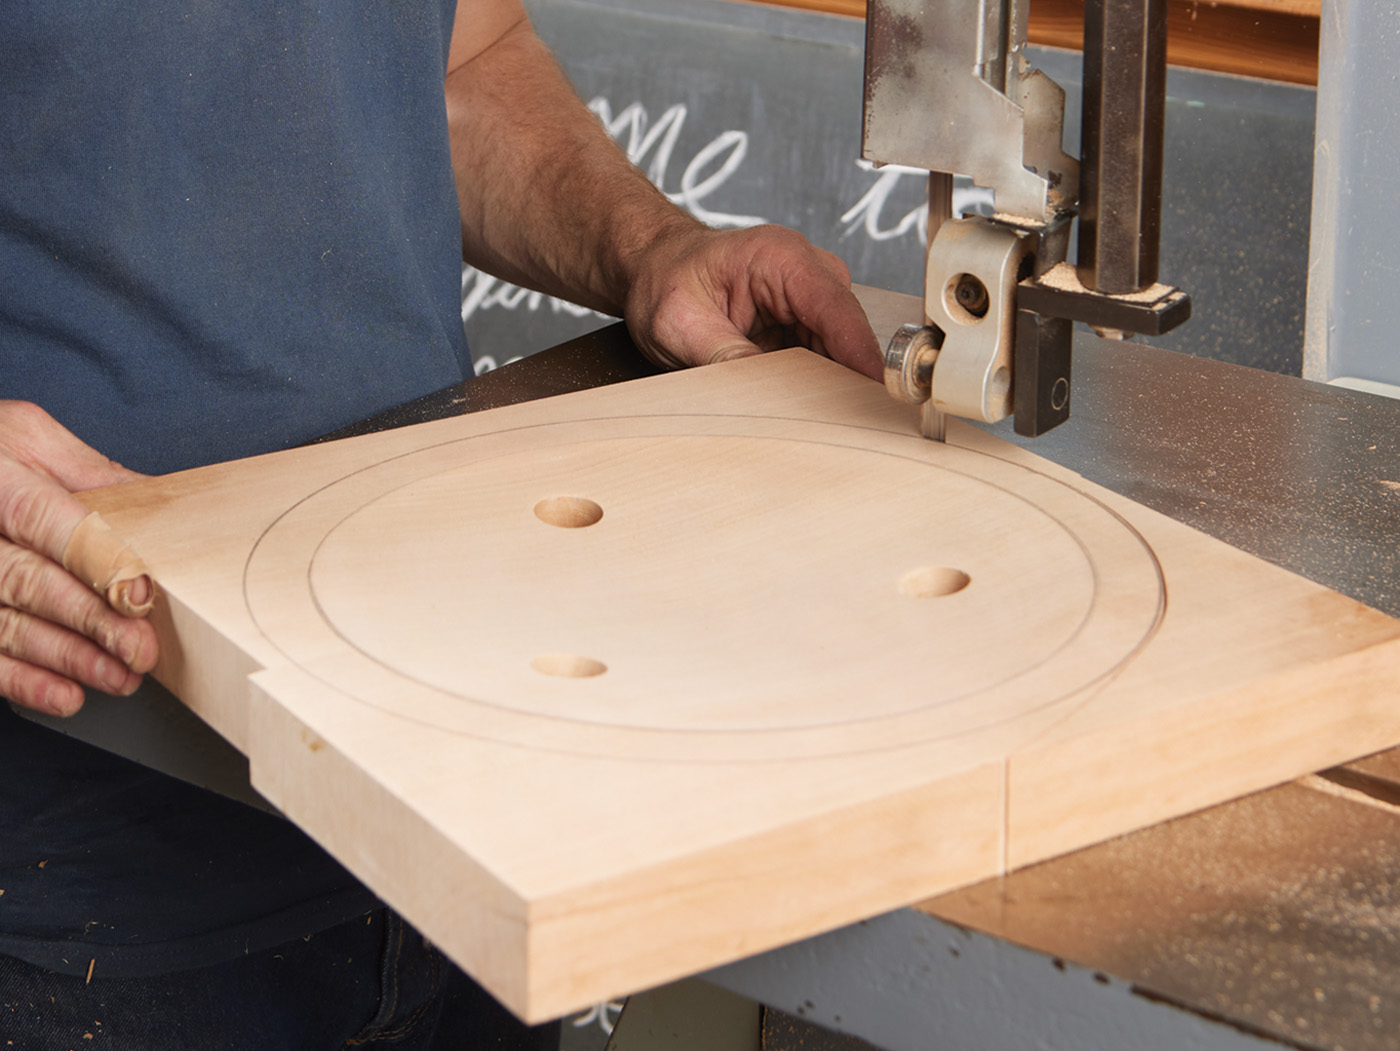
5 Bandsaw out the shape of the seat using a narrow blade.
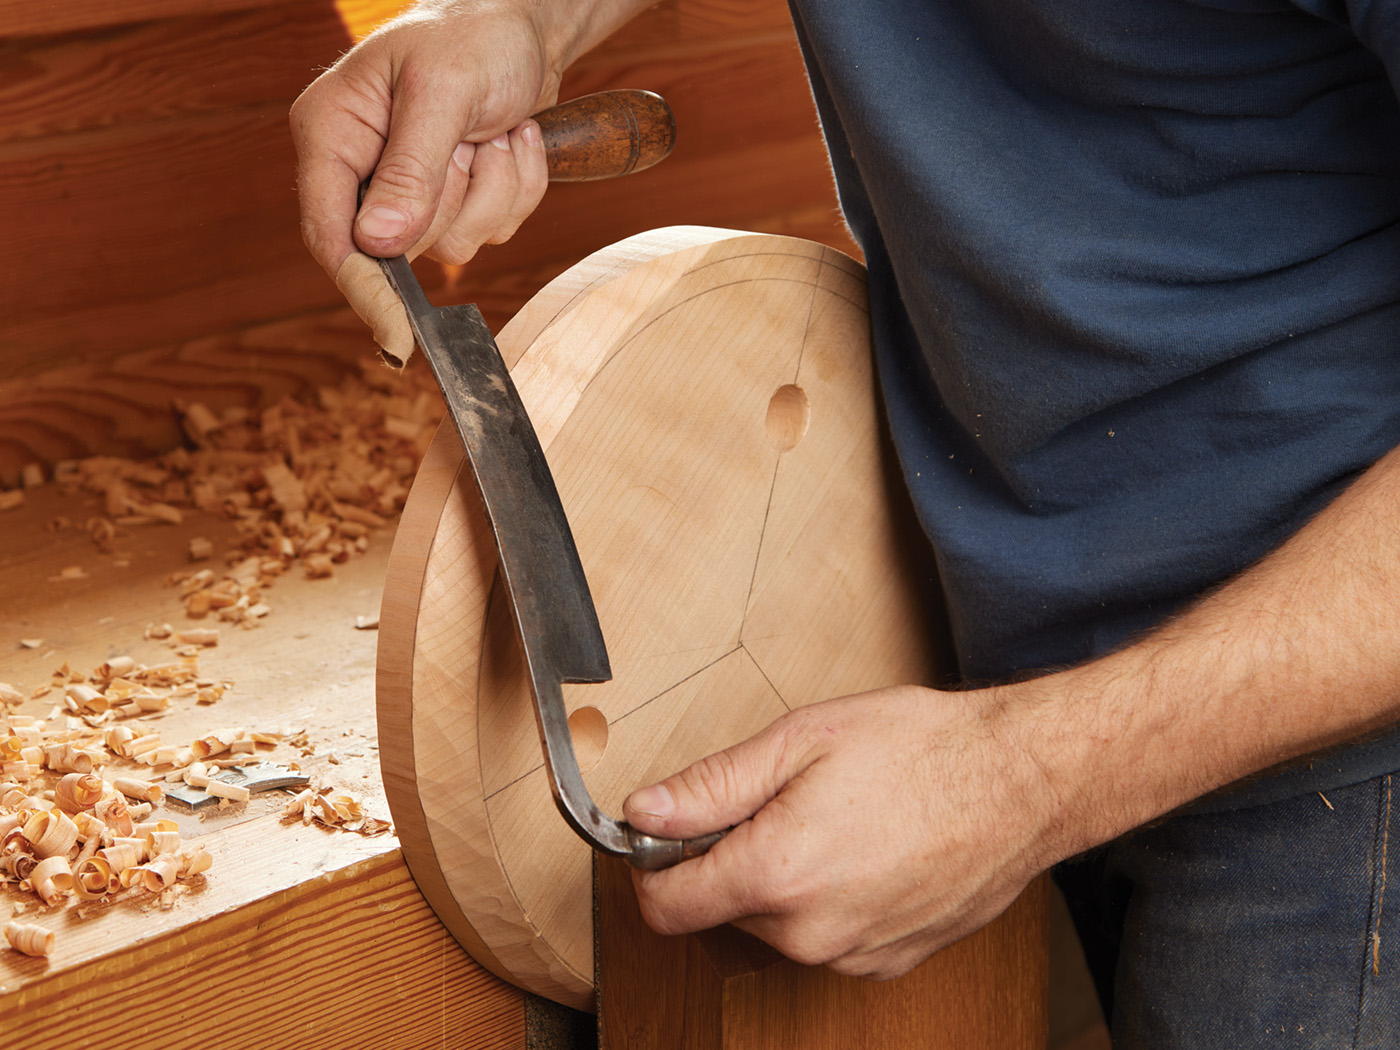
Once the top of the seat is shaped, you will cut out the circle shape of the seat to the circle line you marked with the compass set to 5-3/4“. This is best done with a bandsaw, but a good jigsaw or bow saw with a narrow blade will also do a great job. You will then clean up the outside saw marks with a spokeshave or sander. Next is the under bevel, setting the seat on edge and using a marking gauge or combo square set to 3/4“, you will mark a line around the edge of the seat 3/4“ off the bottom of the seat. Then, using a draw knife, you will connect this line with the circle line of the bottom that you drew with the compass set to 5“ to create a flat underbelly facet. I use the drawknife to get within 1/16“ of the lines and then work to the line with the spokeshave or the sander. Now on to the legs.
6 Lay out a bevel on the bottom of the seat.
7 A draw knife quickly removes the waste and forms the bevel.
Legs
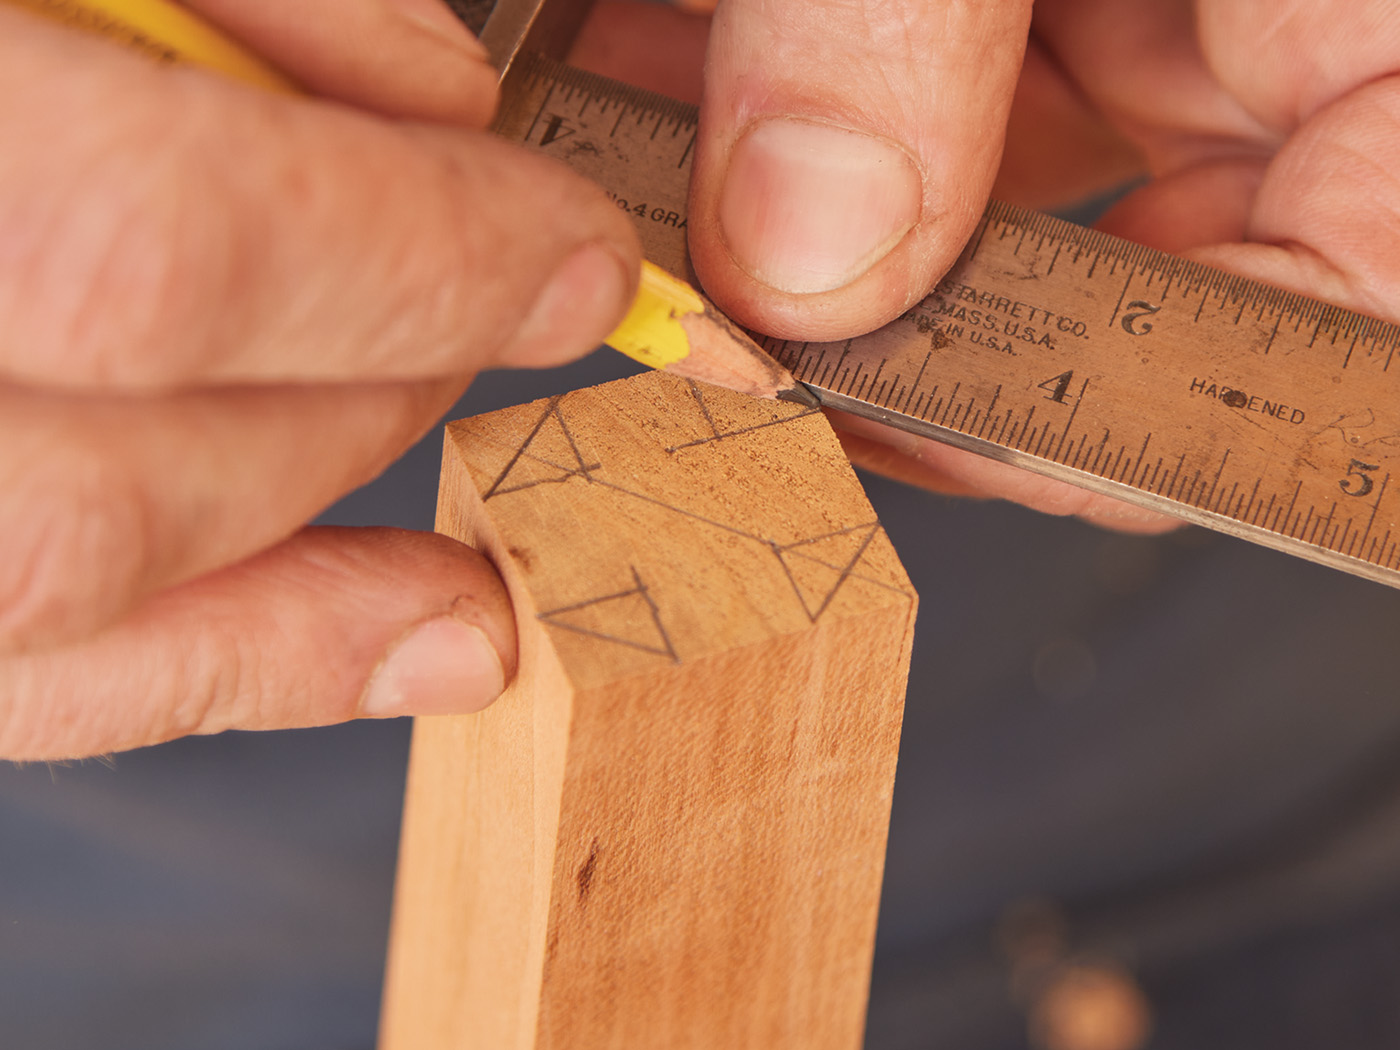
Time for legs. You will start by taking the square blanks from the cutlist and sawing them into a square 4-sided taper. Tapering from 1-1/4“ on the small end to 1-3/4“ on the large end. I normally lay these out with a ruler, saw outside the line on the bandsaw, and then clean up to the line with a handplane. Once done, you will octoganize the entire leg into a tapered octagon. The first step here is to lay out an octagon on each end of the leg.
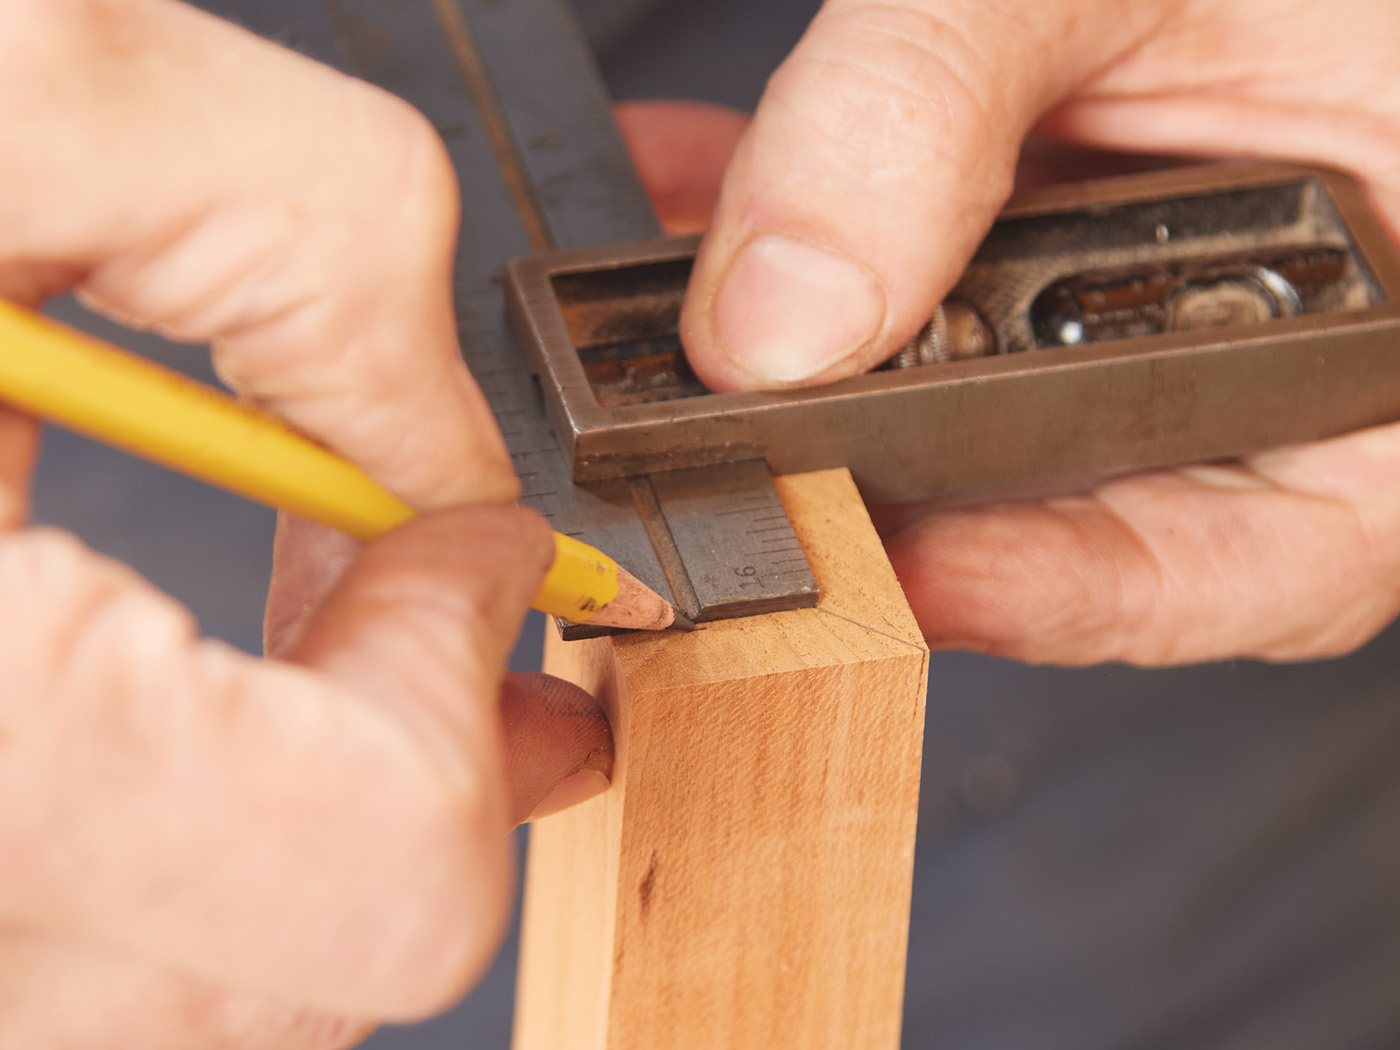
Start by clamping the leg in the vise with the end facing up. You will use a combination square and draw a single diagonal line from one corner to the other.
Then you will measure the distance from the adjacent corner to the line segment. This is the only dimension you will need; let’s call that dimension A. Then set a combination square to this distance and use that going forward, knowing what the exact measurement is irrelevant.
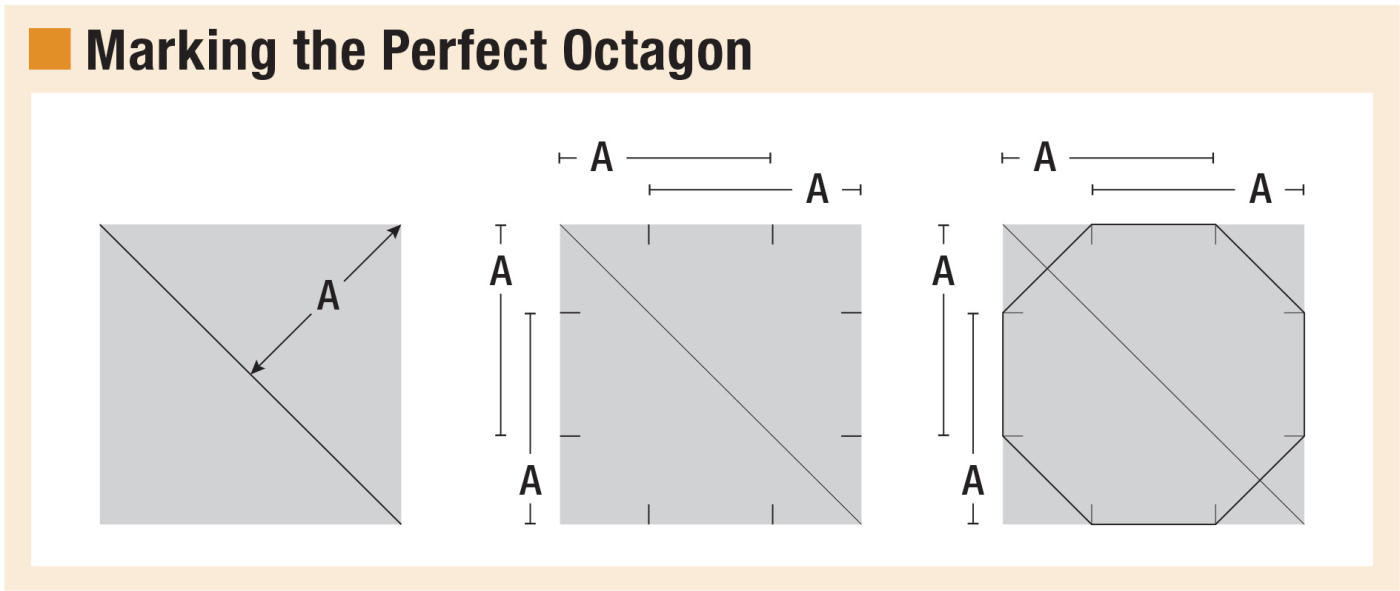
An easy way of laying out octagons is shown in these three steps and photos 8-10.
You will then mark a point from the corner towards the center in both directions from each corner using that same distance measured. Then we will connect these points across the corners. This forms our perfect octagon.

8 The legs of the stool are a tapered octagon.
9 Lay out the octagon on each end.
10 The blanks are sawn into tapers (your method of choice—bandsawing the taper is easy)
Once you have marked an octagon on each end of the leg, you will hand plane off the corners of the leg to connect the octagon facets on each end. Now you have a tapered octagon!
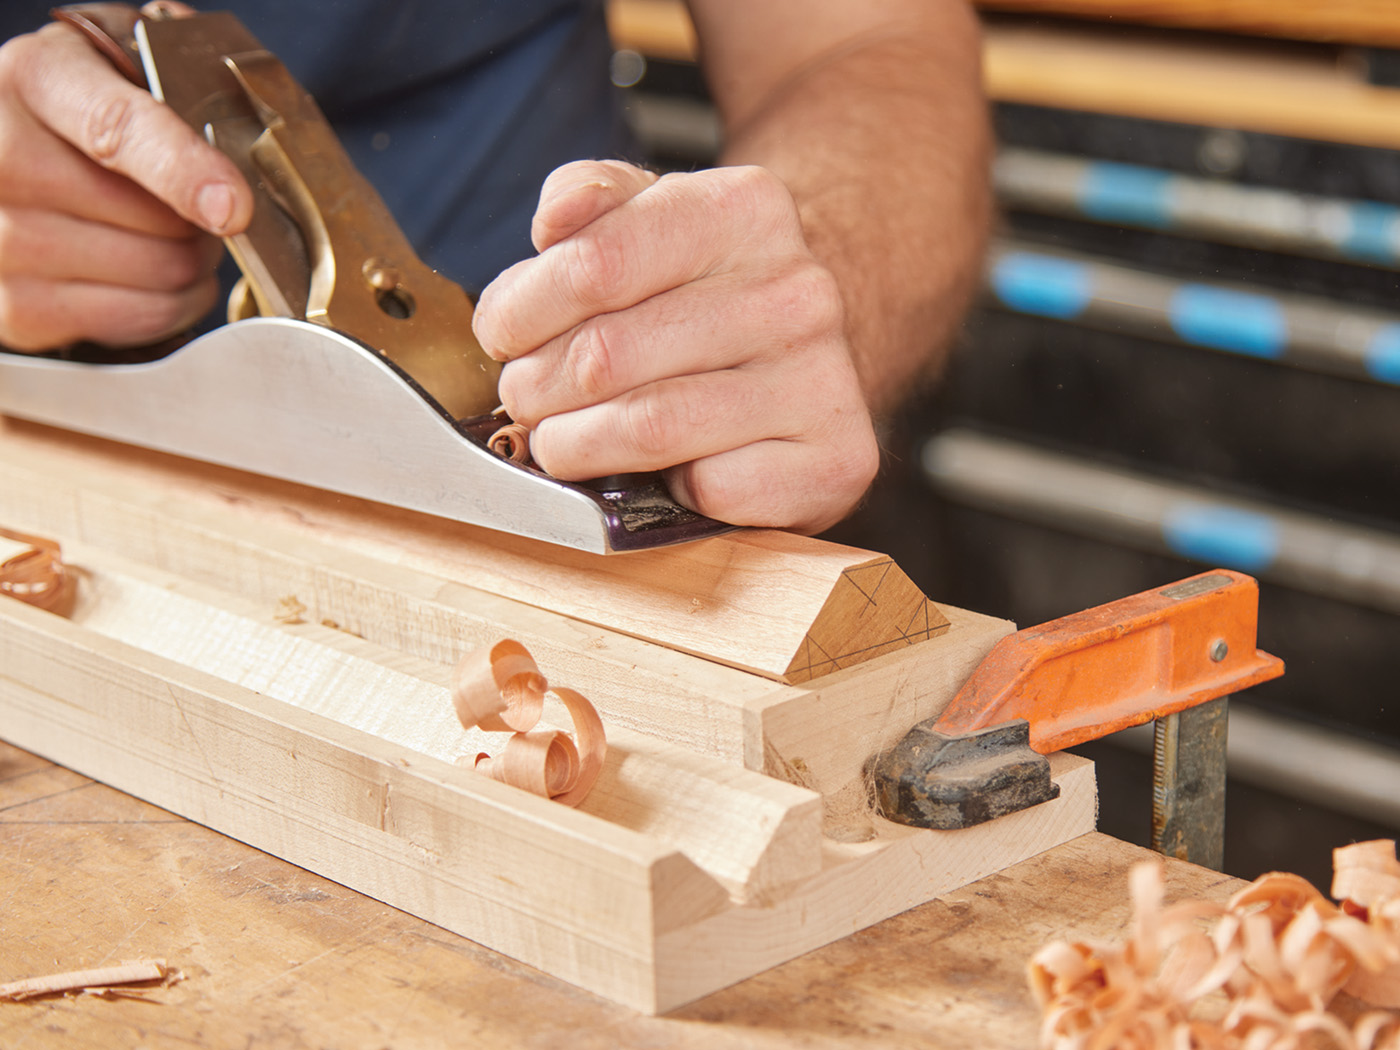
11 After laying out the octagon, it’s time to plane down to the line. I use a tapered jig to hold the legs, and that allows me to plane parallel to the bench.
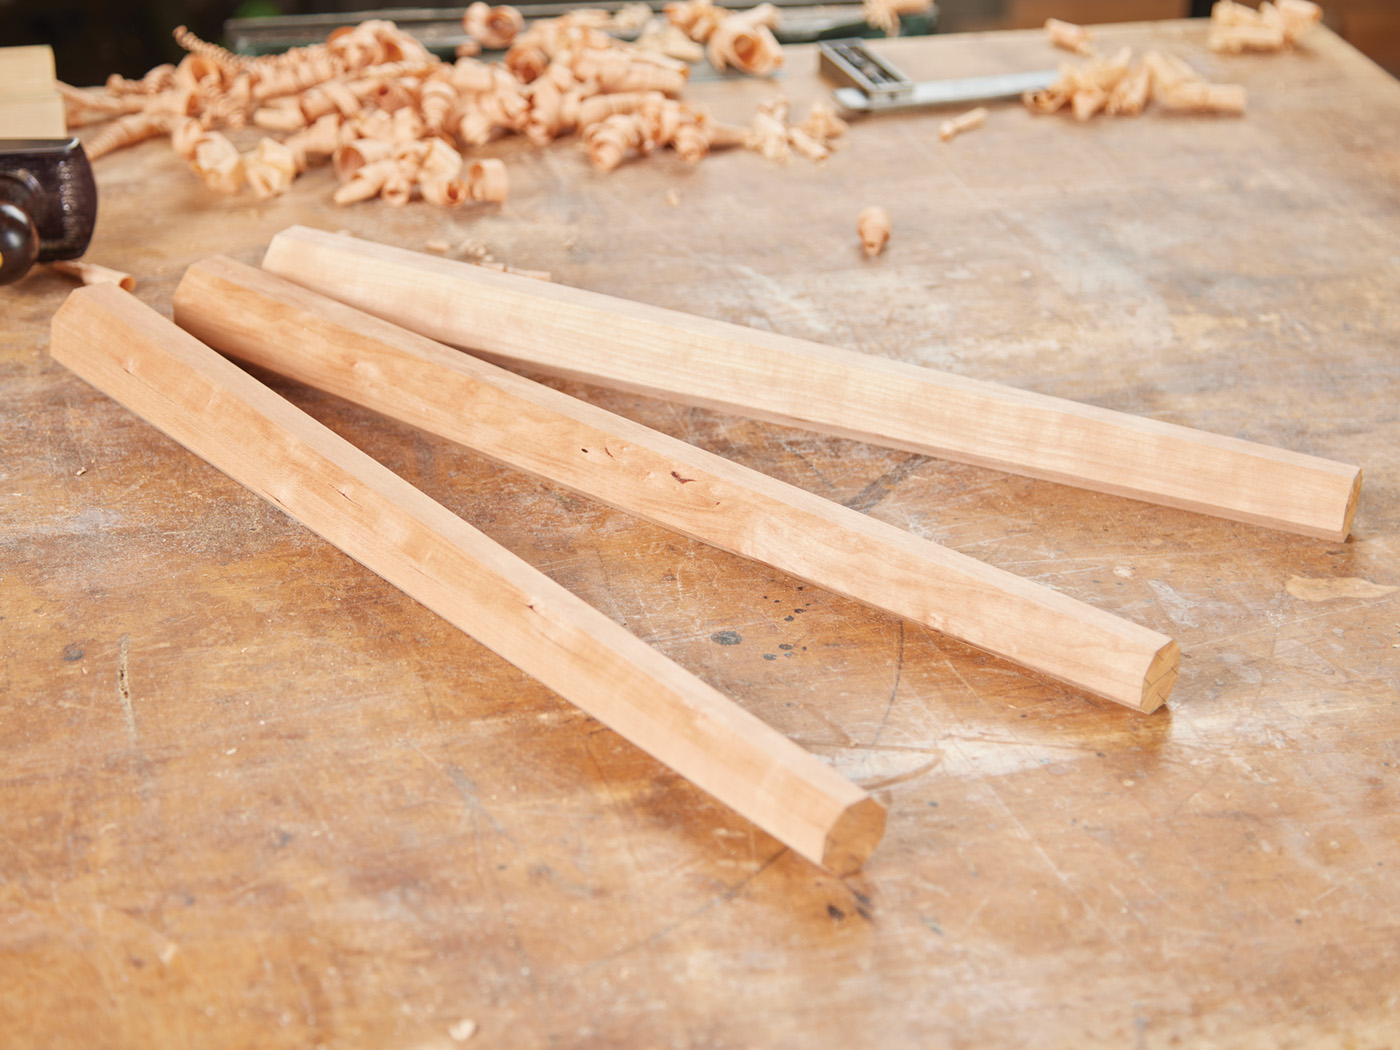
12 The finished legs are smooth and tapered. These legs are now ready to have tenons cut at the ends.
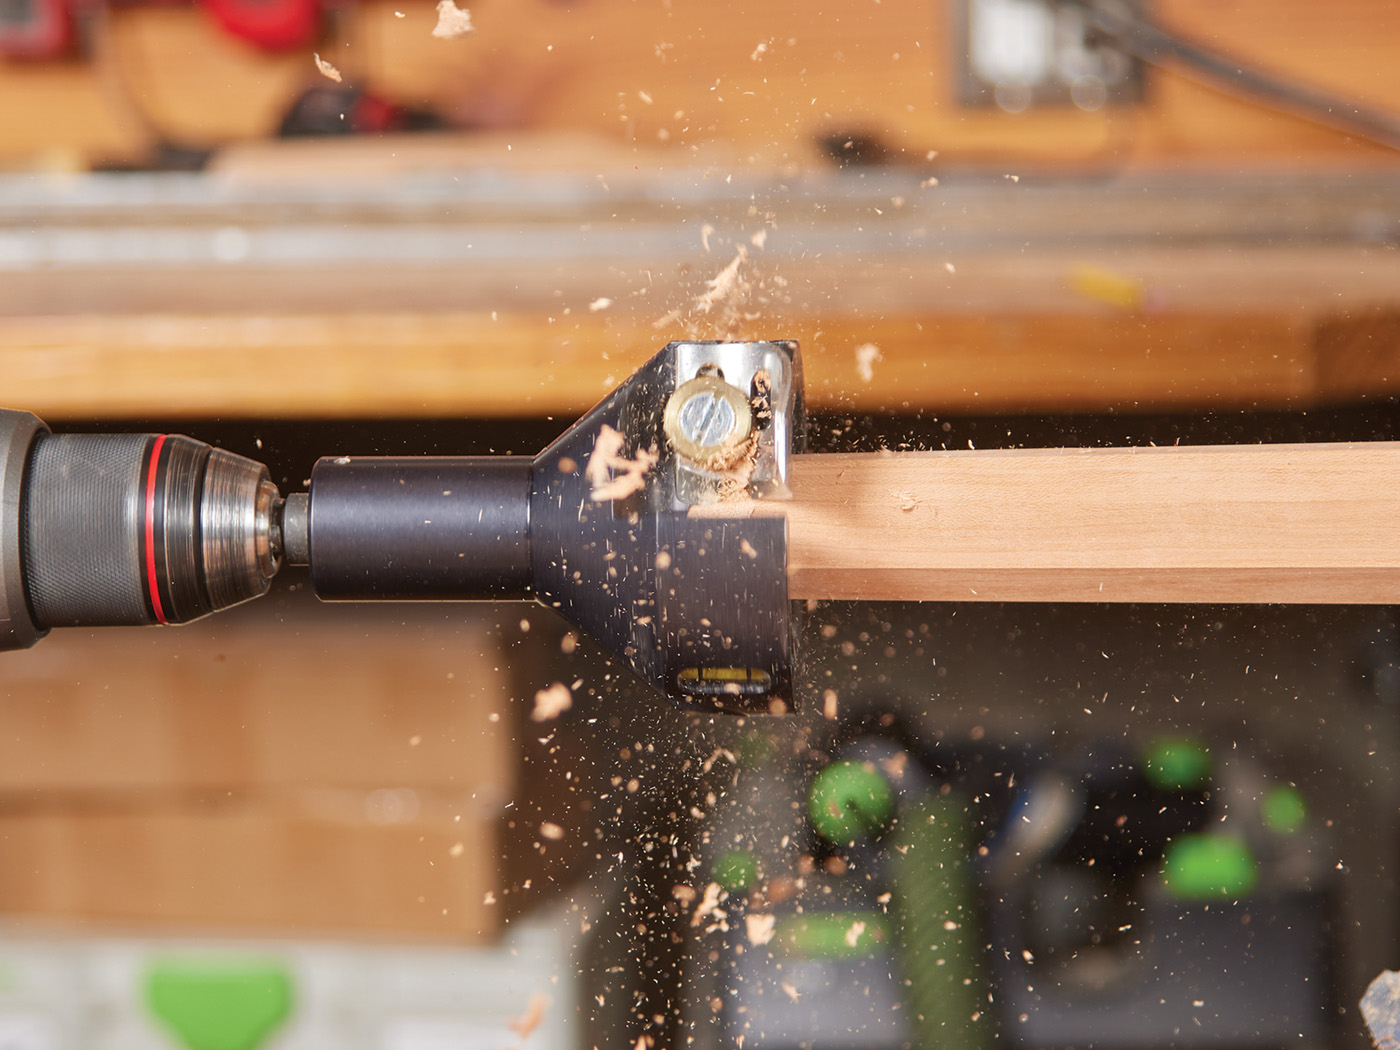
Now it’s time for leg tenons. For this article, I am using the Veritas 1” Power tenon cutter. If you have a lathe, this can easily be done by turning between centers to a 1“ diameter.
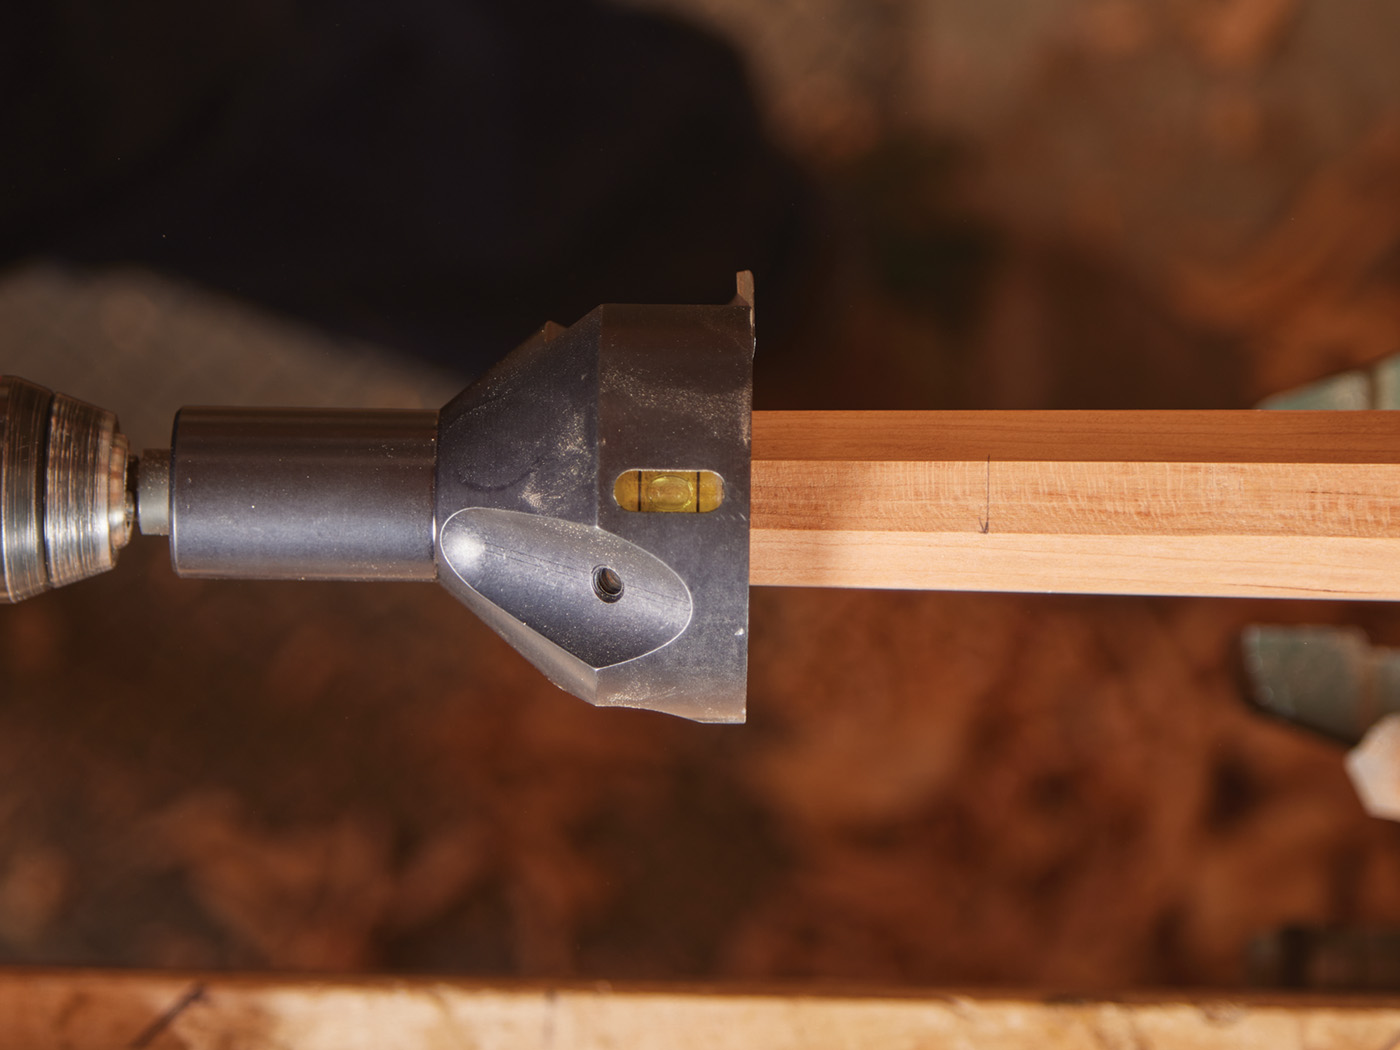
13 The tenon cutter is ran inline with the leg to form the tenon.
14
Start by clamping the leg horizontally and leveling it. Because the leg is tapered on the outside, be sure to register the level between the centers of the leg. Then, on the small end of the leg, we will make a mark 2-1/8“ in from the end of the tenon cutter to cut the tenon to the mark. The tenon cutter has a built-in level that you use as a guide to ensure the tenon stays centered on the leg.
TIP: I recommend practicing with the tenon cutter on scrap until you are comfortable with it before cutting the tenons on your legs.
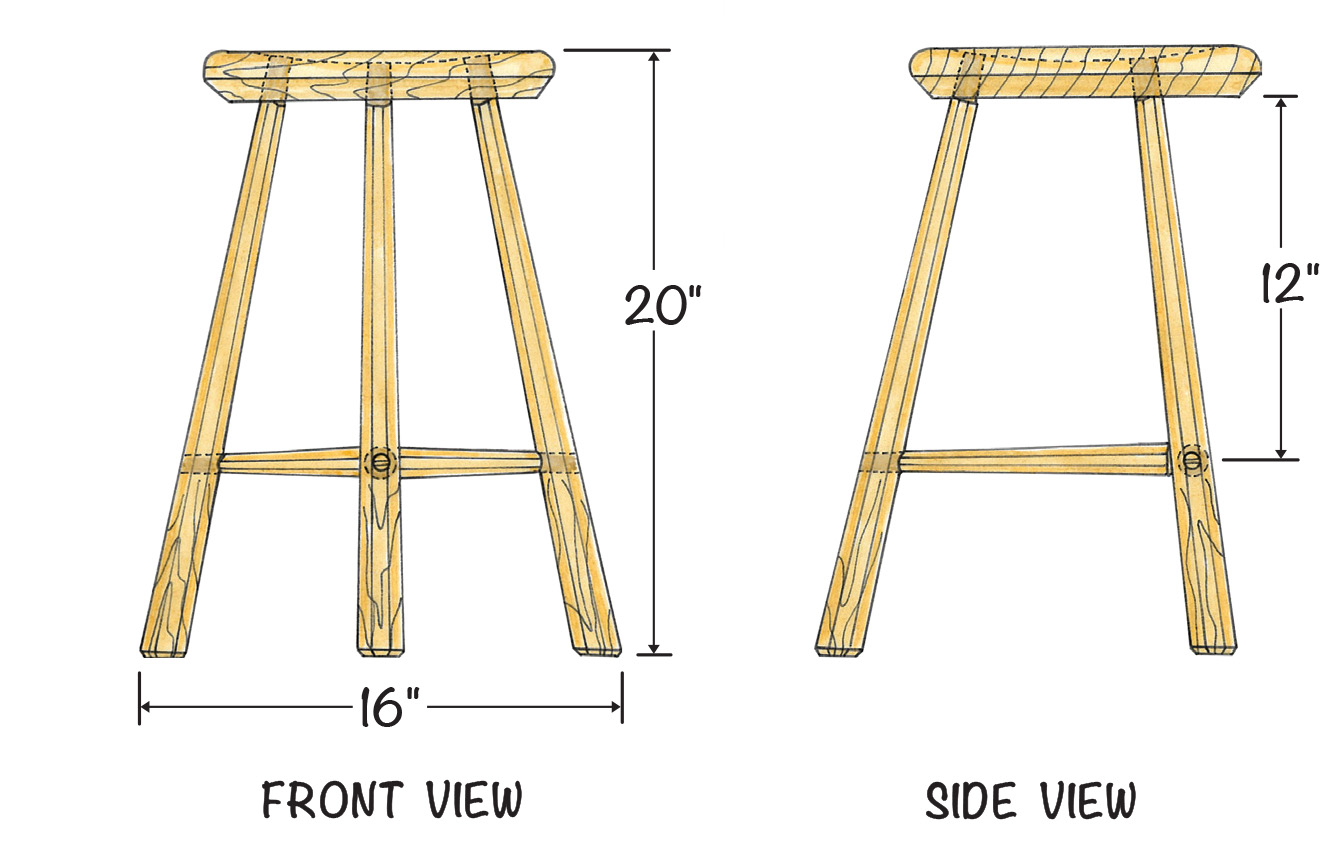
Leg It Up
Now it’ll start looking like a stool. Let’s dry-fit all three legs in the seat. With these straight tenons, if they are cut accurately to the mortise diameter, dry fitting them will be squeaky tight, and you run the risk of them not coming back out, so before putting them in the seat, I recommend you slightly compress the tenons. Compressing the wood fibers in a joint does not compromise the joint, and when wet glue is added, they will swell back tight with no issue. This practice allows you to dry-fit your parts without the risk of them getting stuck.
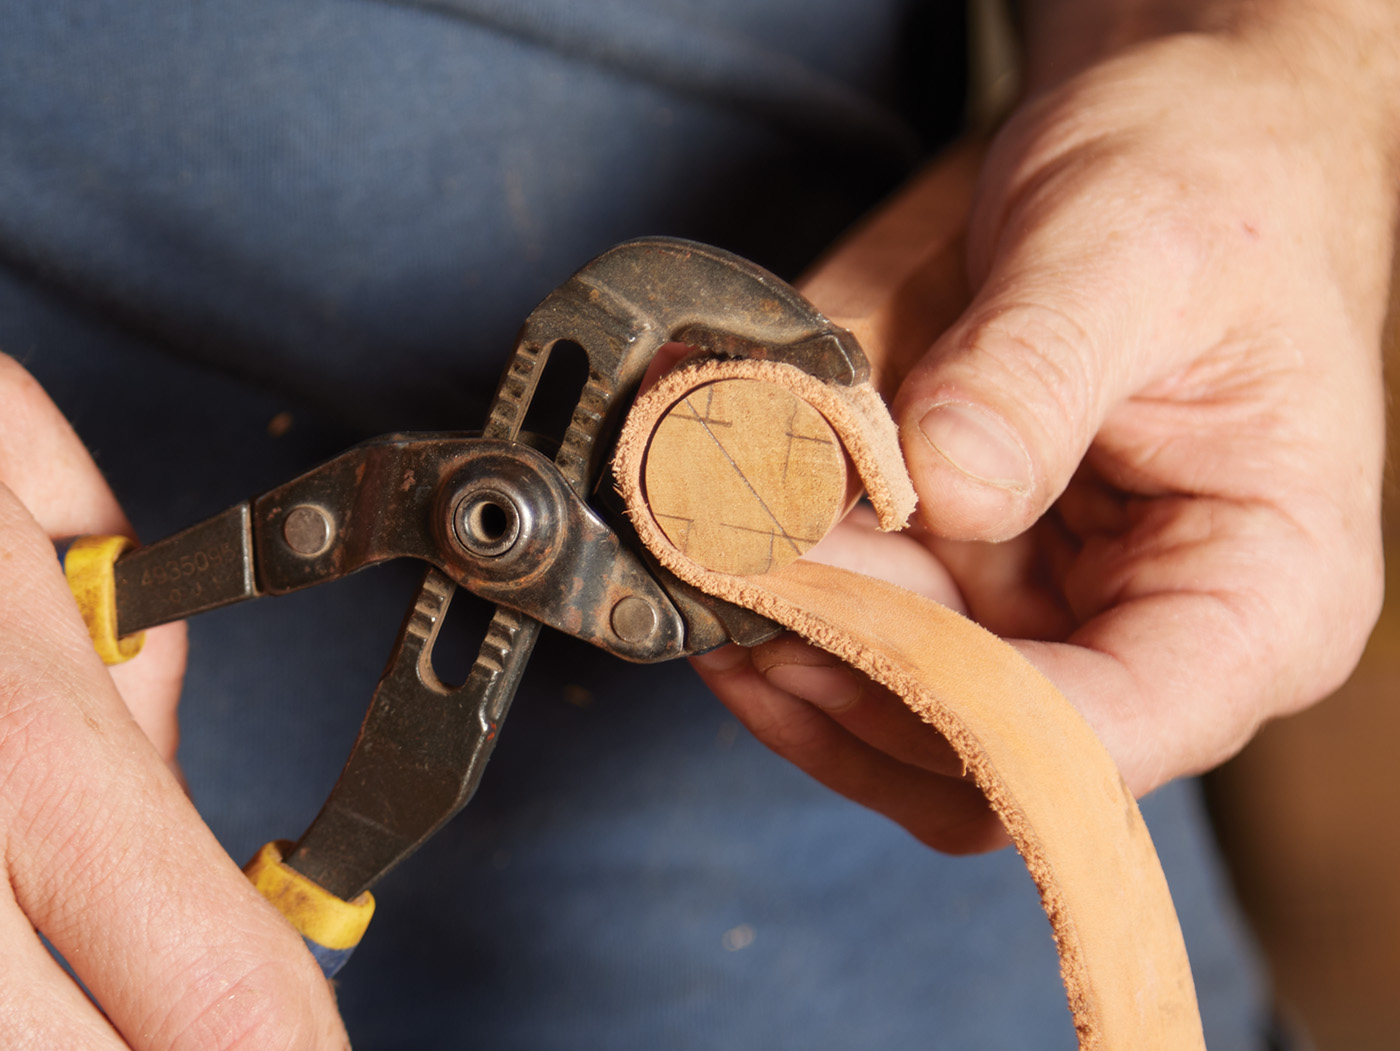
15 Use a pair of channel-lock style pliers and a leather scrap. This compresses the tenon for easier fitting.
The easiest way to do this is using a pair of channel lock pliers with a scrap of leather to pad the jaws and firmly squeeze, compressing the tenon, working the pliers around all sides. This should allow the legs to fit easily in the mortise without getting suck. You will also do this on the stretchers later in the process.
Once the legs are dry fit and seated tightly in the seat, rotate each leg so the endgrain of the tenon and the grain in the seat are parallel; this aligns the long grain in the seat and the long grain in the tenon for a better glue bond. Then mark the kerf for the tenon wedge perpendicular to the grain of the seat. This ensures that as the wedge expands to tighten the tenon, the tenon does not also split the seat. You will also do this on the stretchers to prevent the stretcher tenons from splitting the legs.
16 Test fit the legs and mark the grain and wedge direction.
Next, saw the wedge kerf at the end of the leg going deep enough for the wedge to go about 2/3rds the way through the thickness of the seat. If your mortise and tenon fit snugly, I make my wedges the length of the kerf depth plus 1/4“ and 3/16“ on the thick end of the wedge.
Time for Stretchers
With all three legs dry fit and the wedge kerfs cut and rotated to be perpendicular to the grain of the seat, flip the stool upside down on the bench. With the tenons sticking through the top of the seat I normally put 2 strips about 1“ thick under the seat so the tenons are off the bench top and clamp the seat to the benchtop.
Take both stretcher blanks from the cut list and mark octagons on the ends, hand plane them into straight octagons following the same procedure as the legs.
Now we will mark the stretcher mortise locations. On octagon legs I like the stretchers to land in the center of a facet of the octagon so I will slightly rotate two legs to have their facets facing each other. This may change the wedge orientation in the seat grain, but it’s normally not more than a few degrees and doesn’t impact strength that much.
The stretchers are 12“ off the bottom of the seat so measure off the seat and do a quick pencil tick at 12“ on the facets that are facing each other, then take a long rubberband and stretch it between the two legs aligned with those tick marks, then mark the mortise location between the sides of the rubber band. The rubber band simply gives you visual points of reference to find the center of the leg.
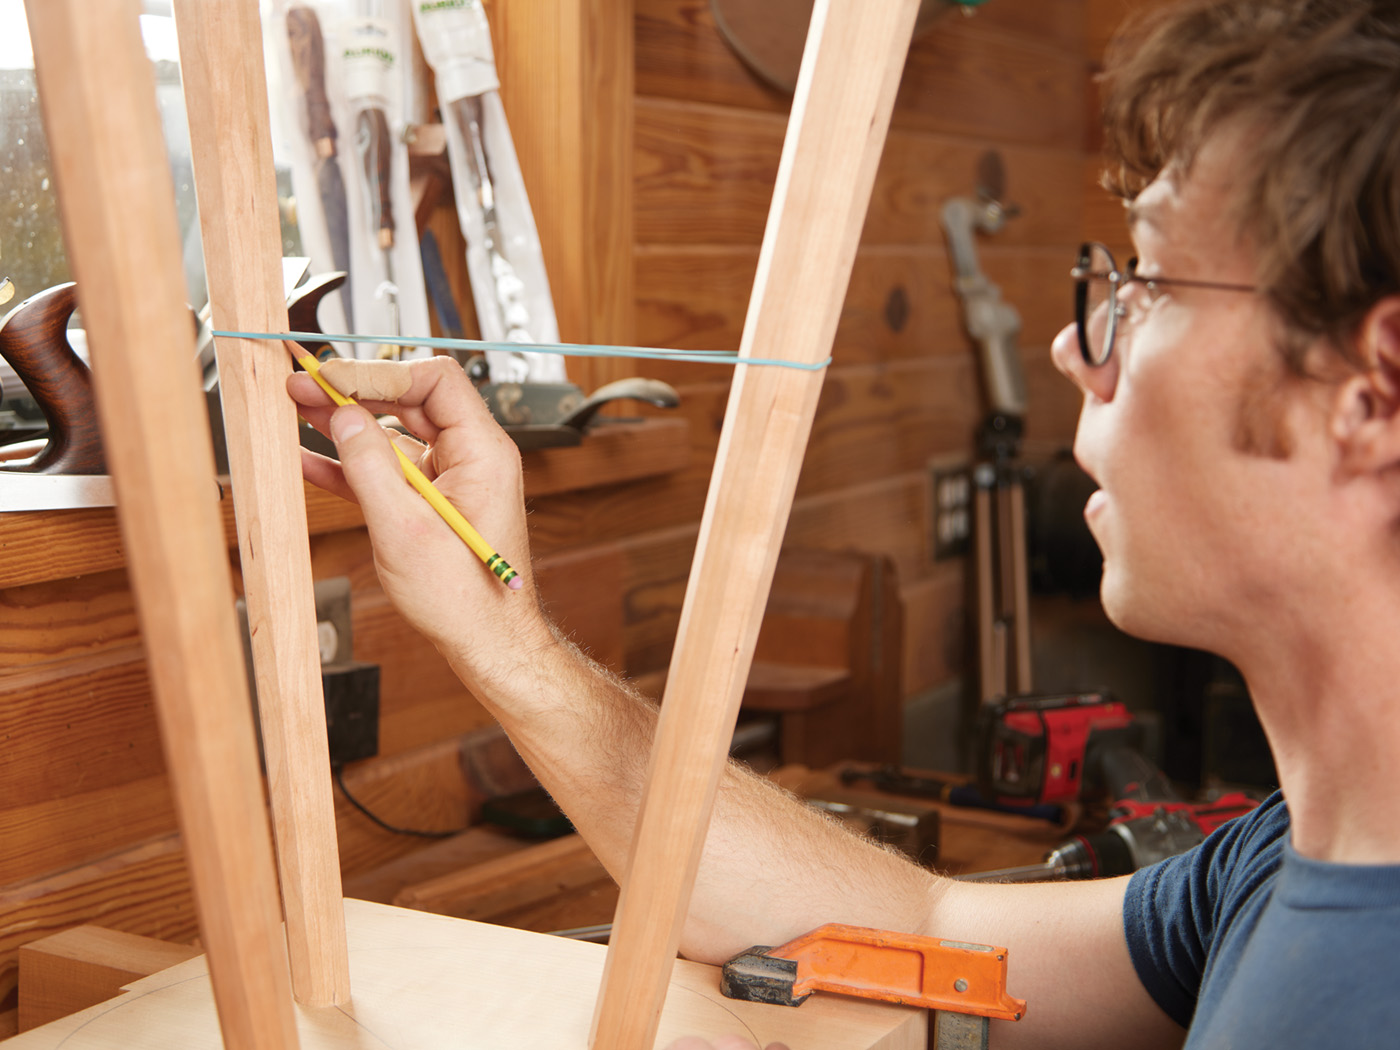
17 Use a rubber band stretched between the legs to layout the stretcher location.
To drill the first mortise, I clamp a scrap across two legs to act as a steady rest and use a 5/8“ drill bit on an extension. The height of the rest off the seat should be 12“ minus half the diameter of the bit extension to put the center of the bit level at 12“ off the seat. When drilling the mortises, I use a good quality brad point bit and start by running it slowly in reverse to score the face of the leg facet. This helps to prevent tearout on the leg. These are through mortises, so if tearout is a concern on the exit of the bit, simple clamp a scrap block on the back side of the leg. Small amounts of tearout are normal and can be hand planned out before assembly later.
18 Use a long bit and scrap to guide the bit and drill the mortise locations
Once this first mortise is drilled, thread the drill bit extension through this first mortise using it as the rest to drill the mortise opposite from it. You should now have two opposing 5/8“ through mortises in each leg 12“ off the bottom of the seat.
Using a ruler, take measurements between the two mortises to determine the length of the stretcher and the length of the tenons. Using a 5/8“ Veritas power tenon cutter or a lathe, cut both tenons on the ends of the stretcher and compress them as you did on the legs. Then, dry fit it in the legs and reassemble everything. Next, rotate the stretcher so the end grain of the tenons is parallel to the length of the leg and mark the wedge kerfs. Then measure between the legs and mark the center of the stretcher for the mortise location of the intersecting stretcher.
19 The stretcher is drilled in the center and can be done at the drill press.
Remove the stretcher and saw the wedge kerfs as you did on the legs and drill the 5/8“ mortise in the center for the intersecting stretcher. Now reassemble.

20 Shape the stretchers.
Next use the mortise in the center of the stretcher as a rest to drill the stretcher mortise in the 3rd leg 12“ off the bottom of the seat. Repeat the same process for the second stretcher, measuring, marking, and sawing the wedge kerfs. The entire stool can now be dry fit to check for alignment. At this point, any final shaping, such as tapering the stretchers, can be done with a hand plane or spokeshave.
Final Assembly
At this point, go ahead and complete all sanding or card scraping of all your part surfaces before glue-up. For glue, I recommend something that will give you a long open time. I prefer hide glue, but a product like Titebond Extend would also be suitable.
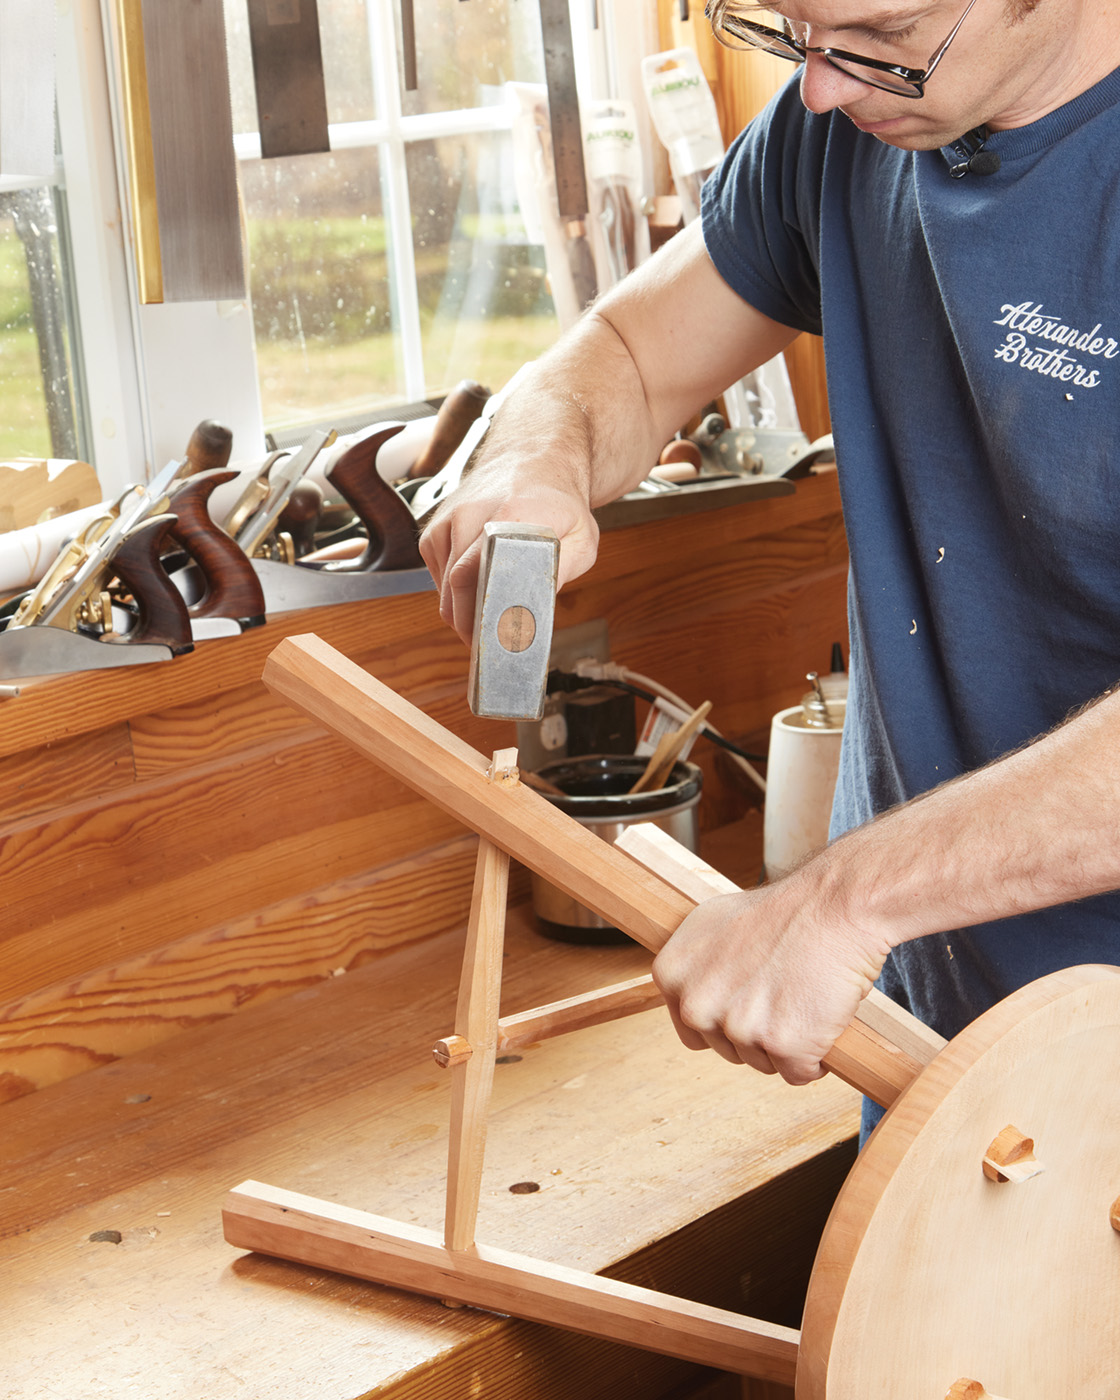
21 Glue up the chair with hide glue and drive in the wedges.
I begin by gluing the stretchers into a “T” and then gluing them into the legs. Now, this leg assembly can be glued into the seat. Begin the wedging by driving each leg into the seat, listening for a sound change when it is tight. Insert the wedges with glue and drive them home. Lastly, we check the rotation of the center stretcher and drive home the stretcher wedges with glue. Be very gentle driving home the stretcher wedges as they do not need a lot of force to seat them, and you don’t want to split the stretchers or the legs.
Trim and Level
Once the glue is dry, it’s time to trim the tenons and level the stool. I find a shallow sweep gouge works well to trim the tenons inside the dish of the seat, and then a saw for the stretcher tenons.
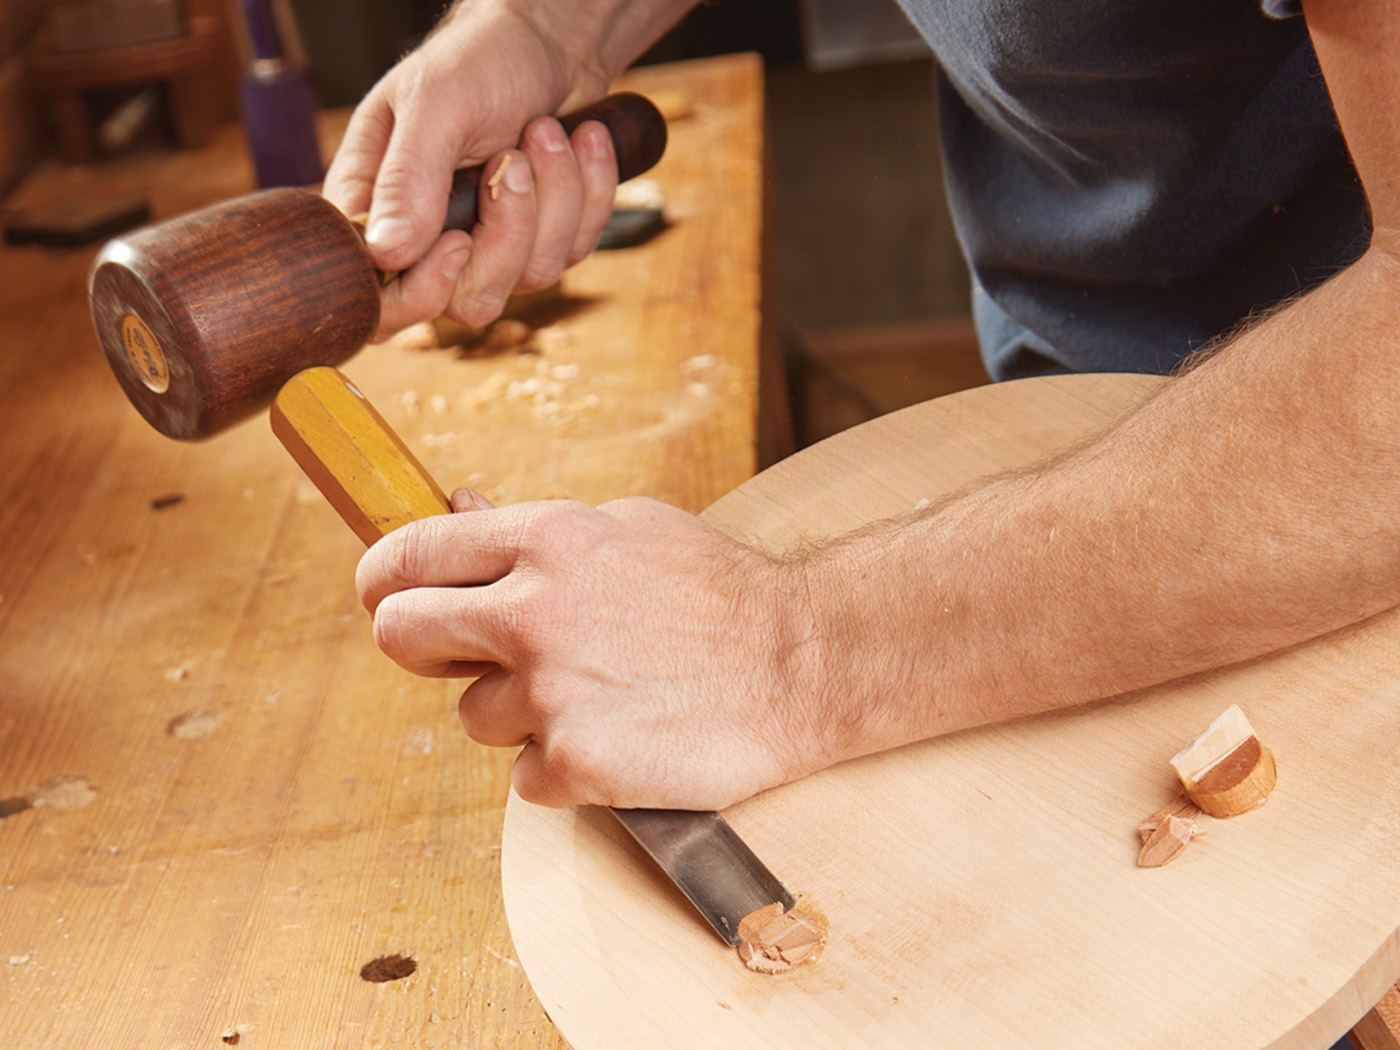
22 Chisel off the excess. You can sand the tenons smooth with the seat or leave it a chiseled texture.
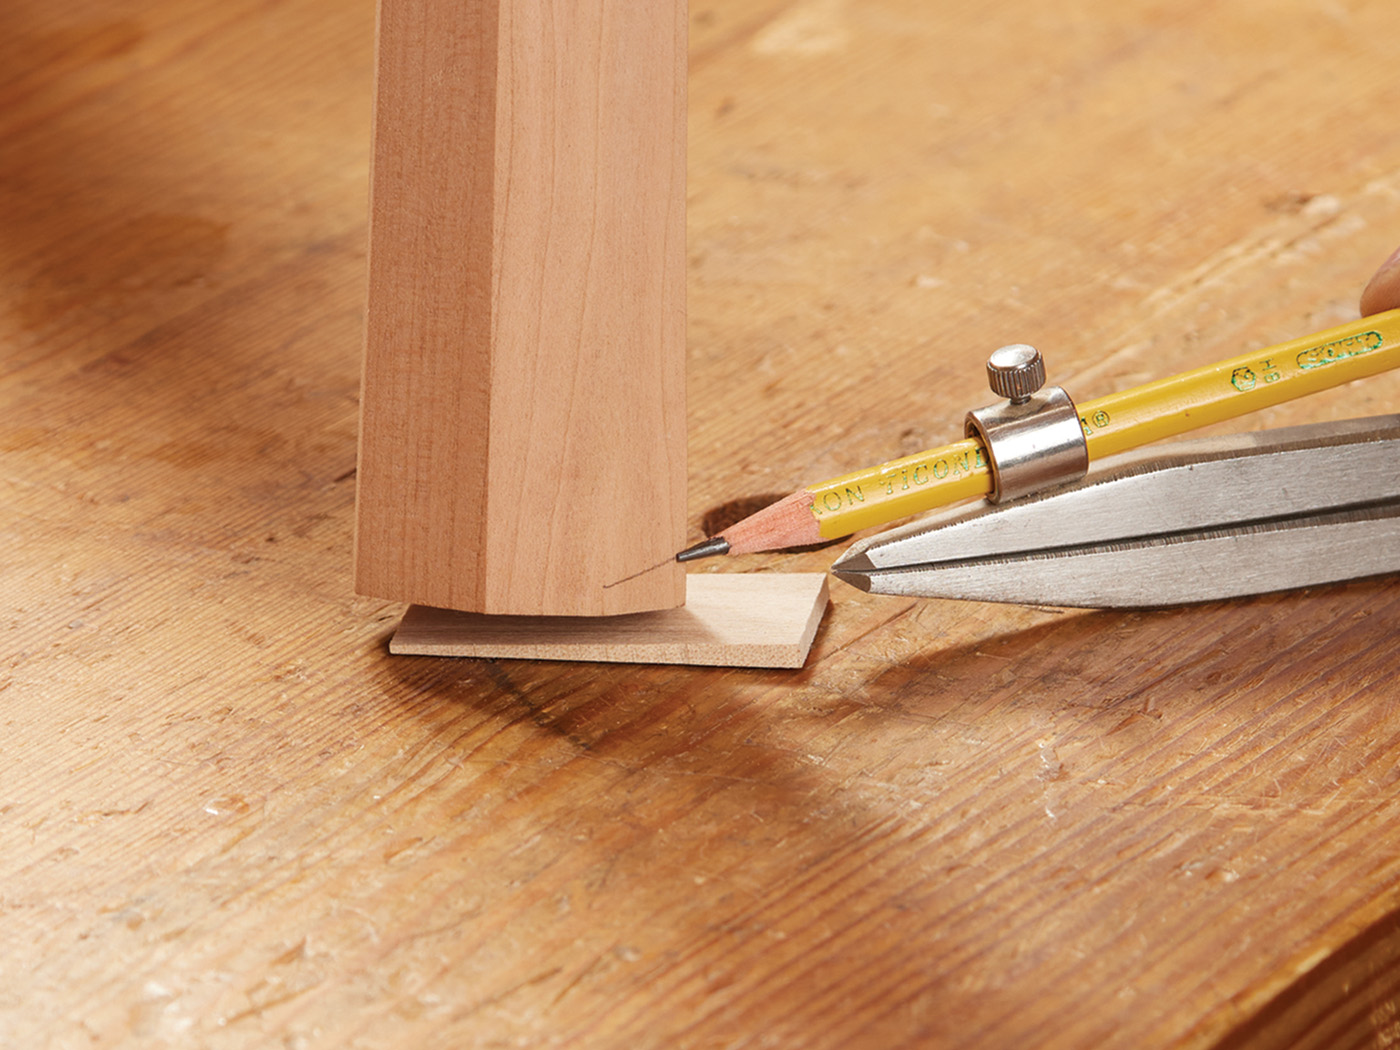
To level the stool, start by putting a level on the seat and use some wedges under the legs to level. Then use a scribe to mark the bottoms of edge leg referencing off the bench top.
23 Level the stool.
24
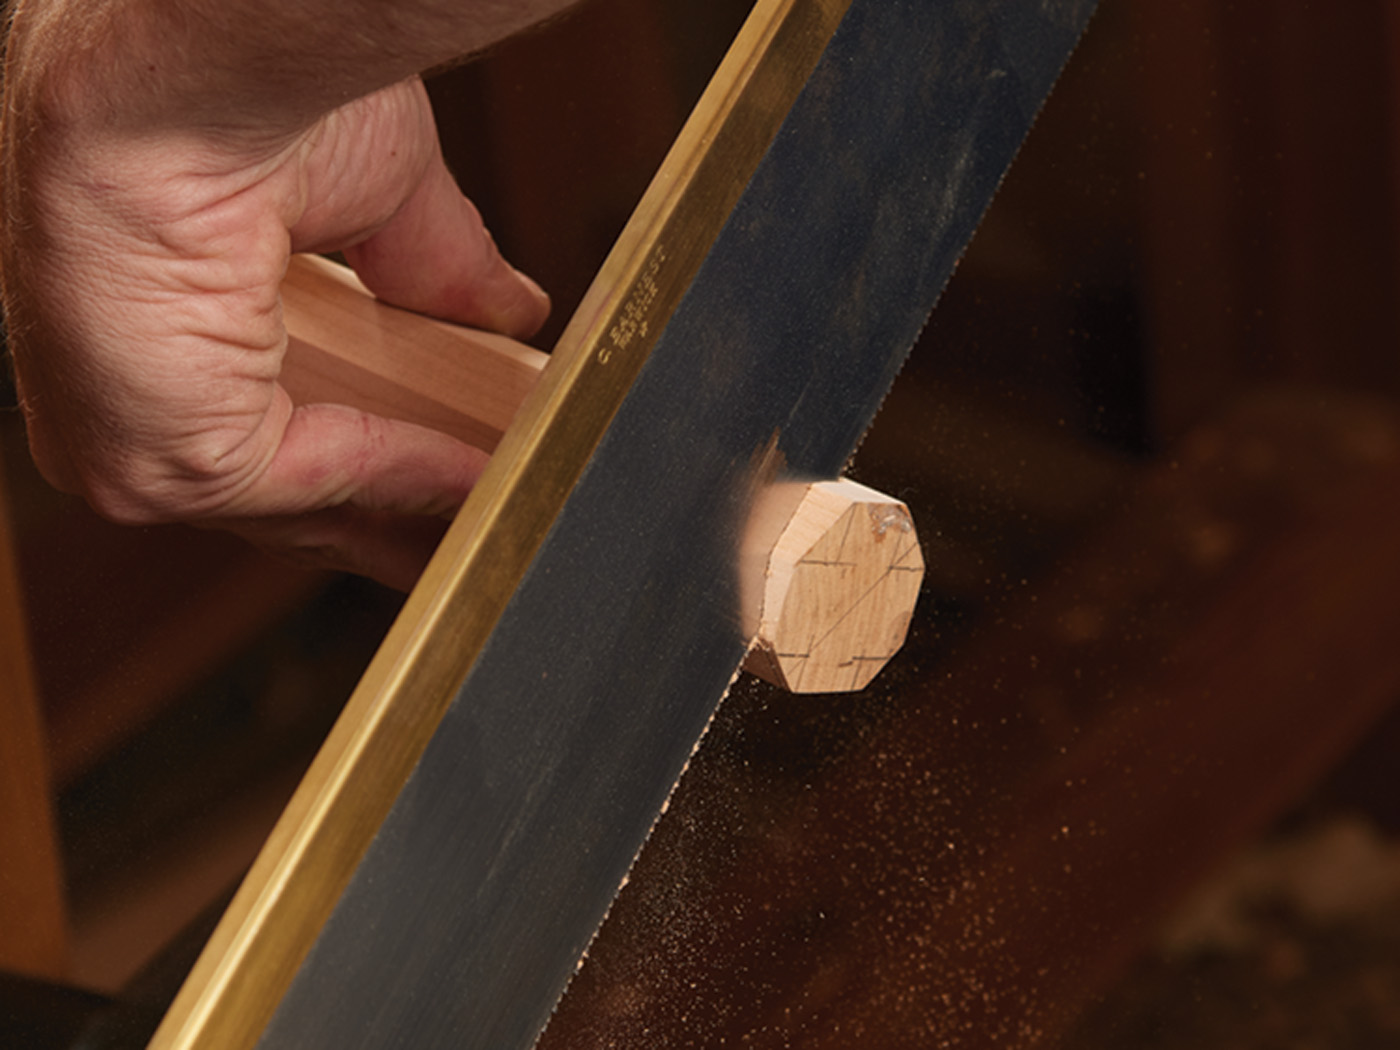
Saw each leg to your mark and it’s time for final sanding and finish.


