


We may receive a commission when you use our affiliate links. However, this does not impact our recommendations.
While simple to build, the details present a worthy challenge.
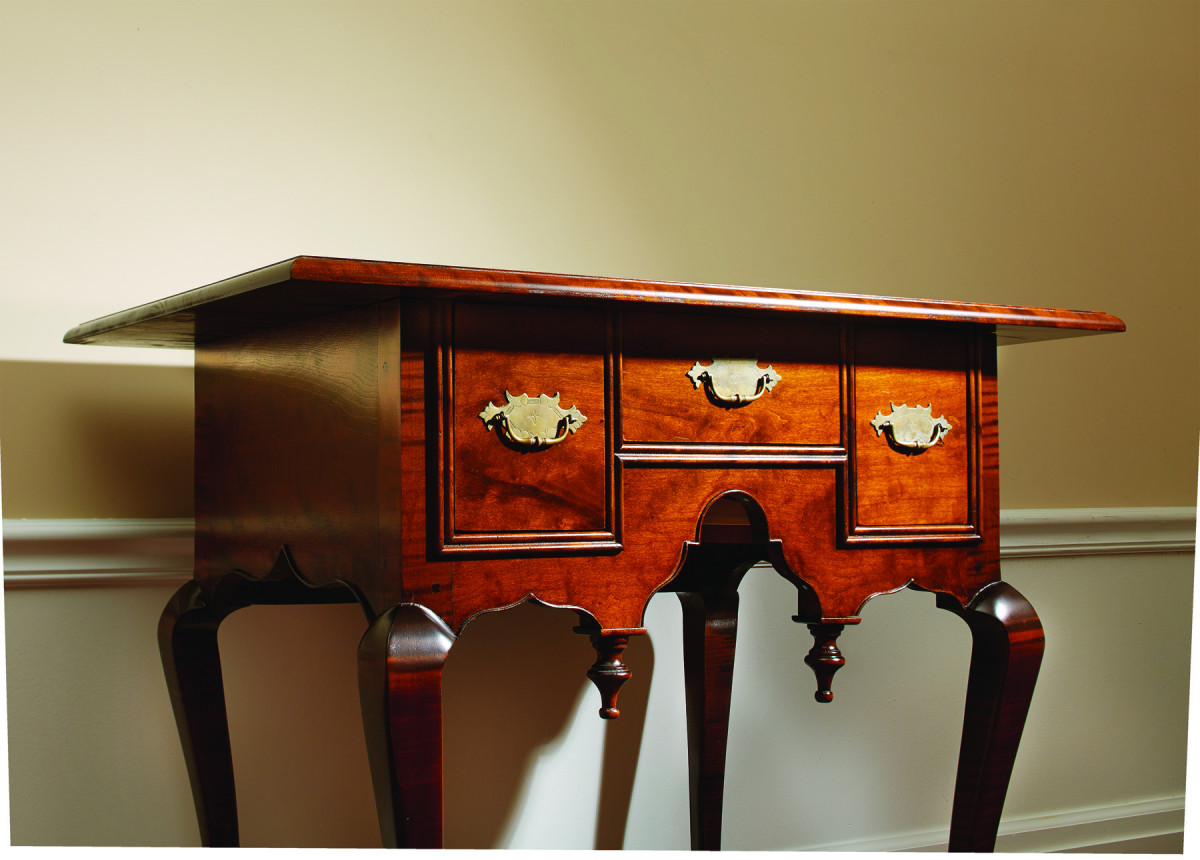
While teaching a class at the Connecticut Valley School of Woodworking, I was asked to sneak down to the Connecticut Historical Society to take a look around. At the museum, I was shown into a back room full of off-exhibit furniture. Halfway down the first row of shelving, a mixed-wood lowboy caught my eye. “What a great piece,” was all I could say. Mass photography began.
The drop pendants and drawer construction on this piece indicate it’s early Queen Anne. As I studied the images, I discovered what may be the easiest-to-build lowboy that I’ve ever seen. But if you dig into the details, you’ll find areas that test a seasoned furniture maker, such as applied cock beading and tapered drawer parts. Of course, these details can be omitted and the results would be still be top-shelf.
Skip the Knee Blocks
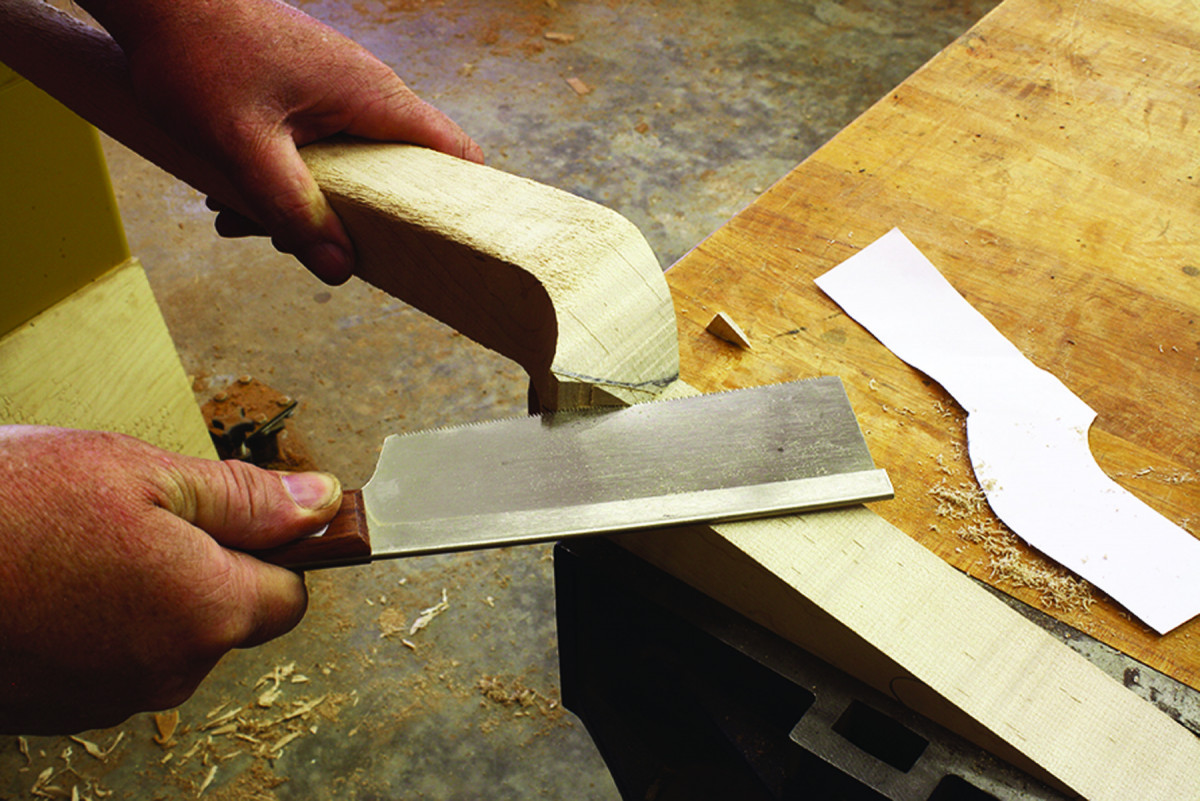
Bulk removal. A few quick saw cuts and the majority of the waste material is trimmed from the cabriole leg.
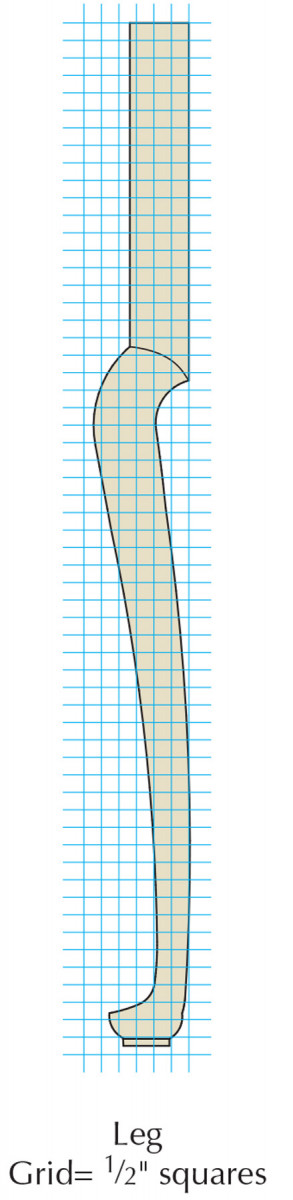
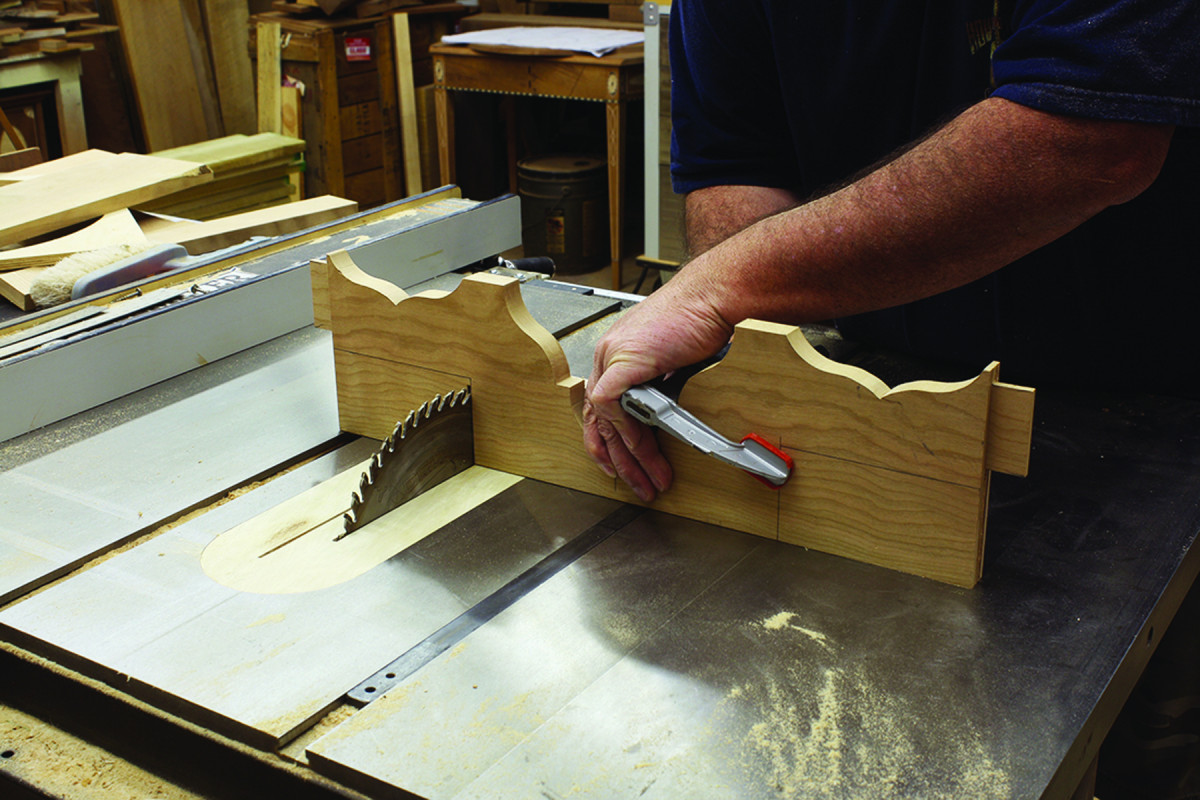
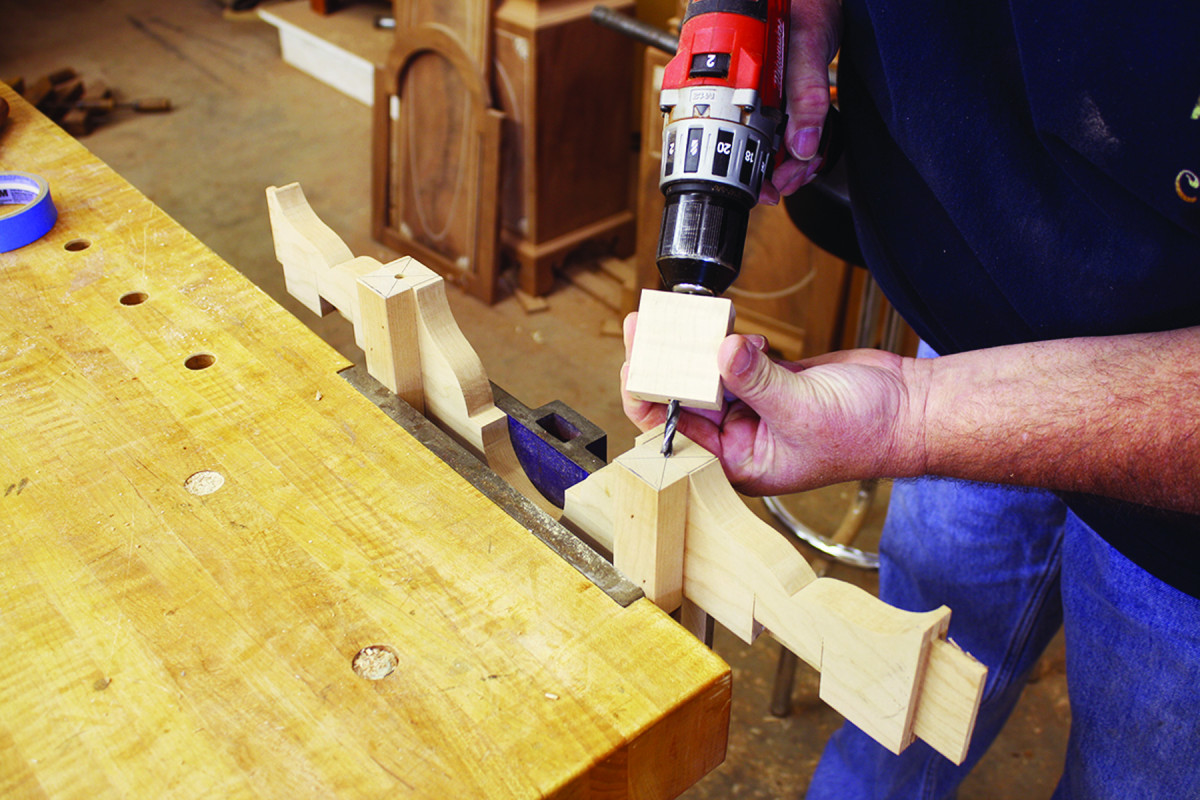
There are numerous video posts and articles that explain how to lay out, cut and shape cabriole legs (see “Online Extras” for additional information). What I haven’t read, however, is how to shape legs such as these that don’t use knee blocks. So here’s the difference.
After you’ve rough-cut the legs, turned the foot and pad areas and shaped your legs, you have to shape the knee area to terminate properly. The first step is to use a pattern of the leg to lay in the arched line. The arc begins where the front corner of the post block and the knee intersect, then continues to where the back of the corner post intersects with the curvature of the leg.
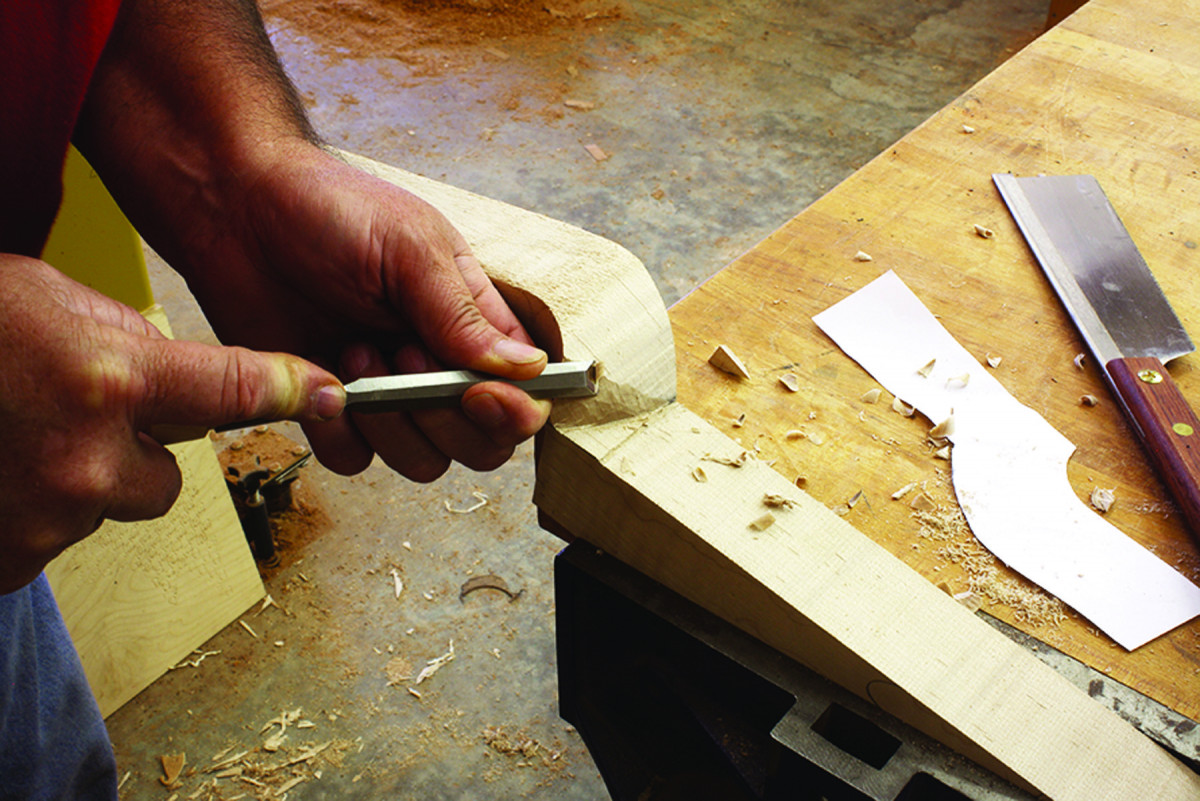
Sculpt to round. Work away the remaining waste using a sharp chisel until the profile rolls gently back to the post.
With the arc drawn, remove as much waste as you can before turning to your chisels. I find it easy to make two or three cuts with a handsaw, working down to the post block’s surface. I then put the saw flat on the post block and saw back to the previously cut lines. Most of the waste material is removed.
What’s left to shape the knees is to remove and smooth the ridge created by the saw cuts. Most of this work is across the grain, so a sharp chisel is all that’s needed. Pare the material while sculpting the rounded shape.
Added strength. The addition of the small uncut section at the center of the leg mortise – known as a bridge – increases the overall strength of the mortise-and-tenon joint.
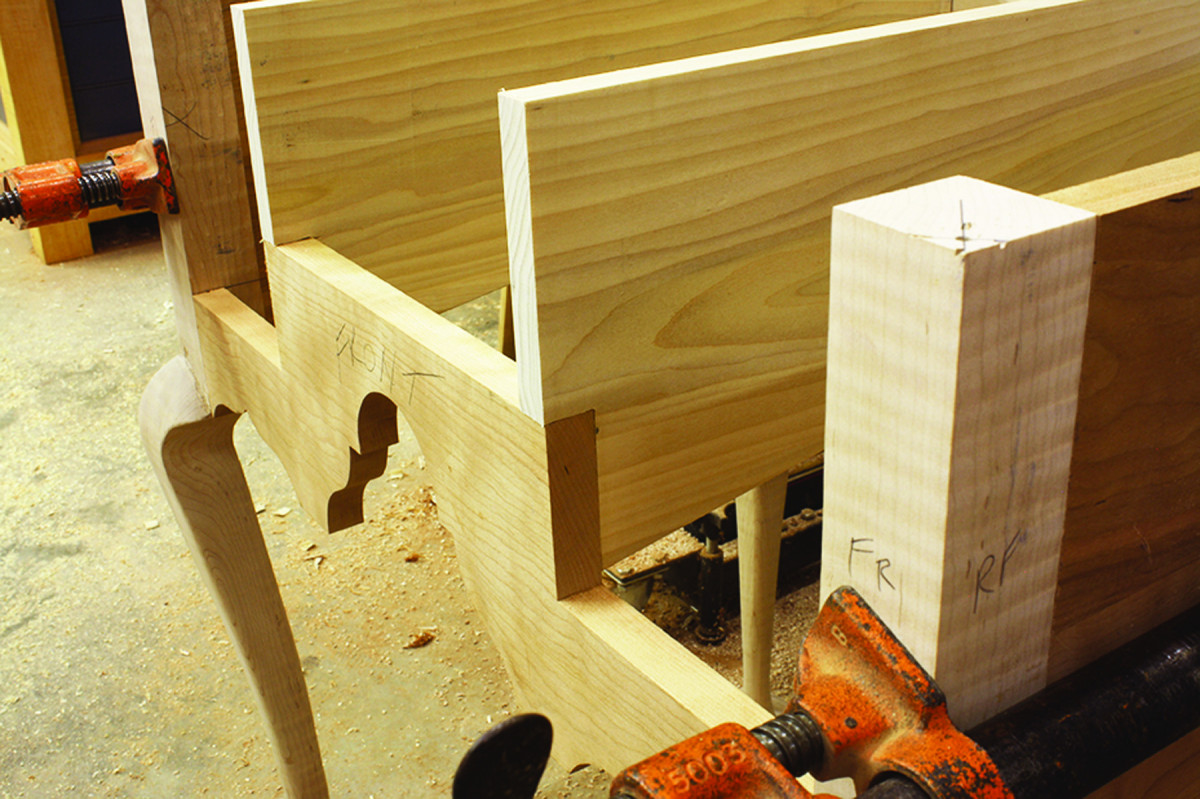
After the legs are complete, lay out the 1⁄4“-wide x 11⁄4“-deep mortises for the back, ends and front apron. For the back and ends, the mortises run the length of the post block, except for 1⁄2” of solid wood at the top and bottom, and for structural support, leave a 1″ bridge at the center of the mortises. The front legs require a different layout. From the bottom edge, move up 1⁄2” as was the case on the back and ends, then mortise up another 23⁄8“. The balance of the front leg post is filled with a drawer.
Connecticut Lowboy Cut List
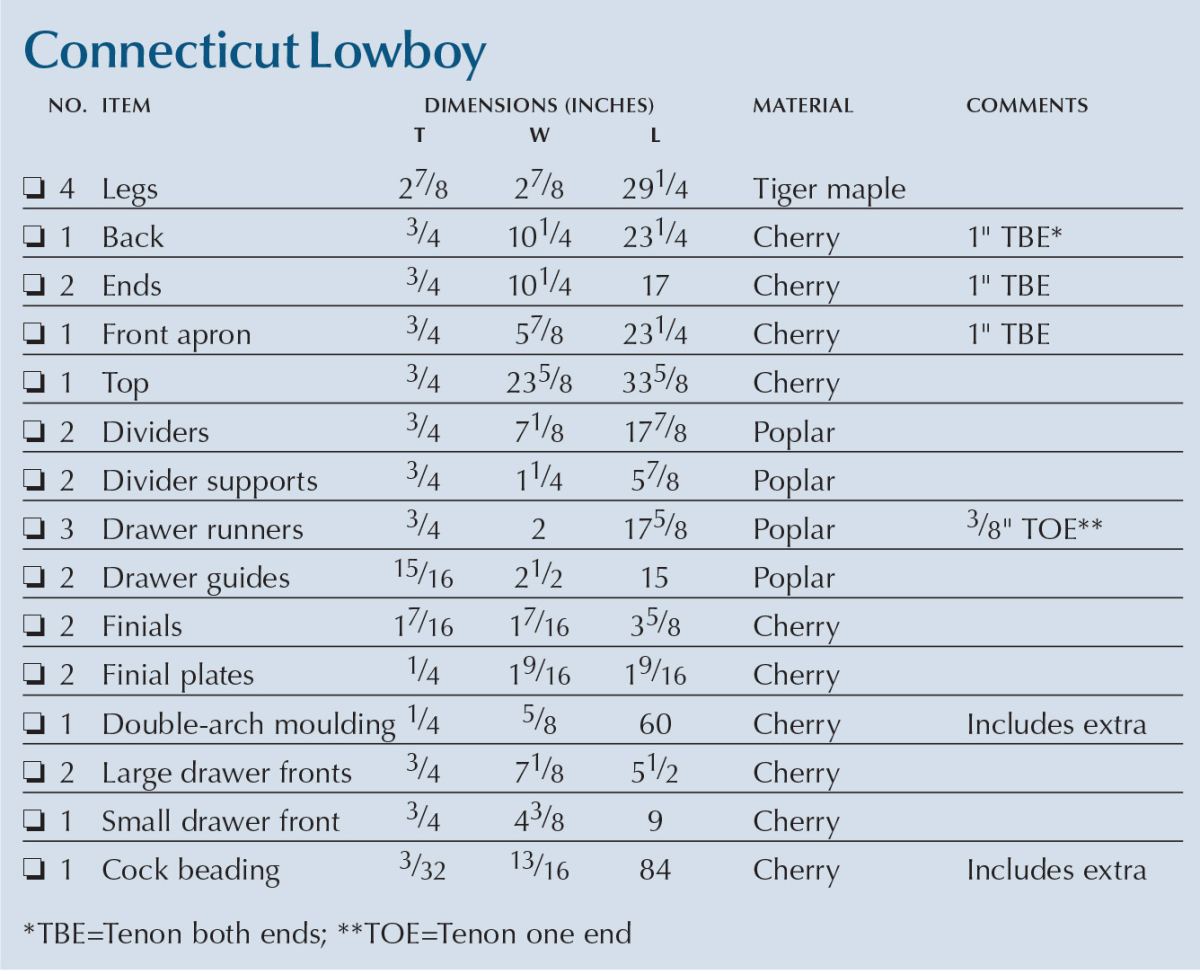
Carcase
An Apron & Three Panels

Spot-on layout. The best layout technique is to work directly off your mortises, but leave a little room for seasonal adjustments.
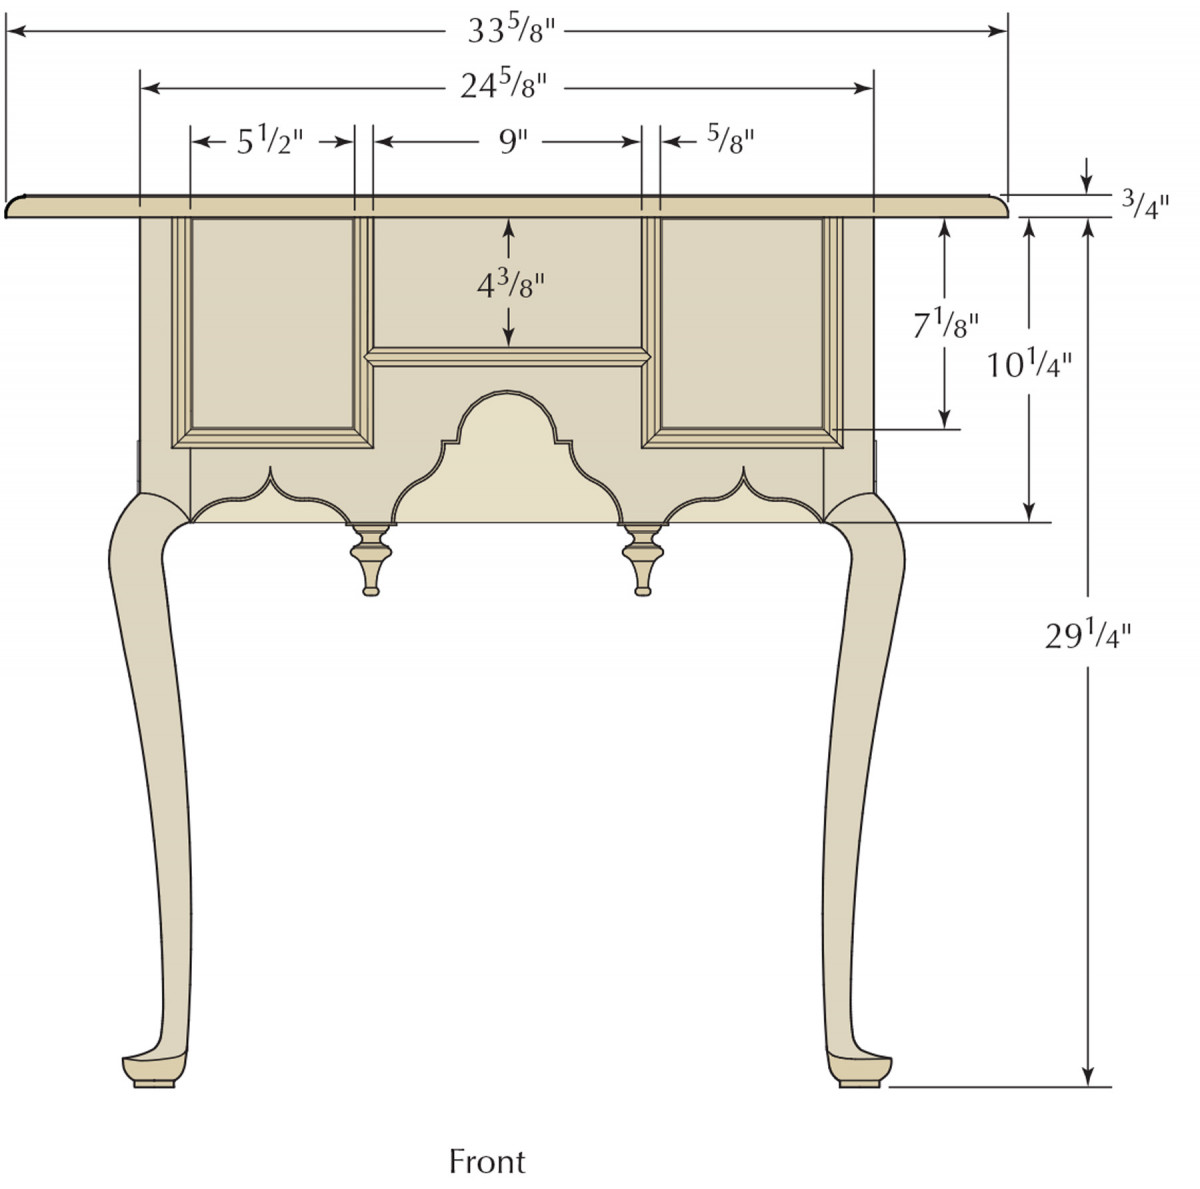
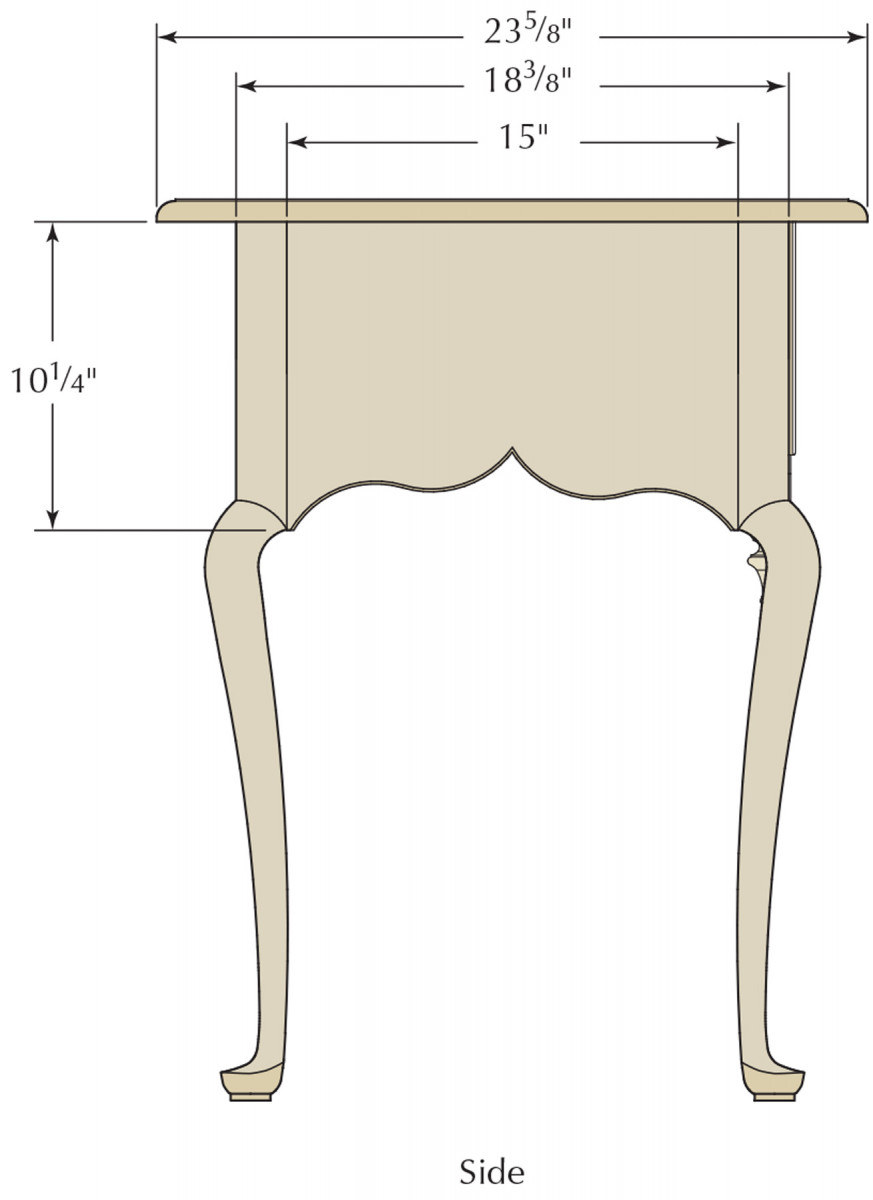
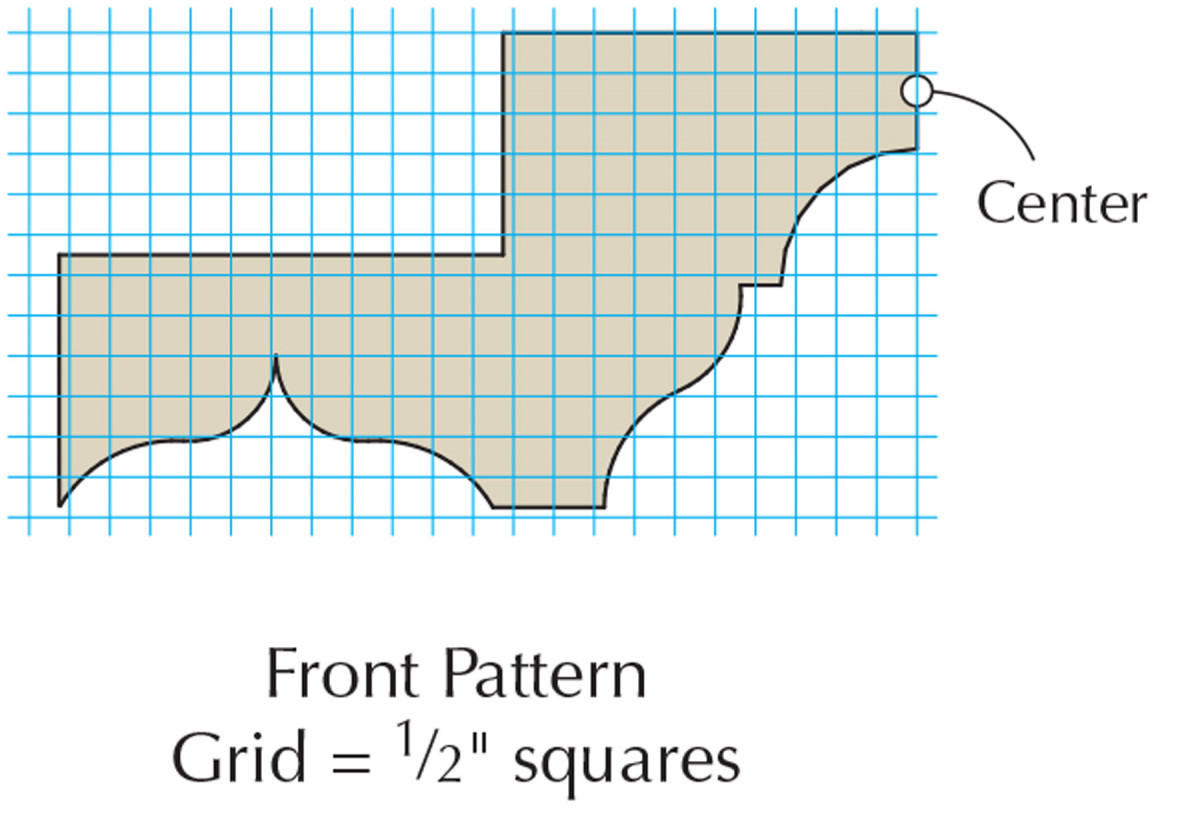
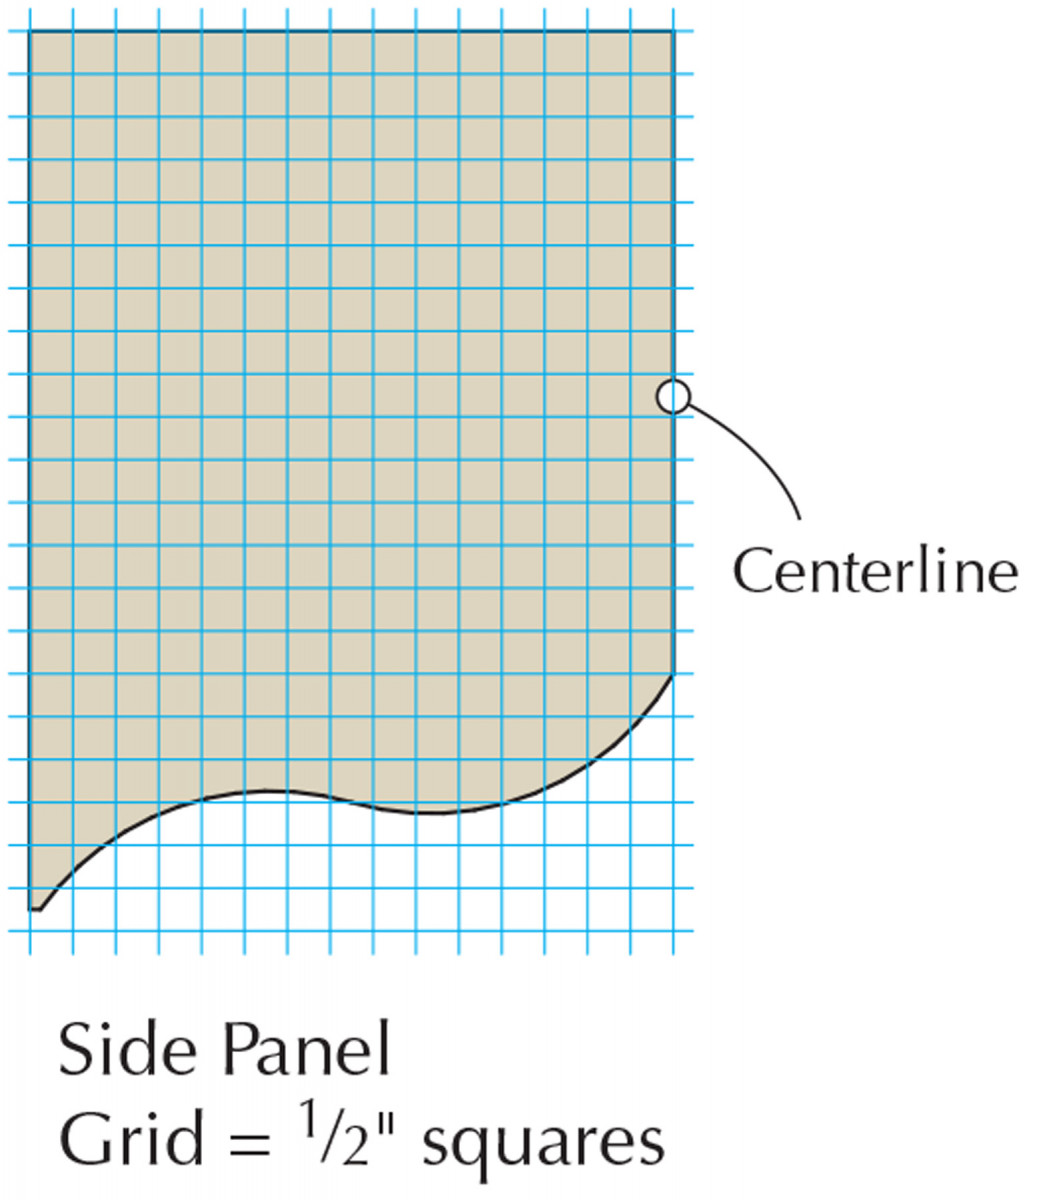
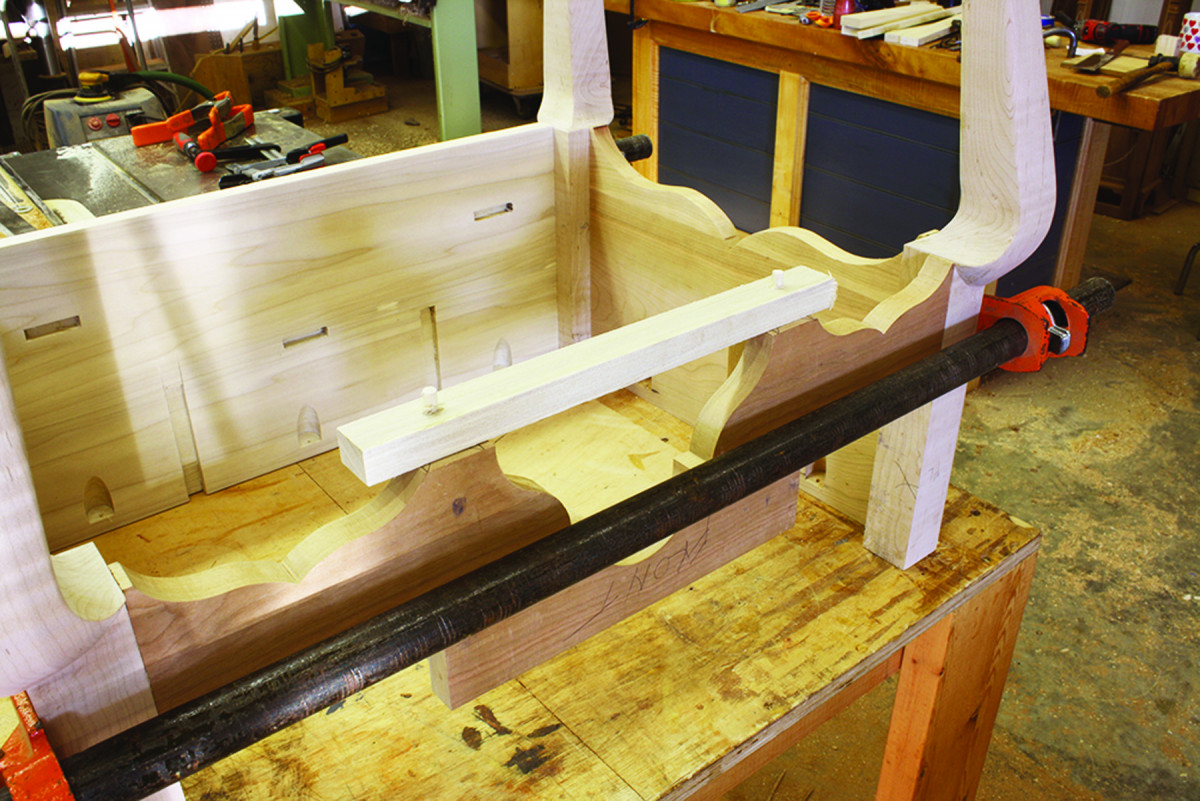
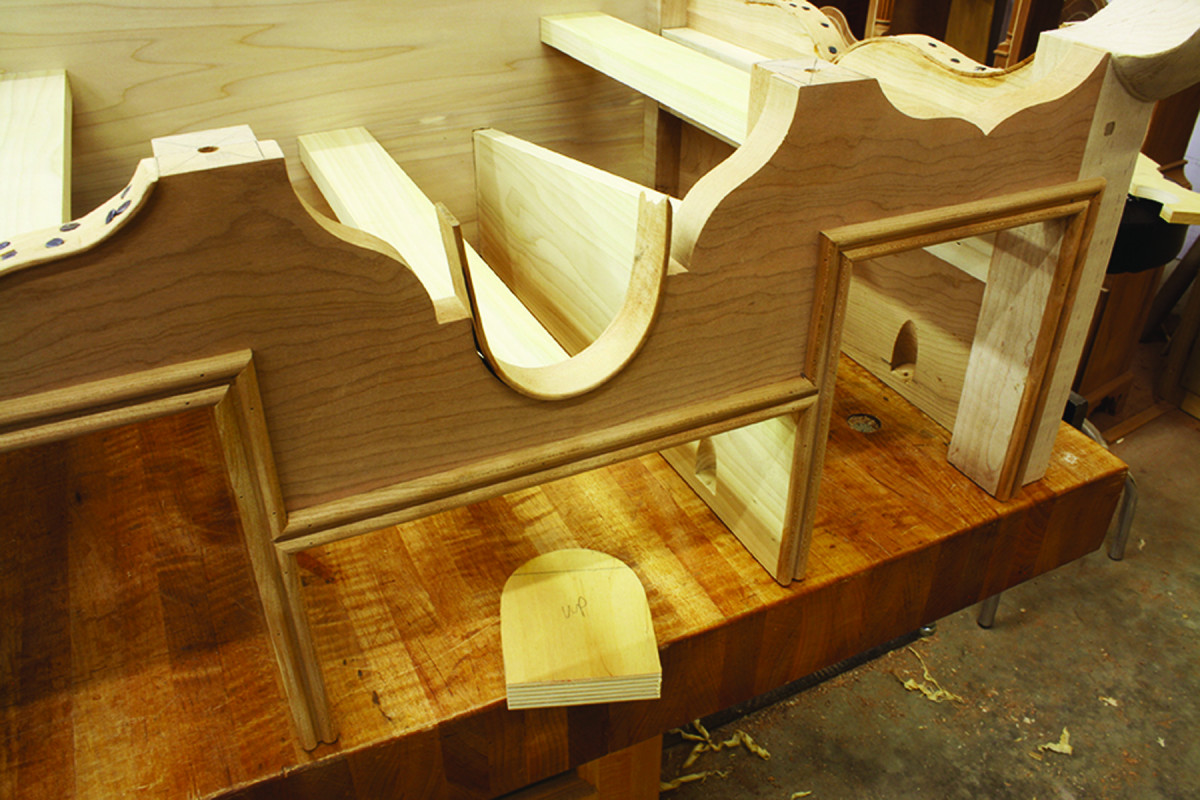
The back of the lowboy is simply a panel with tenons on both ends. The ends are also tenoned, and they have cyma-curve cutouts at the bottom edge. The front apron has three cutout areas and is notched at both ends for the outside drawers. It also has tenons at the ends.
Mill the material for the panels and the apron to size. The best method of work is to cut tenons along the ends of all the parts prior to shaping the curves, and before notching for the drawers on the front apron.
I cut tenons at my table saw. My first cut is with the parts lying face down on the tabletop to define the shoulders. My second cut – the cheek – is made with the parts standing on end while clamped to a fence extension as they are passed over the blade. This results in tenons the entire width of the part. Now I need to locate, mark and saw the width of the tenons to fit my mortises.
An easy way to locate the cuts is to show the part to the leg mortises. As you mark, leave about 1⁄8” of space on each side of the mortises to allow for seasonal movement. Square down from those marks, then cut those lines with your saw. It’s easy to remove the end waste by sawing at the tenon’s base, but the waste area at the center has to be chopped out.
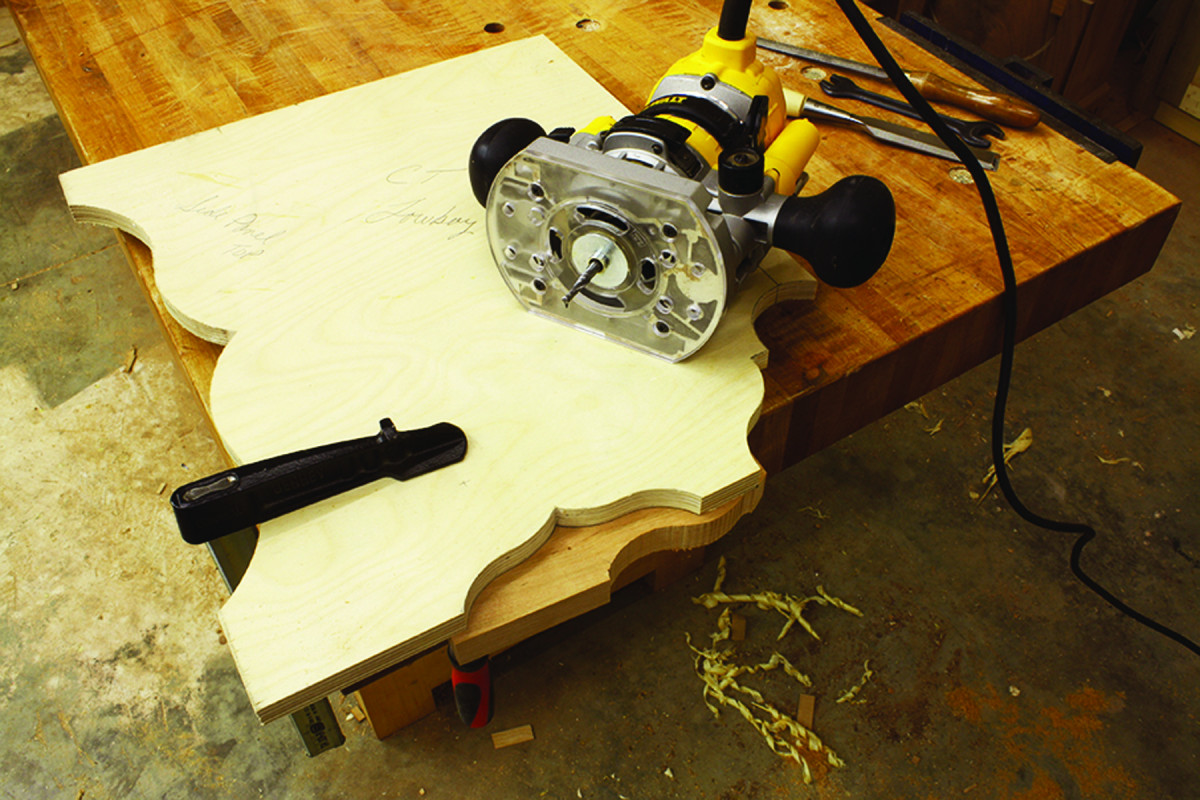
Patterns Make Work Easier
Fast & accurate. Pattern work made with a router setup is quick and easily repeated when needed.
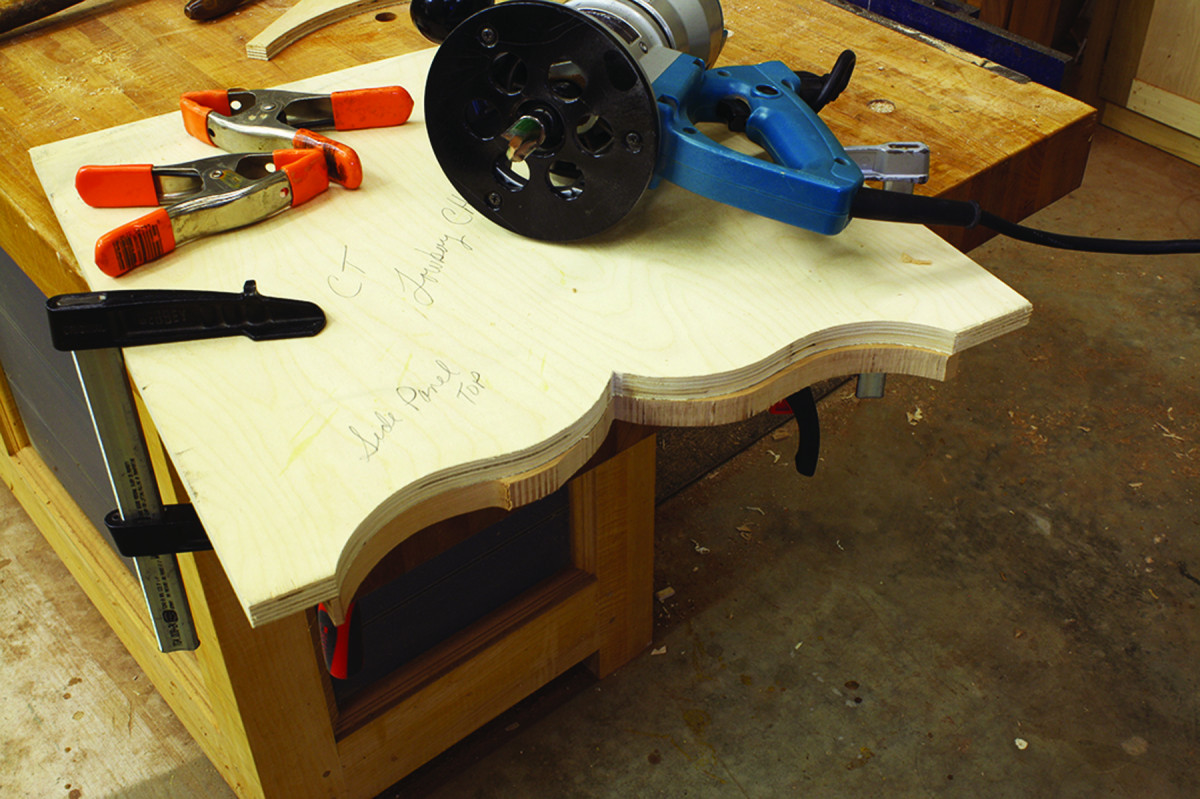
On a piece of good-quality 1⁄2” plywood, lay out the three designs from the plans. Cut and fair the curves to a flowing design that is square at the edge and bump free. These patterns are used a few more times throughout the project.
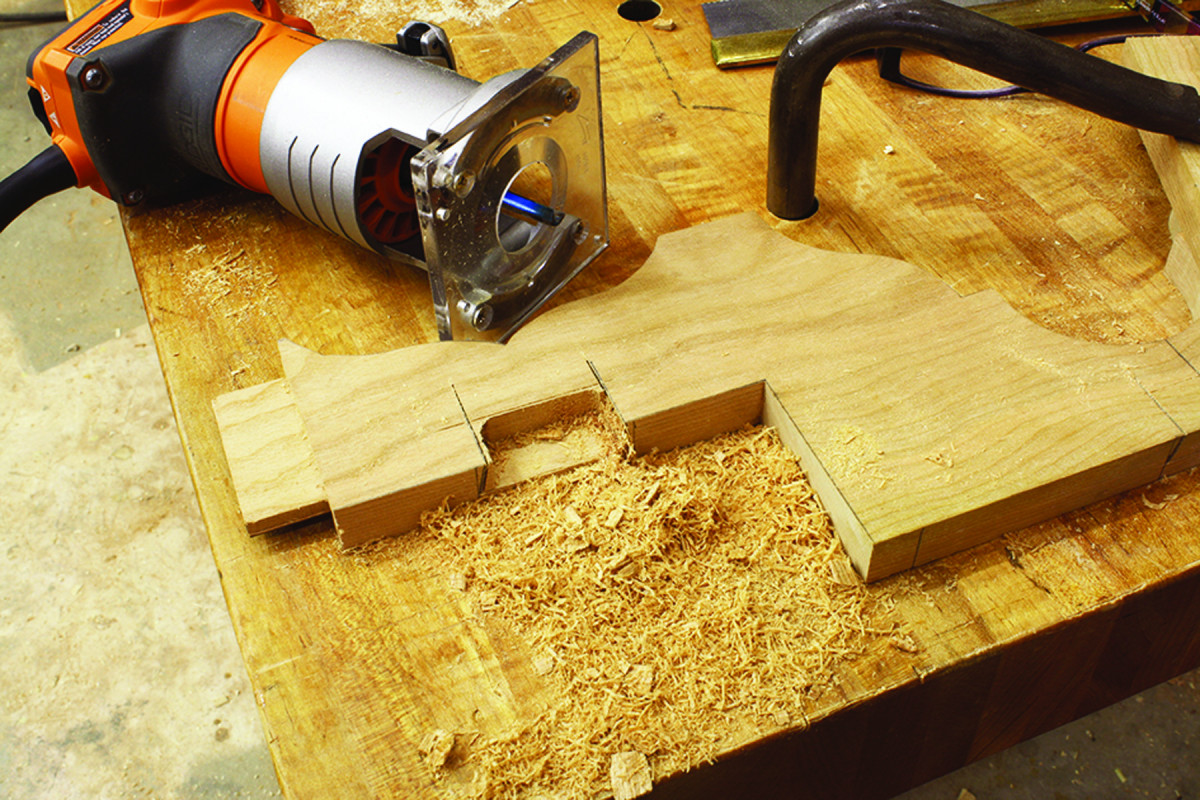
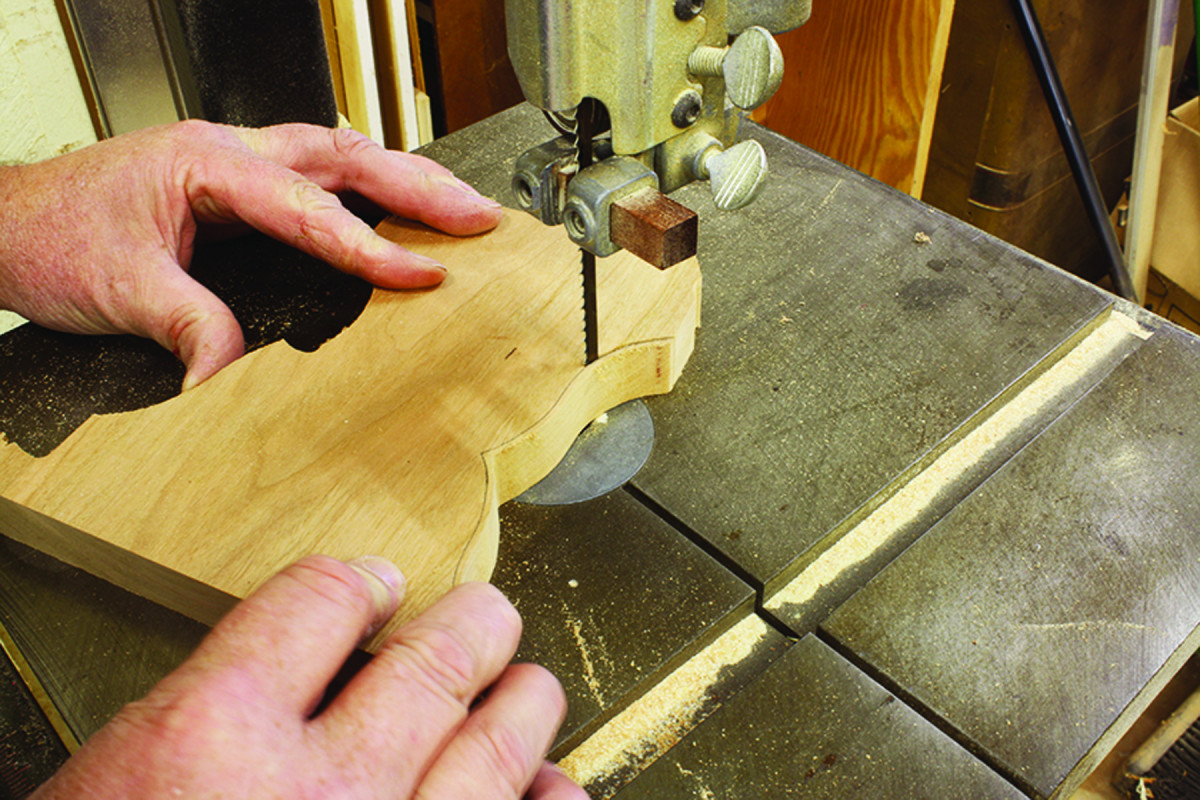
Use the side-panel pattern to lay out the design on the ends. For me, making profile cuts is a router operation. I first cut close to the line (1⁄8” away) using a band saw, then position my pattern and trim the final shape using a pattern bit as shown below. The same steps are followed for the curves on the front.
To form the outside drawer openings on the apron, lay out then saw free the waste at the ends of the apron. Because I can dial in the correct height for the vertical side of the drawer area at my table saw, I use it to make square and straight cuts. The bottom of the opening – because it is not as easily seen – is easier to cut by hand than it is to rig up something at your table saw.
Choose your tool. The depth of cut to create the drawer opening can be reached at the table saw, but this operation could just as easily be completed using a handsaw.
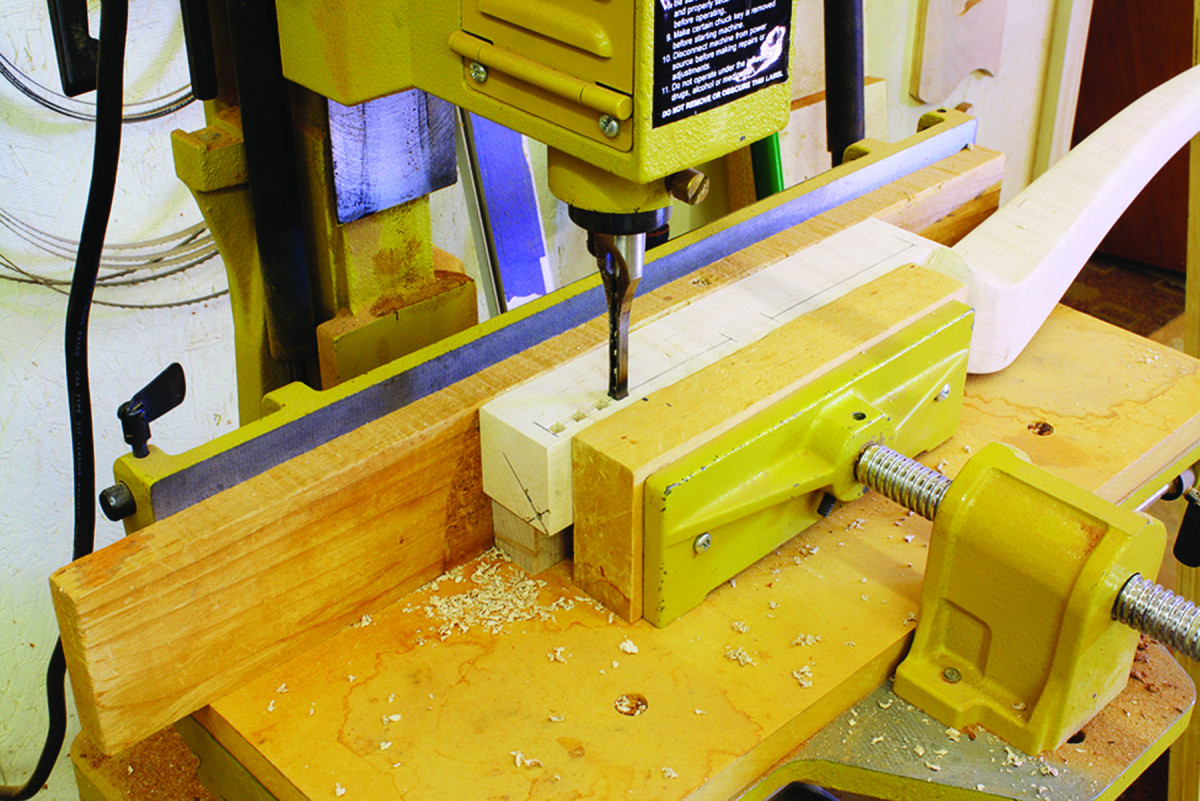
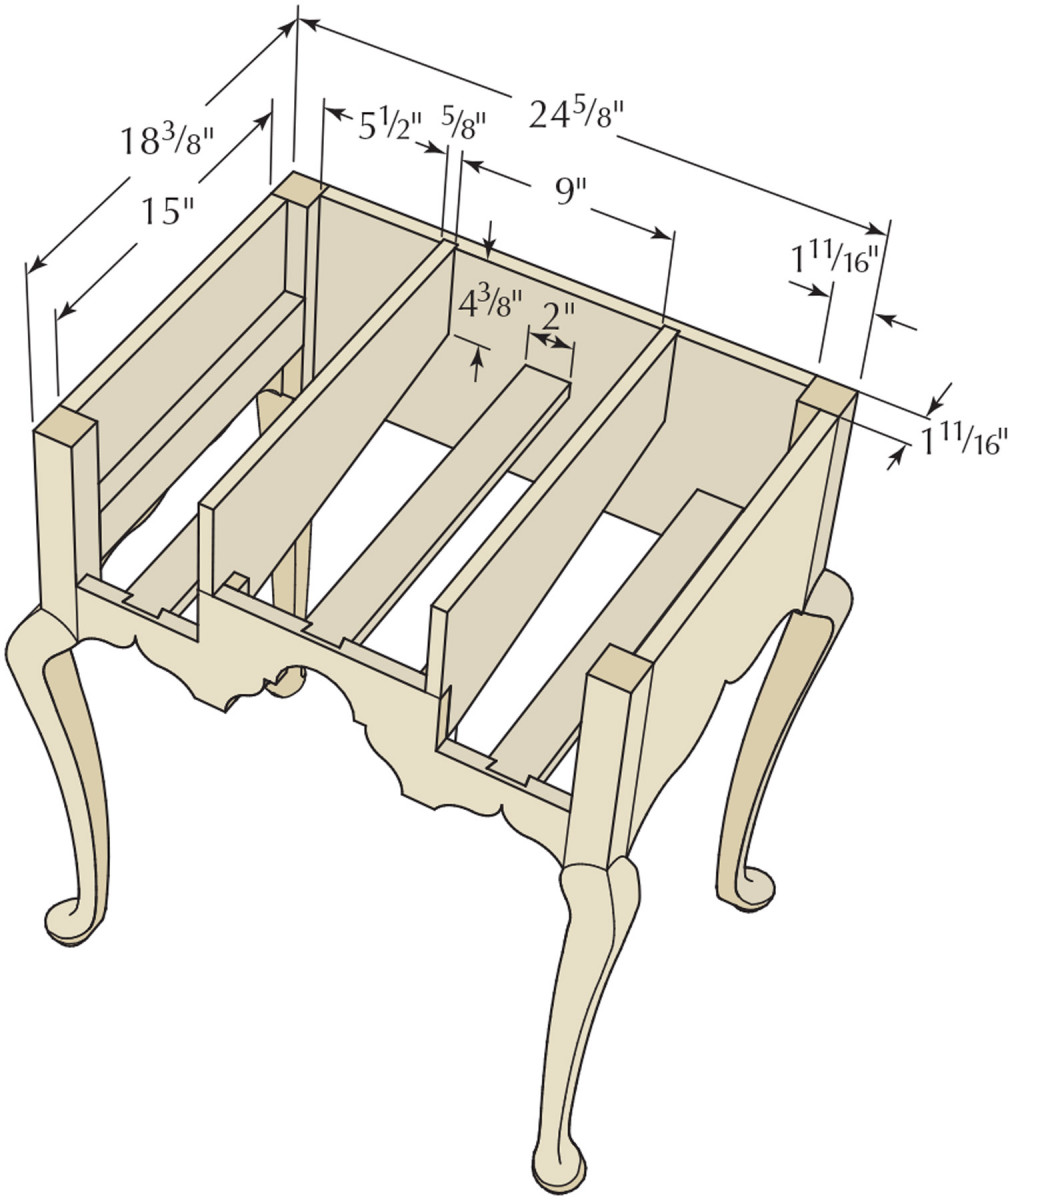
With the cutouts complete on the panels and apron, short dados for the drawer dividers, as well as mortises to catch the drawer runners, are cut into the inside face of the back. For the dados, move in 51⁄2” from the shoulders then lay out the 5⁄8“-wide x 43⁄8“-long x 1⁄4“-deep recess. Again, this is a router operation for which I use a simple platform to guide a pattern router bit with a top-mount bearing.
The mortises are centered in each drawer opening and are positioned to hold the runners – which are set flush with the top edge of the front apron – level from front to back. I chose to work with a 3⁄16” shoulder around my tenon to provide a clean look, so I have a 3⁄8“-wide x 11⁄2“-long mortise. If you want, make your mortise any size up to the exact size of the runner. I used a plunge-router setup to hog out the waste, but this work could just as easily be done with a mortise chisel.
A Simplistic Interior
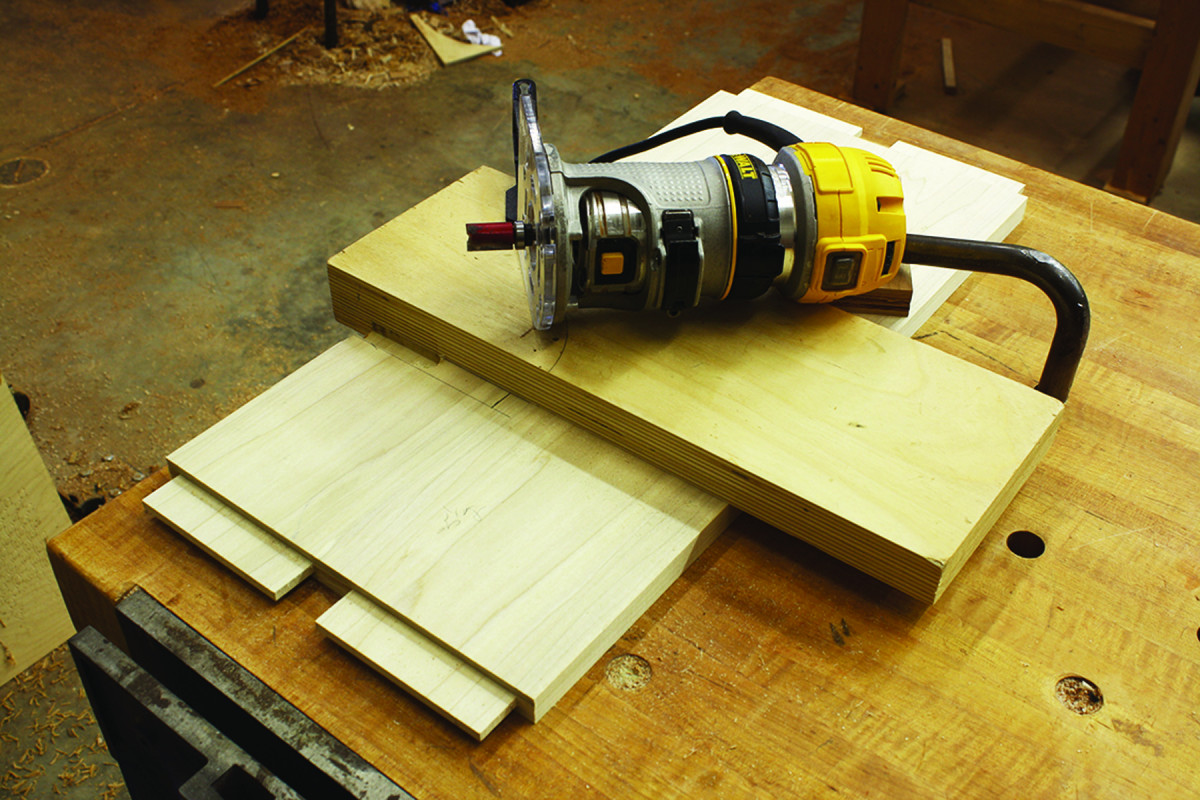
Square-platform jig. I find this setup to be one of the most repeated operation in my shop. Here I’m using a 5⁄8″ pattern bit.
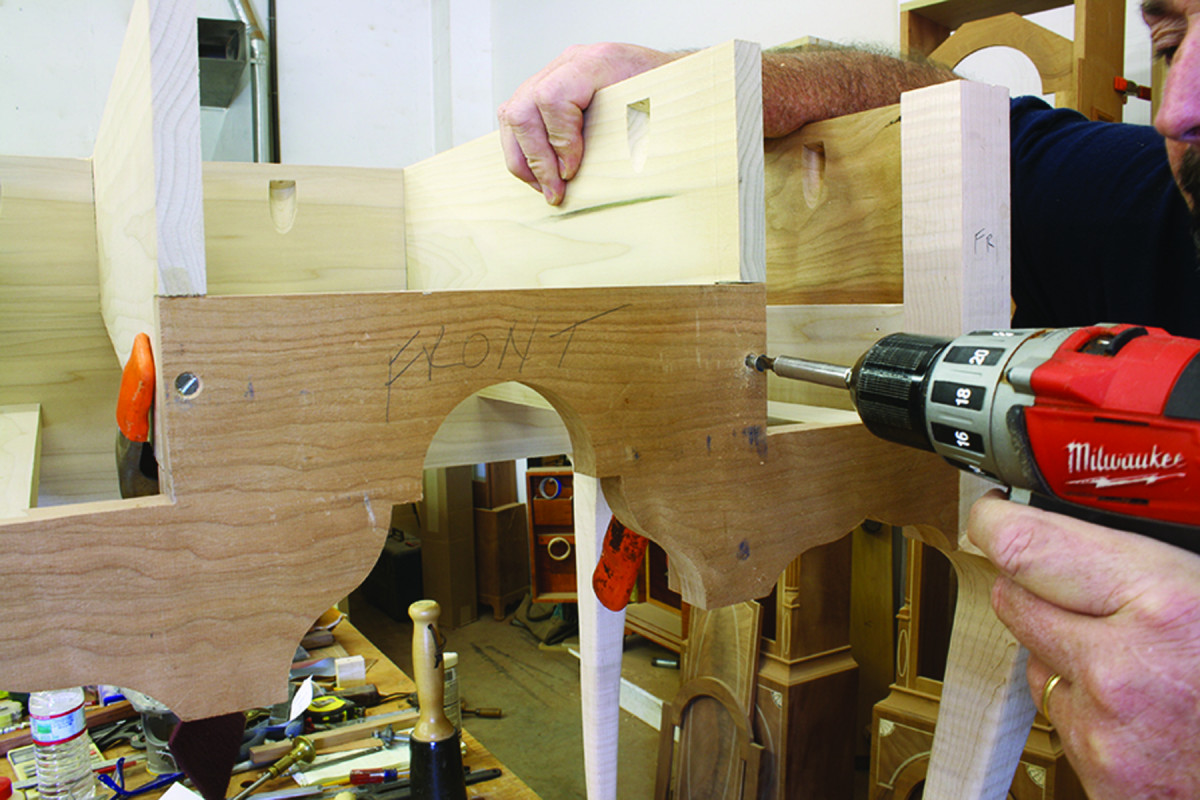
One of the more interesting attributes of this lowboy is the shape of the drawer dividers. The pieces are 43⁄8” at one end (to fit into the dados cut in the back) and 71⁄8” at the front end. The bottom edge of the piece is cut at an angle. Did the maker of the lowboy get the two dividers out of a single wide board? Could it have been that he was saving time making the rear dado shorter in length? Regardless of the intent, the interior is quick to build.
Mill the dividers to size and thickness, then pare the bottom edge flat at the rear so it makes solid contact with the dado. At the front end, measure down from the top edge the same 43⁄8“. Cut a notch equal to the thickness of the apron from that line down. The notch sits on the front apron and is flush with its face while the cutout portion is snug to the back. Dry-assemble the base to check the divider fit and make any needed adjustments. This is a good time to double-check the lengths of your runners. Measure from the inside of your mortises in the case back to a 1⁄2” beyond the back face of the apron.
Accurate layout. On the back, each of the mortises are centered in the drawer openings and are set flush with the front apron. If these aren’t correct, drawer problems are sure to arise.
Pull the front apron from the assembly to lay out and cut the dovetail sockets for the drawer runners. Each of the three sockets (one centrally located for each drawer opening to match the mortises cut in the case back) are a single dovetail socket that is set 1⁄2” in from the back face, 3⁄4” deep and is as wide as the runner. Lay out then saw the edges to define the socket.
Piggyback. Drawer dividers ride on the front apron and sit in dados at the back. That’s easy work.
Because the work is across the grain, it’s easy to chop the waste using hand tools – it’s also easy to remove more than is necessary, so I use a trim router to do the job with the apron face down on my bench. Using a freehand cut, the process is simple and quick, and you’re left with a dead-flat bottom. Fine-tune the sockets with a chisel.
Mill your runners to size, then cut the tenons on the back end. On the runners, scribe baselines for the dovetails then show them to the sockets. Transfer the tail shape to the runners. Because it’s a single large dovetail, cut away the half-pin waste then check the fit. You want a snug fit that’s not too tight.
Exacting fit. Router waste removal produces a dead-flat socket front for the runner dovetail. A tight fit keeps the joint clean.
Cut and fit the drawer guides. Hold the bottom edge of the guides even or slightly below the bottom of the drawer opening. Also, cut and fit the two divider supports. These are notched to wrap around the dividers and fit flush with the top and bottom of the apron – make sure the supports hold the dividers flush with the drawer opening, too. The guides and supports are attached with glue and brads.
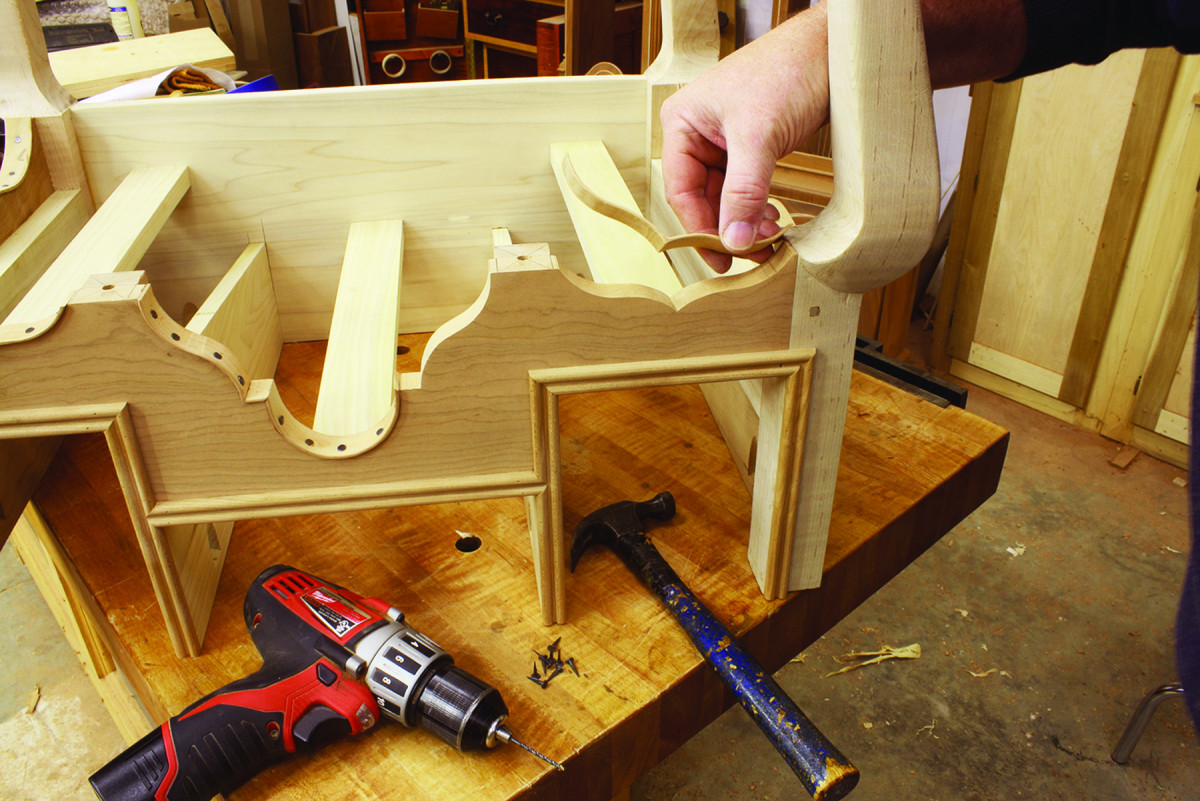
Three Steps to Assembly
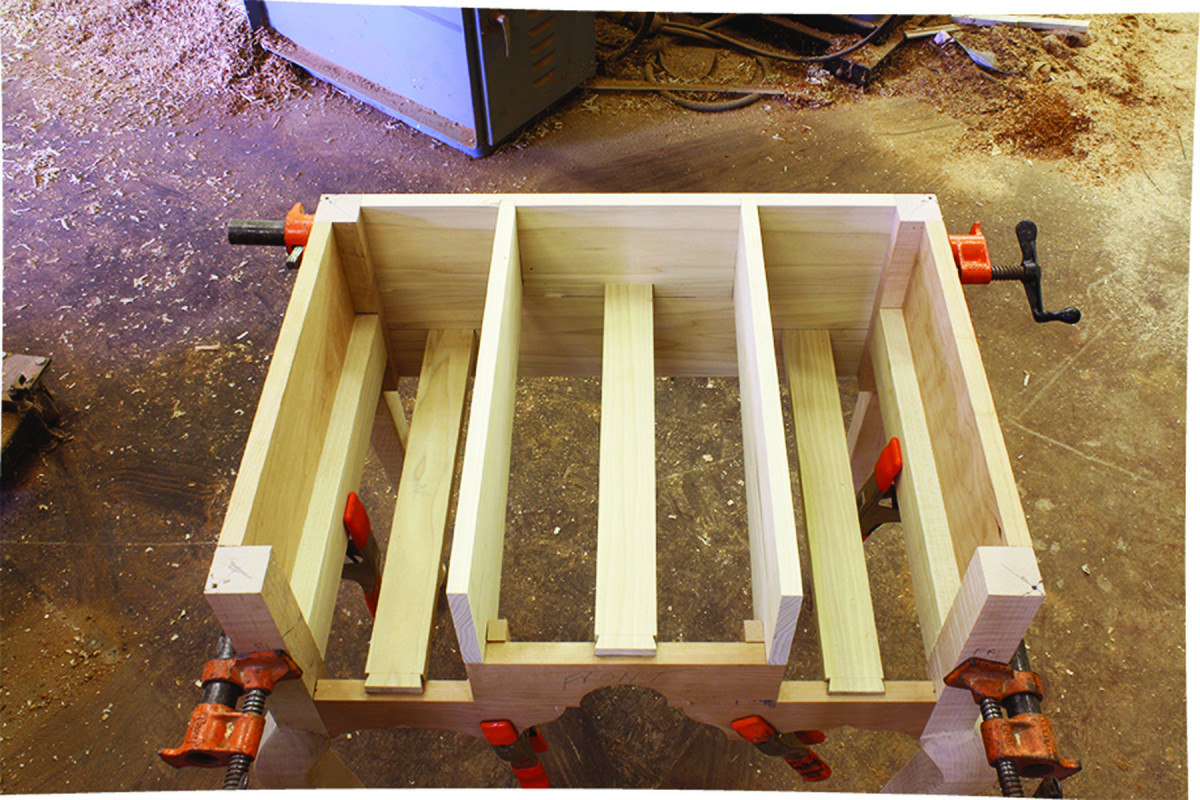
All aboard. A look at the interior parts of the lowboy shows where the seven parts fit.
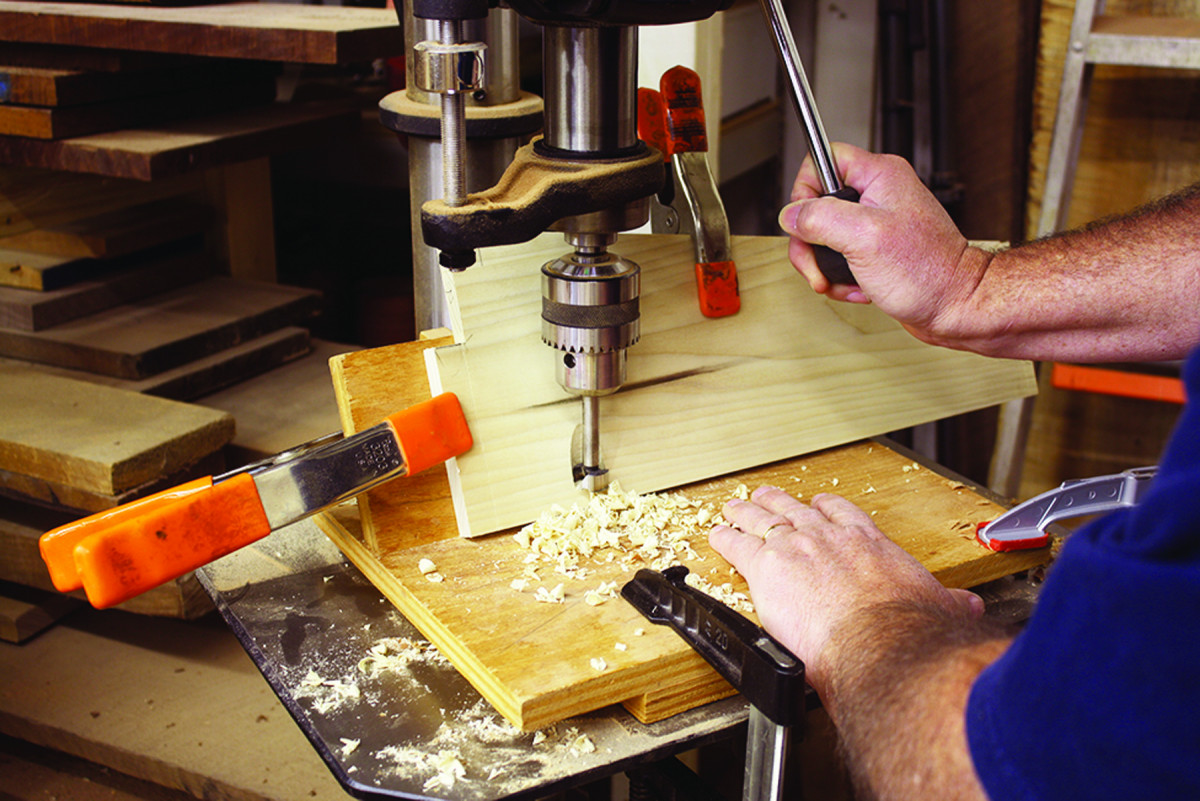
Before any final assembly of the case, there are a few operations left to complete. I elected to attach the top using pocket screws, even though the original was pegged through its top. Placement of the pockets – three along the back, two spaced evenly on the end panels and one in each of the dividers – is important. Make sure you cut the pockets so they are accessible when you’re ready to attach the top. (Don’t align the pockets with the runners.)
I use a jig to drill the pockets at my drill press. The piece is held at a 221⁄2° angle as a 3⁄4“-diameter Forstner bit cuts the pocket. Stop the cut about 5⁄8” from the bottom edge of your panel and use #8 x 11⁄4” screws to join the pieces. (Make a test cut in a scrap, complete the through-hole using a 3⁄16” drill bit and check the needed screw size before beginning the operation; depth of cut adjustments change the screw length required.) When ready, drill the nine pockets.
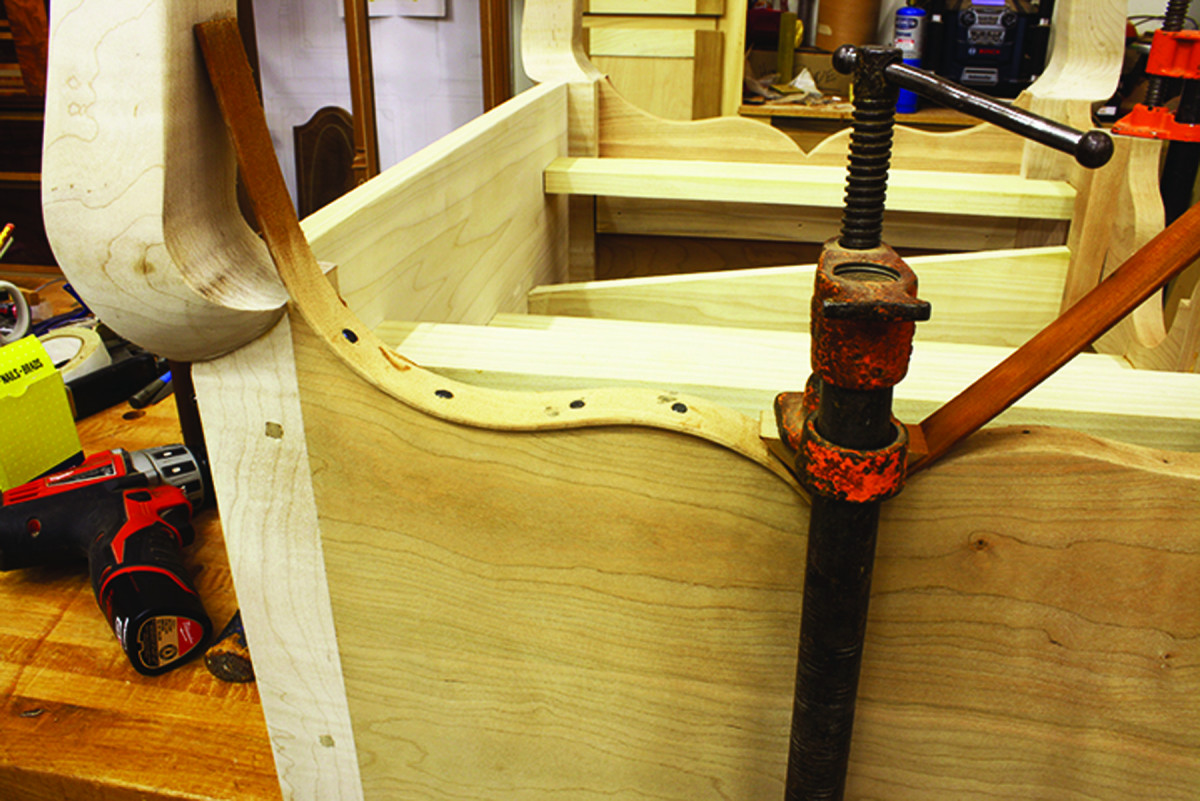
While you can drill the apron assembly for the drop finials later, this is a good time to do so because it may save you from splitting the apron during glue-up. Find and mark the centers of the bottom edge of the apron and supports. On that mark, drill a 1⁄4” hole that’s approximately 11⁄4” deep. Your holes need to be parallel in both directions for the finials to sit right.
Laid back. The key to good pocket-screw holes using a press is to tilt the workpiece at 221⁄2° as you drill.
Add glue to the mortise and tenons for the end panels, slip the joints together, align the top edges of the panels and legs then secure a couple of clamps and let the glue dry.
It’s possible to exert too much force on the mortise and tenons as you assemble the base, so I use the finial holes and a spacer to support the apron – I don’t want to crack or split it as I work. Insert two dowels into the holes, then bridge the gap with a scrap drilled to slip over the dowels as shown on page 31.
With the glue dry on the end panels, repeat the steps to assemble the apron and back panel. Align the top edges, add a few clamps as needed then set the base aside as the glue dries.
Decorative Details
Simple jig. Holes for the drop finials have to be true; one easy technique is to use a drill press to drill a scrap to use as a guide for your power drill. Hold the scrap flat and tight to the apron as you work.
To wrap up the base assembly, slip the drawer dividers into position. Each divider is toenailed at the rear and glued and pinned to the supports; I added a couple of screws through the apron for extra support – the screws are covered by the applied double-arch moulding.
The double-arch moulding surrounds the three drawer openings. There are numerous methods to make this moulding, including a beading plane with a plow plane to groove out the middle, or scratching the profile into the edge of your stock. But for me, this is an operation for the router table. One setup, two passes and it’s done.
Install a 1⁄4” beading bit in your router table, set the profile flush with the tabletop then pass your stock over the bit. Flip the stock end for end and make a second pass. The router bit removes the center as you make the cuts. Rip the moulded strips from the motherboard until you have the necessary lengths.
Stress relief. Use the finial holes to hold a temporary support in place as you clamp the lowboy front; this keeps the apron from cracking under stress.
Miters at the corners of the openings are easy. Where it gets tricky is where the moulding at the bottom edge of the center drawer intersects with the side moulding on the two outside drawer openings. With the ends of the center piece mitered to form a point, I position the piece then mark the two outer edges onto the side mouldings.
On the back face of those pieces, use a combination square to draw in the 45° lines – they intersect at the middle of the moulding. Then saw close to the lines before paring away the balance until you get a tight fit. When the parts are sized, trimmed and ready to install, apply a thin bead of glue, position the mouldings then tack them in place with 23-gauge pins or hammer in a couple of headless brads.
Top it Off
Hidden stability. A couple of well-placed screws – that will be covered by double-arch mouldings – hold the dividers tight to the apron.
There is nothing fancy about the lowboy top. Mill, rip and crosscut the slab to size, then rout a profile along all four edges. I used a 1⁄2” roundover bit then knocked off the bottom edge using sandpaper.
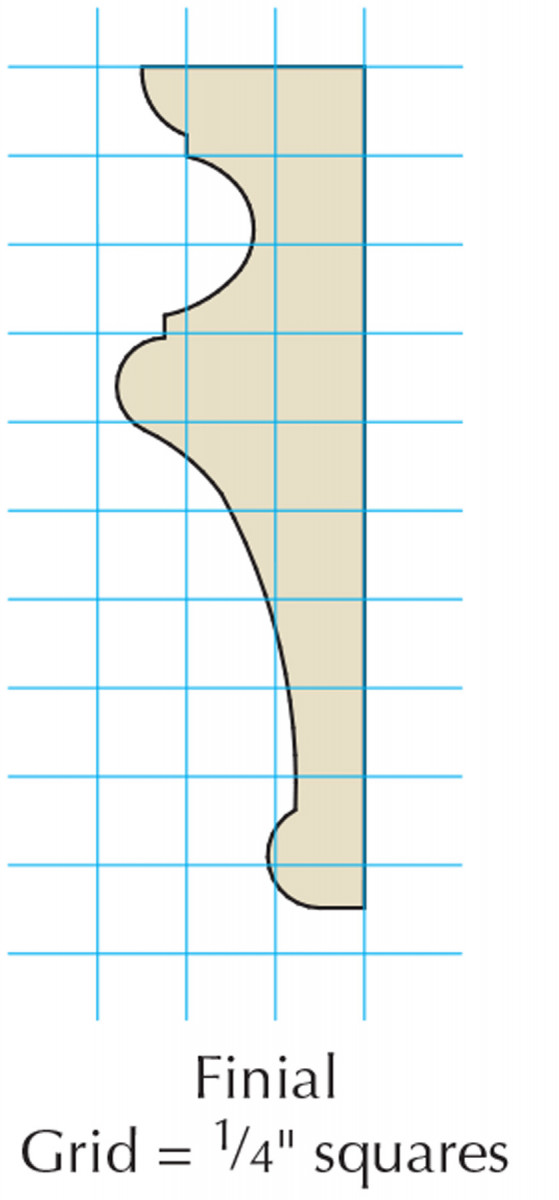
The finials use basic turning techniques. It’s best to turn the two from a single piece of stock (see the pattern up by the cut lists); that makes it easier to create matching shapes. If you turn the tenon as an integral part of the finial (I prefer to insert a dowel after I have the shapes turned), make sure to get the diameter correct. The finials fit to the apron with a friction fit – no glue needed.

Slick trick. Use a scrap cut at a 45° angle to help guide the chisel as you pare the pointed cutout for the intersection of the double-arch moulding.
Before installing the finials, you need to make and shape the plates through which the finial tenons fit. The plates are milled to size and thickness then the edges are rounded over. I use a 1⁄4” roundover bit in my router table, or you could use hand tools to do the job.
Work on the case is now essentially complete, but to take the piece up a notch and to produce a lowboy closer to the original, cock beading can be added. If you plan to take a stab at this technique, see below.
Cock Beading Done Three Ways
Old school. One technique used to form-bend the cock beading is to apply high heat to a soaked piece of moulding. The act of steaming the piece allows it to bend into shape.
When the cock beading was applied to the original lowboy, I suspect that the pieces were steamed then bent into position. If you had seen the number of tacks used to secure the original beading, I’m sure you would think the steamer wasn’t working adequately at the time. There are many tacks in use.
While we have the steam-bending method today, we also have a couple other options with which to work. One such method is to soak the 3⁄32” thick pieces, then apply heat – not hair-dryer heat, but paint-stripping-gun heat – until the wood succumbs and bends to the desired shape. I use this approach to bend and install the cock beading on the end panels. It works fine, but patience is a must during the heating process; I sometimes start bending before the pieces are ready, so I break many as I work. A word of caution with this method: If you expect to need four pieces of beading, make eight.
Work using a heat gun begins with hide glue on the panel edges (as does the steam-bending method). As you “melt” the board and it begins to bend, drill small holes through the cock beading to secure things with 9⁄16“-long tacks. Don’t worry about spacing; place the tacks where they’re needed.
Works great. I found heat bending was excellent for the larger radius bends, and for the round center section. Do use a form.
While I was set up for this process, I used a rounded form – a negative of the central arch in the apron – to bend the circular piece of cock beading to fit that opening. I held the piece to the form until I was ready to install it, which was after most of the other cock beading was complete.
Synergistic. The correct combination of router bit and bushing produces a perfectly thicknessed piece for cock beading.
Another process is available due to routers in the workshop – it uses the patterns made at the beginning of this project to cut the profile, not bend it. Begin with a pattern on top of a piece of stock that is appropriately sized for thickness; orient the board’s grain to align with the pattern length. Add a couple of clamps to keep things secure, then mark the pattern design onto your material.
Test your skills. Cut close to the line, but don’t touch it; excess material can be sanded away, but nicks mean you have to make another piece.
To set up your router, install in a 1⁄4” spiral-upcut bit, add a 7⁄16” outside-diameter guide bushing and you’re ready to work. The combination of the two router accessories produces a perfectly matched pattern cut that is 3⁄32” away from the pattern itself. Run the cut while keeping the bushing against the pattern; you can make a couple of passes, but the last should be held tight to the pattern.
Remove the clamps then take the extra stock to a band saw and trim as close to the pencil line as you can without hitting the line. After the thin, shaped piece is cut free, move to a spindle sander to fair the surface to your layout line. While your cock beading may not fit like a glove, it will be so close that the beading snuggles tight when glued and tacked. (Because the tacks are not holding a bend in place, you can arrange the tacks in a more uniform and clean pattern.)
Look ma, no bends. It’s possible to produce shaped cock beading that perfectly fits the cutout. The secret is pattern work.
I used this method to make the two front cyma curves that flank the center opening, and the two half-cymas that fit around the arched opening. This method may be unconventional, but it works. Sure, there are places where the grain of the router-cut cock beading is not as strong. But after the pieces are glued and tacked in place (drill pilot holes, by the way), I see little chance of any problems. In fact, I have a 35-year-old lowboy with similarly made cock beading that is still 100 percent intact.
— GDH
Drawers of Tapered Sides
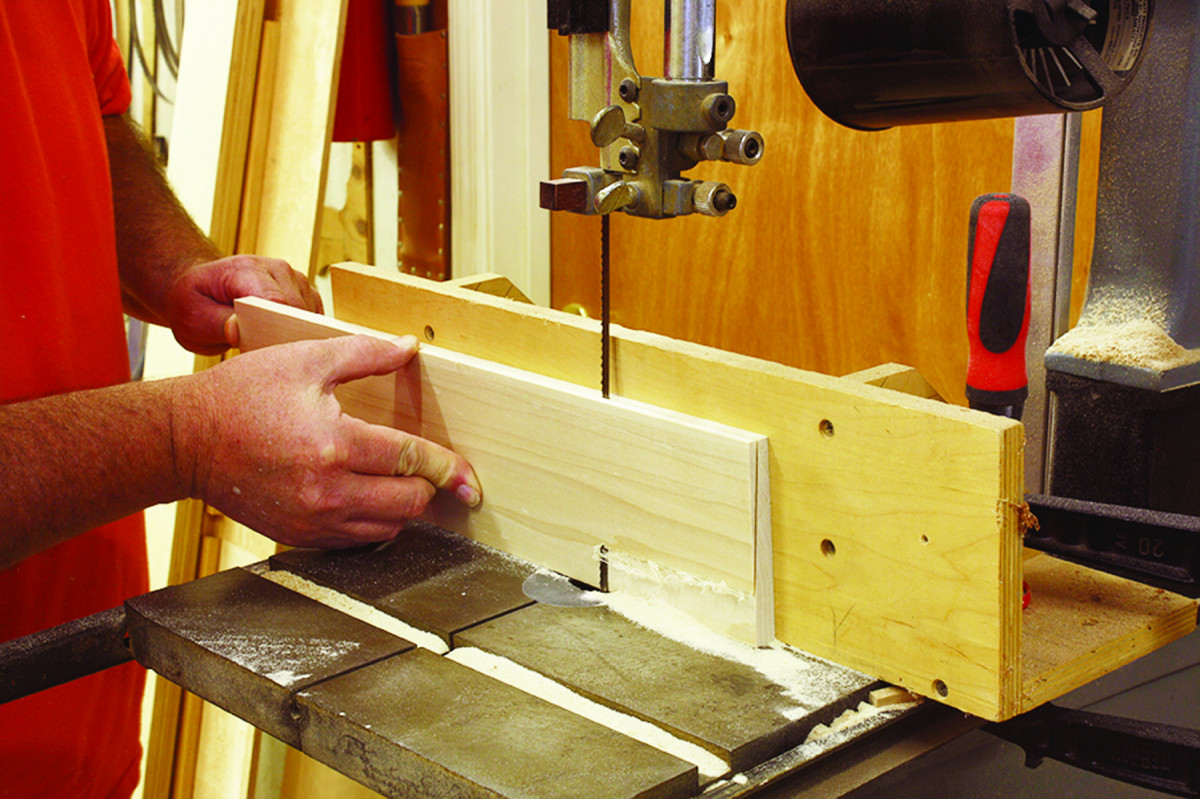
Tapered parts. The band saw is the best way to taper drawer parts. Make sure you leave material to plane the surfaces smooth and still hit the appropriate thicknesses.
Making the drawers begins with careful wood selection for the drawer fronts. In most cases, and especially when drawer banks are divided into two or three separate fronts, I cut the pieces from a single piece of stock; it’s always best to keep the grain flowing across the fronts.
Drawer construction is another telling sign of early Queen Anne period work. Drawer sides and backs are the same width, and a bottom is applied to complete the drawer box. As a result, the sides and back are a 1⁄4” less in width than the drawer fronts, which are rabbeted to accept the drawer bottoms.
Cut and fit the drawer fronts to the openings. Make sure they can easily slide into the openings – I look for about 1⁄16” gap per edge. When the fronts are properly sized, cut the rabbet along the bottom edge then determine the sizes of other drawer parts from the fronts.
The drawers in the antique lowboy featured tapered sides and backs. Building with tapered parts ups your game as a woodworker, but the drawers would work just as well if they were built without tapers.
Mill the drawer sides and backs to thickness, width and length then if you want to match the original, slice the tapers at a band saw. Because there are two different widths of drawer parts, there are two setups at your band saw.
Tip the band saw table so the blade leaves a bit more than 1⁄4” at the top and exits the workpiece about 3⁄8” up from the bottom – after you plane the surface you’ll still have a full 1⁄2” of thickness at the bottom edge, yet the piece tapers evenly along its width.
Mark off your pins and tails before or after scribing a line. Make sure you’re layout work is from the outside, or non-tapered face. Complete the dovetail joints, then mill and attach the 1⁄4“-thick drawer bottoms using glue at the front rabbet and 18-gauge brads to secure the entire bottom.
Finish & Hardware
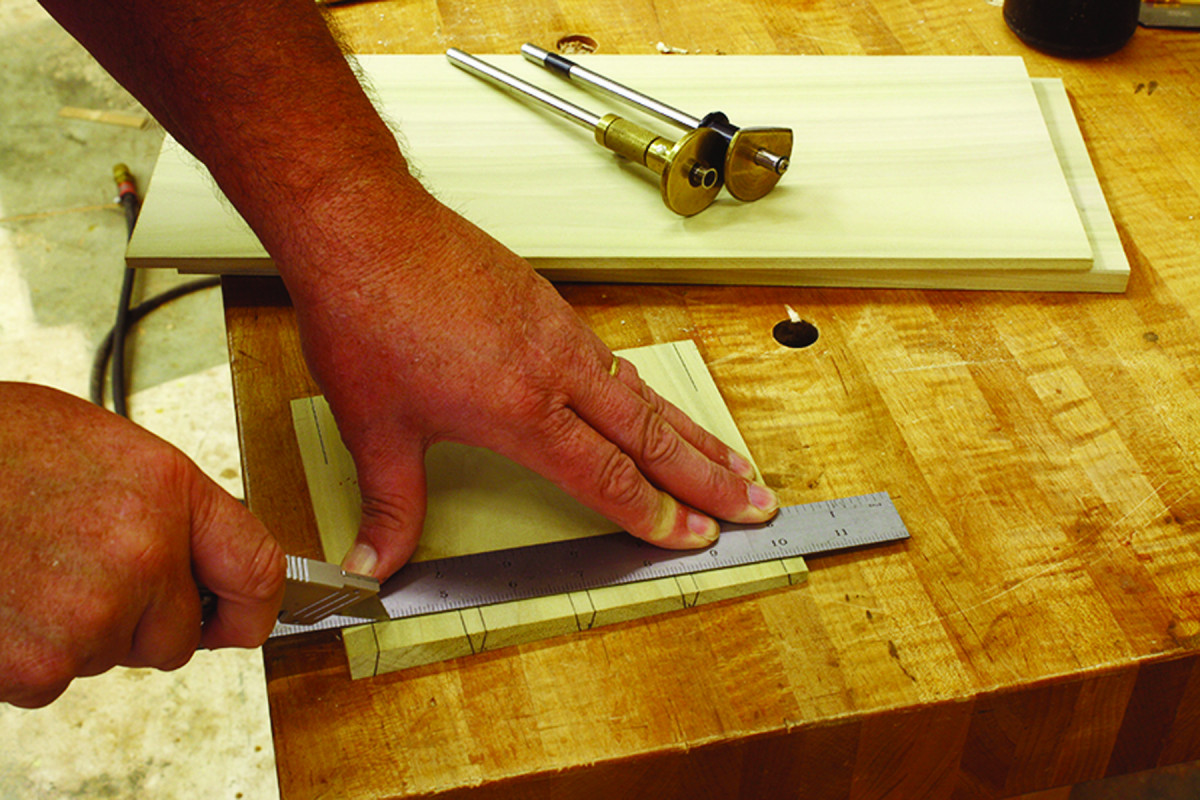
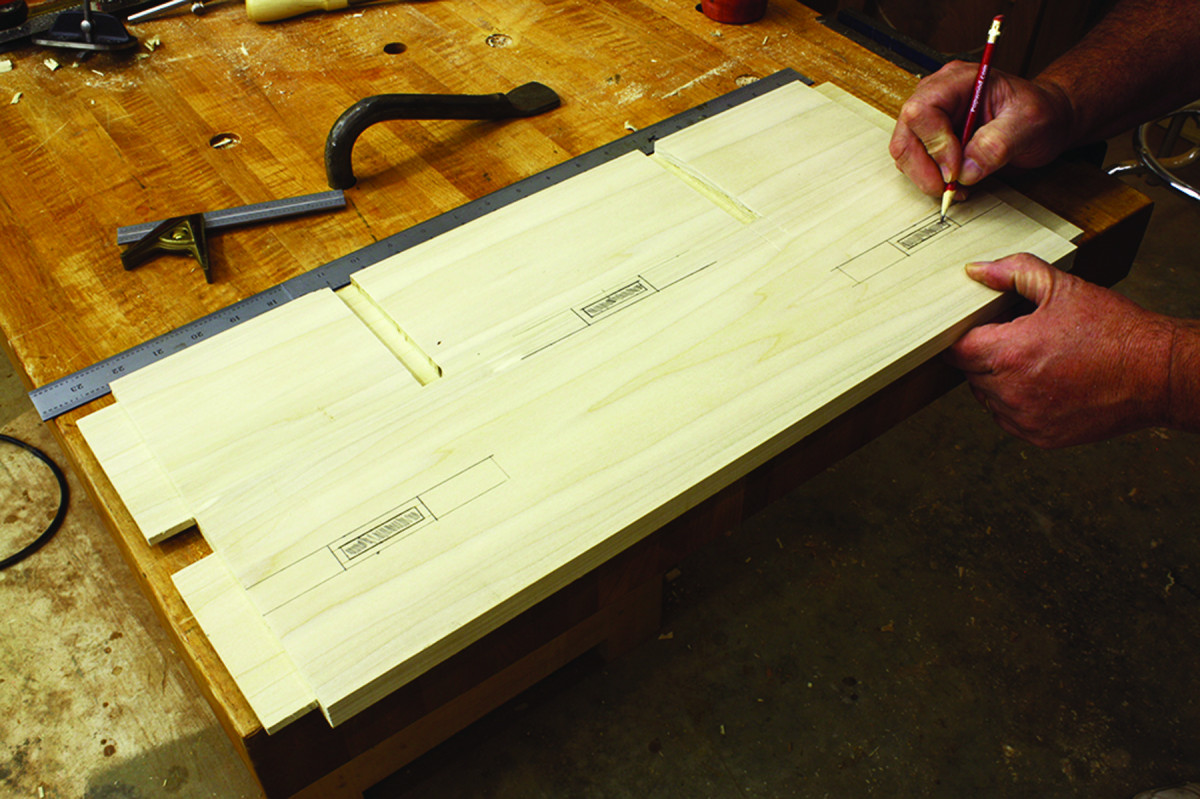
Forget a marking gauge. An easy technique to lay out the top and bottom thicknesses is to strike a line with a sharp knife registered against a straightedge.
Because there are two different primary woods used on this project (tiger maple and cherry), some finishes are not an option – a clear finish would exacerbate the differences (of course, you may choose to highlight those differences if you like). To better blend the two woods, I applied one coat of aniline dye (Moser’s Early American Cherry), then a few coats of shellac. To dull the final coat of shellac, I applied a layer of dull-rubbed effect lacquer.
The three pulls are of an early design, too. The bails of the pulls are attached to the fronts using cotter pins, which are bent and set on the inside face of the drawer fronts. Of course, other hardware options could be used.
With the finish complete and the hardware installed, I attached the top through the nine screw pockets. With the lowboy on the bench with its bottom up, the seven pieces that make up the inside were easy to see.
With a bit of decoration on the outside, you have a great lowboy to display in the house. That’s way better than standing on a rack in a museum’s back room.
Video: Watch the author lay out and cut a cabriole leg using a table saw and band saw.
SketchUp Model: Download a free 3D model of this project
Here are some supplies and tools we find essential in our everyday work around the shop. We may receive a commission from sales referred by our links; however, we have carefully selected these products for their usefulness and quality.


