


We may receive a commission when you use our affiliate links. However, this does not impact our recommendations.

Plastic storage tubs make instant drawers for organizing shop supplies.
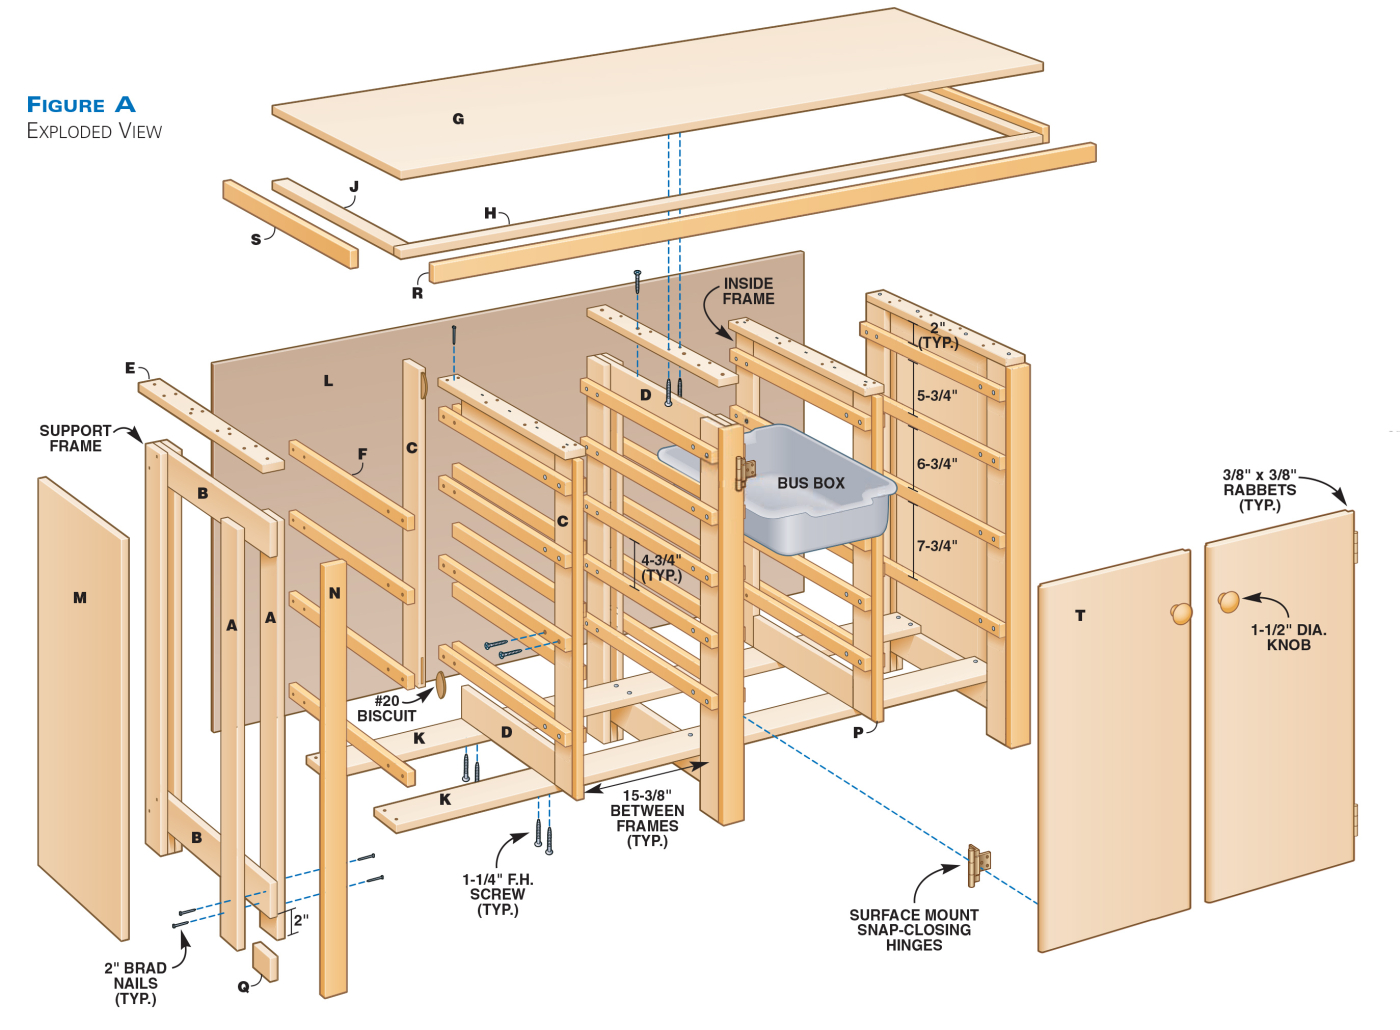
When I worked in a restaurant as a teenager, I hauled dirty dishes in plastic bus boxes. Using them to organize my shop is much more pleasant. Bus boxes are light in weight and strong enough to hold all kinds of shop essentials, including most of my portable power tools. This 6-ft.-long cabinet holds up to twenty 5 in. by 15 in. by 20 in. bus boxes. I built it in a weekend, using an unusual construction method: Instead of using solid pieces of plywood for all the elements, I cut the plywood into narrow strips and glued them back together into structural frames.
This method requires less plywood, because so little is wasted. It’s also a great way to use scrap plywood, because most of the pieces are relatively short and narrow. The plywood doesn’t have to be perfectly flat, either, for the same reason.
This method is also versatile. For example, it’s easy to change the cabinet’s height, the number of storage compartments or the spacing of the bus boxes. Vary the size of the frames to create built-in closets and bookcases. For a bedroom, upgrade to wooden drawers and replace the runners with full-extension hardware.
This cabinet is made from two 4×8 sheets of 3/4 in. plywood (I used exterior grade fir). You’ll also need a piece of 1/4 in. plywood or hardboard for the back, an 8 ft. 1×10 to face all the plywood edges and a 12 ft. 1×12 for the bus box supports.
Additional Reading: See all of our shop project articles.
In Our Store: Simple Storage 9 Projects Download
Bus Box Cabinet Cutlist and Diagrams

Rip The Plywood Parts
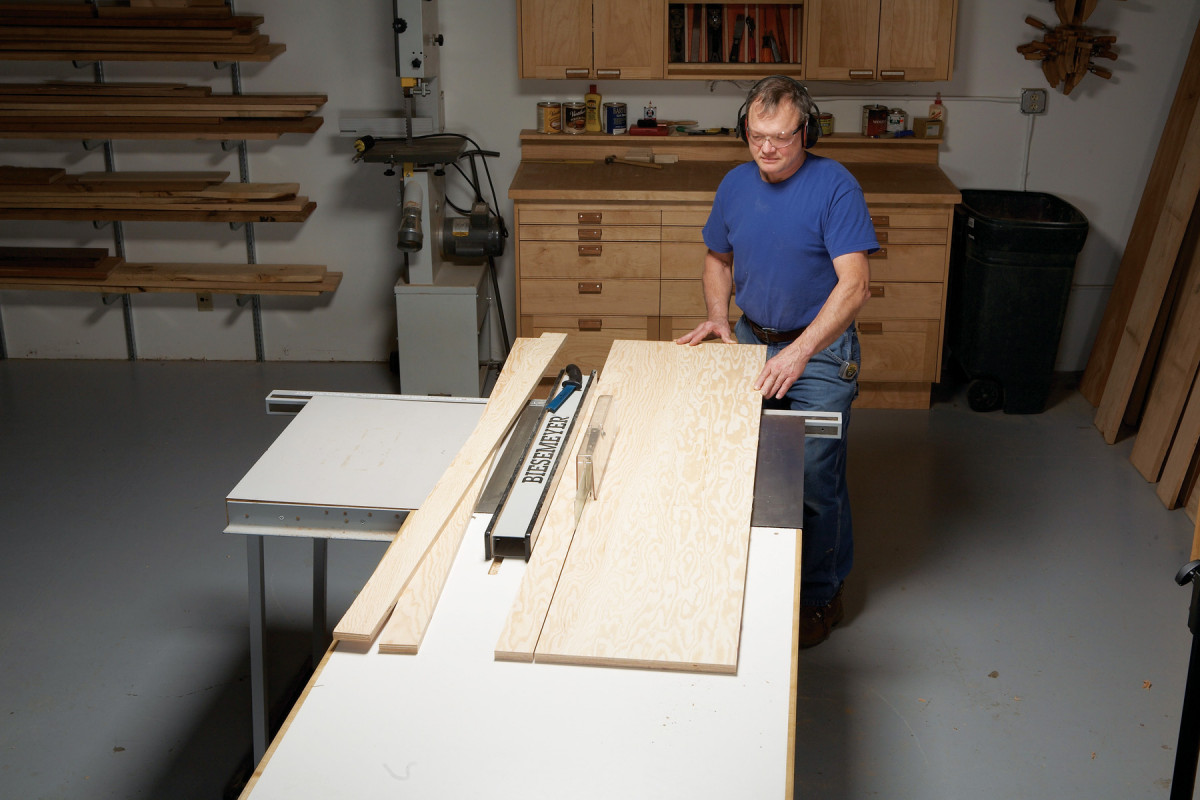
1. This storage cabinet is primarily made from plywood, even the frames that support the bus boxes. The first step is to cut the plywood into narrow strips to make stiles and rails for the frames.
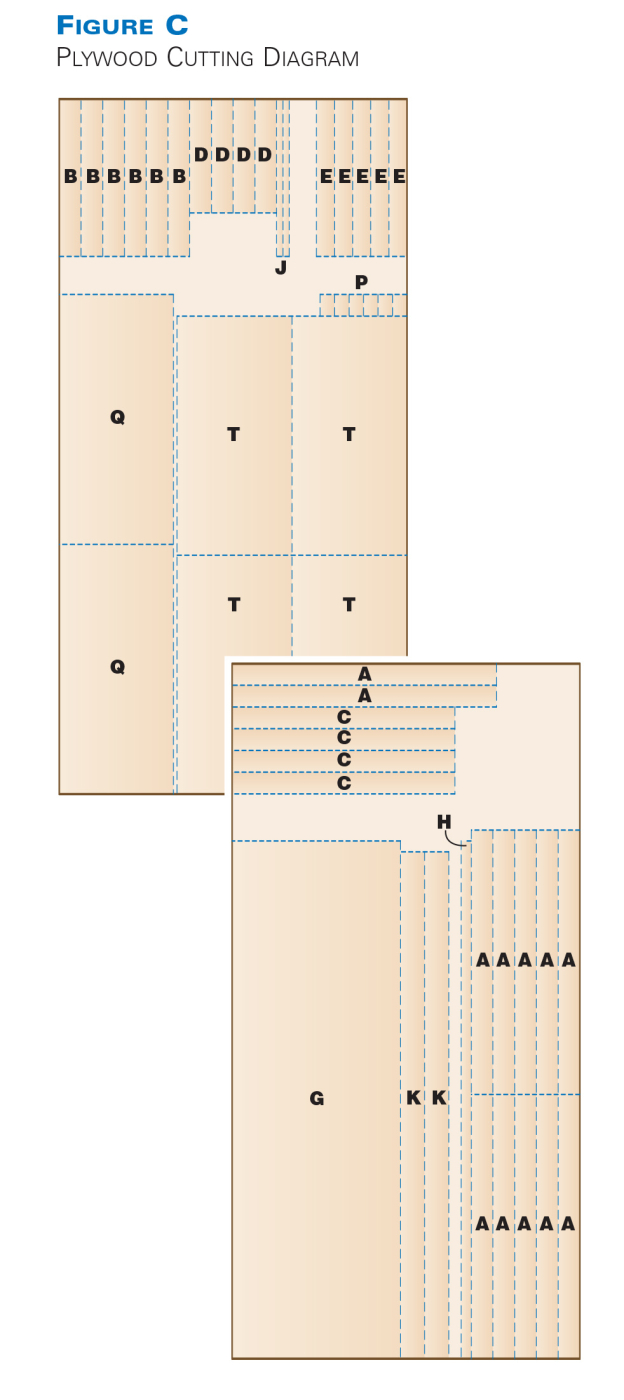
Lay out all the pieces on the plywood sheets (Fig. C and Photo 1).
Cut the stiles, rails and cleats for the structural frames to final size (Parts A-E, Fig. A). Crosscut both plywood sheets into smaller, more manageable pieces, then rip. Make accurate rip cuts; when you add the saw kerfs, some pieces contain very little waste.
Build The Frames
2. Stacked frames with rails sandwiched between the stiles go on the ends of the cabinet and in the middle. They go together quickly, thanks to an assembly jig.
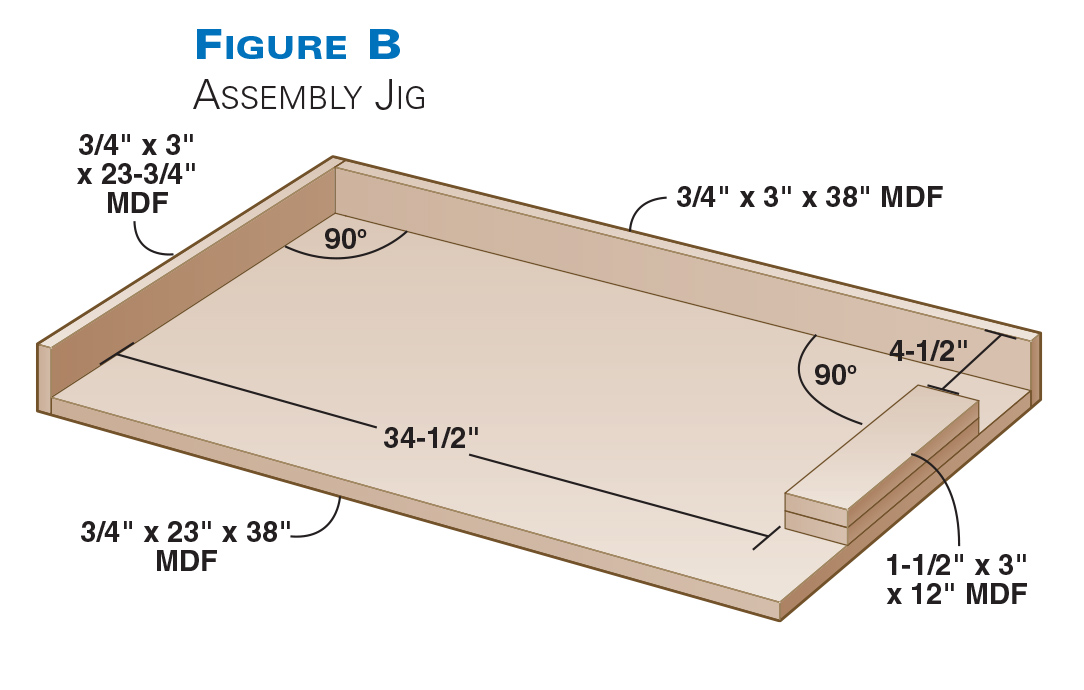
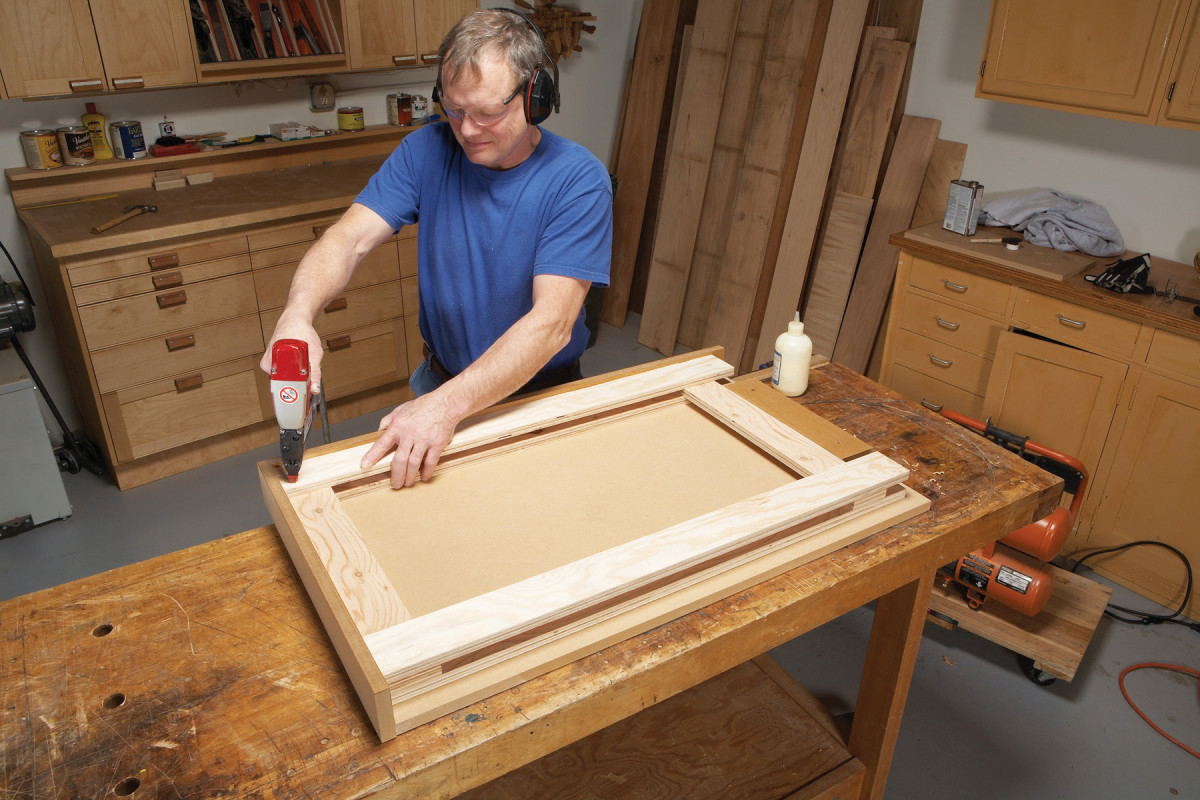
This cabinet includes three support frames that extend to the floor and two inside frames. Build the support frames by layering four stiles and two rails (Photo 2). Use a jig to hold the parts square during assembly (Fig. B). Glue and nail the frame’s top inside corner while holding both stiles against the long fence and the rail against the short fence. Secure the bottom inside joint while holding the rail against both the fence and the rail alignment block. Make sure the stiles and rails are flush on the outside when you glue and nail the outside joints. Use 2 in. nails. After nailing all the joints on one side, flip over the assembly and nail the joints from the opposite side. Wipe off squeezed out glue.
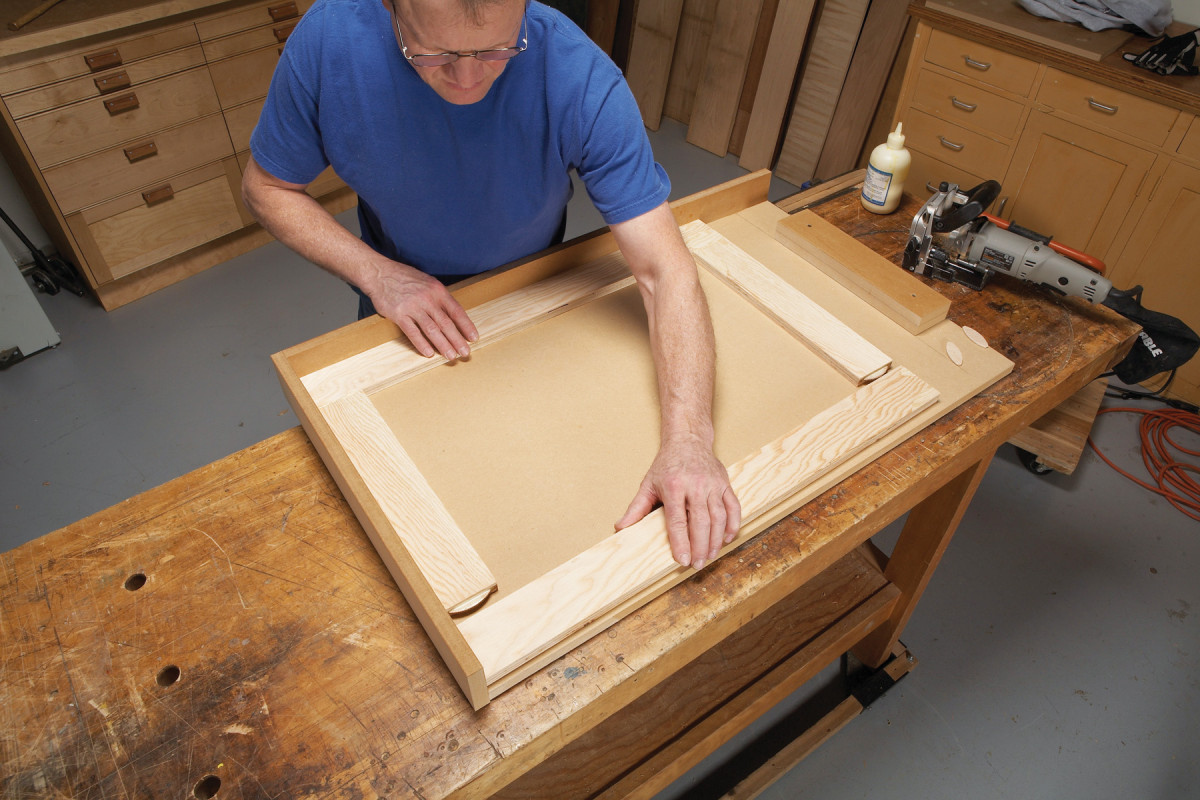
3. The two inside frames are biscuited. To keep the frames square, pull the pieces together while holding the stiles and top rail against the assembly jig’s fences.
Assemble the inside frames with biscuits and glue (Photo 3). Just pull the joints together and let the frame sit; clamp pressure may distort the frame.
Make Cleats and Box Supports
Drill and counterbore the cleats. All of the cleats are glued and nailed to the top of the frames, but the support frame cleats are also screwed to the styles for extra strength.
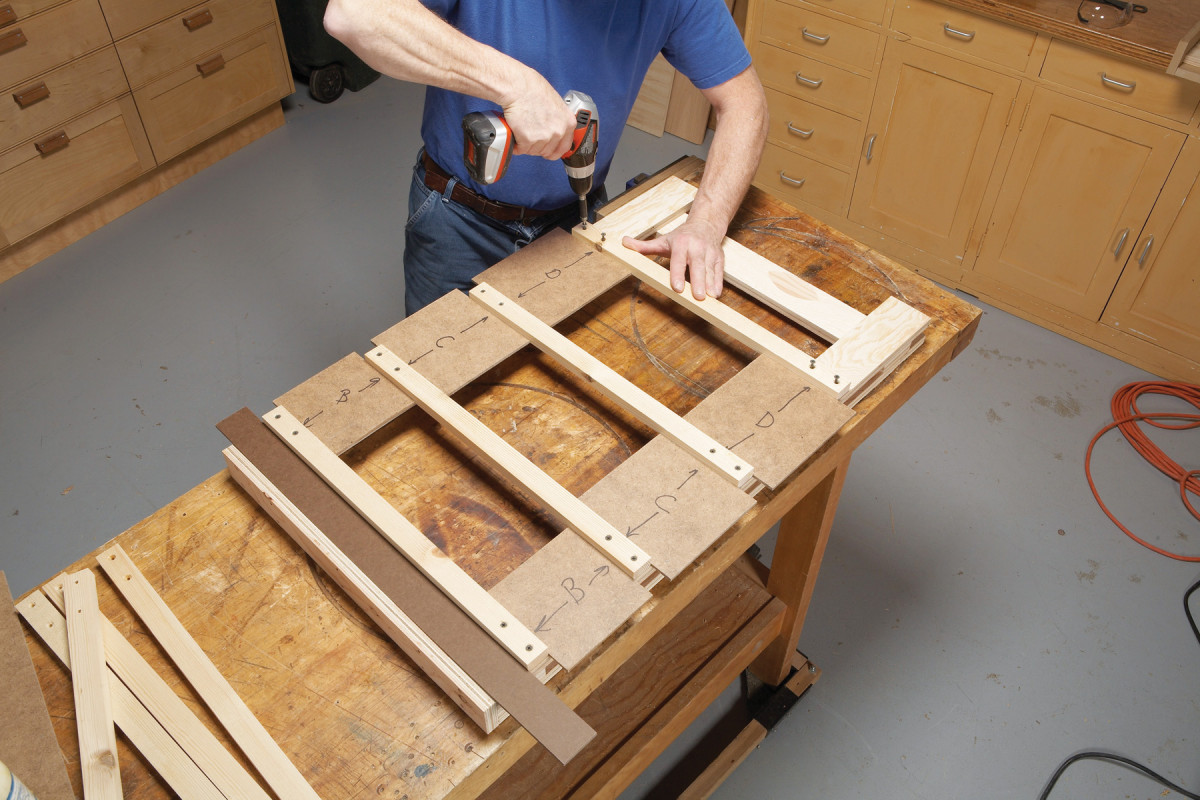
4. Attach a cleat on the top of each frame. Then attach the bus box supports. Position all the top supports 2 in. from the cleat. The rest of the supports can go wherever you want, depending on the height of the items you’ll be storing.
Rip the bus box supports (F) slightly oversized, joint one edge, plane (or rip) them all to the same width and then cut them all to the same length. Assembling the cabinet is easier when the supports are interchangeable: Use a drill press with a fence and stop blocks to drill the counterbored screw holes, so they’re centered and identically located on both ends of each support.
Fasten the supports to the frames, using spacers for easy and accurate positioning (Photo 4). To graduate four bus boxes, use 5-3/4 in., 6-3/4 in. and 7-3/4 in. spacers. To space five boxes evenly, use a 4- 3/4 in. spacer. Always use a 2 in. spacer to position the top cleat.
Fasten The Frames To The Top
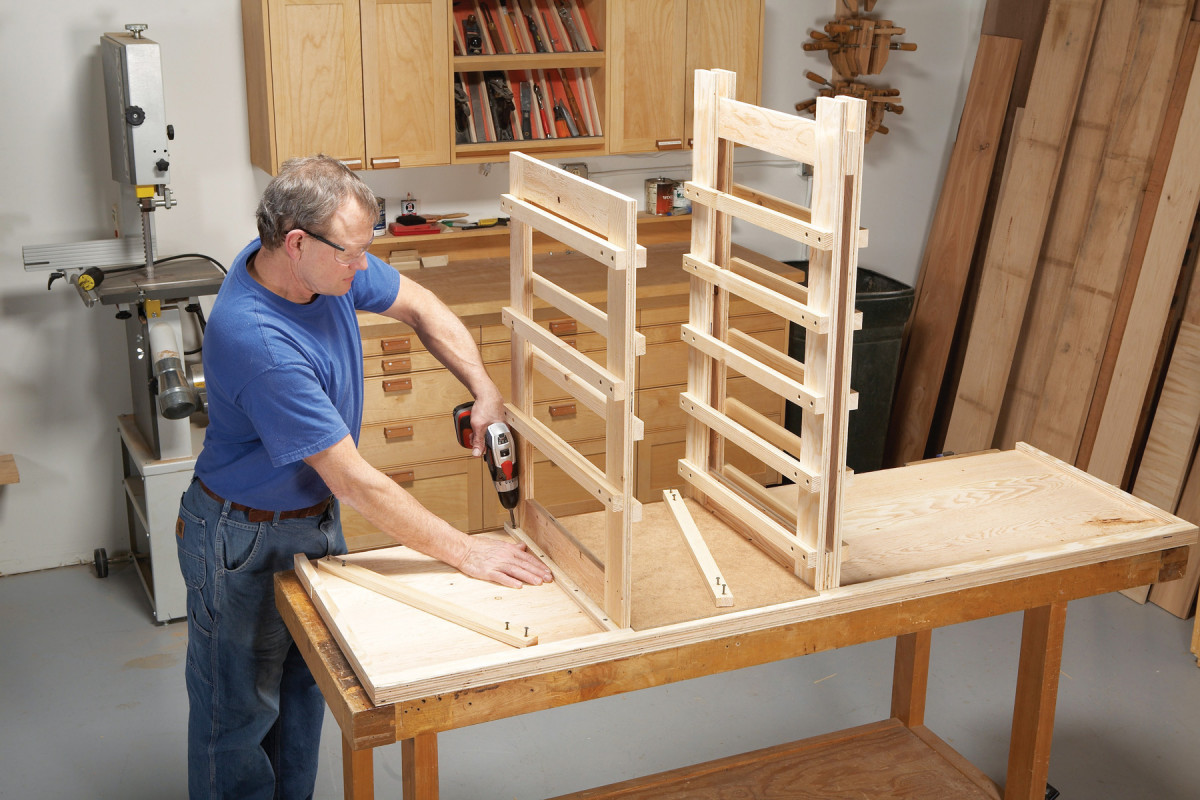
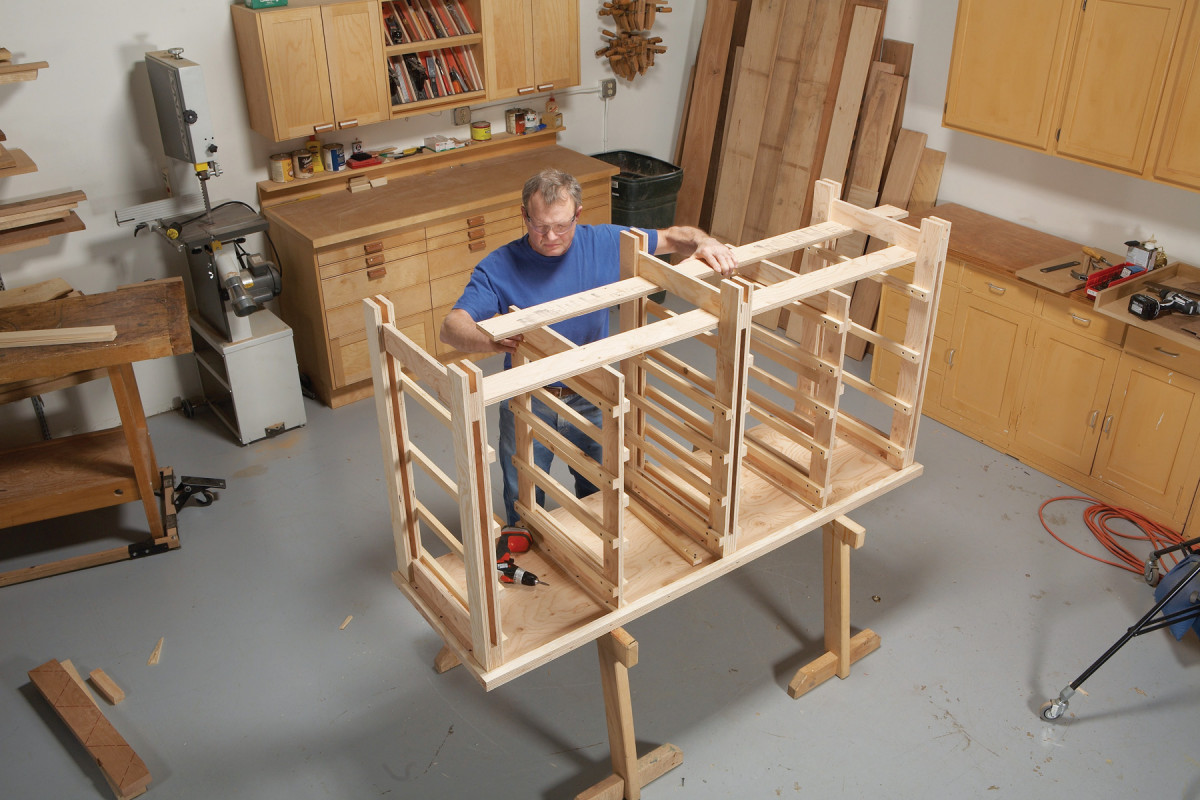
5. Attach one support frame exactly centered on the top. Then use a spacer to locate and attach the remaining frames, so they’re evenly spaced and parallel. You have to remove the top bus box supports to install each frame
Cut the top (G) to final size and glue fill strips (H and J) on the bottom. Mark the center of the top and the center of one support frame. Line up the marks to locate the frame, so it’s perfectly centered and perpendicular to the top’s front edge. Butt the frame against the front fill strip—the top should extend 1/4 in. beyond the frame at the back—and fasten it to the top with 1-1/4 in. screws.
Use a 15-3/8 in. by 22 in. spacer to locate the remaining frames (Photo 5). You have to remove the top pair of bus box supports to fasten each frame. As the supports are interchangeable, reinstalling them is a simple task.
6. Tie the frames together by installing the stretchers. They pass under the bottom rails of the support frames and over the inside frame rails. Use the spacer from the previous step to align the frames before fastening them to the stretchers.
Cut the stretchers (K) to final length. The Cutting List dimensions assume that plywood is exactly 3/4 in. thick, which is rarely true. So measure the actual rail-to-rail distance to determine the correct length for the stretchers.
Install the stretchers flush with the outside edges of the bottom rails and fasten them. (Photo 6).
Use the 15-3/8 in. spacer to position the remaining frames before fastening the stretchers. Again, some supports have to be removed and reinstalled.
Final Assembly
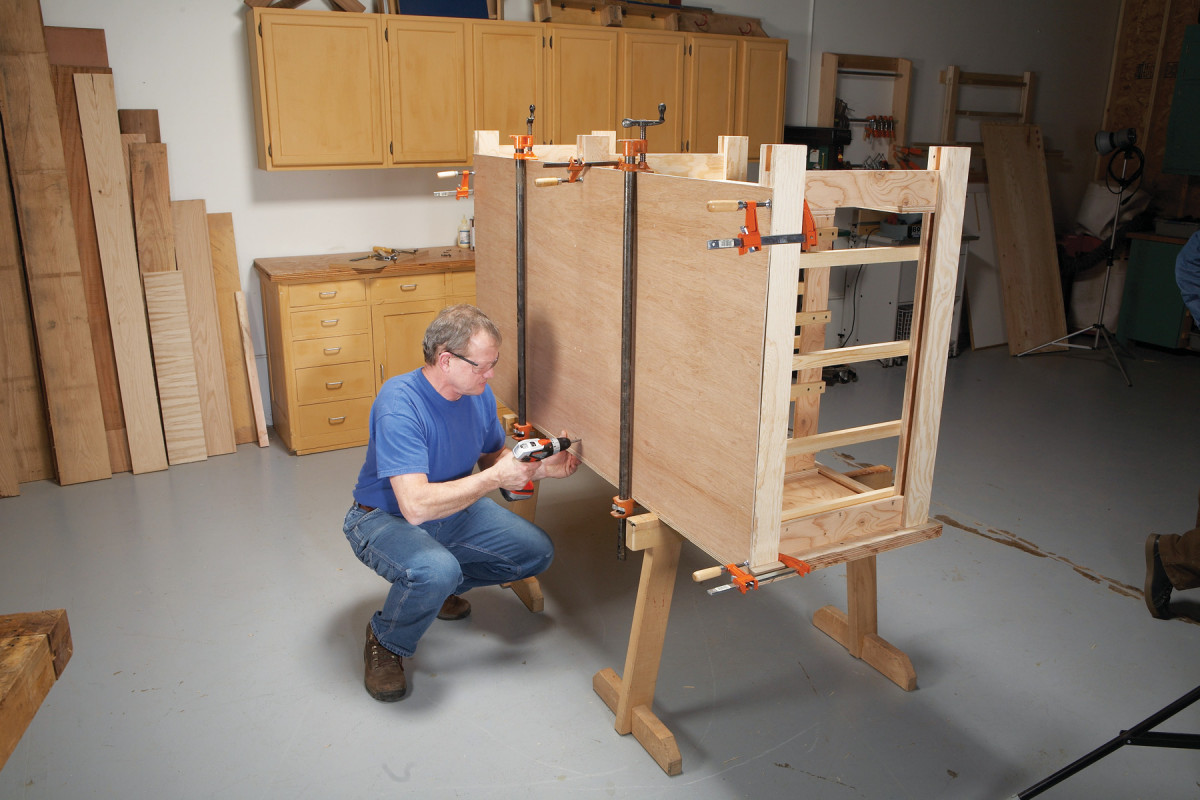
7. Fasten the back after clamping it flush with the cabinet’s edges and top.
Fasten the back (L) with screws after clamping it flush with the cabinet’s edges and top (Photo 7).
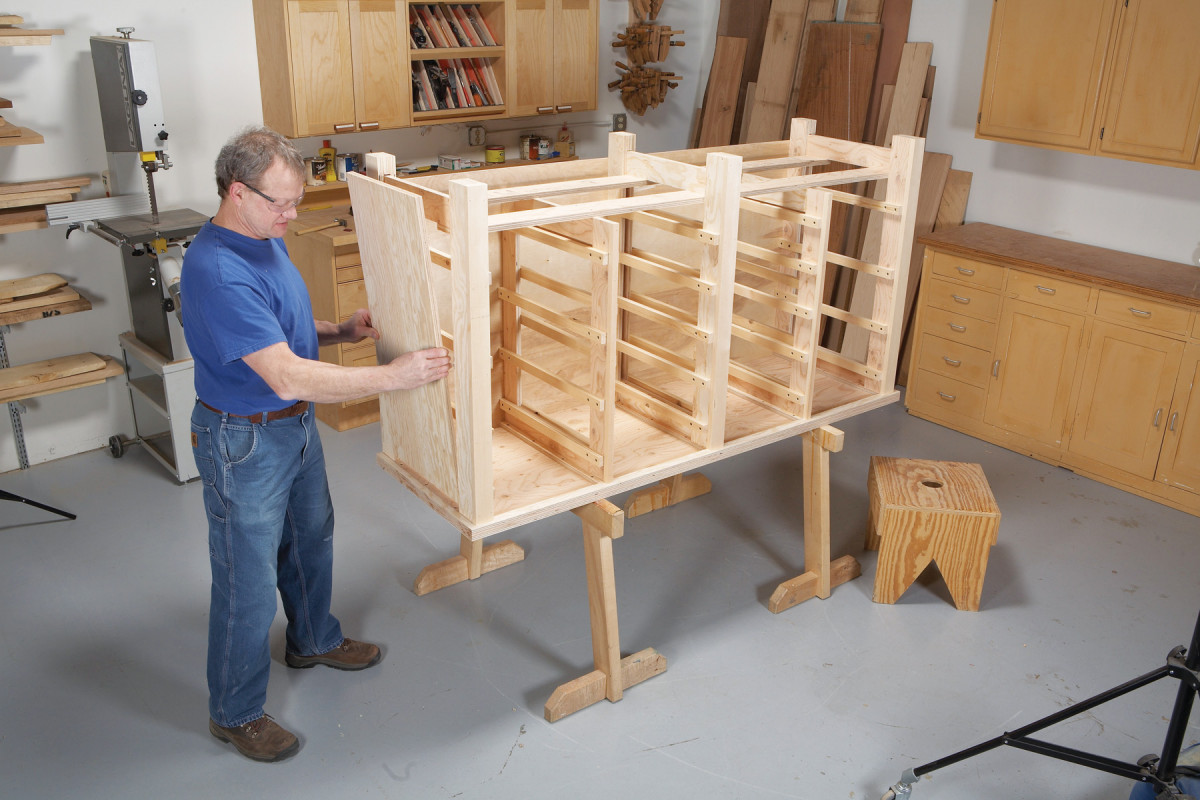
8. Install the end panels to create a flush surface (or use thinner plywood to mimic a recessed panel). Glue solid-wood faces on the fronts of each frame and plywood filler blocks in all the feet.
Glue on the end panels (M)—substitute 1/4 in. or 1/2 in. plywood to create a different look. Glue on the frame faces (N and P) and the foot fillers (Q), to complete the cabinet base (Photo 8).
Finish the top by gluing on the front and side faces (R and S). The side faces butt against the front face, which extends beyond the top.
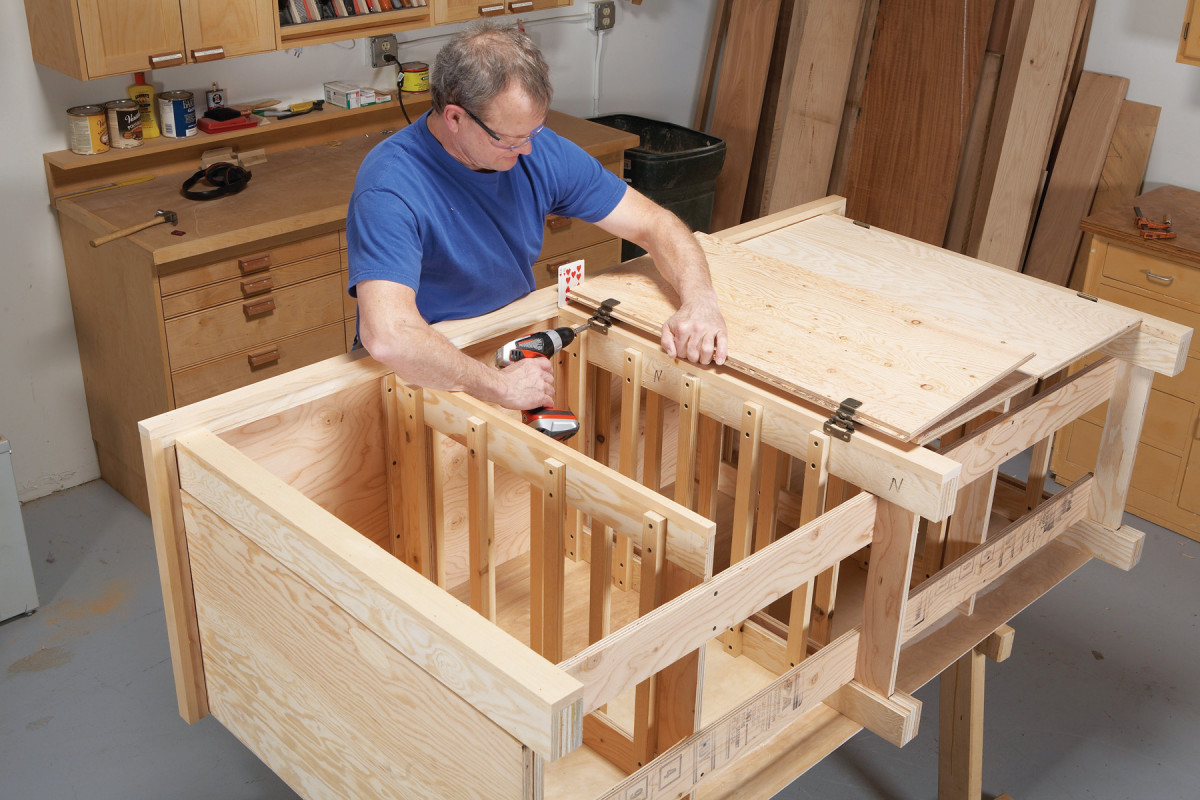
9. Mount the lipped doors, using a stack of playing cards to create adequate clearance between the doors and the top. Only the doors’ long edges are rabbeted, as the cabinet has solid-wood facing, rather than a traditional face frame.
Cut the doors (T) to size and round over the edges. Then saw or rout 3/8 in. by 3/8 in. rabbets on their long edges only. Install the knobs and mount all the hinges. Then mount the doors on the cabinet; use seven or eight playing cards to create a consistent 1/16 in. gap at the top (Photo 9).
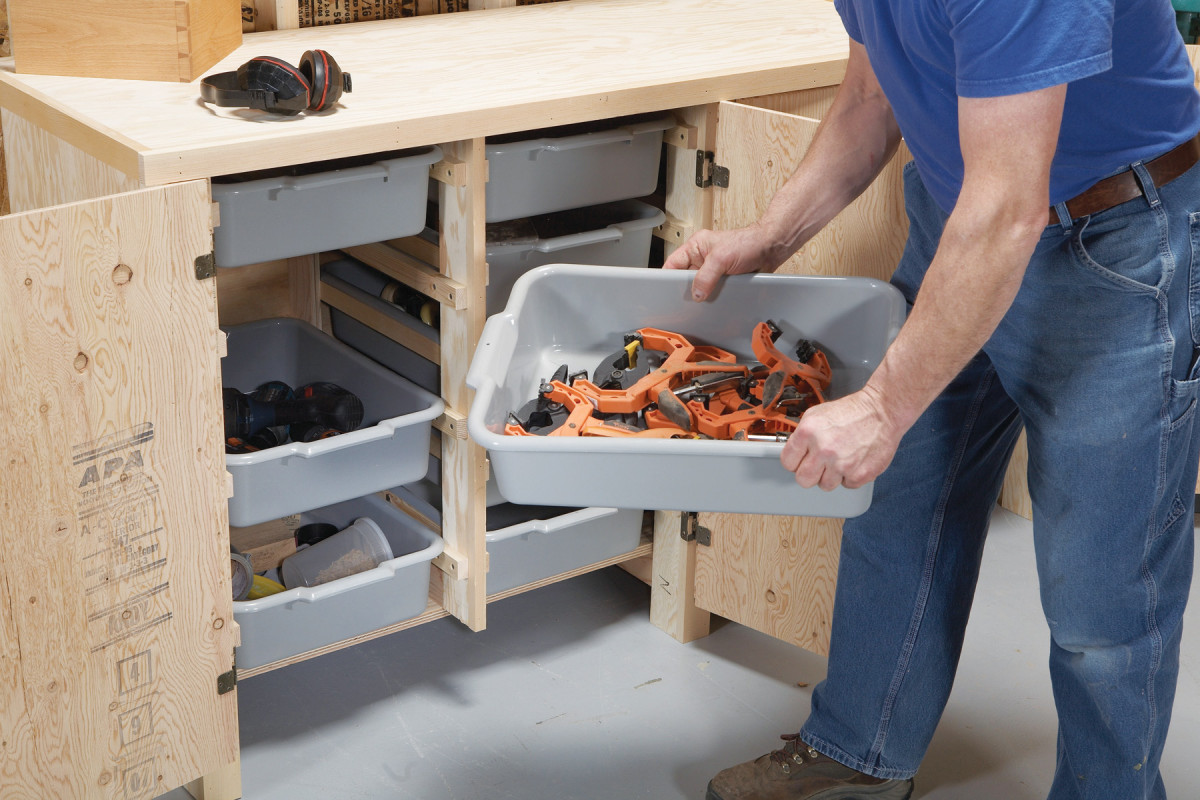
10. Install the bus boxes. Durable and portable, they’re great for organizing all kinds of tools.
Buss up your shop (Photo 10).


