


We may receive a commission when you use our affiliate links. However, this does not impact our recommendations.

I got my first bow for my fourth birthday.
It was a plastic recurve and thank heavens the arrows had rubber tips because everything within a thirty-ft. radius was fair game. These days I exercise better judgement and shoot at designated archery targets, but my fascination with this ancient technology is as strong as ever.
Several years ago I built my own wood and fiberglass recurve bow from a kit. Building it was as exciting as shooting it. Since then I’ve built several bows, each with a feel and character of its own. They’re beautiful to look at and fun to use. A bow is one of the few woodworking projects that you can actually play with outdoors!
A bow may look complex, but the kit I used makes it pretty straight forward (See Bow Kit). In this story, I’ll show you how to make a bow from one of these kits. It’s a fairly easy woodworking project, but you will need a bandsaw and an oscillating spindle sander to shape the bow. A drum sander in a drill press would work as well.

FIG. A BOW LAMINATIONS
The bow is laminated from thin strips of wood and fiberglass (Fig. A). They’re bent and glued together with epoxy using a two-part plywood form. You don’t need a zillion clamps to squeeze the forms together, however. The kit’s manufacturer has a better idea: to apply clamping pressure, you inflate a fire hose with a bicycle pump. Next, you place the assembly in a shop made plywood box equipped with incandescent light bulbs. The bulbs provide the heat necessary to cure the epoxy. The result is a one-piece curved bow with incredible strength and flexibility.
BOW KITS
I used kits from Bingham Projects. You can select from a wide variety of wood species and Bo-Tuff colors for your bow. The kits include:
- Bo-Tuff – fiberglass strips that give the bow strength.
- Four wood strips – two have a slight taper that lay fat end to the middle.
- Tip overlays – micarta plastic used to reinforce the bow tips.
- Riser block and riser overlays – blocks of wood that form the handle and arrow rest.
- Paper patterns – for bow and form shapes.
- Steel hardware for the forms.
- Pressure hose with fittings.
- Steel band – distributes hose pressure evenly.
- Index pin – Keeps the riser block anchored in the form.
- Plastic Laminate – provides a smooth, non-stick surface.
- Reverse Taper Strips – opposite of the bow strip taper.
- Thermostat – limits the temperature in the heat box.
- Slow-set epoxy – allows for unfrenzied assembly.
- High temperature masking tape – protects the Bo-Tuff.
- Construction video
BUILD THE FORMS

1. The first step in bow building is to make the form for gluing the bow laminations. The form is composed of four layers of 1/2-in. plywood glued together. One layer is a template cut to the exact shape. The other pieces are cut oversize and trimmed to match later. A notched trowel makes a great glue spreader.
Use the full-size paper patterns from the kit to lay out, cut and smooth one layer of plywood to use as a template for the upper and lower halves of the form (Fig. B).
Rough cut the other plywood layers about 1/8-in oversize.

2. Trim all the layers flush with the pattern layer using a flushtrim bit. Build the top half of the form in the same manner.
Glue the layers together using 1-3/4-in. screws as clamps (Photo 1). Use a wet rag to clean away any squeeze out on the template edge. You will need a smooth surface for the bit bearing to ride on in the next step.
Once the glue is dry, use a router with a flushtrim bit to trim the other pieces even with the templates (Photo 2).
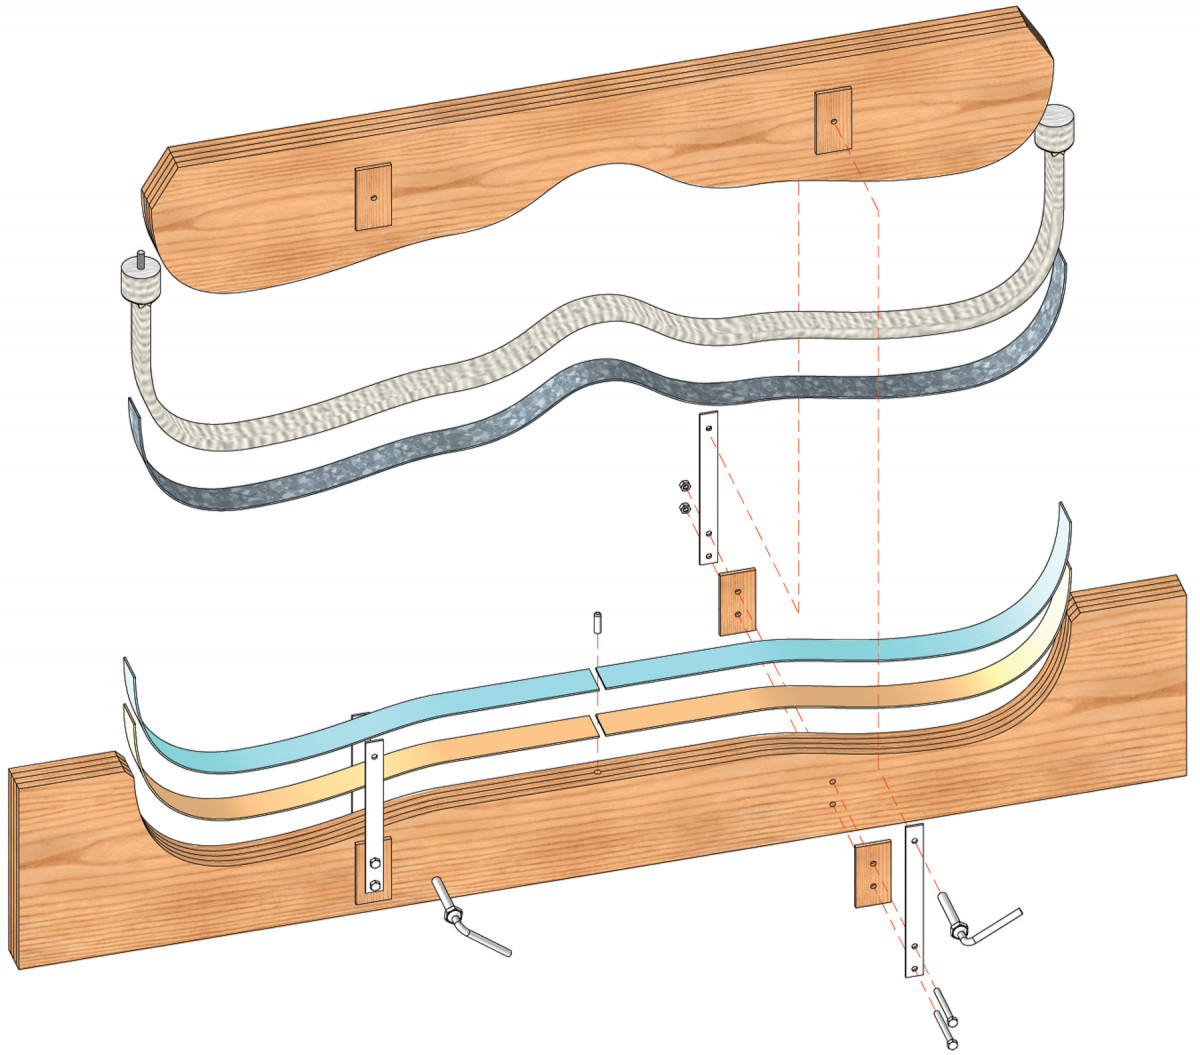
FIG. B FORM
Drill a 1/4-in. hole in the center of the lower form and drive in the steel riser index pin (Fig. B).

3. Glue the reverse taper strips to the lower form. Make sure the thin end goes against the index pin. Add plastic laminate strips on top of the reverse taper strips to create a smooth, nonstick surface. The steel index pin is used to anchor the bow assembly in the form.
Glue the included wood reverse taper strips onto the lower form. Butt the skinny end of each strip against the index pin. The taper on these strips is just the opposite of the taper on the bow lamination strips and creates a better matched clamping surface. Use contact cement for an instant bond without clamps. Then, add strips of plastic laminate to create a smooth nonstick surface (Photo 3). The edge of the upper form does not contact the bow laminations, so it needs no special treatment.
Install the locking hardware on the form (Fig.B). Add 1/4-in. plywood spacers under the hardware to allow room for the deflated hose.

FIG. C HEAT BOX
Build the laminating oven using 1/2-in. plywood and 2×2 corner cleats (Fig. C). Assemble the box as one big unit, then cut the lid free with a circular saw.

FIG. D WIRING DIAGRAM
Wire in porcelain light bulb sockets and thermostat (Fig. D). You can line the box with optional thin-foiled insulation from a home center.
PREP THE LAMINATIONS

4. The bow’s handle is shaped from a large block of solid wood called a “riser block.” Sand the riser with an oscillating spindle sander or a drum sander. A backer board allows you to feather the riser’s tapered edges to a paper-thin thickness.
Shape the riser block to length. Find the exact center of the bottom of the riser block and drill a 5/16-in. hole, 1/2-in. deep to fit over the index pin on the lower form. Trace the shape of the riser using the template in the kit and cut the shape using your bandsaw. Sand with a drum sander (Photo 4).
Cook the riser and wood laminations in the heat box for about 30 minutes to chase off any surface moisture that might interfere with the epoxy set. Then, trim the wood laminations to 32-in.
Cut both bottom pieces of Bo-Tuff to 32 in. and the top piece to 64-in. A Dremel cut-off disc works great, but a pair of metal cutting shears will do. Wear gloves when handling the Bo-Tuff. Fiberglass slivers are a real drag.

5. The bow is composed of three types of laminations: strips of solid wood of uniform thickness , strips of solid wood that taper from end to end, and strips of “Bo-Tuff”fiberglass. Coat all of these pieces with slow-setting epoxy.
The Bo-Tuff has a smooth and a rough side. The smooth side is the finished surface while the rough side gets the epoxy. Apply heat-resistant masking tape to the smooth side of the Bo-Tuff and mark a centerline on each piece. The masking tape keeps epoxy off the surface and avoids unnecessary cleaning and sanding (Photo 5).
It’s imperative to have everything (including a helper) ready before applying epoxy to the bow laminations. Position the form so you can get at it from all sides and underneath. I like to cradle it between blocks clamped to a pair of sawhorses. You’ll need clearance under the forms to wrap filament tape around the laminations. Test the pressure hose fittings for leaks in a pail of water as you would with a bicycle inner tube. Also, rub a thin layer of paste wax onto the plastic laminate and both sides of the metal pressure strip (Fig. B) to keep oozing epoxy from sticking to their surfaces.
Roll out an ample length of plastic wrap over the lower form onto the plastic laminate to further protect it from epoxy squeeze out.
Lay all the lamination pieces onto a papered surface in pairs. Mix about 4 oz. of epoxy in a small can. Coat the rough side of the Bo-Tuff with epoxy and both sides of the wood laminations. Set the wood laminations onto the rough surface of the bow-Tuff.

6. Butt the bottom pair of laminations against the index pin on the form. Set the riser block over these laminations so the hole drilled in the back fits over the index pin. The top laminations will lay over the riser. Plastic wrap protects the form from epoxy squeeze out.Wrap filament tape around the laminations to keep them from sliding around on the bottom form.
Lay the lower Bo-Tuff and tapered laminations onto the lower form and butt them up against the riser index pin. Make sure the thick part of the wood laminations are against the pin.
Coat the riser with epoxy. Set the riser on top of the lower laminations and push it into the index pin (Photo 6). Set the top pair of laminations onto the top of the riser. Make sure the center of the Bo-Tuff rests directly over the center of the block. Place the metal pressure strip over the top of the bow assembly.

7. Pump air into the pressure hose to apply clamping pressure to the laminations. The pressure hose is set on top of the laminated bow in the form. The two halves of the form are held in place with metal straps and bolts that come with the kit.
Wrap filament tape around the form and the pressure strip to pull the laminations tight to the form.
Lay the deflated hose over the pressure strip and bolt the upper form in place. Make sure all the laminations are aligned with each other and no shifting has occurred.
Pump 60 psi into the hose (Photo 7). Place the form into the oven (Photo 8).

8. Set the form in a shop-made plywood oven for a fourhour bake. The oven is heated by incandescent lights.Heat is needed to cure the slow-set epoxy. Remove the form after it’s cooled overnight.
When the curing is done and the form has cooled, remove it from the oven. Unbolt and remove the top half of the form, hose, filament tape and the pressure strip. Pull the bow from the form. Be sure to wear gloves as the hardened epoxy may have sharp edges.
SHAPE THE BOW

9. Sand off the excess epoxy. Wear leather gloves because the epoxy can have sharp edges. Keep the protective masking tape on the surface of the limbs as long as possible to prevent scratches.
Sand the bows edges to remove excess epoxy (Photo 9). Keep the tape on the limbs to protect the surface from scratches. Always wear safety glasses and a dust mask.

10. Use a bridge shaped template to mark the length of each limb (top of the bridge) and to position the grooves for the string (underside of the bridge).
Mark the limb cut-off point and the string groove location with a template (Photo 10). Cut the limbs to length on the bandsaw. This is hard on blades, so use an old one. If you plan to make a lot of bows, you might want a carbide blade.
Draw a centerline along the length of the bow. Mark the limb tip shape (Photo 11).

11. Align a paper template with the limb’s centerline and the string notch mark. Cut the shape on a bandsaw and finish shaping the edges with a drum sander.
Rough-cut the shape of the bow limbs on the bandsaw. Use a drum sander to finish the shape.

12. File the string grooves with a rat-tail file. The angle should be approximately 70-degrees to the tabletop. Check the backside of the bow often to make sure each side is symmetrical.
Start the string groove cut with a triangular file. Follow up with a rat-tail file (Photo 12) and a a fine chain-saw sharpening file. Be sure each string groove is cut at the same angle and depth. The exact angle is a bit arbitrary but should be around 70-degrees to the tabletop.
Reinforce the tips with a tip overlay (Fig.A). Cut and shape the part of the tip overlay that lays directly on the bow surface. Let the outside edges overhang the bow limb for now.

13. Due to variations in shaping and sanding, one limb may be stiffer than another. To test, string the bow and measure from the end of each riser overlay to the string. A stiffer limb will measure shorter. A stiff limb can be limbered up by lightly sanding the fiberglass down with 120-grit paper.
Remove the tape at the tip and lightly sand the area with 120-grit sandpaper. Epoxy the tip overlays to the limbs. Lightly clamp in place and let the epoxy cure overnight. File the tip overlay flush with the bow edges and string grooves.
Remove the tape on the bottom center portion of the bow. Scuff sand the area and epoxy the riser overlays.
Check the bow for uniform limb stiffness (Photo 13). It’s best if both limbs are the same stiffness.

14. Check for twist in the limbs. Make a tiller stick to pull the string and flex the limbs. If one limb is twisted, mark the side that is high. Sand the high edge to remove a small amount of material to correct the twist.
Remove the string and lightly sand the fiberglass surface of each side of the stiff limb with 120- grit sandpaper. If you still end up with one limb slightly stiffer than the other, put the stiffer limb at the bottom of the bow.
The next step in tuning your bow is called “tillering”. Cut an 18-in. tiller stick and use it to stretch the string and mimic bow pull (Photo 14). Sight down the surface of each limb and look for twist. Mark the side of the limb wherever it rises from the horizontal. Then, sand that edge lightly to correct the twist.

15. Draw the arrow notch and the hand-grip profiles using the two templates provided in the kit. Cut the profile for the top first as shown and then lay the bow on its side to further cut the handgrip area.
Use paper patterns to trace the bow grip and arrow notch onto the riser block. Reverse the arrow notch template for a left-hand bow.

16. Use a combination of rasps and small drum sanders to customfit the bow to your hand. Once you get it right, start sanding the wood areas with 80-grit sandpaper. Don’t sand the fiberglass surfaces with anything less than 120-grit sandpaper or you’ll leave deep scratches that are hard to remove.
Rough out the grip shape on a bandsaw with a 3/8-in., 4-TPI skip-toothed blade (Photo 15). Clamp your bow in an end vise and rasp the riser to fit your hand (Photo 16). I used many shaping tools, from small portable drum sanders to files, rasps and sanding blocks.

17. Finish your bow by suspending it from a wire attached to the string grooves. Spray several coats of urethane varnish to protect the bow and bring out the wood’s beauty.
Finish sand all the bow surfaces. Start with 120- grit and work your way up to 400-grit to remove scratch patterns from the fiberglass. Spray the bow with several coats of gloss varnish, let dry – then give your bow a try (Photo 17).
BUYER’S GUIDE
 Bingham Projects, (801)-399-3470, www.binghamprojects.com
- 3-02 Recurve Laminating Press Kit with Video – choose bow length and limb width (includes 3-01 Instructional materials, full-size blueprints & video)
- 2-TC Thermostat Control for laminating oven
- 6-300 Recurve Limb Lamination Kit – choose bow length, limb width (1 3/4″ or 2″), draw weight, draw length and glass color
- 4-03LVC Recurve Riser – choose color
- 4-06-1 Epoxy glue – 3/4 pt.
- 4-02BT Bow tip overlays – choose color
- 17-07 Bow string – 2 recommended
- 4-15 3/4″ Filament tape
- 4-15 High Temperature masking tape – 2″
- 58″ or 60″ Recurve Limb Lamination Kit includes Bo-Tuff E glass and wood strip laminations. Total Bow Supplies Approx. $250 Home Centers
- 4 sheets 1/2-in. CDX
- 1- 2x2x8’ pine
- 5 – 4” x 1-1/2-in. metal ceiling boxes
- 8 – 1/2-in. set screw connectors
- 6 ft. of 1/2-in. EMT conduit
- 1 – 3/8-in. non-metallic connector
- 10 ft. of #14 THHN black insulated wire
- 10 ft. of #14 THHN white insulated wire
- 1 – box cover with center knock-out
- wire connectors
- 4 – porcelain lampholders
- 8 ft. appliance cord Total Materials $150


