|
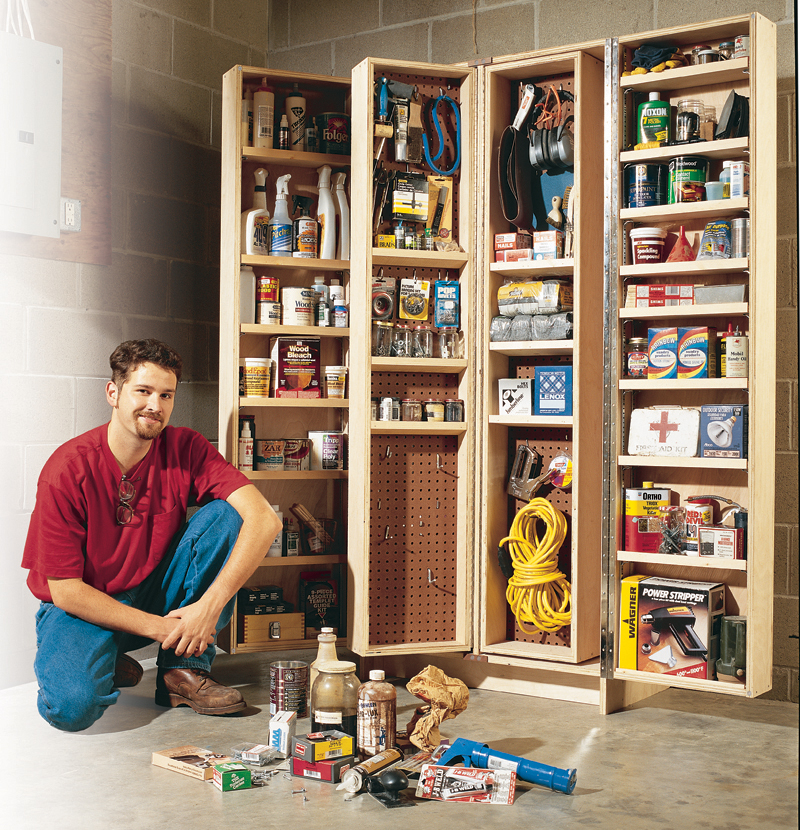
If your workshop seems cluttered and your
workbench is always covered with stuff,
you need this cabinet. It packs 30 cubic ft.of
storage, enough for all of those got-to-have
supplies, from screws to paint cans. Everything
is readily accessible, without reaching, because
the big pantry-style doors open wide. We’ve
packed a room-full of storage into a cabinet the
size of a fridge—only 30-in. wide, 24-in. deep
and 6-ft. tall. Best of all, this cabinet is easy to
build.You and a buddy could whip together a
couple of these beasts over a three-day weekend.
Tools and Materials
To build this cabinet, you’ll need a tablesaw with
a 30-in.-capacity rip fence and an outfeed table,
a dado set and a router with a 1/2-in. diameter
straight bit. You’ll also need a drill/driver, a
bunch of clamps, glue, lots of screws, a hinge bit,
a hack saw and help from a friend to cut the big
sheets of plywood.
All of the materials you need to build the
cabinet, except for the rare-earth magnet door
catches, are available at your local home center
(see Sources and Shopping List, below). You can save money by substituting AB exterior grade
plywood, but it’s considerably harder to
work with. Besides, it’s just plain ugly.
Standards and clips work great to
mount the shelves in the outer doors,
but you can also save a few bucks by mounting the ones inside the
cabinet with wooden cleats or by
drilling holes for shelf pins.
Getting Started
Measure the thickness of your
sheet stock before you start cutting.
It’s often up to 1/32-in. thinner than
you’d expect.The Cutting List below shows which pieces will be affected
if you’ve got skinny plywood. It’s best
not to cut these pieces until you need
them, so you can adjust the
dimensions.
We’ve arranged the cabinet’s pieces
on the plywood so you can cut them all
to final size on your tablesaw, using
only the rip fence.You should recruit a buddy to help you make the first cuts in
each sheet (Fig.D “Buddy Cuts,”in red). If
you’re a lone wolf, it’s safest to make these
cuts with a circular saw and a straightedge.
The long pieces (cabinet sides, center
divider, door fronts and frame sides) are
arranged so you can cut them to exact
length from the short end of the fulllength
sheets (Photo 1). First, mark their
exact length on the plywood.Then,make
a second mark 1/8-in.beyond the first, to
mark the width of the saw kerf. Set the
fence to cut the distance from the waste
end of the plywood to the second mark.
Initial crosscuts leave most of the
cabinet’s long pieces cut to length. They
also result in manageable-sized pieces
that you can handle yourself. Crosscut
the remaining long pieces (one door
frame piece and the center divider) to
length the same way, from full-length
sections, after making an initial rip cut in
the fourth sheet of plywood. Convince
your buddy to stick around and help you
make these cuts, too.
Build the Cabinet
Rabbet the top and back edges of the
cabinet sides (Fig.A,Parts A1 and Photo
2).Then cut dadoes for the center divider
(A2) and fixed shelves (A3, A5 and A7). Perfectly fitting dadoes are easy to cut
with a router equipped with a 1/2-in.
straight-cutting bit, a spacer and a Tsquare
jig (Photo 3). Used on the second
pass, the 1/4-in. spacer makes a 3/4-in.-
wide dado. If your plywood is on the
thin side of 3/4-in., your spacer will have
to be thinner. Rout end-to-end dadoes for
the full-depth bottom shelf,and stopped
dadoes for the narrower middle shelves.
Every joint is glued and screwed.
Assemble the cabinet, using clamping
brackets (X2) to hold it square (Photo 4).
Then, fit the center divider and secure it.
Install the middle shelves. They’re offset
so both sides can be fastened to the center
divider.
Install the nail strip (A9), perf-board
back (A10) and fill strip (A11). The top
of the perf-board should be flush with the
top of the cabinet. Finally, install the toe
kick (A12) and glue on the door stops
(A13).
The Outer Doors
Rabbet the edges of the door fronts (Fig.
A,Parts B1).Fasten the frame sides (B2),
and add the ends (B3). Next, dado the
shelves (B4) to fit around the shelf
standards (Photos 5 and 6).Add a shim
to your dado set to allow a bit of side-to side
clearance for the standards.You have
to flip and re-clamp the pieces for each
pass. After all four dadoes are cut, glue
lips (B5),made from ripped-down 2×4
stock, on the shelf fronts. Then, use the
shelves to install the standards in the
doors. Be sure to push the standards to
the bottom of the door frame before
nailing so the shelves will sit level.
Clamp the doors to the cabinet so you
can install the hinges (Photo 7). Prop
the door in place on a simple stand.Then,
clamp it to a cantilevered straightedge
(use piece X1) and to the cabinet. The
straightedge ensures the door will be
flush with the top of the cabinet.
Clamping the door and cabinet sides
together removes any bow, so the door
will swing freely,once it’s hinged. A perfboard
spacer between the door and the
cabinet side creates room for the hinge
barrel.
When you’ve got the door positioned,
cut the piano hinges to length and install them, using sheet metal screws (Photo
8).Center the hinge between the edges
of the cabinet and door,with the barrel
facing you, and predrill holes for the
screws with a self-centering hinge bit.
The Inner Doors
Rabbet the door frame sides (Fig. C,
Parts C1 and D1) for the ends (C2, D2).
Then cut dadoes in them for the perfboard
panels (C3, D3). Like plywood,
perf-board is often thinner than its
stated thickness. If yours is less than
1/4-in. thick, you’ll have to use a regular
blade in your tablesaw instead of your
dado set. Make two passes, adjusting
the fence between cuts.
Once glued in the dadoes, these perfboard
panels make the doors strong
and rigid. Hold the frames square when
you glue and screw the doors together.
Mounting the inner doors is similar
to mounting the outer doors, but the
hinges are fastened to the plywood faces
instead of the edges.
To prop the inner doors at the right
height, just stack two pieces of 3/4-in.
plywood (door shelves work great) on
top of the little stand used for mounting
the outer doors.Tape an 11/16-in.-wide
perf-board spacer to the front edge of
the center divider. Position the door
against the front of the cabinet,opened
180 degrees and resting on top of the raised-up stand. In this position, the door you’re
mounting will cover the opening on the opposite
side of the cabinet and its hinge side will be flush
with the hinge side of the center divider. They’ll be
separated by the spacer.
Hold the door against the spacer and cabinet with
a clamp at the top. Center the barrel of the hinge (with
the barrel facing you, just like on the outer doors) in
the space between the door and cabinet and install
one screw on each side, in alternating holes. Then
install a couple screws at the bottom of the hinge,
using knee pressure to hold the door against the
cabinet.With the hinge secured top and bottom,
finish installing the hinge screws.
Finishing Touches
Notching the cabinet’s adjustable shelves (Fig. C,
Parts A6 and A8) makes it easy to mount the shelf
standards in the cabinet. You can also add shelves
made from 2×4 and 2×6 stock to the perf-board
doors (Fig.C, Detail 1). Fasten lips (B5, C5,D6 and
D7) to all door-mounted shelves.
Mount the door handles, rare-earth-magnet
catches (two per door) and the latch. Move the
cabinet into position, level it and anchor it securely to
the wall. Then get organized.
Sources
(Note: Source information may have changed since the original publication date.)
Lee Valley Tools Ltd., leevalley.com, 800-871-8158, Rare-Earth Magnet Catch Sets (4 required),
1/2-in. dia. Magnet, #99K31.03, $.82 each;
5/8-in. dia. Magnet Cup, #99K32.53, $.59 each;
5/8-in. dia. Washer, #99K32.63, $.59 each.
Cutting List

Shopping List
This story originally appeared in American Woodworker December 2001, issue #91.
December 2001, issue #91
Purchase this back issue.
|
|
Click on any image to view a larger version
1. Cut the cabinet's long pieces from the short end of
full-sized sheets.You’ll need a buddy to help maneuver the
ungainly sheet and keep the big offcut under control.With
careful measuring, the cut-off piece will be exactly the right length,
ready to be ripped to width.
2. Rabbet the cabinet sides for the top and back,
using an auxiliary fence (Part X1) and a featherboard.
By housing the dado set, the fence allows you to
match the width of the rabbet to the thickness of the
plywood top.The featherboard acts as a blade guard and
ensures a consistent depth of cut.
3. Rout perfect dadoes for the shelves
with a 1/2-in. straight
bit and a T-square-style
jig made from scrap.
Make the wide dado in
two passes, the second
with a spacer held
between the jig’s fence
and the base of
the router.
Oops!
4. Plywood clamping brackets keep the cabinet square and let
you glue and screw it together, one side at a time, without big pipe clamps.
We’ve included the eight brackets you need in the plywood cutting diagrams
(Fig.D, Parts X2).
5. Gang the shelves together for dadoing. A
backer board keeps
the dado set from
blowing out the backside
of the last shelf.
The auxiliary fence’s
extra height keeps the
stack steady.
6. Nailing the standards is a cinch
because the dadoed
shelves hold them in
place for you. Needlenosed
pliers are much
better nail-holding
devises than your
fingers!
7. Clamp the doors in position before installing the hinges, using a shop-made
stand, a perf-board spacer and
a straightedge extending from
the top of the cabinet. Make
sure the edges of the door
and cabinet are flush.
8. Mount the hinges with sheet metal screws. They
have sharp threads that grip much
better than the puny screws supplied
with the hinges.Alternate the screws
between the cabinet and the door so
their heads won’t bind.
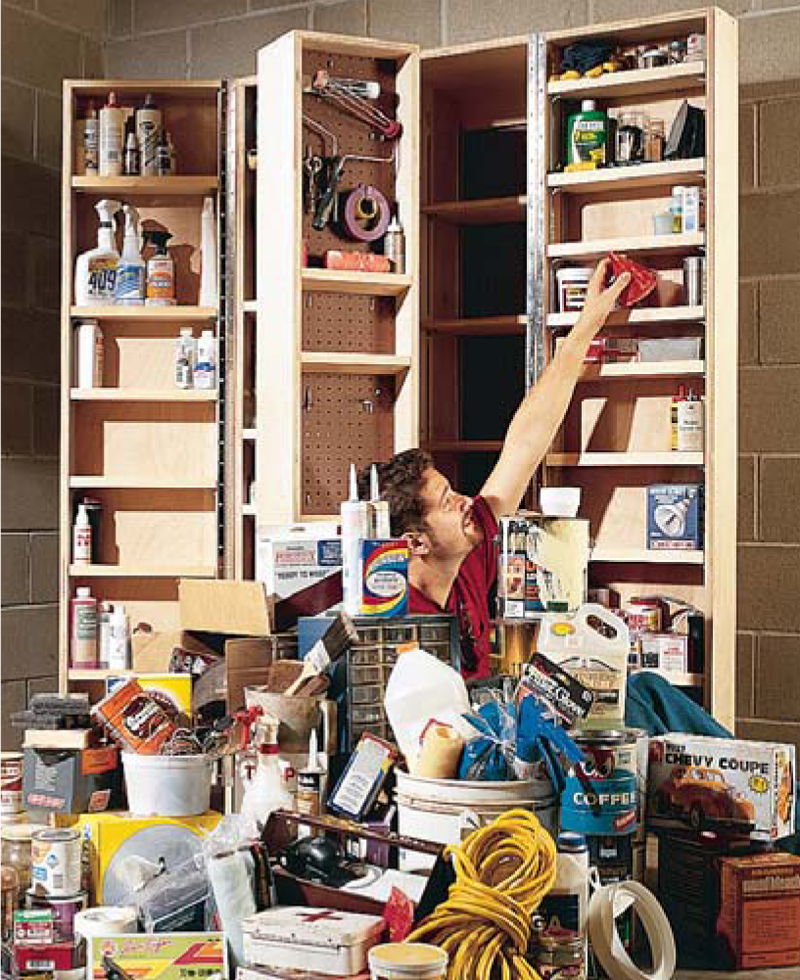
You won’t
believe how
much junk
you can fit
into this
amazing
cabinet.
Fig. A: Cabinet and Outer Doors
Fig. B: Bird's Eye View
Fig. C: Left and Right Inner Doors
Detail 1: Inner Door Shelves
Fig. D: Plywood Cutting Diagram
|