


We may receive a commission when you use our affiliate links. However, this does not impact our recommendations.
Garden Bench
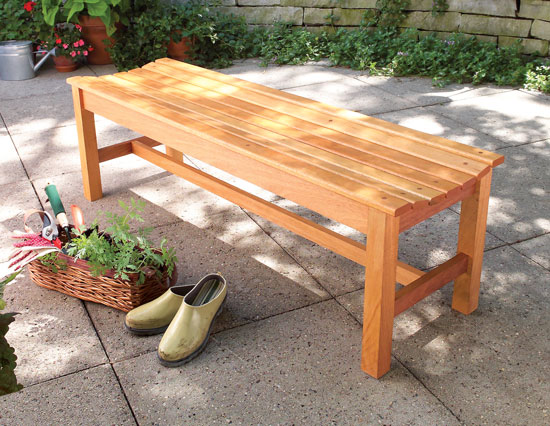
Graceful, comfortable and built to last
by Luke Hartle
| It dawned on me the other day that every single project I’ve made resides in my house. Since I spend a lot of time in my back yard garden, I decided it was high time I made something to enjoy in my outdoor living space as well. This backless bench is the perfect project. The bench is now the centerpiece of my yard. Stout mortise-and-tenon joinery and naturally rot-resistant mahogany ensure that it will retain its exalted position for years to comeTraditional joinery holds the framework together; the seat slats are secured with a newer joinery technique, the Miller Dowel system (see “Miller Dowel Joinery System,” below). The bench seemed to be the perfect project on which to try these high-tech dowels. I really liked how quick and easy they were to use compared with the traditional screw-and-plug approach.
Assembly Steps1. Mill all pieces to their final dimensions, except for the spreaders (D) and brace (F). 2. Make a template (Fig. B, page 66) to route the mortises. 3. It’s easy to end up with misplaced mortises. To avoid mistakes, 4. Drill out the mortises on the drill press. 5. Rout the mortises in the bench legs (Photo 1). 6. Use a chisel to square the mortise’s corners (Photo 2). Do this 7. Rout the tenons on the long rails (B) seat rails (C) and the 8. Use the dovetail jig (Fig. C, below) to rout the stopped-dovetail 9. Insert the stop block in the jig and rout the dovetail sockets in the lower rails. 10. Rough-cut the seat template pattern (Fig. D, page 68) on the bandsaw and sand smooth. 11. Rough cut the curves in the seat rails on the bandsaw. Finish the profile with the seat template and a pattern-cutting bit (Photo 5). Center the template on the rail with the back edges flush. 12. Sand all the parts to 180 grit. 13. Glue the bench frame in stages, using a waerproof glue, such as 14. Determine the exact length of the seat spreader (D) by measuring 15. Measure and cut the brace (F) to length. 16. Route the tails of the dovetails on the seat spreaders and on 17. Use a handsaw to notch each tail so they are about 1/8 in. shorter than the sockets. 18. Rout the curves in the spreaders, as done on the seat rails in 19. Sand the seat spreaders and the brace. 20. Glue in the spreaders (Photo 8). Then, flip the bench and add the brace. 21. Shape the seat slats on the router table with a 1/4-in. round-over bit. 22. Lay out all dowel locations on the seat slats (Fig. A). 23. Attach the seat slats to the bench (Photo 9). First clamp an 24. Use a framing square to keep the slats’ ends aligned. 25. Trim the dowel heads with a flush-cut saw. 26. Sand the slats to 180 grit. 27. Finish the bench with an outdoor finish to preserve its color
SourcesSource information may have changed since the original publication date. Steve Wall Lumber Co., walllumber.com, 800-633-4062, Select Miller Dowel Co., millerdowel.com, 866-966-3734, 1X Miller Rockler, rockler.com, 800-279-4441, 5/8-in.-dia. x 14-degree dovetail bit, #91034, $13. Woodworker’s Supply, woodworker.com, 800-645-9292, 3/4-in. double-flute straight bit, #04-140, $17. Amana Tool, amanatool.com , 800-445-0077, 1/2-in.-dia. x1-in. |
Click on any image to see a larger version.
1. Mortise-and-tenon joinery makes this bench strong and
2. Square the corners of the mortise with a chisel before
3. Cut the tenons on the rails with a 3/4-in.-dia. straight
4. Rout the stopped-dovetail sockets for the seat supports
5. Rout the curve in the seat rails and spreaders using a
6. Glue the long rails to the assembled end frames. Keep the
7. Rout the tails on the ends of the brace and the seat
8. Glue the spreaders and the brace to the bench frame. Slide
9. Install the slats to the bench frame using Miller Dowels. |


Miller Dowel Joinery SystemThe Miller Dowel system combines the strength of wood joinery Miller Dowels are available in three sizes and a wide variety of |
 |
Cutting List
Figure A
Detail 1
Detail 2
This story originally appeared in American Woodworker Feb/Mar 2007, issue #127.
|
Figure B
Figure C
Figure D
|


Here are some supplies and tools we find essential in our everyday work around the shop. We may receive a commission from sales referred by our links; however, we have carefully selected these products for their usefulness and quality.


