


We may receive a commission when you use our affiliate links. However, this does not impact our recommendations.
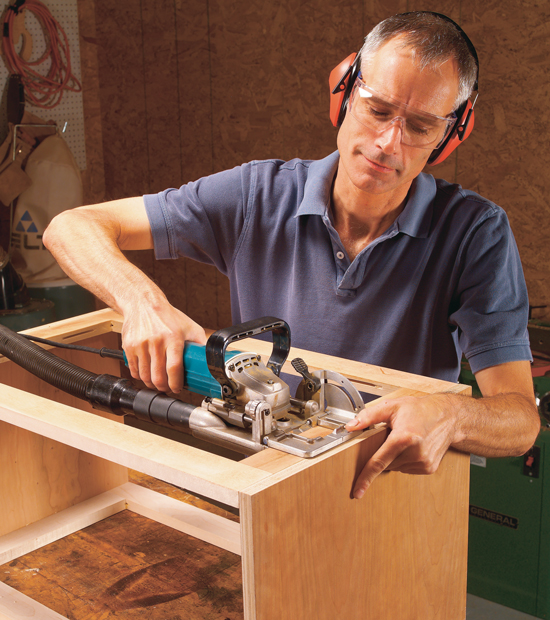
Plate Joiner Tips and Techniques
12 ways to build cabinets faster and better with biscuits
By Jon Stumbras
Fast, Accurate Face FramesAfter you’ve put together a few face frames with dowels or pocket Biscuits Build a |
Click any image to view a larger version.
Hold narrow face-frame pieces with this adjustable jig. It adds extra bearing surface to the end of a rail so your plate joiner won’t slip sideways. |

Align Solid Edging to PlywoodHave you ever sanded through a piece of plywood while trying to even up some solid edging that’s too low? You can avoid this heartbreak by using biscuits to ensure that the entire length of edging is slightly higher than the plywood. The whole idea is to make a slightly offset joint, with the edging raised up above the plywood by a very small amount, such as the thickness of a playing card. Biscuits are ideal for achieving this precise “misalignment.” To make this offset joint on 3/4-in.-thick edging, set your plate joiner to biscuit size #0. Cut slots in the edging (Photo A). Next, cut slots in the plywood, but this time place a shim under the fence (Photo B). Any kind of thin shim will work, such as plastic laminate, a playing card or a couple of pieces of construction paper. |
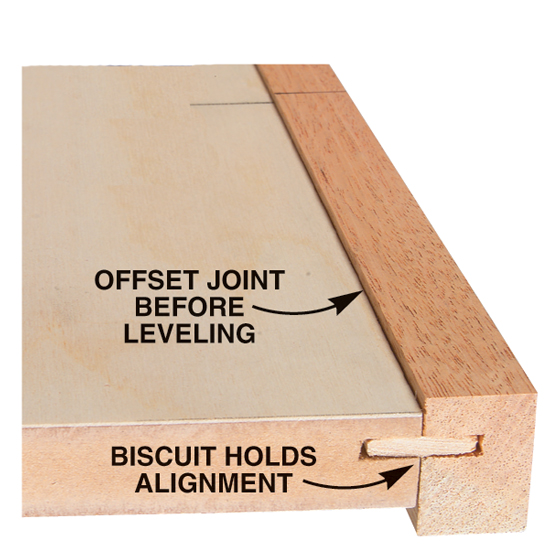
Photo A. First, cut #0 size slots in the edging. Support the fence with a block that’s the same thickness as the edging, so the fence doesn’t tip.
Photo B. Now cut slots in the plywood. Putting a shim under the fence produces an offset joint that’s easy to level successfully. |


Fasten Solid Wood to PlywoodA solid top is a great way to dress up a plywood case. But combining two different materials can be just asking for trouble. As you know, solid wood expands and contracts with changes in humidity. Plywood doesn’t. If they’re fastened rigidly to each other, the solid top will crack. How does your plate joiner fit in? It’s the perfect tool to cut the slots for these fasteners. It’s faster than setting up a router with a fence, and handier than using a router table. With a plate joiner, you can cut the slots after the cabinet is assembled. |

Use your plate joiner to cut slots for tabletop mounting clamps. |

Align Long Edge JointsGluing up long boards can test the nerves of even the most seasoned woodworker. The goal is to get a perfectly flush top right out of the clamps, but all too often you end up with a top that needs a ton of planing or sanding before it’s even. Biscuits make glue-ups go much easier and drastically cut down on the amount of sanding time. Many long boards are slightly bowed, but biscuits help bring bowed boards into alignment. Here are some tips for cutting the slots: • Select tight-fitting #20 biscuits. • Position the centers of the outermost slots at least 3 in. from each end. This allows for you to trim 3/4 in. off after gluing without exposing a biscuit slot. • Cut slots about 8- to 10-in. apart. • Use the fence of your biscuit joiner, not the base, as the reference surface. Press the fence firmly on the top of the board. • Spread glue on the edges of your boards, but not in the slots. This speeds your glue up. After all, the biscuits are for alignment only; the joint will be plenty strong without them. |
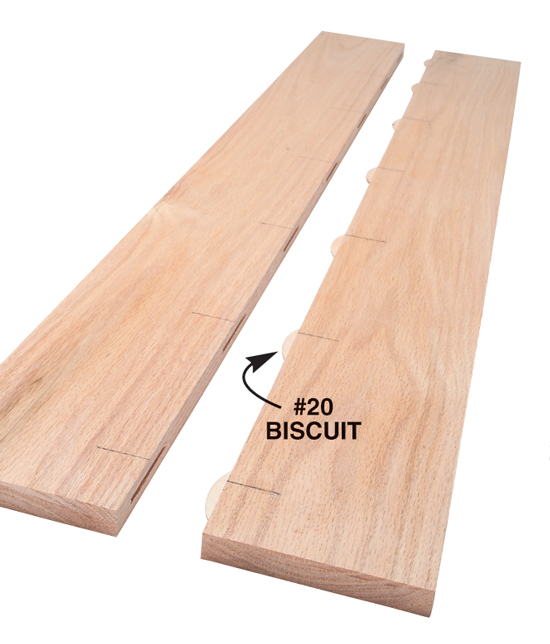
Reduce sanding time by aligning bowed boards with biscuits. Reference your plate joiner fence from the top of each board. |

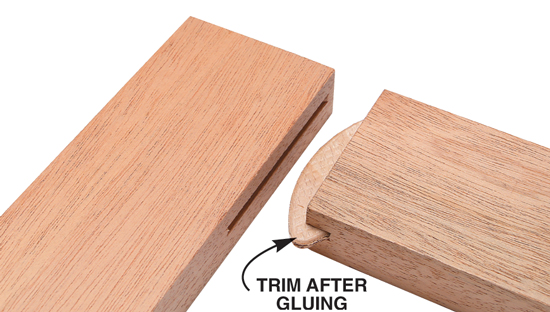
Join Long MitersLong miter joints look terrific. They make an all-plywood case look seamless at the corners. But getting long miters to look right can drive you nuts. Let’s be realistic; biscuits alone aren’t enough. We recommend you add a small piece of hardwood edging to the outside corner as insurance. Here are two reasons to go to this extra trouble. First, a tiny bit of slippage during glue-up is normal, and when you sand an ordinary mitered corner with tips that don’t exactly line up, you’re bound to sand through the face veneer on the piece that stands proud. This reveals some of the plywood’s core, which is usually a different color. To make a long mitered joint, cut the miters on your tablesaw. The bevel should point up in order to minimize tear-out. Then fire up your plate joiner.
Reference from the Outside EdgeAdjust the fence on your plate joiner to wrap over the outside edge of the miter (Photo A). Set the height of the fence so the slot will be a little below the center of the miter. This prevents the biscuit slot from coming through to the outside surface. Insert the biscuits and glue the case together.
Rout the CornerAdd a fence to your router’s base and install a 1/4-in.-straight bit. Adjust the bit and fence to cut a 1/8-in.-square rabbet (Photo B). Normally, you cut from left to right, but in this situation you should cut the opposite way, from right to left, to minimize tear-out of the thin face veneers.
Add a Hardwood StripOn a tablesaw, rip strips that are very slightly over 1/8-in. square. Apply glue to the rabbets and clamp the strips in place with masking tape (Photo C). Alternate the direction you pull the tape to draw the edging tight. Scrape off the excess glue before it hardens and cut the edging to length. Sand it flush to the plywood and round the edge by hand or with a round-over bit. |
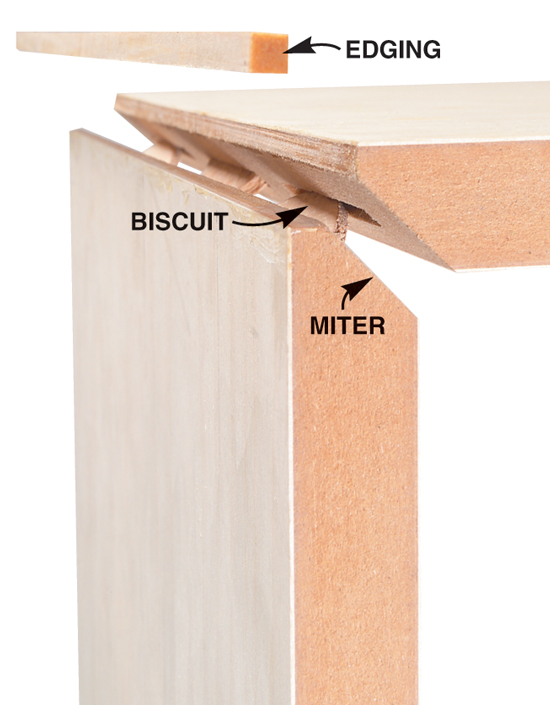
Photo A. Cut accurate slots by angling your fence over the edge of a long miter.
Photo B. After gluing, rout a small rabbet on the corner of the cabinet. Move the router from right to left (climb-cutting) to minimize tear-out.
Photo C. Glue a hardwood strip in the rabbet to make a durable edge. Once rounded over with sandpaper, the strip is practically invisible.
|


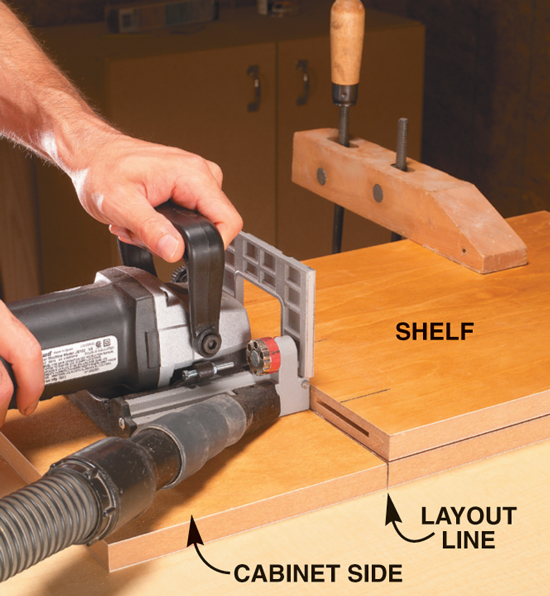
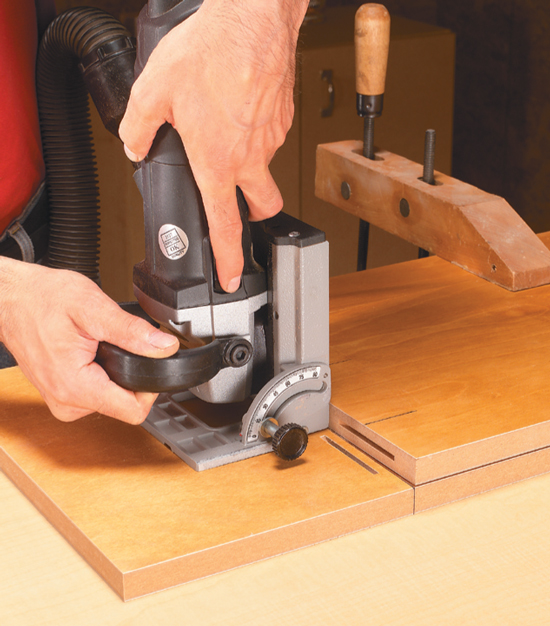
Join Shelves with Only One SetupJoining shelves to the sides of a cabinet can eat up a lot of precious shop time. Dadoes work well, but you’ve got to set up a saw or a router to make a dado exactly the right width, and then you have to worry about whether the dado will show on the front of the case. If you don’t want to see it, you’ve got to make a stopped cut, and that means even more fussing around. Layout is nothing more than drawing a short line on the edge of your case, indicating where the top of the shelf goes. Clamp the shelf right on the line (Photo A). Draw lines on the shelf to indicate the center of each biscuit slot. Pick up your biscuit joiner, set it to the #20 size and cut slots in the shelf. Stand the machine up on end and cut slots in the case side (Photo B). That’s it. Both slots are registered from the bottom of your machine. When you stand up the shelf and put in biscuits, the shelf will sit exactly on your pencil line. Seems too easy, doesn’t it? |
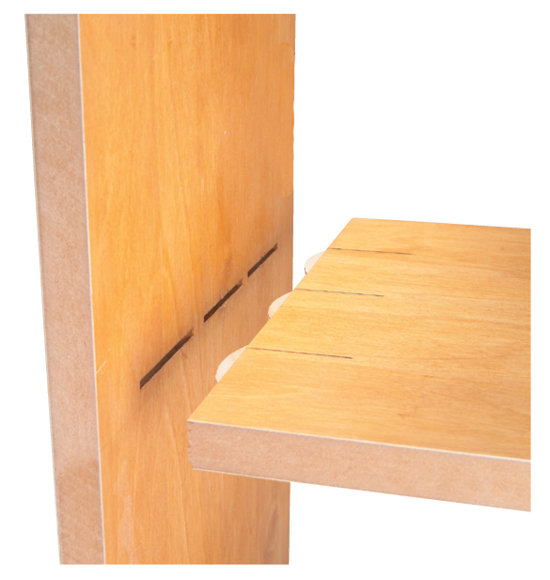
Photo A. Cut biscuit slots in the end of the shelf first.
Photo B. Stand your plate joiner on end to cut slots in the side of the case. The end of the shelf is a built-in straightedge. |
Simplify Drawer MakingWhy bother with fancy joinery when biscuits will hold together a drawer box just fine? Save the dovetails for show pieces, or for when a large drawer rides on wooden supports and must be super-strong. If you’re using metal slides and a false front, biscuits are perfect. The joint doesn’t show, and has enough strength for many years of use. Half-inch Baltic birch plywood and #0 biscuits are a good combination for making drawers. This plywood has very few voids, so its edges generally look good. The slot for a #0 biscuit goes into 1/2-in.-thick stock without coming through the other side. |

Two slots are easier to cut than one. Clamp thin boards together to make a wider bearing surface for your plate joiner. |

Quick Case ConstructionThere’s nothing faster than biscuits for assembling a simple case. You can cut slots for one case in about the same time it takes to set up a dado set in a tablesaw. Add a back or a face frame to the case, and you have a very strong unit. If you’ve been using pin nails or screws for simple casework, consider this additional benefit: Biscuits are completely invisible; nothing shows on the inside or the outside; there are no nail holes to putty or screws to plug. When you cut into the side of the plywood, use a thick support board to help balance your plate joiner. A 2×4 milled square works great; it’s easy to cut to length as needed, and then toss it when you’re done. A 2×4 is just wide enough so your clamps don’t interfere with the base of the plate joiner. |
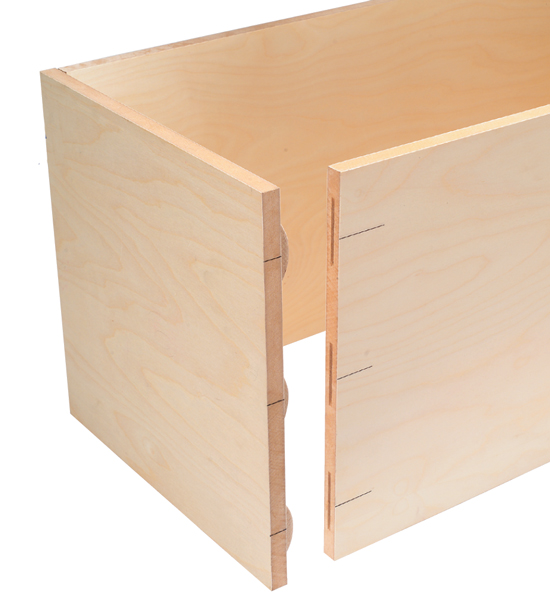
Make invisible corner joints super-fast with a plate joiner. |

Sort Your Biscuits by Thickness
Next time you open a fresh lot of biscuits, try each one in a typical slot and separate them into three piles: too tight, too loose and just the right fit. Put each pile into a plastic bag, label it, and you’ll be ready to go for the next glue-up.
Each size has an ideal use. Thick biscuits work best where exact alignment is critical, such as edge gluing boards. Save loose biscuits for complicated glue-ups, where it may be 10 minutes or so before you can finally squeeze all your joints home with clamps. Use the fits-just-right biscuits for everything else.
How’s Your Depth of Cut?If you need to crank hard on your clamps to get joints to close up, your slots may not be deep enough. Here’s an easy way to set up your machine before you get into trouble. First, cut a slot in a scrap piece of wood. Then place a biscuit in the slot and draw a line across its face. Remove the biscuit, flip it around and stick it back in the slot. Draw a second line. Pull the biscuit out and see what you’ve got. The pencil lines should be about 1/16-in. apart, meaning that each slot is about 1/32-in. deeper than half the width of the biscuit. If your pencil lines are closer together, the slot isn’t deep enough. Most plate joiners have an adjustment screw for changing the slot’s depth, but you may have to fish out your owner’s manual to figure out how it works! |

|

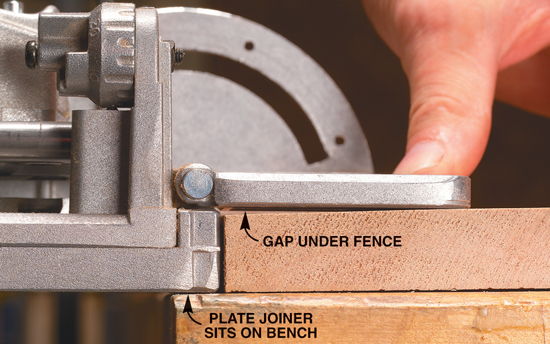
Oops! The Mysterious MisfitI was cutting slots for a long edge joint the other day, and everything was humming right along. But, when I put the boards together, they didn’t line up worth a darn! |

Photo A. Slots may not line up if your plate joiner sits on the benchtop. There may be a small gap under the fence.
|

Squash Fat Biscuits
If you’re down to the last few biscuits and they’re all too fat, don’t give up on them. You can squeeze thick biscuits between the jaws of a vise to make them thinner. A machinist’s vise works best.
That’s more or less how biscuits are made in the first place, after all. They’re simply pieces of compressed beech. Why the squish? Dry biscuits are made to easily fit into a slot. When they come into contact with the moisture in glue, they expand and lock tight. Compressing them a bit more in your vise is perfectly fine.
SourcesNote: Product availability and prices are subject to change. “Fast Accurate Face Frame” “Fasten Solid Wood to Plywood” This story originally appeared in American Woodworker January 2003, issue #98.
|

Here are some supplies and tools we find essential in our everyday work around the shop. We may receive a commission from sales referred by our links; however, we have carefully selected these products for their usefulness and quality.


