We may receive a commission when you use our affiliate links. However, this does not impact our recommendations.
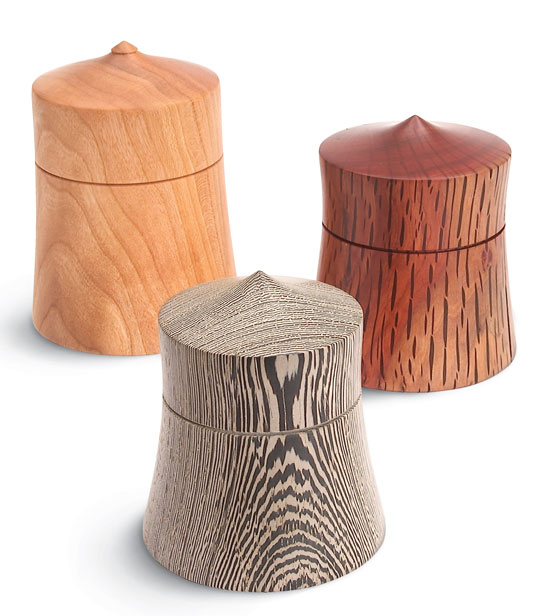
Turned Lidded Box
A Precision Fit Lid that Snaps Shut
By Alan Lacer
|
Of all the different forms of woodturning, I find the most delight in creating lidded boxes. The satisfying snap of a well fit lid as it closes, the beauty of the shape and the wood combined with the usefulness of a lidded container just do it for me. Turning a lidded box is a demanding project, but anyone with a few bowls and some spindle work under their belt can produce these wonderful objects. All it takes is a methodical approach and sound technique. A lidded box presents two unique challenges. One is creating the perfect fit between the lid and base. Think of it as a precise joint that’s designed to come apart. The other challenge is hollowing end grain. End grain can be up to five times harder than side grain and is prone to tear out. Even experienced bowl turners are surprised when they first try hollowing end grain. Fortunately, these problems can be overcome by switching from a gouge to a scraper when hollowing end grain. If you fall in love with lidded boxes, you might consider purchasing a ring or a hook tool that’s designed specifically for cutting end grain. Why hollow end grain when you can make a box from face grain? The answer is simple: an end-grain box is more stable. That means your lid will fit well all year long. Face-grain turnings change shape more dramatically with changes in humidity causing the lid to fit perfectly one day and fit too tight the next. If you want a loose fitting lid and a different grain look, then a face-grain box is acceptable. For this story, I will take you through the entire process of making an end-grain box with a snug, friction-fit lid. We’ll cover chucking the parts in different manners, cutting end grain, tight tolerances, hollowing in a narrow space, creating the desired “perfect fit,” and dealing with a joint designed to come apart. Choosing your woodIf you are new to box making I suggest using walnut, soft maple or cherry. These woods are easy to turn and make fine looking boxes. Select a piece that’s 3-in. square and 5 to 6-in. long. The wood needs to be dry throughout, as you can afford very little dimensional change as you turn these boxes. Move up to exotic domestic or imported woods as you gain experience. A perfect fitting lid is best achieved by roughing out the lid and base interiors first, then letting them sit for a few days or more before finishing the box. Almost all species of wood will change shape when extensively hollowed, no matter how well they are dried.
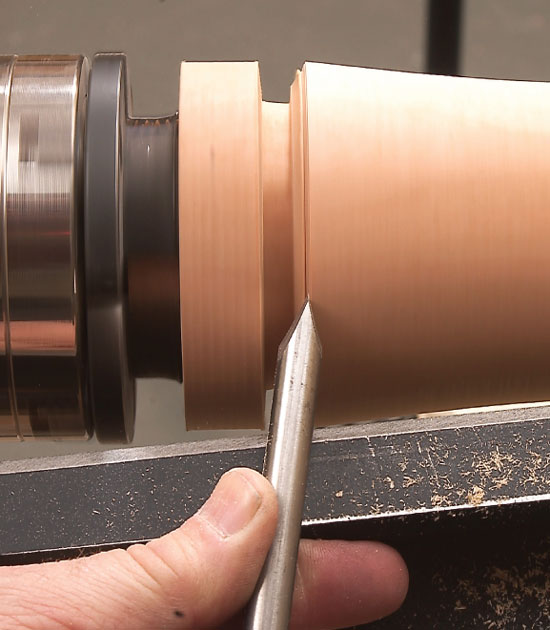
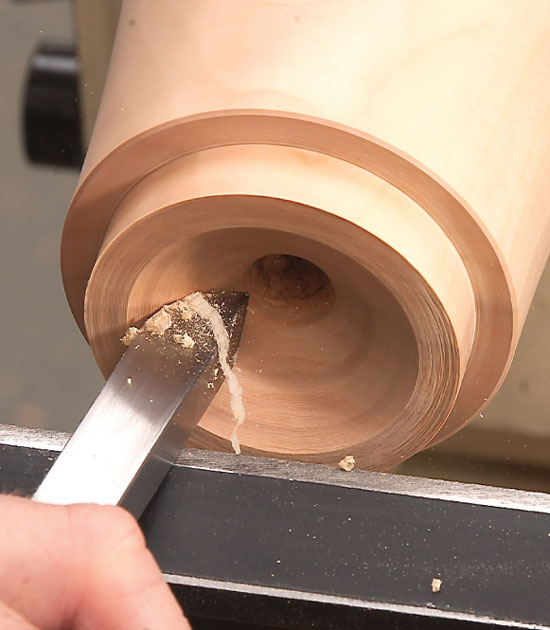
Prepare the blank for the chuck1. Mount your blank between centers as you would for spindle turning. Create a cylinder with the spindle-roughing gouge. 2. Cut tenons on both ends of the cylinder (Photo 1). Set your outside calipers to a size that fits the jaws of your scroll chuck. Cut the tenons slightly shorter than the depth of the scroll chuck’s jaws so the tenons don’t bottom out before the chuck is tightened. The shoulder should be 90-degrees to the tenon in order to seat firmly in the jaws. 3. Separate the lid from the base (Photo 2). On a 5-in.-long box I normally make the lid blank about 1-3/4 in. long. Shape the inside of the lid4. Mount the lid blank into your scroll chuck (Photo 3). 5. Rough shape the inside of the lid (Photo 4). I think a lid looks better when it has a smaller diameter than the base so I leave enough wall thickness to allow for downsizing the outside diameter later on. For a 1-3/4-in. high lid I hollow to about 1-1/4 in. deep, generally following the outside shape I intend to give the lid. Leave the wall thickness about 3/8-in. where the mortise will be cut. 6. For the final passes, use a ring or hook tool designed to solve the problem of cutting end-grain cleanly (Photo 5). An alternative is to shear scrape with your side scraper. Simply tilt the scraper at a 45-degree angle and take a very light cut, just a little above center. 7. Cut the lid’s mortise with the spear point scraper (Photo 6). The sides of the lid at the opening are often referred to as the mortise because it fits over the tenon on the base. This area of the lid must be cut as clean as possible and left untouched by sandpaper. Sanding will change the circularity of the mortise ever so slightly and result in a poor fit. I plan on a 3/8-in. tenon on the base so the lid mortise is cut 1/2 in. deep. 8. Check that the mortise does not taper in towards the center (Photo 7). I strive for either a straight wall or a very slight taper away from center. Finish off this area with a light shear scraping action. Don’t sand the mortise, or you may distort it. 9. Remove the lid from the lathe. Measure the inside diameter and depth of the lid with a Vernier or dial caliper. Record the diameter on paper but lock the setting for the depth on the calipers.
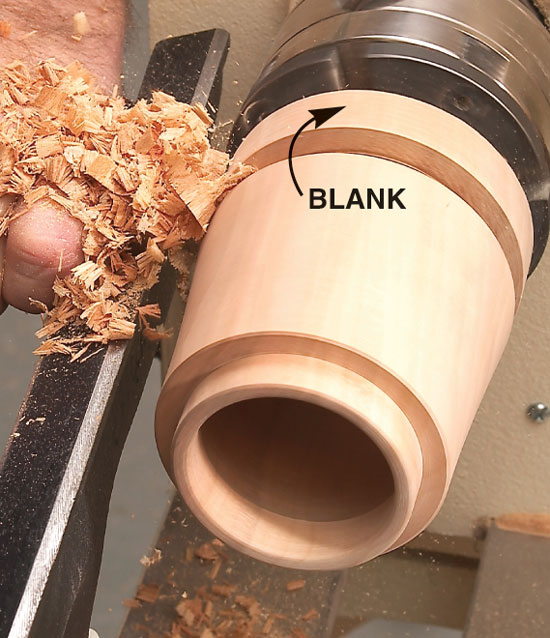
Mount the lid on the base10. Mount the base blank into the chuck. Make sure it is seated securely. 11. Create the rough tenon on the base with a standard parting tool. Set your calipers 1/4 in. larger than the mortise. Once you’re within 1/4 in. of your finished tenon size, it’s time to slow down. You will be amazed how much you can take off with a light cut. That’s because pushing the parting tool in 1/16-in. actually removes 1/8-in. from the tenon’s diameter. Plan on making 5 or 6 light cuts, turning off the lathe and checking the fit after each cut. At this point you need a tight fit on the lid because the outside of the box is turned with the lid in place. The objective is to create a fit that is tight enough to hold the lid on the base while turning but still loose enough to pull off when ready to hollow the base. This is not the final fit of the lid. We’ll get to that later. To simplify “creeping up” on the fit, cut a tenon that tapers slightly in towards the end (Photo 8). 12. If, after all your best efforts, you end up with a fit that’s a tad loose, use a tissue paper shim to tighten it up (Photo 9). Turn the outside of the box13. With the lid now firmly mounted on the base, begin shaping the outside of your box. Use the measurement from step #9 to mark the depth of the hollow on the lid (Photo 10). I start the outside of the box by shaping the lid first (Photo 11). 14. With the lid to your liking, establish the overall height of the box. Use a parting tool to mark the bottom with a 1/4" deep groove. Start on the long side, then nibble away at the height until the box’s proportions look the way you want. Play with different ratios using your eye rather than exact measurements. I like a 1/3 lid, 2/3 base ratio. 15. Shape the sides of the box (Photo 12). I make my boxes with a little asymmetry: the lid has a smaller diameter than the base with a slight curve in the side. This entails working from both ends towards the joint in order to keep working with the grain. 16. Cut a chamfer on the box’s bottom (Photo 13). 17. Make a V-shaped cut at the joint (Photo 14). 18. Sand the outside of the box up to 220 grit. If “ringing” (telltale sanding scratches encircling the box) is a problem —as it often is with cherry and maple—you may have to sand to 400 grit.
Hollow the inside of the base19. Remove the lid from the base. If the smooth surface makes it hard to get a grip, try using one of those rubber gadgets for removing jar lids. 20. Drill the base interior to establish a finish depth (Photo 15). 21. Hollow the base (Photo 16). Complete both the bottom and sides with a shear scraping action. 22. Sand the inside of the box. Do not touch the outside of the tenon with sandpaper.
Final fit the lid23. At this point the lid is too tight for use. With a parting tool, take extremely light cuts from the tenon to loosen the fit. Turners refer to them as “dust cuts” because you barely remove any wood. There are any number of ways to fit the lid to the base: loose, light suction, snap, or tight. The “correct” fit is the one targeted by the turner. If you would like to remove the lid without picking up the piece, then a loose fit is in order. If you want the closest thing to a locking lid then a tight fit is appropriate. To create a snap fit, remove a small amount of wood from the bottom half of the tenon near the shoulder, leaving a fairly tight fit in the upper half. The snap is created when the first sensation of resistance is felt in putting on the lid followed by little or no resistance as it is seated. Like all of the tenon to mortise tolerances in box making, go at this in the tiniest increments to achieve the desired fit—it is very hard to put wood back on.
Shape the bottom of the base24. Part the base off from the blank stock (Photo 17). 25. Use a parting tool to cut a tenon on the blank stock left in the chuck. The tenon is sized to fit the base opening in the same way the base tenon was sized to fit the lid. You want a tight fit that will hold the base while you finish the bottom. This is often referred to as jam chucking. 26. Run the lathe at a slow speed (under 500 rpm if possible) and shape the bottom of the box with the ring tool (Photo 18). As an alternative, use the 1/2 in. side radius scraper—but with very light shear scraping cuts. Be sure and note how deep you hollowed the inside of the base. If there is enough wood at the bottom of the base then make this concave area fairly deep to lighten the feel of the box. Shoot for a bottom thickness of 3/16 in. to 1/4 in. 27. Pull the base off the jam chuck, place the lid on the base and admire your workmanship.
Thoughts on finishingIf the box is a light colored wood, such as maple or holly, I use either wax or white shellac. Both of these products can be applied while your box is on the lathe. For darker woods, such as cherry and walnut, I use pure tung oil or an oil-and-varnish blend. The blend is one part varnish, one part pure tung oil and one part boiled linseed oil. Materials
Editor's Note
The dimensions This story originally appeared in American Woodworker April/May 2007, issue #128.
|
Click any image to view a larger version.
1. Turn your blank into a cylinder then cut tenons on each end with a parting tool. Use a caliper to size the tenon to fit your scroll chuck.
2. Use a thin-kerf parting tool to separate the lid from the base. This tool removes as little material as possible and helps maintain the grain match at the joint.
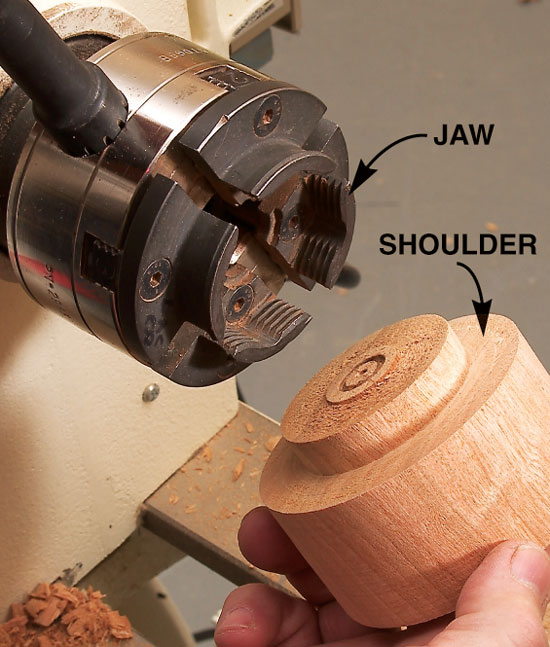
3. Mount the lid blank on your scroll chuck. Push the tenon all the way in so the shoulder sits firmly on top of the jaws.
4. Rough out the inside of the lid with a 1/2-in. side scraper. Hollowing end grain is best done from the center out to minimize tear-out.
5. Make the finish cuts with a ring or hook tool to leave a smooth surface.
6. Cut the lid mortise with a spear point scraper held flat against the tool rest. Finish with light cuts and the tool held at a 45-degree angle (shown). This is known as a shear scraping cut.
7. Check that the mortise does not taper in towards the center of the lid by holding a rule against the mortise. The perfect mortise will position the ruler so that it sits parallel with the lathe bed.
8. Mount the base in the jaw chuck. Cut a tenon that tapers so the lid just fits on the end. Twist the lid to create a burnished line then shave the tenon down to that line. The fit has to be tight so the lid won’t spin as it’s turned on the base.
9. If you inadvertently cut the base tenon too deep, the lid will spin or come off when you shape the box. A tissue paper shim will fix a fit that’s a tad loose.
10. Use the points on a dial or Vernier caliper to mark the depth of the interior hollow on the lid. Be sure the calipers are laying flat on the tool rest.
11. Shape the top of the lid with a shallow gouge. Let your creativity be your guide for the top design. Shoot for a 3/16" – 1/4" thick top.
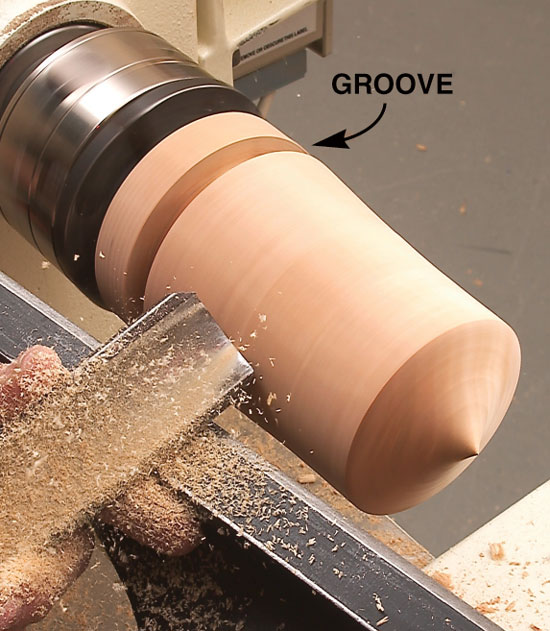
12. Use a spindle-roughing gouge to shape the rest of the box. A groove cut with a parting tool marks the bottom of the box.
13. Use a skew chisel to cut a slight chamfer on the bottom of the box. This softens the sharp corner and creates a small shadow under the box to give it a visual lift.
14. Cut a shallow V-groove at the joint with a skew. This detail helps disguise slight changes in circularity that may show up at the joint over time.
15. Drill out the base’s interior using a drill chuck in the tailstock and a 5/8- to 1-in. drill bit. Mark the desired depth of the base interior with a piece of tape.
16. Use a side radius scraper to continue hollowing the base. Start in the drilled opening and work from the center out.
17. Part the base off from the blank. Be sure to leave enough wood on the base so the bottom can be scooped out in the next step.
18. Turn the base around and mount it on a tenon cut on the remaining blank stock. Use the ring tool to cut from the center out to create a concave bottom with a small rim. |


Here are some supplies and tools we find essential in our everyday work around the shop. We may receive a commission from sales referred by our links; however, we have carefully selected these products for their usefulness and quality.