We may receive a commission when you use our affiliate links. However, this does not impact our recommendations.
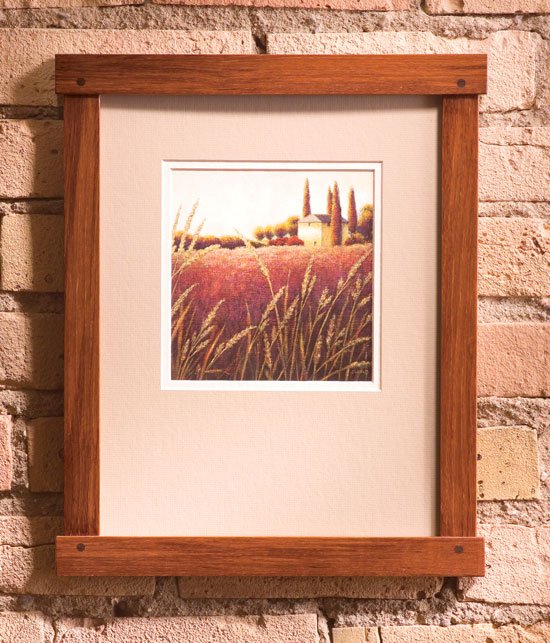
Craftsman Frame
Pegged half-lap joints are the cabinetmaker’s way to build a beautiful frame.
By Jock and Susan Holmen
| Picture frames are pretty easy to make, except when it comes to putting the pieces together. Getting four mitered corners perfectly cut and glued can drive you batty! This frame uses a simpler approach—the half-lap, a traditional furniture maker’s joint. It’s very easy to make on the tablesaw and resembles a much more complicated mortise-and-tenon joint. |
You may also like… |
| If you’ve never made a picture frame or lap joint before, this is a great project to start with. And it’s easy to make a whole bunch of these frames at the same time. We’ll show you an optional goof-proof sled that helps make cutting dozens of joints simple, safe and accurate.
Our frame is teak, a wood whose rich golden color beautifully complements most photos or artwork. Using quartersawn white oak would also look striking. This is a traditional Arts and Crafts-style frame, and quartered oak was the preferred wood of that era. If you’ve got some 8/4 (2-in.) wood, you can make top-grade quartersawn pieces for this frame by ripping the board at an angle (see “Make Your Own Quartersawn Lumber,” below). We’ve sized the frame to fit precut matte and glass available at many craft stores, so you don’t have to cut your own. The matte is 11 x 14 in. and fits an 8 x 10-in. photo. You’ll need a stacking dado set for your tablesaw to make the lap joints. (A wobble-type dado set won’t work because it doesn’t cut a flat bottom.) You’ll also need a rabbeting bit for your router table (Photo 8). We recommend using a brad-point drill bit for the pegs that go into the frame’s corners (see Sources, page below). This bit makes a cleaner entry hole than a standard twist bit. The uprights, or stiles (A, Fig. A, below), of this frame are 5/8 in. thick. The cross pieces, or rails (B), are 3/4 in. thick. If you don’t have a planer to thin down pieces to 5/8 in., that’s not a problem. The pieces are so narrow that you can make them the right thickness on your tablesaw. Just stand some 3/4-in. pieces on edge and rip them to 5/8 in. Begin by cutting the stiles and rails to final width and length (see Cutting List, below). At the same time, make two extra stiles and two extra rails from an inexpensive wood to use as test pieces when you cut the joints. |
Click any image to view a larger version.
|

| 1. Build a sled to cut the half-lap joints (Fig. B, below). You could simply use a fence on your miter gauge, but this sled is more accurate, is safer and always delivers consistent results. Install a 3/4-in. dado set in your saw and raise the blade 1/8 in. above the sled. Cut a slot through the sled’s base and you’re ready to go. |  |
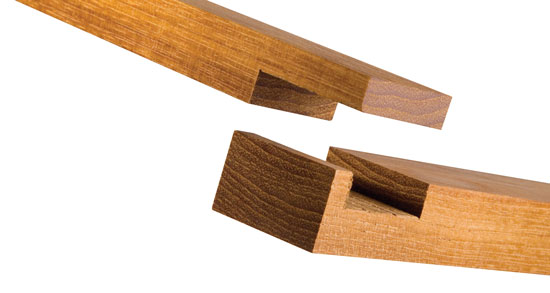
| 2. Cut a rabbet on one end of each of your spare stiles (Fig. C, below). Your goal is to remove exactly half the thickness. Clamp the stop block so the length of the rabbet matches the width of a rail. Two passes are necessary to cut the full rabbet. |  |
| 3. Test the fit until the two test pieces are flush. The back of the frame will then be perfectly flat, which is important for accurately cutting the rabbet that holds the matte and glass. If the pieces aren’t flush, adjust the height of the blade and try again. It’s better to start with the blade too low rather than too high, because you can recut the same pieces. When you’re satisfied, make these cuts on the ends of all the real stiles. |  |
| 4. Cut the first half of the dadoes in all the rails with the blade at the same height as in Step 2. The full dado requires two overlapping cuts. You’ll clamp the stop block in a different position for each cut. For the first cut, mark the dado on a test rail. Line up the outside mark with the right-hand cut in the sled. |  |
| 5. Cut the second half of the dado only in a test piece. Move the stop block so the inside dado mark lines up with the left-hand cut in the sled. |  |
| 6. Test fit one corner. Your goal is to have the two pieces slip by each other to make a tight fit without requiring any force. If the joint is too tight, move the stop block and recut the test piece. If the joint is too loose, make the dado narrower by adding a piece or two of tape to the stop block’s end. Try the new setting out on the second test piece. When you’re satisfied with the fit, continue cutting the actual rails. Sand all the pieces to 150 grit. Slightly round all the edges with sandpaper. |  |
| 7. Glue the frame together. You don’t need much glue or clamping pressure. Spring clamps work fine, so you don’t have to worry about marring freshly sanded surfaces. Remove any squeezed-out glue with a sharp stick before the glue hardens. Wipe off the stick’s glue on a damp rag as you go. |  |
| 8. Rout a rabbet all the way around the frame’s back (Figure D). Use a rabbeting bit with a ball-bearing pilot. The pilot rides on the inside of the frame to control the depth of cut. Make this cut in two passes. Raise the router bit so the first cut is 1/4 in. high; then raise the bit so the second cut is 3/8 in. high. | 
|

| 9. Square the rabbet’s corners using a wide chisel. Cut across the grain first, then with the grain, then across again, and so on, taking small cuts to avoid splintering the wood. When the rabbet is complete, order the glass. It should be 1/16 in. smaller than the opening. To be on the safe side, your best bet is to give the frame to the glass cutter. (Precut 11 x 14-in. glass to fit the frame is also widely available.) |  |
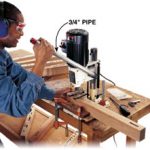
| 10. Drill a hole all the way through each corner of the frame using a brad-point bit. Glue 1/4-in. dowels into each hole. Use a contrasting wood to emphasize this accent (see Sources, below). Small dowels vary in diameter, so it’s a good idea to drill a test hole first. You may need to switch to a slightly undersize bit to get a good fit. The brad point bit I used comes in 1/64-in. sizes (see Sources). |  |
| 11. Cut off the dowels with a flush-cut saw. Hold the blade down against the frame, press into the dowel and saw slowly. A good flush-cut saw shouldn’t leave any saw marks on your frame, but it’s a good idea to practice first on the back of the frame. Only a minimum of cleanup sanding is necessary. Finish the frame with shellac or varnish.. |  |
| 12. Fit the glass, matte, photo or art into the frame and secure with fasteners. For more information on installing these materials, see “How To Mount Artwork,” below. Attach hangers or eye hooks and wire onto the back of the frame. |
|

Make your own quartersawn lumberIf you’ve got some spare 8/4 (2-in.) lumber lying around your shop, it’s easy to transform it into stunning quartersawn wood for your picture frame. Quartersawn figure in almost every wood is really something special, and quite different from species to species. Even an ordinary piece of thick oak, maple or cherry has a surprise waiting within it. |
 |

Mark both ends of a milled 8/4 board with a series of parallel lines that run at right angles to the growth rings. Tilt the blade to match the angle of the first cut—just eyeball it. Move the fence and make the second cut at the same angle. Next, turn the board around and repeat the same procedure for the other outside edge. Continue to work your way from the outside in, so the last cuts you make are for the center pieces, where your drawn lines are almost vertical. |

Return the blade to 90 degrees and saw off the angled edges. Make sure the edge that runs along the fence has the point facing up. If it faces down, it could get trapped underneath the fence. Run the pieces through the planer, and you’re ready to make a very special picture frame. |
How to mount artworkHere’s how to expertly mount photos and artwork to protect them from moisture and damage. |
 |

1. Hinge the matte to a mounting board (a solid piece of acid-free matte or foam core board). Butt the top edges together and secure them with acid-free mounting tape (see Sources, below). |

2. Position the artwork in the matte’s opening. Keep the artwork from shifting by weighing it down with a block of wood that has acid-free matte board glued to its bottom. |

3. Mount the art to the mounting board using T-shaped hinges, which allow the artwork to expand and contract, staying wrinkle-free. Fasten the tape sticky-side up on the back side of the artwork, at the top corners only. Place a second piece of tape, sticky-side down, as close to the artwork as possible. |

4. Install clean glass. The best way to keep fingerprints, dirt and lint off the matte and glass is to wear darkroom gloves. Install the artwork, mounting board and matte. |

5. Secure the assembly with brads or glazier’s points. The safest way to push in the brads is by using a pair of adjustable pliers. |

6. Protect the artwork from dust and insects by sealing the back of the frame with a paper dust shield. A grocery bag or kraft paper works fine. After installing the paper, dampen it with a sponge. The paper will shrink as it dries, leaving a tight, wrinkle-free dust shield. |
Sources(Note: Product availability and costs are subject to change since original publication date.) Groff & Groff Lumber Co., groffslumber.com, 800-342-0001, 4/4 teak. The Wood & Shop Inc., woodnshop.com, 314-731-2761, 1/4-in.-dia. x 36-in. walnut dowel, #221077. Lee Valley Tools Ltd., leevalley.com, 800-871-8158, Veritas flush-cut saw, single edge, #05K34.01; 1/4-in. brad-point drill bit, #07J02.16. Woodworker’s Hardware, wwhardware.com, 800-383-0130, CMT 1/2-in.-shank rabbeting router bit set, #CMT835.501.11. PENCO Graphic Supply Inc., artsuppliesonline.com, 800-967-7367, Acid-free matte board, 32 x 40-in. sheets; Gummed frame/hinge-sealing tape, #LI533-0751; Darkroom gloves, #PGS. |
Cutting List
|
Project Requirements
|


Fig. A: Exploded View
|
Fig. B: Dado Sled
|


Fig. C: Half-Lap Joint
|
Fig. D: Rabbet
|


| This story originally appeared in American Woodworker January 2005, issue #112.
|

Here are some supplies and tools we find essential in our everyday work around the shop. We may receive a commission from sales referred by our links; however, we have carefully selected these products for their usefulness and quality.