We may receive a commission when you use our affiliate links. However, this does not impact our recommendations.
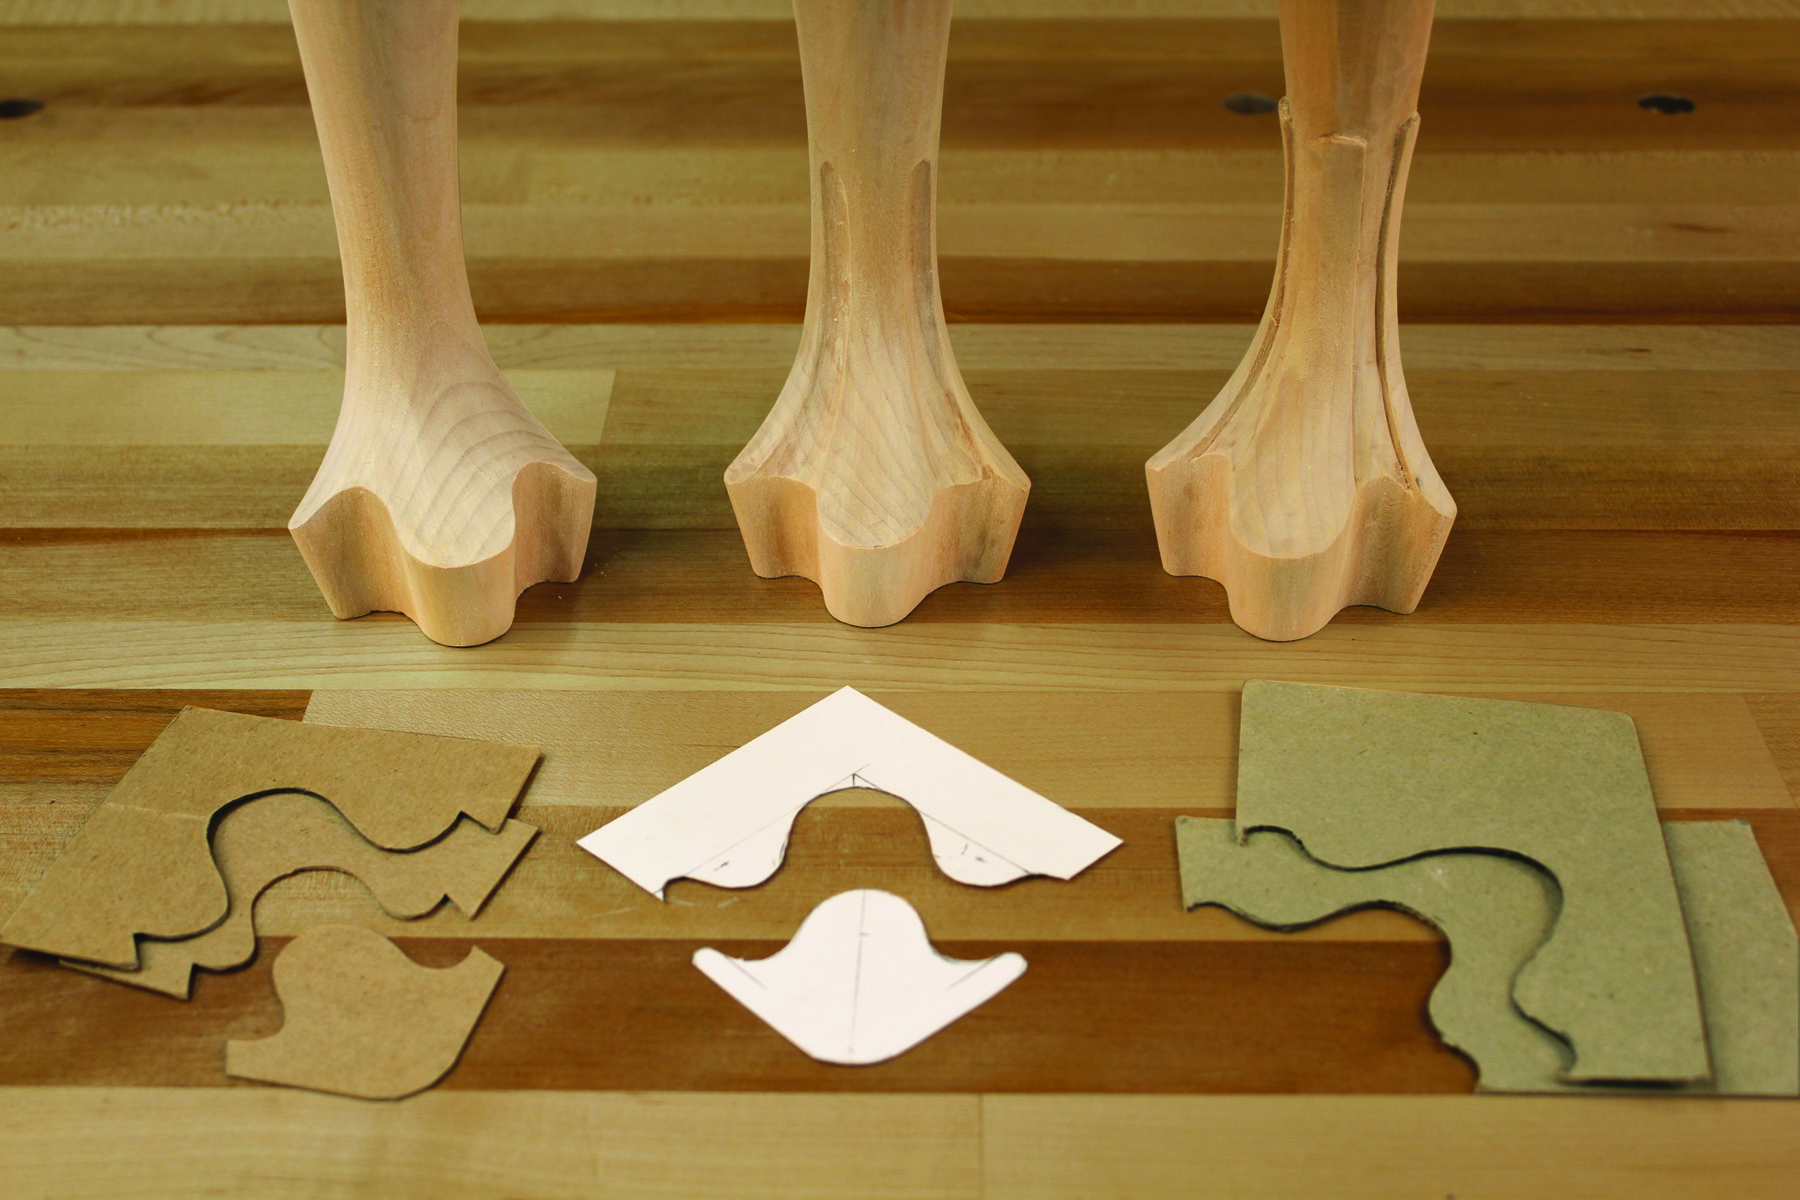
Three variations on a carved foot offer high style.
Access to information provides the modern woodworker with greater variety, and it challenges their skills more than their 18th-century counterparts. When we consider how fashion-conscious both producers and consumers were in the 1700s, it’s truly amazing to think how quickly the word spread of stylistic changes such as cyma-curved backsplats in chairs, cabriole legs and ball-and-claw feet.
Over the course of a few decades, furniture construction methods and aesthetics shifted between simple, unadorned pieces to richly carved and decorated pieces – then back again. Even with all this tumult in the furniture fashion world, period cabinetmakers were limited by regional taste and tradition.
While they may have known about ball-and-claw feet, per se, they may not have understood the regional variations that took place between areas such as Boston, New York and Philadelphia. Fashion changed from the rigid Jacobean to the more curvilinear William & Mary style and, eventually, to the dainty, feminine style of Queen Anne. Throughout the Colonies, cabriole legs were all the rage. Pad feet ran rampant – everywhere except in Philadelphia and its surrounding environs.
A great influx of Irish cabinetmakers and carvers brought with them a foot design that would dominate the Philadelphia Queen Anne style: the trifid foot. Pad feet were made in the region but no other foot design caught the ever fashion-conscious consumer’s eye like the trifid foot. An outgrowth of the pad foot, a trifid foot is elegant yet simple – which played well with local Quaker sensibilities.
Carvers divided a pad foot into three distinct toes creating a more “naturalistic” looking foot – so much so that trifid feet are also called “drake” feet (after the male duck). The style sense was shifting from the rigid toward the rococo. Having furniture with more “realistic” carving adorning it was quickly becoming the height of fashion. Trifid feet filled that need in the greater Philadelphia area unlike any other. The simple fact is that even though trifid feet were extremely popular in Philadelphia and England, they just never really caught on much elsewhere else in the Colonies.
Trifid feet are as varied as the consumers who coveted them. They can be clubbish or delicate and elegantly carved. They can have well-defined toes or be far more abstract. They can be cuffed, stockinged or plain. I’m sure that if cabinetmakers throughout the Colonies had the same access to the variety of trifid feet we have today, the feet would have been far more popular in many areas of the country.
From One, Many
In the 1720s and ’30s the cabriole leg was rapidly becoming the height of fashion. Furniture to this point had been primarily the playground of the joiner and turner. As the cabriole leg came into vogue, the turners kept their hand in furniture making by creating pad feet. And while there are a few variations on that theme, for the most part, one pad foot looks much like any other.
Looking for ways to set their work apart from one another, craftsmen of the 18th century added their own flair to cabriole legs. Some of the simplest versions were really no more than the cabriole leg cut out and shaped smooth. And while that simple look may have been appealing to certain clients, it certainly wasn’t the look that everyone coveted. Also, it didn’t give the rising class of carvers a chance to show off their skills.
Once carvers took over the block feet of a cabriole leg, it wasn’t long until there were a multitude of trifid foot variations. The first trifid feet were little more than the block foot with three defined toes – and even with just three toes there can be variations. The toes round over into one another creating line divisions between them, or hollow valleys can be carved between the toes to give them a more separated look. The edges of the toes can be sharp or rounded off, or even a combination of the two.
In an effort to further distinguish the toes of the trifid foot, carvers began defining them through the ankle and up the leg, essentially creating webbing between the toes. Sometimes this webbing was squarish in nature and other times it was a hollow. Either way, this extra definition gave the feet greater visual punch by creating more areas of reflection and shadow.
Although the majority of 18th-century carving on American furniture isn’t very deep, it creates surfaces that capture and reflect light to impart depth and interest. The appearance of un-webbed trifid feet is much flatter. By adding webbing, the carver adds interest and depth to the entire foot.
In yet another example of the carver’s efforts to create more light and shadow lines, some trifid feet had a cuff line added. These cuff lines defined the end point of the webbing just above the ankle. They are also sometimes referred to as “stockinged feet.” The cuff not only adds another shadow, but gives the leg a visual transition between the ankle and the calf of the leg, thus accentuating the foot even more.
Shape a CaBriole Leg
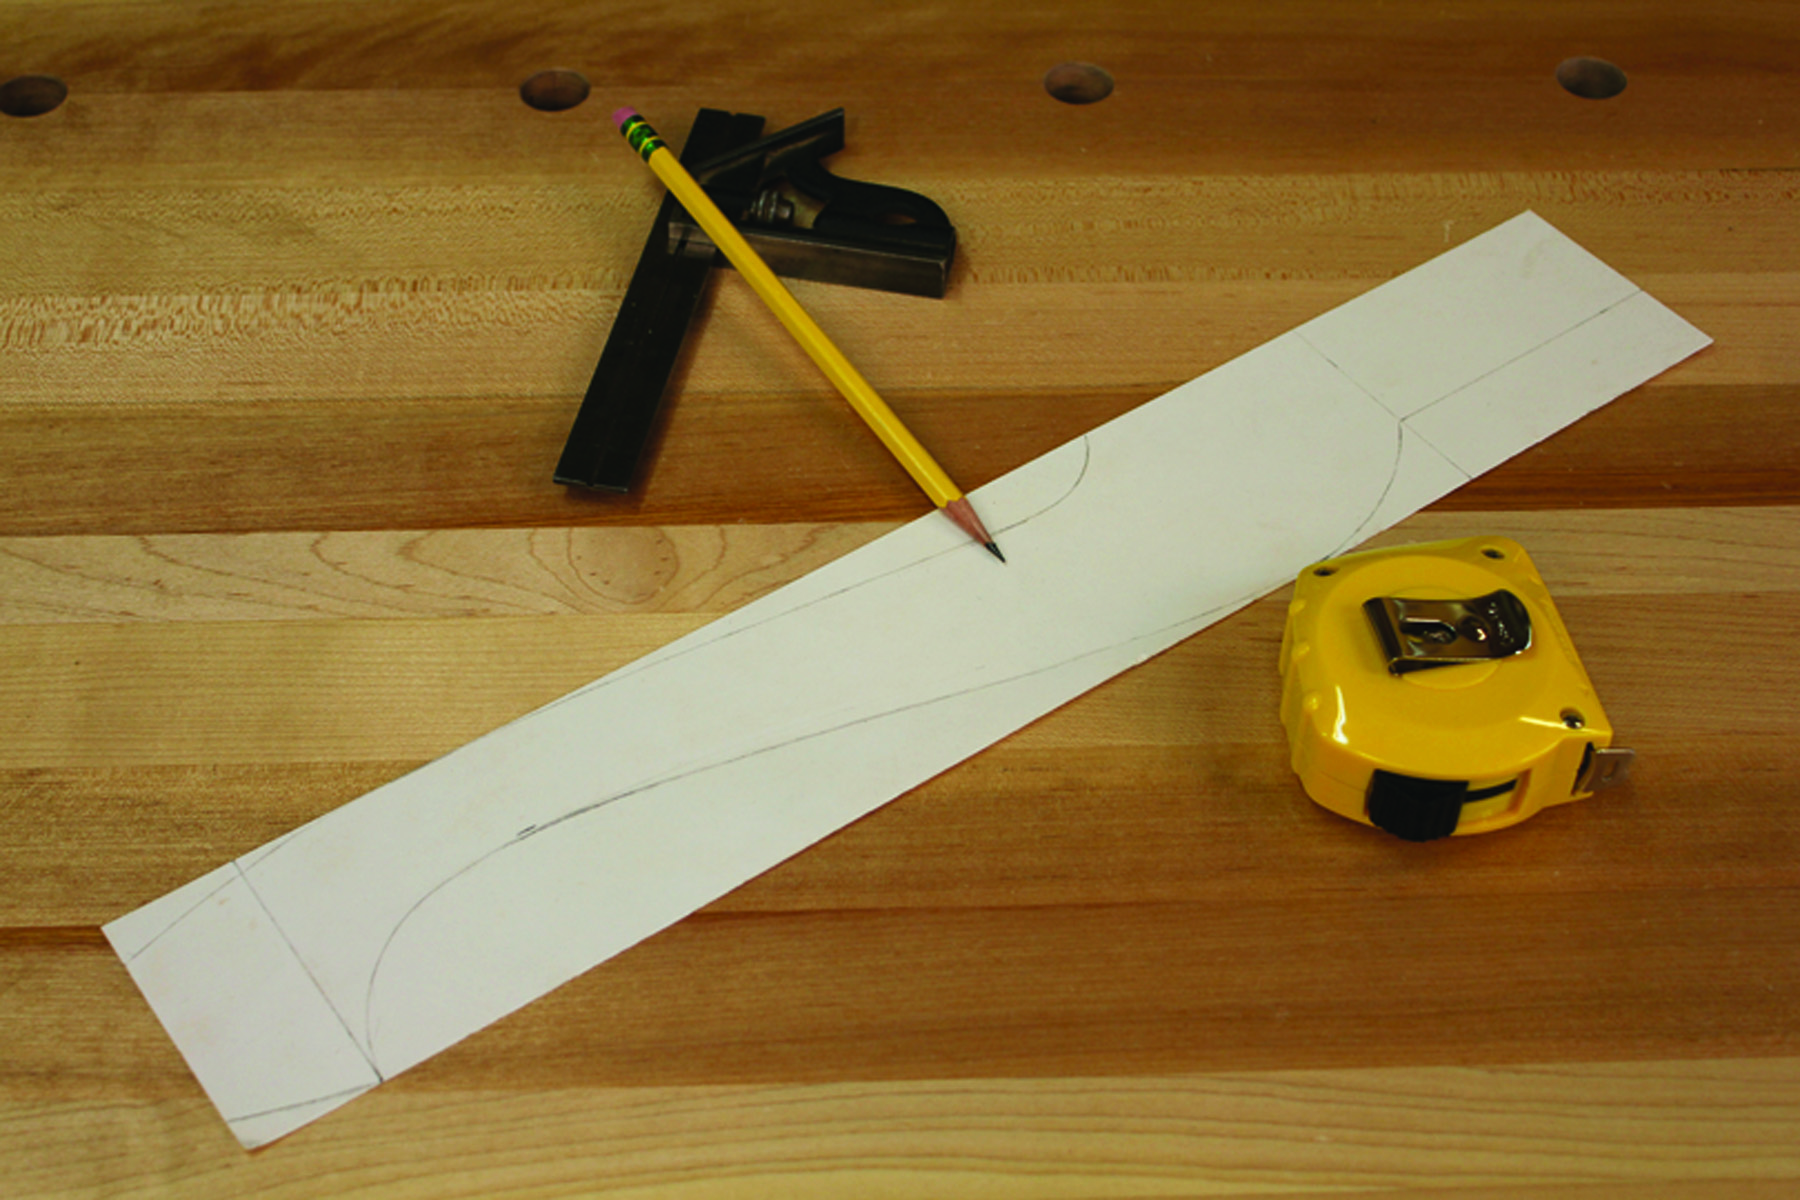
Draw the pattern. The cabriole-leg pattern doesn’t vary much from a pad-foot pattern.
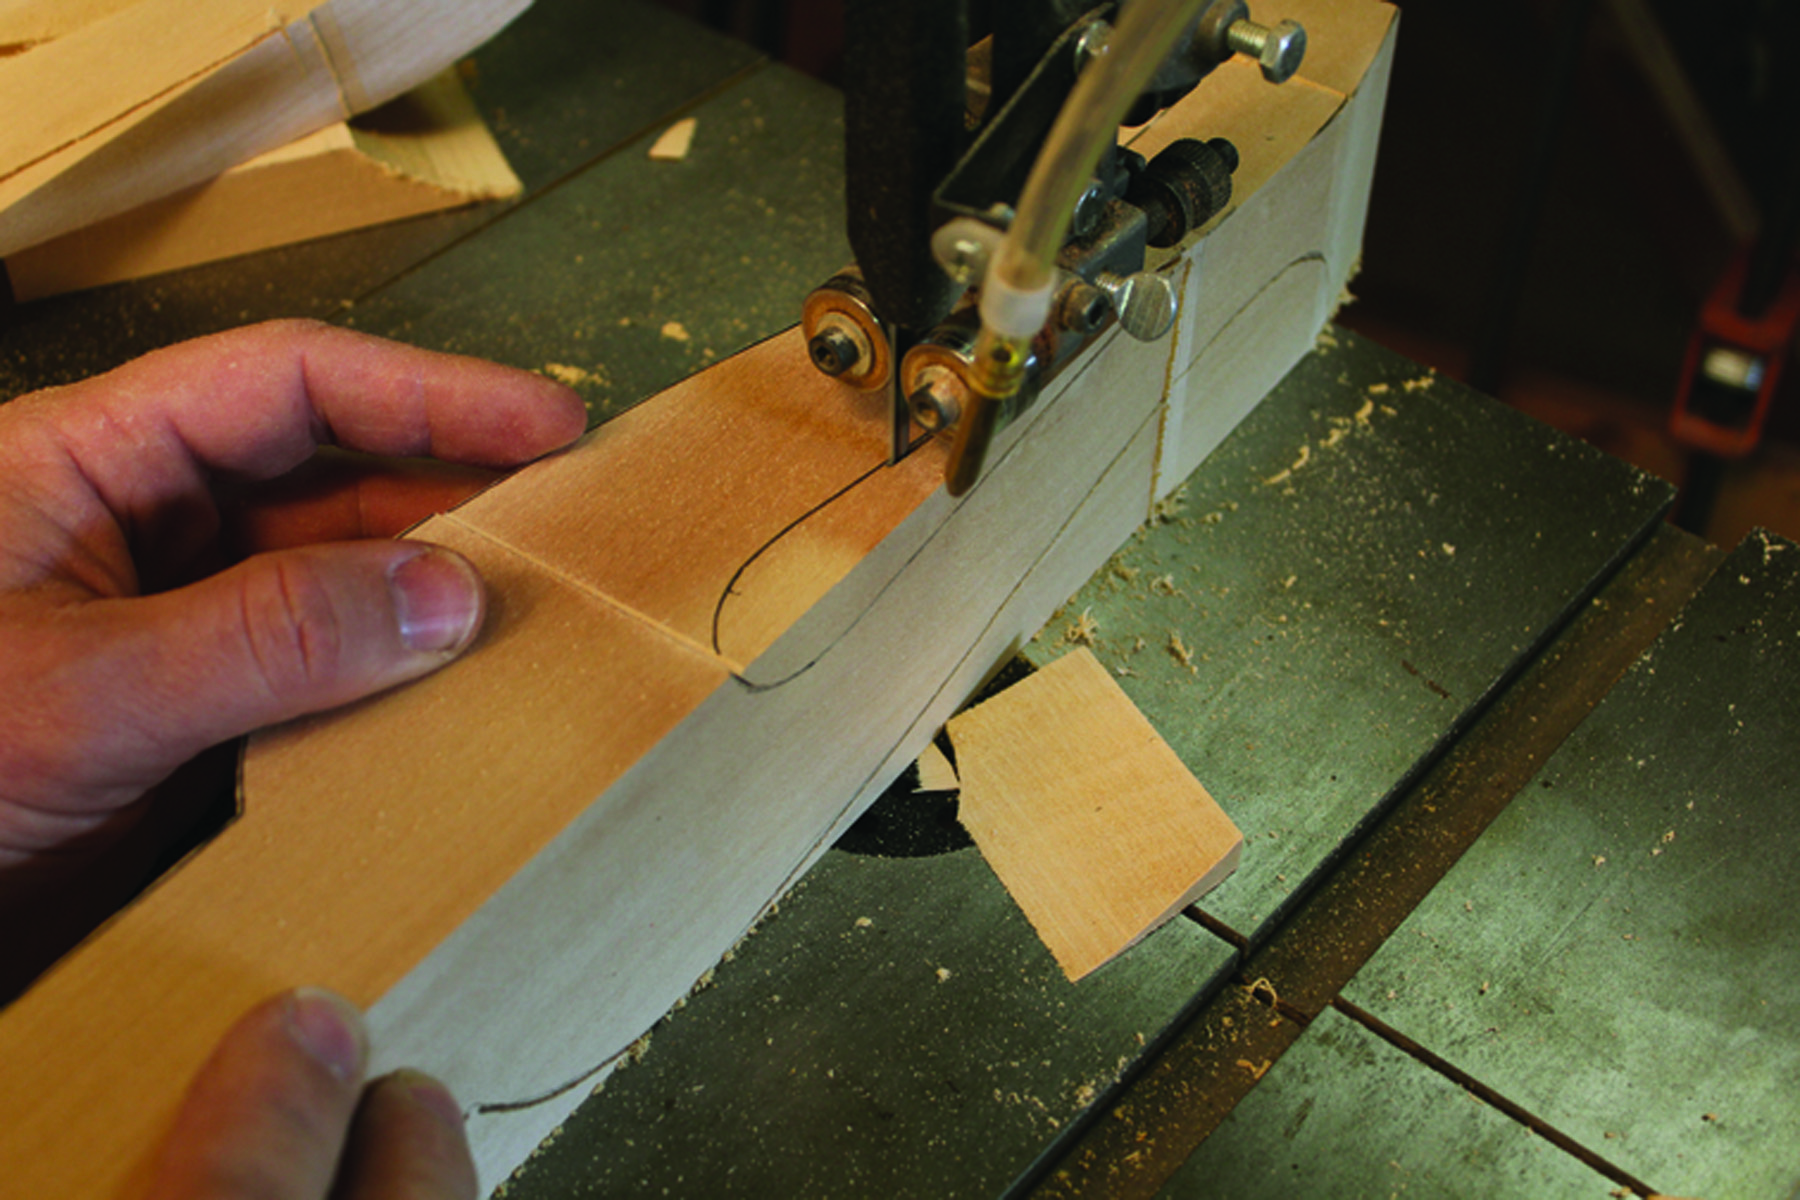
Cut the leg. Cut out the cabriole leg using the method you like (my “Cabriole Legs Simplified” DVD offers good instruction).
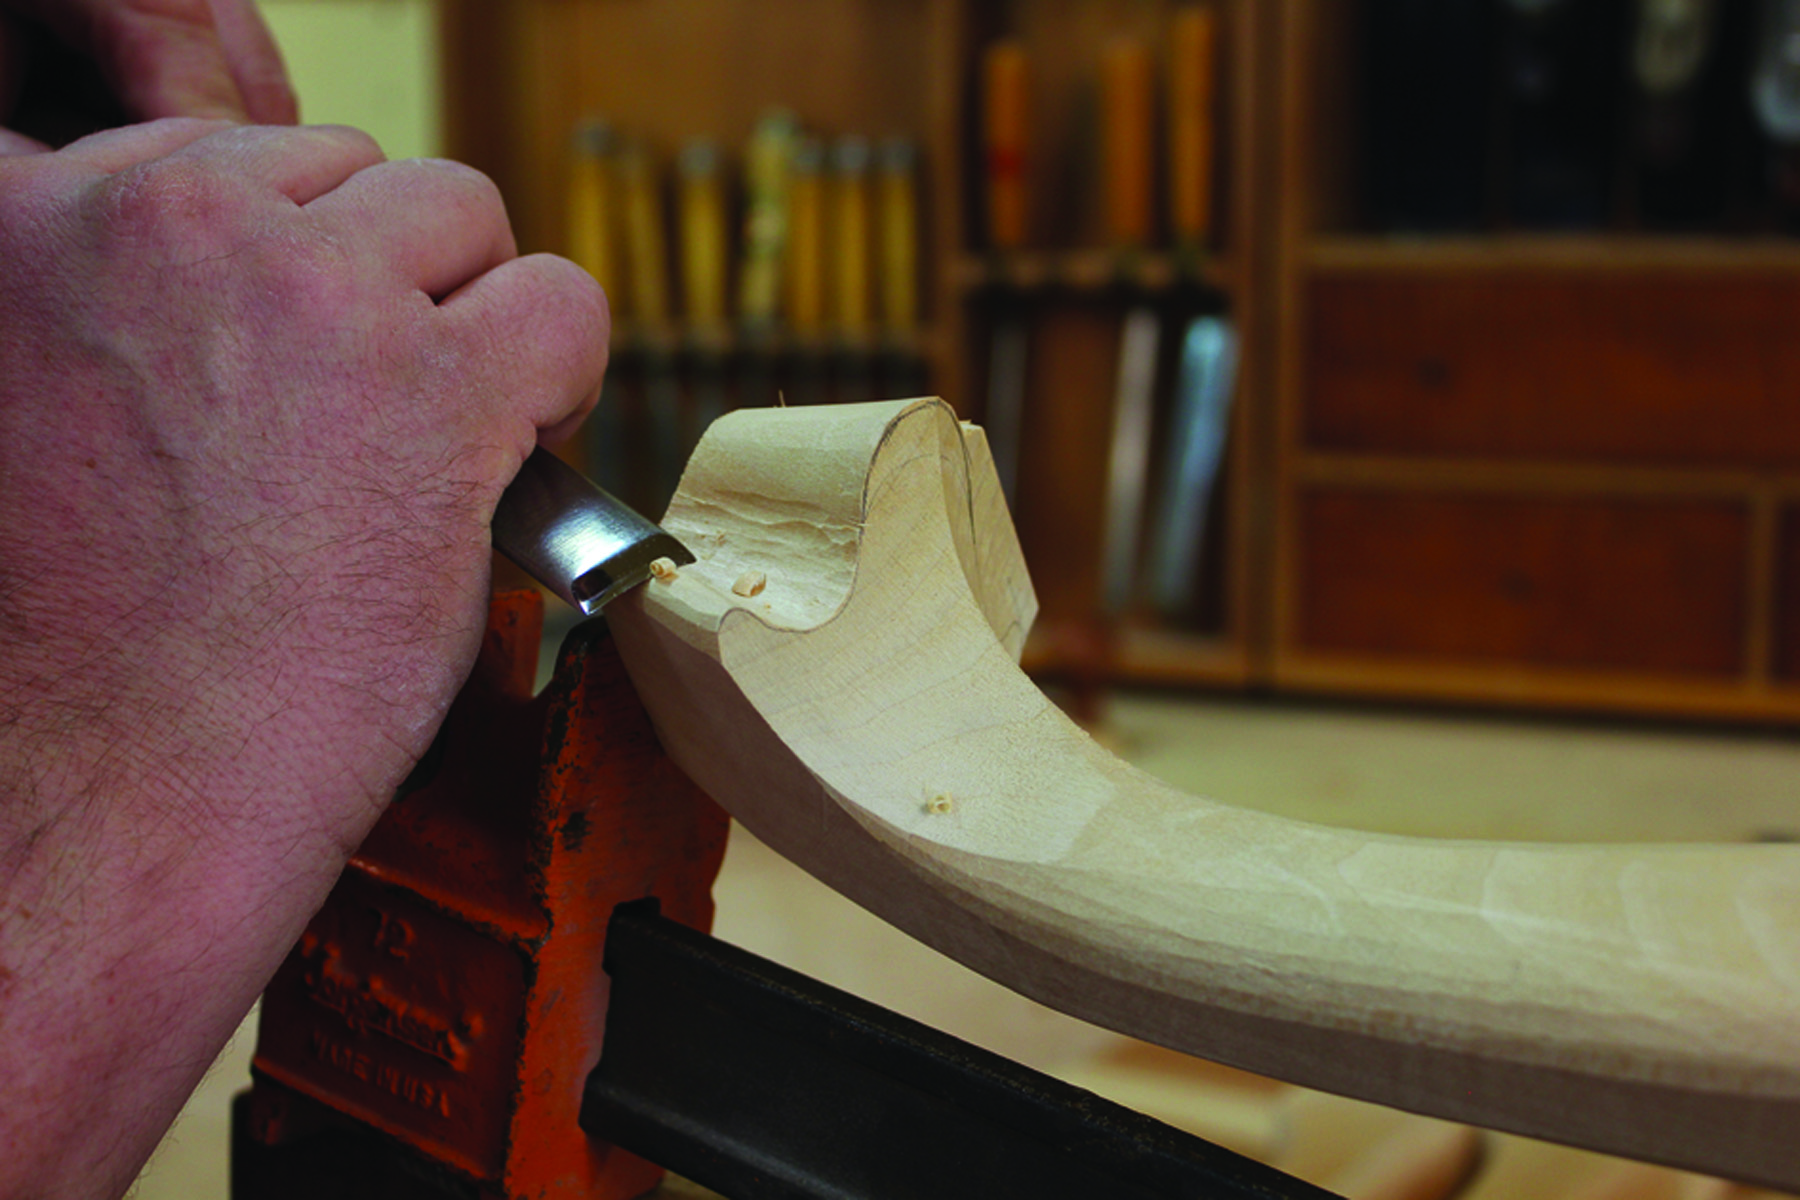
Refine the shape. Smooth, shape up and refine the curves on the leg using a spokeshave.
The Beginning
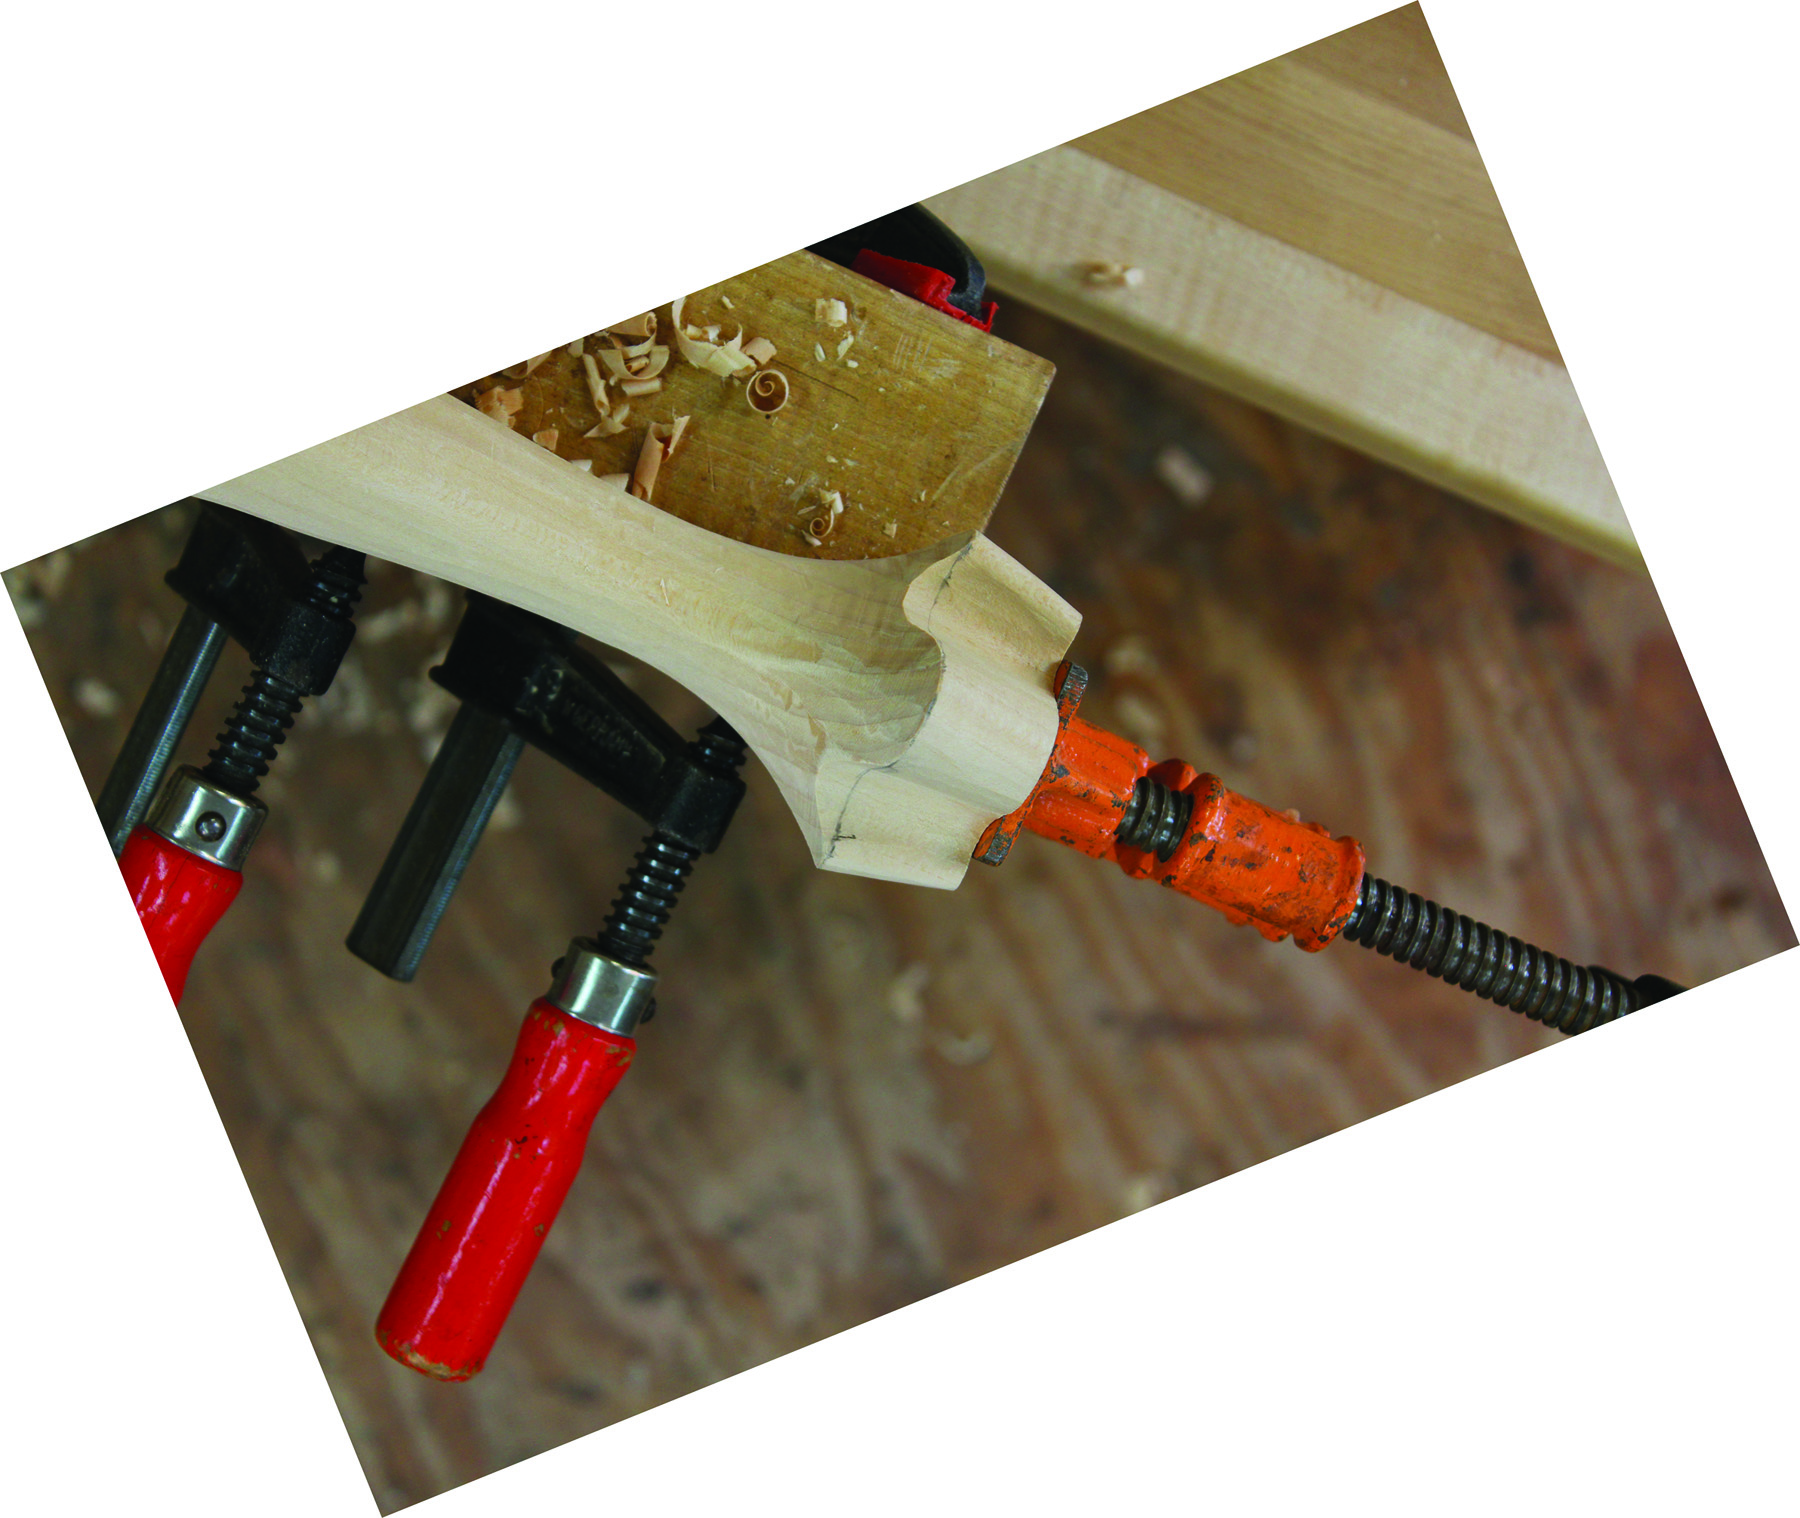
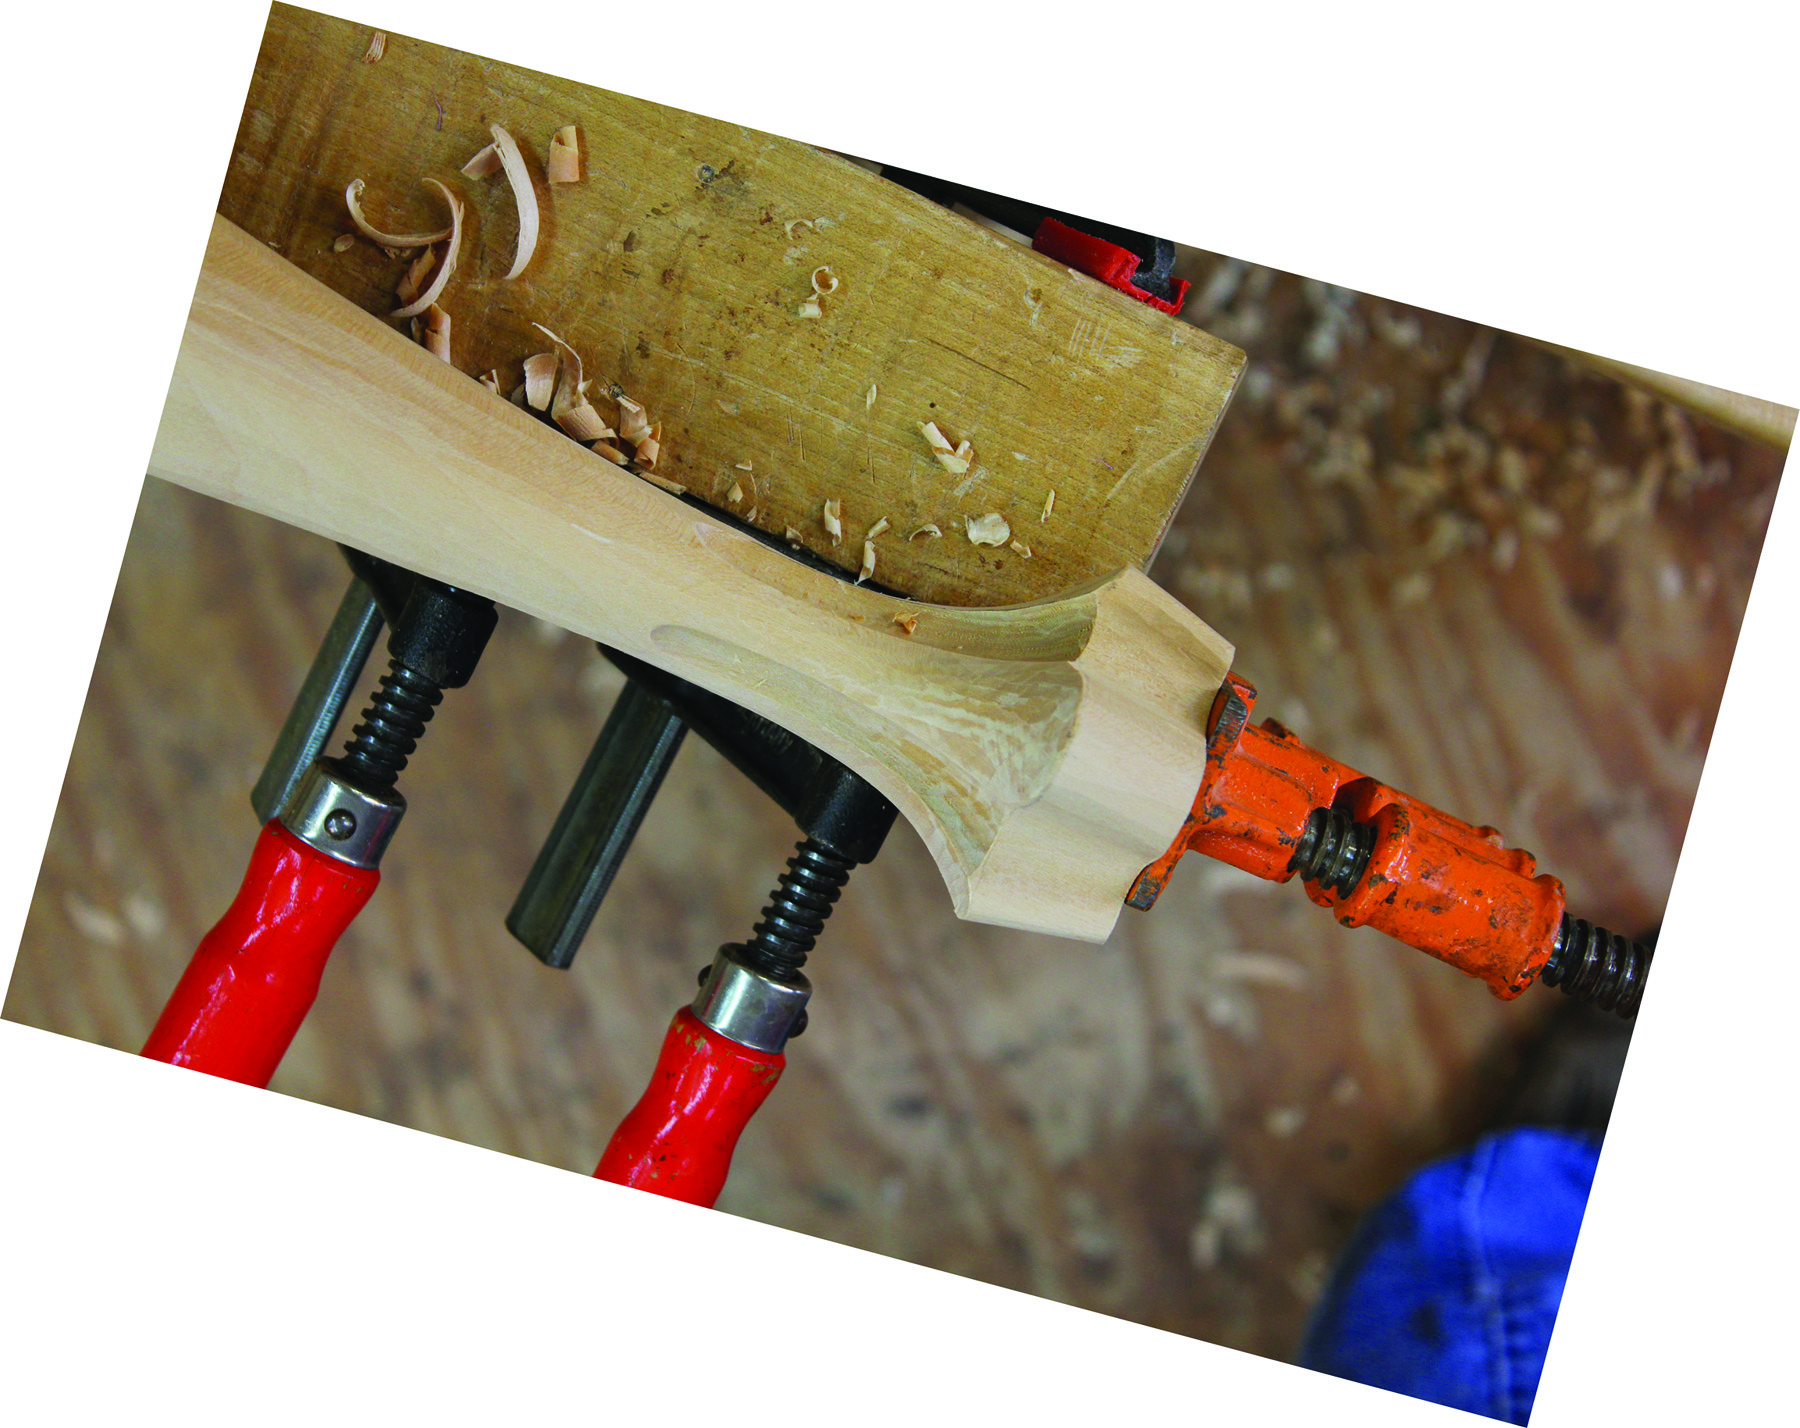
The making of a trifid foot is fairly simple. The bulk of the work happens when shaping the cabriole leg. Proper planning of your pattern prevents improperly proportioned trifid feet from plaguing your furniture designs. If we begin with the simplest version of a trifid foot, I’m sure you’ll see how minor changes in the sweep of the leg can dramatically affect the look of the foot. This foot truly leans toward the simple Philadelphia Quaker taste.
It all begins with the pattern for the cabriole leg. For most chairs and tables, I begin with 23⁄4” stock. The pattern should not vary too much from that of a cabriole leg with a pad foot. The main difference comes in how far down the toe of the pattern is swept. While there is variation amongst feet, the most delicate looking have the toe of the pattern swept down a good bit thinner than your standard pad foot. I usually start somewhere around 11⁄4” in height. The best trifid feet are smaller at the point where they touch the floor than they are at the top of the toes.
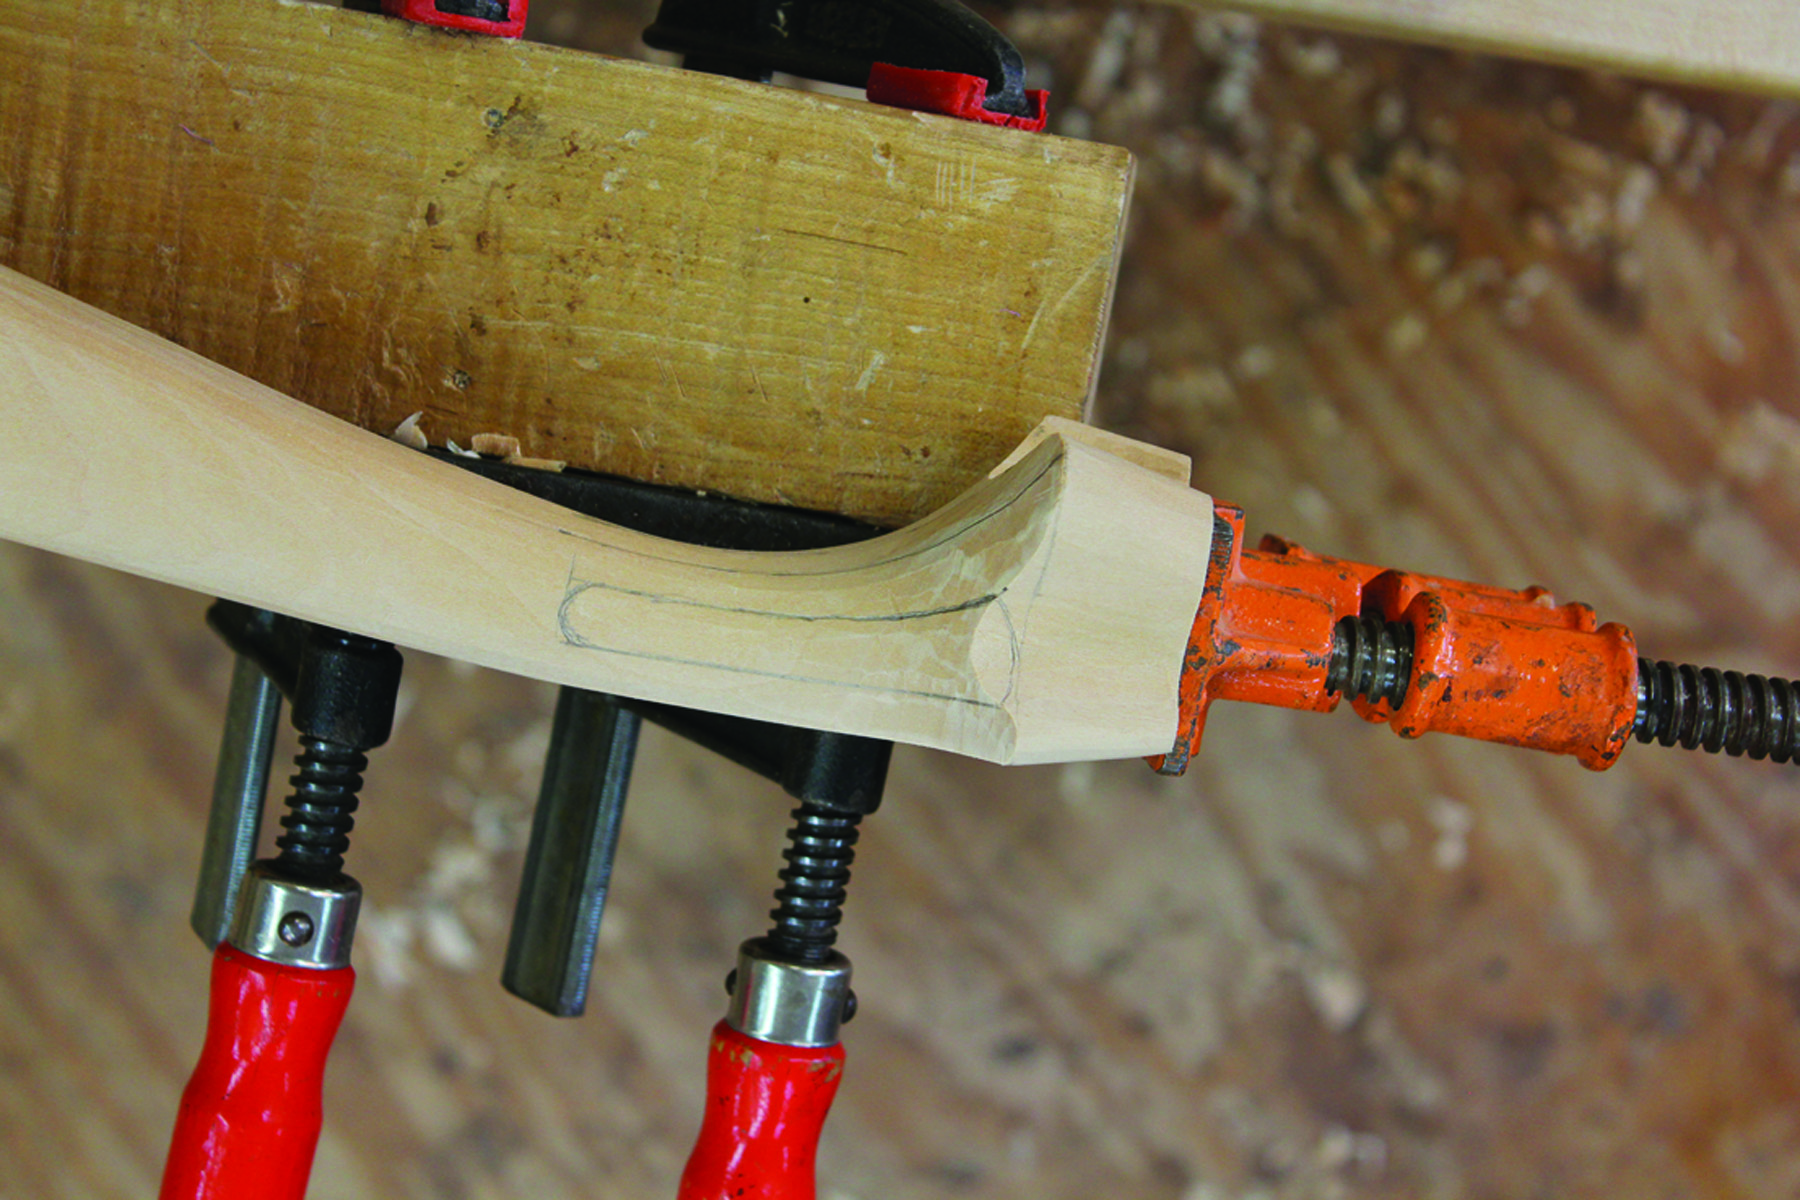
Cut out the cabriole leg blank the same way you would for a pad foot leg. The point where the pattern exits at the top of the toe should be about 23⁄8” square. The foot should angle back so that the bottom of the foot is about 2″ square. When you’re finished you should have a leg with a square block foot. For this first foot you need to decide if you want the toes separated by division lines or hollows. Either way, we’re going to need two patterns in order to lay out our feet: one for the top of the foot and a smaller one for the bottom. I’m going to show you how to lay out the foot where the toes are separated by hollows; the other two trifid feet in this article will be based on that same basic design.
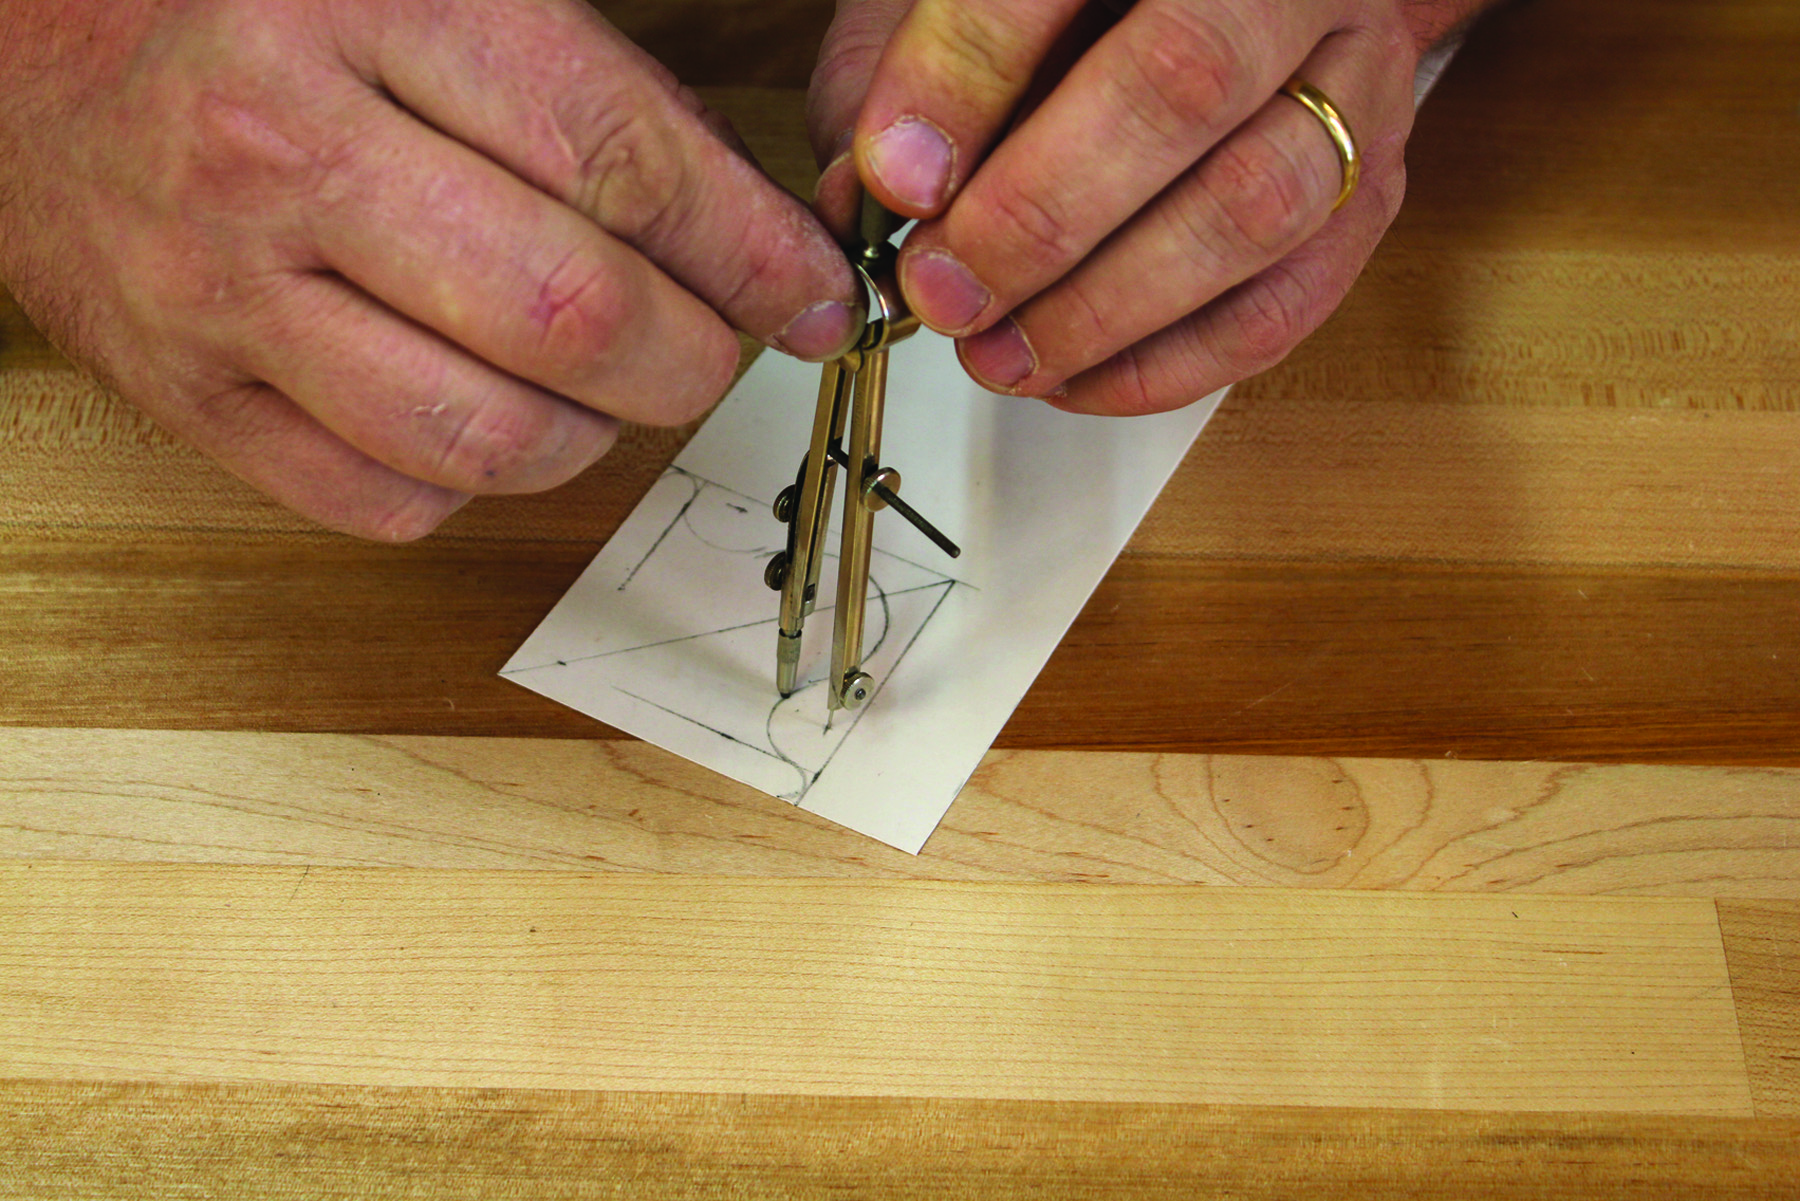
To draw the patterns I usually begin with cardboard or poster board. Draw two squares: the first should be 23⁄8“, and the second about 2” square. At the top of our foot the outer two toes will be about 5⁄16” in width. The center toe will be about 11⁄4” in width where the convex portion ends. On the bottom of the foot, the outer two toes will be about 1⁄4” in width and the center toe will be about 1″ in width where the convex portion ends. In order to make sure both patterns are symmetrical, start by drawing a diagonal from one corner of the pattern to the other.
Lay out the Foot
Draw a pattern. Draw a diagonal line from the back of the foot pattern to the toe, then strike the arcs for the toes.
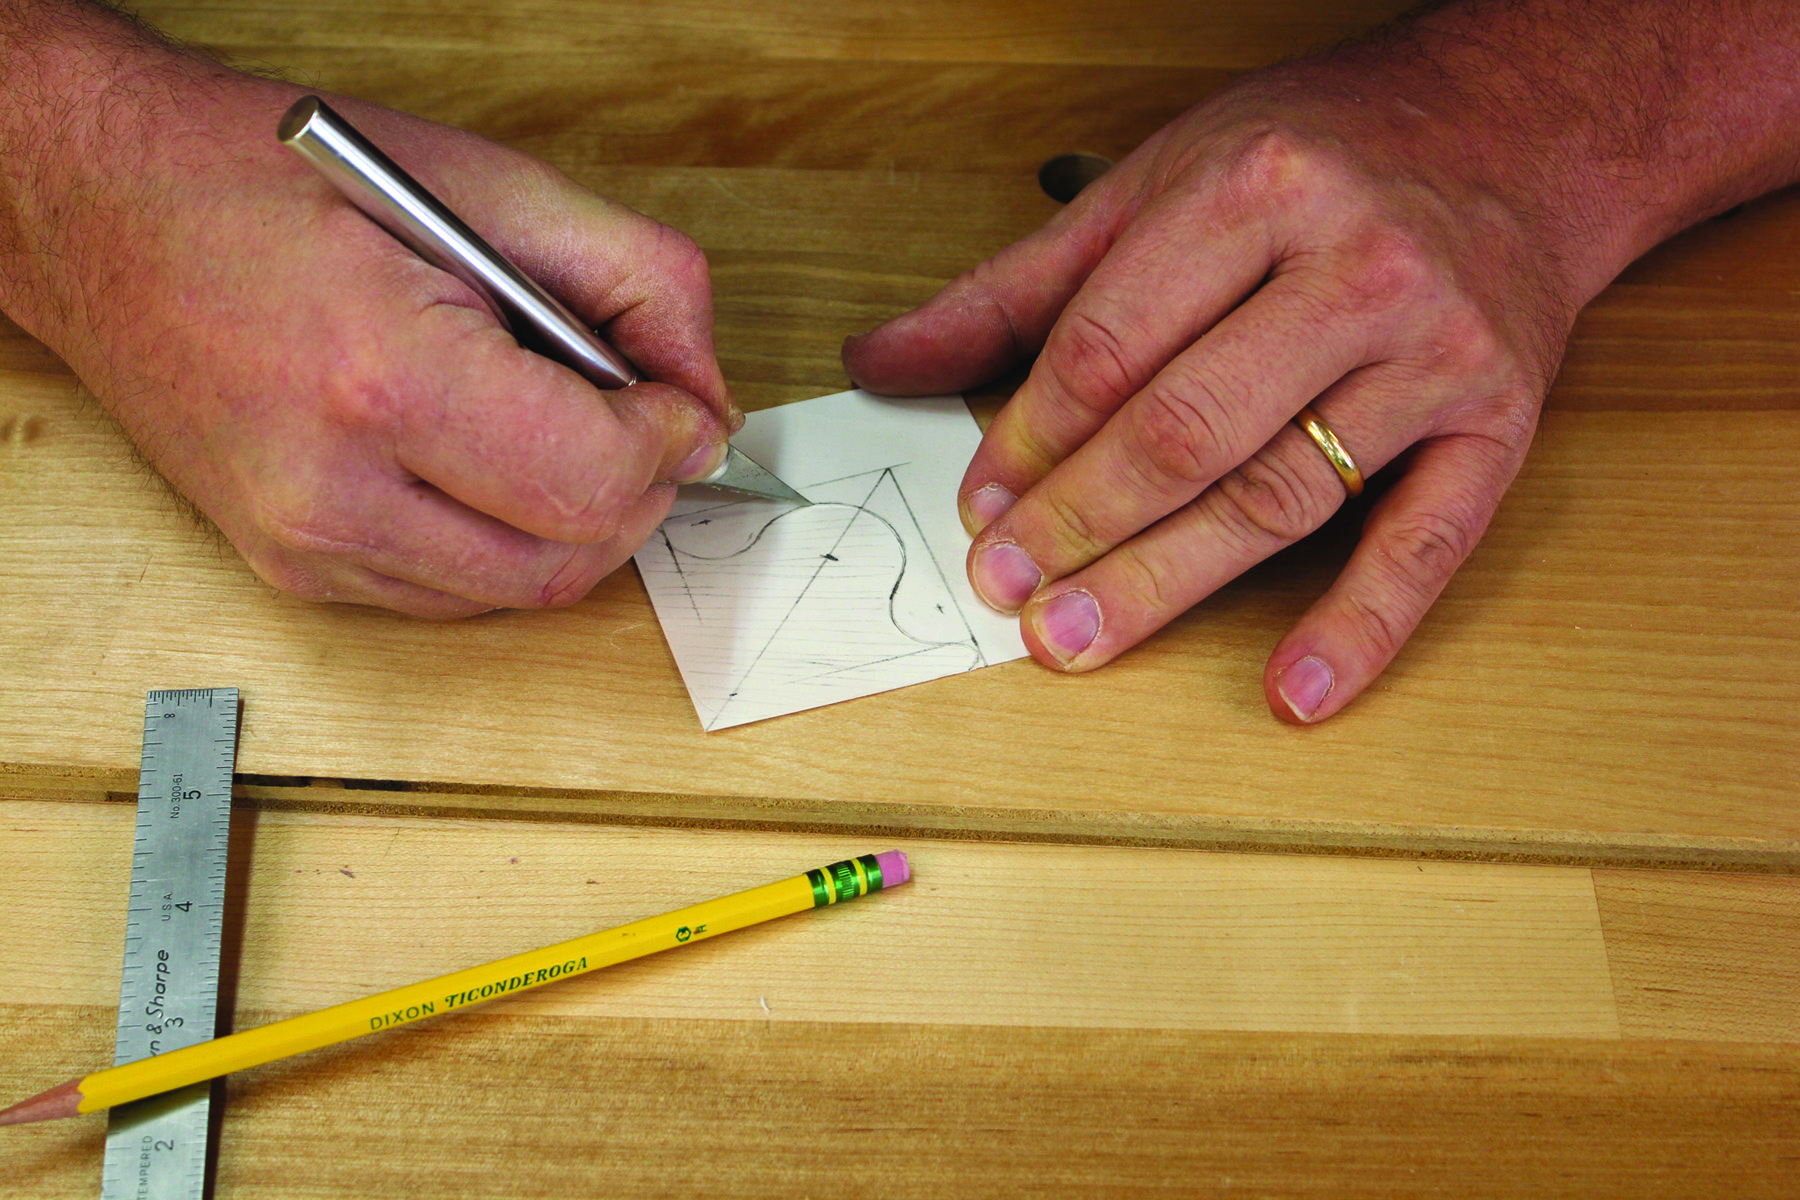
Cut it out. Cut out the patterns carefully. An X-Acto knife is ideal for the task.
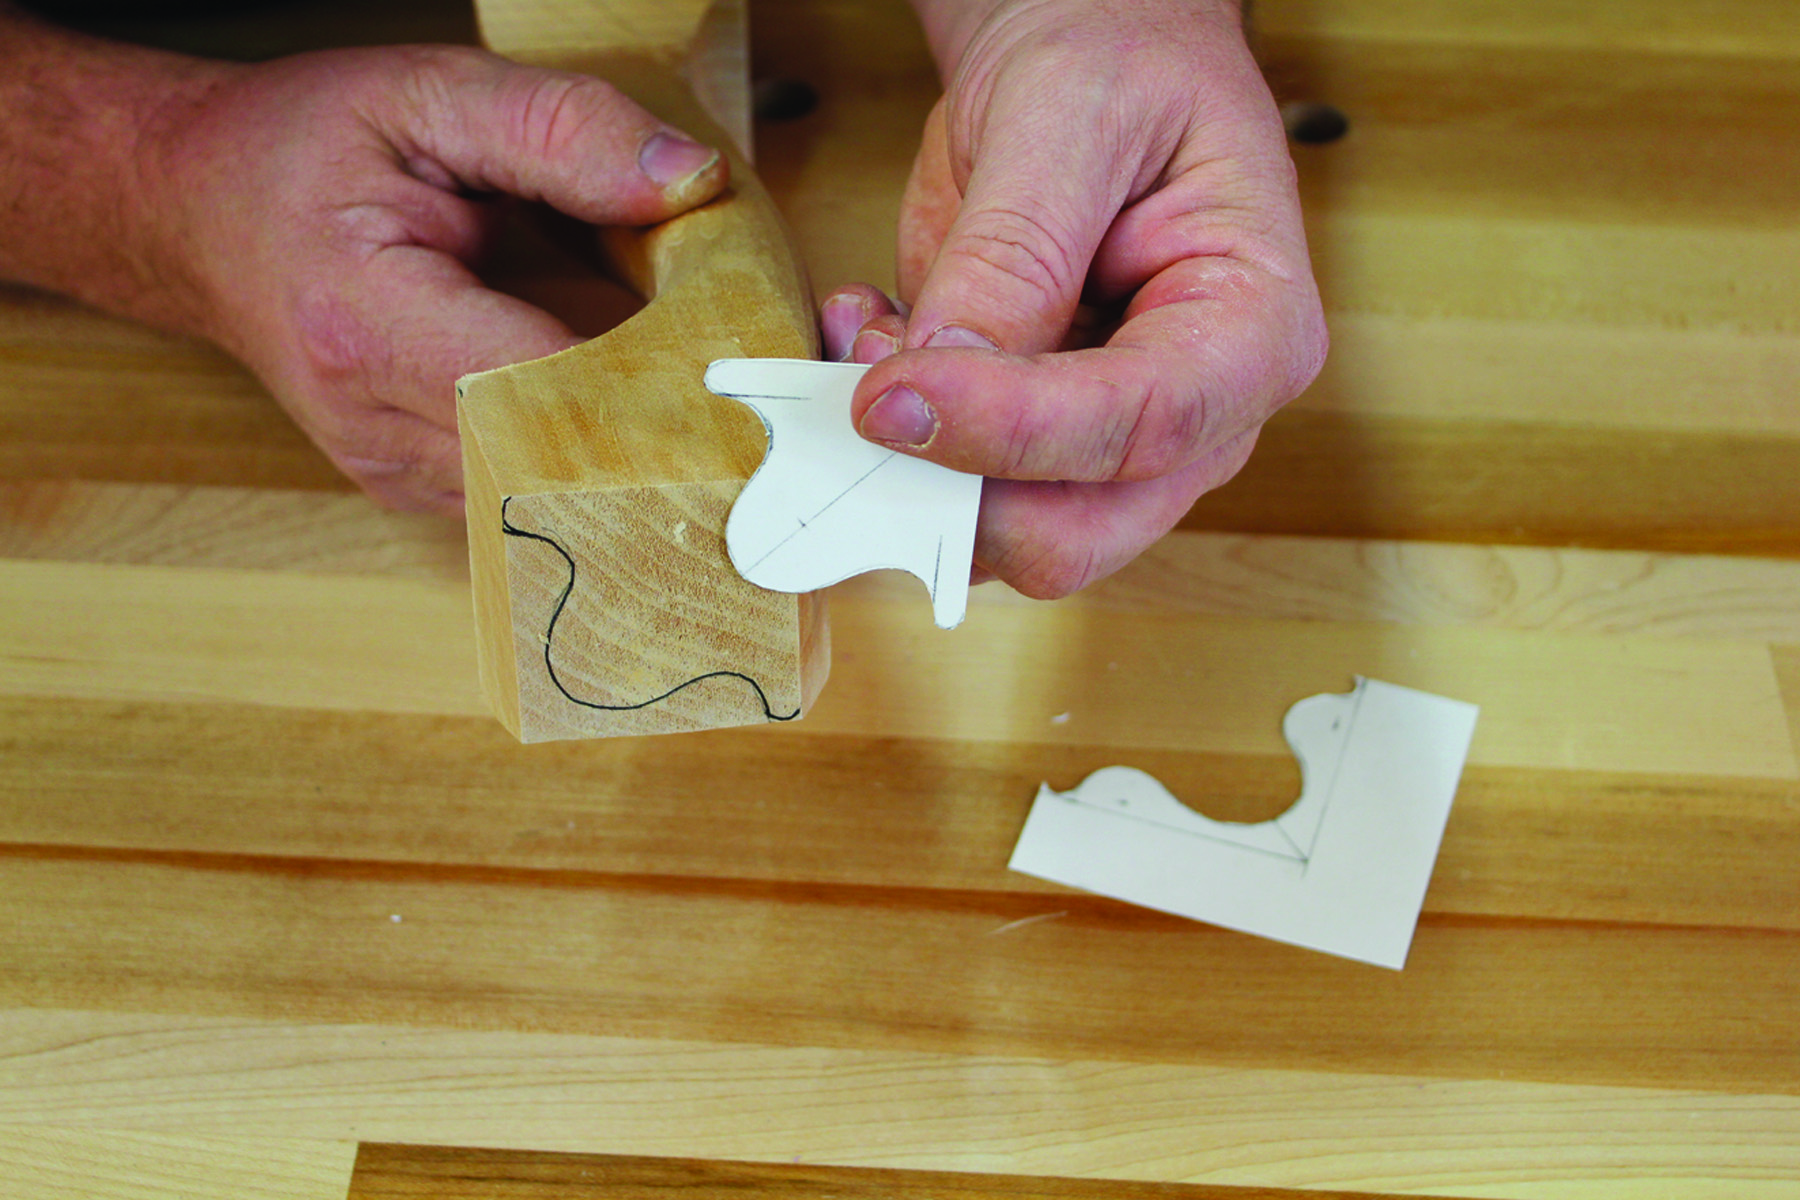
Now the negative. Use the larger negative pattern to mark the top of the foot.

Foot bottom. Draw, cut out then mark the smaller pattern on the bottom of the foot.
On Your Toes
It’s time to begin laying out the toes. I usually start with the larger pattern. Lay out two lines parallel to two adjacent sides that are 5⁄16” from the outside of the pattern. These lines represent the width of the outside toes. In fact, two half-circles can be drawn at the outside of the patterns within the 5⁄16” space for the toes. From the back corner of the foot, along the diagonal line, mark a point at 21⁄2“. This will become the centerpoint of the central toe. With a compass set at 5⁄8“, strike a half-circle from that centerpoint on the diagonal line.
Mark two centerpoints 1⁄8” from the front edges of the pattern that are 11⁄16” from the back edge of the foot. With the compass set at 7⁄16“, strike the two concave lines that will separate the three toes. The toes should flow smoothly from the outside toes through the middle toe. Because the arcs do not meet, you’ll need to sketch them in so the lines flow together.
The next step is to cut out the pattern. With this upper pattern, we’ll be saving and using the outside of the poster board. The inner portion will be discarded because there is no way to transfer the pattern to the actual foot. In essence, we’ve created a negative pattern.
The lower pattern is created in much the same way. We begin by striking two lines on adjacent edges of the pattern that are 1⁄4” from the outside of the pattern. Draw in the diagonal line from the back corner of the foot to the front corner. Along that line, plot a point that is 111⁄16” from the back corner. At that point, with the compass set at 9⁄16“, draw a half-circle. These arcs should meet but you still may have to modify the area where they come together to get a good flow. Cut out this pattern the same way as the upper – but we’re going to use the positive pattern this time.
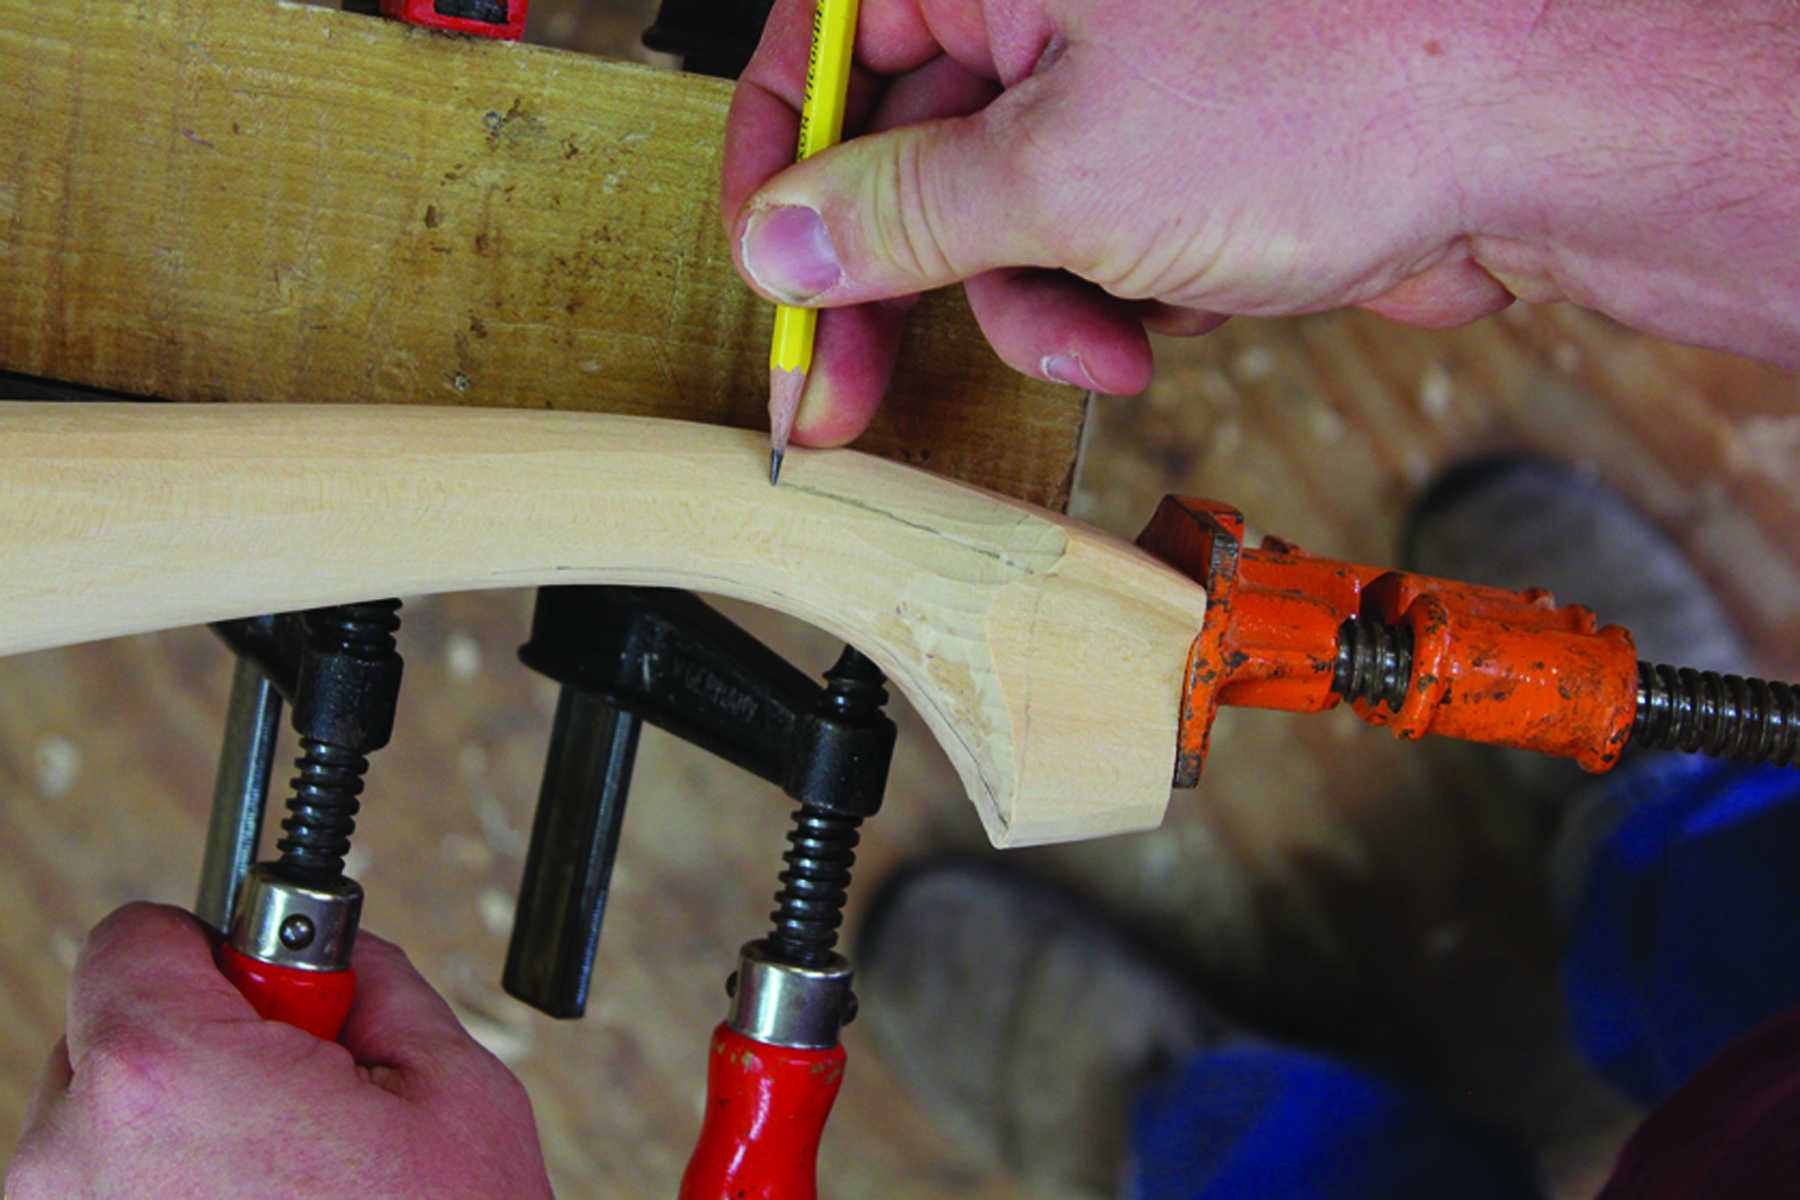
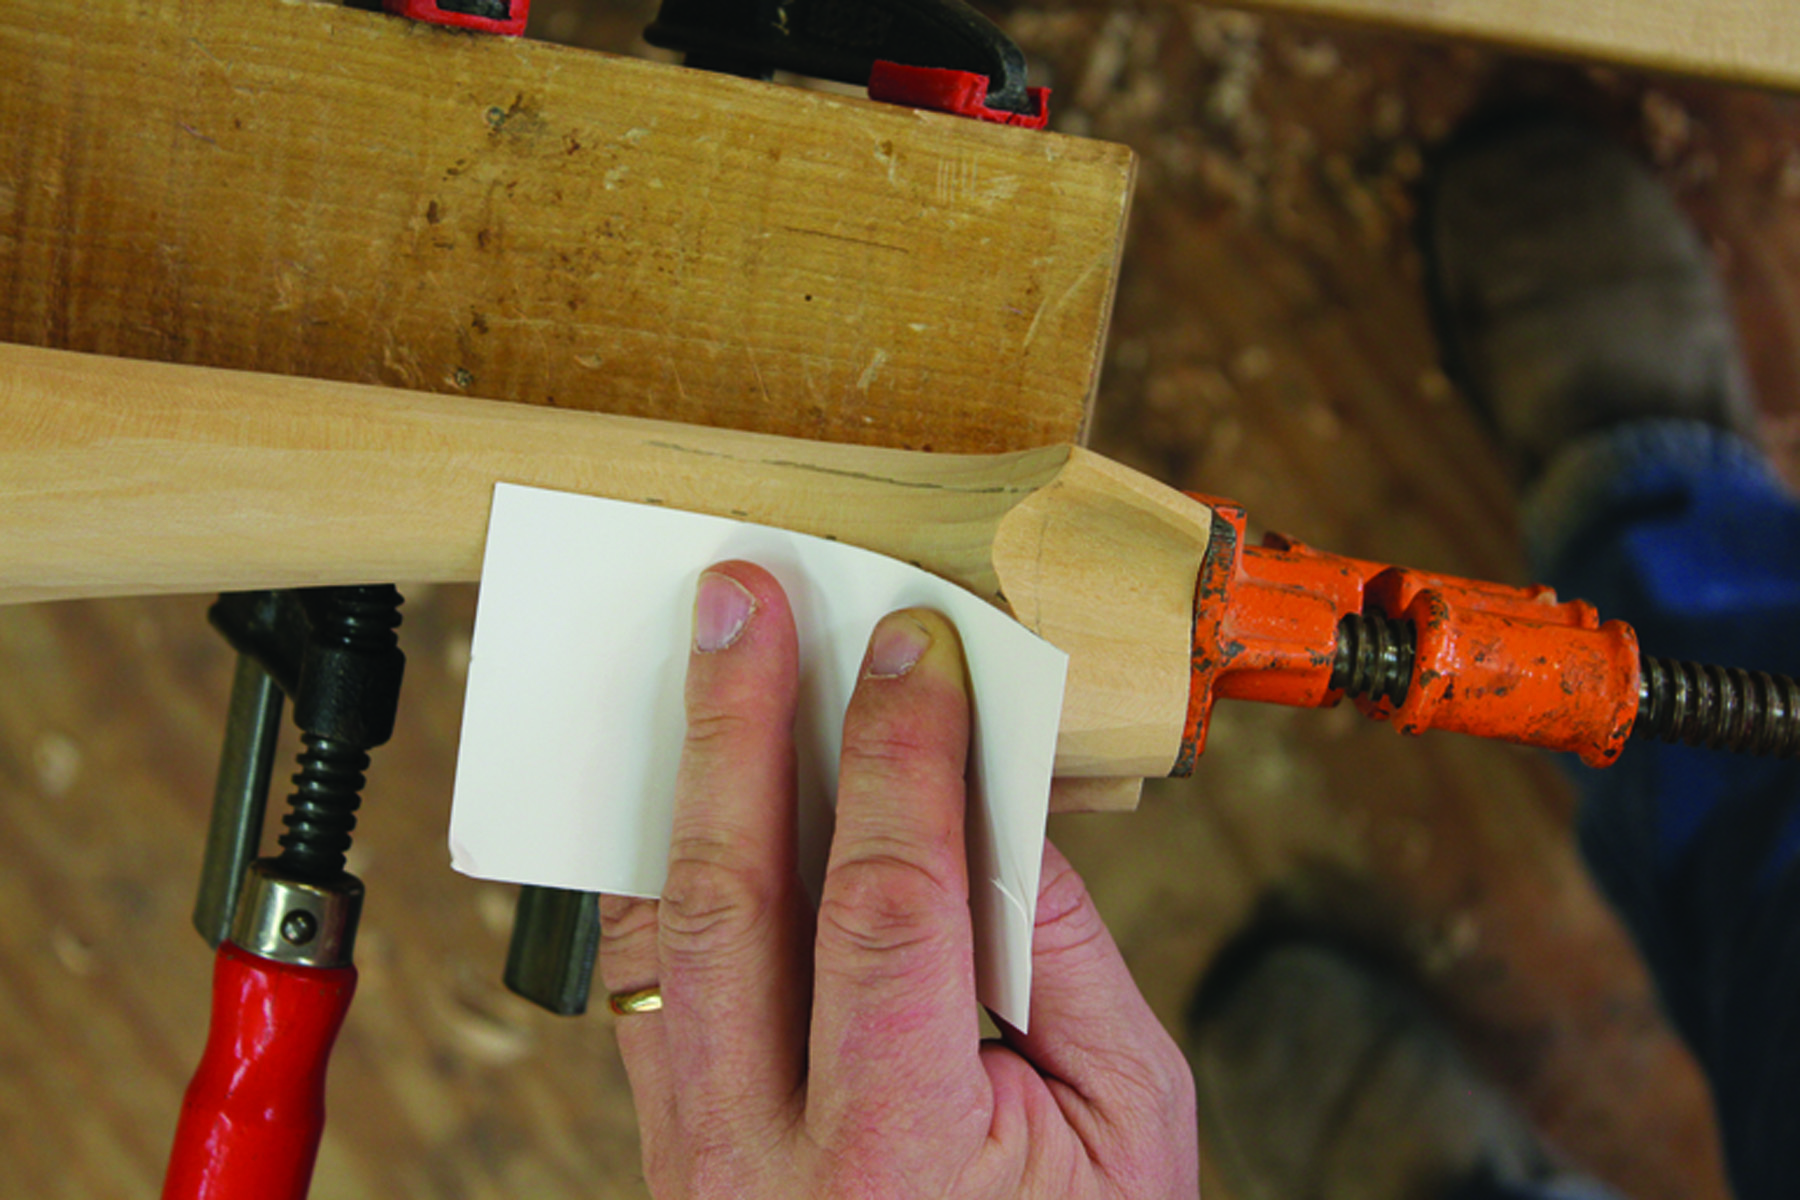
Begin by placing the bottom pattern on the bottom of the leg blank and trace it off. This becomes the line to which you will carve the bottom of the foot. Along the back edge of the foot, mark points 23⁄8” from the heel of the leg. These become the alignment points for our pattern. Taking the negative pattern for the top of the foot, line it up with the marks you just made and trace off the pattern.
This will be the general shape for all three feet we’ll be carving. The tools necessary for carving most trifid feet are: a 5⁄16” bench chisel; a 11⁄2“-wide (or as wide as you have) bench chisel; a 20mm No. 5 gouge; a 10mm No. 8 gouge; a 15mm No. 7 gouge; a 12mm No. 9 gouge; and a 6mm No. 15 V parting tool (a No. 12 would work as well).
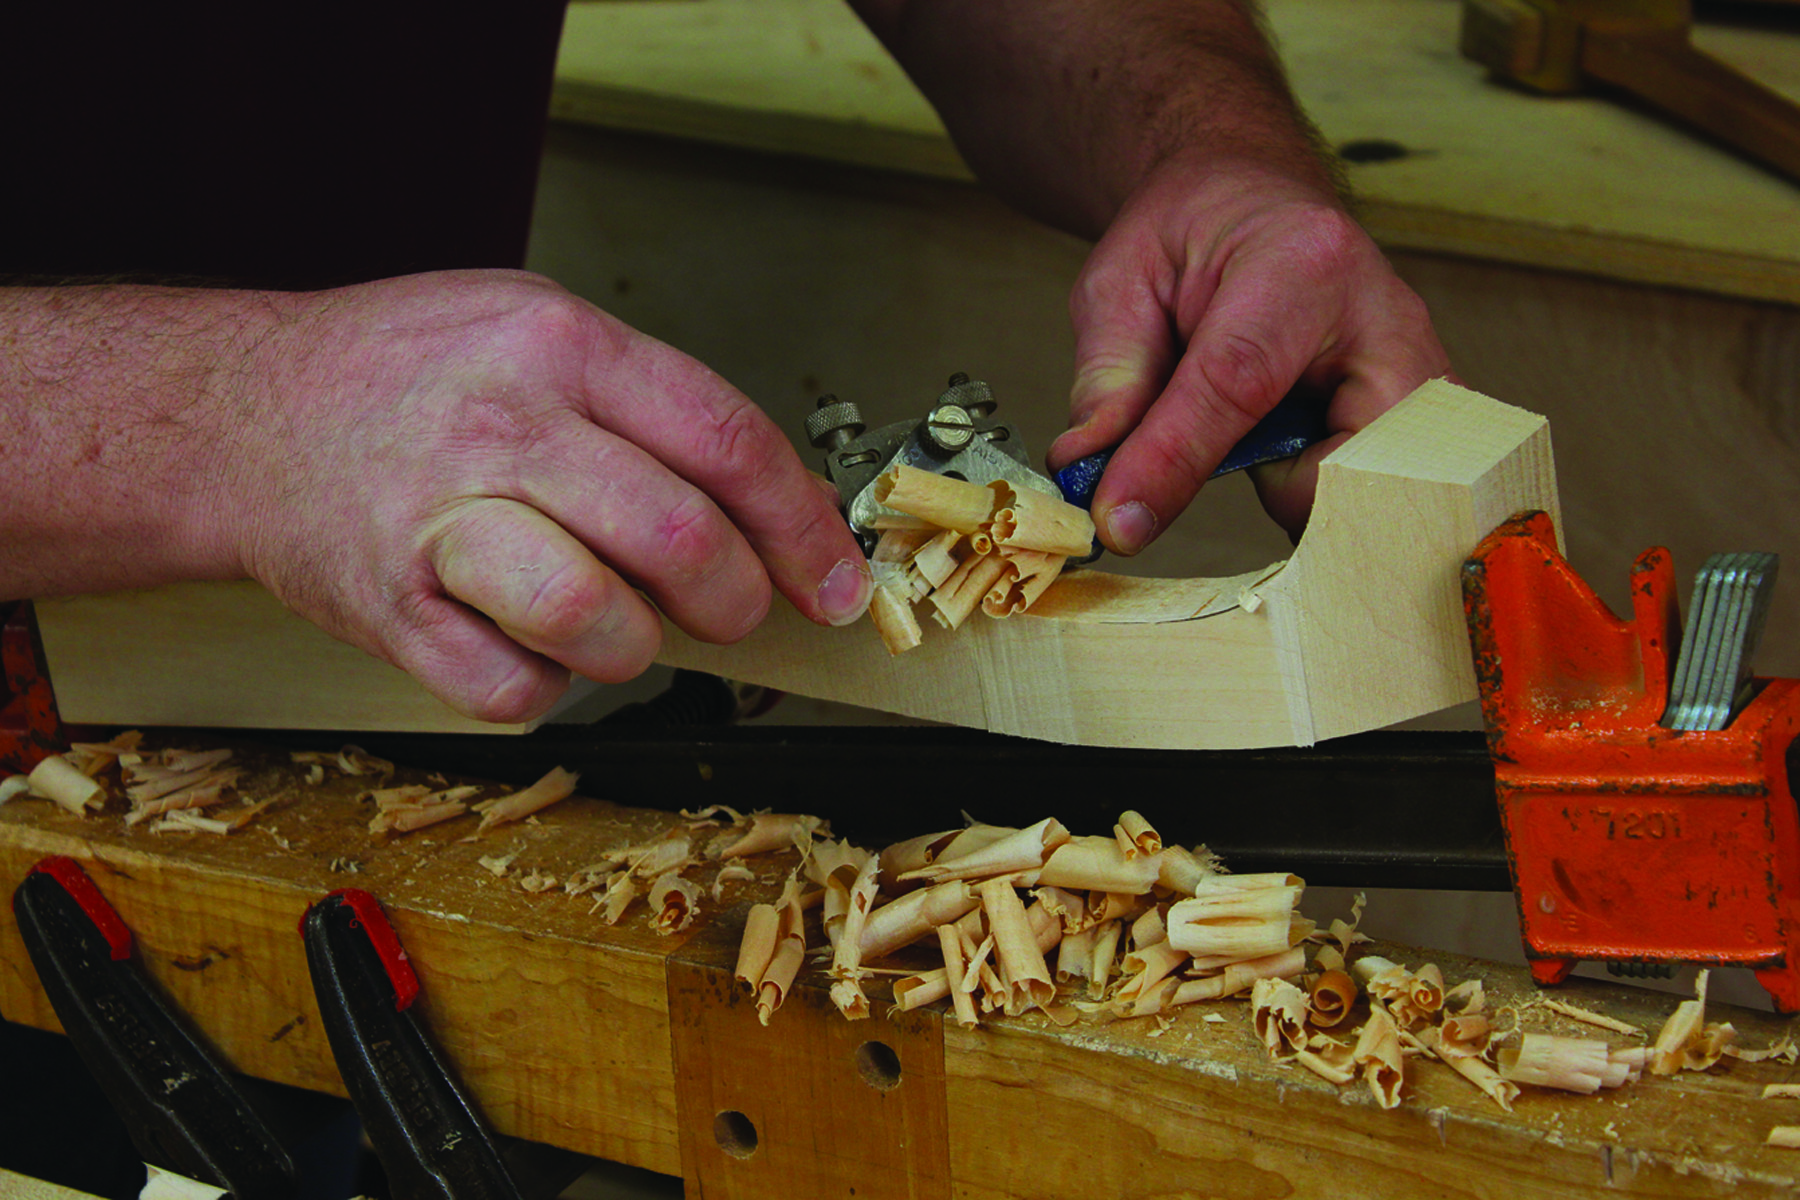
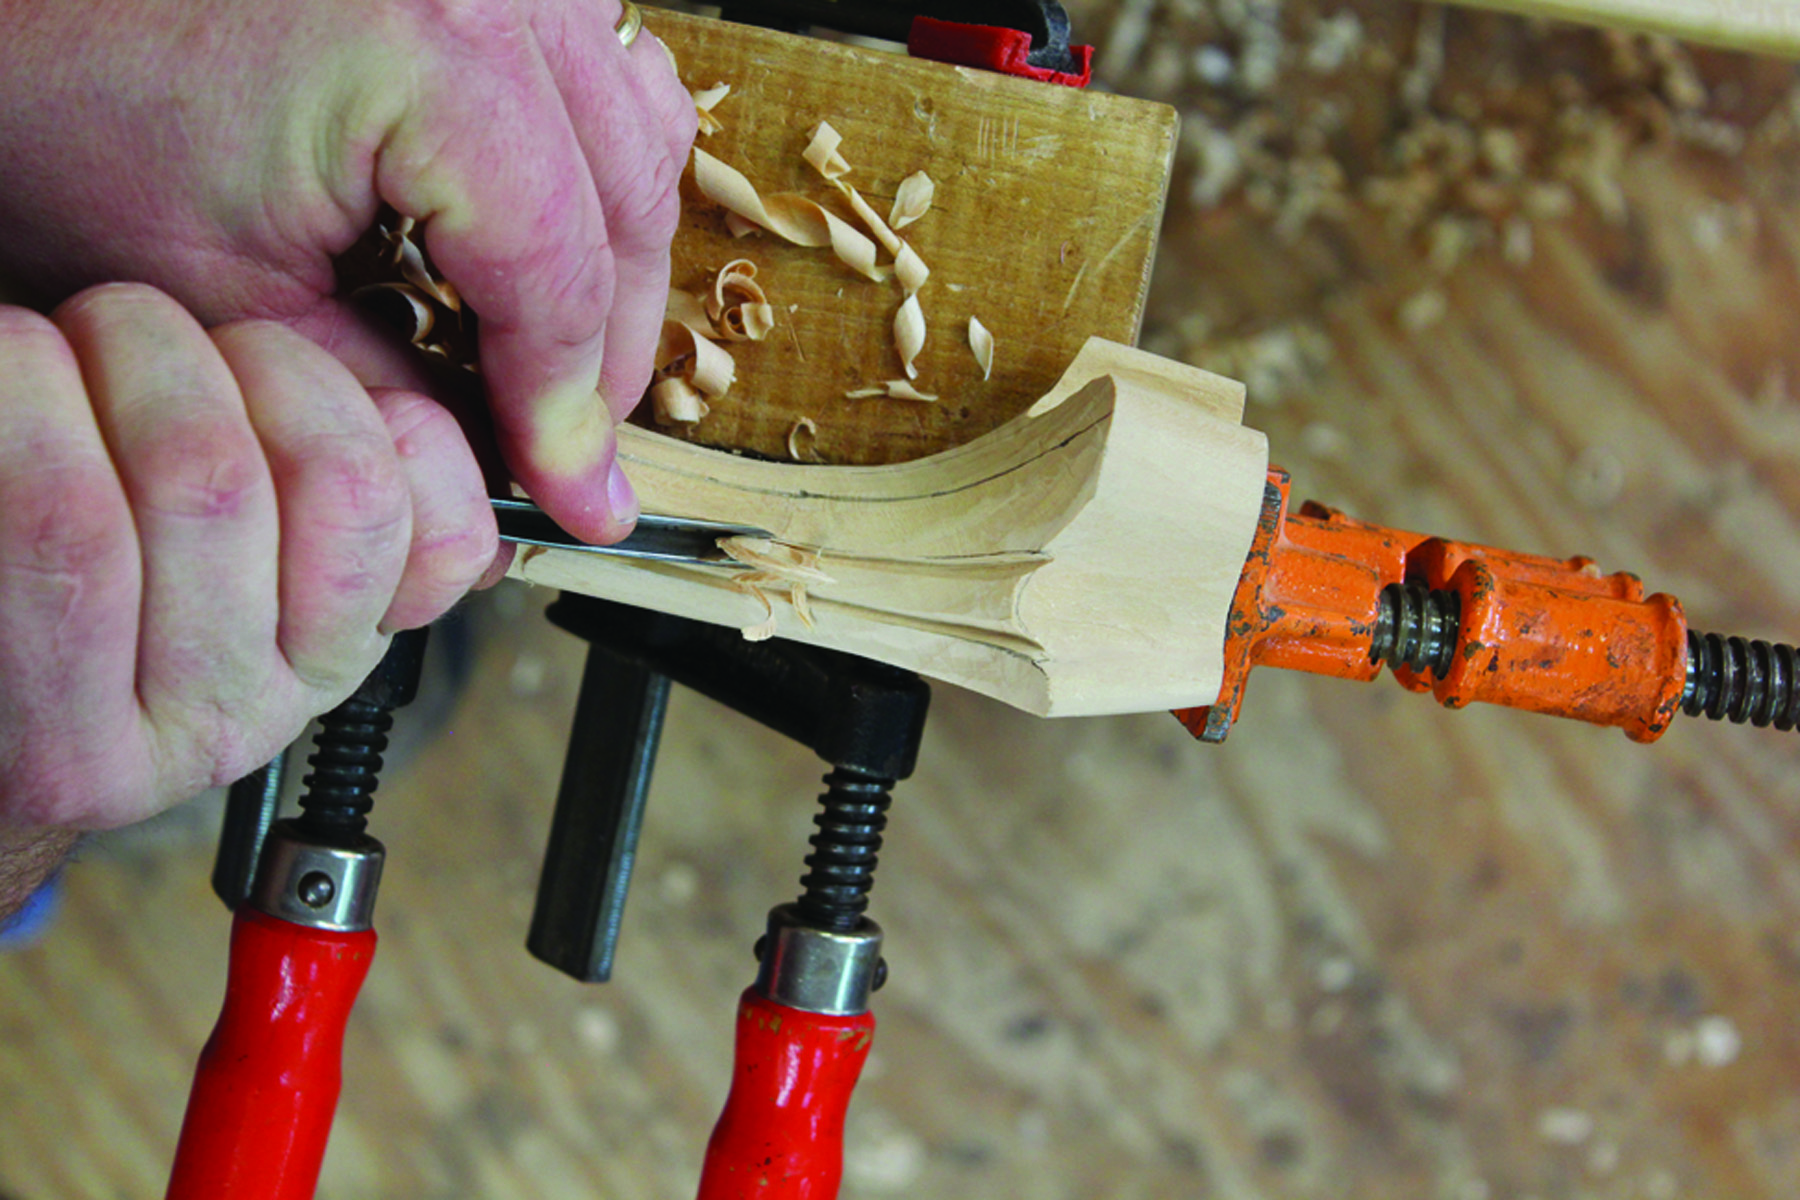
Begin by knocking off the toe with your wide bench chisel. I follow this by inverting a 20mm No. 5 gouge to shape the front toe. It’s as easy as connecting the upper and lower lines on your foot. With the 12mm No. 9 gouge, begin to hog out the waste between the toes. Once you get close to the lines, you’ll switch to one of the other gouges to smooth out the surface of the curve. Round over the vertical ends of the outside toes and we’ve nearly finished the first trifid foot.
Mark from the bottom of the foot up between 1″ and 11⁄8” to establish the thickness, or height, of the foot. I used a spindle sander to knock off the bulk of the material above my line then moved right to my wide bench chisel to finesse the surface to the line. I finish using a spokeshave to smooth out the chisel marks. A little sanding and the basic trifid foot is complete.
Variation One: Simple Trifid Foot
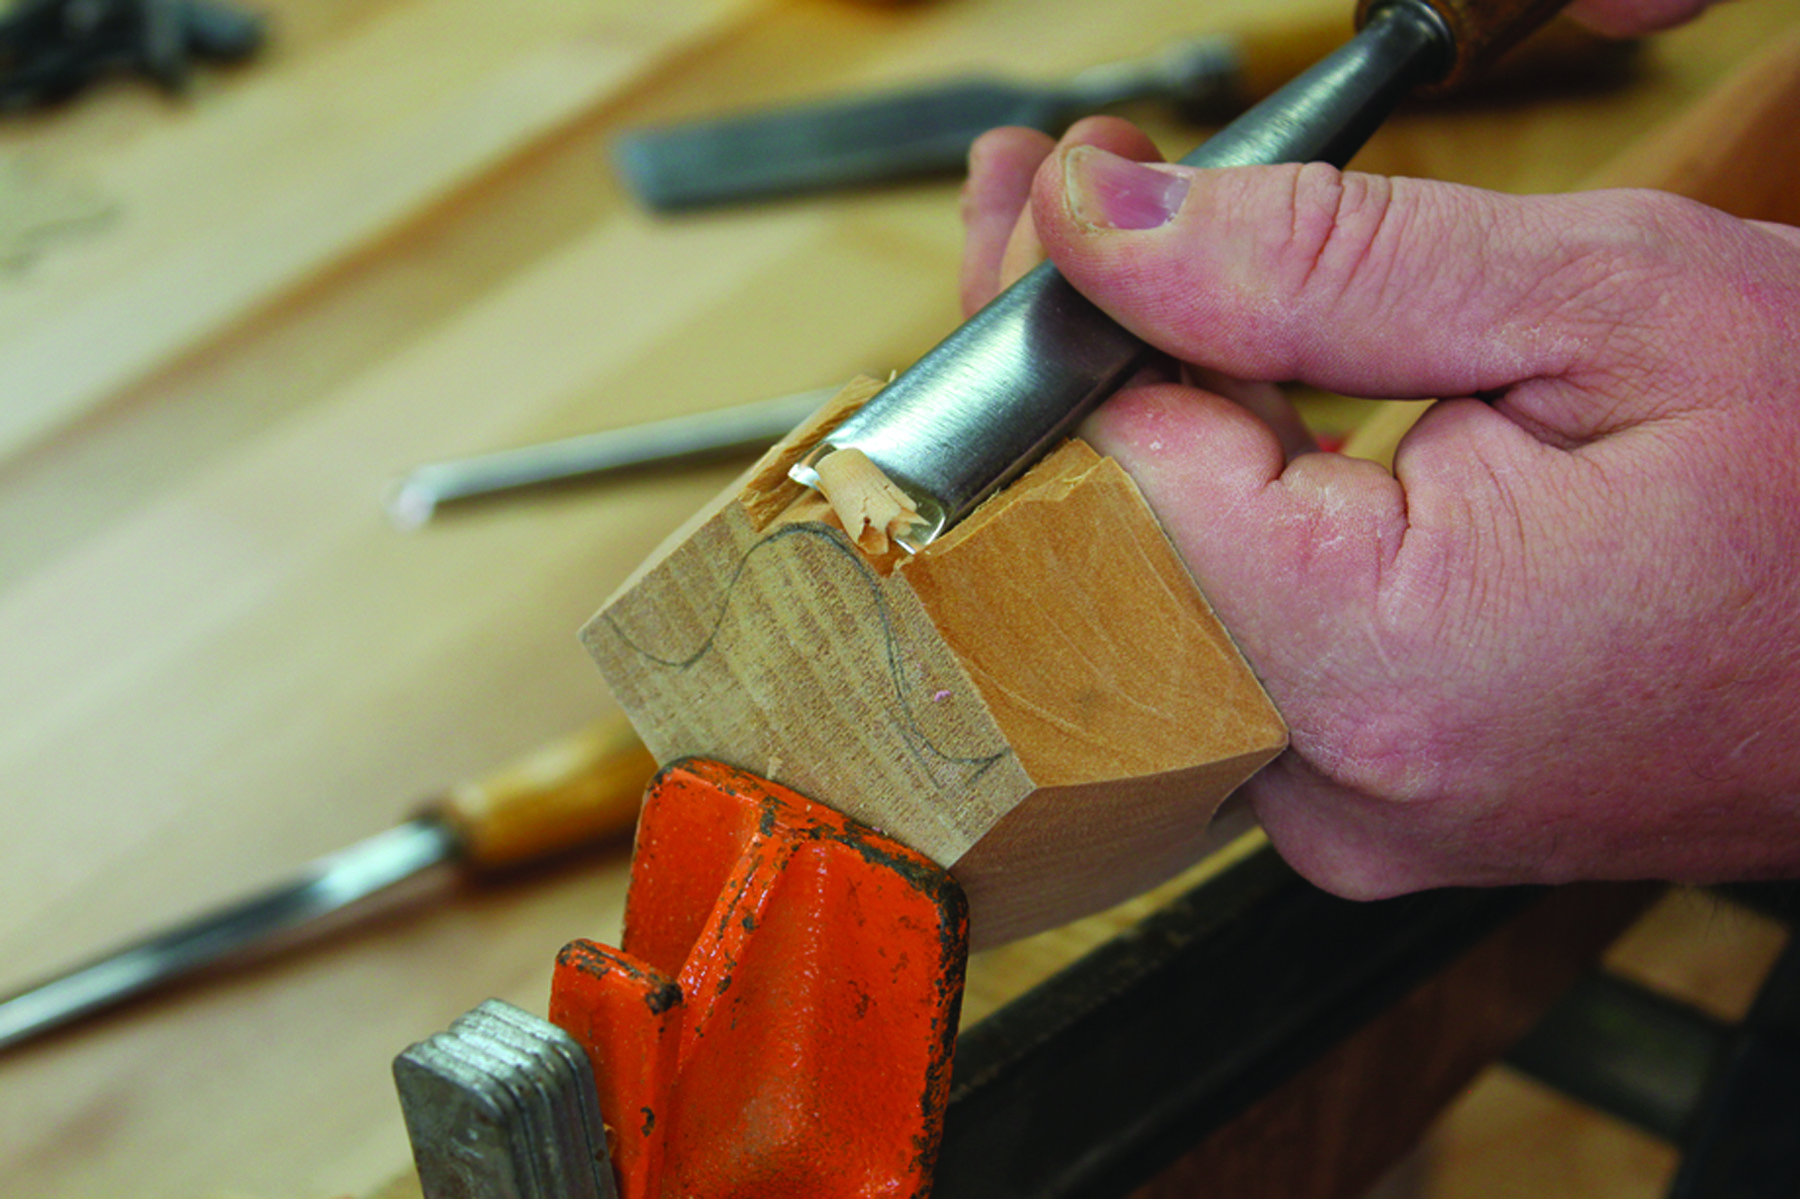
Middle toe. Invert the 20mm No. 5 gouge to shape the front toe.
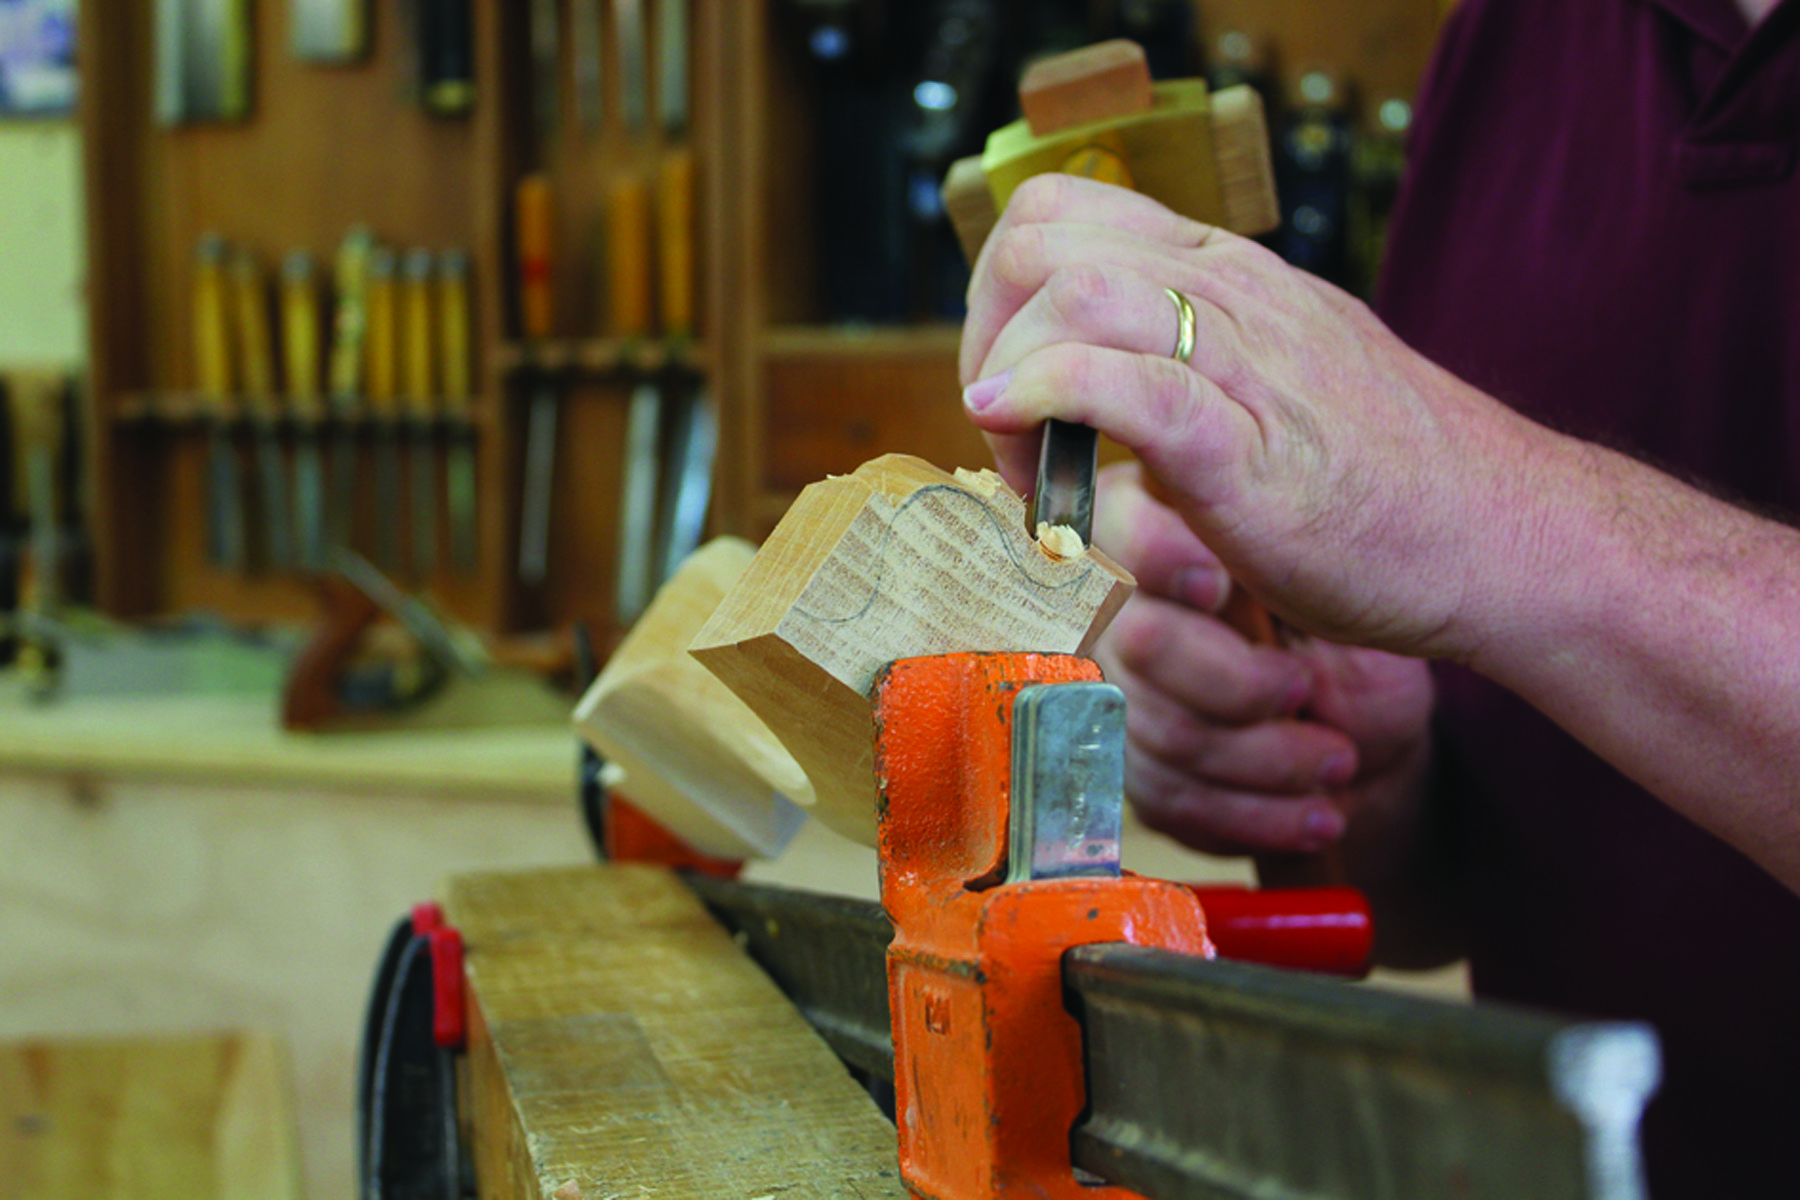
Toe jam removal. Use your 12mm No. 9 gouge to remove the bulk of the waste between the toes.
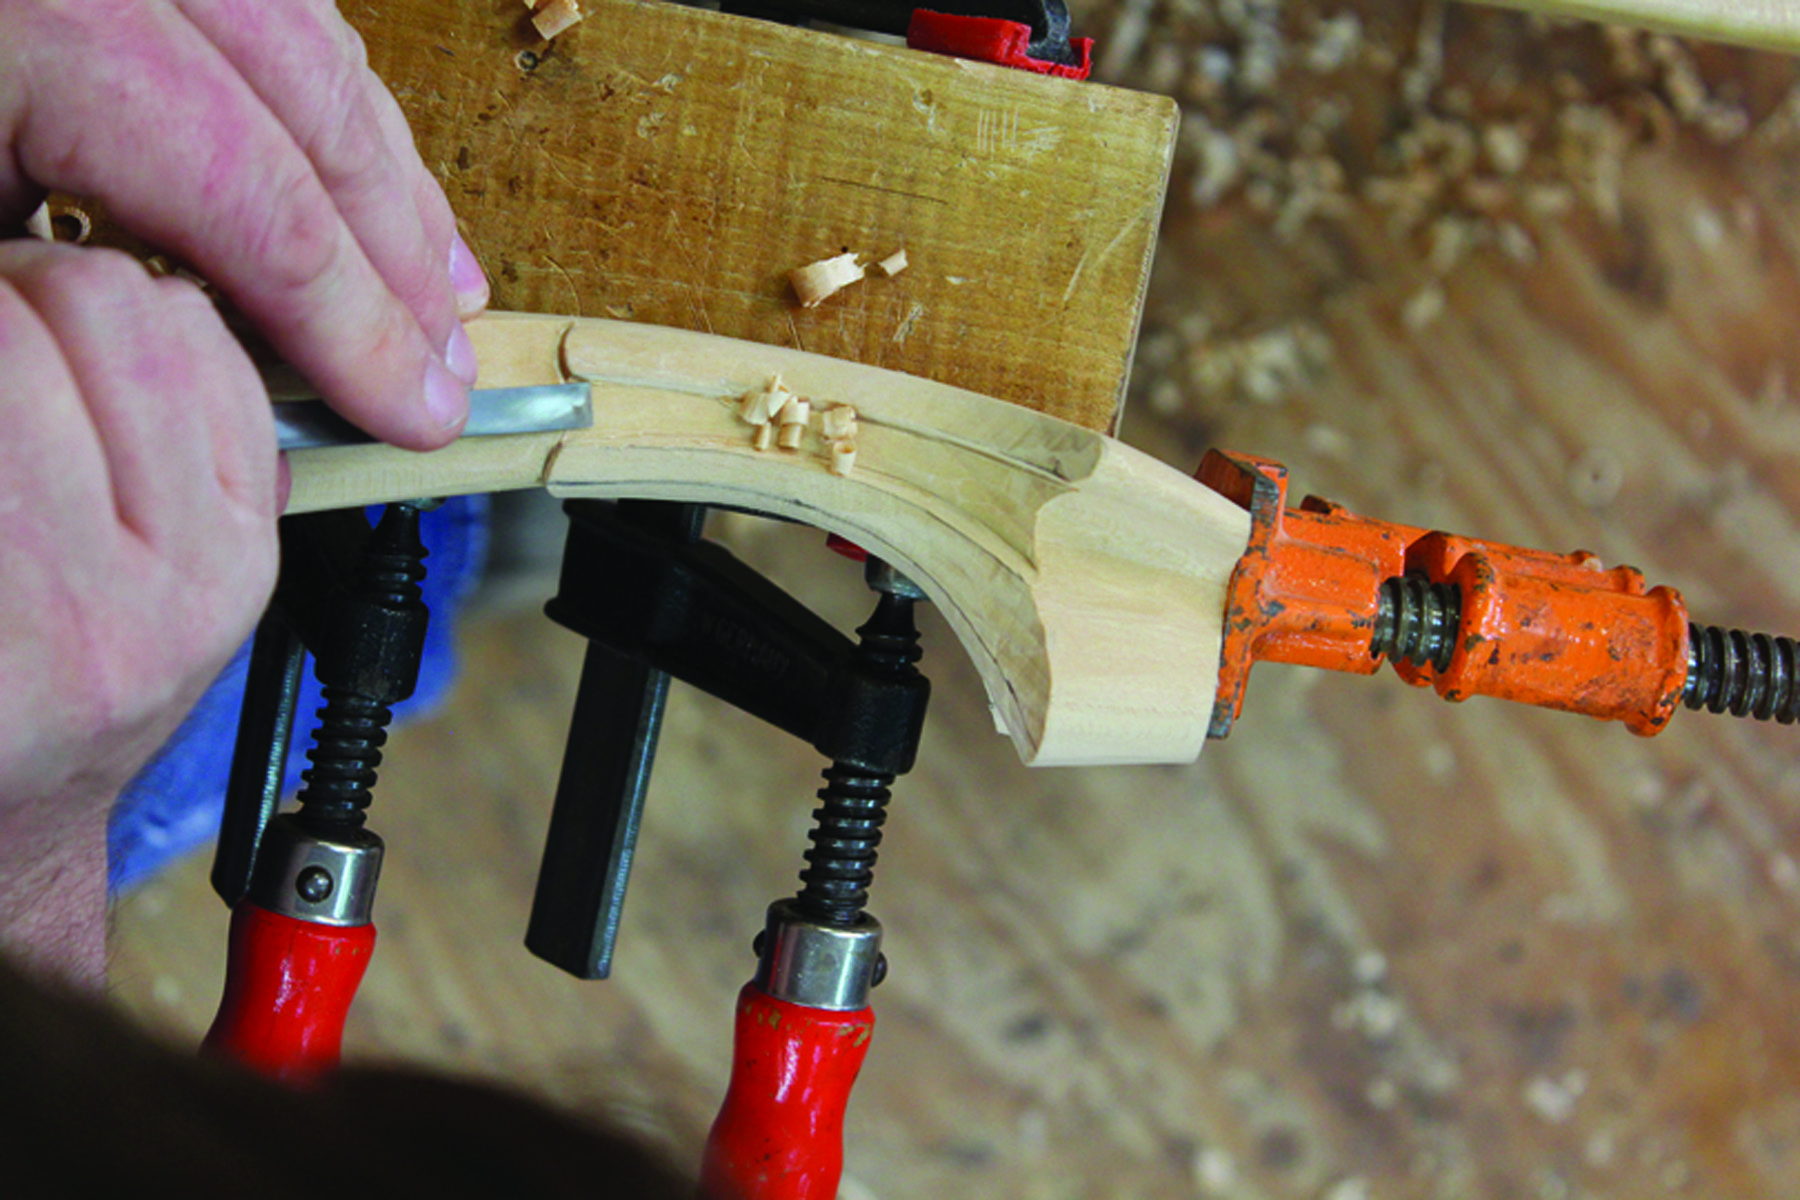
Curve. Round over the hard edges of the outside toes.
Height. After marking off the height of the foot at about 11⁄8″, use a bench chisel to bring the foot to final height.
Foot one. The simple trifid foot – the basis for variations two and three – is now ready for sanding.
Hollows: a Lasting Impression
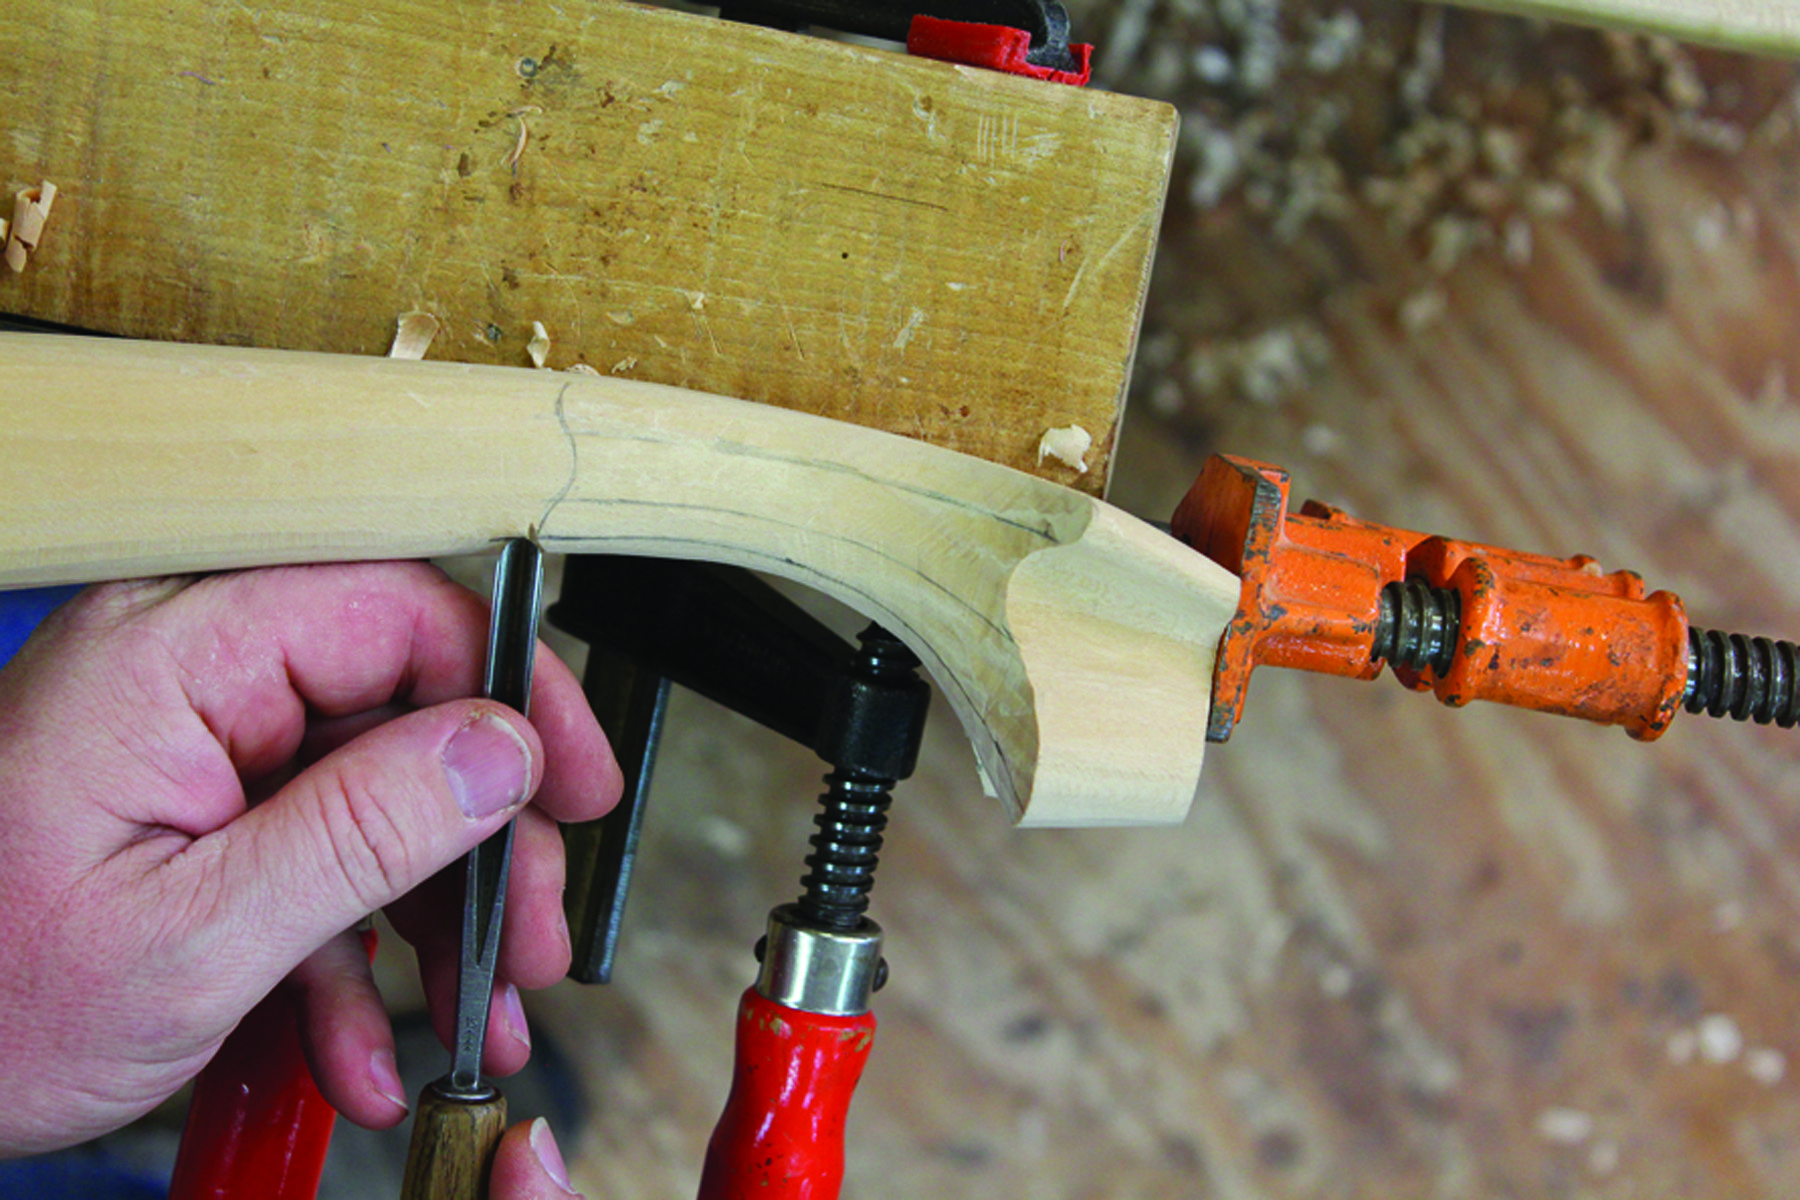
While the basic foot adds interest compared to a pad foot, it still lacks the facets to create light and shadow. To give the basic foot a bit more punch, let’s define the toes a bit by adding some simple webbing.
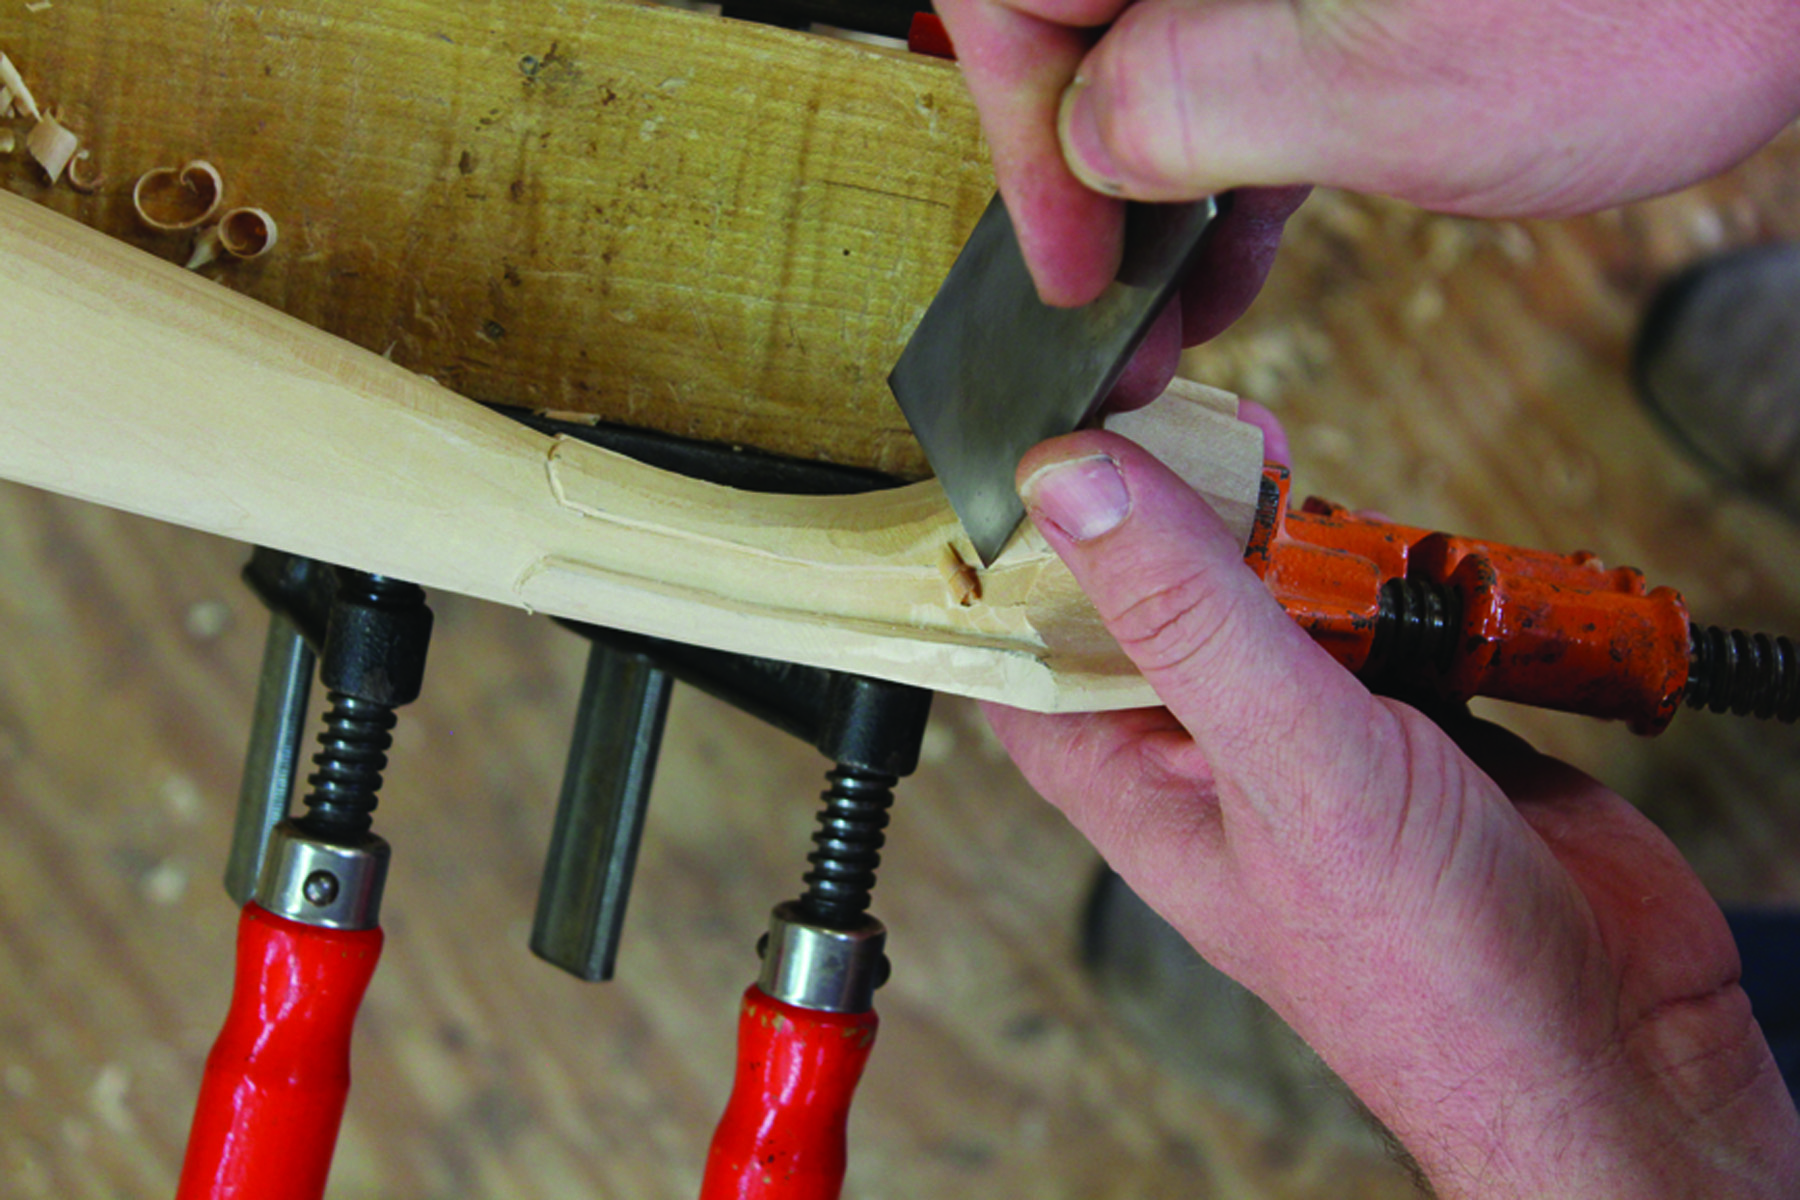
Begin by carving the basic foot then measure and mark a centerline from the front toe through the ankle of the leg. This will be the base of our center toe. Using my finger I extend the line of the outer toes up the ankle of the leg. This line is about 5⁄16” from the back edge of the foot. Using my centerline as a reference, I draw the outer lines of the center toe webbing so that the center toe flows in a smooth taper from the front of the foot to the ankle. The webbing area between the toes may need to be adjusted slightly to keep a pleasing flow. I usually do this by cheating the outer and center toe lines in or out just a bit to give the foot a pleasing appearance.
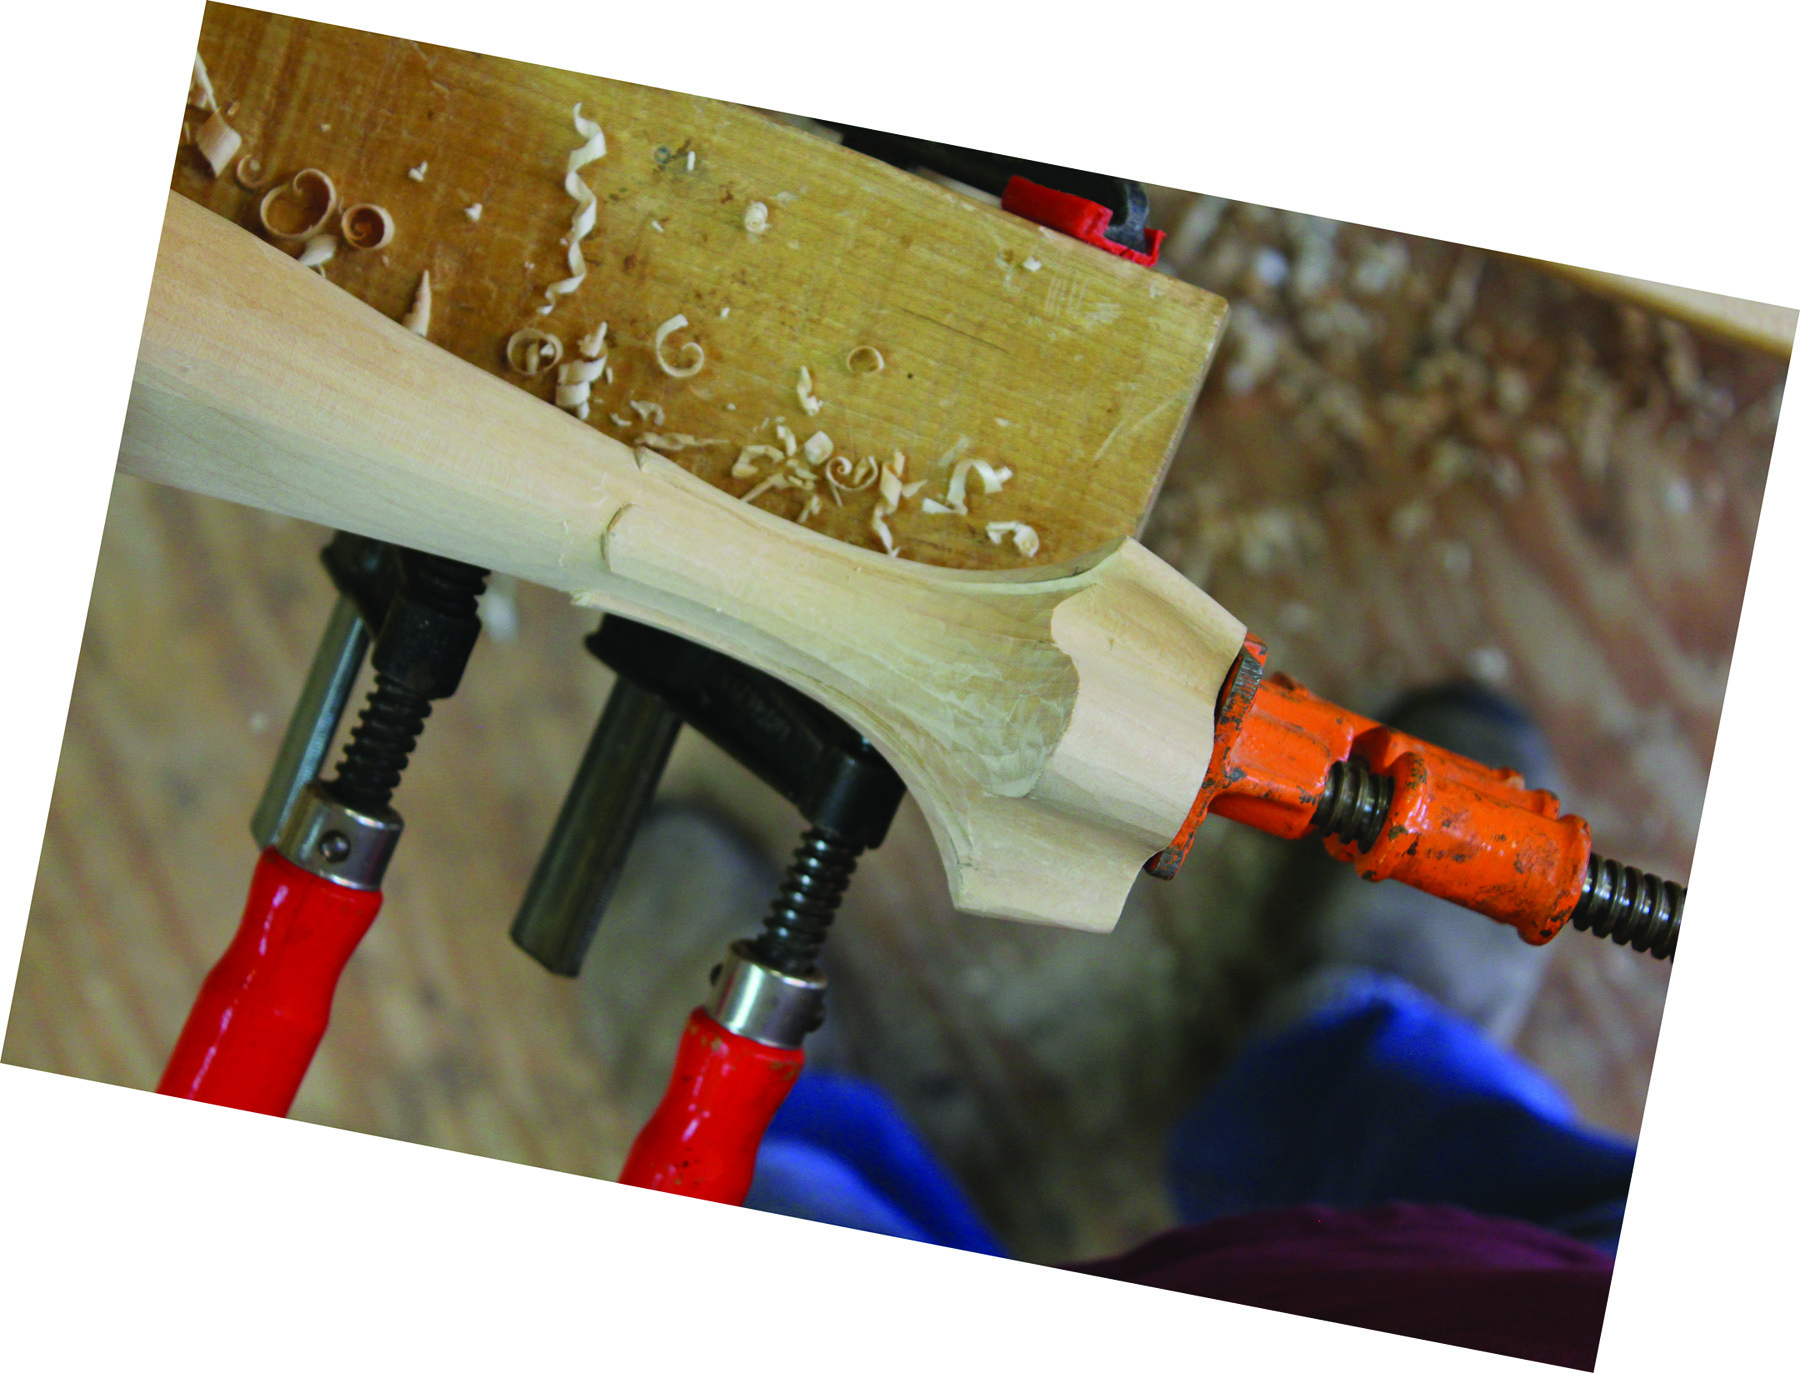
In between the toes, I usually sketch in an approximate depth of the webbing by bringing it down to the line that established the thickness of the foot. Taking the 12mm No. 9 gouge, hollow out the webbing area to the lines. You’ll want to fade out the carving as you move from the foot to the ankle. The transition between the ankle and the webbing should be defined but fairly shallow.
Round over the top of the center toe a bit with a wide bench chisel. You might also need to refine the shape of the outer toes a bit to give the ankle a good flow. A little more sanding and you’ve completed another variation of a trifid foot.
Variation Two: Webbed Trifid Foot
Finger guide. Use your finger to extend the toe line up through the ankle of the leg.
Upper marks. Using poster board as aflexible straightedge, mark the upper portions of the center toe.
Cove. Mark out the cove for the webbing between the toes.

Carve. Using a 12mm No. 9 gouge, carve to the lines.
Foot two. The webbed trifid foot variation is now ready for sanding.
The Necessary Tools
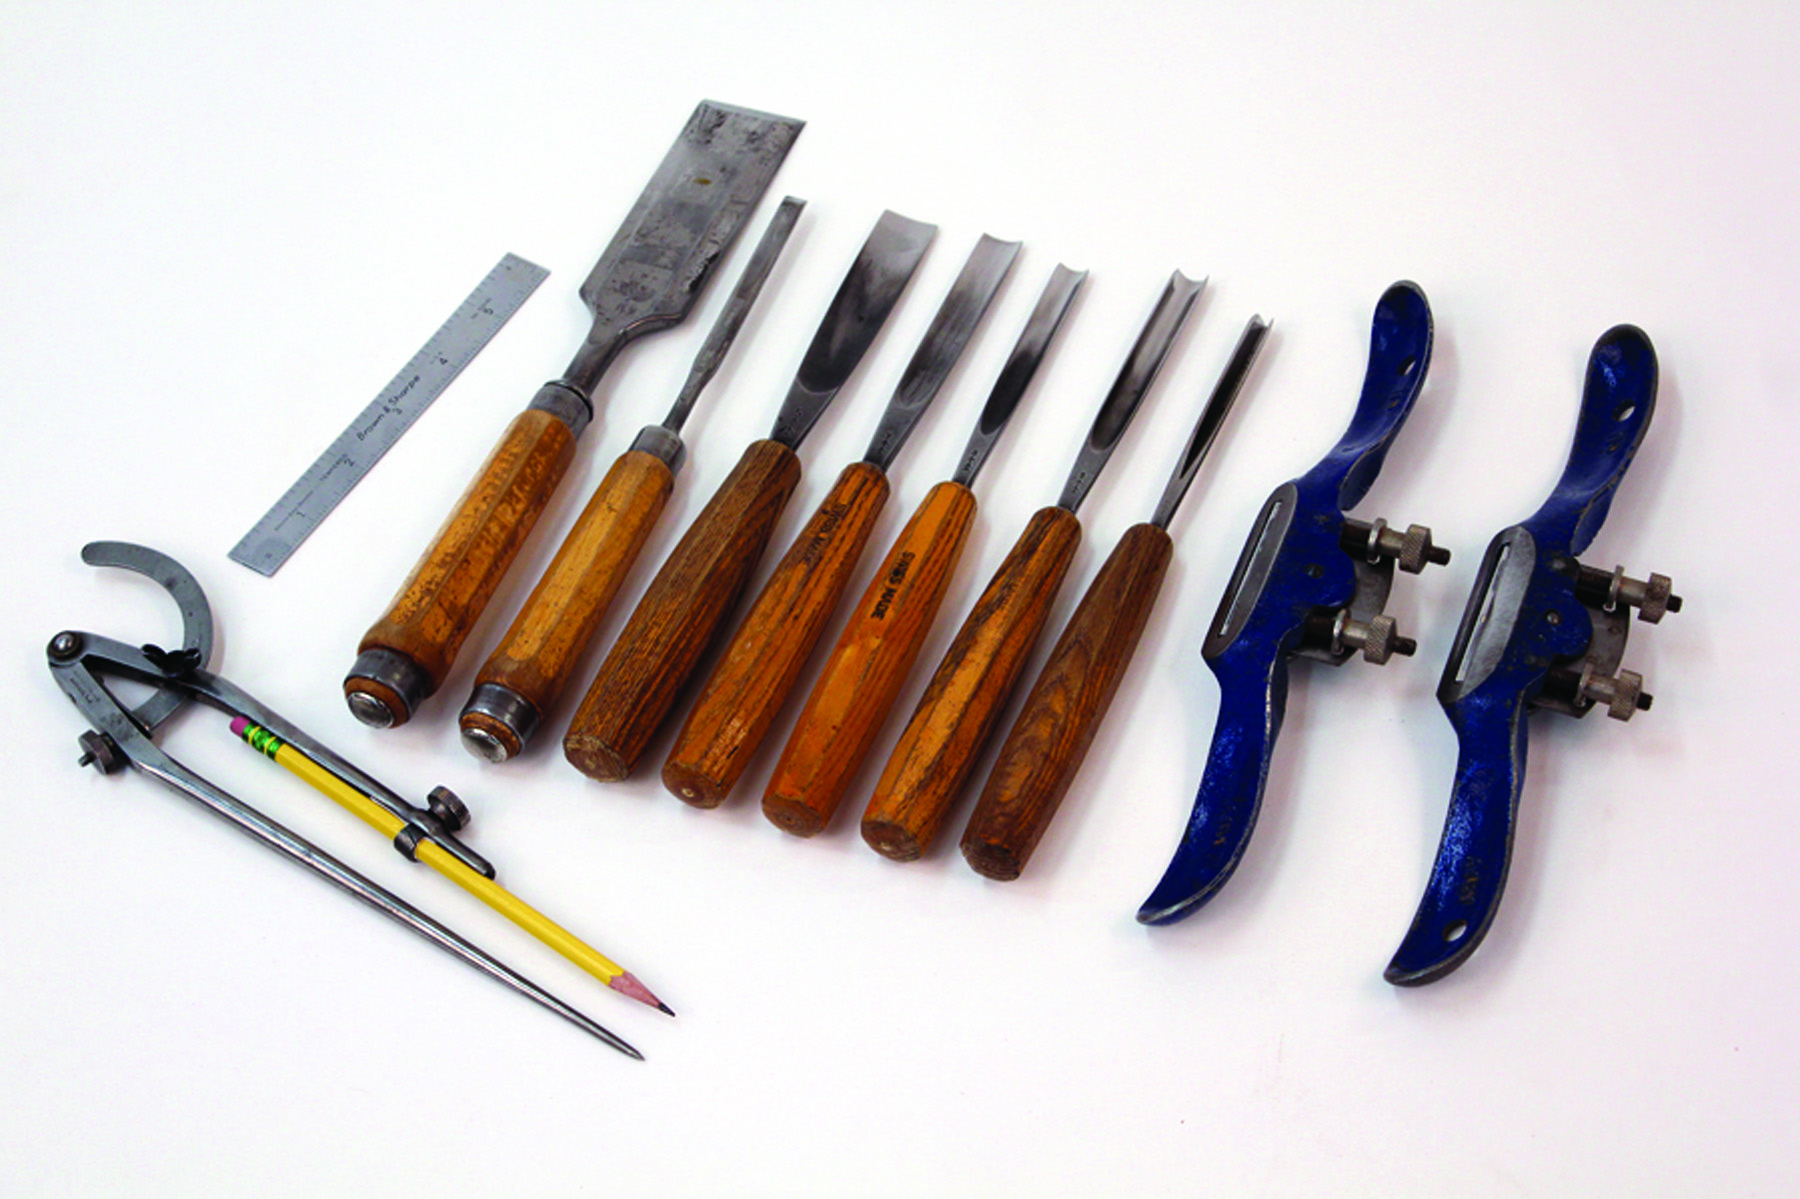
From left to right:
• compass for drawing the arcs
• ruler for measuring the various centers of the radii necessary to lay out a trifid foot
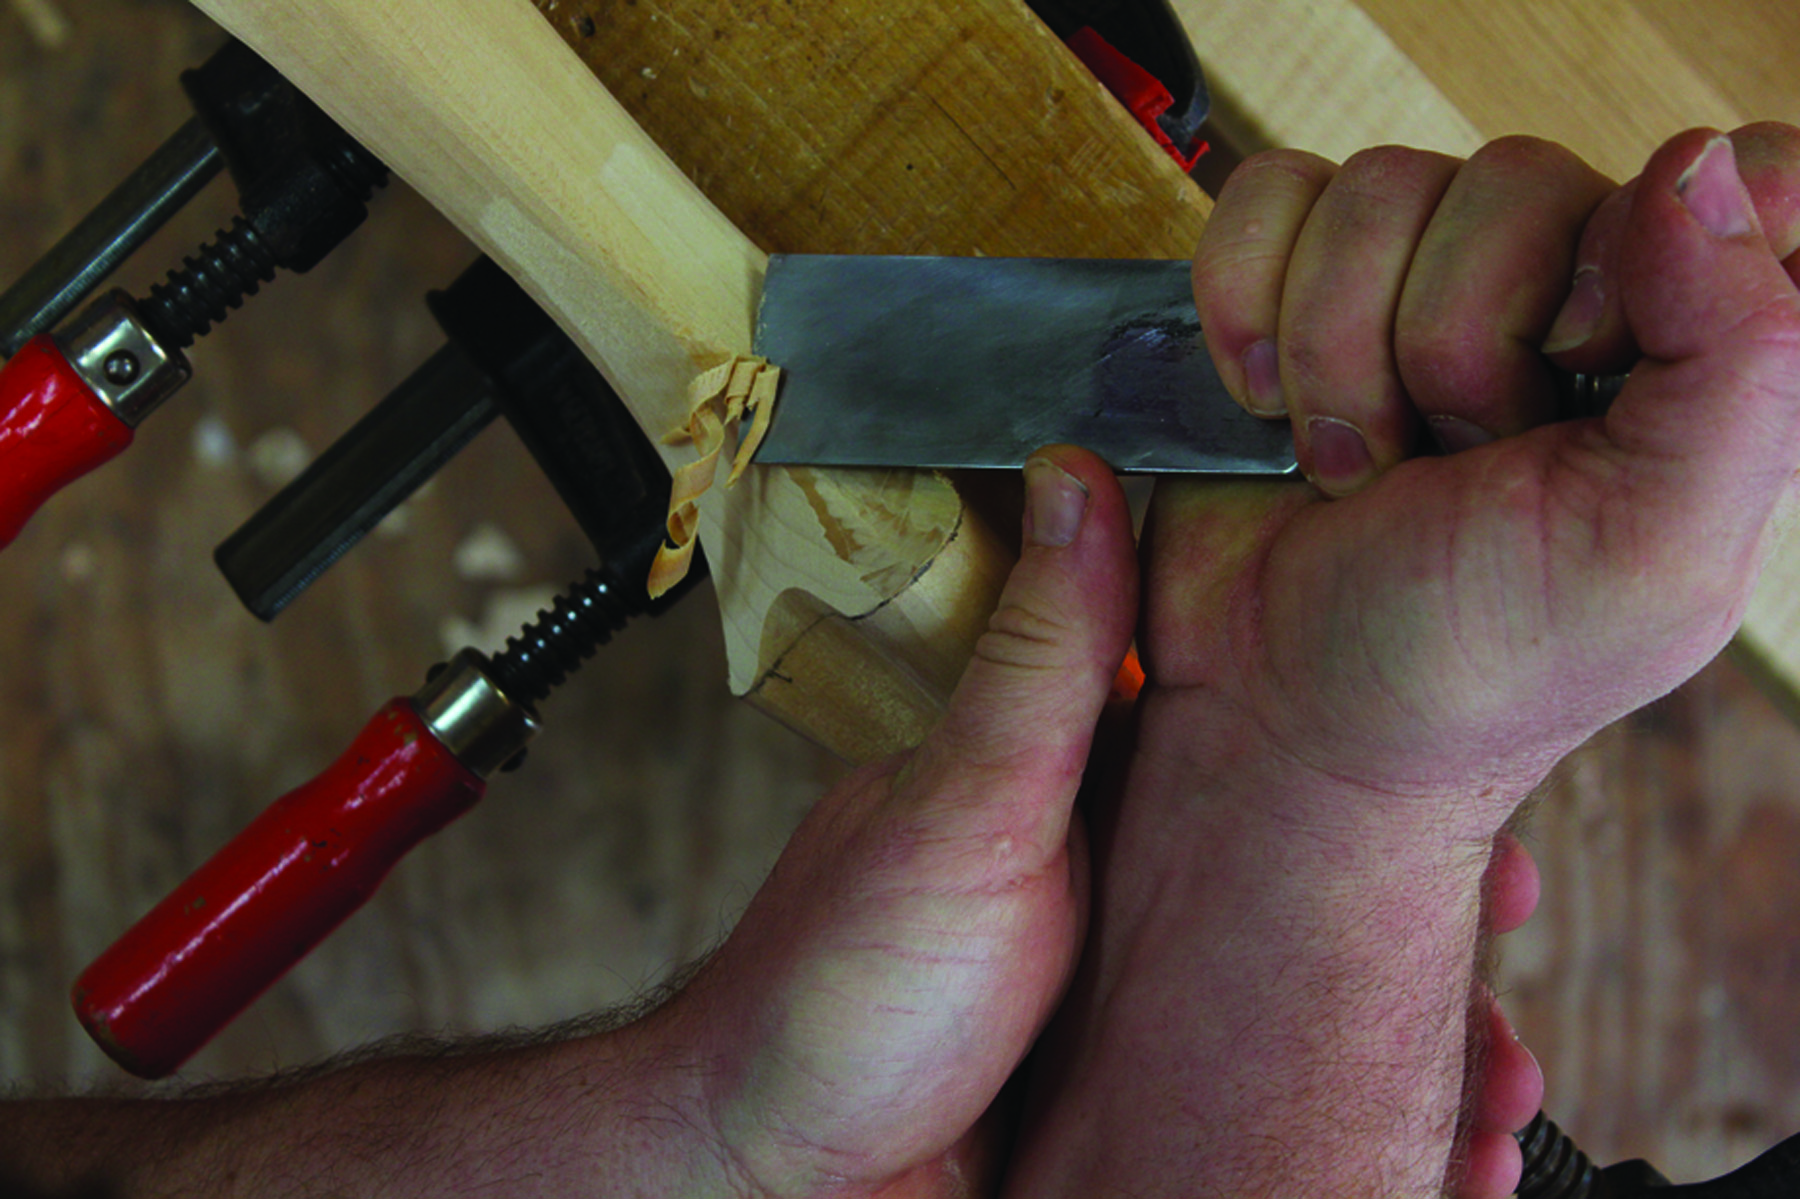
• wide bench chisel for rough and fine shaping of the calf ankle and foot of a cabriole leg
• narrow bench chisel for carving and defining the webbing between the toes of a trifid foot
• 20mm No. 5 gouge for shaping the center toe
• 15mm No. 7 gouge for smoothing the concave areas between the toes
• 10mm No. 8 gouge for defining and shaping the area between the toes and the webbing
• 12mm No. 9 gouge for roughing out the concave areas between the toes
• 6mm No. 15 V parting tool for defining the cuffs and the webbing
• flat-face spokeshave for shaping the cabriole leg
• round-face spokeshave for refining and shaping the ankle and the transition between the calf and stocking
— CB
Stockings add Style
For the final variation, we again begin with the basic foot. Establish the centerline as in the last example then draw in all three toes up to the ankle. Coming up off the bottom of the foot 43⁄4“, draw in a cuff, or division, that will accentuate the transition from leg to foot. This is usually done by flowing convex lines where the toes are into concave lines at the top of the webbing. I usually give my cuffs about 3⁄16” of rise or fall.
Using a 6mm No. 15 V parting tool, carve along the cuff line about 1⁄16” deep. You’ll need to fade this cut out at the beginning and end of the cuff for an elegant look. Then, using a wide bench chisel and a spokeshave, flow the calf of the leg into the cuff.
Using the V parting tool, carve along the toe lines to separate the toes from the webbing. This cut should be about 1⁄16” deep along the entire length of the line. With the 5⁄16” bench chisel, carve out the webbing. Between the toes, the webbing should have a slight convex arch.
As the webbing moves up the leg, it eventually flows out through the cuff and blends with the calf of the leg. I primarily work with the chisel held bevel down to help control the depth of cut. Round off the central toe and trim the outer toes to give the leg a nice flow. A little sanding, and the third variation of a trifid foot is complete.
Variation Three: Cuffed Trifid Foot
Establish the cuffs. Draw in the cuff and put convex lobes over the toes and concave lobes over the webbing. Then use a V parting tool to carve in the cuff.
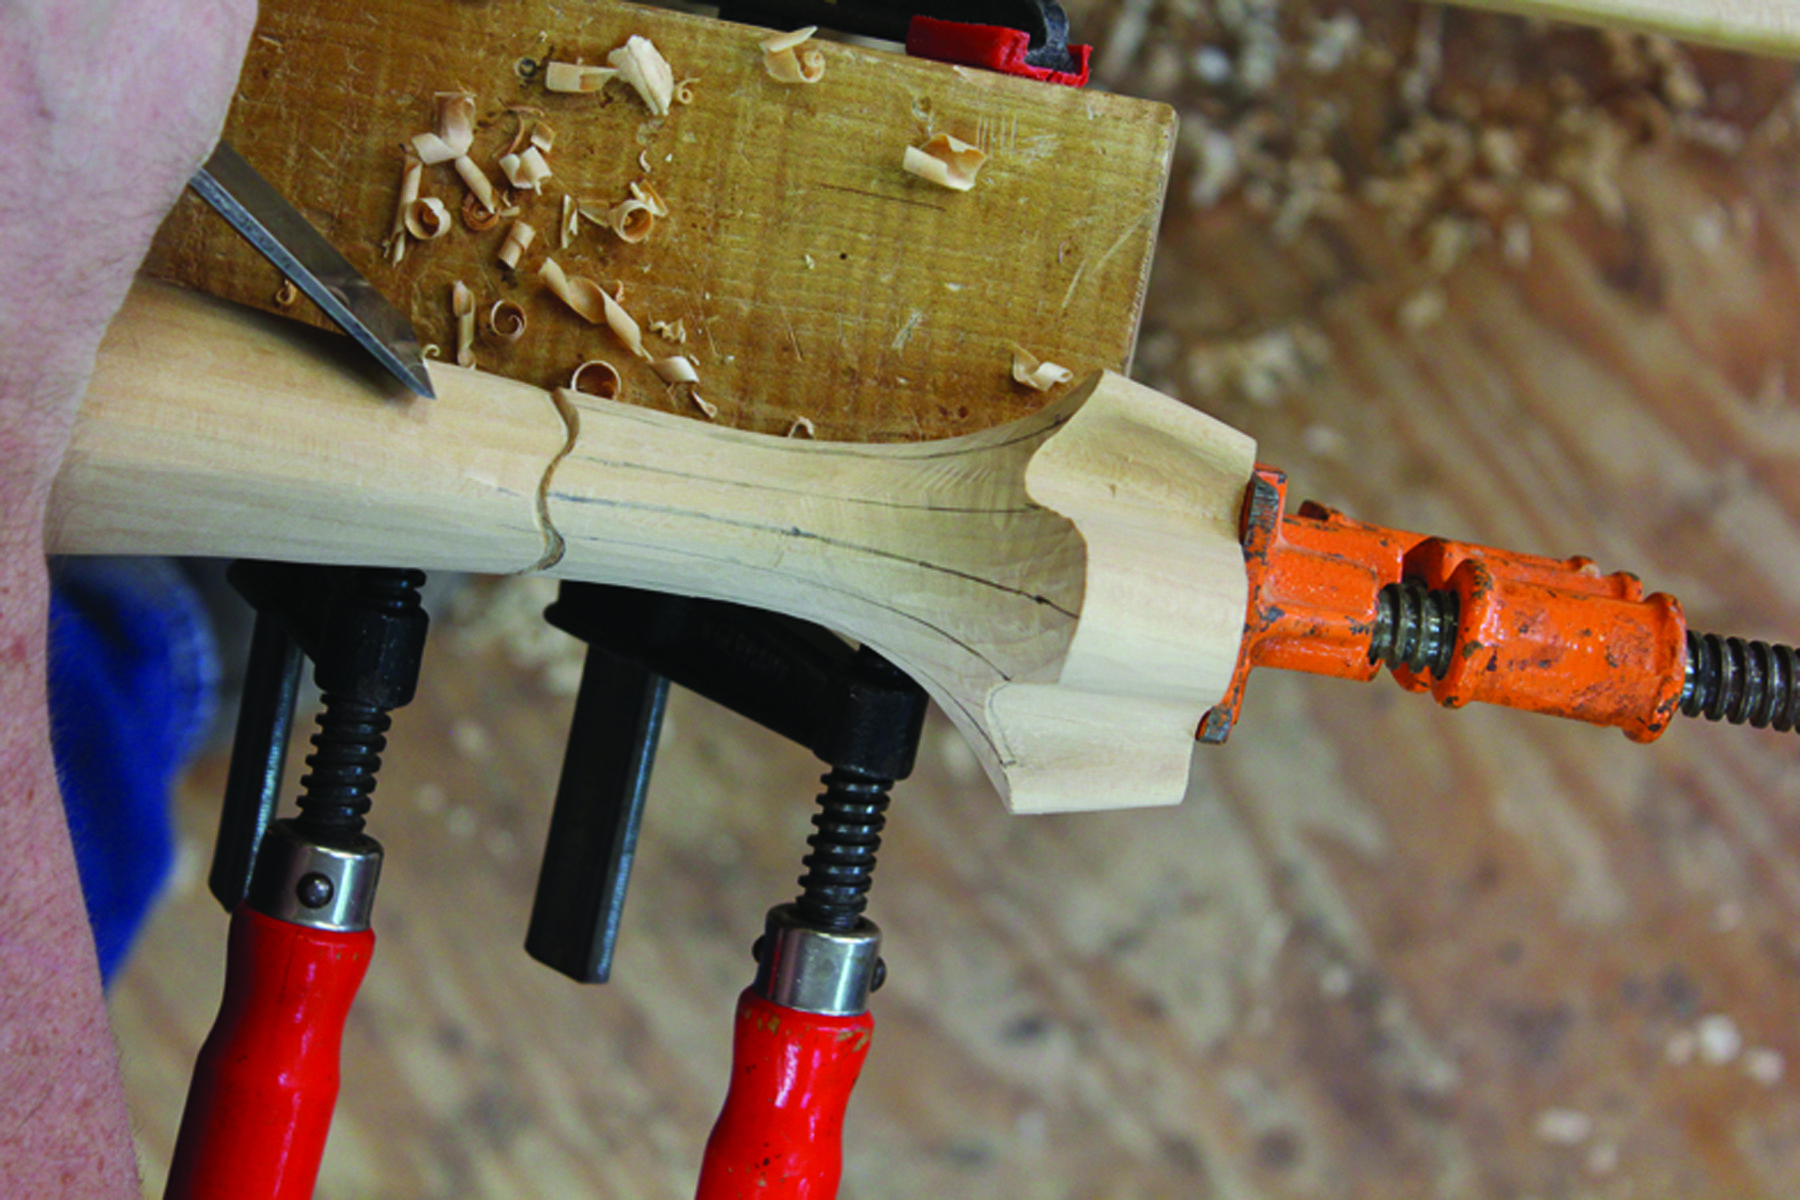
Transition. Use a bench chisel to flow the leg into the cuff.
Define lines. With a V parting tool, carve in the toe and webbing dividing lines.
Refine lines. Use a small bench chisel to shape and define the webbing.
Even it out. Use a wide bench chisel to round over the center toe and even out the depth of the webbing.
Foot three. Here’s the third, cuffed, variation on a trifid foot, now ready for sanding.
No Limits
Trifid feet were my primary diet of carving early in my career. At the time, I dreamed of carving ball-and-claw and hairy-paw feet. Trifid feet were rather plain to my eye because the shop in which I worked sold only one or two styles. As my study of period furniture progressed, and I saw so many variations, I came to truly appreciate the grace and beauty of the nearly infinitely variable trifid foot. Let your imagination take your trifid feet in different directions. Who knows, maybe you’ll start the latest furniture fashion frenzy.
Charles is a renowned period furniture maker and the lead instructor at Acanthus Workshop in Pottstown, Penn. (acanthus.com).
Blog: Read Charles Bender’s blog, “Parings: A Woodworker’s Journal.”
Here are some supplies and tools we find essential in our everyday work around the shop. We may receive a commission from sales referred by our links; however, we have carefully selected these products for their usefulness and quality.